torque YAMAHA WR 400F 2000 User Guide
[x] Cancel search | Manufacturer: YAMAHA, Model Year: 2000, Model line: WR 400F, Model: YAMAHA WR 400F 2000Pages: 654, PDF Size: 60.12 MB
Page 289 of 654

ENG
4 - 13
CARBURATEUR
VERGASER
CARBURADOR
Choke-Schieber
1. Kontrollieren:
lKaltstarter-Tauchkolben 1
lHeißstarter-Tauchkolben
(rot) 2
Verschleiß/Beschädigung ®
Erneuern.
Beschleunigungspumpe
1. Kontrollieren:
lMembran (Beschleuni-
gungspumpe) 1
lFeder (Beschleunigungs-
pumpe) 2
lDeckel 3
lO-Ring 4
lDruckstange 5
Rißbildung (Membran)/
Beschädigung ® Erneuern.
Verunreinigung ® Reinigen.
2. Inspizieren:
lDrosselwelle 1
lFeder 2
lHebel 1 3
lFeder 1 4
lHebel 2 5
lFeder 6
Schmutz ® Säubern
Luftabschaltventil
1. Kontrollieren:
lMembran (Luftabschaltven-
til) 1
lFeder 2
lDeckel 3
lO-Ring 4
Rißbildung (Membran)/
Beschädigung ® Erneuern.
ZUSAMMENBAU UND MONTAGE
Vergaser
1. Montieren:
lHeißstarter- Tauchkolben
(rot) 1
lKaltstarter-Tauchkolben 2 Plongeur de starter
1. Contrôler:
lPlongeur de démarrage à froid
1
lPlongeur de démarrage à chaud
(rouge) 2
Usure/endommagement ®
Remplacer.
Pompe d’accélérateur
1. Contrôler:
lDiaphragme (pompe d’accélé-
rateur) 1
lRessort (pompe d’accéléra-
teur) 2
lCouvercle de pompe d’accélé-
rateur 3
lJoint torque 4
lTige de poussée 5
Déchirure (diaphragme)/
endommagement ® Rempla-
cer.
Encrassement ® Nettoyer.
2. Inspecter:
lAxe de papillon 1
lRessort 2
lLevier 1 3
lRessort 1 4
lLevier 2 5
lRessort 6
Sale ® Nettoyer
Clapet de coupure d’air
1. Inspecter:
lMembrane (clapet de coupure
d’air) 1
lRessort (clapet de coupure
d’air) 2
lCouvercle de clapet de coupure
d’air 3
lJoint torique 4
Déchirures (membrane)/
endommagement ® Rempla-
cer.
ASSEMBLAGE ET MONTAGE
Carburateur
1. Monter:
lPlongeur de démarrage à chaud
(rouge) 1
lPlongeur de démarrage à froid
2 Empujador del arrancador
1. Inspeccionar:
lEmpujador de arranque en frío
1
lEmpujador de arranque en
caliente (rojo) 2
Desgaste/Daños ® Reempla-
zar.
Bomba de aceleración
1. Inspeccionar:
lDiafragma (bomba de acelera-
ción) 1
lMuelle (bomba de acelera-
ción) 2
lTapa de la bomba de acelera-
ción 3
lJunta tórica 4
lVarilla de empuje 5
Desgarraduras (diafragma)/
Daños ® Reemplazar.
Suciedad ® Limpiar.
2. Inspeccionar:
lEje del acelerador 1
lResorte 2
lPalanca 1 3
lResorte 1 4
lPalanca 2 5
lResorte 6
Sucio ® Limpiar.
Válvula de corte de aire
1. Inspeccionar:
lDiafragma (válvula de corte de
aire) 1
lMuelle (válvula de corte de
aire) 2
lCubierta de la válvula de corte
de aire 3
lJunta tórica 4
Desgarraduras (diafragma)/
Daños ® Reemplazar.
MONTAJE E INSTALACIÓN
Carburador
1. Instalar:
lEmpujador de arranque en
caliente (rojo) 1
lEmpujador de arranque en frío
2
Page 314 of 654

4 - 26
ENGCAMSHAFTS
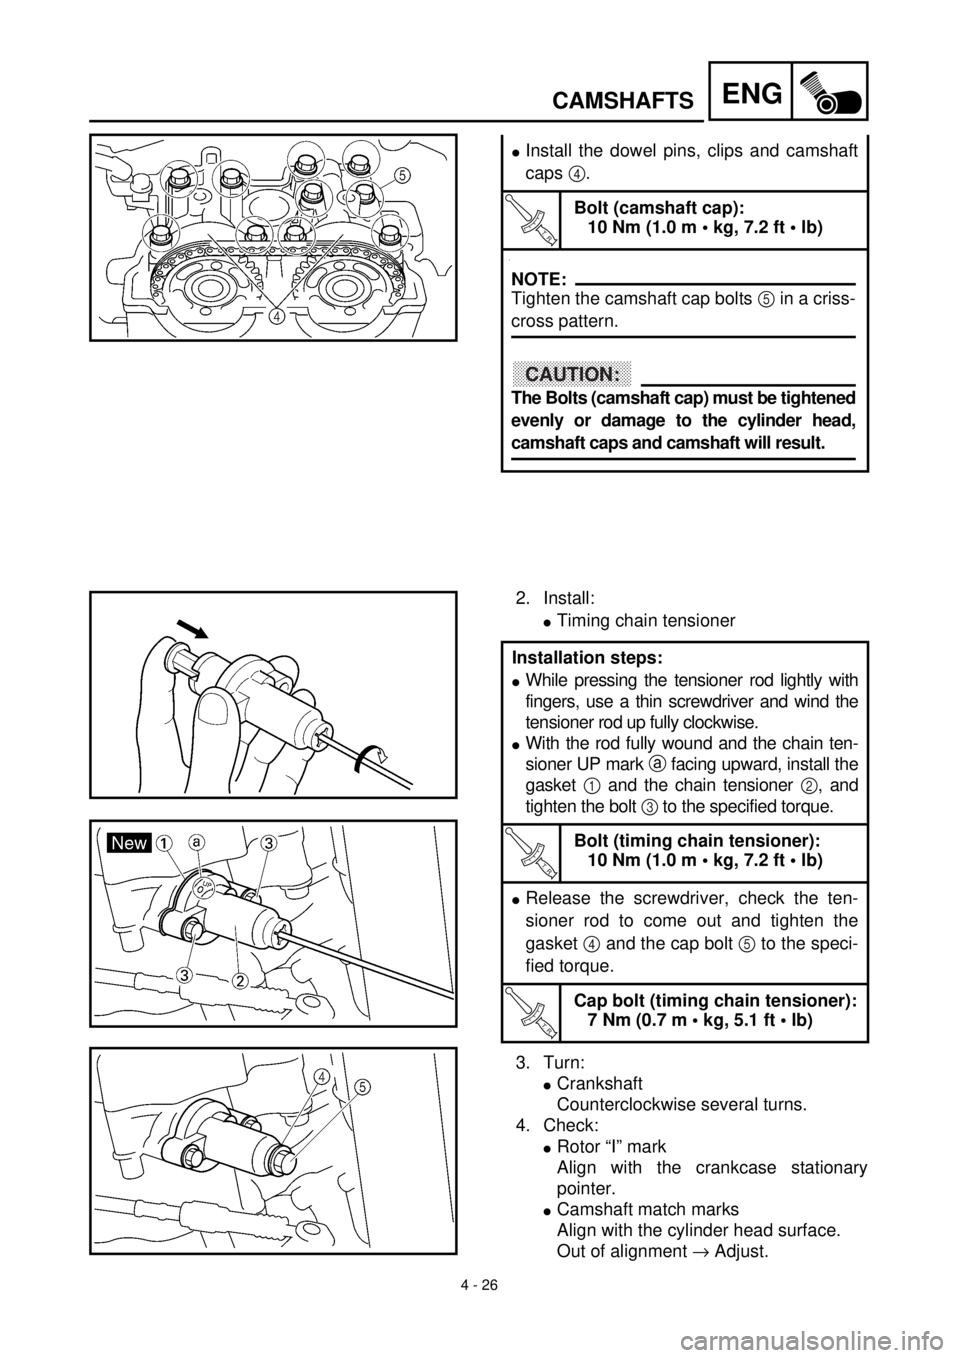
lInstall the dowel pins, clips and camshaft
caps 4.
T R..
Bolt (camshaft cap):
10 Nm (1.0 m • kg, 7.2 ft • lb)
.
NOTE:
Tighten the camshaft cap bolts 5 in a criss-
cross pattern.
CAUTION:
The Bolts (camshaft cap) must be tightened
evenly or damage to the cylinder head,
camshaft caps and camshaft will result.
2. Install:
lTiming chain tensioner
3. Turn:
lCrankshaft
Counterclockwise several turns.
4. Check:
lRotor “I” mark
Align with the crankcase stationary
pointer.
lCamshaft match marks
Align with the cylinder head surface.
Out of alignment ® Adjust. Installation steps:
lWhile pressing the tensioner rod lightly with
fingers, use a thin screwdriver and wind the
tensioner rod up fully clockwise.
lWith the rod fully wound and the chain ten-
sioner UP mark a facing upward, install the
gasket 1 and the chain tensioner 2, and
tighten the bolt 3 to the specified torque.
T R..
Bolt (timing chain tensioner):
10 Nm (1.0 m • kg, 7.2 ft • lb)
lRelease the screwdriver, check the ten-
sioner rod to come out and tighten the
gasket 4 and the cap bolt 5 to the speci-
fied torque.
T R..
Cap bolt (timing chain tensioner):
7 Nm (0.7 m • kg, 5.1 ft • lb)
Page 522 of 654

5 - 38
CHASFRONT FORK
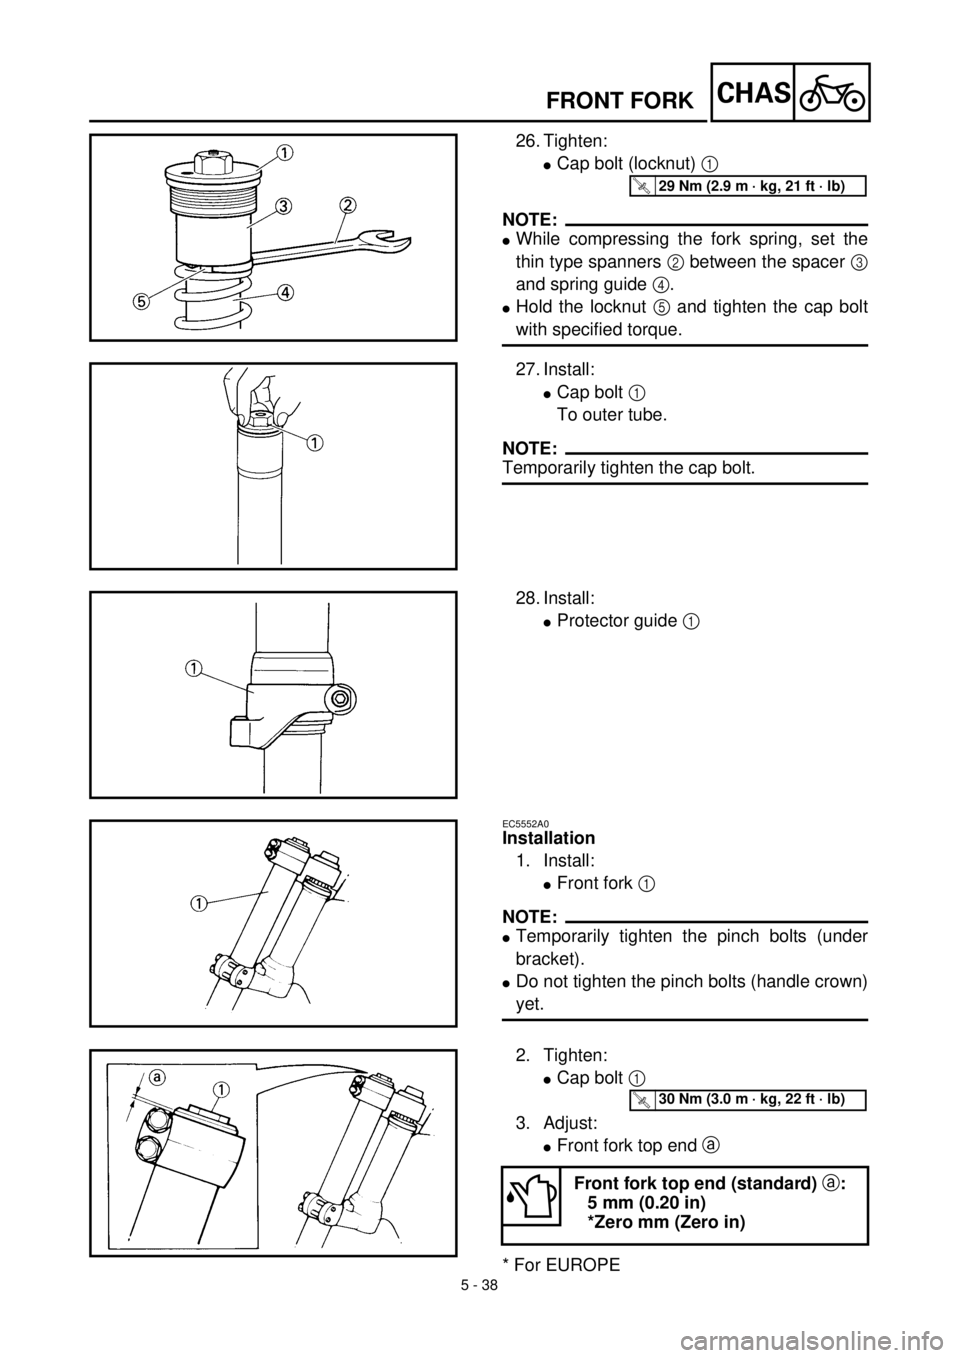
26. Tighten:
lCap bolt (locknut) 1
NOTE:
lWhile compressing the fork spring, set the
thin type spanners 2 between the spacer 3
and spring guide 4.
lHold the locknut 5 and tighten the cap bolt
with specified torque.
T R..29 Nm (2.9 m · kg, 21 ft · lb)
27. Install:
lCap bolt 1
To outer tube.
NOTE:
Temporarily tighten the cap bolt.
28. Install:
lProtector guide 1
EC5552A0
Installation
1. Install:
lFront fork 1
NOTE:
lTemporarily tighten the pinch bolts (under
bracket).
lDo not tighten the pinch bolts (handle crown)
yet.
2. Tighten:
lCap bolt 1
3. Adjust:
lFront fork top end a
* For EUROPE
Front fork top end (standard) a:
5 mm (0.20 in)
*Zero mm (Zero in)
T R..30 Nm (3.0 m · kg, 22 ft · lb)
Page 524 of 654

5 - 39
CHASFRONT FORK
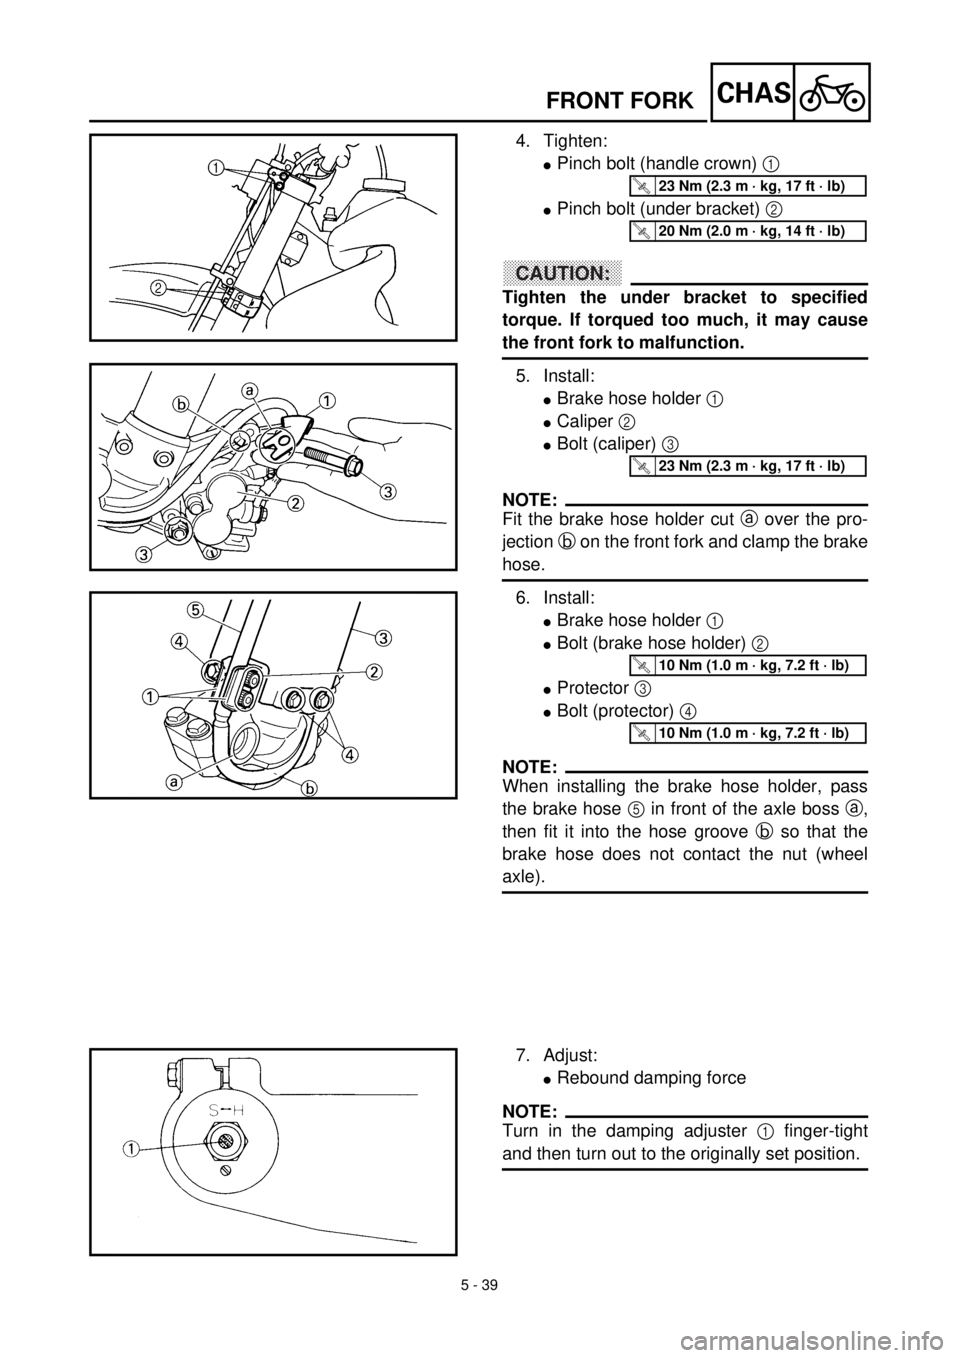
4. Tighten:
lPinch bolt (handle crown) 1
lPinch bolt (under bracket) 2
CAUTION:
Tighten the under bracket to specified
torque. If torqued too much, it may cause
the front fork to malfunction.
5. Install:
lBrake hose holder 1
lCaliper 2
lBolt (caliper) 3
NOTE:
Fit the brake hose holder cut a over the pro-
jection b on the front fork and clamp the brake
hose.
6. Install:
lBrake hose holder 1
lBolt (brake hose holder) 2
lProtector 3
lBolt (protector) 4
NOTE:
When installing the brake hose holder, pass
the brake hose 5 in front of the axle boss a,
then fit it into the hose groove b so that the
brake hose does not contact the nut (wheel
axle).
T R..23 Nm (2.3 m · kg, 17 ft · lb)
T R..20 Nm (2.0 m · kg, 14 ft · lb)
T R..23 Nm (2.3 m · kg, 17 ft · lb)
T R..10 Nm (1.0 m · kg, 7.2 ft · lb)
T R..10 Nm (1.0 m · kg, 7.2 ft · lb)
7. Adjust:
lRebound damping force
NOTE:
Turn in the damping adjuster 1 finger-tight
and then turn out to the originally set position.
Page 546 of 654

5 - 50
CHASSTEERING
9. After tightening the nut, check the steer-
ing for smooth movement. If not, adjust
the steering by loosening the ring nut little
by little.
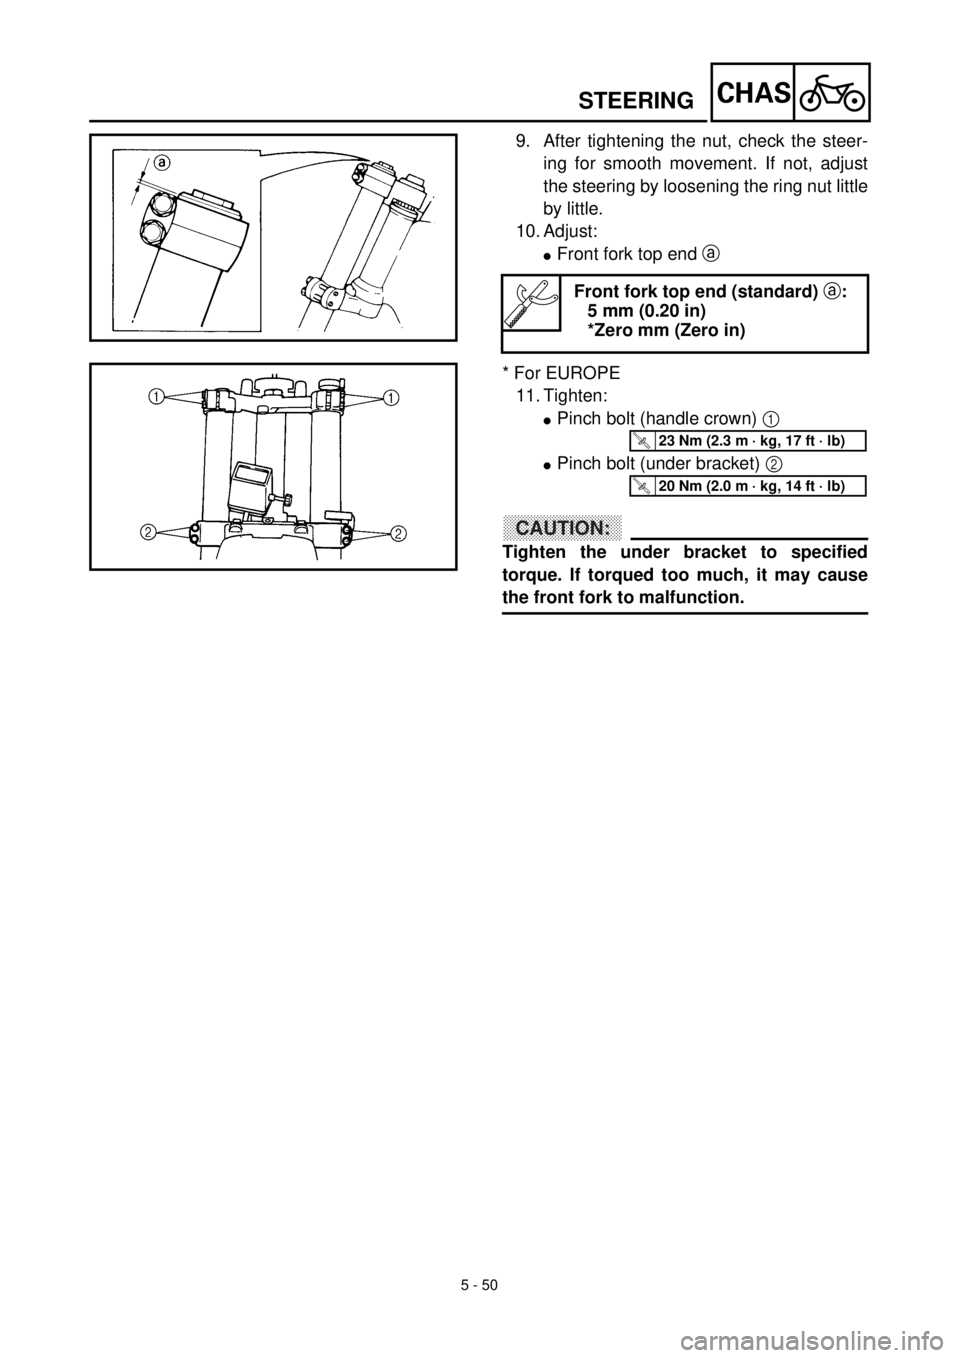
10. Adjust:
lFront fork top end a
* For EUROPE
11. Tighten:
lPinch bolt (handle crown) 1
lPinch bolt (under bracket) 2
CAUTION:
Tighten the under bracket to specified
torque. If torqued too much, it may cause
the front fork to malfunction.
Front fork top end (standard) a:
5 mm (0.20 in)
*Zero mm (Zero in)
T R..23 Nm (2.3 m · kg, 17 ft · lb)
T R..20 Nm (2.0 m · kg, 14 ft · lb)
Page 646 of 654

7 - 20
TUNSETTING
EC72H002
Suspension setting
lFront fork
NOTE:
lIf any of the following symptoms is experienced with the standard position as the base, make
resetting by reference to the adjustment procedure given in the same chart.
lBefore any change, set the rear shock absorber sunken length to the standard figure 90 ~
100 mm (3.5 ~ 3.9 in).
SymptomSection
Check Adjust
JumpLarge
gapMedium
gapSmall
gap
Stiff over entire range
CCC
Compression damping
Oil level (oil amount)
SpringTurn adjuster counterclockwise (about 2 clicks) to
decrease damping.
Decrease oil level by about 5 ~ 10 mm (0.2 ~ 0.4 in).
Replace with soft spring.
Unsmooth movement
over entire range
CCCC
Outer tube
Inner tube
Under bracket tightening
torqueCheck for any bends, dents, and other noticeable
scars, etc. If any, replace affected parts.
Retighten to specified torque.
Poor initial movement
C
Rebound damping
Oil sealTurn adjuster counterclockwise (about 2 clicks) to
decrease damping.
Apply grease in oil seal wall.
Soft over entire range,
bottoming out
CC
Compression damping
Oil level (oil amount)
SpringTurn adjuster clockwise (about 2 clicks) to increase
damping.
Increase oil level by about 5 ~ 10 mm (0.2 ~ 0.4 in).
Replace with stiff spring.
Stiff toward stroke end
COil level (oil amount) Decrease oil level by about 5 mm (0.2 in).
Soft toward stroke end,
bottoming out
COil level (oil amount) Increase oil level by about 5 mm (0.2 in).
Stiff initial movement
CCCCCompression dampingTurn adjuster counterclockwise (about 2 clicks) to
decrease damping.
Low front, tending to
lower front posture
CC
Compression damping
Rebound damping
Balance with rear end
Oil level (oil amount)Turn adjuster clockwise (about 2 clicks) to increase
damping.
Turn adjuster counterclockwise (about 2 clicks) to
decrease damping.
Set sunken length for 95 ~ 100 mm (3.7 ~ 3.9 in) when
one passenger is astride seat (lower rear posture).
Increase oil level by about 5 mm (0.2 in).
“Obtrusive” front, tend-
ing to upper front pos-
ture
CC
Compression damping
Balance with rear end
Spring
Oil lever (oil amount)Turn adjuster counterclockwise (about 2 clicks) to
decrease damping.
Set sunken length for 90 ~ 95 mm (3.5 ~ 3.7 in) when
one passenger is astride seat (upper rear posture).
Replace with soft spring.
Decrease oil level by about 5 ~ 10 mm (0.2 ~ 0.4 in).