battery YAMAHA WR 450F 2008 Owners Manual
[x] Cancel search | Manufacturer: YAMAHA, Model Year: 2008, Model line: WR 450F, Model: YAMAHA WR 450F 2008Pages: 224, PDF Size: 13.7 MB
Page 18 of 224

1-8
CONTROL FUNCTIONS
CONTROL FUNCTIONS
MAIN SWITCH
Functions of the respective switch po-
sitions are as follows:
ON:
The engine can be started only at this
position.
OFF:
All electrical circuits are switched off.
Main switch indicator light
The main switch "1" is equipped with
an indicator light "2" to avoid forget-
ting to turn it off. This light functions
as follows.
• It lights up with the main switch
"ON".
• It goes out when the engine in-
creases its speed after being start-
ed.
• It lights up again when the engine is
stopped.
If the indicator light will not light up
with the main switch "ON", it shows a
lack of the battery voltage. Recharge
the battery.
ENGINE STOP SWITCH
The engine stop switch "1" is located
on the left handlebar. Continue push-
ing the engine stop switch till the en-
gine comes to a stop.
START SWITCH
The start switch "1" is located on the
right handlebar. Push this switch to
crank the engine with the starter.CLUTCH LEVER
The clutch lever "1" is located on the
left handlebar; it disengages or en-
gages the clutch. Pull the clutch lever
to the handlebar to disengage the
clutch, and release the lever to en-
gage the clutch. The lever should be
pulled rapidly and released slowly for
smooth starts.
SHIFT PEDAL
The gear ratios of the constant-mesh
5 speed transmission are ideally
spaced. The gears can be shifted by
using the shift pedal "1" on the left
side of the engine.
KICKSTARTER CRANK
Rotate the kickstarter crank "1" away
from the engine. Push the starter
down lightly with your foot until the
gears engage, then kick smoothly
and forcefully to start the engine. This
model has a primary kickstarter crank
so the engine can be started in any
gear if the clutch is disengaged. In
normal practices, however, shift to
neutral before starting.
THROTTLE GRIP
The throttle grip "1" is located on the
right handlebar; it accelerates or de-
celerates the engine. For accelera-
tion, turn the grip toward you; for
deceleration, turn it away from you.FRONT BRAKE LEVER
The front brake lever "1" is located on
the right handlebar. Pull it toward the
handlebar to activate the front brake.
REAR BRAKE PEDAL
The rear brake pedal "1" is located on
the right side of the machine. Press
down on the brake pedal to activate
the rear brake.
FUEL COCK
The fuel cock supplies fuel from the
tank to carburetor and also filters the
fuel. The fuel cock has the three posi-
tions:
OFF:
With the lever in this position, fuel will
not flow. Always return the lever to
this position when the engine is not
running.
ON:
With the lever in this position, fuel
flows to the carburetor. Normal riding
is done with the lever in this position.
RES:
With the lever in this position fuel
flows to the carburetor from the re-
serve section of the fuel tank after the
main supply of the fuel has been de-
pleted. Normal riding is possible with
the lever is in this position, but it is
recommended to add fuel as soon as
possible.
Page 24 of 224
1-14
STARTING AND BREAK-IN
STARTING AND BREAK-IN
FUEL
Always use the recommended fuel as
stated below. Also, be sure to use
new gasoline the day of a race.
Use only unleaded gasoline. The
use of leaded gasoline will cause
severe damage to the engine inter-
nal parts such as valves, piston
rings, and exhaust system, etc.
If knocking or pinging occurs, use a
different brand of gasoline or higher
octane grade.
• For refueling, be sure to stop the
engine and use enough care not
to spill any fuel. Also be sure to
avoid refueling close to a fire.
• Refuel after the engine, exhaust
pipe, etc. have cooled off.
HANDLING NOTE
Never start or run the engine in a
closed area. The exhaust fumes
are poisonous; they can cause
loss of consciousness and death
in a very short time. Always oper-
ate the machine in a well-ventilated
area.
• The carburetor on this machine
has a built-in accelerator pump.
Therefore, when starting the en-
gine, do not operate the throttle
or the spark plug will foul.
• Unlike a two-stroke engine, this
engine cannot be kick started
when the throttle is open be-
cause the kickstarter may kick
back. Also, if the throttle is open
the air/fuel mixture may be too
lean for the engine to start.
• Before starting the machine, per-
form the checks in the pre-opera-
tion check list.
AIR FILTER MAINTENANCE
According to "CLEANING THE AIR
FILTER ELEMENT" section in the
CHAPTER 3, apply the foam-air-filter
oil or its equivalent to the element.
(Excess oil in the element may ad-
versely affect engine starting.)
STARTING A COLD ENGINE
This model is equipped with an igni-
tion circuit cut-off system. The engine
can be started under the following
conditions.
• When the transmission is in neutral.
• When the clutch is disengaged with
the transmission in any position.
However, it is recommended to shift
into neutral before starting the en-
gine.
1. Inspect the coolant level.
2. Turn the fuel cock to "ON".
3. Push on the main switch to "ON".
4. Shift the transmission into neutral.
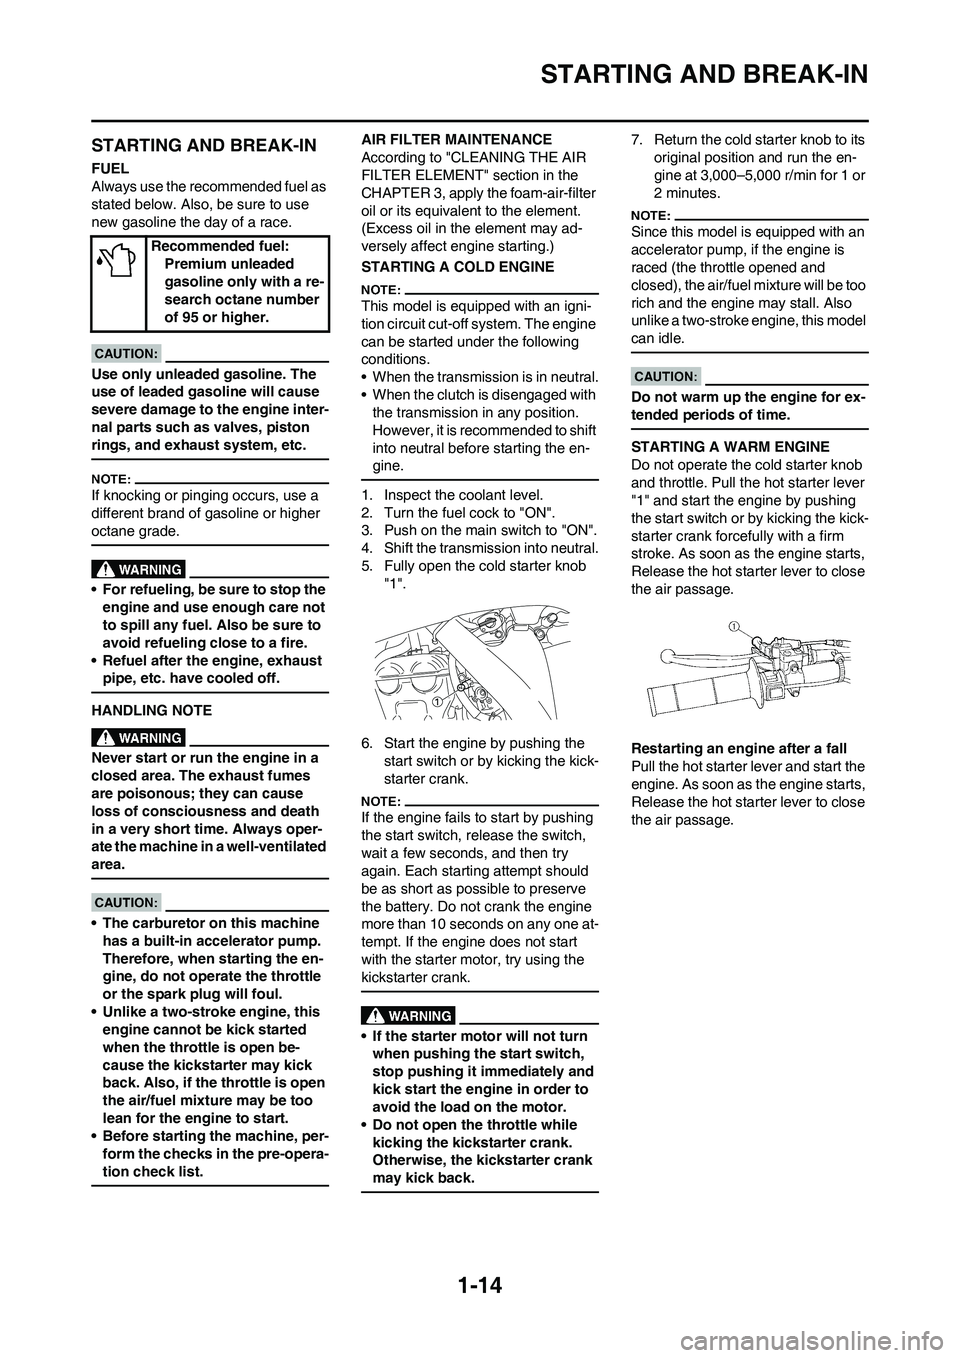
5. Fully open the cold starter knob
"1".
6. Start the engine by pushing the
start switch or by kicking the kick-
starter crank.
If the engine fails to start by pushing
the start switch, release the switch,
wait a few seconds, and then try
again. Each starting attempt should
be as short as possible to preserve
the battery. Do not crank the engine
more than 10 seconds on any one at-
tempt. If the engine does not start
with the starter motor, try using the
kickstarter crank.
• If the starter motor will not turn
when pushing the start switch,
stop pushing it immediately and
kick start the engine in order to
avoid the load on the motor.
• Do not open the throttle while
kicking the kickstarter crank.
Otherwise, the kickstarter crank
may kick back.
7. Return the cold starter knob to its
original position and run the en-
gine at 3,000–5,000 r/min for 1 or
2 minutes.
Since this model is equipped with an
accelerator pump, if the engine is
raced (the throttle opened and
closed), the air/fuel mixture will be too
rich and the engine may stall. Also
unlike a two-stroke engine, this model
can idle.
Do not warm up the engine for ex-
tended periods of time.
STARTING A WARM ENGINE
Do not operate the cold starter knob
and throttle. Pull the hot starter lever
"1" and start the engine by pushing
the start switch or by kicking the kick-
starter crank forcefully with a firm
stroke. As soon as the engine starts,
Release the hot starter lever to close
the air passage.
Restarting an engine after a fall
Pull the hot starter lever and start the
engine. As soon as the engine starts,
Release the hot starter lever to close
the air passage. Recommended fuel:
Premium unleaded
gasoline only with a re-
search octane number
of 95 or higher.
Page 30 of 224
2-3
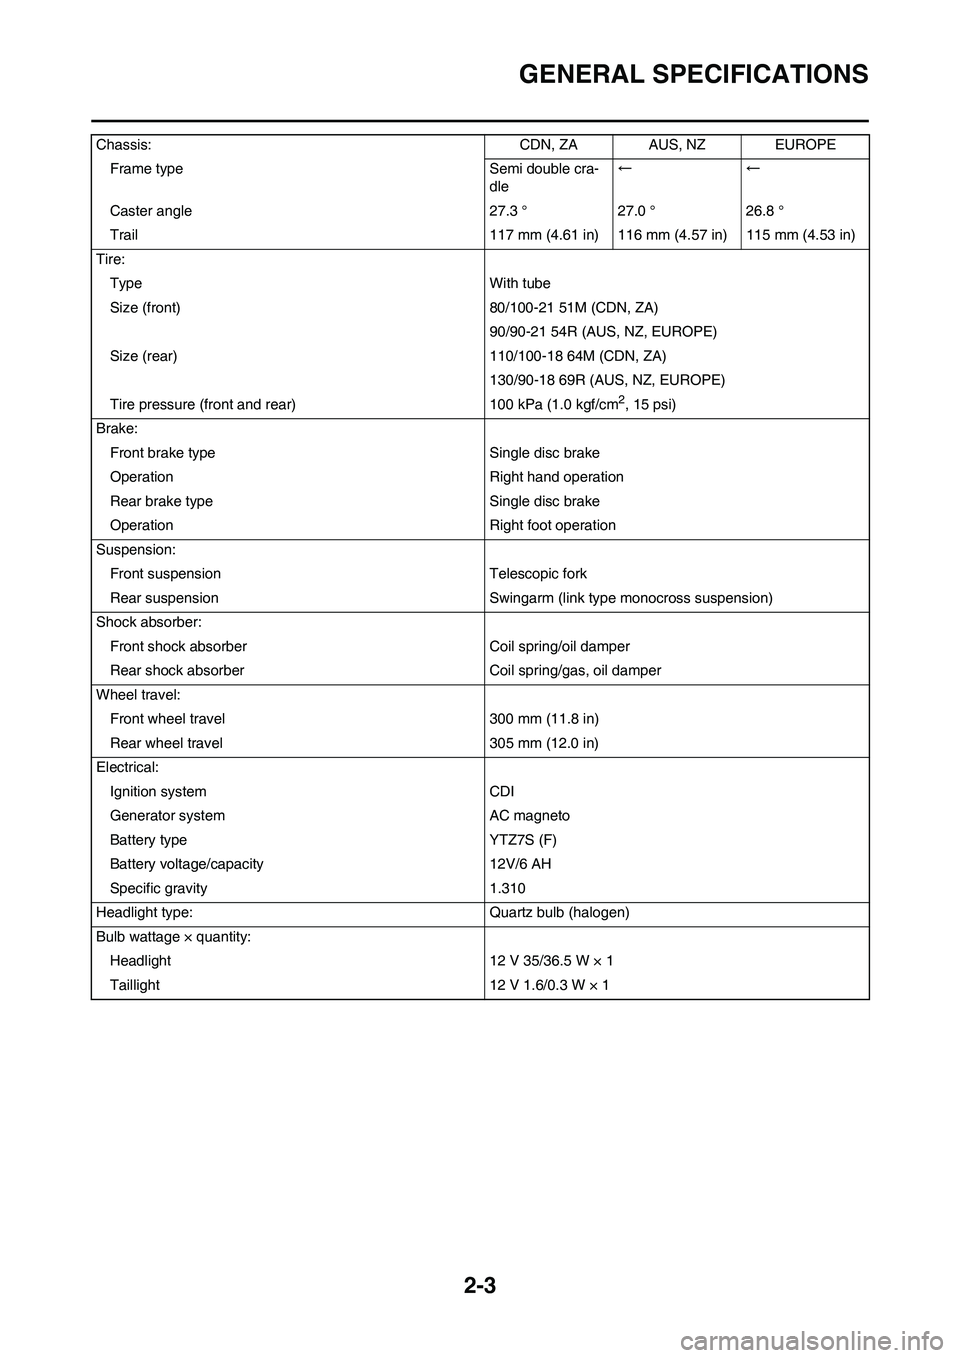
GENERAL SPECIFICATIONS
Chassis: CDN, ZA AUS, NZ EUROPE
Frame type Semi double cra-
dle←←
Caster angle 27.3 ° 27.0 ° 26.8 °
Trail 117 mm (4.61 in) 116 mm (4.57 in) 115 mm (4.53 in)
Tire:
Type With tube
Size (front) 80/100-21 51M (CDN, ZA)
90/90-21 54R (AUS, NZ, EUROPE)
Size (rear) 110/100-18 64M (CDN, ZA)
130/90-18 69R (AUS, NZ, EUROPE)
Tire pressure (front and rear) 100 kPa (1.0 kgf/cm
2, 15 psi)
Brake:
Front brake type Single disc brake
Operation Right hand operation
Rear brake type Single disc brake
Operation Right foot operation
Suspension:
Front suspension Telescopic fork
Rear suspension Swingarm (link type monocross suspension)
Shock absorber:
Front shock absorber Coil spring/oil damper
Rear shock absorber Coil spring/gas, oil damper
Wheel travel:
Front wheel travel 300 mm (11.8 in)
Rear wheel travel 305 mm (12.0 in)
Electrical:
Ignition system CDI
Generator system AC magneto
Battery type YTZ7S (F)
Battery voltage/capacity 12V/6 AH
Specific gravity 1.310
Headlight type: Quartz bulb (halogen)
Bulb wattage × quantity:
Headlight 12 V 35/36.5 W × 1
Taillight 12 V 1.6/0.3 W × 1
Page 48 of 224

2-21
CABLE ROUTING DIAGRAM
CABLE ROUTING DIAGRAM
1. Fuel tank breather hose
2. Clamp
3. Diode
4. Hot starter cable
5. Throttle position sensor lead
6. Wire harness
7. Hump (frame)
8. Negative battery lead
9. Starter motor lead10. Neutral switch lead
11. AC magneto lead
12. Brake hose
13. Rectifier/regulator lead
14. Carburetor breather hose
15. Carburetor overflow hose
16. Catch tank breather hoseA. Insert the end of the fuel tank
breather hose into the hole in
the steering stem.
B. Fasten the throttle cable, hot
starter cable and rectifier/regula-
tor lead onto the frame. Locate
the clamp end facing the lower
side of the hot starter cable and
cut off the tie end.
Page 52 of 224

2-25
CABLE ROUTING DIAGRAM
1. Clamp
2. Positive battery lead
3. Battery
4. Negative battery lead
5. Taillight coupler
6. CDI unit coupler (6-pin)
7. CDI unit coupler (3-pin)
8. CDI unit coupler (6-pin)A. Fasten the wire harness to the
upper engine bracket (left side).
Locate the clamp end facing to-
ward the upper side of the frame
with the tie end cut off on the in-
side of the frame.B. Fasten the wire harness to the
upper engine bracket (left side).
Locate the clamp end facing to-
ward the upper side of the frame
with the tie end cut off on the in-
side of the frame. Clamp the
wire harness at the marking.
C. Pass the starter motor lead
through the hole in the relay
holder.
D. Fit the cover securely.
Page 53 of 224

2-26
CABLE ROUTING DIAGRAM
E. Connect the wire harness to the
starter relay.
F. Fasten the catch tank breather
hose and catch tank hose to the
rear frame. Clamp them close to
where they are joined to the
frame. Fasten the pipe tightly
enough not to crush it. Locate
the clamp end facing toward the
rear of the frame with the tie end
facing downward.
G. Fasten the (three) CDI unit leads
and taillight lead to the rear
frame. Locate the clamp end
facing toward the upper side of
the frame and cut off the tie end.
H. Connect the negative battery
lead to the battery negative ter-
minal.
I. Connect the negative battery
lead to the wire harness.
J. Fasten the wire harness to the
rear frame. Locate the clamp
end facing toward the upper side
of the frame and the tie end to-
ward the inside of the frame.
Clamp the wire harness at the
marking.
K. Pass the wire harness, starter
relay lead, starting circuit cut-off
relay lead and negative battery
lead through the hole in the relay
holder.
L. Fasten the (three) CDI unit leads
and taillight lead to the rear
frame. Locate the clamp end
facing toward the lower side of
the frame and cut off the tie end.
M. Fasten the taillight lead to the
rear frame. Locate the clamp
end facing toward the upper side
of the frame and cut off the tie
end.
N. Do not allow the taillight lead to
slacken.
O. Locate the CDI unit lead be-
tween the CDI unit and rear
fender.
P. Locate the CDI unit coupler in
the clearance between the up-
per side of the CDI unit and low-
er side of the catch tank stay.
Q. Locate the CDI unit lead be-
tween the CDI unit and rear
frame.
Page 59 of 224
3-4
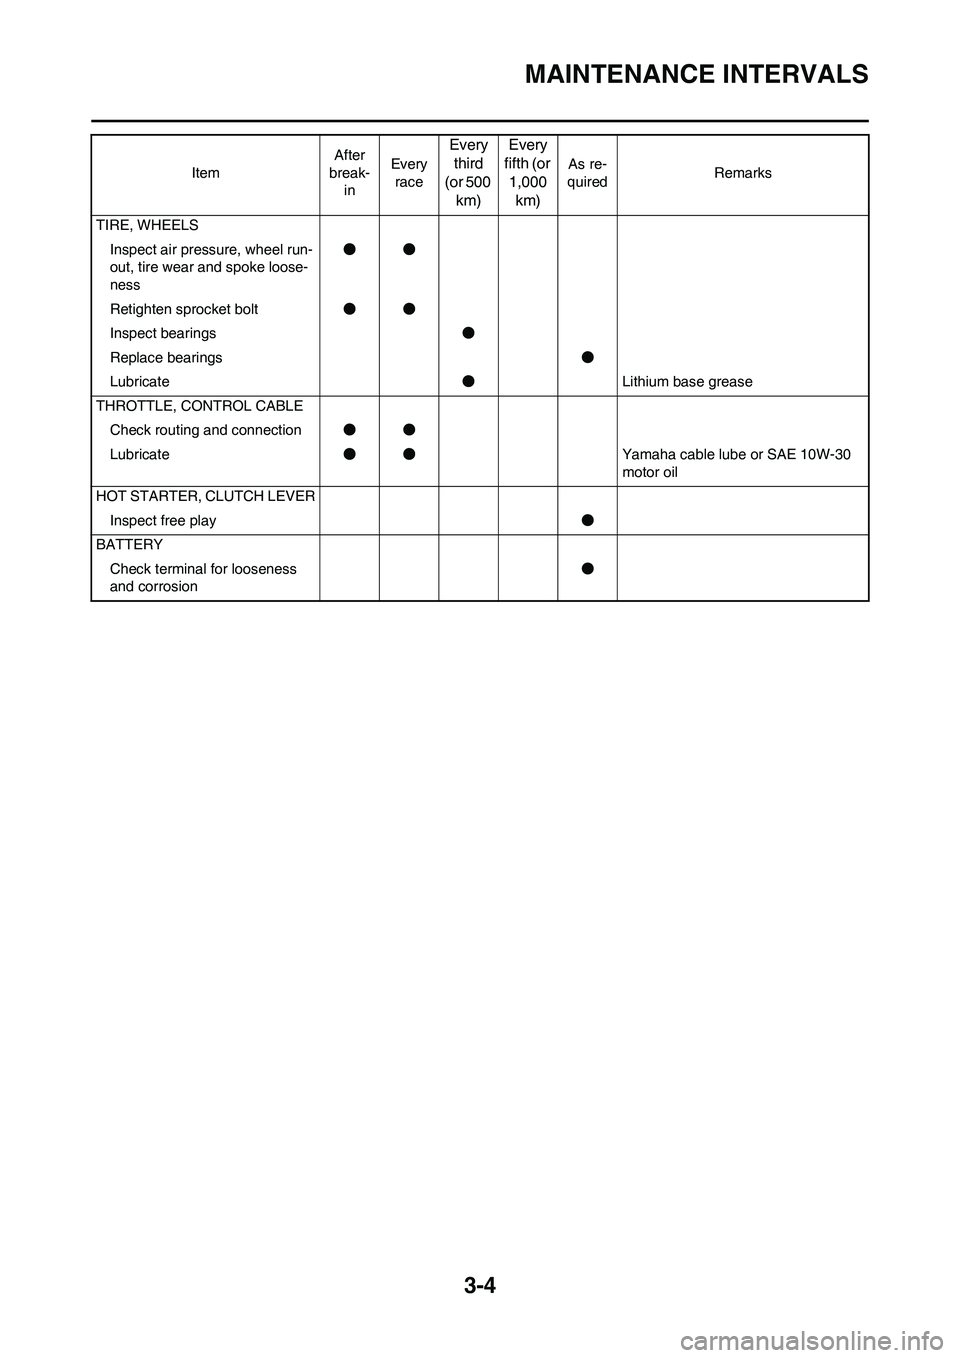
MAINTENANCE INTERVALS
TIRE, WHEELS
Inspect air pressure, wheel run-
out, tire wear and spoke loose-
ness●●
Retighten sprocket bolt●●
Inspect bearings●
Replace bearings●
Lubricate●Lithium base grease
THROTTLE, CONTROL CABLE
Check routing and connection●●
Lubricate●●Yamaha cable lube or SAE 10W-30
motor oil
HOT STARTER, CLUTCH LEVER
Inspect free play●
BATTERY
Check terminal for looseness
and corrosion● ItemAfter
break-
inEvery
race
Every
third
(or 500
km)Every
fifth (or
1,000
km)
As re-
quiredRemarks
Page 82 of 224

3-27
ELECTRICAL
ELECTRICAL
CHECKING THE SPARK PLUG
1. Remove:
• Spark plug
2. Inspect:
• Electrode "1"
Wear/damage→Replace.
• Insulator color "2"
Normal condition is a medium to
light tan color.
Distinctly different color→Check
the engine condition.
When the engine runs for many hours
at low speeds, the spark plug insula-
tor will become sooty, even if the en-
gine and carburetor are in good
operating condition.
3. Measure:
• Plug gap "a"
Use a wire gauge or thickness
gauge.
Out of specification→Regap.
4. Clean the plug with a spark plug
cleaner if necessary.
5. Tighten:
• Spark plug
• Before installing a spark plug, clean
the gasket surface and plug sur-
face.
• Finger-tighten "a" the spark plug
before torquing to specification "b".
CHECKING THE IGNITION TIMING
1. Remove:
• Timing mark accessing screw "1"
2. Attach:
• Timing light
• Inductive tachometer
To the ignition coil lead (orange
lead"1").
3. Adjust:
• Engine idling speed
Refer to "ADJUSTING THE EN-
GINE IDLING SPEED" section.
4. Check:
• Ignition timing
Visually check the stationary
pointer "a" is within the firing
range "b" on the rotor.
Incorrect firing range→Check ro-
tor and pickup assembly.
5. Install:
• Timing mark accessing screw
CHECKING AND CHARGING THE
BATTERY
Batteries generate explosive hy-
drogen gas and contain electrolyte
which is made of poisonous and
highly caustic sulfuric acid. There-
fore, always follow these preven-
tive measures:
• Wear protective eye gear when
handling or working near batter-
ies.• Charge batteries in a well-venti-
lated area.
• Keep batteries away from fire,
sparks or open flames (e.g.,
welding equipment, lighted ciga-
rettes).
• DO NOT SMOKE when charging
or handling batteries.
• KEEP BATTERIES AND ELEC-
TROLYTE OUT OF REACH OF
CHILDREN.
• Avoid bodily contact with elec-
trolyte as it can cause severe
burns or permanent eye injury.
FIRST AID IN CASE OF BODILY
CONTACT:
EXTERNAL
• Skin — Wash with water.
• Eyes — Flush with water for 15
minutes and get immediate med-
ical attention.
INTERNAL
• Drink large quantities of water or
milk followed with milk of magne-
sia, beaten egg or vegetable oil.
Get immediate medical attention.
Charging time, charging amperage
and charging voltage for an MF
battery are different from those of
conventional batteries. The MF
battery should be charged as ex-
plained in the charging method il-
lustrations. If the battery is
overcharged, the electrolyte level
will drop considerably. Therefore,
take special care when charging
the battery.
Since MF batteries are sealed, it is
not possible to check the charge state
of the battery by measuring the spe-
cific gravity of the electrolyte. There-
fore, the charge of the battery has to
be checked by measuring the voltage
at the battery terminals.
1. Remove:
• Seat
2. Disconnect:
• Battery leads
(from the battery terminals)
First, disconnect the negative bat-
tery lead "1", and then the positive
battery lead "2".
Spark plug gap:
0.7–0.8 mm (0.028–
0.031 in)
Spark plug:
13 Nm (1.3 m•kg, 9.4
ft•lb)
Timing light:
YM-33277-A/90890-
03141
Page 83 of 224
3-28
ELECTRICAL
3. Remove:
• Battery band
•Battery
4. Measure:
• Battery charge
Measurement steps:
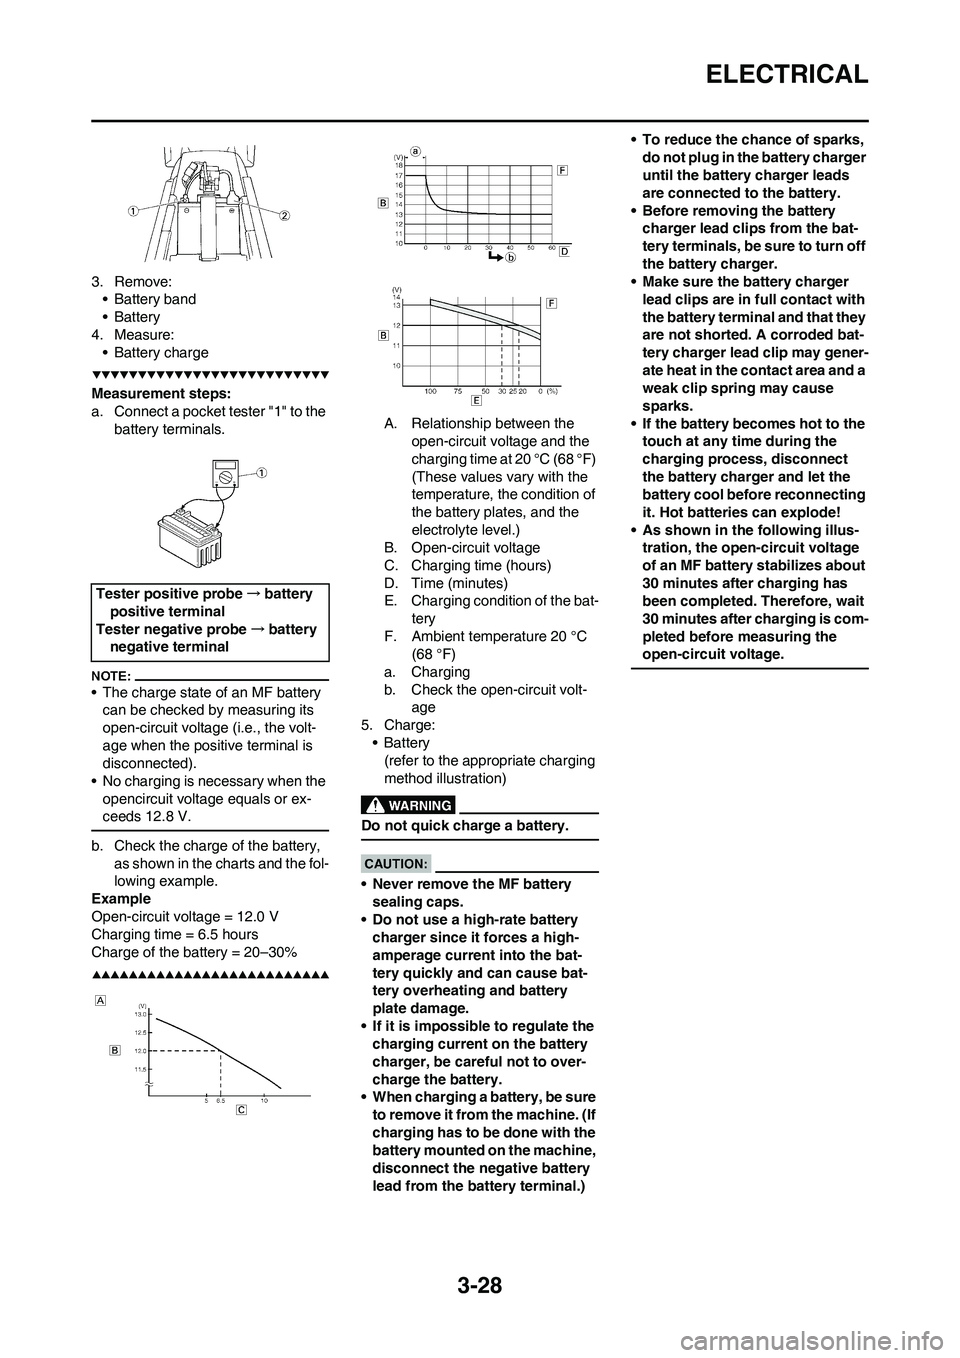
a. Connect a pocket tester "1" to the
battery terminals.
• The charge state of an MF battery
can be checked by measuring its
open-circuit voltage (i.e., the volt-
age when the positive terminal is
disconnected).
• No charging is necessary when the
opencircuit voltage equals or ex-
ceeds 12.8 V.
b. Check the charge of the battery,
as shown in the charts and the fol-
lowing example.
Example
Open-circuit voltage = 12.0 V
Charging time = 6.5 hours
Charge of the battery = 20–30%
A. Relationship between the
open-circuit voltage and the
charging time at 20 °C (68 °F)
(These values vary with the
temperature, the condition of
the battery plates, and the
electrolyte level.)
B. Open-circuit voltage
C. Charging time (hours)
D. Time (minutes)
E. Charging condition of the bat-
tery
F. Ambient temperature 20 °C
(68 °F)
a. Charging
b. Check the open-circuit volt-
age
5. Charge:
•Battery
(refer to the appropriate charging
method illustration)
Do not quick charge a battery.
• Never remove the MF battery
sealing caps.
• Do not use a high-rate battery
charger since it forces a high-
amperage current into the bat-
tery quickly and can cause bat-
tery overheating and battery
plate damage.
• If it is impossible to regulate the
charging current on the battery
charger, be careful not to over-
charge the battery.
• When charging a battery, be sure
to remove it from the machine. (If
charging has to be done with the
battery mounted on the machine,
disconnect the negative battery
lead from the battery terminal.)• To reduce the chance of sparks,
do not plug in the battery charger
until the battery charger leads
are connected to the battery.
• Before removing the battery
charger lead clips from the bat-
tery terminals, be sure to turn off
the battery charger.
• Make sure the battery charger
lead clips are in full contact with
the battery terminal and that they
are not shorted. A corroded bat-
tery charger lead clip may gener-
ate heat in the contact area and a
weak clip spring may cause
sparks.
• If the battery becomes hot to the
touch at any time during the
charging process, disconnect
the battery charger and let the
battery cool before reconnecting
it. Hot batteries can explode!
• As shown in the following illus-
tration, the open-circuit voltage
of an MF battery stabilizes about
30 minutes after charging has
been completed. Therefore, wait
30 minutes after charging is com-
pleted before measuring the
open-circuit voltage.
Tester positive probe→battery
positive terminal
Tester negative probe→battery
negative terminal
Page 86 of 224
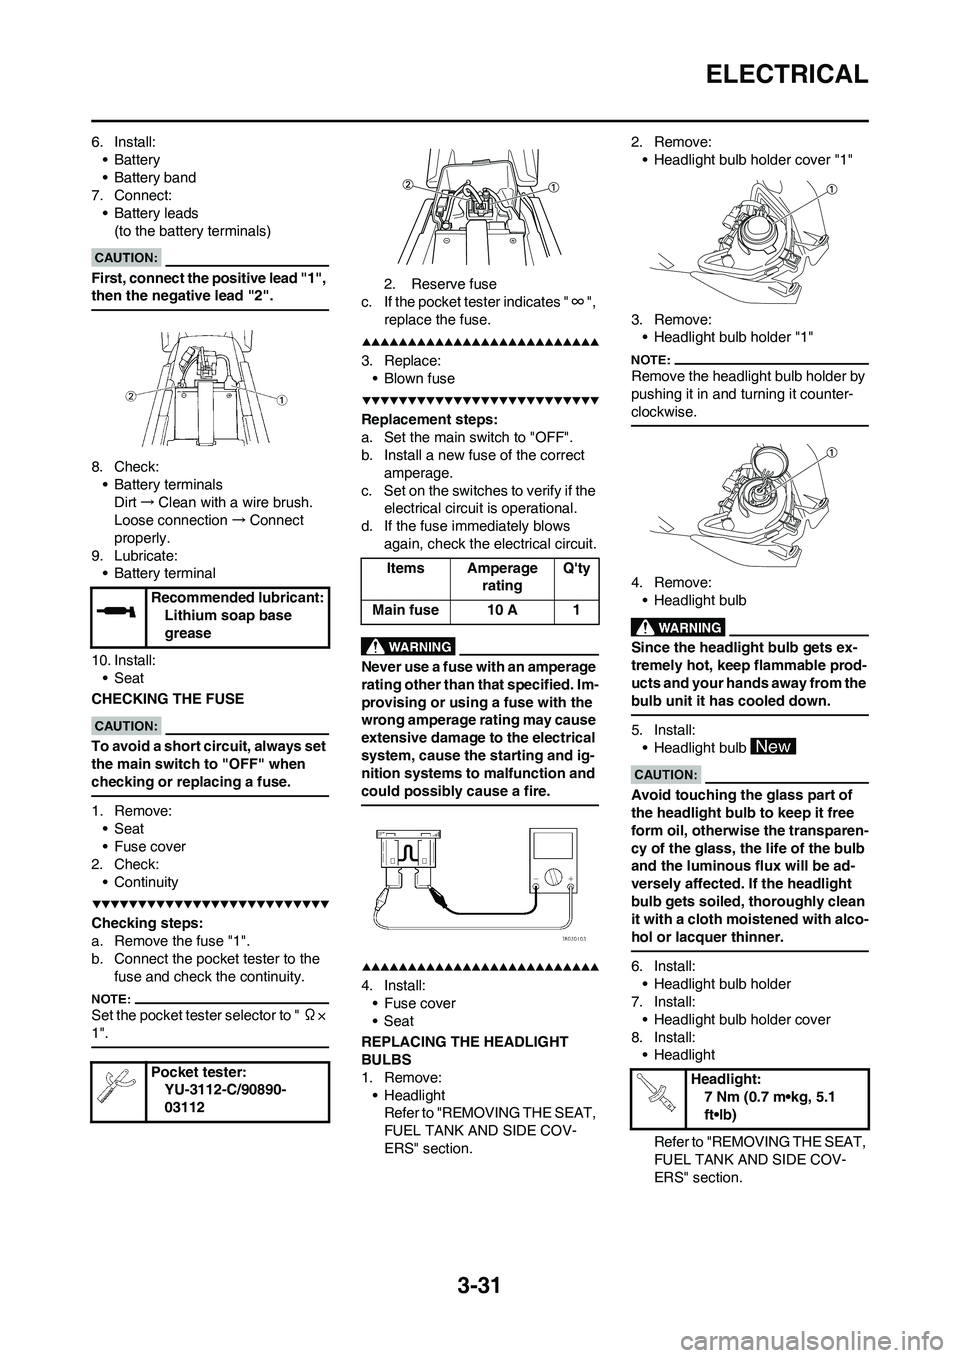
3-31
ELECTRICAL
6. Install:
•Battery
• Battery band
7. Connect:
• Battery leads
(to the battery terminals)
First, connect the positive lead "1",
then the negative lead "2".
8. Check:
• Battery terminals
Dirt→Clean with a wire brush.
Loose connection→Connect
properly.
9. Lubricate:
• Battery terminal
10. Install:
• Seat
CHECKING THE FUSE
To avoid a short circuit, always set
the main switch to "OFF" when
checking or replacing a fuse.
1. Remove:
• Seat
• Fuse cover
2. Check:
• Continuity
Checking steps:
a. Remove the fuse "1".
b. Connect the pocket tester to the
fuse and check the continuity.
Set the pocket tester selector to " Ω×
1".
2. Reserve fuse
c. If the pocket tester indicates "∞",
replace the fuse.
3. Replace:
• Blown fuse
Replacement steps:
a. Set the main switch to "OFF".
b. Install a new fuse of the correct
amperage.
c. Set on the switches to verify if the
electrical circuit is operational.
d. If the fuse immediately blows
again, check the electrical circuit.
Never use a fuse with an amperage
rating other than that specified. Im-
provising or using a fuse with the
wrong amperage rating may cause
extensive damage to the electrical
system, cause the starting and ig-
nition systems to malfunction and
could possibly cause a fire.
4. Install:
• Fuse cover
•Seat
REPLACING THE HEADLIGHT
BULBS
1. Remove:
• Headlight
Refer to "REMOVING THE SEAT,
FUEL TANK AND SIDE COV-
ERS" section.2. Remove:
• Headlight bulb holder cover "1"
3. Remove:
• Headlight bulb holder "1"
Remove the headlight bulb holder by
pushing it in and turning it counter-
clockwise.
4. Remove:
• Headlight bulb
Since the headlight bulb gets ex-
tremely hot, keep flammable prod-
ucts and your hands away from the
bulb unit it has cooled down.
5. Install:
• Headlight bulb
Avoid touching the glass part of
the headlight bulb to keep it free
form oil, otherwise the transparen-
cy of the glass, the life of the bulb
and the luminous flux will be ad-
versely affected. If the headlight
bulb gets soiled, thoroughly clean
it with a cloth moistened with alco-
hol or lacquer thinner.
6. Install:
• Headlight bulb holder
7. Install:
• Headlight bulb holder cover
8. Install:
• Headlight
Refer to "REMOVING THE SEAT,
FUEL TANK AND SIDE COV-
ERS" section. Recommended lubricant:
Lithium soap base
grease
Pocket tester:
YU-3112-C/90890-
03112
Items Amperage
ratingQ'ty
Main fuse 10 A 1
Headlight:
7 Nm (0.7 m•kg, 5.1
ft•lb)