bulb YAMAHA WR 450F 2008 Owners Manual
[x] Cancel search | Manufacturer: YAMAHA, Model Year: 2008, Model line: WR 450F, Model: YAMAHA WR 450F 2008Pages: 224, PDF Size: 13.7 MB
Page 30 of 224

2-3
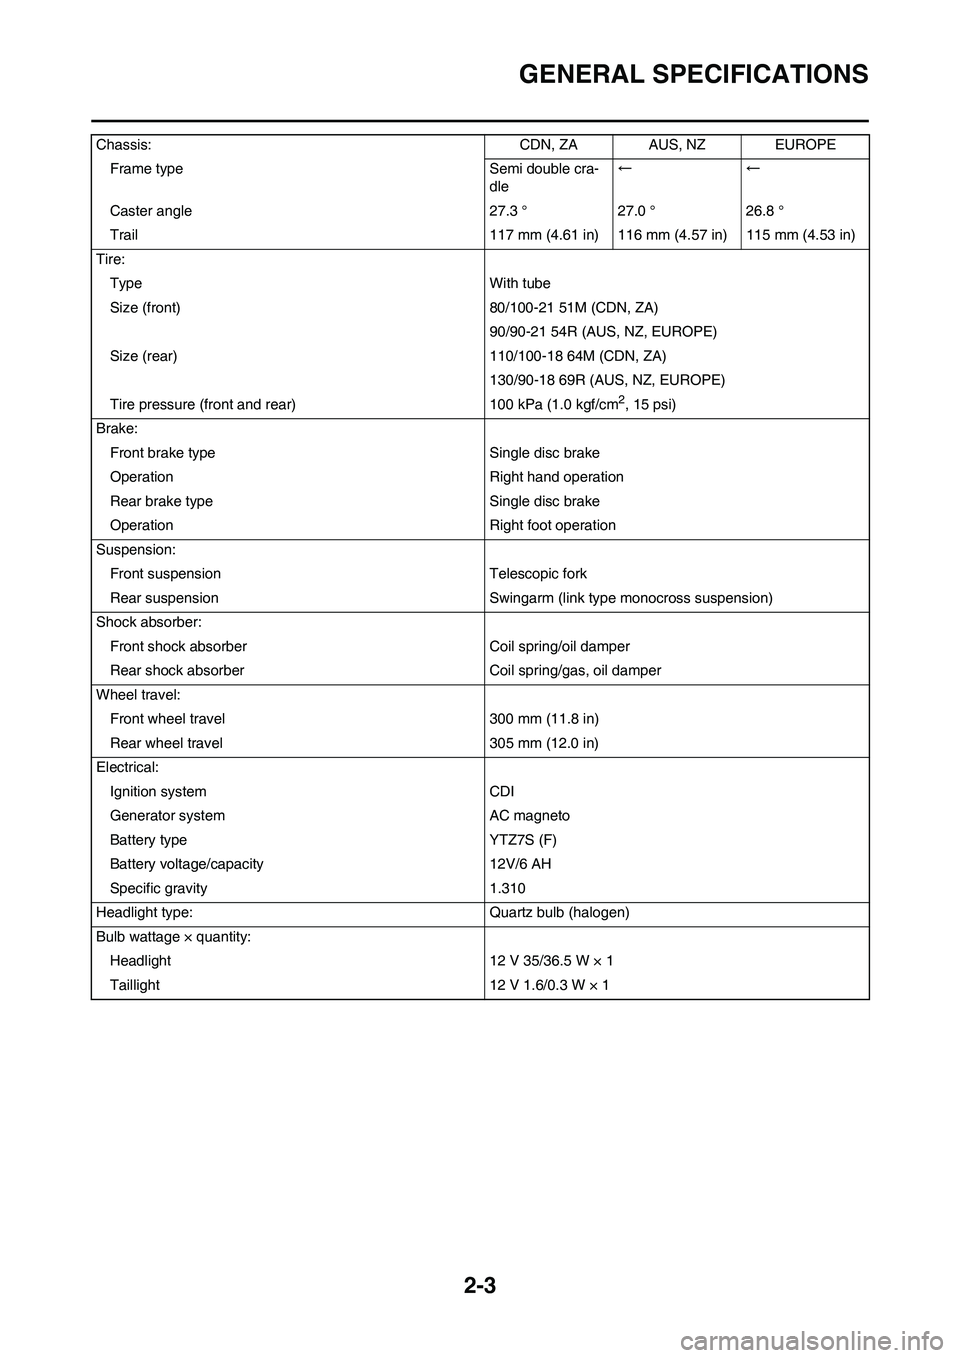
GENERAL SPECIFICATIONS
Chassis: CDN, ZA AUS, NZ EUROPE
Frame type Semi double cra-
dle←←
Caster angle 27.3 ° 27.0 ° 26.8 °
Trail 117 mm (4.61 in) 116 mm (4.57 in) 115 mm (4.53 in)
Tire:
Type With tube
Size (front) 80/100-21 51M (CDN, ZA)
90/90-21 54R (AUS, NZ, EUROPE)
Size (rear) 110/100-18 64M (CDN, ZA)
130/90-18 69R (AUS, NZ, EUROPE)
Tire pressure (front and rear) 100 kPa (1.0 kgf/cm
2, 15 psi)
Brake:
Front brake type Single disc brake
Operation Right hand operation
Rear brake type Single disc brake
Operation Right foot operation
Suspension:
Front suspension Telescopic fork
Rear suspension Swingarm (link type monocross suspension)
Shock absorber:
Front shock absorber Coil spring/oil damper
Rear shock absorber Coil spring/gas, oil damper
Wheel travel:
Front wheel travel 300 mm (11.8 in)
Rear wheel travel 305 mm (12.0 in)
Electrical:
Ignition system CDI
Generator system AC magneto
Battery type YTZ7S (F)
Battery voltage/capacity 12V/6 AH
Specific gravity 1.310
Headlight type: Quartz bulb (halogen)
Bulb wattage × quantity:
Headlight 12 V 35/36.5 W × 1
Taillight 12 V 1.6/0.3 W × 1
Page 86 of 224

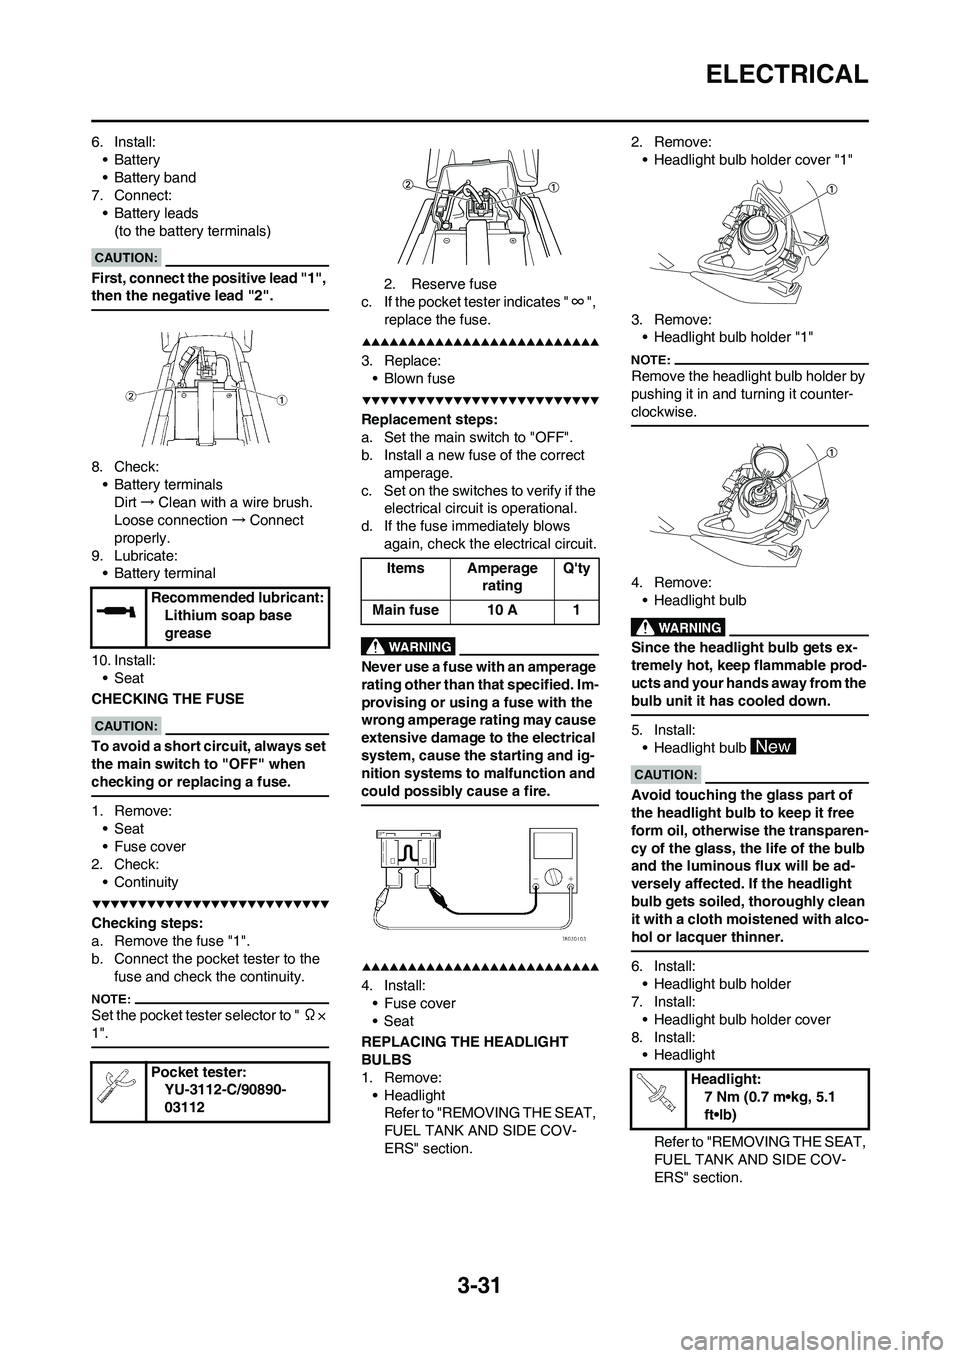
3-31
ELECTRICAL
6. Install:
•Battery
• Battery band
7. Connect:
• Battery leads
(to the battery terminals)
First, connect the positive lead "1",
then the negative lead "2".
8. Check:
• Battery terminals
Dirt→Clean with a wire brush.
Loose connection→Connect
properly.
9. Lubricate:
• Battery terminal
10. Install:
• Seat
CHECKING THE FUSE
To avoid a short circuit, always set
the main switch to "OFF" when
checking or replacing a fuse.
1. Remove:
• Seat
• Fuse cover
2. Check:
• Continuity
Checking steps:
a. Remove the fuse "1".
b. Connect the pocket tester to the
fuse and check the continuity.
Set the pocket tester selector to " Ω×
1".
2. Reserve fuse
c. If the pocket tester indicates "∞",
replace the fuse.
3. Replace:
• Blown fuse
Replacement steps:
a. Set the main switch to "OFF".
b. Install a new fuse of the correct
amperage.
c. Set on the switches to verify if the
electrical circuit is operational.
d. If the fuse immediately blows
again, check the electrical circuit.
Never use a fuse with an amperage
rating other than that specified. Im-
provising or using a fuse with the
wrong amperage rating may cause
extensive damage to the electrical
system, cause the starting and ig-
nition systems to malfunction and
could possibly cause a fire.
4. Install:
• Fuse cover
•Seat
REPLACING THE HEADLIGHT
BULBS
1. Remove:
• Headlight
Refer to "REMOVING THE SEAT,
FUEL TANK AND SIDE COV-
ERS" section.2. Remove:
• Headlight bulb holder cover "1"
3. Remove:
• Headlight bulb holder "1"
Remove the headlight bulb holder by
pushing it in and turning it counter-
clockwise.
4. Remove:
• Headlight bulb
Since the headlight bulb gets ex-
tremely hot, keep flammable prod-
ucts and your hands away from the
bulb unit it has cooled down.
5. Install:
• Headlight bulb
Avoid touching the glass part of
the headlight bulb to keep it free
form oil, otherwise the transparen-
cy of the glass, the life of the bulb
and the luminous flux will be ad-
versely affected. If the headlight
bulb gets soiled, thoroughly clean
it with a cloth moistened with alco-
hol or lacquer thinner.
6. Install:
• Headlight bulb holder
7. Install:
• Headlight bulb holder cover
8. Install:
• Headlight
Refer to "REMOVING THE SEAT,
FUEL TANK AND SIDE COV-
ERS" section. Recommended lubricant:
Lithium soap base
grease
Pocket tester:
YU-3112-C/90890-
03112
Items Amperage
ratingQ'ty
Main fuse 10 A 1
Headlight:
7 Nm (0.7 m•kg, 5.1
ft•lb)
Page 219 of 224

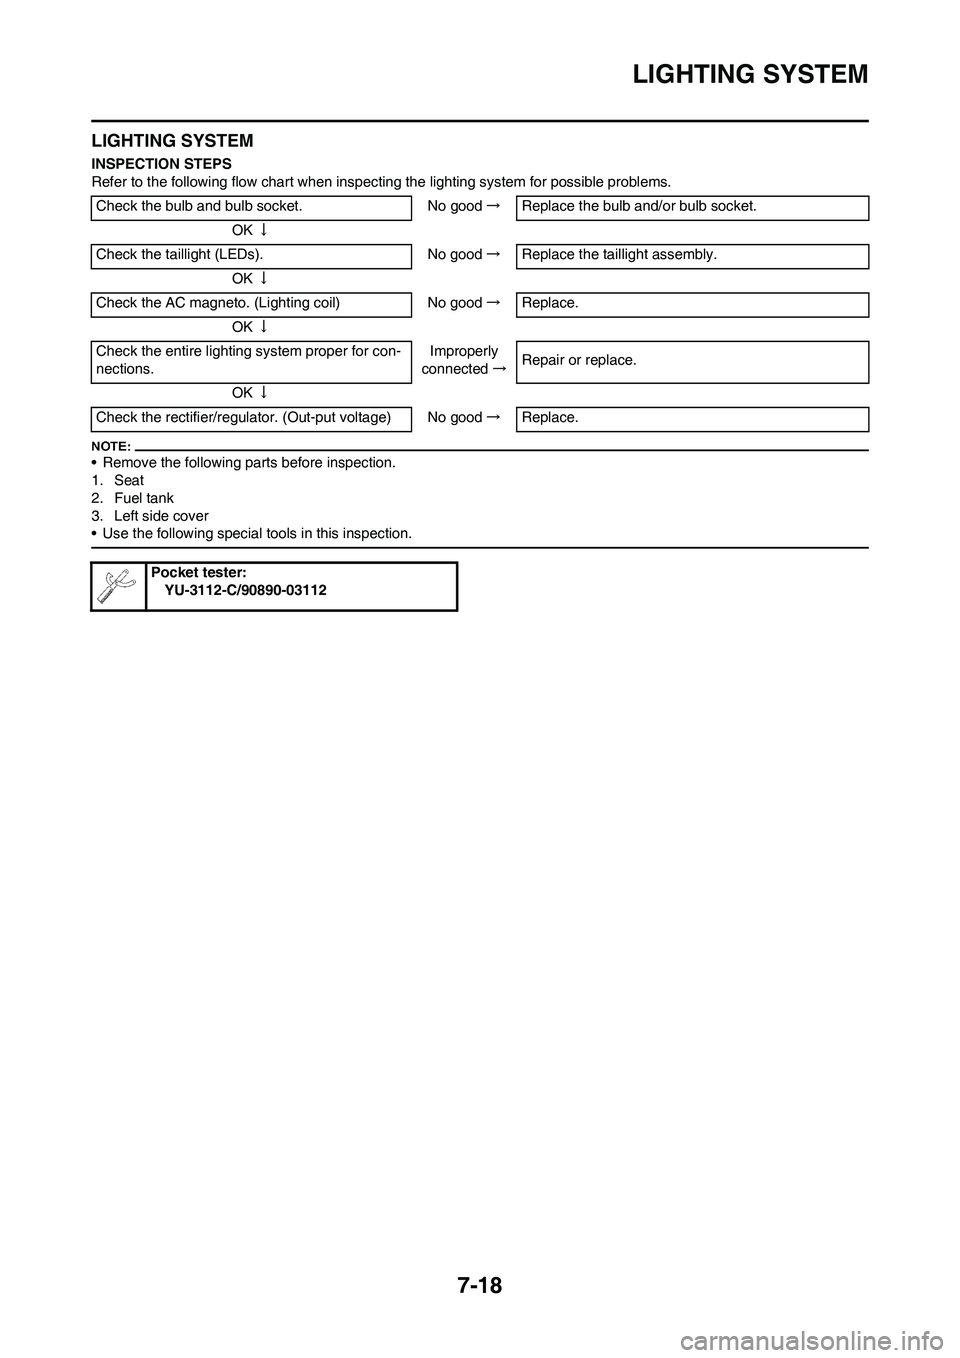
7-18
LIGHTING SYSTEM
LIGHTING SYSTEM
INSPECTION STEPS
Refer to the following flow chart when inspecting the lighting system for possible problems.
• Remove the following parts before inspection.
1. Seat
2. Fuel tank
3. Left side cover
• Use the following special tools in this inspection.
Check the bulb and bulb socket. No good→Replace the bulb and/or bulb socket.
OK↓
Check the taillight (LEDs). No good→Replace the taillight assembly.
OK↓
Check the AC magneto. (Lighting coil) No good→Replace.
OK↓
Check the entire lighting system proper for con-
nections.Improperly
connected→Repair or replace.
OK↓
Check the rectifier/regulator. (Out-put voltage) No good→Replace.
Pocket tester:
YU-3112-C/90890-03112