oil level YAMAHA WR 450F 2012 Owners Manual
[x] Cancel search | Manufacturer: YAMAHA, Model Year: 2012, Model line: WR 450F, Model: YAMAHA WR 450F 2012Pages: 96, PDF Size: 2.47 MB
Page 6 of 96

TABLE OF CONTENTSSAFETY INFORMATION .................. 1-1
DESCRIPTION .................................. 2-1
Left view .......................................... 2-1
Right view ........................................ 2-2
Controls and instrument s................. 2-3
INSTRUMENT AND CONTROL
FUNCTIONS ....................................... 3-1
Main switch ..................................... 3-1
Indicator lights and warning
lights ............................................ 3-1
Multi-function display ...................... 3-2
Handlebar switches ........................ 3-7
Clutch lever ..................................... 3-8
Shift pedal ...... ............................. .... 3-8
Brake lever ..................................... 3-8
Brake pedal .................................... 3-9
Fuel tank cap .................................. 3-9
Fuel ............................................... 3-10
Fuel tank breather hose ................ 3-11
Catalytic converter ........................ 3-11
Starter knob .................................. 3-12
Kickstarter ...... ............................. .. 3-12
Steering lock ................................. 3-13
Seat .............................................. 3-13
Adjusting the front fork .................. 3-14
Front fork bleeding ........................ 3-15
Adjusting the shock absorber assembly ................................... 3-16
Sidestand ...................................... 3-18 Ignition circuit cut-o
ff system ........ 3-19
FOR YOUR SAFETY –
PRE-OPERATION CHECKS ............. 4-1
OPERATION AND IMPORTANT
RIDING POINTS ................................. 5-1
Starting a cold engine .................... 5-1
Starting a warm engine .................. 5-2
Shifting ........................................... 5-3
Tips for reducing fuel
consumption ............................... 5-3
Engine break-in .............................. 5-4
Parking ........................................... 5-5
PERIODIC MAINTENANCE AND
ADJUSTMENT ................................... 6-1
Owner’s tool kit ............................... 6-2
Periodic maintenance chart for the emission control system ............. 6-3
General maintenance and lubrication chart .......................... 6-4
Removing and installing the
panel ........................................... 6-7
Checking the spark plug ................. 6-7
Engine oil and oil filter element ...... 6-8
Coolant ......................................... 6-12
Cleaning the air filter element
and check hose ......................... 6-14
Adjusting the engine idling speed ........................................ 6-17 Checking the throttle grip free
play ............................................ 6-17
Valve clearance ............................ 6-18
Tires .............................................. 6-18
Spoke wheels ............................... 6-20
Adjusting the clutch lever free play ............................................ 6-20
Checking the brake lever free
play ............................................ 6-21
Checking the shift pedal ............... 6-22
Brake light switches ...................... 6-22
Checking the front and rear brake pads ................................. 6-22
Checking the brake fluid level ....... 6-23
Changing the brake fluid ............... 6-24
Drive chain slack ........................... 6-24
Cleaning and lubricating the
drive chain ................................. 6-26
Checking and lubricating the cables ........................................ 6-26
Checking and lubricating the throttle grip and cable ................ 6-27
Checking and lubricating the
brake and clutch levers ............. 6-27
Checking and lubricating the
brake pedal ................................ 6-28
Checking and lubricating the sidestand ................................... 6-28
Lubricating the swingarm pivots ... 6-28
Checking the front fork .................. 6-29
Checking the steering ................... 6-291DX-9-E0.book 1 ページ 2011年10月10日 月曜日 午後2時14分
Page 36 of 96
4-1
1
2
34
5
6
7
8
9
FOR YOUR SAFETY – PRE-OPERATION CHECKS
EAU15596
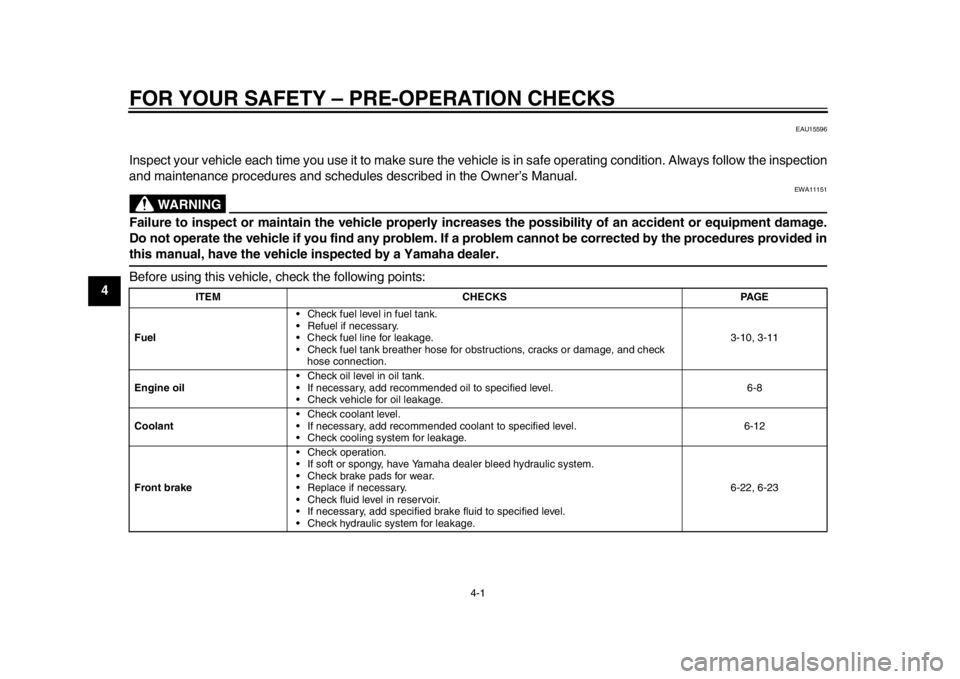
Inspect your vehicle each time you use it to make sure the vehicle is in safe operating condition. Always follow the inspection
and maintenance procedures and schedules described in the Owner’s Manual.
WARNING
EWA11151
Failure to inspect or maintain the vehicle properly increases the possibility of an accident or equipment damage.
Do not operate the vehicle if you find any problem. If a problem cannot be corrected by the procedures provided inthis manual, have the vehicle inspected by a Yamaha dealer.
Before using this vehicle, check the following points:
ITEM CHECKS PAGE
Fuel Check fuel level in fuel tank.
Refuel if necessary.
Check fuel line for leakage.
Check fuel tank breather hose for obst
ructions, cracks or damage, and check
hose connection. 3-10, 3-11
Engine oil Check oil level in oil tank.
If necessary, add recommended oil to specified level.
Check vehicle for oil leakage. 6-8
Coolant Check coolant level.
If necessary, add recommended coolant to specified level.
Check cooling system for leakage. 6-12
Front brake Check operation.
If soft or spongy, have Yamaha dealer bleed hydraulic system.
Check brake pads for wear.
Replace if necessary.
Check fluid level in reservoir.
If necessary, add specified brak
e fluid to specified level.
Check hydraulic system for leakage. 6-22, 6-23
1DX-9-E0.book 1 ページ 2011年10月10日 月曜日 午後2時14分
Page 48 of 96

PERIODIC MAINTENANCE AND ADJUSTMENT
6-5
1
2
3
4
56
7
8
9
12 *Chassis fasteners Make sure that all nuts, bolts and screws are properly
tightened.
13 Brake lever pivot
shaft Lubricate with silicone grease.
14 Brake pedal pivot
shaft Lubricate with lithium-soap-based grease.
15 Clutch lever pivot
shaft Lubricate with lithium-soap-based grease.
16 Sidestand Check operation.
Lubricate with lithium-soap-based grease.
17 * Sidestand switch Check operation.
18 * Front fork Check operation and for oil leakage.
19 * Shock absorber
assembly Check operation and shock absorber for oil leakage.
20 * Rear suspension
relay arm and
connecting arm
pivoting points Check operation.
21 Engine oil Change.
Check oil level and vehicle for oil leakage.
22 Engine oil filter
element Replace.
23 * Cooling system Check hoses for cracks of damage.
Replace if necessary.
Check coolant level and vehicle for coolant leakage.
Change with ethylene glycol anti-freeze coolant. Every 1 year
NO. ITEM CHECKS AND MAINTENANCE JOBS
INITIAL
ODOMETER
READINGS
ANNUAL CHECK
1000 km
(600 mi) or
1 month 3000 km
(1800 mi) or 3
months 5000 km
(3000 mi) or 6
months1DX-9-E0.book 5 ページ 2011年10月10日 月曜日 午後2時14分
Page 51 of 96
PERIODIC MAINTENANCE AND ADJUSTMENT
6-8
2
3
4
567
8
9
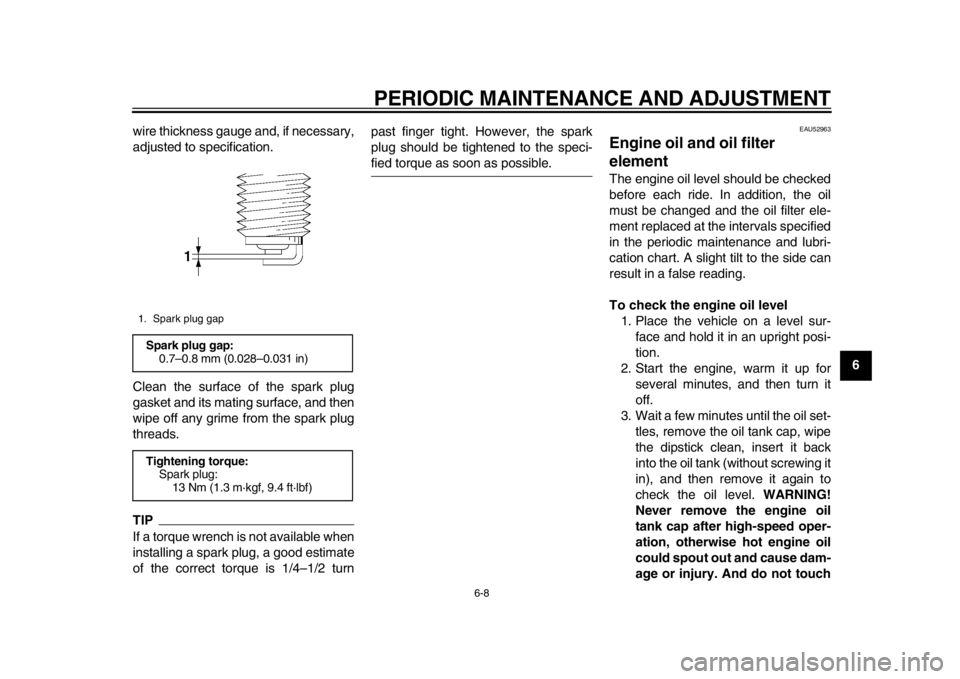
wire thickness gauge and, if necessary,
adjusted to specification.
Clean the surface of the spark plug
gasket and its mating surface, and then
wipe off any grime from the spark plug
threads.
TIPIf a torque wrench is not available when
installing a spark plug, a good estimate
of the correct torque is 1/4–1/2 turn past finger tight. However, the spark
plug should be tightened to the speci-
fied torque as soon as possible.
EAU52963
Engine oil and oil filter
element The engine oil level should be checked
before each ride. In addition, the oil
must be changed and the oil filter ele-
ment replaced at the intervals specified
in the periodic maintenance and lubri-
cation chart. A slight tilt to the side can
result in a false reading.
To check the engine oil level
1. Place the vehicle on a level sur- face and hold it in an upright posi-
tion.
2. Start the engine, warm it up for several minutes, and then turn it
off.
3. Wait a few minutes until the oil set- tles, remove the oil tank cap, wipe
the dipstick clean, insert it back
into the oil tank (without screwing it
in), and then remove it again to
check the oil level. WARNING!
Never remove the engine oil
tank cap after high-speed oper-
ation, otherwise hot engine oil
could spout out and cause dam-
age or injury. And do not touch
1. Spark plug gapSpark plug gap: 0.7–0.8 mm (0.028–0.031 in)
Tightening torque: Spark plug: 13 Nm (1.3 m·kgf, 9.4 ft·lbf)
1DX-9-E0.book 8 ページ 2011年10月10日 月曜日 午後2時14分
Page 52 of 96
PERIODIC MAINTENANCE AND ADJUSTMENT
6-9
1
2
3
4
56
7
8
9the radiator pipe after
high-speed operation, other-
wise the cooling system is hot
and cause burns. Always let the
engine oil cool down sufficient-
ly before removing the oil tank
cap.
[EWA16140]
NOTICE: Do not op-
erate the vehicle until you know
that the engine oil level is suffi-
cient.
[ECA10011]
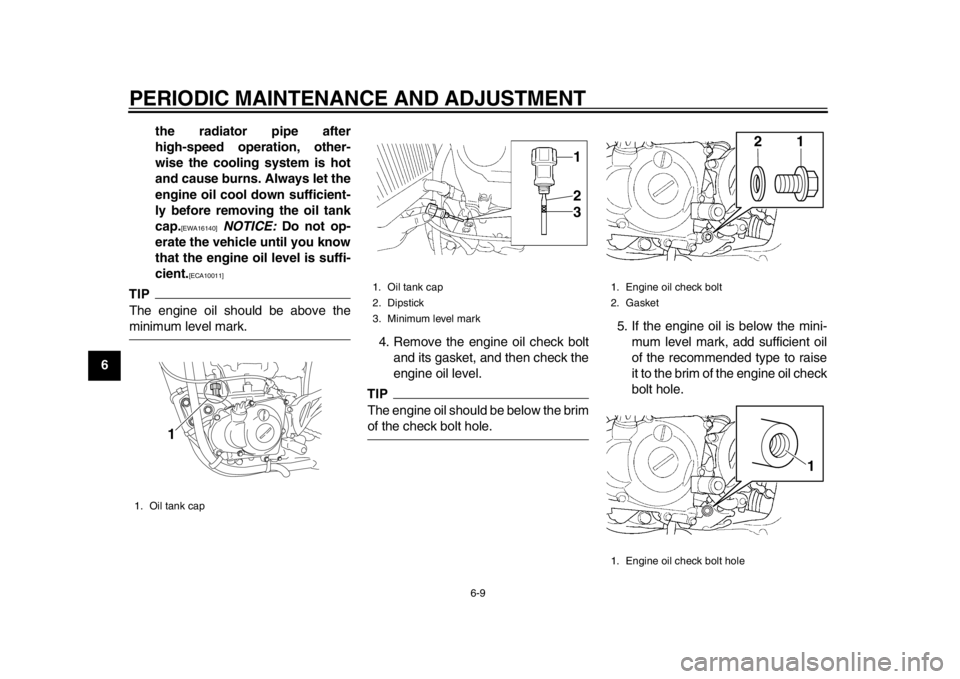
TIPThe engine oil should be above theminimum level mark. 4. Remove the engine oil check bolt
and its gasket, and then check the
engine oil level.
TIPThe engine oil should be below the brimof the check bolt hole. 5. If the engine oil is below the mini-
mum level mark, add sufficient oil
of the recommended type to raise
it to the brim of the engine oil check
bolt hole.
1. Oil tank cap
1
1. Oil tank cap
2. Dipstick
3. Minimum level mark
312
1. Engine oil check bolt
2. Gasket
1. Engine oil check bolt hole
21
1
1DX-9-E0.book 9 ページ 2011年10月10日 月曜日 午後2時14分
Page 53 of 96
PERIODIC MAINTENANCE AND ADJUSTMENT
6-10
2
3
4
567
8
9
6. Install the oil tank cap, and then
the check bolt and its gasket.
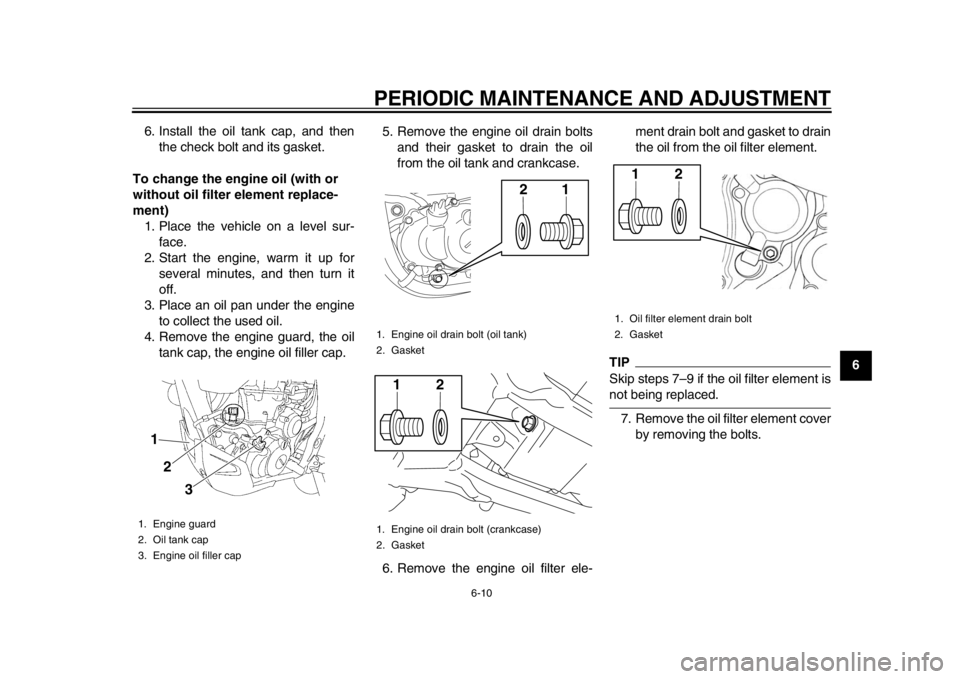
To change the engine oil (with or
without oil filter element replace-
ment) 1. Place the vehicle on a level sur- face.
2. Start the engine, warm it up for several minutes, and then turn it
off.
3. Place an oil pan under the engine to collect the used oil.
4. Remove the engine guard, the oil tank cap, the engine oil filler cap. 5. Remove the engine oil drain bolts
and their gasket to drain the oil
from the oil tank and crankcase.
6. Remove the engine oil filter ele- ment drain bolt and gasket to drain
the oil from the oil filter element.
TIPSkip steps 7–9 if the oil filter element isnot being replaced.
7. Remove the oil filter element cover by removing the bolts.
1. Engine guard
2. Oil tank cap
3. Engine oil filler cap1
2
3
1. Engine oil drain bolt (oil tank)
2. Gasket
1. Engine oil drain bolt (crankcase)
2. Gasket
21
21
1. Oil filter element drain bolt
2. Gasket
21
1DX-9-E0.book 10 ページ 2011年10月10日 月曜日 午後2時14分
Page 55 of 96
PERIODIC MAINTENANCE AND ADJUSTMENT
6-12
2
3
4
567
8
9
it for oil leakage. If oil is leaking, im-
mediately turn the engine off and
check for the cause.
13. Turn the engine off, wait a few min- utes until the oil settles, and then
check the oil level and correct it if
necessary.
14. Install the engine guard.
NOTICE
ECA11231
After changing the engine oil, make
sure to check the oil pressure as de-
scribed below.
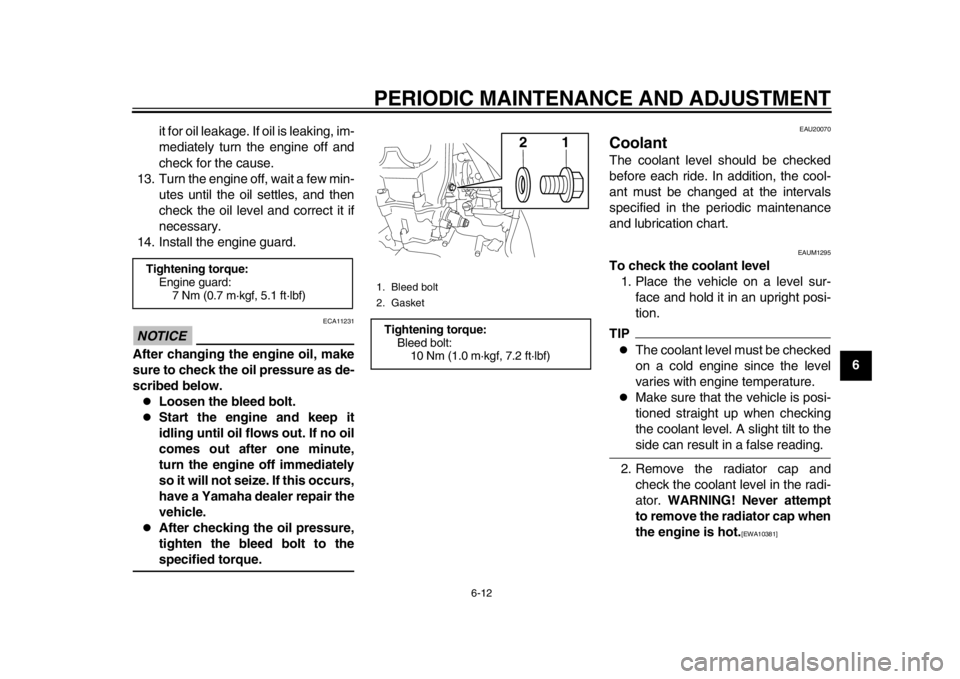
Loosen the bleed bolt.
Start the engine and keep it
idling until oil flows out. If no oil
comes out after one minute,
turn the engine off immediately
so it will not seize. If this occurs,
have a Yamaha dealer repair the
vehicle.
After checking the oil pressure,
tighten the bleed bolt to thespecified torque.
EAU20070
Coolant The coolant level should be checked
before each ride. In addition, the cool-
ant must be changed at the intervals
specified in the periodic maintenance
and lubrication chart.
EAUM1295
To check the coolant level 1. Place the vehicle on a level sur- face and hold it in an upright posi-
tion.TIP
The coolant level must be checked
on a cold engine since the level
varies with engine temperature.
Make sure that the vehicle is posi-
tioned straight up when checking
the coolant level. A slight tilt to theside can result in a false reading.
2. Remove the radiator cap and check the coolant level in the radi-
ator. WARNING! Never attempt
to remove the radiator cap when
the engine is hot.
[EWA10381]
Tightening torque: Engine guard: 7 Nm (0.7 m·kgf, 5.1 ft·lbf)
1. Bleed bolt
2. GasketTightening torque:Bleed bolt:
10 Nm (1.0 m·kgf, 7.2 ft·lbf)
21
1DX-9-E0.book 12 ページ 2011年10月10日 月曜日 午後2時14分
Page 67 of 96
PERIODIC MAINTENANCE AND ADJUSTMENT
6-24
2
3
4
567
8
9
may deteriorate, causing leak-
age.
Refill with the same type of
brake fluid. Adding a brake fluid
other than DOT 4 may result in a
harmful chemical reaction.
Be careful that water does not
enter the brake fluid reservoir
when refilling. Water will signifi-
cantly lower the boiling point of
the fluid and may result in vaporlock.
NOTICE
ECA17640
Brake fluid may damage painted sur-
faces or plastic parts. Always cleanup spilled fluid immediately.
As the brake pads wear, it is normal for
the brake fluid level to gradually go
down. A low brake fluid level may indi-
cate worn brake pads and/or brake sys-
tem leakage; therefore, be sure to
check the brake pads for wear and the
brake system for leakage. If the brake
fluid level goes down suddenly, have a
Yamaha dealer check the cause before
further riding.
EAU52951
Changing the brake fluid Have a Yamaha dealer change the
brake fluid at the intervals specified in
the TIP after the periodic maintenance
and lubrication chart. In addition, have
the oil seals of the master cylinders and
calipers as well as the brake hoses re-
placed every 20000 km (12000 mi) or
every two years or whenever they are
damaged or leaking.
EAU22760
Drive chain slack The drive chain slack should be
checked before each ride and adjusted
if necessary.
EAU52480
To check the drive chain slack
1. Place the motorcycle on the side- stand.TIPWhen checking and adjusting the drive
chain slack, ther e should be no weighton the motorcycle.
2. Shift the transmission into the neu- tral position.
3. Pull the drive chain up above the drive chain guard installation bolt
with a force of 50 N (5.0 kgf, 11
lbf).
4. Measure drive chain slack be- tween the drive chain guard and
the bottom of the chain as shown.
Drive chain slack:48.0–58.0 mm (1.89–2.28 in)
1DX-9-E0.book 24 ページ 2011年10月10日 月曜日 午後2時14分
Page 72 of 96
PERIODIC MAINTENANCE AND ADJUSTMENT
6-29
1
2
3
4
56
7
8
9
EAU23272
Checking the front fork The condition and operation of the front
fork must be checked as follows at the
intervals specified in the periodic main-
tenance and lubrication chart.
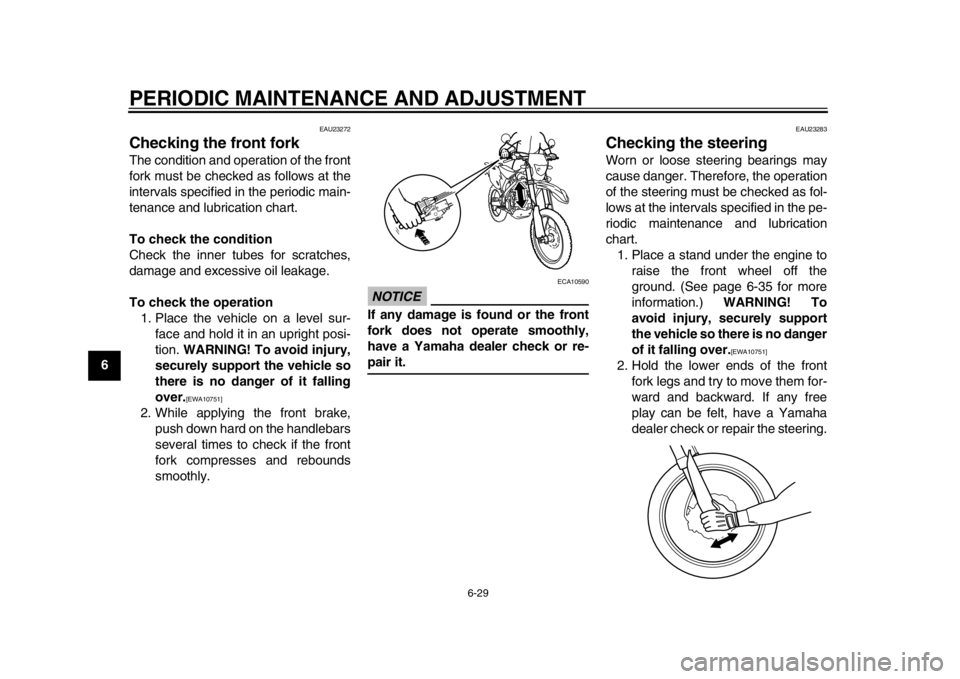
To check the condition
Check the inner tubes for scratches,
damage and excessive oil leakage.
To check the operation1. Place the vehicle on a level sur- face and hold it in an upright posi-
tion. WARNING! To avoid injury,
securely support the vehicle so
there is no danger of it falling
over.
[EWA10751]
2. While applying the front brake, push down hard on the handlebars
several times to check if the front
fork compresses and rebounds
smoothly.
NOTICE
ECA10590
If any damage is found or the front
fork does not operate smoothly,
have a Yamaha dealer check or re-pair it.
EAU23283
Checking the steering Worn or loose steering bearings may
cause danger. Therefore, the operation
of the steering must be checked as fol-
lows at the intervals specified in the pe-
riodic maintenance and lubrication
chart.1. Place a stand under the engine to raise the front wheel off the
ground. (See page 6-35 for more
information.) WARNING! To
avoid injury, securely support
the vehicle so there is no danger
of it falling over.
[EWA10751]
2. Hold the lower ends of the front fork legs and try to move them for-
ward and backward. If any free
play can be felt, have a Yamaha
dealer check or repair the steering.
1DX-9-E0.book 29 ページ 2011年10月10日 月曜日 午後2時14分
Page 89 of 96
8-1
2
3
4
5
6
789
SPECIFICATIONS
EAU50973
Dimensions:Overall length: 2315 mm (91.1 in)
Overall width: 825 mm (32.5 in)
Overall height: 1275 mm (50.2 in)
Seat height:
960 mm (37.8 in)
Wheelbase: 1475 mm (58.1 in)
Ground clearance: 335 mm (13.19 in)
Minimum turning radius:
2400 mm (94.5 in)Weight:Curb weight: 129 kg (284 lb)Noise and vibration level:Noise level (77/311/EEC): 80.2 dB(A)
Vibration on seat (EN1032, ISO5008): Will not exceed 0.5 m/s
2
Vibration on handlebar (EN1032, ISO5008): Will not exceed 2.5 m/s
2
Engine:Engine type: Liquid cooled 4-stroke, DOHC
Cylinder arrangement:
Single cylinder
Displacement: 449 cm
3
Bore stroke:
95.0 63.4 mm (3.74 2.50 in) Compression ratio:
12.30 : 1
Starting system:
Electric starter and kickstarter
Lubrication system: Dry sump
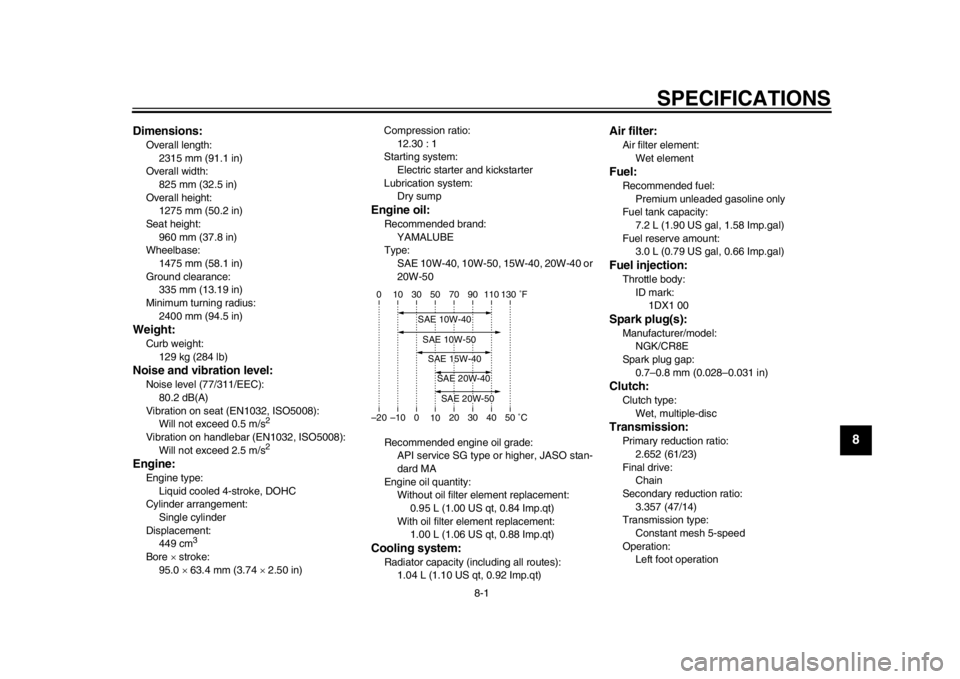
Engine oil:Recommended brand:
YAMALUBE
Type: SAE 10W-40, 10W-50, 15W-40, 20W-40 or
20W-50
Recommended engine oil grade: API service SG type or higher, JASO stan-
dard MA
Engine oil quantity: Without oil filter element replacement:
0.95 L (1.00 US qt, 0.84 Imp.qt)
With oil filter element replacement: 1.00 L (1.06 US qt, 0.88 Imp.qt)Cooling system:Radiator capacity (including all routes): 1.04 L (1.10 US qt, 0.92 Imp.qt)
Air filter:Air filter element:
Wet elementFuel:Recommended fuel: Premium unleaded gasoline only
Fuel tank capacity:
7.2 L (1.90 US gal, 1.58 Imp.gal)
Fuel reserve amount: 3.0 L (0.79 US gal, 0.66 Imp.gal)Fuel injection:Throttle body:
ID mark: 1DX1 00Spark plug(s):Manufacturer/model: NGK/CR8E
Spark plug gap: 0.7–0.8 mm (0.028–0.031 in)Clutch:Clutch type: Wet, multiple-discTransmission:Primary reduction ratio:
2.652 (61/23)
Final drive: Chain
Secondary reduction ratio: 3.357 (47/14)
Transmission type:
Constant mesh 5-speed
Operation: Left foot operation
–20 –10 0 1020 30 40 50 �C
10 30 50 70 90 110
0 130 �F
SAE 20W-50SAE 20W-40SAE 15W-40SAE 10W-40SAE 10W-50
1DX-9-E0.book 1 ページ 2011年10月10日 月曜日 午後2時14分