ground clearance YAMAHA WR 450F 2016 Owners Manual
[x] Cancel search | Manufacturer: YAMAHA, Model Year: 2016, Model line: WR 450F, Model: YAMAHA WR 450F 2016Pages: 426, PDF Size: 10.86 MB
Page 52 of 426

GENERAL SPECIFICATIONS
2-1
EAS2GC1061
GENERAL SPECIFICATIONS
ModelModel 2GC1 (USA) 2GC2 (CAN)
2GC3 (EUR)
2GC4, 2GC5 (AUS) (NZL) (ZAF)
DimensionsOverall length 2165 mm (85.2 in)
Overall width 825 mm (32.5 in)
Overall height 1280 mm (50.4 in)
Seat height 965 mm (38.0 in)
Wheelbase 1465 mm (57.7 in)
Ground clearance 325 mm (12.80 in)
WeightCurb weight 123 kg (271 lb)
Page 129 of 426

CHASSIS
3-31
• When refilling, be careful that water does not enter the brake fluid reservoir. Water
will significantly lower the boiling point of
the brake fluid and could cause vapor
lock.
ECA
NOTICE
Brake fluid may damage painted surfaces
and plastic parts. Therefore, always clean
up any spilt brake fluid immediately.
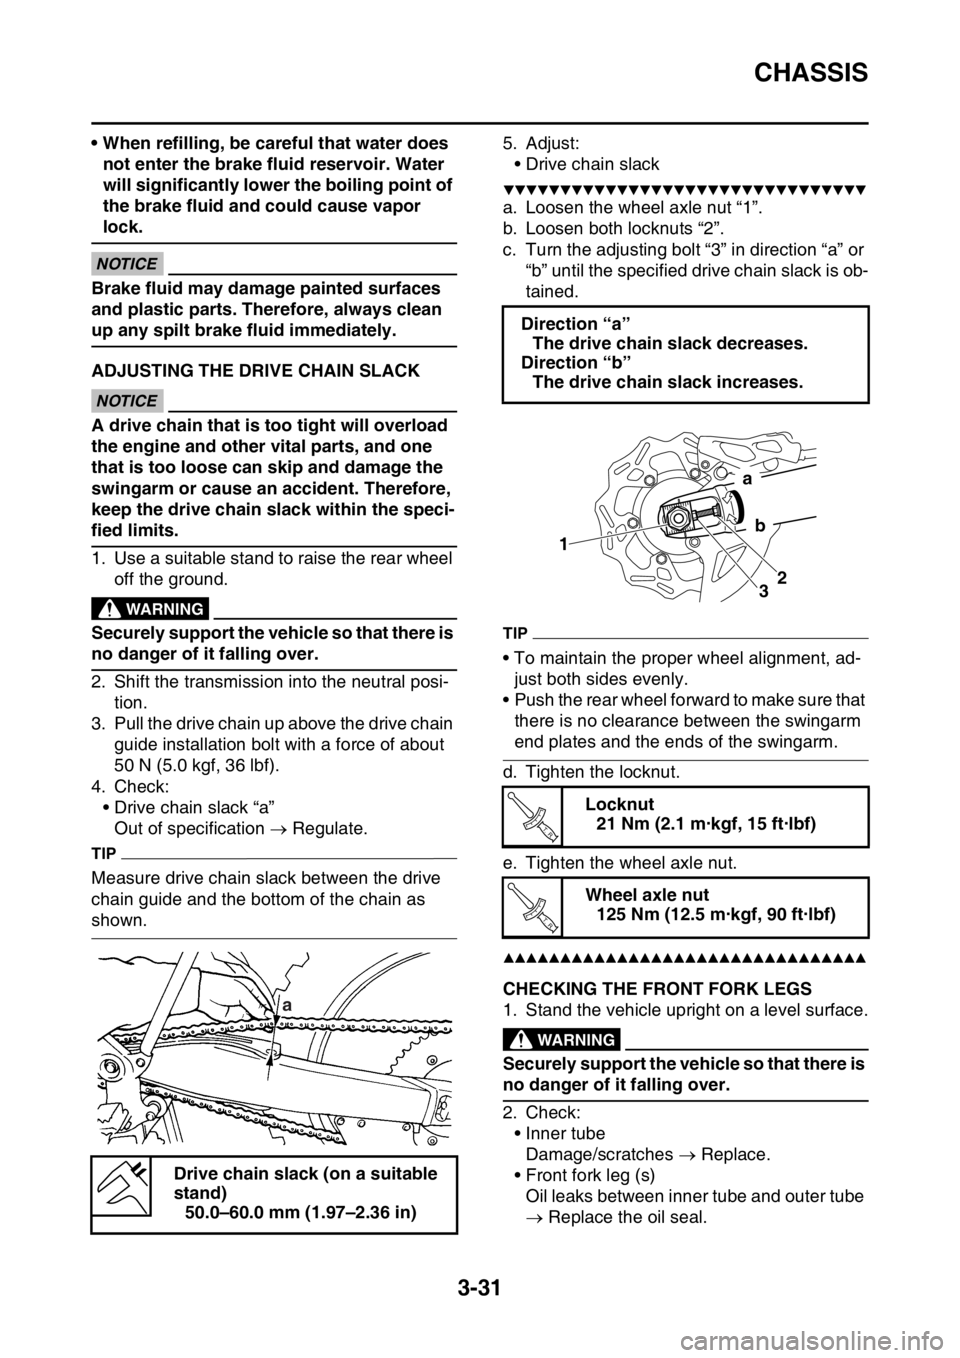
EAS2GC1110ADJUSTING THE DRIVE CHAIN SLACKECA
NOTICE
A drive chain that is too tight will overload
the engine and other vital parts, and one
that is too loose can skip and damage the
swingarm or cause an accident. Therefore,
keep the drive chain slack within the speci-
fied limits.
1. Use a suitable stand to raise the rear wheel off the ground.
EWA
WARNING
Securely support the vehicle so that there is
no danger of it falling over.
2. Shift the transmission into the neutral posi-
tion.
3. Pull the drive chain up above the drive chain guide installation bolt with a force of about
50 N (5.0 kgf, 36 lbf).
4. Check: • Drive chain slack “a”
Out of specification Regulate.
TIP
Measure drive chain slack between the drive
chain guide and the bottom of the chain as
shown. 5. Adjust:
• Drive chain slack
▼▼▼▼▼▼▼▼▼▼▼▼▼▼▼▼▼▼▼▼▼▼▼▼▼▼▼▼▼▼▼▼
a. Loosen the wheel axle nut “1”.
b. Loosen both locknuts “2”.
c. Turn the adjusting bolt “3” in direction “a” or “b” until the specified drive chain slack is ob-
tained.
TIP
• To maintain the proper wheel alignment, ad-just both sides evenly.
• Push the rear wheel forward to make sure that
there is no clearance between the swingarm
end plates and the ends of the swingarm.
d. Tighten the locknut.
e. Tighten the wheel axle nut.
▲▲▲▲▲▲▲▲▲▲▲▲▲▲▲▲▲▲▲▲▲▲▲▲▲▲▲▲▲▲▲▲
EAS2GC1111CHECKING THE FRONT FORK LEGS
1. Stand the vehicle upright on a level surface.
EWA
WARNING
Securely support the vehicle so that there is
no danger of it falling over.
2. Check: • Inner tubeDamage/scratches Replace.
• Front fork leg (s) Oil leaks between inner tube and outer tube
Replace the oil seal.
Drive chain slack (on a suitable
stand)
50.0–60.0 mm (1.97–2.36 in)
a
Direction “a”The drive chain slack decreases.
Direction “b” The drive chain slack increases.
Locknut21 Nm (2.1 m·kgf, 15 ft·lbf)
Wheel axle nut 125 Nm (12.5 m·kgf, 90 ft·lbf)
1
32
a
b
T R..
T R..
Page 132 of 426

CHASSIS
3-34
EAS2GC1116CHECKING THE SWINGARM OPERATION
1. Check:• Swingarm smooth action
• Swingarm free playRefer to “SWINGARM” on page 5-65.
EAS2GC1117CHECKING THE REAR SUSPENSION
1. Stand the vehicle upright on a level surface.
EWA
WARNING
Securely support the vehicle so that there is
no danger of it falling over.
2. Check:• Rear shock absorber assemblyGas leaks/oil leaks Replace the rear
shock absorber assembly.
Refer to “REAR SHOCK ABSORBER AS-
SEMBLY” on page 5-58.
3. Check: • Rear shock absorber assembly smooth ac-tion
• Rear suspension link smooth action Sit astride the seat and shake your body up
and down several times to check whether
the rear shock absorber assembly operates
smoothly.
Unsmooth operation Correct or replace.
Refer to “REAR SHOCK ABSORBER AS-
SEMBLY” on page 5-58.
EAS2GC1118ADJUSTING THE REAR SHOCK ABSORB-
ER ASSEMBLY
Use a suitable stand to raise the rear wheel off
the ground.
EWA
WARNING
Securely support the vehicle so that there is
no danger of it falling over. Spring preload
ECA
NOTICE
Do not turn the adjuster forcibly beyond its
adjusting range.
1. Remove:
• Rear frameRefer to “REAR SHOCK ABSORBER AS-
SEMBLY” on page 5-58.
2. Adjust: • Spring preload
▼▼▼▼▼▼▼▼▼▼▼▼▼▼▼▼▼▼▼▼▼▼▼▼▼▼▼▼▼▼▼▼
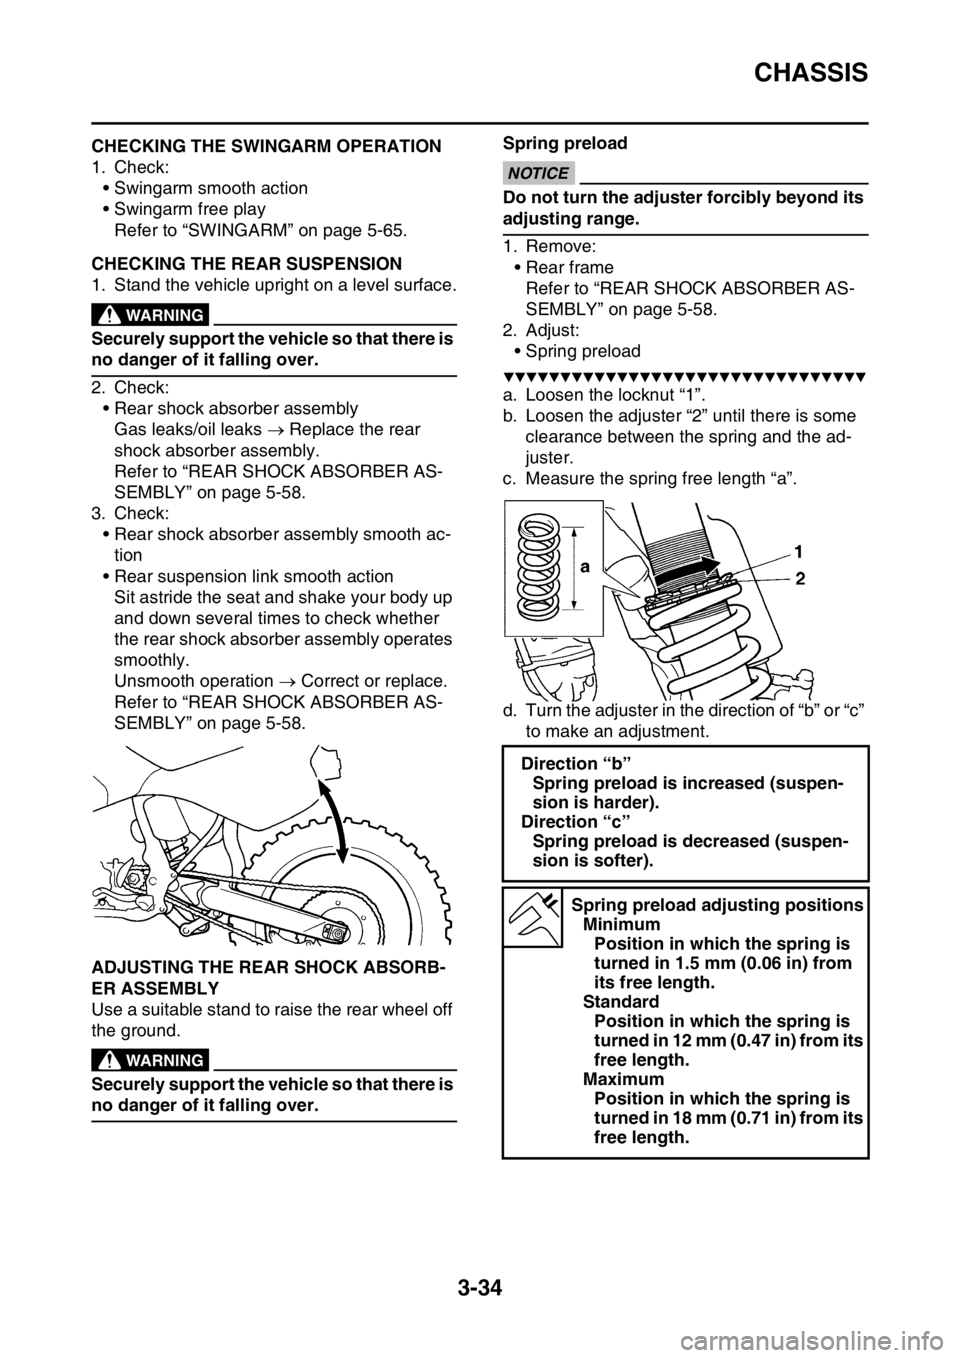
a. Loosen the locknut “1”.
b. Loosen the adjuster “2” until there is some clearance between the spring and the ad-
juster.
c. Measure the spring free length “a”.
d. Turn the adjuster in the direction of “b” or “c” to make an adjustment.
Direction “b”Spring preload is increased (suspen-
sion is harder).
Direction “c” Spring preload is decreased (suspen-
sion is softer).
Spring preload adjusting positionsMinimum Position in which the spring is
turned in 1.5 mm (0.06 in) from
its free length.
Standard Position in which the spring is
turned in 12 mm (0.47 in) from its
free length.
Maximum Position in which the spring is
turned in 18 mm (0.71 in) from its
free length.
Page 414 of 426

TROUBLESHOOTING
10-1
EAS2GC1406
TROUBLESHOOTING
EAS2GC1407GENERAL INFORMATION
TIP
The following guide for troubleshooting does
not cover all the possible causes of trouble. It
should be helpful, however, as a guide to basic
troubleshooting. Refer to the relative procedure
in this manual for checks, adjustments, and re-
placement of parts.
EAS2GC1408STARTING FAILURES
Engine
1. Cylinder and cylinder head• Loose spark plug
• Loose cylinder head or cylinder
• Damaged cylinder head gasket
• Damaged cylinder gasket
• Worn or damaged cylinder
• Incorrect valve clearance
• Improperly sealed valve
• Incorrect valve-to-valve-seat contact
• Incorrect valve timing
• Faulty valve spring
• Seized valve
2. Piston and piston ring(s) • Improperly installed piston ring
• Damaged, worn or fatigued piston ring
• Seized piston ring
• Seized or damaged piston
3. Air filter • Improperly installed air filter
• Clogged air filter element
4. Crankcase and crankshaft • Improperly assembled crankcase
• Seized crankshaft
Fuel system
1. Fuel tank • Empty fuel tank
• Clogged fuel tank breather hose
• Deteriorated or contaminated fuel
• Clogged or damaged fuel hose
2. Fuel pump
• Faulty fuel pump
3. Throttle body • Deteriorated or contaminated fuel
• Sucked-in air Electrical system
1. Battery
• Discharged battery
• Faulty battery
2. Fuse • Blown, damaged or incorrect fuse
• Improperly installed fuse
3. Spark plug • Incorrect spark plug gap
• Incorrect spark plug heat range
• Fouled spark plug
• Worn or damaged electrode
• Worn or damaged insulator
4. Ignition coil • Cracked or broken ignition coil body
• Broken or shorted primary or secondary coils
5. Ignition system • Faulty ECU
• Faulty crankshaft position sensor
• Broken generator rotor woodruff key
6. Switches and wiring
• Faulty ECU
• Faulty engine stop switch
• Broken or shorted wiring
• Faulty neutral switch
• Improperly grounded circuit
• Loose connections
7. Starting system • Faulty starter motor
• Faulty starter relay
• Faulty starting circuit cut-off relay
• Faulty starter clutch
EAS2GC1409INCORRECT ENGINE IDLING SPEED
Engine
1. Cylinder and cylinder head• Incorrect valve clearance
• Damaged valve train components
2. Air filter • Clogged air filter element
Fuel system
1. Throttle body • Damaged or loose throttle body joint
• Improperly synchronized throttle bodies
• Improper throttle cable free play
• Flooded throttle body