turn signal YAMAHA XMAX 125 2014 Owners Manual
[x] Cancel search | Manufacturer: YAMAHA, Model Year: 2014, Model line: XMAX 125, Model: YAMAHA XMAX 125 2014Pages: 94, PDF Size: 8.21 MB
Page 6 of 94

TABLE OF CONTENTSSAFETY INFORMATION.................. 1-1
Further safe-riding points ............... 1-5
DESCRIPTION.................................. 2-1
Left view ......................................... 2-1
Right view ....................................... 2-2
Controls and instruments ............... 2-3
INSTRUMENT AND CONTROL
FUNCTIONS...................................... 3-1
Immobilizer system......................... 3-1
Main switch/steering lock............... 3-2
Indicator lights and warning
lights............................................ 3-3
Multi-function meter unit ................ 3-5
Anti-theft alarm (optional) ............. 3-13
Handlebar switches ...................... 3-14
Front brake lever .......................... 3-15
Rear brake lever ........................... 3-15
ABS (for ABS models) .................. 3-16
Fuel tank cap ................................ 3-17
Fuel ............................................... 3-17
Catalytic converters...................... 3-19
Seat .............................................. 3-19
Storage compartments................. 3-20
Adjusting the shock absorber
assemblies ................................ 3-21
Sidestand ..................................... 3-22
Ignition circuit cut-off system ....... 3-23FOR YOUR SAFETY –
PRE-OPERATION CHECKS............. 4-1
OPERATION AND IMPORTANT
RIDING POINTS................................ 5-1
Starting the engine .......................... 5-1
Starting off ...................................... 5-2
Acceleration and deceleration ........ 5-3
Braking ............................................ 5-3
Tips for reducing fuel
consumption ................................ 5-4
Engine break-in ............................... 5-4
Parking ............................................ 5-5
PERIODIC MAINTENANCE AND
ADJUSTMENT................................... 6-1
Owner’s tool kit ............................... 6-2
Periodic maintenance chart for the
emission control system .............. 6-3
General maintenance and
lubrication chart ........................... 6-4
Removing and installing panels ...... 6-8
Checking the spark plug ............... 6-10
Engine oil....................................... 6-12
Final transmission oil..................... 6-14
Coolant.......................................... 6-15
Air filter and V-belt case air filter
elements and check hoses ........ 6-16
Checking the throttle grip free
play ............................................ 6-18
Valve clearance ............................. 6-18Tires .............................................. 6-18
Cast wheels .................................. 6-20
Checking the front and rear brake
lever free play ............................ 6-21
Checking the front and rear brake
pads .......................................... 6-21
Checking the brake fluid level ...... 6-22
Changing the brake fluid .............. 6-24
Checking and lubricating the
cables ........................................ 6-24
Checking and lubricating the
throttle grip and cable ............... 6-24
Lubricating the front and rear
brake levers ............................... 6-25
Checking and lubricating the
centerstand and sidestand........ 6-25
Checking the front fork ................. 6-26
Checking the steering................... 6-27
Checking the wheel bearings ....... 6-27
Battery .......................................... 6-27
Replacing the fuses ...................... 6-29
Replacing a headlight bulb ........... 6-30
Tail/brake light .............................. 6-31
Front turn signal light .................... 6-31
Replacing a rear turn signal light
bulb ........................................... 6-31
Replacing the license plate light
bulb ........................................... 6-32
Auxiliary light ................................ 6-33
Troubleshooting............................ 6-33
Troubleshooting charts................. 6-34U2DME1E0.book Page 1 Wednesday, October 23, 2013 1:37 PM
Page 9 of 94

SAFETY INFORMATION
1-2
1 Many accidents involve inexperi-
enced operators. In fact, many op-
erators who have been involved in
accidents do not even have a cur-
rent driver’s license.
• Make sure that you are qualified
and that you only lend your
scooter to other qualified opera-
tors.
• Know your skills and limits.
Staying within your limits may
help you to avoid an accident.
• We recommend that you prac-
tice riding your scooter where
there is no traffic until you have
become thoroughly familiar with
the scooter and all of its con-
trols.
Many accidents have been
caused by error of the scooter op-
erator. A typical error made by the
operator is veering wide on a turn
due to excessive speed or under-
cornering (insufficient lean angle
for the speed).
• Always obey the speed limit and
never travel faster than warrant-
ed by road and traffic condi-
tions.• Always signal before turning or
changing lanes. Make sure that
other motorists can see you.
The posture of the operator and
passenger is important for proper
control.
• The operator should keep both
hands on the handlebar and
both feet on the operator foot-
rests during operation to main-
tain control of the scooter.
• The passenger should always
hold onto the operator, the seat
strap or grab bar, if equipped,
with both hands and keep both
feet on the passenger footrests.
Never carry a passenger unless
he or she can firmly place both
feet on the passenger footrests.
Never ride under the influence of
alcohol or other drugs.
This scooter is designed for on-
road use only. It is not suitable for
off-road use.Protective Apparel
The majority of fatalities from scooter
accidents are the result of head inju-
ries. The use of a safety helmet is the
single most critical factor in the pre-
vention or reduction of head injuries.
Always wear an approved helmet.
Wear a face shield or goggles.
Wind in your unprotected eyes
could contribute to an impairment
of vision that could delay seeing a
hazard.
The use of a jacket, substantial
shoes, trousers, gloves, etc., is ef-
fective in preventing or reducing
abrasions or lacerations.
Never wear loose-fitting clothes,
otherwise they could catch on the
control levers or wheels and cause
injury or an accident.
Always wear protective clothing
that covers your legs, ankles, and
feet. The engine or exhaust sys-
tem become very hot during or af-
ter operation and can cause
burns.
A passenger should also observe
the above precautions.
U2DME1E0.book Page 2 Wednesday, October 23, 2013 1:37 PM
Page 12 of 94

SAFETY INFORMATION
1-5
1Aftermarket Tires and Rims
The tires and rims that came with your
scooter were designed to match the
performance capabilities and to pro-
vide the best combination of handling,
braking, and comfort. Other tires, rims,
sizes, and combinations may not be
appropriate. Refer to page 6-18 for tire
specifications and more information on
replacing your tires.
Transporting the Scooter
Be sure to observe following instruc-
tions before transporting the scooter in
another vehicle.
Remove all loose items from the
scooter.
Point the front wheel straight
ahead on the trailer or in the truck
bed, and choke it in a rail to pre-
vent movement.
Secure the scooter with tie-downs
or suitable straps that are at-
tached to solid parts of the scoot-
er, such as the frame or upper
front fork triple clamp (and not, for
example, to rubber-mounted han-
dlebars or turn signals, or parts
that could break). Choose the lo-cation for the straps carefully so
the straps will not rub against
painted surfaces during transport.
The suspension should be com-
pressed somewhat by the tie-
downs, if possible, so that the
scooter will not bounce exces-
sively during transport.
EAU57600
Further safe-riding pointsBe sure to signal clearly when
making turns.
Braking can be extremely difficult
on a wet road. Avoid hard braking,
because the scooter could slide.
Apply the brakes slowly when
stopping on a wet surface.
Slow down as you approach a
corner or turn. Once you have
completed a turn, accelerate
slowly.
Be careful when passing parked
cars. A driver might not see you
and open a door in your path.
Railroad crossings, streetcar rails,
iron plates on road construction
sites, and manhole covers be-
come extremely slippery when
wet. Slow down and cross them
with caution. Keep the scooter up-
right, otherwise it could slide out
from under you.
The brake pads or linings could
get wet when you wash the scoot-
er. After washing the scooter,
check the brakes before riding.
U2DME1E0.book Page 5 Wednesday, October 23, 2013 1:37 PM
Page 18 of 94
INSTRUMENT AND CONTROL FUNCTIONS
3-2
3Keep other immobilizer system
keys away from the main switch
as they may cause signal inter-
ference.
EAU10473
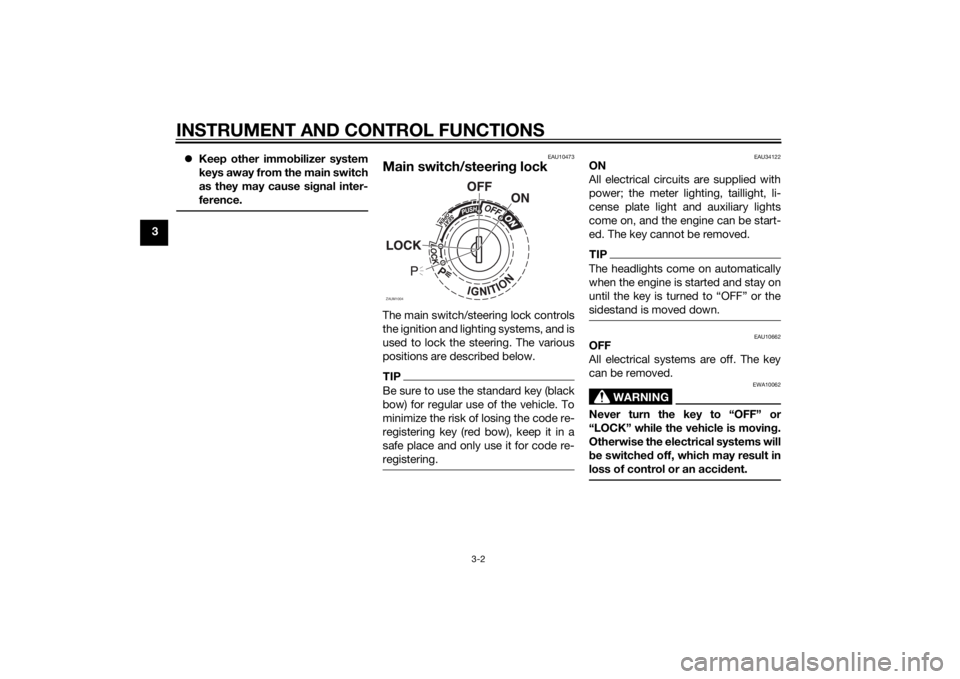
Main switch/steering lockThe main switch/steering lock controls
the ignition and lighting systems, and is
used to lock the steering. The various
positions are described below.TIPBe sure to use the standard key (black
bow) for regular use of the vehicle. To
minimize the risk of losing the code re-
registering key (red bow), keep it in a
safe place and only use it for code re-
registering.
EAU34122
ON
All electrical circuits are supplied with
power; the meter lighting, taillight, li-
cense plate light and auxiliary lights
come on, and the engine can be start-
ed. The key cannot be removed.TIPThe headlights come on automatically
when the engine is started and stay on
sidestand is moved down.
EAU10662
OFF
All electrical systems are off. The key
can be removed.
WARNING
EWA10062
Never turn the key to “OFF” or
“LOCK” while the vehicle is moving.
Otherwise the electrical systems will
be switched off, which may result in
loss of control or an accident.
ZAUM1004
U2DME1E0.book Page 2 Wednesday, October 23, 2013 1:37 PM
Page 19 of 94
INSTRUMENT AND CONTROL FUNCTIONS
3-3
3
EAU10685
LOCK
The steering is locked, and all electrical
systems are off. The key can be re-
moved.
To lock the steering1. Turn the handlebars all the way to
the left.
2. Push the key in from the “OFF”
position, and then turn it to
“LOCK” while still pushing it.
3. Remove the key.
To unlock the steeringPush the key in, and then turn it to
“OFF” while still pushing it.
EAUM2971
(Parking)
The hazard lights and turn signal lights
can be turned on, but all other electri-
cal systems are off. The key can be re-
moved.
The steering must be locked before the
key can be turned to “ ”.
NOTICE
ECA11021
Do not use the parking position for
an extended length of time, other-
wise the battery may discharge.
EAU49395
Indicator lights and warning
lights
EAU11031
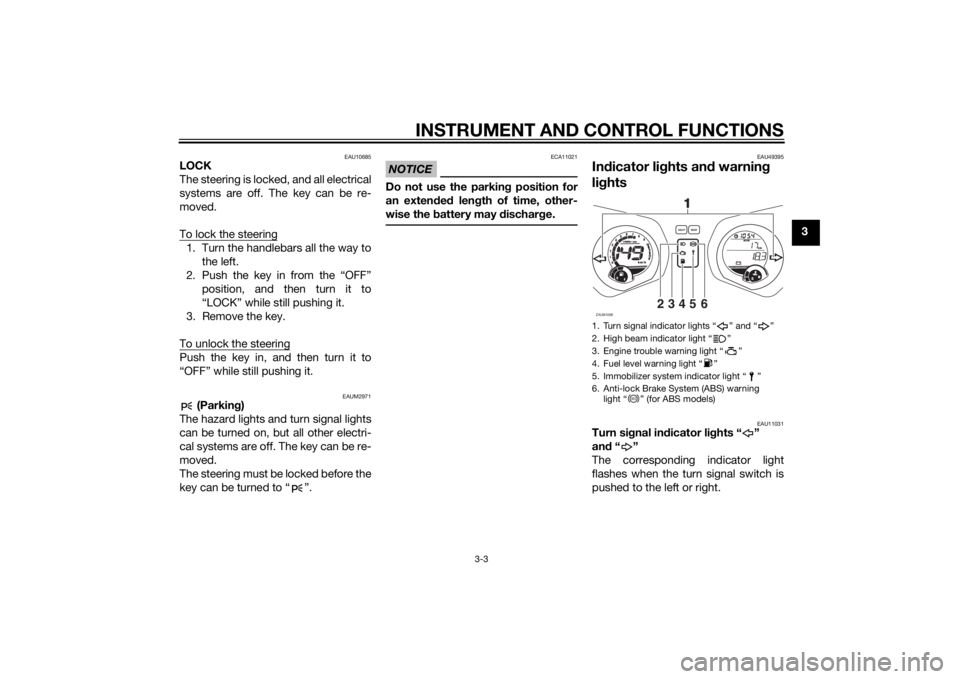
Turn signal indicator lights “ ”
and“”
The corresponding indicator light
flashes when the turn signal switch is
pushed to the left or right.1. Turn signal indicator lights “ ” and “ ”
2. High beam indicator light “ ”
3. Engine trouble warning light “ ”
4. Fuel level warning light “ ”
5. Immobilizer system indicator light “ ”
6. Anti-lock Brake System (ABS) warning
light “ ” (for ABS models)ZAUM1098
23456
987654321
11 10
12
0
1000r/minx
km/h
E
F
CHkm
Odo
Odo
SELECT
RESET11
ABS
U2DME1E0.book Page 3 Wednesday, October 23, 2013 1:37 PM
Page 30 of 94
INSTRUMENT AND CONTROL FUNCTIONS
3-14
3
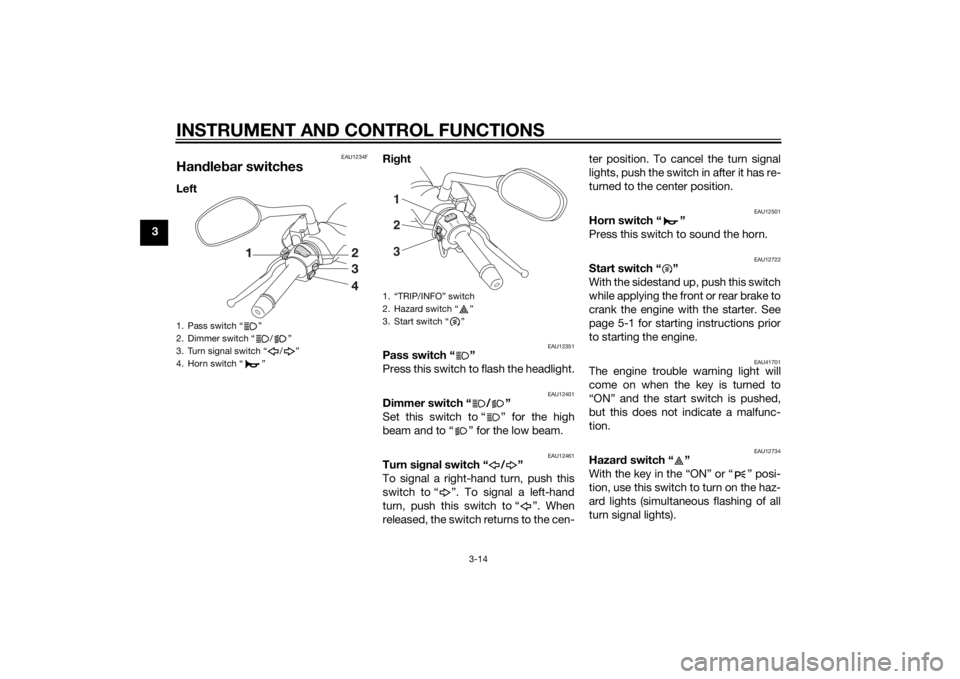
EAU1234F
Handlebar switchesLeftRight
EAU12351
Pass switch “ ”
Press this switch to flash the headlight.
EAU12401
Dimmer switch “ / ”
Set this switch to “ ” for the high
beam and to “ ” for the low beam.
EAU12461
Turn signal switch “ / ”
To signal a right-hand turn, push this
switch to “ ”. To signal a left-hand
turn, push this switch to “ ”. When
released, the switch returns to the cen-ter position. To cancel the turn signal
lights, push the switch in after it has re-
turned to the center position.
EAU12501
Horn switch “ ”
Press this switch to sound the horn.
EAU12722
Start switch “ ”
With the sidestand up, push this switch
while applying the front or rear brake to
crank the engine with the starter. See
page 5-1 for starting instructions prior
to starting the engine.
EAU41701
The engine trouble warning light will
come on when the key is turned to
“ON” and the start switch is pushed,
but this does not indicate a malfunc-
tion.
EAU12734
Hazard switch “ ”
With the key in the “ON” or “ ” posi-
tion, use this switch to turn on the haz-
ard lights (simultaneous flashing of all
turn signal lights).
1. Pass switch “ ”
2. Dimmer switch “ / ”
3. Turn signal switch “ / ”
4. Horn switch “ ”
1. “TRIP/INFO” switch
2. Hazard switch “ ”
3. Start switch “ ”
I
N
FOTRI
P
1
3 2
U2DME1E0.book Page 14 Wednesday, October 23, 2013 1:37 PM
Page 44 of 94
OPERATION AND IMPORTANT RIDING POINTS
5-2
5dicator light remains on, see page
3-3 for the corresponding warning
and indicator light circuit check.
For ABS models:The ABS warning light should
come on when the main switch is
turned to “ON” and then go off af-
ter traveling at a speed of 10 km/h
(6 mi/h) or higher.
NOTICE
ECA17682
If the ABS warning light does not
come on and then go off as ex-
plained above, see page 3-3 for the
warning light circuit check.2. Close the throttle completely.
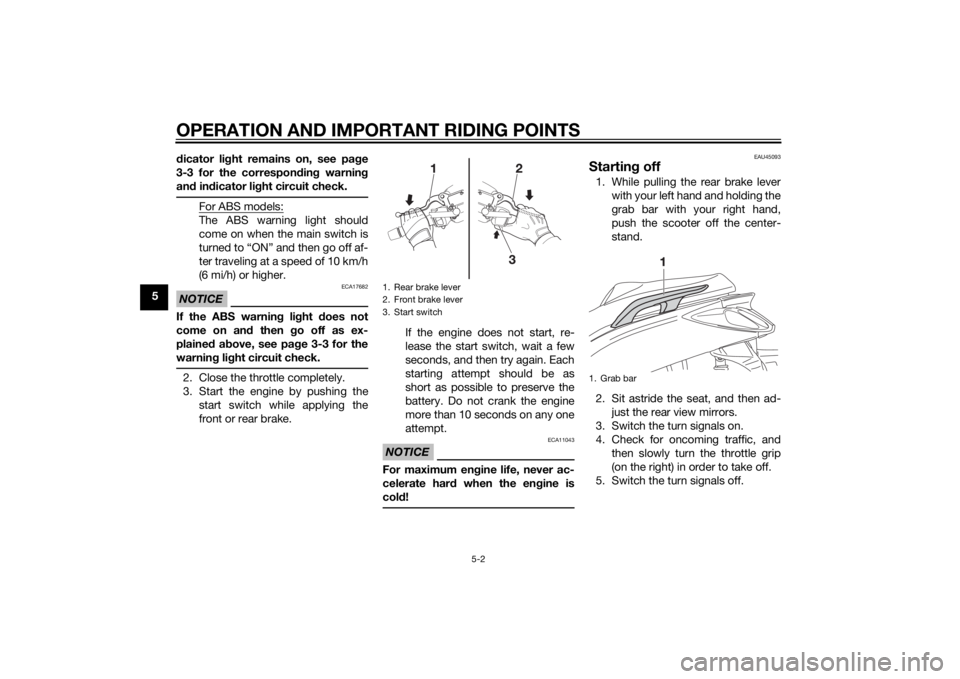
3. Start the engine by pushing the
start switch while applying the
front or rear brake. If the engine does not start, re-
lease the start switch, wait a few
seconds, and then try again. Each
starting attempt should be as
short as possible to preserve the
battery. Do not crank the engine
more than 10 seconds on any one
attempt.
NOTICE
ECA11043
For maximum engine life, never ac-
celerate hard when the engine is
cold!
EAU45093
Starting off1. While pulling the rear brake lever
with your left hand and holding the
grab bar with your right hand,
push the scooter off the center-
stand.
2. Sit astride the seat, and then ad- just the rear view mirrors.
3. Switch the turn signals on.
4. Check for oncoming traffic, and then slowly turn the throttle grip
(on the right) in order to take off.
5. Switch the turn signals off.
1. Rear brake lever
2. Front brake lever
3. Start switch
1. Grab bar
U2DME1E0.book Page 2 Wednesday, October 23, 2013 1:48 PM
Page 77 of 94
PERIODIC MAINTENANCE AND ADJUSTMENT
6-30
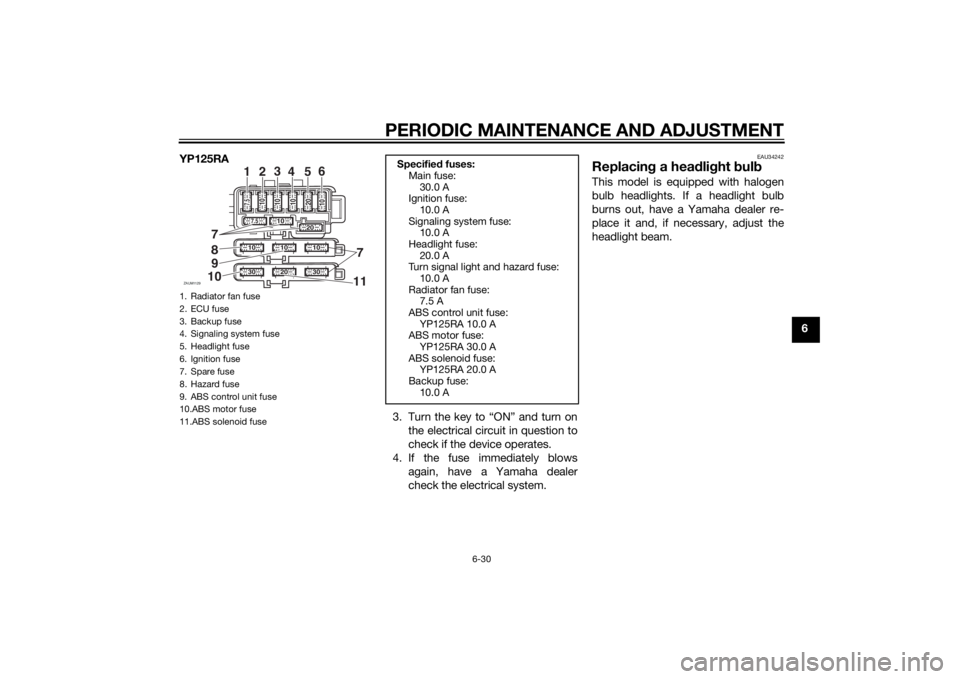
6 YP125RA
3. Turn the key to “ON” and turn on
the electrical circuit in question to
check if the device operates.
4. If the fuse immediately blows
again, have a Yamaha dealer
check the electrical system.
EAU34242
Replacing a headlight bulbThis model is equipped with halogen
bulb headlights. If a headlight bulb
burns out, have a Yamaha dealer re-
place it and, if necessary, adjust the
headlight beam.
1. Radiator fan fuse
2. ECU fuse
3. Backup fuse
4. Signaling system fuse
5. Headlight fuse
6. Ignition fuse
7. Spare fuse
8. Hazard fuse
9. ABS control unit fuse
10.ABS motor fuse
11.ABS solenoid fuseZAUM1129
10
10
10
20
30
30
7
7
11
1
2
3
4
56
20 1020
1010 1010
7.57.5
9
10
Specified fuses:
Main fuse:
30.0 A
Ignition fuse:
10.0 A
Signaling system fuse:
10.0 A
Headlight fuse:
20.0 A
Turn signal light and hazard fuse:
10.0 A
Radiator fan fuse:
7.5 A
ABS control unit fuse:
YP125RA 10.0 A
ABS motor fuse:
YP125RA 30.0 A
ABS solenoid fuse:
YP125RA 20.0 A
Backup fuse:
10.0 A
U2DME1E0.book Page 30 Wednesday, October 23, 2013 1:37 PM
Page 78 of 94
PERIODIC MAINTENANCE AND ADJUSTMENT
6-31
6
EAU24182
Tail/brake lightThis model is equipped with an LED-
type tail/brake light.
If the tail/brake light does not come on,
have a Yamaha dealer check it.
EAU39881
Front turn signal lightIf a front turn signal light does not
come on, have a Yamaha dealer check
its electrical circuit or replace the bulb.
EAUM3062
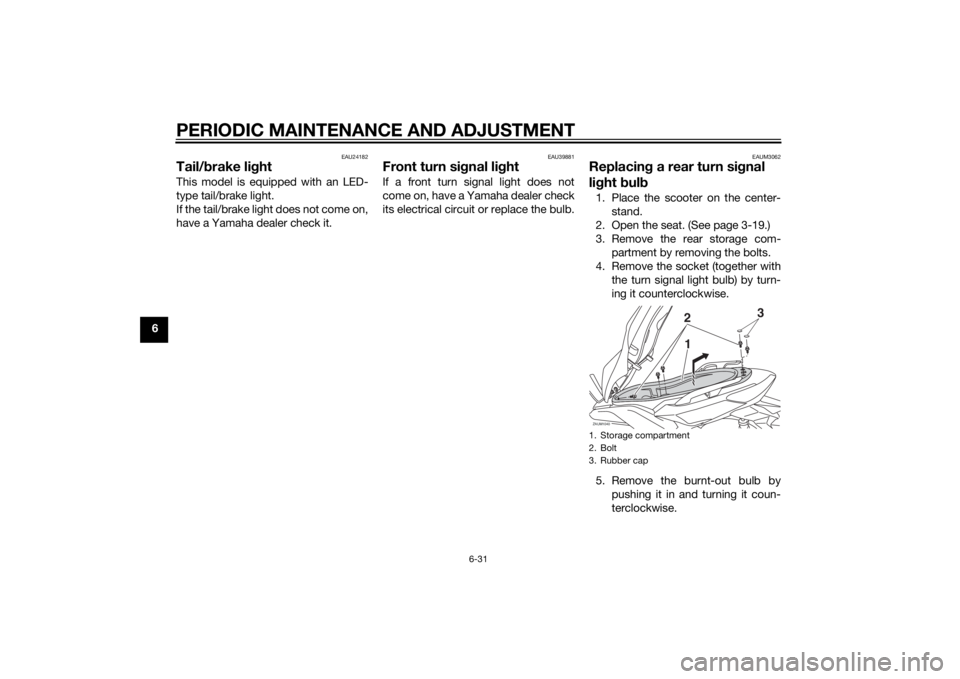
Replacing a rear turn signal
light bulb1. Place the scooter on the center-
stand.
2. Open the seat. (See page 3-19.)
3. Remove the rear storage com-
partment by removing the bolts.
4. Remove the socket (together with
the turn signal light bulb) by turn-
ing it counterclockwise.
5. Remove the burnt-out bulb by
pushing it in and turning it coun-
terclockwise.1. Storage compartment
2. Bolt
3. Rubber capZAUM1040
23
1
U2DME1E0.book Page 31 Wednesday, October 23, 2013 1:37 PM
Page 79 of 94
PERIODIC MAINTENANCE AND ADJUSTMENT
6-32
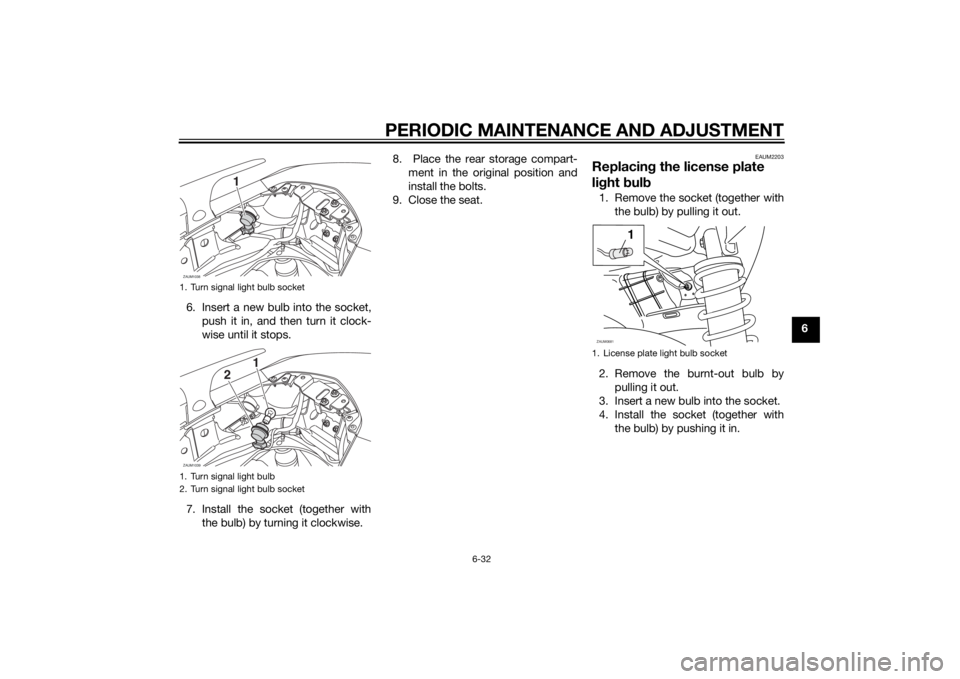
6 6. Insert a new bulb into the socket,
push it in, and then turn it clock-
wise until it stops.
7. Install the socket (together with
the bulb) by turning it clockwise.8. Place the rear storage compart-
ment in the original position and
install the bolts.
9. Close the seat.
EAUM2203
Replacing the license plate
light bulb1. Remove the socket (together with
the bulb) by pulling it out.
2. Remove the burnt-out bulb by
pulling it out.
3. Insert a new bulb into the socket.
4. Install the socket (together with
the bulb) by pushing it in.
1. Turn signal light bulb socket
1. Turn signal light bulb
2. Turn signal light bulb socketZAUM1038
1
ZAUM1039
1
2
1. License plate light bulb socketZAUM0681
1
U2DME1E0.book Page 32 Wednesday, October 23, 2013 1:37 PM