lock YAMAHA XMAX 250 2014 User Guide
[x] Cancel search | Manufacturer: YAMAHA, Model Year: 2014, Model line: XMAX 250, Model: YAMAHA XMAX 250 2014Pages: 96, PDF Size: 8.03 MB
Page 34 of 96
Instrument and control functions
3-20
3
EAU13933
Seat
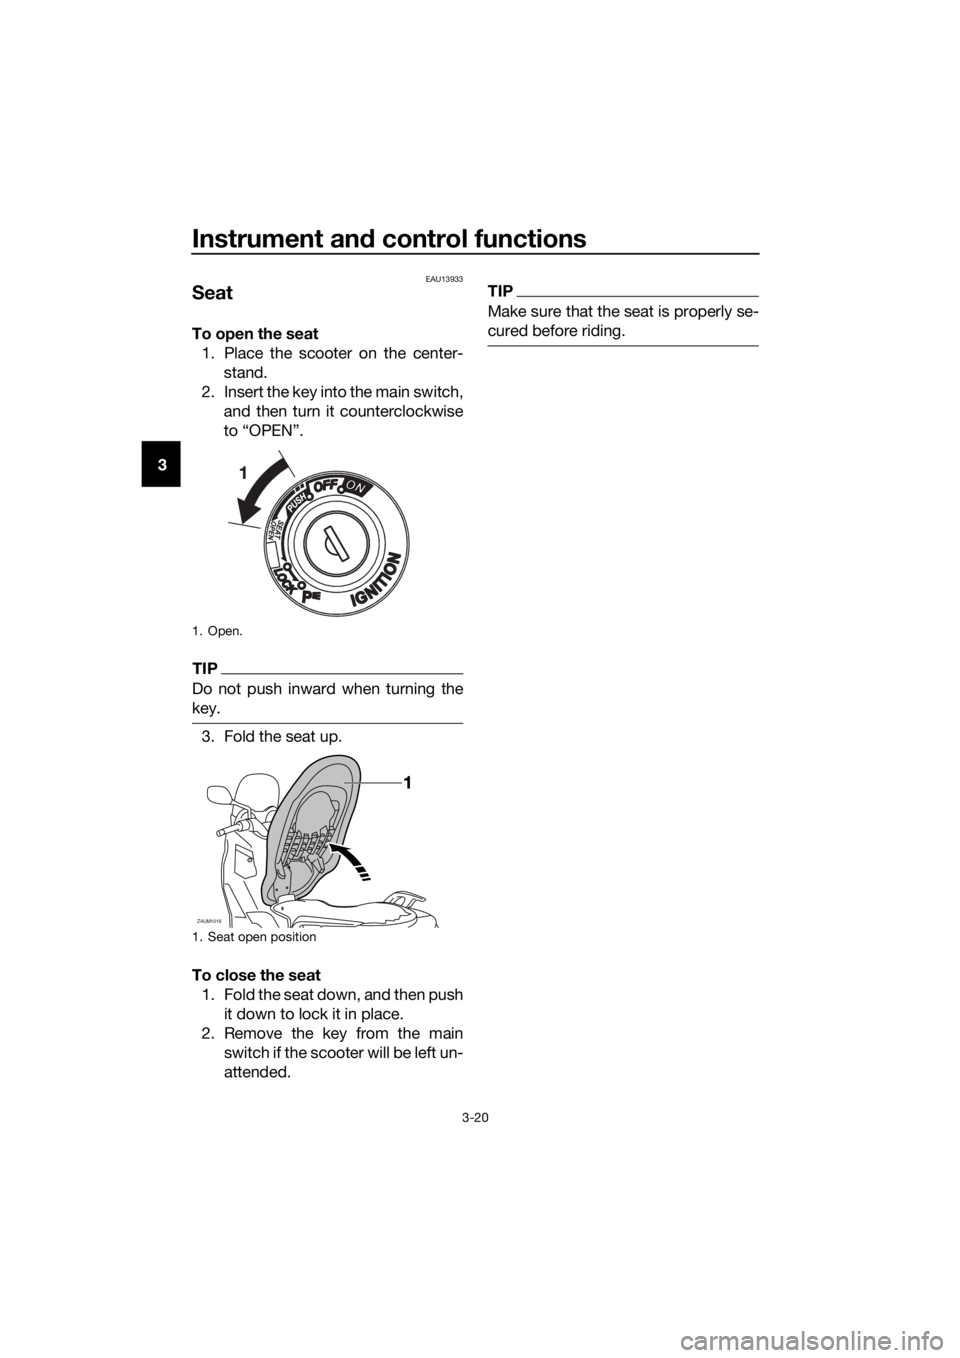
To open the seat
1. Place the scooter on the center-
stand.
2. Insert the key into the main switch,
and then turn it counterclockwise
to “OPEN”.
TIP
Do not push inward when turning the
key.
3. Fold the seat up.
To close the seat
1. Fold the seat down, and then push
it down to lock it in place.
2. Remove the key from the main
switch if the scooter will be left un-
attended.
TIP
Make sure that the seat is properly se-
cured before riding.
1. Open.
1. Seat open position
ZAUM1016
U2DLE2E0.book Page 20 Thursday, July 2, 2015 6:20 PM
Page 35 of 96
Instrument and control functions
3-21
3
EAUM3002
Storage compartments
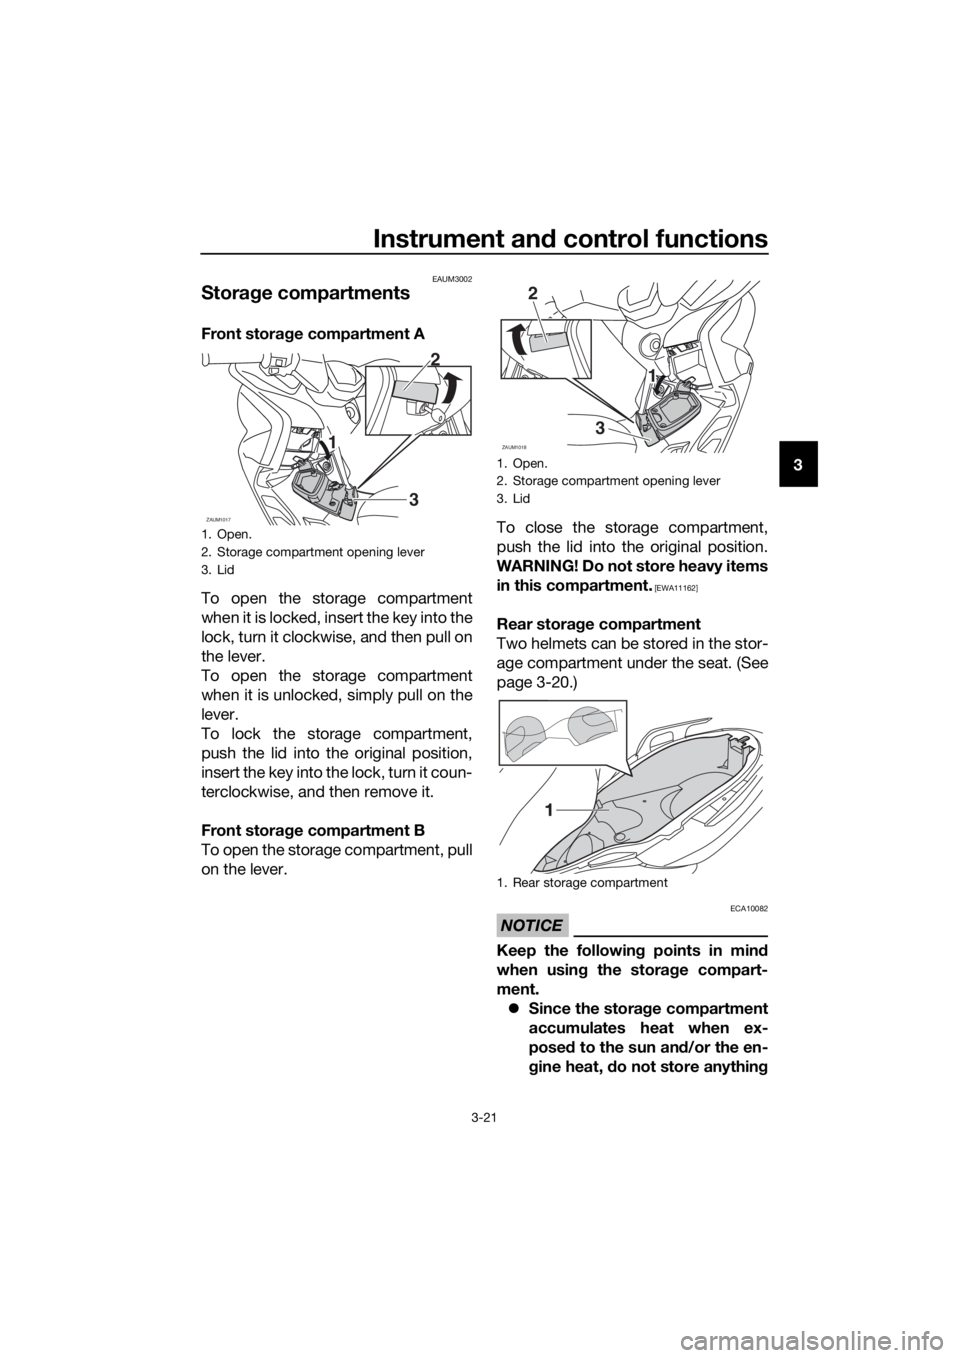
Front storage compartment A
To open the storage compartment
when it is locked, insert the key into the
lock, turn it clockwise, and then pull on
the lever.
To open the storage compartment
when it is unlocked, simply pull on the
lever.
To lock the storage compartment,
push the lid into the original position,
insert the key into the lock, turn it coun-
terclockwise, and then remove it.
Front storage compartment B
To open the storage compartment, pull
on the lever.To close the storage compartment,
push the lid into the original position.
WARNING! Do not store heavy items
in this compartment.
[EWA11162]
Rear storage compartment
Two helmets can be stored in the stor-
age compartment under the seat. (See
page 3-20.)
NOTICE
ECA10082
Keep the following points in mind
when using the storage compart-
ment.
Since the storage compartment
accumulates heat when ex-
posed to the sun and/or the en-
gine heat, do not store anything
1. Open.
2. Storage compartment opening lever
3. Lid
ZAUM10173
1 12
1. Open.
2. Storage compartment opening lever
3. Lid
1. Rear storage compartment
ZAUM1018
2
31 1
U2DLE2E0.book Page 21 Thursday, July 2, 2015 6:20 PM
Page 69 of 96
Periodic maintenance and adjustment
6-22
6 Clean the filler cap before re-
moving. Use only DOT 4 brake
fluid from a sealed container.
Use only the specified brake flu-
id; otherwise, the rubber seals
may deteriorate, causing leak-
age.
Refill with the same type of
brake fluid. Adding a brake fluid
other than DOT 4 may result in a
harmful chemical reaction.
Be careful that water or dust
does not enter the brake fluid
reservoir when refilling. Water
will significantly lower the boil-
ing point of the fluid and may re-
sult in vapor lock, and dirt may
clog the ABS hydraulic unit
valves.
NOTICE
ECA17641
Brake fluid may damage painted
surfaces or plastic parts. Always
clean up spilled fluid immediately.
As the brake pads wear, it is normal for
the brake fluid level to gradually go
down. A low brake fluid level may indi-
cate worn brake pads and/or brake
system leakage; therefore, be sure to
check the brake pads for wear and the
brake system for leakage. If the brake
fluid level goes down suddenly, have a
Yamaha dealer check the cause before
further riding.
EAU22733
Changing the brake fluid
Have a Yamaha dealer change the
brake fluid at the intervals specified in
the periodic maintenance and lubrica-
tion chart. In addition, have the oil seals
of the master cylinders and calipers as
well as the brake hoses replaced at the
intervals listed below or whenever they
are damaged or leaking.
Oil seals: Replace every two
years.
Brake hoses: Replace every four
years.
U2DLE2E0.book Page 22 Thursday, July 2, 2015 6:20 PM
Page 79 of 96
Periodic maintenance and adjustment
6-32
6
EAUM3062
Replacing a rear turn signal
light bulb
1. Place the scooter on the center-
stand.
2. Open the seat. (See page 3-20.)
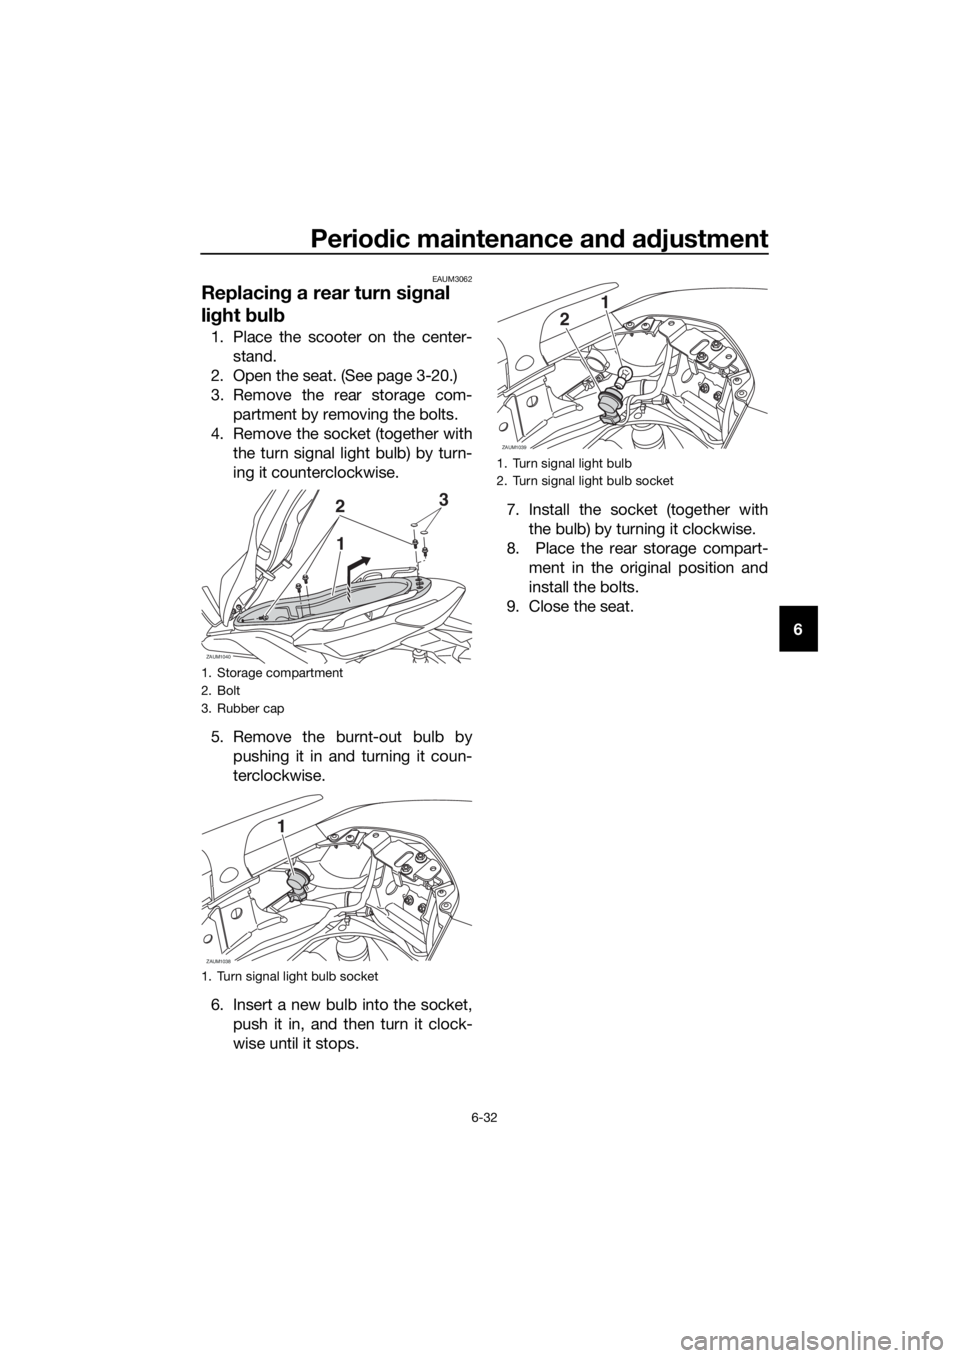
3. Remove the rear storage com-
partment by removing the bolts.
4. Remove the socket (together with
the turn signal light bulb) by turn-
ing it counterclockwise.
5. Remove the burnt-out bulb by
pushing it in and turning it coun-
terclockwise.
6. Insert a new bulb into the socket,
push it in, and then turn it clock-
wise until it stops.7. Install the socket (together with
the bulb) by turning it clockwise.
8. Place the rear storage compart-
ment in the original position and
install the bolts.
9. Close the seat.
1. Storage compartment
2. Bolt
3. Rubber cap
1. Turn signal light bulb socket
ZAUM1040
23
1
ZAUM1038
1
1. Turn signal light bulb
2. Turn signal light bulb socket
ZAUM1039
1
2
U2DLE2E0.book Page 32 Thursday, July 2, 2015 6:20 PM
Page 82 of 96
Periodic maintenance and adjustment
6-35
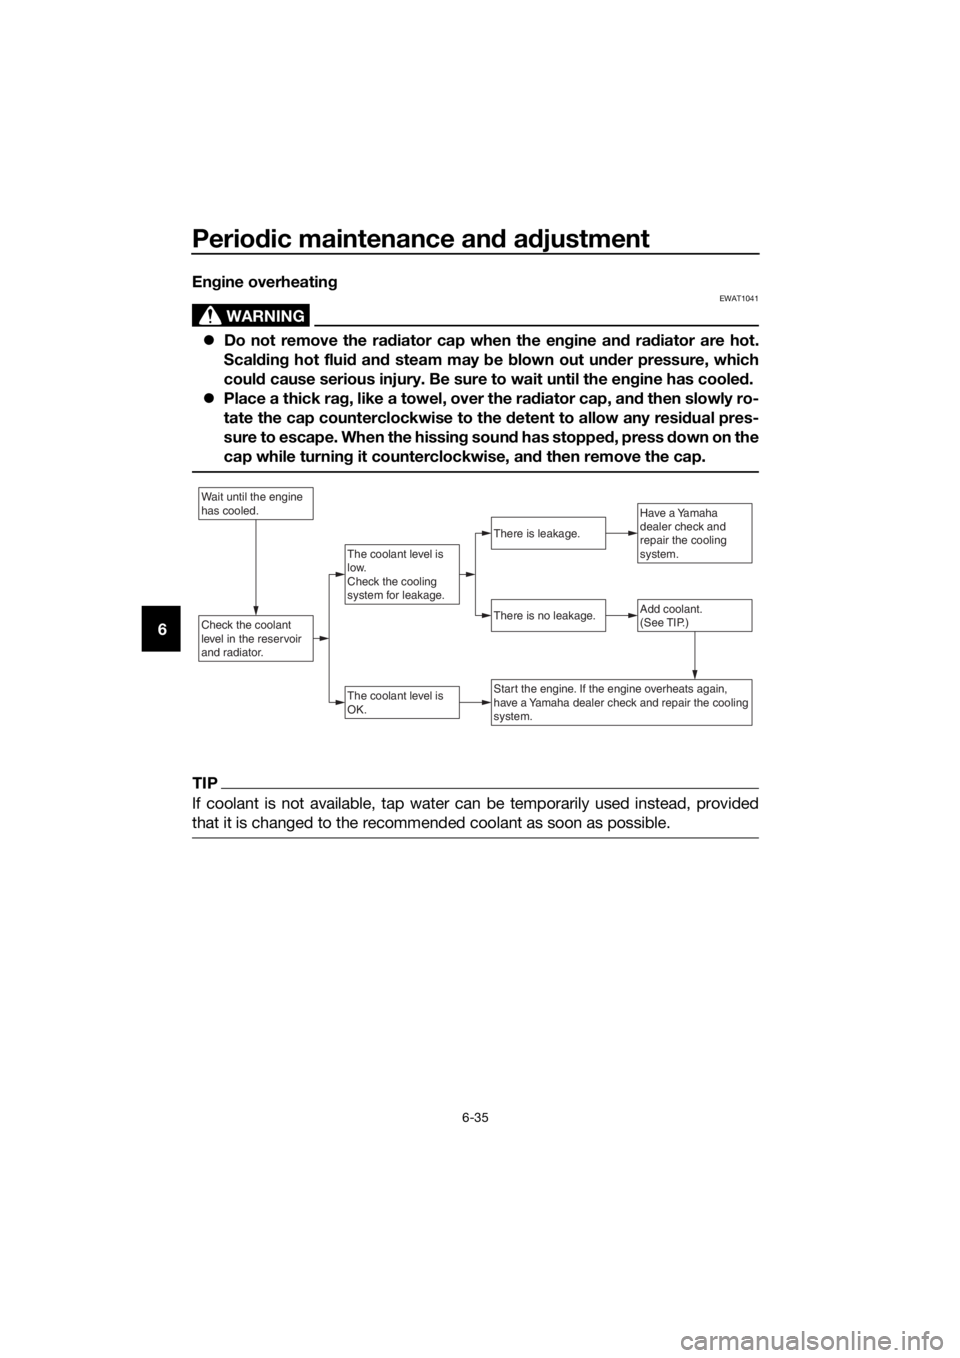
6Engine overheating
WARNING
EWAT1041
Do not remove the radiator cap when the engine and radiator are hot.
Scalding hot fluid and steam may be blown out under pressure, which
could cause serious injury. Be sure to wait until the engine has cooled.
Place a thick rag, like a towel, over the radiator cap, and then slowly ro-
tate the cap counterclockwise to the detent to allow any residual pres-
sure to escape. When the hissing sound has stopped, press down on the
cap while turning it counterclockwise, and then remove the cap.
TIP
If coolant is not available, tap water can be temporarily used instead, provided
that it is changed to the recommended coolant as soon as possible.
Wait until the engine
has cooled.
Check the coolant
level in the reservoir
and radiator.Add coolant.
(See TIP.)
The coolant level is
OK.
There is no leakage.
There is leakage.
The coolant level is
low.
Check the cooling
system for leakage.
Have a Yamaha
dealer check and
repair the cooling
system.
Start the engine. If the engine overheats again,
have a Yamaha dealer check and repair the cooling
system.
U2DLE2E0.book Page 35 Thursday, July 2, 2015 6:20 PM
Page 92 of 96

10-1
10
Index
A
ABS (for ABS models) ........................... 3-16
ABS warning light (for ABS models) ....... 3-4
Acceleration and deceleration ................ 5-3
Air filter and V-belt case air filter
elements ............................................. 6-14
Auxiliary lights ....................................... 6-30
B
Battery .................................................. 6-26
Brake fluid, changing ............................ 6-22
Brake fluid level, checking .................... 6-21
Brake lever, front .................................. 3-15
Brake lever, rear.................................... 3-16
Brake levers, lubricating ....................... 6-24
Braking.................................................... 5-4
C
Cables, checking and lubricating ......... 6-23
Care ........................................................ 7-1
Catalytic converters .............................. 3-19
Centerstand and sidestand, checking
and lubricating .................................... 6-24
Coolant ................................................. 6-13
D
Dimmer switch ...................................... 3-14
E
Engine break-in....................................... 5-5
Engine oil .............................................. 6-10
Engine trouble warning light ................... 3-4
F
Final transmission oil ............................ 6-12
Front and rear brake lever free play,
checking ............................................. 6-19
Front and rear brake pads, checking.... 6-20
Front fork, checking .............................. 6-25
Front turn signal light ............................ 6-31
Fuel ....................................................... 3-18
Fuel consumption, tips for reducing ....... 5-5
Fuel level warning light ........................... 3-4
Fuel tank cap ........................................ 3-17
Fuses, replacing.................................... 6-28
H
Handlebar switches .............................. 3-14
Hazard switch ....................................... 3-14
Headlight bulb, replacing ...................... 6-30
High beam indicator light........................ 3-4
Horn switch ........................................... 3-14
I
Identification numbers ............................ 9-1
Ignition circuit cut-off system ............... 3-24
Immobilizer system ................................. 3-1Immobilizer system indicator light.......... 3-5
Indicator lights and warning lights ......... 3-4
Info switch ............................................ 3-15
L
License plate light bulb, replacing........ 6-33
M
Main switch/steering lock....................... 3-2
Maintenance and lubrication, periodic ... 6-4
Maintenance, emission control
system.................................................. 6-3
Matte color, caution ............................... 7-1
Model label ............................................. 9-1
Multi-function meter unit ........................ 3-6
P
Panels, removing and installing.............. 6-7
Parking ................................................... 5-6
Part locations ......................................... 2-1
Pass switch .......................................... 3-14
S
Safe-riding points ................................... 1-5
Safety information .................................. 1-1
Seat ...................................................... 3-20
Shock absorber assemblies,
adjusting............................................. 3-22
Sidestand ............................................. 3-23
Spark plug, checking ............................. 6-9
Specifications ......................................... 8-1
Starting off.............................................. 5-3
Starting the engine ................................. 5-2
Start switch .......................................... 3-14
Steering, checking................................ 6-25
Storage ................................................... 7-4
Storage compartments ........................ 3-21
T
Tail/brake light ...................................... 6-31
Throttle grip and cable, checking and
lubricating .......................................... 6-23
Throttle grip free play, checking........... 6-16
Tires ...................................................... 6-17
Tool kit.................................................... 6-2
Troubleshooting ................................... 6-33
Troubleshooting charts ........................ 6-34
Turn signal indicator lights ..................... 3-4
Turn signal light bulb (rear),
replacing ............................................ 6-32
Turn signal switch ................................ 3-14
V
Valve clearance .................................... 6-16
Vehicle identification number ................. 9-1
U2DLE2E0.book Page 1 Thursday, July 2, 2015 6:20 PM