YAMAHA XMAX 300 2018 Owner's Manual
Manufacturer: YAMAHA, Model Year: 2018, Model line: XMAX 300, Model: YAMAHA XMAX 300 2018Pages: 116, PDF Size: 7.14 MB
Page 21 of 116
Smart key system
3-7
3 Do not expose smart key to ex-
cessive heat, such as sunshine
or fire.
Chemical Burn Hazard - do not in-
gest the battery.
If the battery is swallowed, it
can cause severe internal burns
in just 2 hours and can lead to
death.
If you think batteries might have
been swallowed or placed in-
side any part of the body, seek
immediate medical attention.
NOTICE
ECA15784
Use a cloth when opening the
smart key case with a screw-
driver. Direct contact with hard
objects may damage or scratch
the smart key.
Take precautions to prevent the
waterproof seal from being
damaged or contaminated by
dirt.
Do not touch the internal cir-
cuits and terminals. This may
cause malfunctions.
Do not apply excessive force to
the smart key when replacing
the battery.
Make sure the battery is in-
stalled correctly. Confirm the di-
rection of the positive/“+” side
of the battery.
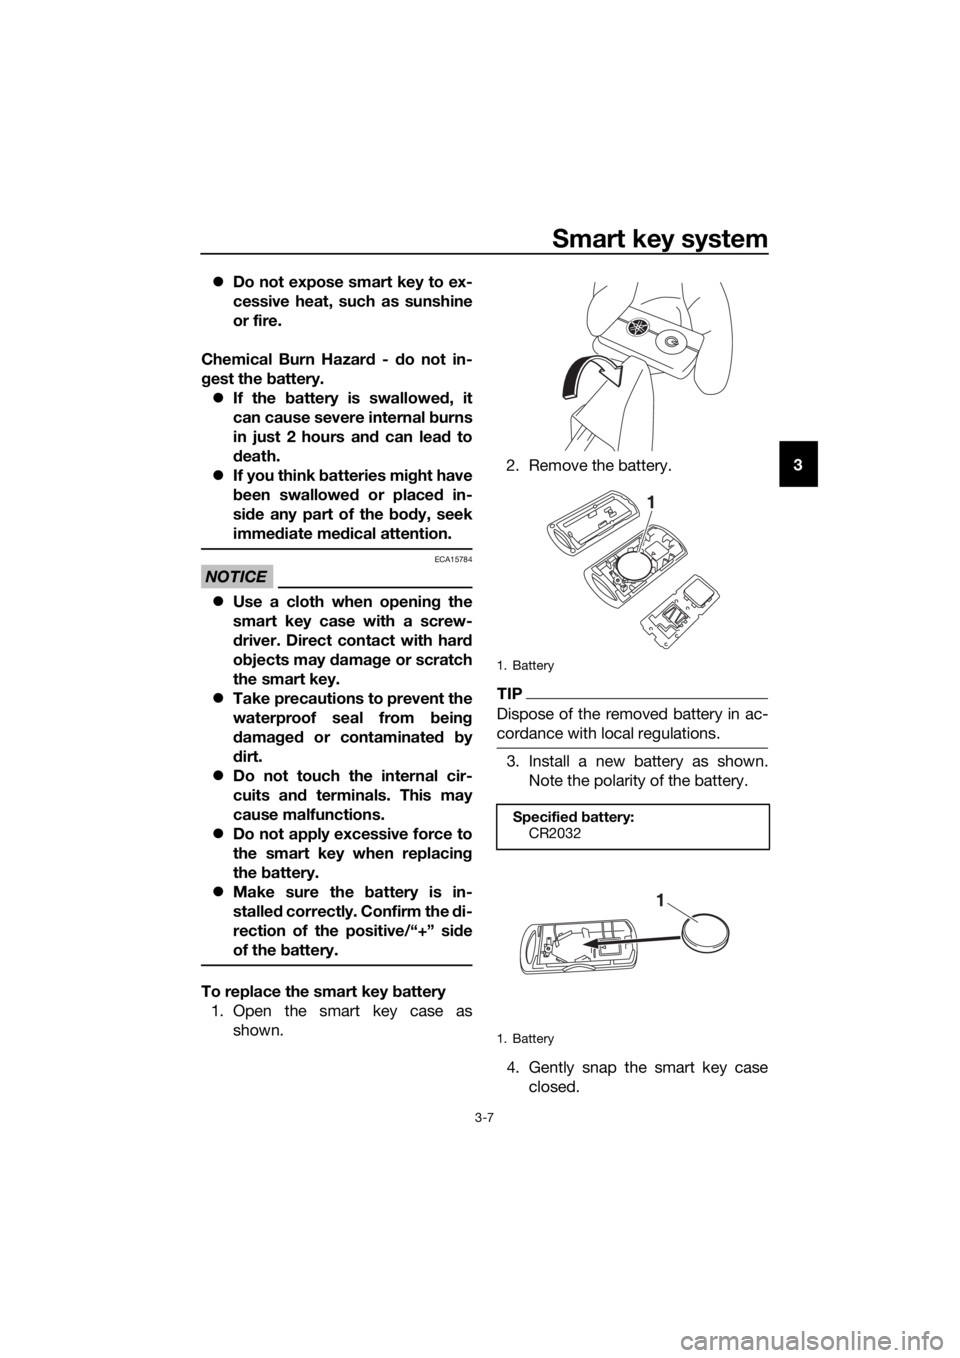
To replace the smart key battery
1. Open the smart key case as
shown.2. Remove the battery.
TIP
Dispose of the removed battery in ac-
cordance with local regulations.
3. Install a new battery as shown.
Note the polarity of the battery.
4. Gently snap the smart key case
closed.
1. Battery
Specified battery:
CR2032
1. Battery
1
1
UBY3E0E0.book Page 7 Friday, September 15, 2017 3:59 PM
Page 22 of 116
Smart key system
3-8
3
EAU76892
Main switch
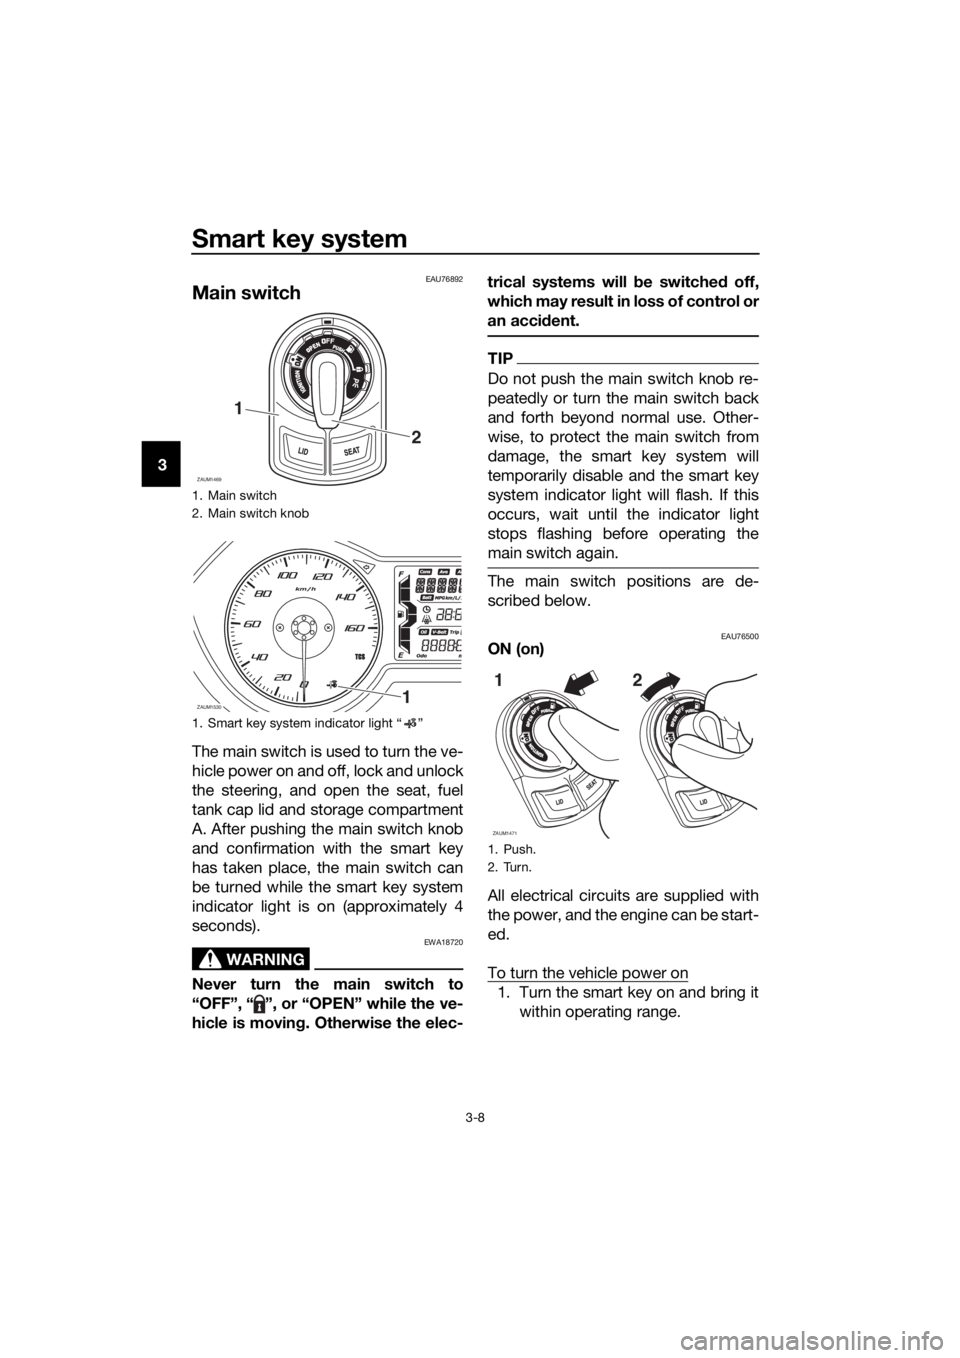
The main switch is used to turn the ve-
hicle power on and off, lock and unlock
the steering, and open the seat, fuel
tank cap lid and storage compartment
A. After pushing the main switch knob
and confirmation with the smart key
has taken place, the main switch can
be turned while the smart key system
indicator light is on (approximately 4
seconds).
WARNING
EWA18720
Never turn the main switch to
“OFF”, “ ”, or “OPEN” while the ve-
hicle is moving. Otherwise the elec-trical systems will be switched off,
which may result in loss of control or
an accident.
TIP
Do not push the main switch knob re-
peatedly or turn the main switch back
and forth beyond normal use. Other-
wise, to protect the main switch from
damage, the smart key system will
temporarily disable and the smart key
system indicator light will flash. If this
occurs, wait until the indicator light
stops flashing before operating the
main switch again.
The main switch positions are de-
scribed below.
EAU76500ON (on)
All electrical circuits are supplied with
the power, and the engine can be start-
ed.
To turn the vehicle power on
1. Turn the smart key on and bring it
within operating range.
1. Main switch
2. Main switch knob
1. Smart key system indicator light “ ”
ZAUM1469
2
1
ZAUM15301
1. Push.
2. Turn.
ZAUM1471
1
2
UBY3E0E0.book Page 8 Friday, September 15, 2017 3:59 PM
Page 23 of 116
Smart key system
3-9
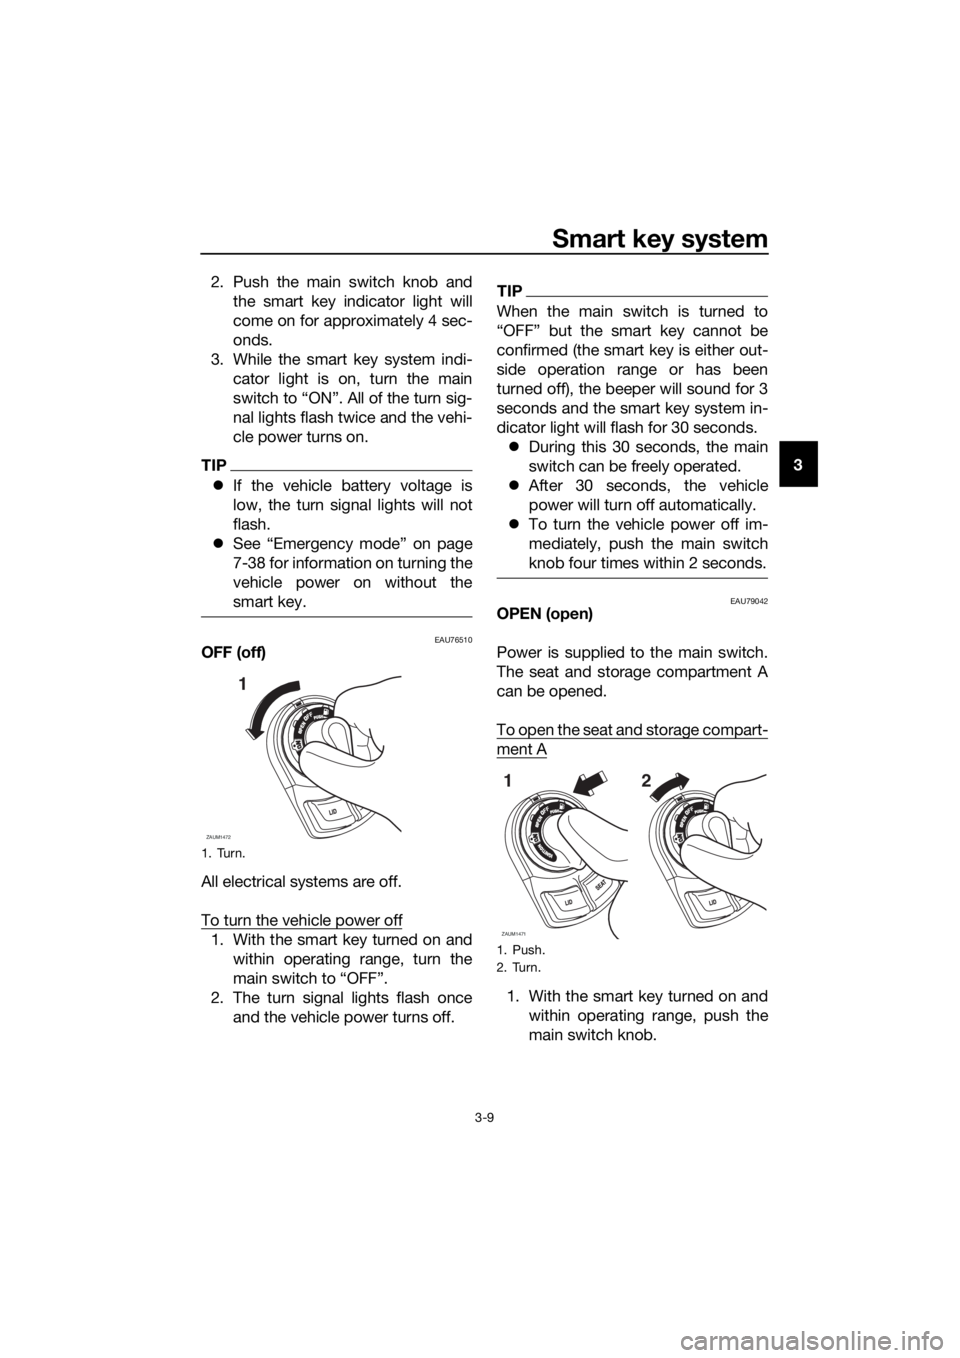
3 2. Push the main switch knob and
the smart key indicator light will
come on for approximately 4 sec-
onds.
3. While the smart key system indi-
cator light is on, turn the main
switch to “ON”. All of the turn sig-
nal lights flash twice and the vehi-
cle power turns on.TIP
If the vehicle battery voltage is
low, the turn signal lights will not
flash.
See “Emergency mode” on page
7-38 for information on turning the
vehicle power on without the
smart key.
EAU76510OFF (off)
All electrical systems are off.
To turn the vehicle power off
1. With the smart key turned on and
within operating range, turn the
main switch to “OFF”.
2. The turn signal lights flash once
and the vehicle power turns off.
TIP
When the main switch is turned to
confirmed (the smart key is either out-
side operation range or has been
turned off), the beeper will sound for 3
seconds and the smart key system in-
dicator light will flash for 30 seconds.
During this 30 seconds, the main
switch can be freely operated.
After 30 seconds, the vehicle
power will turn off automatically.
To turn the vehicle power off im-
mediately, push the main switch
knob four times within 2 seconds.
EAU79042OPEN (open)
Power is supplied to the main switch.
The seat and storage compartment A
can be opened.
To open the seat and storage compart-
ment A
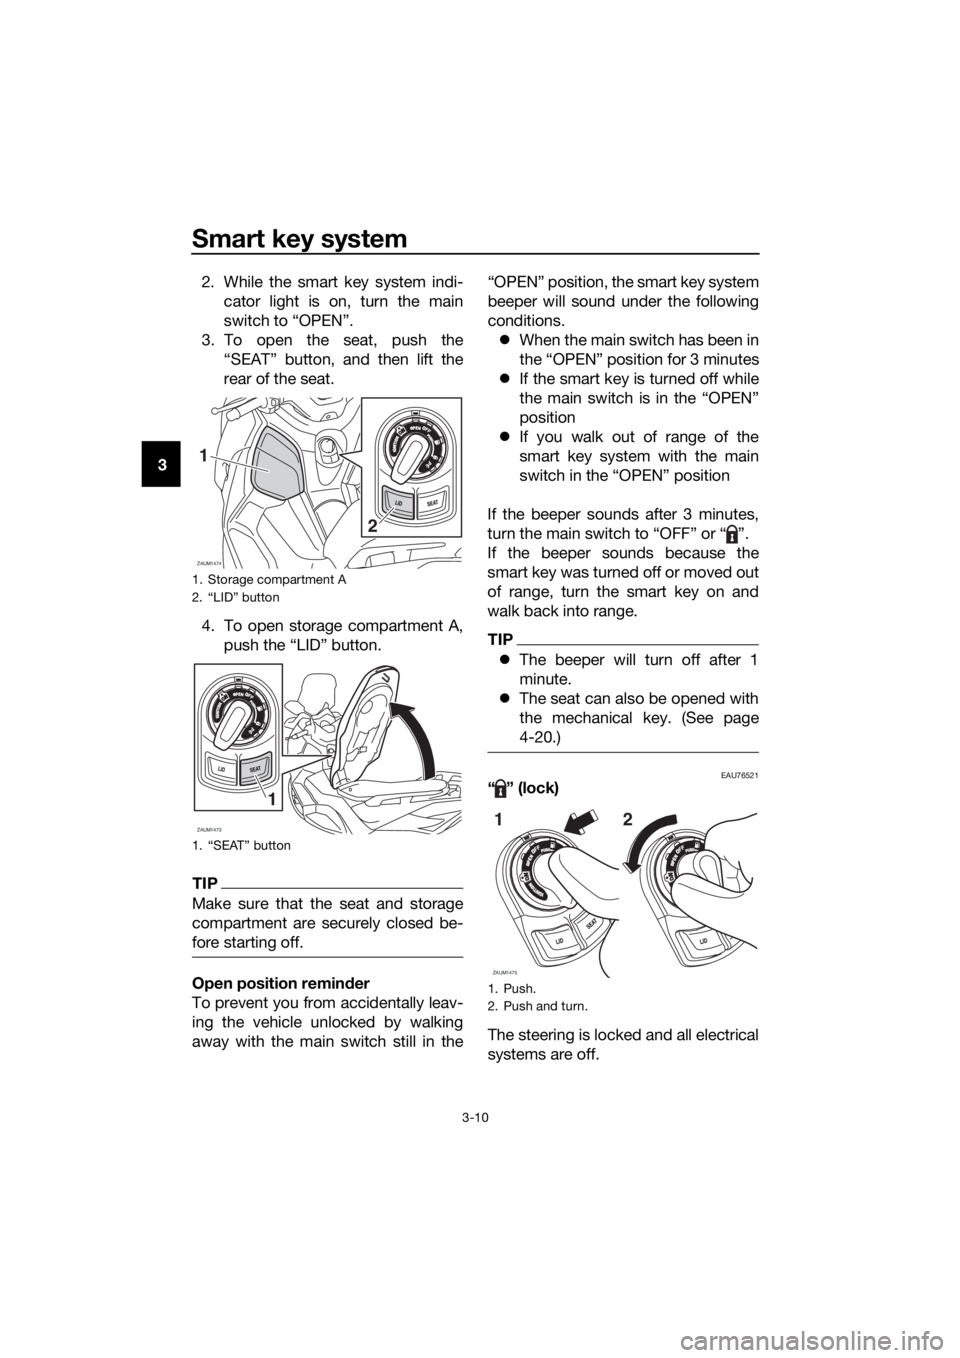
1. With the smart key turned on and
within operating range, push the
main switch knob.
1. Turn.
ZAUM1472
1
1. Push.
2. Turn.
ZAUM1471
1
2
UBY3E0E0.book Page 9 Friday, September 15, 2017 3:59 PM
Page 24 of 116
Smart key system
3-10
32. While the smart key system indi-
cator light is on, turn the main
switch to “OPEN”.
3. To open the seat, push the
“SEAT” button, and then lift the
rear of the seat.
4. To open storage compartment A,
push the “LID” button.
TIP
Make sure that the seat and storage
compartment are securely closed be-
fore starting off.
Open position reminder
To prevent you from accidentally leav-
ing the vehicle unlocked by walking
away with the main switch still in the“OPEN” position, the smart key system
beeper will sound under the following
conditions.
When the main switch has been in
the “OPEN” position for 3 minutes
If the smart key is turned off while
the main switch is in the “OPEN”
position
If you walk out of range of the
smart key system with the main
switch in the “OPEN” position
If the beeper sounds after 3 minutes,
turn the main switch to “OFF” or “ ”.
If the beeper sounds because the
smart key was turned off or moved out
of range, turn the smart key on and
walk back into range.
TIP
The beeper will turn off after 1
minute.
The seat can also be opened with
the mechanical key. (See page
4-20.)
EAU76521“ ” (lock)
The steering is locked and all electrical
systems are off.
1. Storage compartment A
2. “LID” button
1. “SEAT” button
ZAUM1474
1
2
ZAUM1473
1
1. Push.
2. Push and turn.
ZAUM1475
12
UBY3E0E0.book Page 10 Friday, September 15, 2017 3:59 PM
Page 25 of 116
Smart key system
3-11
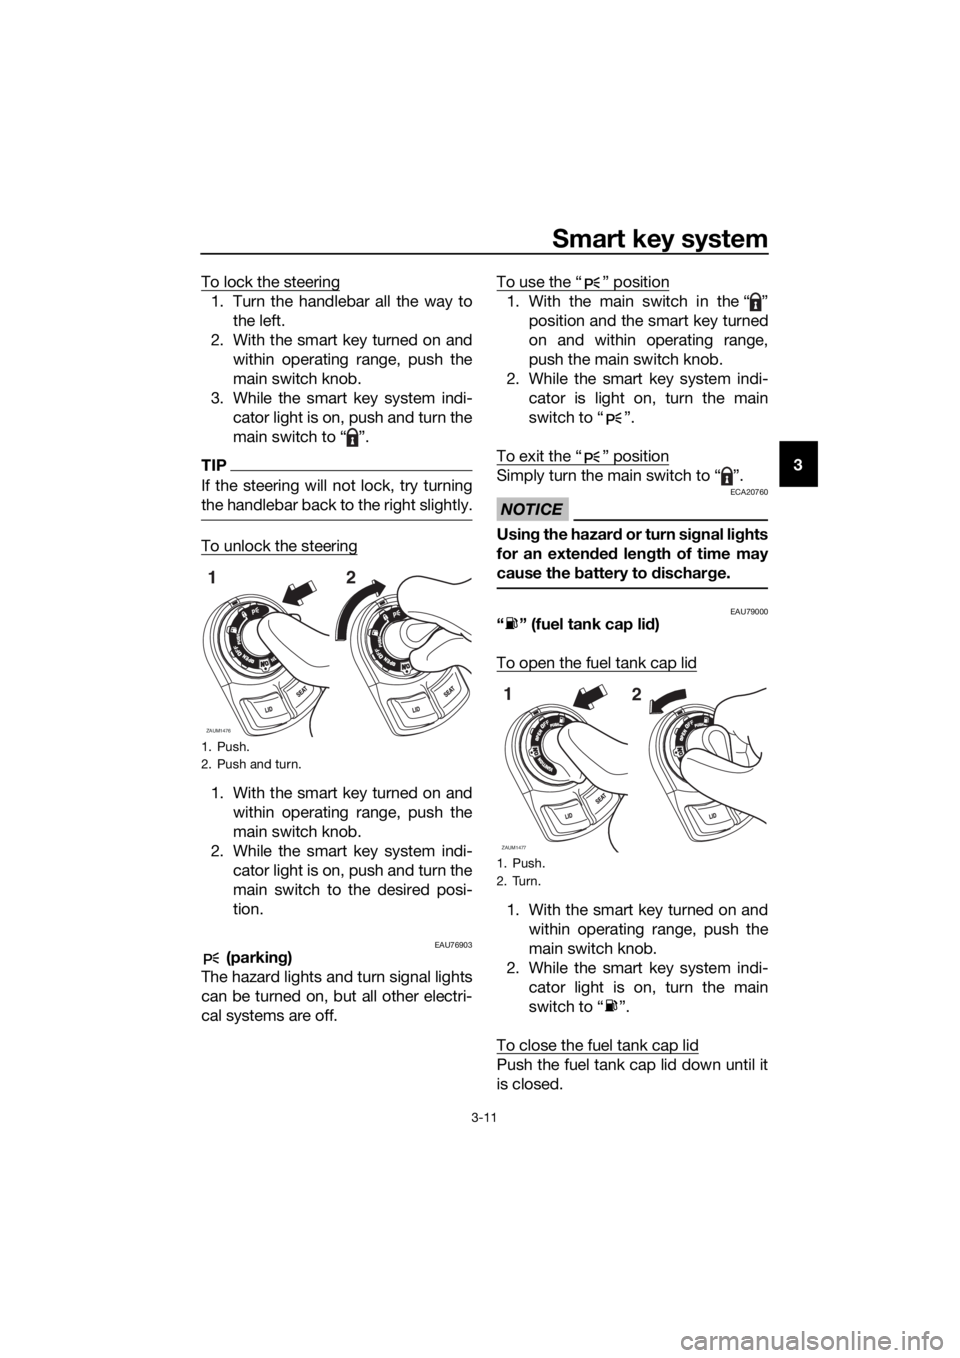
3 To lock the steering
1. Turn the handlebar all the way to
the left.
2. With the smart key turned on and
within operating range, push the
main switch knob.
3. While the smart key system indi-
cator light is on, push and turn the
main switch to “ ”.
TIP
If the steering will not lock, try turning
the handlebar back to the right slightly.
To unlock the steering
1. With the smart key turned on and
within operating range, push the
main switch knob.
2. While the smart key system indi-
cator light is on, push and turn the
main switch to the desired posi-
tion.
EAU76903 (parking)
The hazard lights and turn signal lights
can be turned on, but all other electri-
cal systems are off.To use the “ ” position
1. With the main switch in the “ ”
position and the smart key turned
on and within operating range,
push the main switch knob.
2. While the smart key system indi-
cator is light on, turn the main
switch to “ ”.
To exit the “ ” position
Simply turn the main switch to “ ”.
NOTICE
ECA20760
Using the hazard or turn signal lights
for an extended length of time may
cause the battery to discharge.
EAU79000“ ” (fuel tank cap lid)
To open the fuel tank cap lid
1. With the smart key turned on and
within operating range, push the
main switch knob.
2. While the smart key system indi-
cator light is on, turn the main
switch to “ ”.
To close the fuel tank cap lid
Push the fuel tank cap lid down until it
is closed.
1. Push.
2. Push and turn.
ZAUM1476
12
1. Push.
2. Turn.
ZAUM1477
1
2
UBY3E0E0.book Page 11 Friday, September 15, 2017 3:59 PM
Page 26 of 116

Smart key system
3-12
3
TIP
Make sure that fuel tank cap lid is se-
curely closed before starting off.
UBY3E0E0.book Page 12 Friday, September 15, 2017 3:59 PM
Page 27 of 116
Instrument and control functions
4-1
4
EAU4939D
Indicator lights and warning
lights
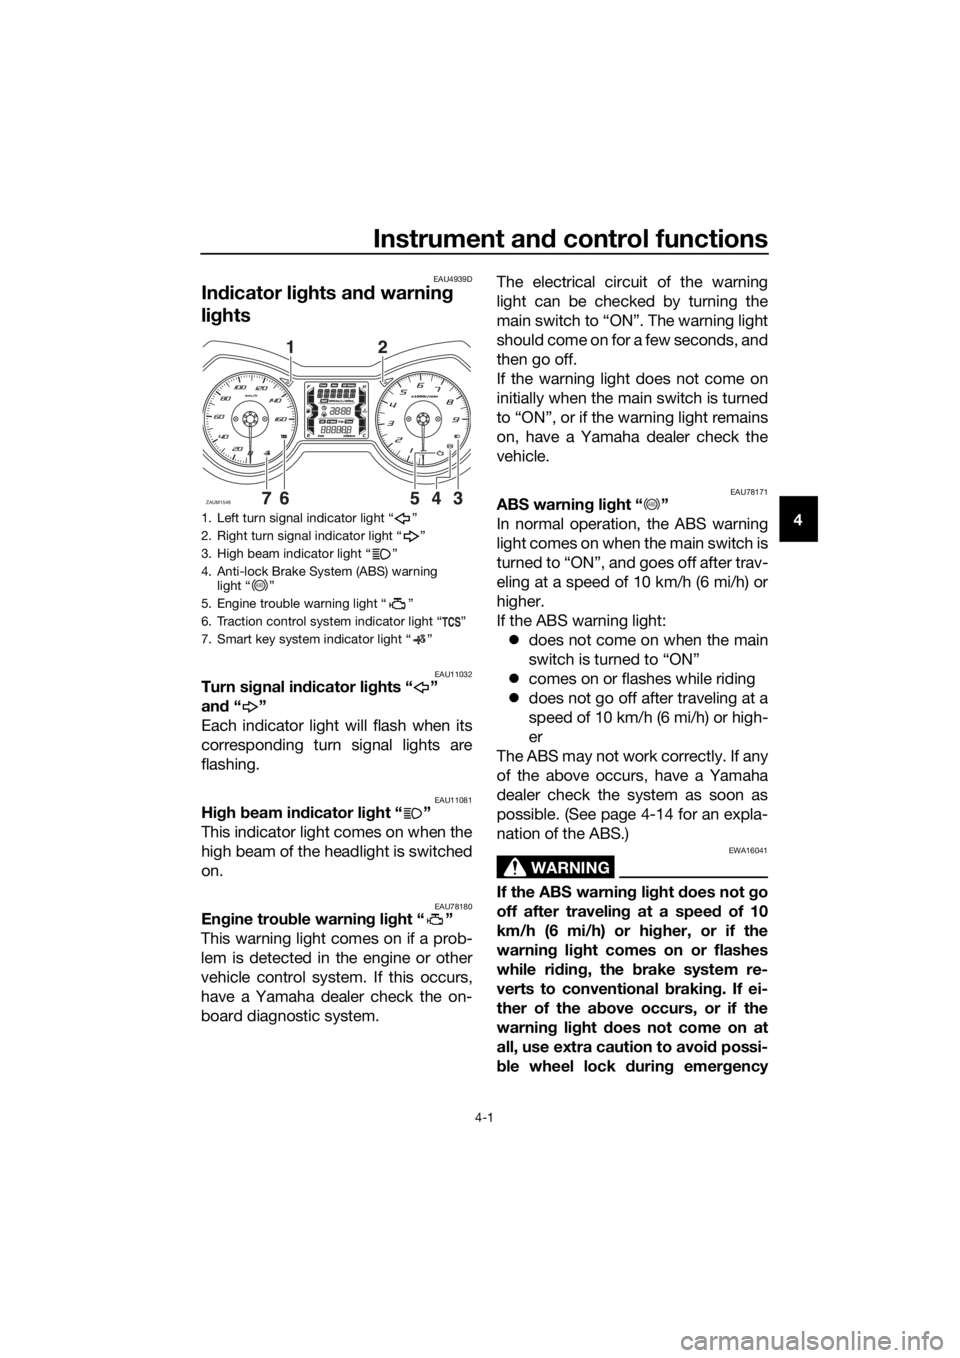
EAU11032Turn signal indicator lights “ ”
and“”
Each indicator light will flash when its
corresponding turn signal lights are
flashing.
EAU11081High beam indicator light “ ”
This indicator light comes on when the
high beam of the headlight is switched
on.
EAU78180Engine trouble warning light “ ”
This warning light comes on if a prob-
lem is detected in the engine or other
vehicle control system. If this occurs,
have a Yamaha dealer check the on-
board diagnostic system.The electrical circuit of the warning
light can be checked by turning the
main switch to “ON”. The warning light
should come on for a few seconds, and
then go off.
If the warning light does not come on
initially when the main switch is turned
to “ON”, or if the warning light remains
on, have a Yamaha dealer check the
vehicle.
EAU78171ABS warning light “ ”
In normal operation, the ABS warning
light comes on when the main switch is
turned to “ON”, and goes off after trav-
eling at a speed of 10 km/h (6 mi/h) or
higher.
If the ABS warning light:
does not come on when the main
switch is turned to “ON”
comes on or flashes while riding
does not go off after traveling at a
speed of 10 km/h (6 mi/h) or high-
er
The ABS may not work correctly. If any
of the above occurs, have a Yamaha
dealer check the system as soon as
possible. (See page 4-14 for an expla-
nation of the ABS.)
WARNING
EWA16041
If the ABS warning light does not go
off after traveling at a speed of 10
km/h (6 mi/h) or higher, or if the
warning light comes on or flashes
while riding, the brake system re-
verts to conventional braking. If ei-
ther of the above occurs, or if the
warning light does not come on at
all, use extra caution to avoid possi-
ble wheel lock during emergency
1. Left turn signal indicator light “ ”
2. Right turn signal indicator light “ ”
3. High beam indicator light “ ”
4. Anti-lock Brake System (ABS) warning
light “ ”
5. Engine trouble warning light “ ”
6. Traction control system indicator light “ ”
7. Smart key system indicator light “ ”
ZAUM1548
12
ABS
ABS
UBY3E0E0.book Page 1 Friday, September 15, 2017 3:59 PM
Page 28 of 116
Instrument and control functions
4-2
4braking. Have a Yamaha dealer
check the brake system and electri-
cal circuits as soon as possible.
TIP
The ABS warning light may come on
while accelerating the engine with the
vehicle on its centerstand, but this
does not indicate a malfunction.
If this happens, turn the main switch off
and then back on again to reset the in-
dicator light.
EAU78591Traction control system indicator
light “TCS”
This indicator light will flash when trac-
tion control has engaged.
If the traction control system is turned
off, this indicator light will come on.
(See page 4-15.)
TIP
When the vehicle is turned on, the light
should come on for a few seconds and
then go off. If the light does not come
on, or if the light remains on, have a
Yamaha dealer check vehicle.
EAU78600Smart key system indicator
light “ ”
This indicator light communicates the
status of the smart key system. When
the smart key system is operating nor-
mally, this indicator light will be off. If
there is an error in the smart key sys-
tem, the indicator light will flash. The
indicator light will also flash when com-
munication between the vehicle and
smart key takes place and when cer-
tain smart key system operations are
carried out.
EAU63544
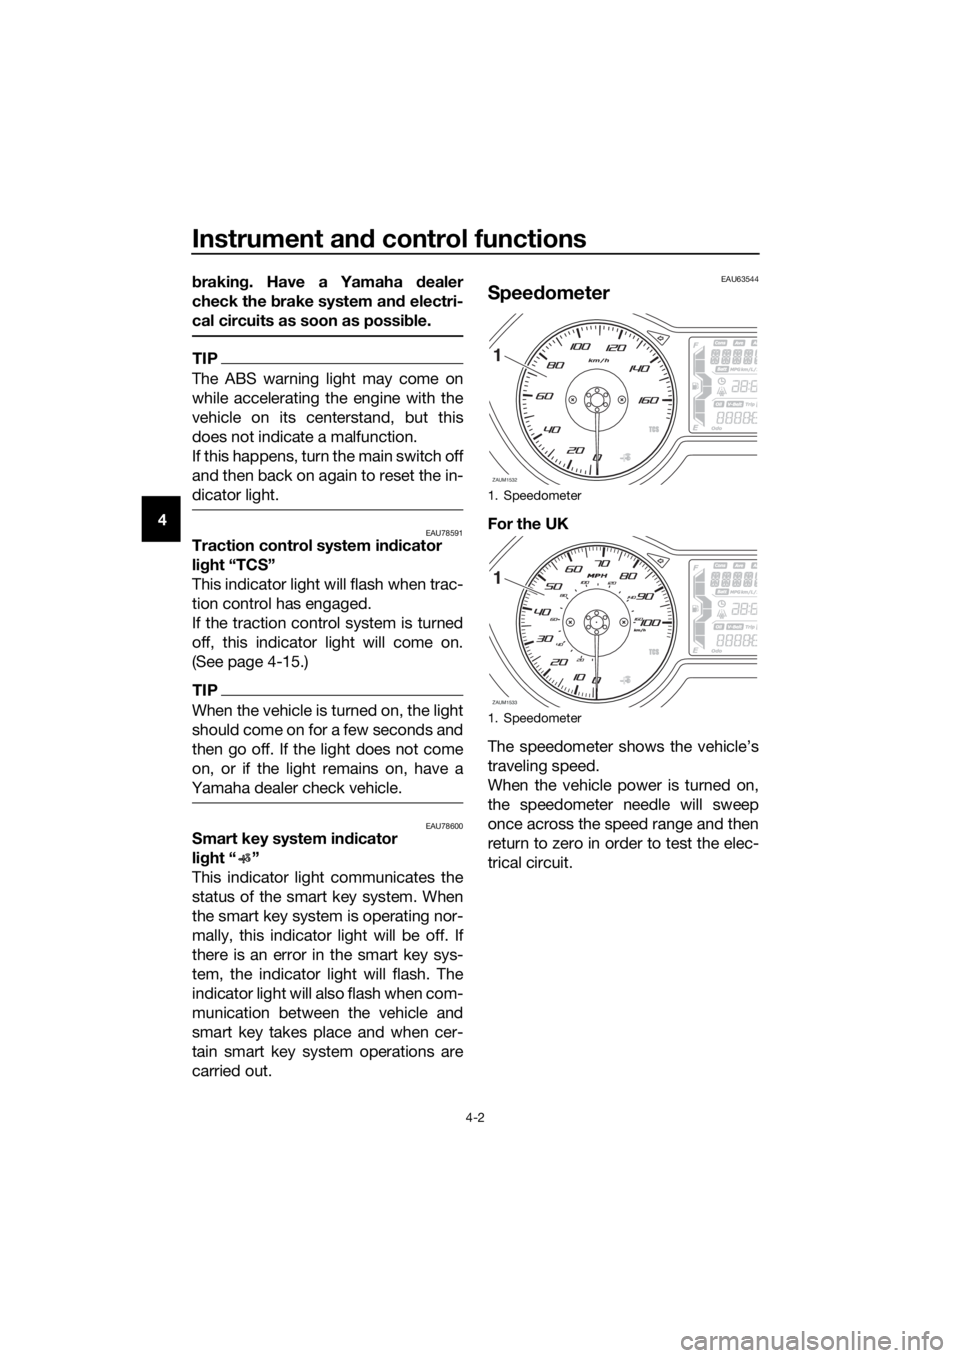
Speedometer
For the UK
The speedometer shows the vehicle’s
traveling speed.
When the vehicle power is turned on,
the speedometer needle will sweep
once across the speed range and then
return to zero in order to test the elec-
trical circuit.
1. Speedometer
1. Speedometer
ZAUM1532
1
ZAUM1533
1
UBY3E0E0.book Page 2 Friday, September 15, 2017 3:59 PM
Page 29 of 116
Instrument and control functions
4-3
4
EAU63551
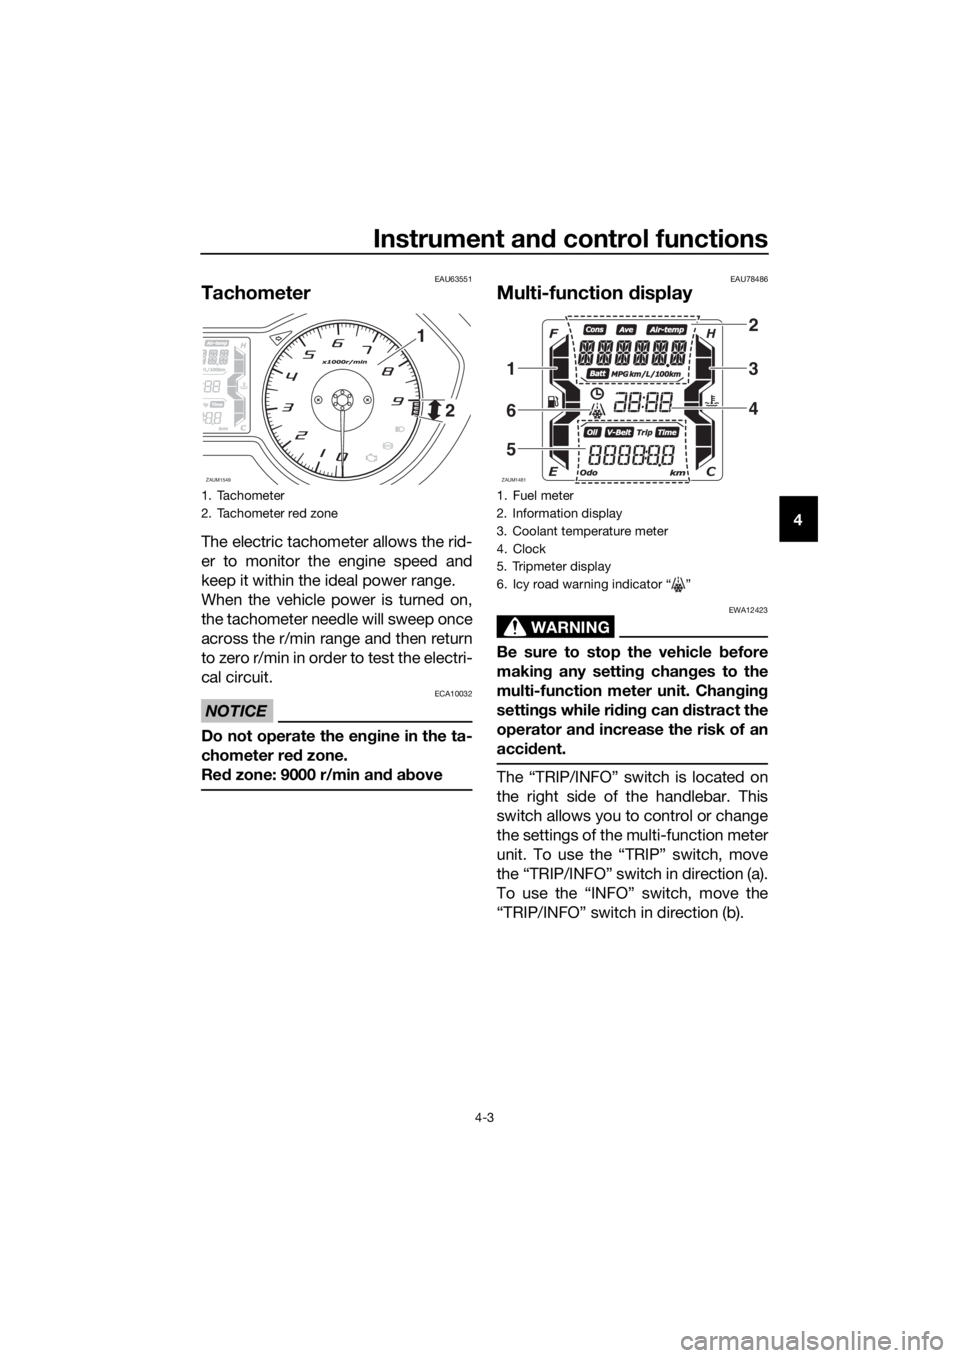
Tachometer
The electric tachometer allows the rid-
er to monitor the engine speed and
keep it within the ideal power range.
When the vehicle power is turned on,
the tachometer needle will sweep once
across the r/min range and then return
to zero r/min in order to test the electri-
cal circuit.
NOTICE
ECA10032
Do not operate the engine in the ta-
chometer red zone.
Red zone: 9000 r/min and above
EAU78486
Multi-function display
WARNING
EWA12423
Be sure to stop the vehicle before
making any setting changes to the
multi-function meter unit. Changing
settings while riding can distract the
operator and increase the risk of an
accident.
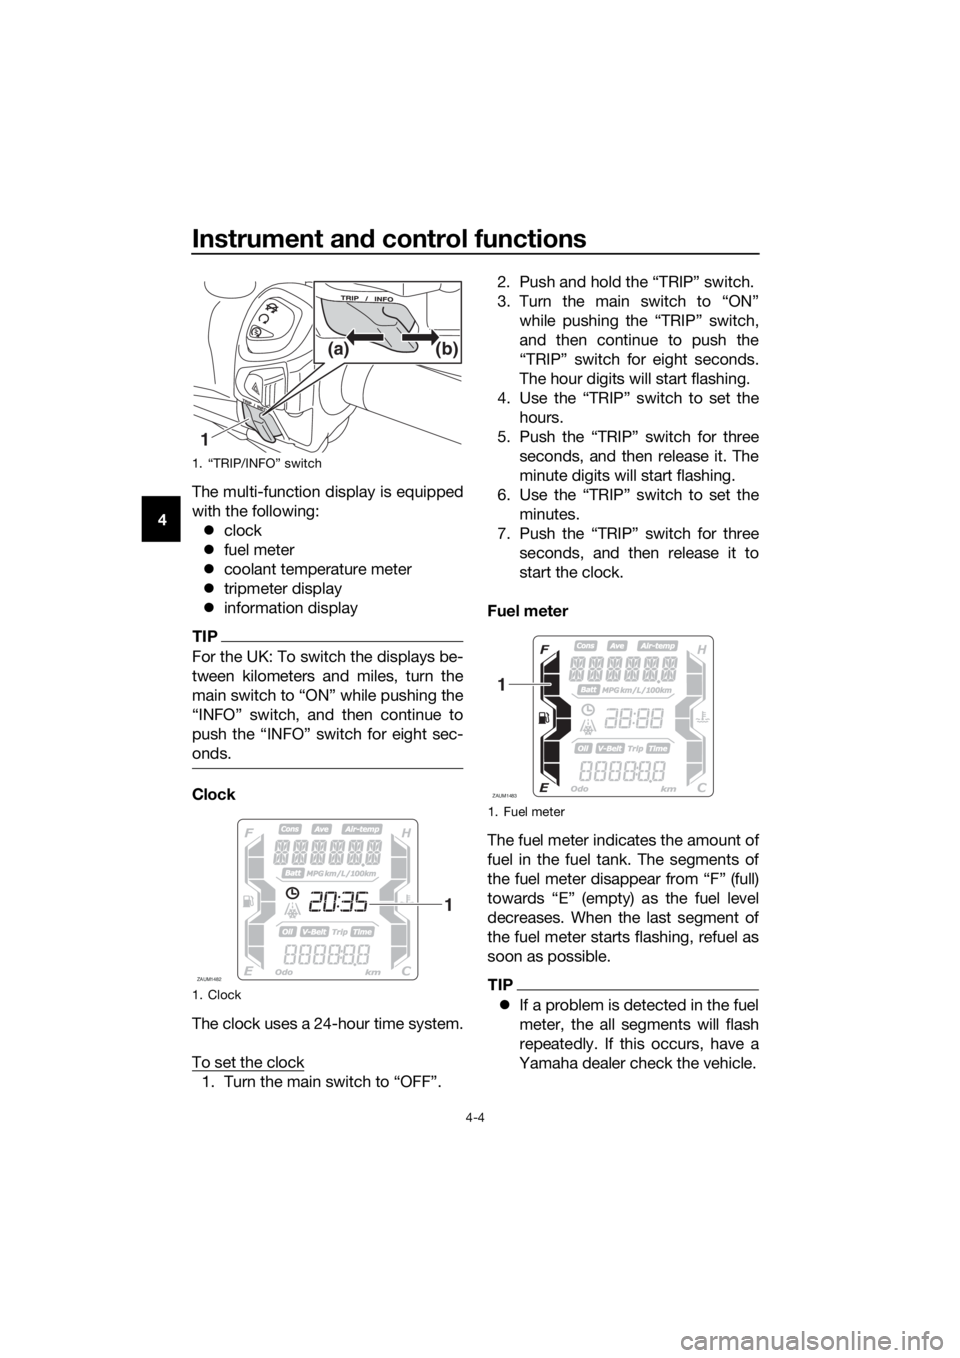
The “TRIP/INFO” switch is located on
the right side of the handlebar. This
switch allows you to control or change
the settings of the multi-function meter
unit. To use the “TRIP” switch, move
the “TRIP/INFO” switch in direction (a).
To use the “INFO” switch, move the
“TRIP/INFO” switch in direction (b).
1. Tachometer
2. Tachometer red zone
ZAUM1549
1
2
1. Fuel meter
2. Information display
3. Coolant temperature meter
4. Clock
5. Tripmeter display
6. Icy road warning indicator Ž
ZAUM1481
2
3
4
1
6
5
UBY3E0E0.book Page 3 Friday, September 15, 2017 3:59 PM
Page 30 of 116
Instrument and control functions
4-4
4The multi-function display is equipped
with the following:
clock
fuel meter
coolant temperature meter
tripmeter display
information display
TIP
For the UK: To switch the displays be-
tween kilometers and miles, turn the
onds.
Clock
The clock uses a 24-hour time system.
To set the clock
1. Turn the main switch to “OFF”.2. Push and hold the “TRIP” switch.
3. Turn the main switch to “ON”
while pushing the “TRIP” switch,
and then continue to push the
“TRIP” switch for eight seconds.
The hour digits will start flashing.
4. Use the “TRIP” switch to set the
hours.
5. Push the “TRIP” switch for three
seconds, and then release it. The
minute digits will start flashing.
6. Use the “TRIP” switch to set the
minutes.
7. Push the “TRIP” switch for three
seconds, and then release it to
start the clock.
Fuel meter
The fuel meter indicates the amount of
fuel in the fuel tank. The segments of
the fuel meter disappear from “F” (full)
towards “E” (empty) as the fuel level
decreases. When the last segment of
the fuel meter starts flashing, refuel as
soon as possible.
TIP
If a problem is detected in the fuel
meter, the all segments will flash
repeatedly. If this occurs, have a
Yamaha dealer check the vehicle.
1. “TRIP/INFO” switch
1. Clock
1(b) (a)
ZAUM1482
1
1. Fuel meter
ZAUM1483
1
UBY3E0E0.book Page 4 Friday, September 15, 2017 3:59 PM