stop start YAMAHA XT1200Z 2019 Owners Manual
[x] Cancel search | Manufacturer: YAMAHA, Model Year: 2019, Model line: XT1200Z, Model: YAMAHA XT1200Z 2019Pages: 118, PDF Size: 3.8 MB
Page 19 of 118

Instrument and control functions
3-5
3
b
rakin g. Have a Yamaha d ealer
check the brake system an d electri-
cal circuits as soon as possi ble.
EAU74082Traction control system in dicator
li g ht “ ”
This indicator light will flash when trac-
tion control has engaged.
If the traction control system is turned
off, this indicator light will come on.
TIP
When the vehicle is turned on, the light
should come on for a few seconds and
then go off. If the light does not come
on, or if the light remains on, have a
Yamaha dealer check the vehicle.
EAU73120Immo bilizer system in dicator
li g ht “ ”
When the key is turned to “OFF” and
30 seconds have passed, the indicator
light will flash steadily to indicate the
immobilizer system is enabled. After 24
hours have passed, the indicator light
will stop flashing, however the immobi-
lizer system is still enabled.
The electrical circuit of the indicator
light can be checked by turning the key
to “ON”. The indicator light should
come on for a few seconds, and then
go off.
If the indicator light does not come on
initially when the key is turned to “ON”,
if the indicator light remains on, or if the
indicator light flashes in a pattern (if a
problem is detected in the immobilizer
system, the immobilizer system indica-
tor light will flash in a pattern), have a
Yamaha dealer check the vehicle.
TIP
If the immobilizer system indicator light
flashes in the pattern, slowly 5 times
then quickly 2 times, this could be
caused by transponder interference. If
this occurs, try the following.
1. Make sure there are no other im- mobilizer keys close to the main
switch. Other immobilizer system
keys may cause signal interfer-
ence and prevent the engine from
starting.
2. Use the code re-registering key to start the engine.
3. If the engine starts, turn it off, and try starting the engine with the
standard keys.
4. If one or both of the standard keys do not start the engine, take the
vehicle and all 3 keys to a Yamaha
dealer to have the standard keys
re-registered.
UBP8E1E0.book Page 5 Friday, September 14, 2018 11:35 AM
Page 22 of 118

Instrument and control functions
3-8
3
WARNING
EWA16351
It is d angerous to use the resume
function when the previously set
cruisin g speed is too hi gh for current
con ditions.
TIP
Pushing the power switch while the
system is operating will turn the system
off completely and erase the previously
set cruising speed. You will not be able
to use the resume function until a new
cruising speed has been set.
Automatic deactivation of the cruise
control system
The cruise control system for this mod-
el is electronically controlled and is
linked with the other control systems.
The cruise control system will auto-
matically become deactivated under
the following conditions:
The cruise control system is not
able to maintain the set cruising
speed.
Wheel slip or wheel spin is detect-
ed. (If the traction control system
has not been turned off, the trac-
tion control system will work.)
The start/engine stop switch is set
to the “ ” position.
The engine stalls.
The sidestand is lowered.
When traveling with a set cruising
speed, if the cruise control system is
deactivated under the above condi-
tions, the “ ” indicator light will go off
and the “SET” indicator light will flash
for 4 seconds, and then go off. When not traveling with a set cruising
speed, if the start/engine stop switch is
set to the “ ” position, the engine
stalls, or the sidestand is lowered, then
the “ ” indicator light will go off (the
“SET” indicator light will not flash).
If the cruise control system is automat-
ically deactivated, please stop and
confirm that your vehicle is in good op-
erating condition.
Before using the cruise control system
again, activate it using the power
switch.
TIP
In some cases, the cruise control sys-
tem may not be able to maintain the set
cruising speed when the vehicle is
traveling uphill or downhill.
When the vehicle is traveling up-
hill, the actual traveling speed may
become lower than the set cruis-
ing speed. If this occurs, acceler-
ate to the desired traveling speed
using the throttle.
When the vehicle is traveling
downhill, the actual traveling
speed may become higher than
the set cruising speed. If this oc-
curs, the setting switch cannot be
used to adjust the set cruising
speed. To reduce the traveling
speed, apply the brakes. When
the brakes are applied, the cruise
control system will become deac-
tivated.
UBP8E1E0.book Page 8 Friday, September 14, 2018 11:35 AM
Page 24 of 118
Instrument and control functions
3-10
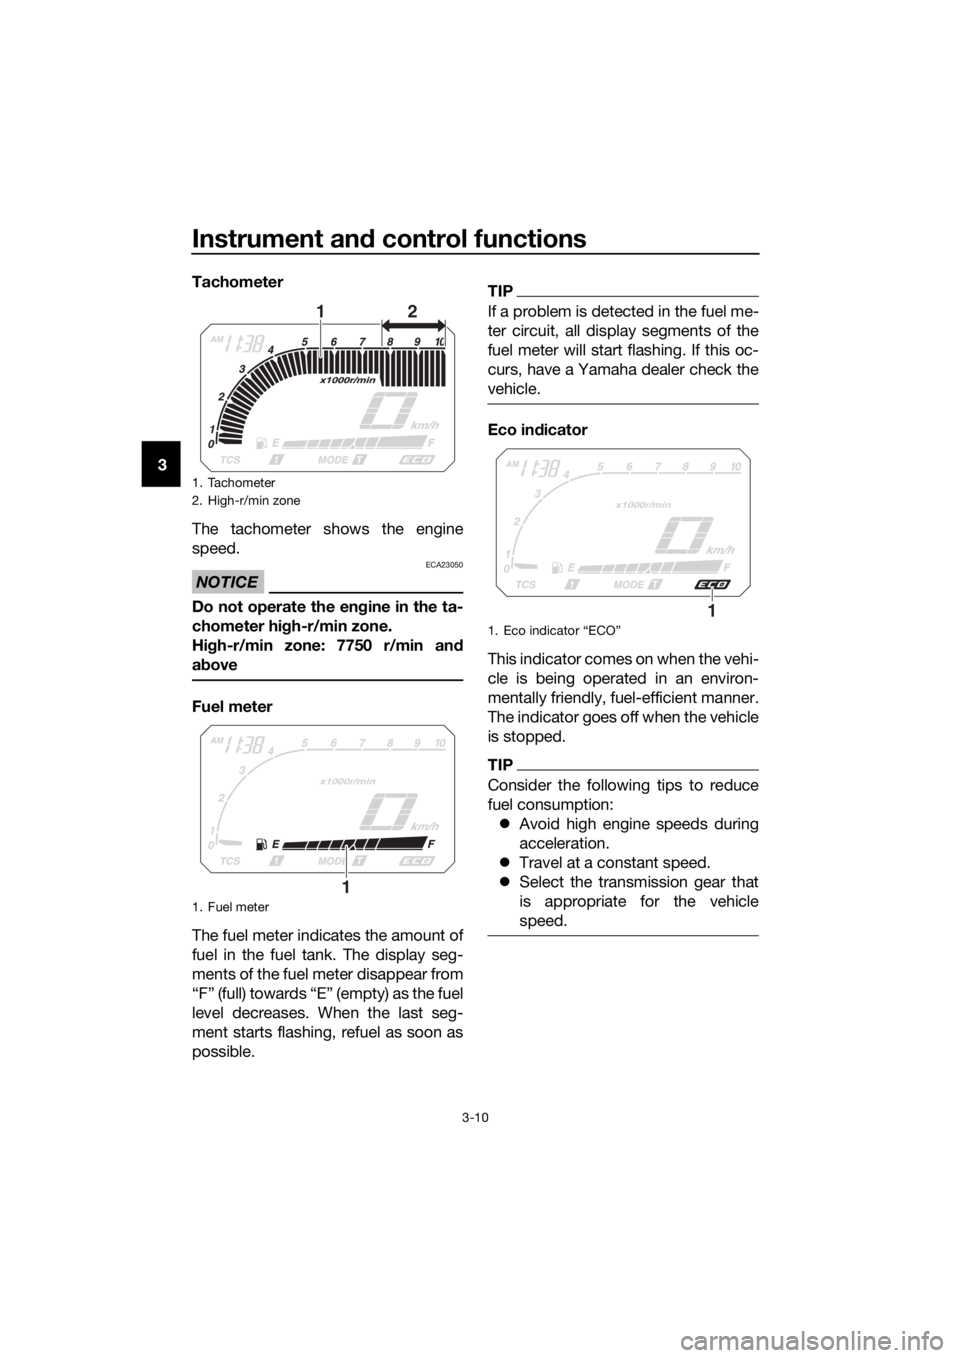
3 Tachometer
The tachometer shows the engine
speed.
NOTICE
ECA23050
Do not operate the en
gine in the ta-
chometer hi gh-r/min zone.
Hi gh-r/min zone: 7750 r/min an d
a b ove
Fuel meter
The fuel meter indicates the amount of
fuel in the fuel tank. The display seg-
ments of the fuel meter disappear from
“F” (full) towards “E” (empty) as the fuel
level decreases. When the last seg-
ment starts flashing, refuel as soon as
possible.
TIP
If a problem is detected in the fuel me-
ter circuit, all display segments of the
fuel meter will start flashing. If this oc-
curs, have a Yamaha dealer check the
vehicle.
Eco in dicator
This indicator comes on when the vehi-
cle is being operated in an environ-
mentally friendly, fuel-efficient manner.
The indicator goes off when the vehicle
is stopped.
TIP
Consider the following tips to reduce
fuel consumption: Avoid high engine speeds during
acceleration.
Travel at a constant speed.
Select the transmission gear that
is appropriate for the vehicle
speed.
1. Tachometer
2. High-r/min zone
1. Fuel meter
12
1
1. Eco indicator “ECO”
1
UBP8E1E0.book Page 10 Friday, September 14, 2018 11:35 AM
Page 28 of 118
Instrument and control functions
3-14
3
“km/L” shows the number of kilo-
meters traveled on one liter of fuel.
“L/100km” shows how many liters
of fuel is needed to travel 100 km.
“MPG” shows the number of miles
traveled per Imp.gallon of fuel.
TIP
See “Selecting the units” on page 3-16
to change the kilometer-based fuel
consumption units or to switch to
miles.
To reset the average fuel consumption,
push the “RESET” button briefly so
that the average fuel consumption dis-
play flashes, and then push and hold
the “RESET” button for 2 seconds.
TIP
After resetting the average fuel con-
sumption, “_ _._” will be shown until
the vehicle has traveled 1 km (0.6 mi).
NOTICE
ECA15474
If there is a malfunction, “– –.–” will
be continuously displaye d. Have a
Yamaha dealer check the vehicle.
Instantaneous fuel consumption:
This function calculates the instanta-
neous fuel consumption under current
riding conditions. The instantaneous
fuel consumption can be displayed as
“km/L”, “L/100km” or “MPG”.
“km/L” shows the number of kilo-
meters traveled on one liter of fuel.
“L/100km” shows how many liters
of fuel is needed to travel 100 km.
“MPG” shows the number of miles
traveled per Imp.gallon of fuel.
TIP
See “Selecting the units” on page
3-16 to change the kilometer-
based fuel consumption units or
to switch to miles.
When traveling under 10 km/h (6
mi/h), “_ _._” will be displayed.
NOTICE
ECA15474
If there is a malfunction, “– –.–” will
be continuously displaye d. Have a
Yamaha dealer check the vehicle.
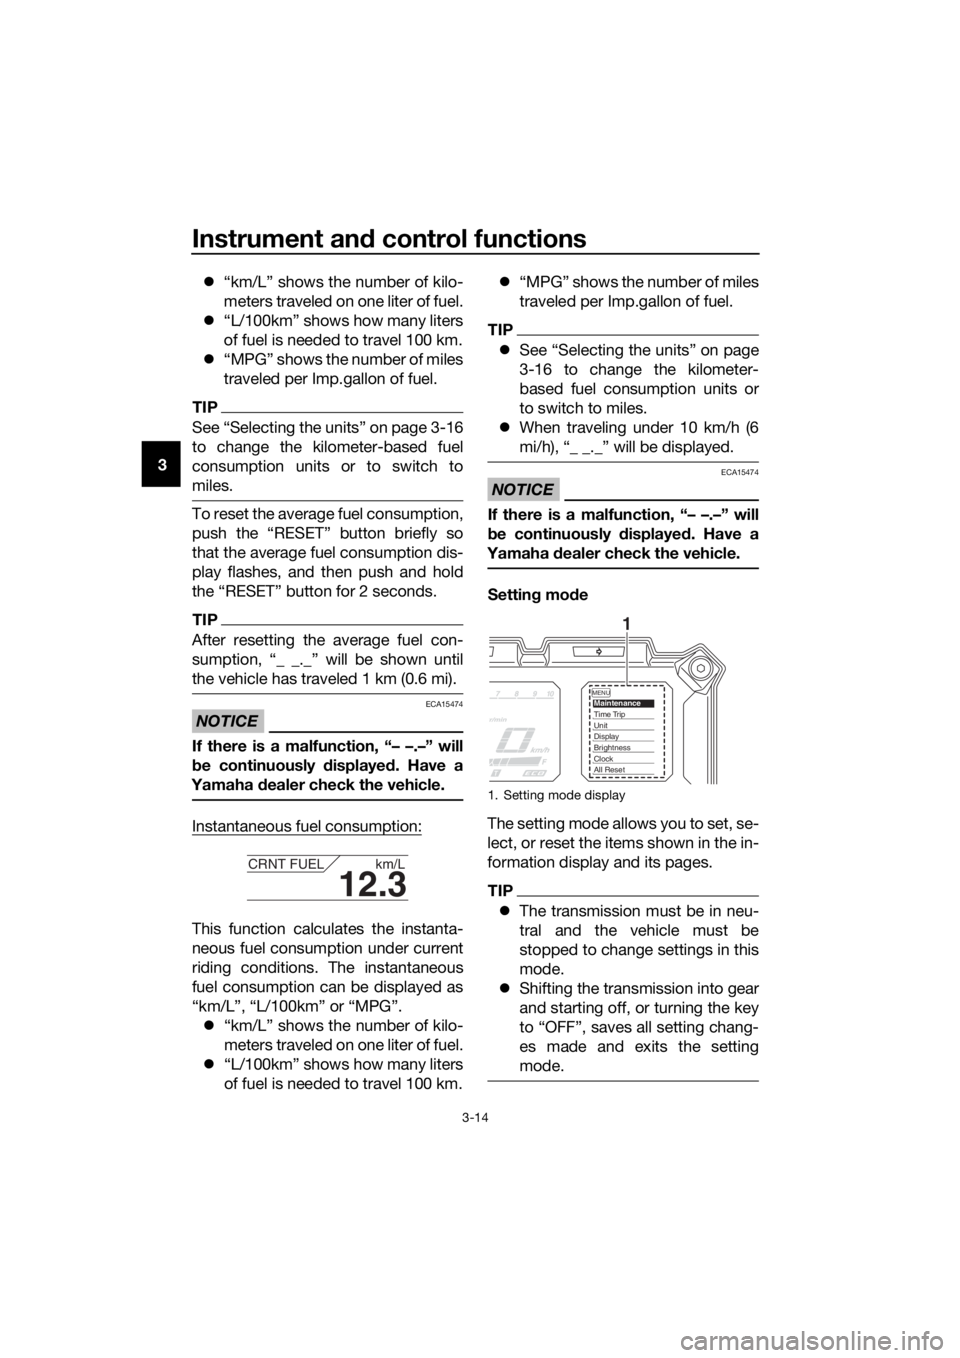
Settin g mo de
The setting mode allows you to set, se-
lect, or reset the items shown in the in-
formation display and its pages.
TIP
The transmission must be in neu-
tral and the vehicle must be
stopped to change settings in this
mode.
Shifting the transmission into gear
and starting off, or turning the key
to “OFF”, saves all setting chang-
es made and exits the setting
mode.
12.3
CRNT FUEL km/L
1. Setting mode display
MENUMaintenanceTime TripUnitDisplayBrightnessClockAll Reset
1
UBP8E1E0.book Page 14 Friday, September 14, 2018 11:35 AM
Page 34 of 118
Instrument and control functions
3-20
3
EAU1234M
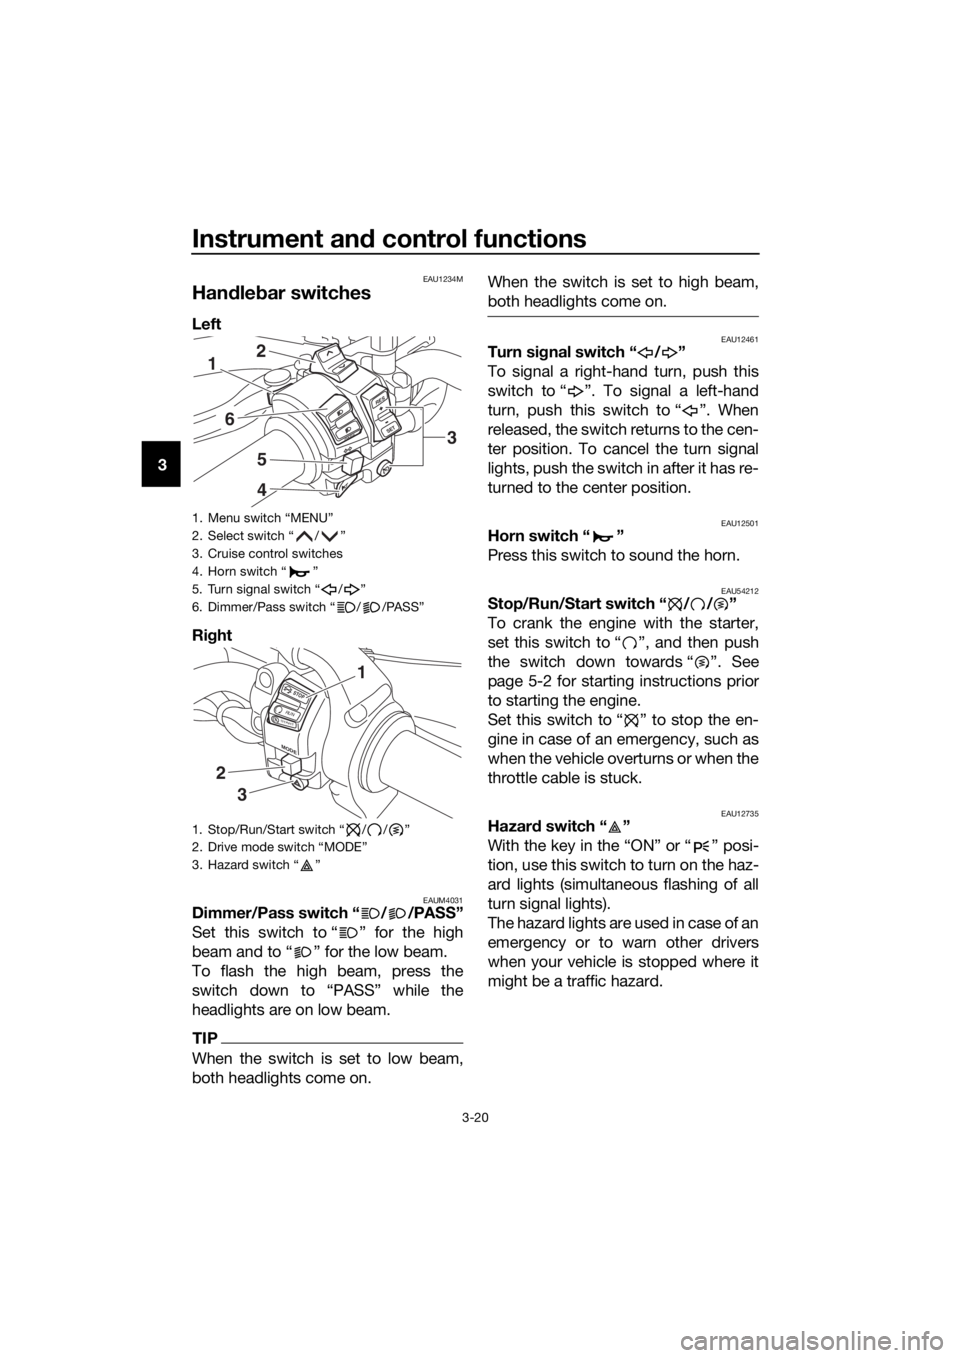
Han dle bar switches
Left
Ri ght
EAUM4031Dimmer/Pass switch “ / /PASS”
Set this switch to “ ” for the high
beam and to “ ” for the low beam.
To flash the high beam, press the
switch down to “PASS” while the
headlights are on low beam.
TIP
When the switch is set to low beam,
both headlights come on. When the switch is set to high beam,
both headlights come on.
EAU12461Turn si
gnal switch “ / ”
To signal a right-hand turn, push this
switch to “ ”. To signal a left-hand
turn, push this switch to “ ”. When
released, the switch returns to the cen-
ter position. To cancel the turn signal
lights, push the switch in after it has re-
turned to the center position.
EAU12501Horn switch “ ”
Press this switch to sound the horn.
EAU54212Stop/Run/Start switch “ / / ”
To crank the engine with the starter,
set this switch to “ ”, and then push
the switch down towards “ ”. See
page 5-2 for starting instructions prior
to starting the engine.
Set this switch to “ ” to stop the en-
gine in case of an emergency, such as
when the vehicle overturns or when the
throttle cable is stuck.
EAU12735Hazar d switch “ ”
With the key in the “ON” or “ ” posi-
tion, use this switch to turn on the haz-
ard lights (simultaneous flashing of all
turn signal lights).
The hazard lights are used in case of an
emergency or to warn other drivers
when your vehicle is stopped where it
might be a traffic hazard.
1. Menu switch “MENU”
2. Select switch “ / ”
3. Cruise control switches
4. Horn switch “ ”
5. Turn signal switch “ / ”
6. Dimmer/Pass switch “ / /PASS”
1. Stop/Run/Start switch “ / / ”
2. Drive mode switch “MODE”
3. Hazard switch “ ”
R ES
SETPA S S
1
6
5
4
2
3
MODE
STOP
RUNSTA R
T
3
2
1
UBP8E1E0.book Page 20 Friday, September 14, 2018 11:35 AM
Page 37 of 118
Instrument and control functions
3-23
3
EAU4951B
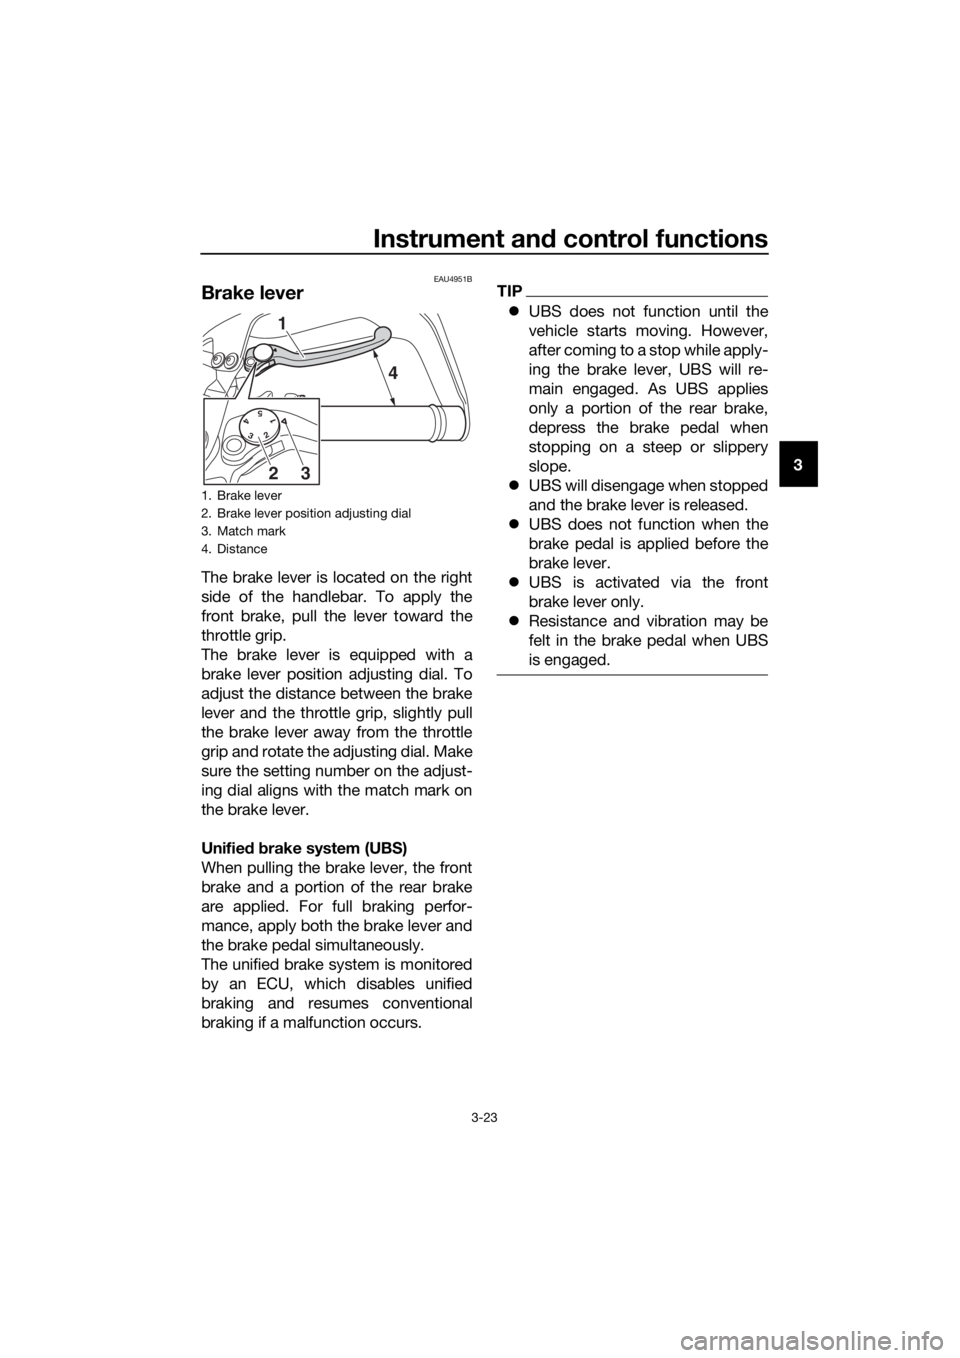
Brake lever
The brake lever is located on the right
side of the handlebar. To apply the
front brake, pull the lever toward the
throttle grip.
The brake lever is equipped with a
brake lever position adjusting dial. To
adjust the distance between the brake
lever and the throttle grip, slightly pull
the brake lever away from the throttle
grip and rotate the adjusting dial. Make
sure the setting number on the adjust-
ing dial aligns with the match mark on
the brake lever.
Unifie d b rake system (UBS)
When pulling the brake lever, the front
brake and a portion of the rear brake
are applied. For full braking perfor-
mance, apply both the brake lever and
the brake pedal simultaneously.
The unified brake system is monitored
by an ECU, which disables unified
braking and resumes conventional
braking if a malfunction occurs.
TIP
UBS does not function until the
vehicle starts moving. However,
after coming to a stop while apply-
ing the brake lever, UBS will re-
main engaged. As UBS applies
only a portion of the rear brake,
depress the brake pedal when
stopping on a steep or slippery
slope.
UBS will disengage when stopped
and the brake lever is released.
UBS does not function when the
brake pedal is applied before the
brake lever.
UBS is activated via the front
brake lever only.
Resistance and vibration may be
felt in the brake pedal when UBS
is engaged.
1. Brake lever
2. Brake lever position adjusting dial
3. Match mark
4. Distance
5 4 3 2 1
1
4
32
UBP8E1E0.book Page 23 Friday, September 14, 2018 11:35 AM
Page 54 of 118
Instrument and control functions
3-40
3
EAU15306
Si destan d
The sidestand is located on the left
side of the frame. Raise the sidestand
or lower it with your foot while holding
the vehicle upright.
TIP
The built-in sidestand switch is part of
the ignition circuit cut-off system,
which cuts the ignition in certain situa-
tions. (See the following section for an
explanation of the ignition circuit cut-
off system.)
WARNING
EWA10242
The vehicle must not be ri dden with
the si destan d d own, or if the si de-
stan d cannot b e properly move d up
(or does not stay up), otherwise the
si destan d coul d contact the groun d
an d d istract the operator, resultin g
in a possi ble loss of control.
Yamaha’s i gnition circuit cut-off
system has been desi gne d to assist
the operator in fulfillin g the respon-
si bility of raisin g the si destan d b e-
fore startin g off. Therefore, check
this system re gularly an d have a
Yamaha dealer repair it if it does not
function properly.
EAU83150
I g nition circuit cut-off system
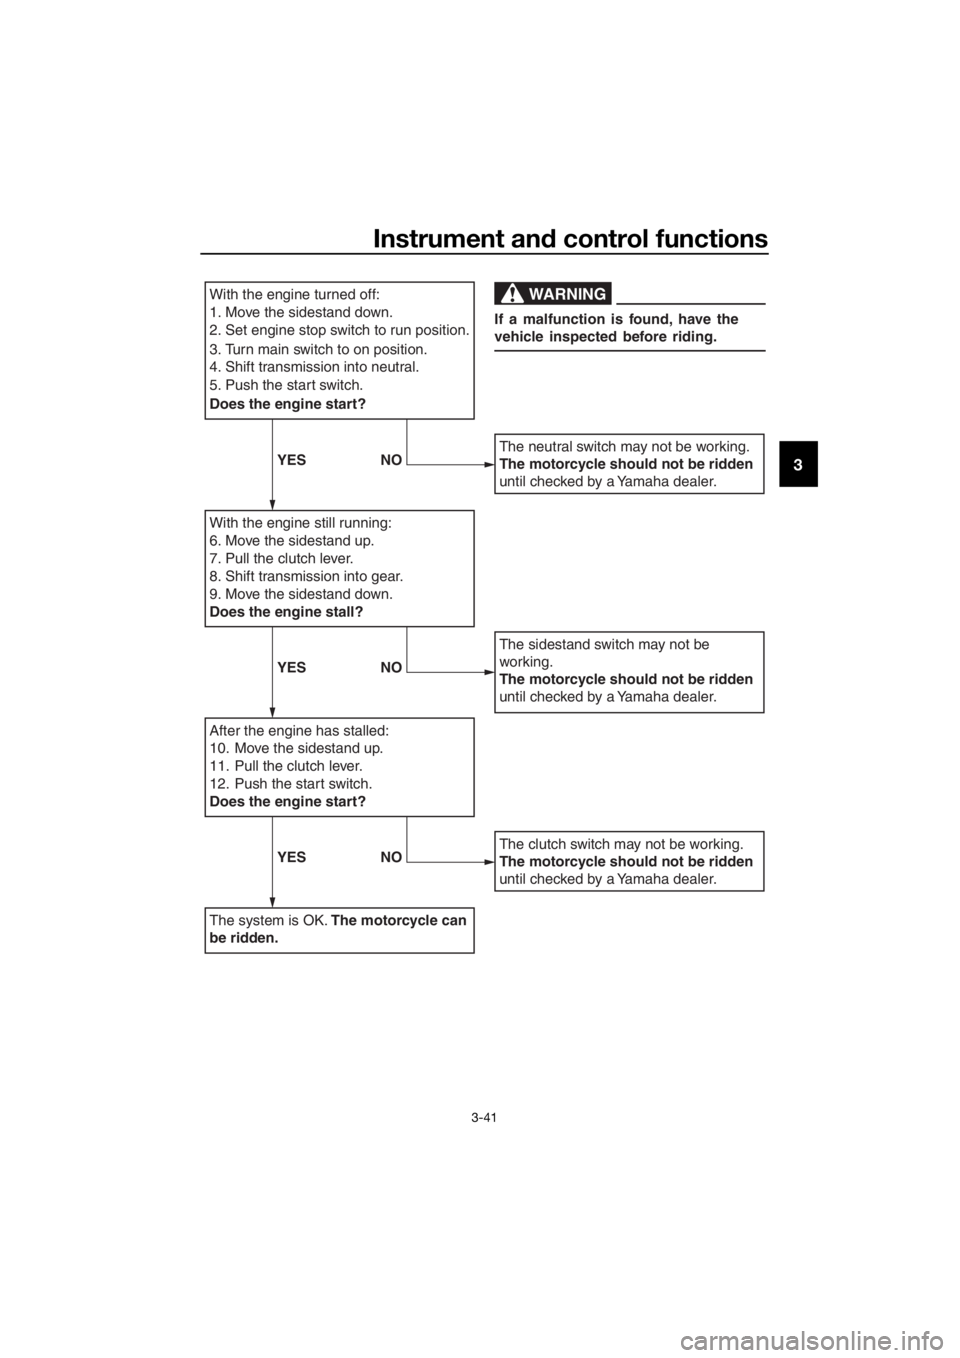
This system prevents in-gear engine
starts unless the clutch lever is pulled
and the sidestand is up. Also, it will
stop the running engine should the
sidestand be lowered while the trans-
mission is in gear.
Periodically check the system via the
following procedure.
TIP
This check is most reliable if per-
formed with a warmed-up engine.
See pages 3-2 and 3-20 for switch
operation information.
UBP8E1E0.book Page 40 Friday, September 14, 2018 11:35 AM
Page 55 of 118
Instrument and control functions
3-41
3
With the engine turned off:
1. Move the sidestand down.
2. Set engine stop switch to run position.
3. Turn main switch to on position.
4. Shift transmission into neutral.
5. Push the start switch.
Does the engine start?
With the engine still running:
6. Move the sidestand up.
7. Pull the clutch lever.
8. Shift transmission into gear.
9. Move the sidestand down.
Does the engine stall?
After the engine has stalled:
10. Move the sidestand up.
11. Pull the clutch lever.
12. Push the start switch.
Does the engine start?
The system is OK. The motorcycle can
be ridden.
The neutral switch may not be working.
The motorcycle should not be ridden
until checked by a Yamaha dealer.
The sidestand switch may not be
working.
The motorcycle should not be ridden
until checked by a Yamaha dealer.
The clutch switch may not be working.
The motorcycle should not be ridden
until checked by a Yamaha dealer.
WARNING
If a malfunction is found, have the
vehicle inspected before riding.
YES NO
YESNO
YESNO
UBP8E1E0.book Page 41 Friday, September 14, 2018 11:35 AM
Page 58 of 118

Operation and important rid ing points
5-1
5
EAU15952
Read the Owner’s Manual carefully to
become familiar with all controls. If
there is a control or function you do not
understand, ask your Yamaha dealer.
WARNING
EWA10272
Failure to familiarize yourself with
the controls can lea d to loss of con-
trol, which coul d cause an acci dent
or injury.
EAU73451
TIP
This model is equipped with: a lean angle sensor to stop the en-
gine in case of turnover. Turn the
main switch off once before at-
tempting to restart the engine.
Failing to do so will prevent the en-
gine from starting, even though
the engine will crank when the
start switch is pushed.
an engine auto-stop system. The
engine stops automatically if left
idling for 20 minutes. In this case,
simply push the start switch to re-
start the engine.
UBP8E1E0.book Page 1 Friday, September 14, 2018 11:35 AM
Page 59 of 118
Operation and important ri din g points
5-2
5
EAU54174
Startin g the eng ine
In order for the ignition circuit cut-off
system (page 3-40) to enable starting,
one of the following conditions must be
met:
the transmission is in neutral.
the clutch lever is pulled and the
sidestand up.
To start the engine
1. Turn the main switch to “ON” and set the engine stop switch to “ ”.
2. Confirm the following lights come on for a few seconds, and then go
off. Oil level warning light
Engine trouble warning light
TCS indicator light
Cruise control indicator lights
Immobilizer system indicator
light
ABS warning light
Neutral indicator light
TIP
The ABS warning light should go
off when the vehicle reaches a
traveling speed of 10 km/h (6
mi/h).
The neutral indicator light should
be on when the transmission is in
neutral.
NOTICE
ECA24110
If a warnin g or in dicator li ght does
not work as descri bed a bove, have a
Yamaha dealer check the vehicle.
3. Shift the transmission into neutral.
4. Push the start switch, and release
it when the engine starts. If the engine does not start within
5 seconds of pressing the start
switch, wait 10 seconds before
pressing the switch again to allow
the battery voltage to restore.
NOTICE
ECA11043
For maximum en
gine life, never ac-
celerate har d when the en gine is
col d!
UBP8E1E0.book Page 2 Friday, September 14, 2018 11:35 AM