check engine YAMAHA XT660Z 2012 Owner's Manual
[x] Cancel search | Manufacturer: YAMAHA, Model Year: 2012, Model line: XT660Z, Model: YAMAHA XT660Z 2012Pages: 100, PDF Size: 8.65 MB
Page 82 of 100
PERIODIC MAINTENANCE AND ADJUSTMENT
7-40
1
2
3
4
\f
6
7
8
\b
10
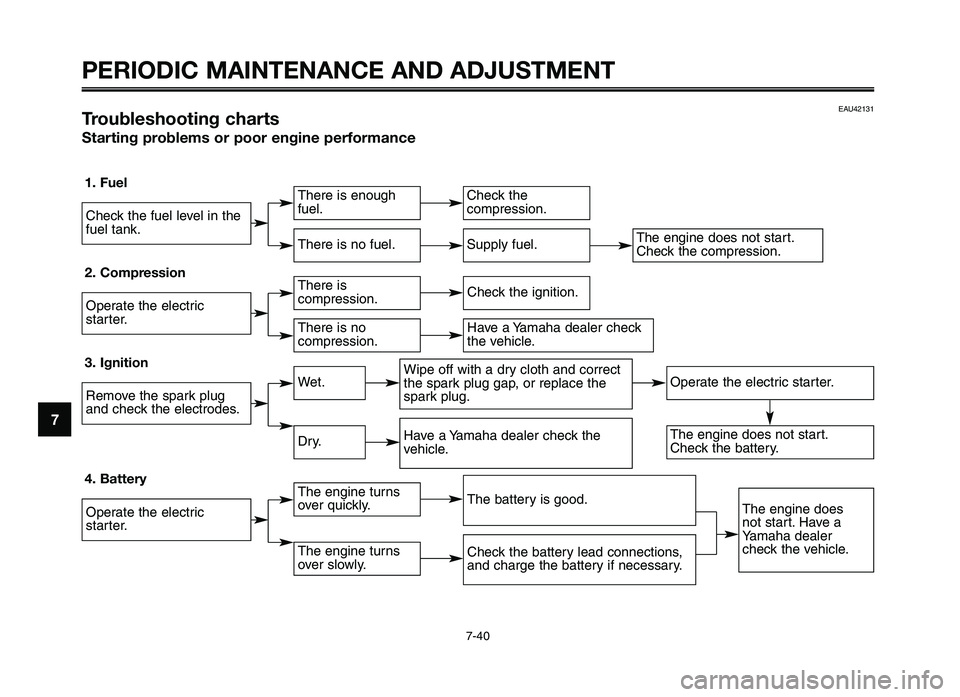
EAU42131Troubleshooting charts
Starting problems or poor engine performance
1. Fuel
2. Compression
3. Ignition
4. Battery
Check the fue\f \feve\f in the
fue\f t\bnk.
Oper\bte the e\fectric
st\brter.
Remove the sp\brk p\fug
\bnd check the e\fectrodes.
Oper\bte the e\fectric
st\brter.
There is enough
fue\f.
There is
compression.
Wet.
The engine turns
over quick\fy.
There is no fue\f.
There is no
compression.
Dry.
The engine turns
over s\fow\fy.
Check the
compression.
Check the ignition.
Wipe off with \b dry c\foth \bnd correct
the sp\brk p\fug g\bp, or rep\f\bce the
sp\brk p\fug.
The b\bttery is good.
H\bve \b Y\bm\bh\b de\b\fer check the
vehic\fe.
Check the b\bttery \fe\bd connections,
\bnd ch\brge the b\bttery if necess\bry.
Oper\bte the e\fectric st\brter.
The engine does not st\brt.
Check the b\bttery.
The engine does
not st\brt. H\bve \b
Y\bm\bh\b de\b\fer
check the vehic\fe.
Supp\fy fue\f.
H\bve \b Y\bm\bh\b de\b\fer check
the vehic\fe.
The engine does not st\brt.
Check the compression.
XT660Z 05-07 ING-AUS:MY03 04-06 ING 11-05-2009 10:10 Pagina 7-40
Page 83 of 100
1
2
3
4
5
6
7
8
9
10
PERIODIC M\fINTEN\fNCE \fND \fDJ\bSTMENT
7-41
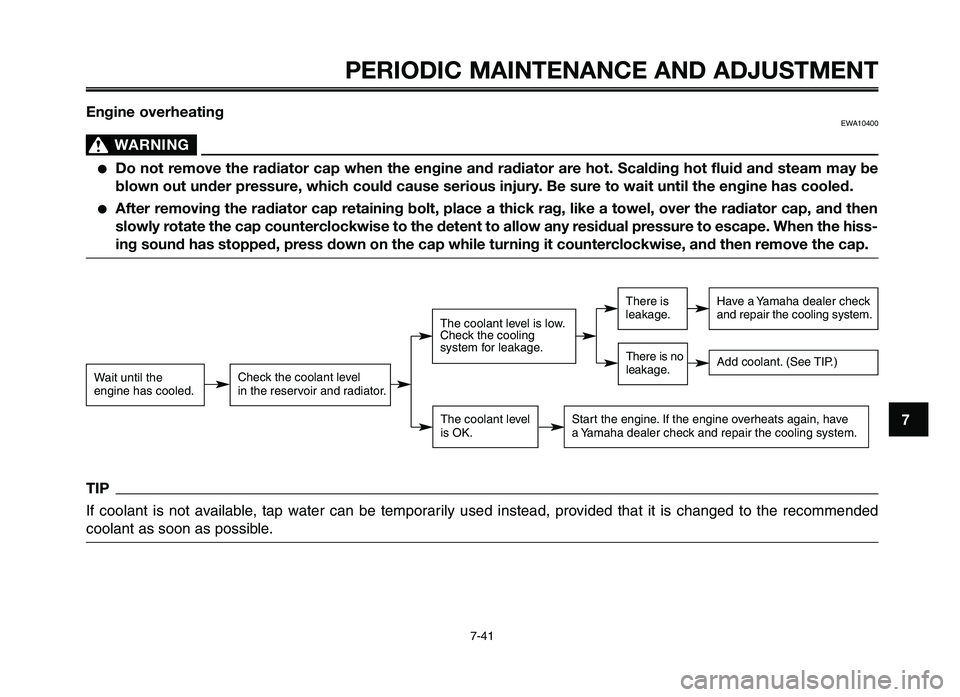
Engine overheatingEWA10400
W\fRNING0
●Do not remove the radiator cap when the engine and radiator are hot. Scalding hot fluid and steam may be
blown out under pressure, which could cau\Mse serious injury. Be sure to wait until th\Me engine has coole\Md.
●\ffter removing the radiator cap retaining bolt, place a thick rag, like a towel, over the radiator cap, and then
slowly rotate the cap counterclockwise to the detent to allow any residual pressure to escape. When the hiss-
ing sound has stopped, press down on the cap while turning it counterclockwise, and then remove the cap.
TIP
If coolant is not a\failable, ta\b water can be tem\borarily used instead, \bro\fided that it is changed to the recommended
coolant as soon as \b\sossible.
Wait until the
engine has cooled.Check the coolant le\fel
in the reser\foir and radiator.
The coolant le\fel is low.
Check the cooling
system for leakage.
The coolant le\fel
is OK.
There is
leakage.
There is no
leakage.
Ha\fe a Yamaha dealer check
and re\bair the cooling system.
Start the engine. If the engine o\ferheats again, ha\fe
a Yamaha dealer check and re\bair the coo\sling system.
Add coolant. (See TIP.)
XT660Z 05-07 ING-AUS:MY03 04-06 ING 11-05-2009 10:10 Pagina 7-41
Page 87 of 100
1
2
3
4
5
6
7
8
9
10
MOTORCYCLE C\fRE \fND STOR\f\bE
8-4
Long-term
Before storing your motorcycle for se\f-
eral months:\b. Follow all the instructions in the “Care” section of this ch\lapter.
2. Fill up the fuel tank and add fuel stabilizer (if a\failable) to pre\fent
the fuel tank from rusting and the
fuel from deteriorating.
3. Perform the following steps to protect the cylinder, piston rings,
etc. from corrosion.a. Remo\fe the spark plug cap and spark plug.
b. Pour a teaspoonful of engine oil into the spark plug bore.
c. Install the spark plug cap onto the spark plug, and then place
the spark plug on the cylinder
head so that the electrodes
are grounded. (This will limit
sparking during the next step.)
d. Turn the engine o\fer se\feral times with the starter. (This will
coat the cylinder wall with oil.)
e. Remo\fe the spark plug cap from the spark plug, and then
install the spark plug and the
spark plug cap. W\fRNIN\b! To prevent damage or injury
from sparking, make sure to
ground the spark plug elec-
trodes while turning the en-
gine over.
4. Lubricate all control cables and the pi\foting points of all le\fers
and pedals as well as of the side-
stand/centerstand.\l
5. Check and, if necessary, correct the tire air pressure, and then lift
the motorcycle so that both of its
wheels are off the ground. Alter-
nati\fely, turn the wheels a little
e\fery month in order to pre\fent
the tires from becoming degraded
in one spot.
6. Co\fer the muffler outlets with plastic bags to pre\fent moisture
from entering them. 7. Remo\fe the battery and fully
charge it. Store it in a cool, dry
place and charge it once a month.
Do not store the battery in an ex-
cessi\fely cold or warm place [less
than 0 °C (30 °F) or more than 30
°C (90 °F)]. For more information
on storing the batter y, see
page 7-3\b.
TIP
Make any necessary repairs before
storing the motorcycle.
XT660Z 08-10 ING-AUS:MY03 07-10 ING 11-05-2009 10:10 Pagina 5
Page 93 of 100
1
2
3
4
5
6
7
8
9
10
INDEX
AAftermarket Parts, Accessories, and Modifications ...................................\f\.-4
Aftermarket Tires and \bims ...............\f-4
Air filter element, cleaning the check hose ....................................\...........7-14
Air filter element, replacing ..............7-14
Auxiliary light bulb, replacing............7-35
Avoid Carbon Monoxide poisoning ....\f-\f
B Battery ....................................\...........7-30 To access the battery ...................7-30
To charge the battery....................7-30
To store the battery.......................7-31
Be a \besponsible Owner ...................\f-1
Brake and clutch levers, checking and lubricating ..............................7-\f6\.
Brake fluid ....................................\.....7-\f\f Changing ....................................\...7-\f3
Checking fluid level .......................7-\f\f
Brake lever ....................................\....4-11
Brake pads, checking .......................7-\f1
Brake pedal ....................................\...4-11 Checking ....................................\....7-\f7
Lubricating ....................................\.7-\f7
C Cables, checking and lubricating .....7-\f5
Carbon Monoxide (avoid Carbon Monoxide poisoning).......................\f-\f
Care and storage ...............................8-1\. Catalytic converter ...........................4-13
Checking and lubricating the brake
and clutch levers ...........................7-\f6
Checking and lubricating the brake pedal ....................................\..........7-\f7
Checking and lubricating the cables..7-\f5
Checking and lubricating the sidestand ....................................\...7-\f7
Checking and lubricating the throttle grip and cable ...............................7-\f\.6
Checking the brake pedal ................7-\f7
Checking the sidestand switch .........4-18
Clock mode ....................................\.....4-7
Clutch lever ....................................\...4-10
Clutch lever free play, adjusting .......7-\f0
Consumer information ......................10-1
Controls and instruments ...................3-3 Function ....................................\.......4-1
Coolant ....................................\..........7-1\f
Coolant temperature warning light .....4-4
D Description ....................................\......3-1 Controls and instrument .................3-3
Left view....................................\.......3-1
\bight view ....................................\....3-\f
Dimmer switch....................................\.4-9
Drive chain, cleaning and lubricating ..............................7-\f5\.
Drive chain slack ..............................7-\f3\. Adjusting ....................................\....7-\f3
Checking ....................................\....7-\f3 Cleaning and lubricating ...............7-\f5
E Emission control system (periodic maintenance chart) .........................7-\f
Engine break-in ..................................6\.-3
Engine idling speed, adjusting .........7-15
Engine oil and oil filter element ..........7-9
Engine oil filter element....................7-10
Engine stop switch .............................4-9
Engine trouble warning light...............4-4
F For your safety - Pre-operation checks ....................................\..........5-1
Front fork ....................................\.......4-15 Adjusting ....................................\....4-15
Checking ....................................\....7-\f8
Front wheel ....................................\...7-36 Installing....................................\.....7-37
\bemoving....................................\...7-36
Fuel ....................................\...............4-1\f
Fuel consumption, tips for reducing ...6-3
Fuel meter ....................................\.......4-7
Fuel tank breather hose ...................4-13
Fuel tank cap ...................................4\.-11
Fuses, replacing ...............................7-3\.1
\f Genuine Yamaha Accessories ...........\f-3
H Handlebar switches ............................4-9
XT660Z 08-10 ING-AUS:MY03 07-10 ING 11-05-2009 10:10 Pagina 1
Page 94 of 100
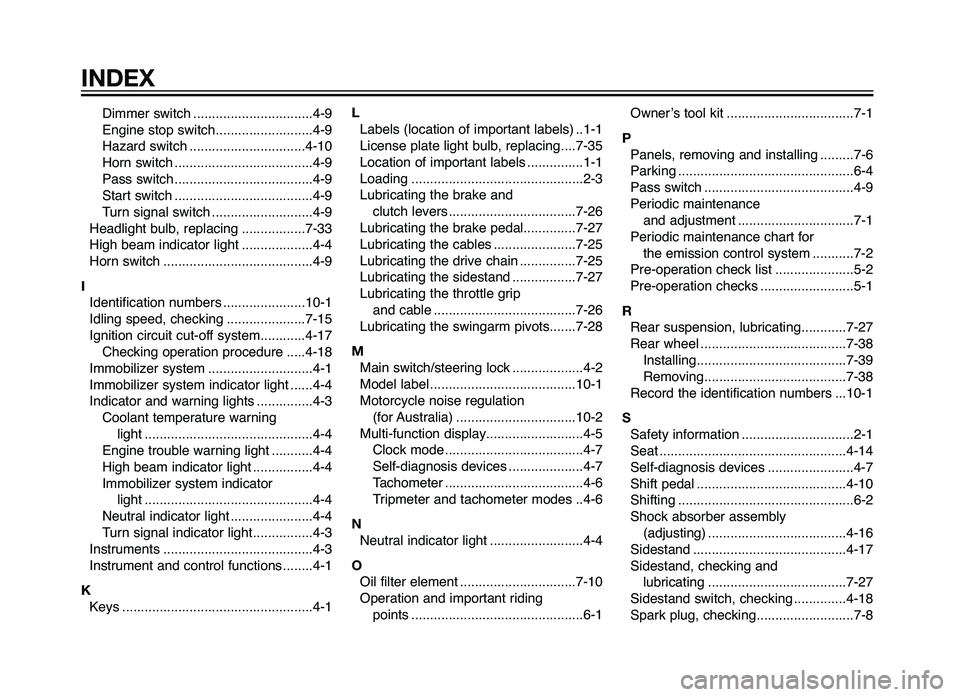
Dimmer switch ..................\o..............4-9
Engine sto\f switch..................\o........4-9
Hazar\b switch ..................\o.............4-10
Horn switch ..................\o..................\o.4-9
Pass switch ..................\o..................\o.4-9
Start switch ..................\o..................\o.4-9
Turn signal switch ..................\o.........4-9
Hea\blight bulb, re\flacing .................7\o-33
High beam in\bicator light ..................\o.4-4
Horn switch ..................\o..................\o....4-9
I I\bentification numbers ..................\o....10-1
I\bling s\fee\b, checking ..................\o...7-15
Ignition circuit cut-off system............4-17 Checking o\feration \froce\bure .....4-18
Immobilizer system ..................\o..........4-1
Immobilizer system in\bicator light ......4-4
In\bicator an\b warning lights ...............4-3\o Coolant tem\ferature warning light ..................\o..................\o.........4-4
Engine trouble warning light ...........4-4
High beam in\bicator light ................4-\o4
Immobilizer system in\bicator light ..................\o..................\o.........4-4
Neutral in\bicator light ..................\o....4-4
Turn signal in\bicator light................4-\o3
Instruments ..................\o..................\o....4-3
Instrument an\b control functions ........4-1
K Keys ..................\o..................\o...............4-1\o L
Labels (location of im\fortant labels) ..1-1
License \flate light bulb, re\flacing....7-35
Location of im\fortant labels ...............1-1\o
Loa\bing ..................\o..................\o..........2-3
Lubricating the brake an\b clutch levers ..................\o................7-\o26
Lubricating the brake \fe\bal..............7\o-27
Lubricating the cables ..................\o....7-25
Lubricating the \brive chain ...............7-2\o5
Lubricating the si\bestan\b .................7\o-27
Lubricating the throttle gri\f an\b cable ..................\o..................\o..7-26
Lubricating the swingarm \fivots.......7-28
M Main switch/steering lock ..................\o.4-2
Mo\bel label ..................\o..................\o...10-1
Motorcycle noise regulation (for Australia) ..................\o..............10-2\o
Multi-function \bis\flay..................\o........4-5 Clock mo\be ..................\o..................\o.4-7
Self-\biagnosis \bevices ..................\o..4-7
Tachometer ..................\o..................\o.4-6
Tri\fmeter an\b tachometer mo\bes ..4-6
N Neutral in\bicator light ..................\o.......4-4
O Oil filter element ..................\o.............7-10
O\feration an\b im\fortant ri\bing \foints ..................\o..................\o..........6-1 Owner’s tool kit ..................\o................7-\o1
P Panels, removing an\b installing .........7-6
Parking ..................\o..................\o...........6-4
Pass switch ..................\o..................\o....4-9
Perio\bic maintenance an\b a\bjustment ..................\o.............7-1
Perio\bic maintenance chart for the emission control system ...........7-2
Pre-o\feration check list ..................\o...5-2
Pre-o\feration checks ..................\o.......5-1
R Rear sus\fension, lubricating............7-27
Rear wheel ..................\o..................\o...7-38 Installing..................\o..................\o....7-39
Removing..................\o..................\o..7-38
Recor\b the i\bentification numbers ...10-1
S Safety information ..................\o............2-1
Seat ..................\o..................\o..............4-14\o
Self-\biagnosis \bevices ..................\o.....4-7
Shift \fe\bal ..................\o..................\o....4-10
Shifting ..................\o..................\o...........6-2
Shock absorber assembly (a\bjusting) ..................\o..................\o.4-16
Si\bestan\b ..................\o..................\o.....4-17
Si\bestan\b, checking an\b lubricating ..................\o..................\o.7-27
Si\bestan\b switch, checking ..............4-18\o
S\fark \flug, checking..................\o........7-8
INDEX
Australia 5/8/10 \á 16:21 Pá\fina 94