oil filter YAMAHA XV1600A 2000 Owners Manual
[x] Cancel search | Manufacturer: YAMAHA, Model Year: 2000, Model line: XV1600A, Model: YAMAHA XV1600A 2000Pages: 95, PDF Size: 19.02 MB
Page 42 of 95
OPERATION AND IMPORTANT RIDING POINTS
5-6
5
EAU01740
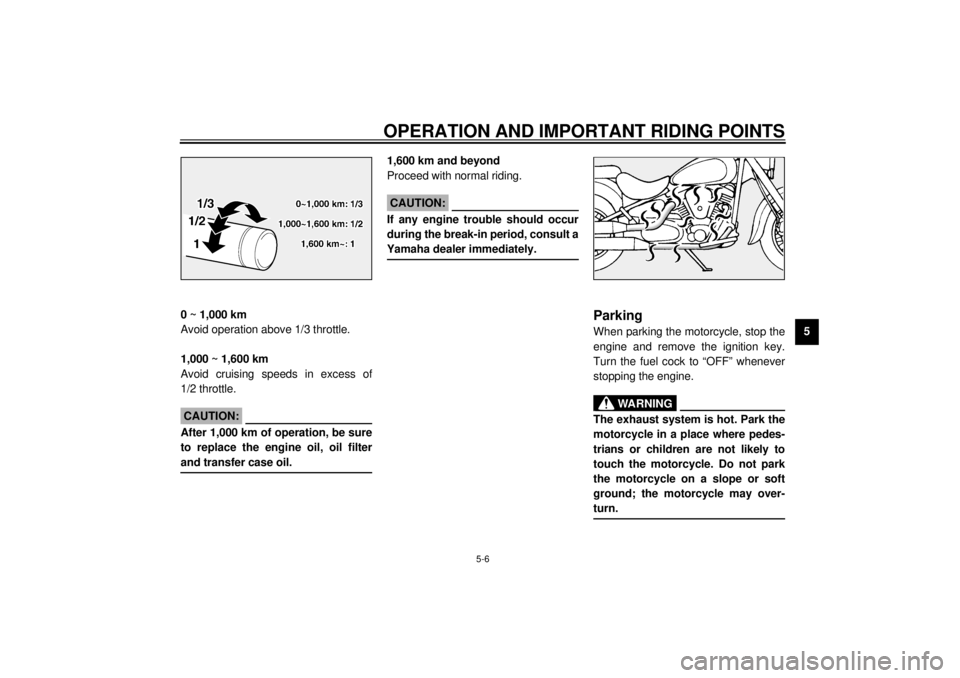
0 ~ 1,000 km
Avoid operation above 1/3 throttle.
1,000 ~ 1,600 km
Avoid cruising speeds in excess of
1/2 throttle.
ECA00026
CAUTION:@ After 1,000 km of operation, be sure
to replace the engine oil, oil filter
and transfer case oil. @
1,600 km and beyond
Proceed with normal riding.
EC000049
CAUTION:@ If any engine trouble should occur
during the break-in period, consult a
Yamaha dealer immediately. @
EAU00457
ParkingWhen parking the motorcycle, stop the
engine and remove the ignition key.
Turn the fuel cock to “OFF” whenever
stopping the engine.
EW000058
WARNING
@ The exhaust system is hot. Park the
motorcycle in a place where pedes-
trians or children are not likely to
touch the motorcycle. Do not park
the motorcycle on a slope or soft
ground; the motorcycle may over-
turn. @
E_5ja_Operation.fm Page 6 Saturday, October 16, 1999 10:11 AM
Page 44 of 95
6
PERIODIC MAINTENANCE AND MINOR REPAIR
Tool kit................................................................... 6-1
Periodic maintenance and lubrication ................... 6-3
Spark plug inspection ........................................... 6-6
Engine oil .............................................................. 6-7
Transfer case oil .................................................. 6-10
Air filter ............................................................... 6-11
Carburetor adjustment ........................................ 6-13
Idle speed adjustment ........................................ 6-13
Throttle cable free play inspection ...................... 6-14
Valve clearance adjustment ................................ 6-14
Tires .................................................................... 6-15
Wheels ................................................................ 6-17
Clutch lever free play adjustment........................ 6-17
Front brake lever free play adjustment ................ 6-18
Rear brake pedal height adjustment ................... 6-19
Brake light switch adjustment ............................. 6-19
Checking the front and rear brake pads.............. 6-20Inspecting the brake fluid level ........................... 6-21
Brake fluid replacement ..................................... 6-22
Drive belt slack check ........................................ 6-22
Drive belt slack adjustment ................................ 6-23
Brake and shift pedal lubrication ........................ 6-24
Brake and clutch lever lubrication ...................... 6-25
Sidestand lubrication.......................................... 6-25
Front fork inspection ........................................... 6-26
Steering inspection ............................................ 6-26
Wheel bearings .................................................. 6-27
Battery................................................................ 6-27
Fuse replacement .............................................. 6-28
Headlight bulb replacement ............................... 6-29
Turn signal and tail/brake light bulb
replacement ..................................................... 6-31
Troubleshooting .................................................. 6-31
Troubleshooting chart ......................................... 6-32
E_5ja_PeriodicTOC.fm Page 1 Saturday, October 16, 1999 10:12 AM
Page 49 of 95
PERIODIC MAINTENANCE AND MINOR REPAIR
6-5
6
* Since these items require special tools, data and technical skills, they should be serviced by a Yamaha dealer.
EAU02970
NOTE:@ l
The air filter needs more frequent service if you are riding in unusually wet or dusty areas.
l
Hydraulic brake system
• When disassembling the master cylinder or caliper, always replace the brake fluid. Check the brake fluid level regu-
larly and fill as required.
• Replace the oil seals on the inner parts of the master cylinder and caliper every two years.
• Replace the brake hoses every four years or if cracked or damaged.
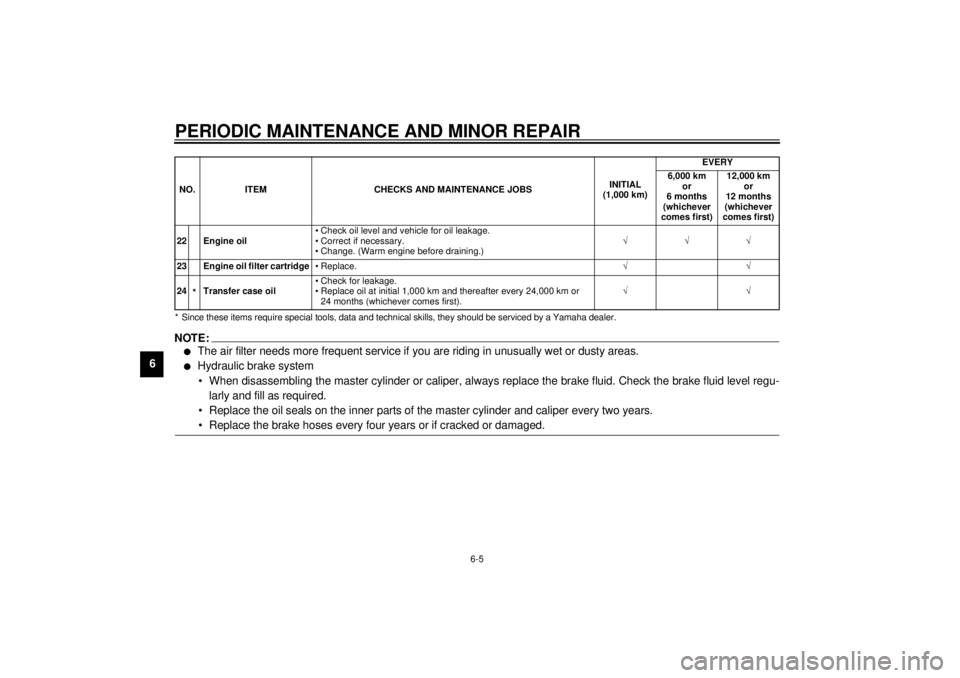
@22 Engine oil• Check oil level and vehicle for oil leakage.
• Correct if necessary.
• Change. (Warm engine before draining.)ÖÖÖ
23 Engine oil filter cartridge•Replace.ÖÖ
24
*Transfer case oil• Check for leakage.
• Replace oil at initial 1,000 km and thereafter every 24,000 km or
24 months (whichever comes first).ÖÖ NO. ITEM CHECKS AND MAINTENANCE JOBSINITIAL
(1,000 km)EVERY
6,000 km
or
6 months
(whichever
comes first)12,000 km
or
12 months
(whichever
comes first)
E_5ja_Periodic.fm Page 5 Saturday, October 16, 1999 10:12 AM
Page 52 of 95
PERIODIC MAINTENANCE AND MINOR REPAIR
6-8
6
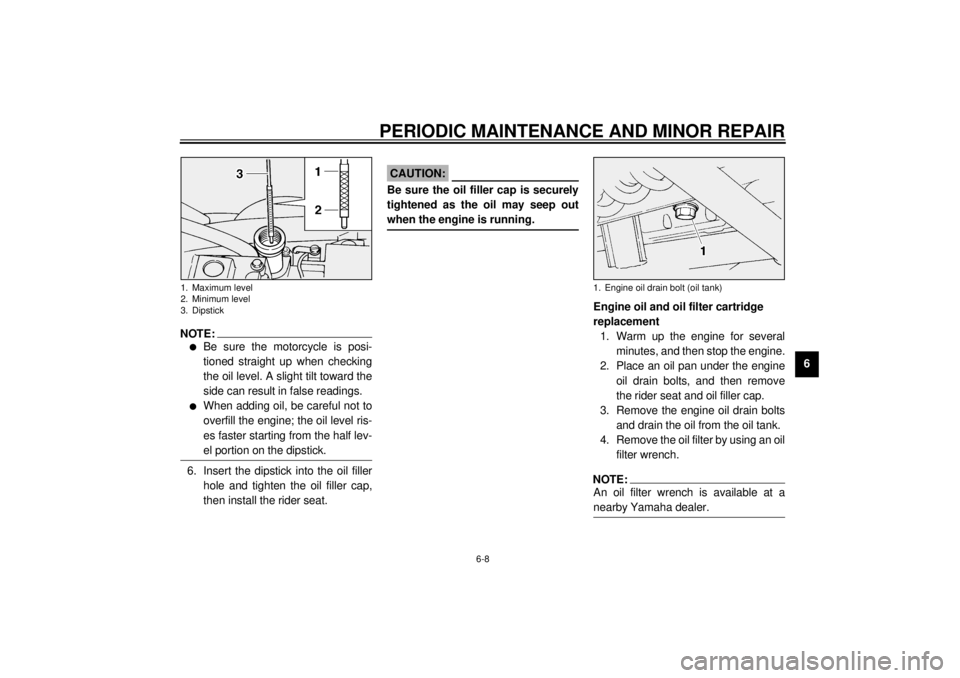
NOTE:@ l
Be sure the motorcycle is posi-
tioned straight up when checking
the oil level. A slight tilt toward the
side can result in false readings.
l
When adding oil, be careful not to
overfill the engine; the oil level ris-
es faster starting from the half lev-
el portion on the dipstick.
@6. Insert the dipstick into the oil filler
hole and tighten the oil filler cap,
then install the rider seat.
ECA00027
CAUTION:@ Be sure the oil filler cap is securely
tightened as the oil may seep out
when the engine is running. @
Engine oil and oil filter cartridge
replacement
1. Warm up the engine for several
minutes, and then stop the engine.
2. Place an oil pan under the engine
oil drain bolts, and then remove
the rider seat and oil filler cap.
3. Remove the engine oil drain bolts
and drain the oil from the oil tank.
4. Remove the oil filter by using an oil
filter wrench.NOTE:@ An oil filter wrench is available at a
nearby Yamaha dealer. @
1. Maximum level
2. Minimum level
3. Dipstick
1. Engine oil drain bolt (oil tank)
E_5ja_Periodic.fm Page 8 Saturday, October 16, 1999 10:12 AM
Page 53 of 95
PERIODIC MAINTENANCE AND MINOR REPAIR
6-9
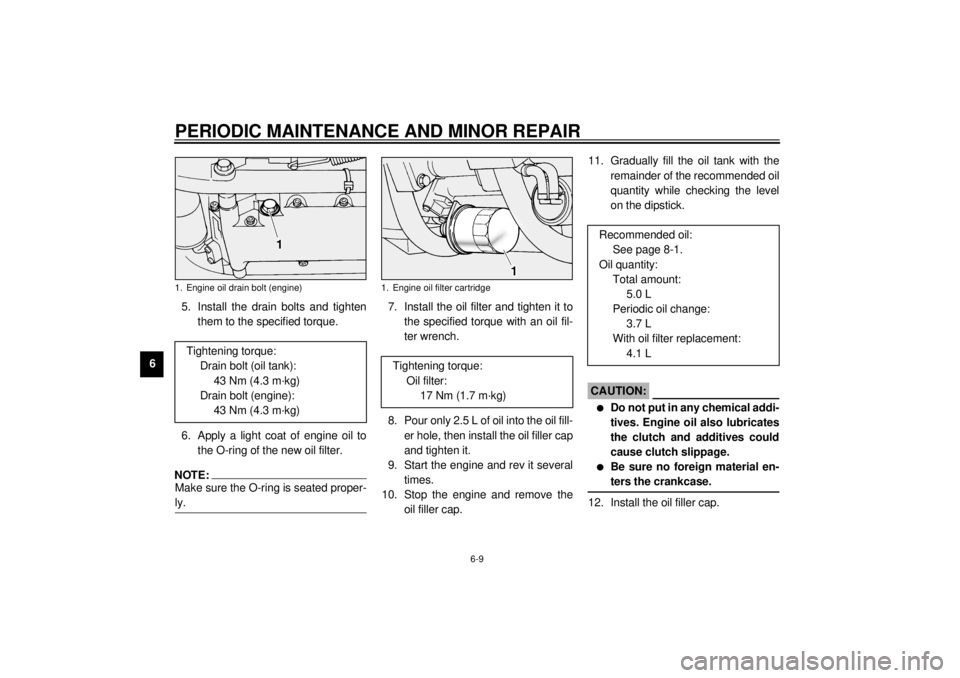
65. Install the drain bolts and tighten
them to the specified torque.
6. Apply a light coat of engine oil to
the O-ring of the new oil filter.
NOTE:@ Make sure the O-ring is seated proper-
ly. @
7. Install the oil filter and tighten it to
the specified torque with an oil fil-
ter wrench.
8. Pour only 2.5 L of oil into the oil fill-
er hole, then install the oil filler cap
and tighten it.
9. Start the engine and rev it several
times.
10. Stop the engine and remove the
oil filler cap.11. Gradually fill the oil tank with the
remainder of the recommended oil
quantity while checking the level
on the dipstick.
EC000066
CAUTION:@ l
Do not put in any chemical addi-
tives. Engine oil also lubricates
the clutch and additives could
cause clutch slippage.
l
Be sure no foreign material en-
ters the crankcase.
@12. Install the oil filler cap.
1. Engine oil drain bolt (engine)Tightening torque:
Drain bolt (oil tank):
43 Nm (4.3 m·kg)
Drain bolt (engine):
43 Nm (4.3 m·kg)
1. Engine oil filter cartridge
Tightening torque:
Oil filter:
17 Nm (1.7 m·kg)
Recommended oil:
See page 8-1.
Oil quantity:
Total amount:
5.0 L
Periodic oil change:
3.7 L
With oil filter replacement:
4.1 L
E_5ja_Periodic.fm Page 9 Saturday, October 16, 1999 10:12 AM
Page 55 of 95
PERIODIC MAINTENANCE AND MINOR REPAIR
6-11
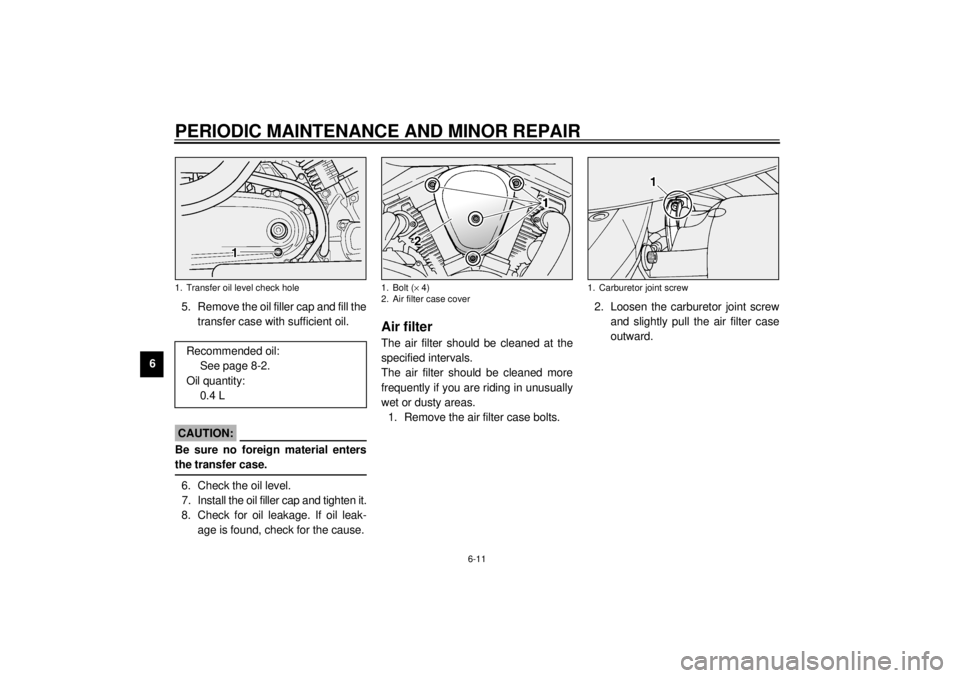
65. Remove the oil filler cap and fill the
transfer case with sufficient oil.
ECA00024
CAUTION:@ Be sure no foreign material enters
the transfer case. @6. Check the oil level.
7. Install the oil filler cap and tighten it.
8. Check for oil leakage. If oil leak-
age is found, check for the cause.
EAU01829
Air filterThe air filter should be cleaned at the
specified intervals.
The air filter should be cleaned more
frequently if you are riding in unusually
wet or dusty areas.
1. Remove the air filter case bolts.2. Loosen the carburetor joint screw
and slightly pull the air filter case
outward.
1. Transfer oil level check holeRecommended oil:
See page 8-2.
Oil quantity:
0.4 L
1. Bolt (´ 4)
2. Air filter case cover
1. Carburetor joint screw
E_5ja_Periodic.fm Page 11 Saturday, October 16, 1999 10:12 AM
Page 85 of 95
8-1
8
EAU01038
8-SPECIFICATIONSSpecifications
Model XV1600A
Dimensions
Overall length 2,500 mm
Overall width 980 mm
Overall height 1,140 mm
Seat height 710 mm
Wheelbase 1,685 mm
Ground clearance 145 mm
Minimum turning radius 3,200 mm
Basic weight (with oil and full
fuel tank)
332 kg
Engine
Engine type Air-cooled 4-stroke, OHV
Cylinder arrangement V-type 2-cylinder
Displacement 1,602 cm
3
Bore ´ Stroke 95 ´ 113 mm
Compression ratio 8.3:1
Starting system Electric starter
Lubrication system Dry sumpEngine oil
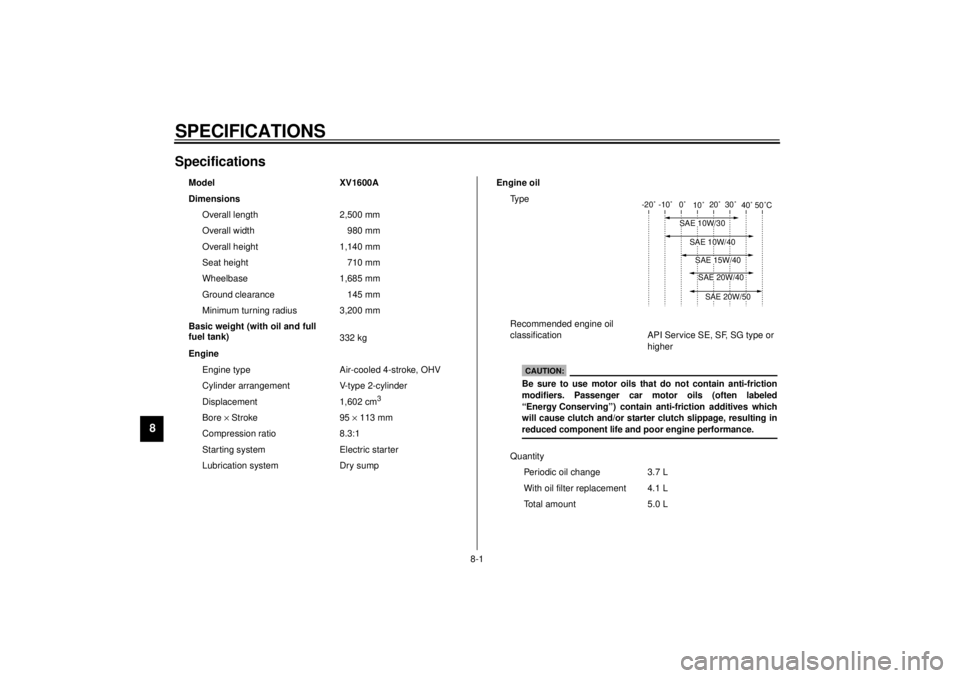
Ty p e
Recommended engine oil
classification API Service SE, SF, SG type or
higher
Quantity
Periodic oil change 3.7 L
With oil filter replacement 4.1 L
Total amount 5.0 L
-20˚ -10˚ 0˚
10˚20˚ 30˚
40˚50˚C
SAE 10W/30
SAE 15W/40SAE 20W/40SAE 20W/50
SAE 10W/40
CAUTION:Be sure to use motor oils that do not contain anti-friction
modifiers. Passenger car motor oils (often labeled
“Energy Conserving”) contain anti-friction additives which
will cause clutch and/or starter clutch slippage, resulting in
reduced component life and poor engine performance.
E_5ja_Spec.fm Page 1 Saturday, October 16, 1999 10:18 AM
Page 86 of 95

SPECIFICATIONS
8-2
8
Transfer case oil
Type SAE80API “GL-4” Hypoid Gear
Oil
Quantity 0.4 L
Air filterDry type element
Fuel
Type Regular unleaded gasoline
Fuel tank capacity 20 L
Reserve amount 3.5 L
Carburetor
Manufacturer MIKUNI
Type ´ quantity BSR40 ´ 1
Spark plug
Manufacturer/type NGK / DPR7EA-9 or
DENSO / X22EPR-U9
Gap 0.8 ~ 0.9 mm
Clutch typeWet, multiple-disc
Transmission
Primary reduction system Spur gear
Primary reduction ratio 1.532
Secondary reduction system Belt
Secondary reduction ratio 2.320
Transmission type Constant mesh 5-speed
Operation Left foot operationGear ratio
1st 2.438
2nd 1.579
3rd 1.160
4th 0.906
5th 0.750
Chassis
Frame type Double cradle
Caster angle 32°
Trail 142 mm
Tire
Front
Type With tube
Size 130/90-16 67H
Manufacturer/model Dunlop / D404FL
Bridgestone / G703F
Rear
Type With tube
Size 150/80B-16 71H
Manufacturer/model Dunlop / D404
Bridgestone / G702
E_5ja_Spec.fm Page 2 Saturday, October 16, 1999 10:18 AM
Page 93 of 95
10-INDEXAAdjusting rear shock absorber
preload ................................................ 3-14
Air filter .................................................. 6-11
Antitheft alarm (optional) ..........................3-4BBattery ................................................... 6-27
Brake and clutch lever lubrication........... 6-25
Brake and shift pedal lubrication ............ 6-24
Brake fluid replacement ......................... 6-22
Brake light switch adjustment ................. 6-19CCarburetor adjustment ........................... 6-13
Care.........................................................7-1
Checking the front and rear brake
pads .................................................... 6-20
Clutch lever ..............................................3-7
Clutch lever free play adjustment ........... 6-17
Controls/Instruments ................................2-3DDiagnosis device......................................3-4
Digital clock..............................................3-5
Dimmer switch .........................................3-6
Drive belt slack adjustment .................... 6-23
Drive belt slack check ............................ 6-22EEngine break-in........................................5-5
Engine oil .................................................6-7
Engine stop switch ...................................3-6
Engine trouble indicator light ....................3-2
FFront brake lever ..................................... 3-8
Front brake lever free play
adjustment .......................................... 6-18
Front fork inspection .............................. 6-26
Fuel ......................................................... 3-9
Fuel cock ............................................... 3-11
Fuel gauge .............................................. 3-4
Fuel level indicator light ........................... 3-2
Fuel tank breather hose ......................... 3-10
Fuel tank cap ........................................... 3-9
Fuse replacement.................................. 6-28GGive safety the right of way ..................... 1-1HHandlebar switches ................................. 3-6
Dimmer switch ................................... 3-6
Engine stop switch ............................. 3-6
Horn switch ........................................ 3-6
Lights switch ...................................... 3-6
Pass switch ........................................ 3-6
Start switch ........................................ 3-7
Turn signal switch .............................. 3-6
Headlight bulb replacement ................... 6-29
Helmet holder ........................................ 3-13
High beam indicator light ......................... 3-2
Horn switch ............................................. 3-6IIdentification number records................... 9-1
Idle speed adjustment ........................... 6-13
Indicator lights ..........................................3-2
Engine trouble indicator light ...............3-2
Fuel level indicator light ......................3-2
High beam indicator light ....................3-2
Neutral indicator light ..........................3-2
Turn indicator light ..............................3-2
Inspecting the brake fluid level ...............6-21KKey identification number .........................9-1LLeft view...................................................2-1
Lights switch ............................................3-6MMain switch/steering lock .........................3-1
Model label ..............................................9-2NNeutral indicator light ...............................3-2PParking.....................................................5-6
Pass switch ..............................................3-6
Periodic maintenance and lubrication .......6-3
Pre-operation check list ............................4-1RRear brake pedal .....................................3-8
Rear brake pedal height adjustment.......6-19
Recommended shift points
(for Switzerland only) .............................5-5
Rider seat ..............................................3-13
Right view ................................................2-2
E_5jaIX.fm Page 1 Saturday, October 16, 1999 10:19 AM