service YAMAHA XVS1100 2000 Owners Manual
[x] Cancel search | Manufacturer: YAMAHA, Model Year: 2000, Model line: XVS1100, Model: YAMAHA XVS1100 2000Pages: 96, PDF Size: 13.11 MB
Page 30 of 96
INSTRUMENT AND CONTROL FUNCTIONS
3-15
3
EAU00315
WARNING
@ This shock absorber contains high-
ly pressurized nitrogen gas. Read
and understand the following infor-
mation before handling the shock
absorber. The manufacturer cannot
be held responsible for property
damage or personal injury that may
result from improper handling.l
Do not tamper with or attempt to
open the cylinder assembly.
l
Do not subject the shock ab-
sorber to an open flame or other
high heat source. This may
cause the unit to explode due to
excessive gas pressure.
l
Do not deform or damage the
cylinder in any way. Cylinder
damage will result in poor
damping performance.
l
Take your shock absorber to a
Yamaha dealer for any service.
@
EAU01172
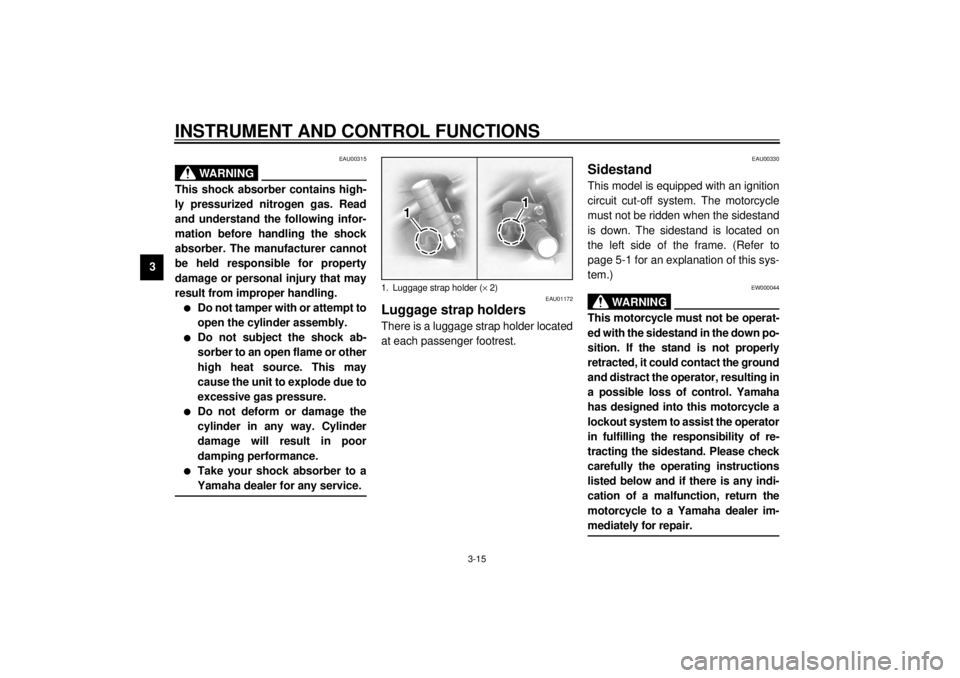
Luggage strap holdersThere is a luggage strap holder located
at each passenger footrest.
EAU00330
SidestandThis model is equipped with an ignition
circuit cut-off system. The motorcycle
must not be ridden when the sidestand
is down. The sidestand is located on
the left side of the frame. (Refer to
page 5-1 for an explanation of this sys-
tem.)
EW000044
WARNING
@ This motorcycle must not be operat-
ed with the sidestand in the down po-
sition. If the stand is not properly
retracted, it could contact the ground
and distract the operator, resulting in
a possible loss of control. Yamaha
has designed into this motorcycle a
lockout system to assist the operator
in fulfilling the responsibility of re-
tracting the sidestand. Please check
carefully the operating instructions
listed below and if there is any indi-
cation of a malfunction, return the
motorcycle to a Yamaha dealer im-
mediately for repair. @
1. Luggage strap holder (´ 2)
E_5el_Functions.fm Page 15 Monday, May 1, 2000 9:38 AM
Page 46 of 96
6-1
6
EAU00462
6-PERIODIC MAINTENANCE AND MINOR REPAIR
EAU00464
Periodic inspection, adjustment and lu-
brication will keep your motorcycle in
the safest and most efficient condition
possible. Safety is an obligation of the
motorcycle owner. The maintenance
and lubrication schedule chart should
be considered strictly as a guide to
general maintenance and lubrication
intervals. YOU MUST TAKE INTO
CONSIDERATION THAT WEATHER,
TERRAIN, GEOGRAPHICAL LOCA-
TIONS, AND A VARIETY OF INDIVID-
UAL USES ALL TEND TO DEMAND
THAT EACH OWNER ALTER THIS
TIME SCHEDULE TO SHORTER IN-
TERVALS TO MATCH THE ENVI-
RONMENT. The most important points
of motorcycle inspection, adjustment,
and lubrication are explained in the fol-
lowing pages.
EW000060
WARNING
@ If you are not familiar with motor-
cycle service, this work should be
done by a Yamaha dealer. @
EAU01129
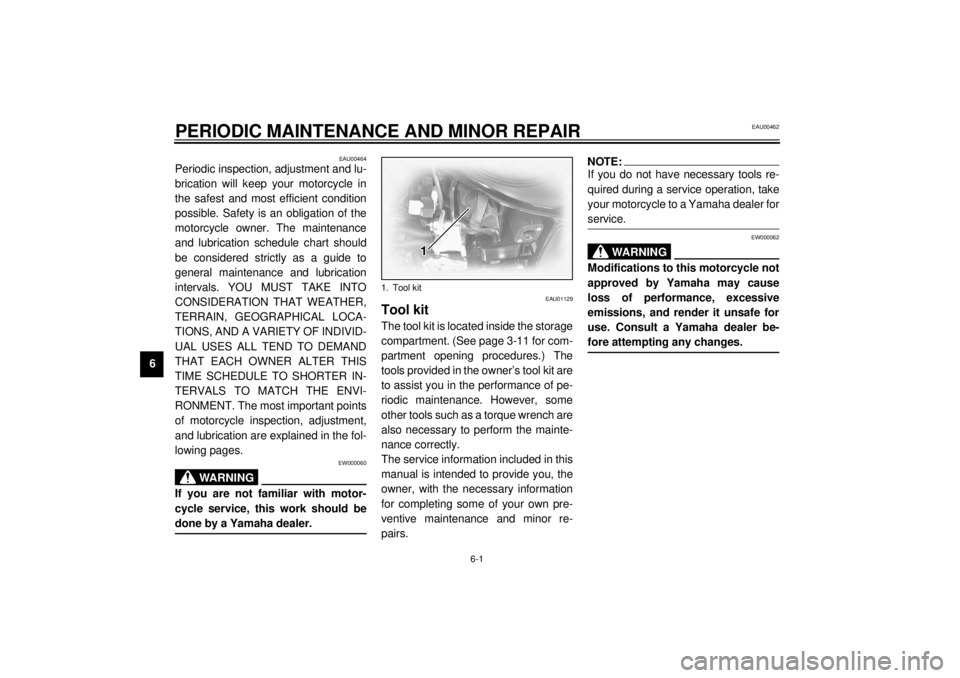
Tool kitThe tool kit is located inside the storage
compartment. (See page 3-11 for com-
partment opening procedures.) The
tools provided in the owner’s tool kit are
to assist you in the performance of pe-
riodic maintenance. However, some
other tools such as a torque wrench are
also necessary to perform the mainte-
nance correctly.
The service information included in this
manual is intended to provide you, the
owner, with the necessary information
for completing some of your own pre-
ventive maintenance and minor re-
pairs.
NOTE:@ If you do not have necessary tools re-
quired during a service operation, take
your motorcycle to a Yamaha dealer for
service. @
EW000062
WARNING
@ Modifications to this motorcycle not
approved by Yamaha may cause
loss of performance, excessive
emissions, and render it unsafe for
use. Consult a Yamaha dealer be-
fore attempting any changes. @
1. Tool kit
E_5el_Periodic.fm Page 1 Monday, May 1, 2000 9:44 AM
Page 49 of 96
PERIODIC MAINTENANCE AND MINOR REPAIR
6-4
6
* Since these items require special tools, data and technical skills, they should be serviced by a Yamaha dealer.
EAU02970
NOTE:@ l
The air filter needs more frequent service if you are riding in unusually wet or dusty areas.
l
Hydraulic brake system
• When disassembling the master cylinder or caliper, always replace the brake fluid. Check the brake fluid level regu-
larly and fill as required.
• Replace the oil seals on the inner parts of the master cylinder and caliper every two years.
• Replace the brake hoses every four years or if cracked or damaged.
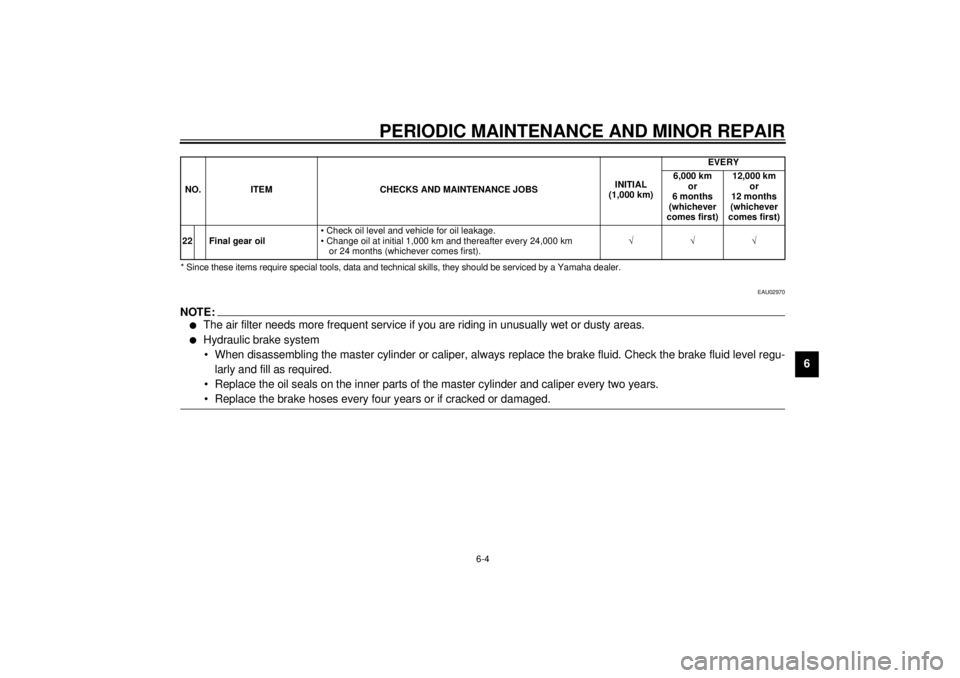
@22 Final gear oil• Check oil level and vehicle for oil leakage.
• Change oil at initial 1,000 km and thereafter every 24,000 km
or 24 months (whichever comes first).ÖÖÖ NO. ITEM CHECKS AND MAINTENANCE JOBSINITIAL
(1,000 km)EVERY
6,000 km
or
6 months
(whichever
comes first)12,000 km
or
12 months
(whichever
comes first)
E_5el_Periodic.fm Page 4 Monday, May 1, 2000 9:44 AM
Page 54 of 96
PERIODIC MAINTENANCE AND MINOR REPAIR
6-9
66. Start the engine and warm it up for
a few minutes. While warming up,
check for oil leakage. If oil leakage
is found, stop the engine immedi-
ately and check for the cause.
NOTE:@ After the engine is started, the oil level
indicator light should go off if oil is filled
to the specified level. @
EC000067
CAUTION:@ If the indicator light flickers or re-
mains on, immediately stop the en-
gine and consult with a Yamaha
dealer. @Engine oil filter replacement
It is recommended that the oil filter be
changed by an authorized Yamaha
dealer due to necessary disassembly
of components that is only covered in
the service manual.
EAU02943
Final gear oil
EW000066
WARNING
@ Do not let foreign material enter the
final gear case. Be sure oil does not
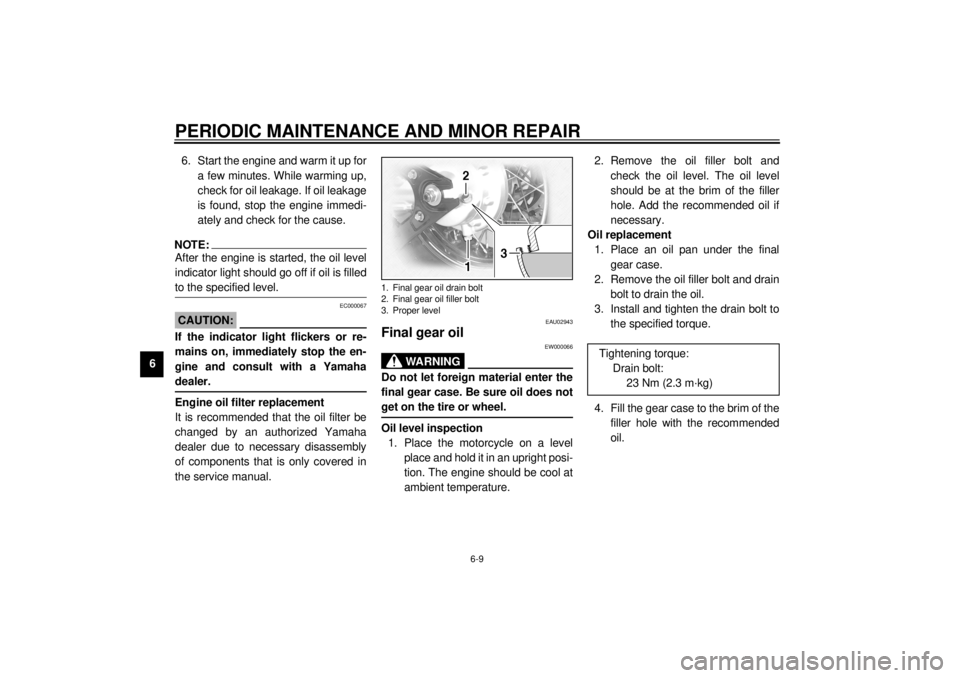
get on the tire or wheel. @Oil level inspection
1. Place the motorcycle on a level
place and hold it in an upright posi-
tion. The engine should be cool at
ambient temperature.2. Remove the oil filler bolt and
check the oil level. The oil level
should be at the brim of the filler
hole. Add the recommended oil if
necessary.
Oil replacement
1. Place an oil pan under the final
gear case.
2. Remove the oil filler bolt and drain
bolt to drain the oil.
3. Install and tighten the drain bolt to
the specified torque.
4. Fill the gear case to the brim of the
filler hole with the recommended
oil.1. Final gear oil drain bolt
2. Final gear oil filler bolt
3. Proper level
Tightening torque:
Drain bolt:
23 Nm (2.3 m·kg)
E_5el_Periodic.fm Page 9 Monday, May 1, 2000 9:44 AM
Page 57 of 96

PERIODIC MAINTENANCE AND MINOR REPAIR
6-12
6 2. Set the idle to the specified engine
speed by adjusting the throttle
stop screw. Turn the screw in di-
rection
a to increase engine
speed and in direction
b to de-
crease engine speed.
NOTE:@ If the specified idle speed cannot be
obtained by performing the above ad-
justment, consult a Yamaha dealer. @
EAU00635
Throttle cable free play
inspectionThere should be a free play of 4 ~
6 mm at the throttle grip. If the free play
is incorrect, ask a Yamaha dealer to
make this adjustment.
EAU00637
Valve clearance adjustmentThe correct valve clearance changes
with use, resulting in improper fuel/air
supply or engine noise. To prevent this,
the valve clearance must be adjusted
regularly. This adjustment however,
should be left to a professional
Yamaha service technician.
1. Throttle stop screw
Standard idle speed:
950 ~ 1,050 r/min
a. Free play
E_5el_Periodic.fm Page 12 Monday, May 1, 2000 9:44 AM
Page 58 of 96
PERIODIC MAINTENANCE AND MINOR REPAIR
6-13
6
EAU00647
*
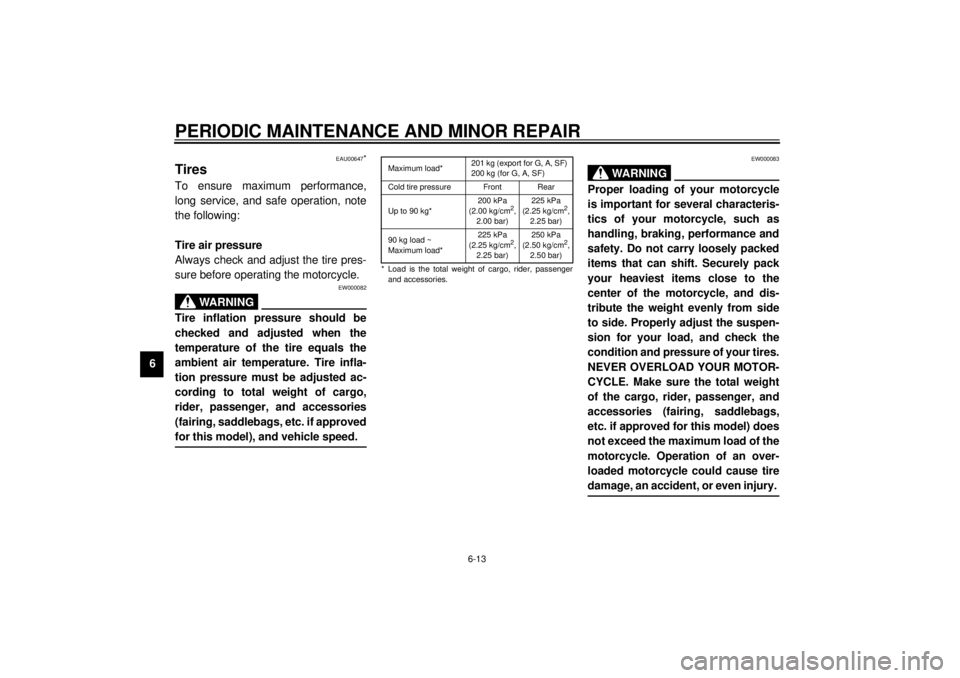
TiresTo ensure maximum performance,
long service, and safe operation, note
the following:
Tire air pressure
Always check and adjust the tire pres-
sure before operating the motorcycle.
EW000082
WARNING
@ Tire inflation pressure should be
checked and adjusted when the
temperature of the tire equals the
ambient air temperature. Tire infla-
tion pressure must be adjusted ac-
cording to total weight of cargo,
rider, passenger, and accessories
(fairing, saddlebags, etc. if approved
for this model), and vehicle speed. @
CE-32EEW000083
WARNING
@ Proper loading of your motorcycle
is important for several characteris-
tics of your motorcycle, such as
handling, braking, performance and
safety. Do not carry loosely packed
items that can shift. Securely pack
your heaviest items close to the
center of the motorcycle, and dis-
tribute the weight evenly from side
to side. Properly adjust the suspen-
sion for your load, and check the
condition and pressure of your tires.
NEVER OVERLOAD YOUR MOTOR-
CYCLE. Make sure the total weight
of the cargo, rider, passenger, and
accessories (fairing, saddlebags,
etc. if approved for this model) does
not exceed the maximum load of the
motorcycle. Operation of an over-
loaded motorcycle could cause tire
damage, an accident, or even injury.
Maximum load*201 kg (export for G, A, SF)
200 kg (for G, A, SF)
Cold tire pressure Front Rear
Up to 90 kg*200 kPa
(2.00 kg/cm
2,
2.00 bar)225 kPa
(2.25 kg/cm
2,
2.25 bar)
90 kg load ~
Maximum load*225 kPa
(2.25 kg/cm
2,
2.25 bar)250 kPa
(2.50 kg/cm
2,
2.50 bar)
* Load is the total weight of cargo, rider, passenger
and accessories.
E_5el_Periodic.fm Page 13 Monday, May 1, 2000 9:44 AM
Page 59 of 96
PERIODIC MAINTENANCE AND MINOR REPAIR
6-14
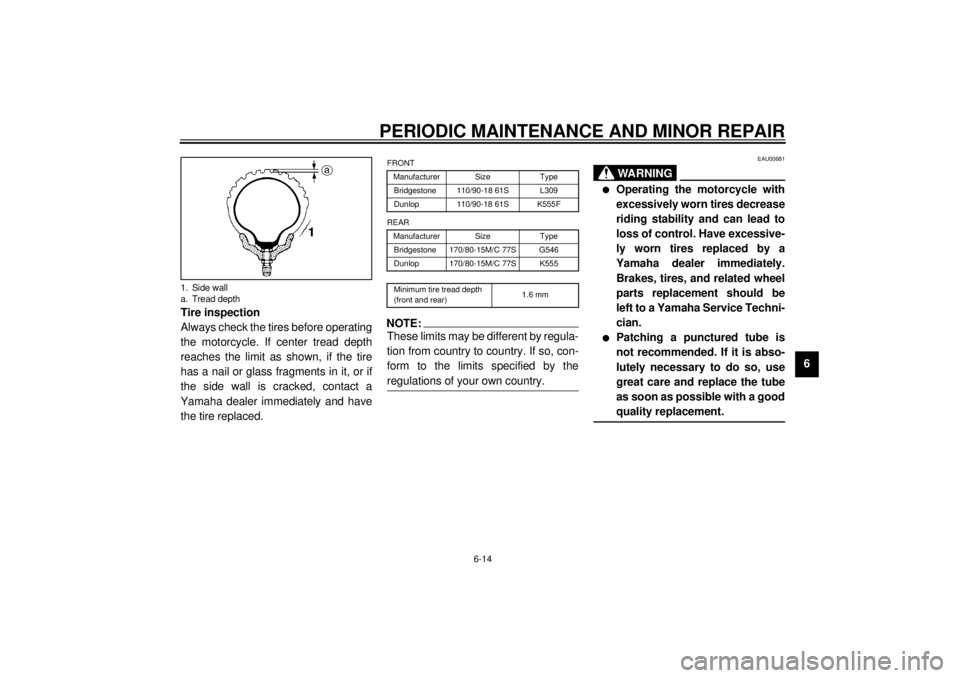
6 Tire inspection
Always check the tires before operating
the motorcycle. If center tread depth
reaches the limit as shown, if the tire
has a nail or glass fragments in it, or if
the side wall is cracked, contact a
Yamaha dealer immediately and have
the tire replaced.
CE-10E
CE-26ENOTE:@ These limits may be different by regula-
tion from country to country. If so, con-
form to the limits specified by the
regulations of your own country. @
EAU00681
WARNING
@ l
Operating the motorcycle with
excessively worn tires decrease
riding stability and can lead to
loss of control. Have excessive-
ly worn tires replaced by a
Yamaha dealer immediately.
Brakes, tires, and related wheel
parts replacement should be
left to a Yamaha Service Techni-
cian.
l
Patching a punctured tube is
not recommended. If it is abso-
lutely necessary to do so, use
great care and replace the tube
as soon as possible with a good
quality replacement.
@
1. Side wall
a. Tread depth
FRONT
Manufacturer Size Type
Bridgestone 110/90-18 61S L309
Dunlop 110/90-18 61S K555F
REAR
Manufacturer Size Type
Bridgestone 170/80-15M/C 77S G546
Dunlop 170/80-15M/C 77S K555
Minimum tire tread depth
(front and rear)1.6 mm
E_5el_Periodic.fm Page 14 Monday, May 1, 2000 9:44 AM
Page 60 of 96
PERIODIC MAINTENANCE AND MINOR REPAIR
6-15
6
EAU00685
WheelsTo ensure maximum performance,
long service, and safe operation, note
the following:l
Always inspect the wheels before
a ride. Check for cracks, bends or
warpage of the wheel. Be sure the
spokes are tight and undamaged.
If any abnormal condition exists in
a wheel, consult a Yamaha dealer.
Do not attempt even small repairs
to the wheel. If a wheel is de-
formed or cracked, it must be re-
placed.
l
Tires and wheels should be bal-
anced whenever either one is
changed or replaced. Failure to
have a wheel balanced can result
in poor performance, adverse han-
dling characteristics, and short-
ened tire life.
l
Ride at moderate speeds after
changing a tire since the tire sur-
face must first be broken in for it to
develop its optimal characteristics.
EAU00692
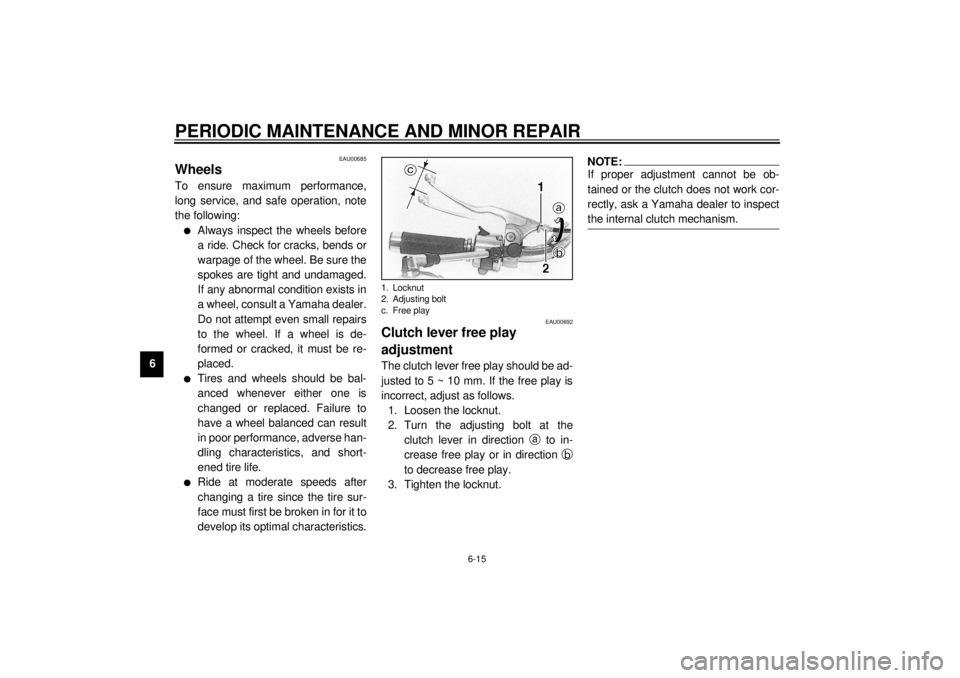
Clutch lever free play
adjustmentThe clutch lever free play should be ad-
justed to 5 ~ 10 mm. If the free play is
incorrect, adjust as follows.
1. Loosen the locknut.
2. Turn the adjusting bolt at the
clutch lever in direction
a to in-
crease free play or in direction
b
to decrease free play.
3. Tighten the locknut.
NOTE:@ If proper adjustment cannot be ob-
tained or the clutch does not work cor-
rectly, ask a Yamaha dealer to inspect
the internal clutch mechanism. @
1. Locknut
2. Adjusting bolt
c. Free play
E_5el_Periodic.fm Page 15 Monday, May 1, 2000 9:44 AM
Page 65 of 96
PERIODIC MAINTENANCE AND MINOR REPAIR
6-20
6
EAU00742
Brake fluid replacementThe brake fluid should be replaced only
by trained Yamaha service personnel.
Have the Yamaha dealer replace the
following components during periodic
maintenance or when they are dam-
aged or leaking:l
oil seals (every two years)
l
brake hoses (every four years)
EAU02962
Cable inspection and
lubrication
EW000112
WARNING
@ Damage to the outer housing of ca-
bles may lead to internal rusting and
interfere with the cable movement.
Replace damaged cables as soon as
possible to prevent unsafe condi-
tions. @Lubricate the cables and cable ends. If
a cable does not operate smoothly, ask
a Yamaha dealer to replace it.
EAU00773
Throttle cable and grip
lubricationThe throttle twist grip assembly should
be greased at the time that the cable is
lubricated, since the grip must be re-
moved to get at the end of the throttle
cable. After removing the screws, hold
the end of the cable up in the air and
put in several drops of lubricant. With
the throttle grip disassembled, coat the
metal surface of the grip assembly with
a suitable all-purpose grease.
Recommended lubricant:
Engine oil
E_5el_Periodic.fm Page 20 Monday, May 1, 2000 9:44 AM
Page 74 of 96

PERIODIC MAINTENANCE AND MINOR REPAIR
6-29
6
EAU01008
TroubleshootingAlthough Yamaha motorcycles receive
a rigid inspection before shipment from
the factory, trouble may occur during
operation.
Any problem in the fuel, compression,
or ignition systems can cause poor
starting and loss of power. The trouble-
shooting chart describes a quick, easy
procedure for making checks.
If your motorcycle requires any repair,
bring it to a Yamaha dealer. The skilled
technicians at a Yamaha dealership
have the tools, experience, and know-
how to properly service your motor-
cycle. Use only genuine Yamaha parts
on your motorcycle. Imitation parts may
look like Yamaha parts, but they are of-
ten inferior. Consequently, they have a
shorter service life and can lead to ex-
pensive repair bills.E_5el_Periodic.fm Page 29 Monday, May 1, 2000 9:44 AM