light YAMAHA XVS125 2002 User Guide
[x] Cancel search | Manufacturer: YAMAHA, Model Year: 2002, Model line: XVS125, Model: YAMAHA XVS125 2002Pages: 86, PDF Size: 1.63 MB
Page 30 of 86

5-4
OPERATION AND IMPORTANT RIDING POINTS
5
EAU00424
Tips for reducing fuel
consumption
Fuel consumption, tips for reducing
Fuel consumption depends largely on
your riding style. Consider the follow-
ing tips to reduce fuel consumption:
8Thoroughly warm up the engine.
8Turn the starter (choke) off as
soon as possible.
8Shift up swiftly, and avoid high
engine speeds during accelera-
tion.
8Do not rev the engine while shift-
ing down, and avoid high engine
speeds with no load on the
engine.
8Turn the engine off instead of let-
ting it idle for an extended length
of time (e.g., in traffic jams, at
traffic lights or at railroad cross-
ings).
EAU00436
Engine break-in
Engine break-in
There is never a more important peri-
od in the life of your engine than the
period between 0 and 1,000 km. For
this reason, you should read the fol-
lowing material carefully.
Since the engine is brand new, do
not put an excessive load on it for the
first 1,000 km. The various parts in
the engine wear and polish them-
selves to the correct operating clear-
ances. During this period, prolonged
full-throttle operation or any condition
that might result in engine overheat-
ing must be avoided.
EAU04399
0–500 km
Avoid prolonged operation above 1/3
throttle.
500–1,000 km
Avoid prolonged operation above 1/2
throttle.
ECA00058
cCAfter 1,000 km of operation, the
engine oil must be changed, and
the oil filter element replaced.1,000 km and beyond
The vehicle can now be operated
normally.
EC000049
cCIf any engine trouble should occur
during the engine break-in period,
immediately have a Yamaha dealer
check the vehicle.
5JX-28199-E2 honbun 10/11/01 2:14 PM Page 29
Page 35 of 86

6-4
PERIODIC MAINTENANCE AND MINOR REPAIR
6
EAU03541
NOTE:
8The air filter needs more frequent service if you are riding in unusually wet or dusty areas.
8Hydraulic brake service
9Regularly check and, if necessary, correct the brake fluid level.
9Every two years replace the internal components of the brake master cylinder and caliper, and change the brake
fluid.
9Replace the brake hoses every four years and if cracked or damaged.19
*Shock absorber
assemblies•Check operation and shock absorbers for oil leakage.√√√√
20*Carburetor•Check starter (choke) operation.
•Adjust engine idling speed.√√√√√ √
21 Engine oil•Change.
•Check oil level and vehicle for oil leakage.√√√√√ √
22 Engine oil filter element•Replace.√√√
23*Front and rear brake
switches•Check operation.√√√√√ √
24 Moving parts and cables•Lubricate.√√√√ √
25*Lights, signals and
switches•Check operation.
•Adjust headlight beam.√√√√√ √ NO. ITEM CHECK OR MAINTENANCE JOBODOMETER READING (× 1,000 km)
ANNUAL
CHECK
1 6 12 18 24
5JX-28199-E2 honbun 10/11/01 2:14 PM Page 34
Page 39 of 86

6-8
PERIODIC MAINTENANCE AND MINOR REPAIR
62. Remove the spark plug as
shown, with the spark plug
wrench included in the owner’s
tool kit.To check the spark plugs
1. Check that the porcelain insulator
around the center electrode on
each spark plug is a medium-to-
light tan (the ideal color when the
motorcycle is ridden normally).2. Check that all spark plugs
installed in the engine have the
same color.NOTE:
If any spark plug shows a distinctly
different color, the engine could be
defective. Do not attempt to diagnose
such problems yourself. Instead,
have a Yamaha dealer check the
motorcycle.3. Check each spark plug for elec-
trode erosion and excessive car-
bon or other deposits, and
replace it if necessary.To install a spark plug
1. Measure the spark plug gap with
a wire thickness gauge and, if
necessary, adjust the gap to
specification.
2. Clean the surface of the spark
plug gasket and its mating sur-
face, and then wipe off any grime
from the spark plug threads.
3. Install the spark plug with the
spark plug wrench, and then
tighten it to the specified torque.
1
a
1. Spark plug wrencha. Spark plug gap
Specified spark plug:
CR7HSA (NGK)
U22FSR-U (DENSO)
Spark plug gap:
0.6–0.7 mm
5JX-28199-E2 honbun 10/11/01 2:14 PM Page 38
Page 40 of 86

6-9
PERIODIC MAINTENANCE AND MINOR REPAIR
6
NOTE:
If a torque wrench is not available
when installing a spark plug, a good
estimate of the correct torque is
1/4–1/2 turn past finger tight.
However, the spark plug should be
tightened to the specified torque as
soon as possible.4. Install the spark plug cap.
EAU04433
Engine oil and oil filter
element
Engine oil and oil filter element
The engine oil level should be
checked before each ride. In addition,
the oil must be changed and the oil
filter element replaced at the intervals
specified in the periodic maintenance
and lubrication chart.
To check the engine oil level
1. Place the motorcycle on a level
surface and hold it in an upright
position.NOTE:
Make sure that the motorcycle is
positioned straight up when checking
the oil level. A slight tilt to the side
can result in a false reading.2. Start the engine, warm it up for
several minutes, and then turn it
off.3. Wait a few minutes until the oil
settles, and then check the oil
level through the check window
located at the bottom-right side
of the crankcase.
NOTE:
The engine oil should be between the
minimum and maximum level marks.4. If the engine oil is below the min-
imum level mark, add sufficient
oil of the recommended type to
raise it to the correct level.
2
1
3
1. Oil level check window
2. Maximum level mark
3. Minimum level mark
Tightening torque:
Spark plug:
12.5 Nm (1.25 m0kgf)
5JX-28199-E2 honbun 10/11/01 2:14 PM Page 39
Page 44 of 86

6-13
PERIODIC MAINTENANCE AND MINOR REPAIR
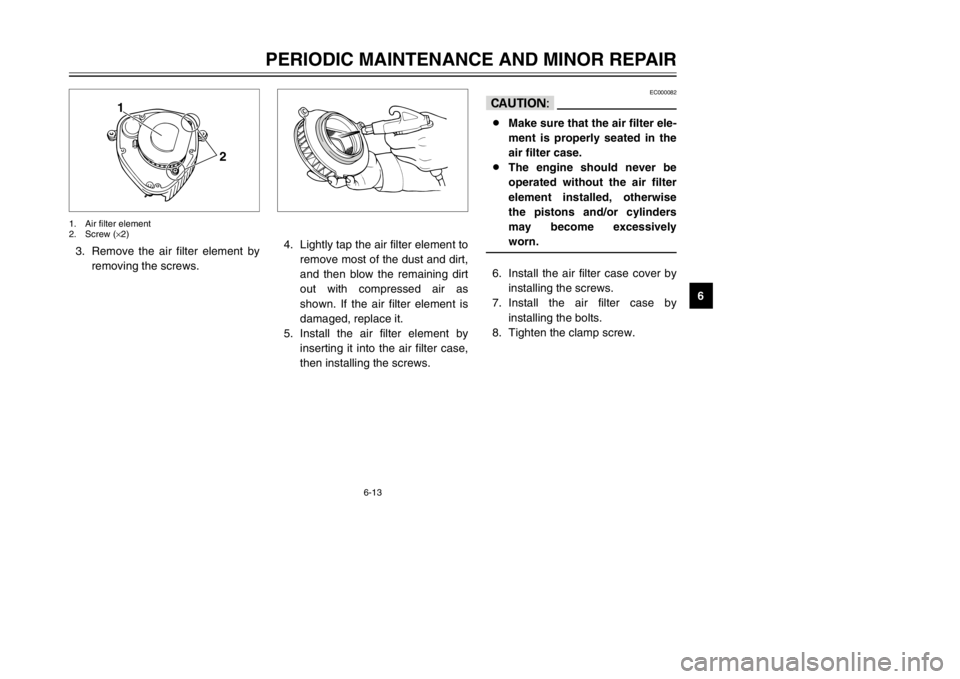
6 3. Remove the air filter element by
removing the screws.4. Lightly tap the air filter element to
remove most of the dust and dirt,
and then blow the remaining dirt
out with compressed air as
shown. If the air filter element is
damaged, replace it.
5. Install the air filter element by
inserting it into the air filter case,
then installing the screws.
EC000082
cC8Make sure that the air filter ele-
ment is properly seated in the
air filter case.
8The engine should never be
operated without the air filter
element installed, otherwise
the pistons and/or cylinders
may become excessively
worn.6. Install the air filter case cover by
installing the screws.
7. Install the air filter case by
installing the bolts.
8. Tighten the clamp screw.
1
2
1. Air filter element
2. Screw (×2)
5JX-28199-E2 honbun 10/11/01 2:14 PM Page 43
Page 53 of 86

6-22
PERIODIC MAINTENANCE AND MINOR REPAIR
6
EW000106
w8After adjusting the drive chain
slack or removing and
installing the rear wheel,
always check the brake pedal
free play.
8If proper adjustment cannot be
obtained as described, have a
Yamaha dealer make this
adjustment.
8After adjusting the brake pedal
free play, check the operation
of the brake light.
EAU00713
Adjusting the rear brake light
switch
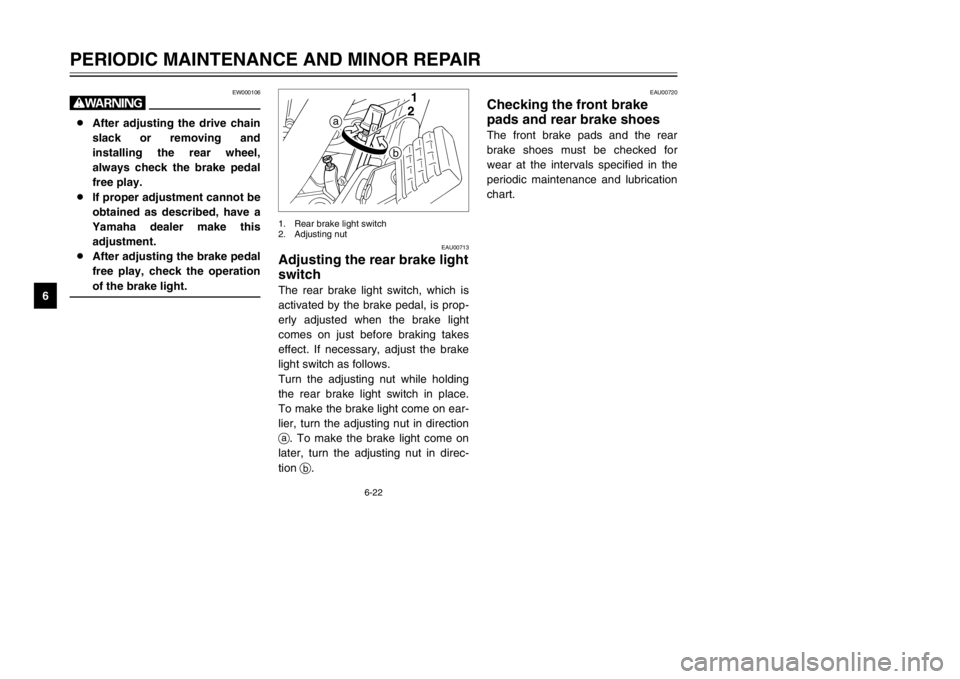
Rear brake light switch, adjusting
The rear brake light switch, which is
activated by the brake pedal, is prop-
erly adjusted when the brake light
comes on just before braking takes
effect. If necessary, adjust the brake
light switch as follows.
Turn the adjusting nut while holding
the rear brake light switch in place.
To make the brake light come on ear-
lier, turn the adjusting nut in direction
a. To make the brake light come on
later, turn the adjusting nut in direc-
tion b.
EAU00720
Checking the front brake
pads and rear brake shoesThe front brake pads and the rear
brake shoes must be checked for
wear at the intervals specified in the
periodic maintenance and lubrication
chart.
12
b
a
1. Rear brake light switch
2. Adjusting nut
5JX-28199-E2 honbun 10/11/01 2:14 PM Page 52
Page 57 of 86

6-26
PERIODIC MAINTENANCE AND MINOR REPAIR
62. To tighten the drive chain, turn
the adjusting nut at each end of
the swingarm in direction a. To
loosen the drive chain, turn the
adjusting nut at each end of the
swingarm in direction b, and
then push the rear wheel for-
ward.
NOTE:
Using the alignment marks on each
side of the swingarm, make sure that
both adjusting nuts are in the same
position for proper wheel alignment.
EC000096
cCImproper drive chain slack will
overload the engine as well as
other vital parts of the motorcycle
and can lead to chain slippage or
breakage. To prevent this from
occurring, keep the drive chain
slack within the specified limits.3. Tighten both locknuts, and then
tighten the axle nut to the speci-
fied torque.
4. Adjust the brake pedal free play.
(See page 6-21 for brake pedal
free play adjustment proce-
dures.)
EW000103
wAfter adjusting the brake pedal
free play, check the operation of
the brake light.
1
3
1
2
ba
1. Axle nut 1. Drive chain adjusting nut
2. Alignment marks
3. Locknut
Tightening torque:
Axle nut:
104 Nm (10.4 m0kgf)
5JX-28199-E2 honbun 10/11/01 2:14 PM Page 56
Page 64 of 86

6-33
PERIODIC MAINTENANCE AND MINOR REPAIR
6
EAU04190
Replacing the fuses
Fuses, replacing
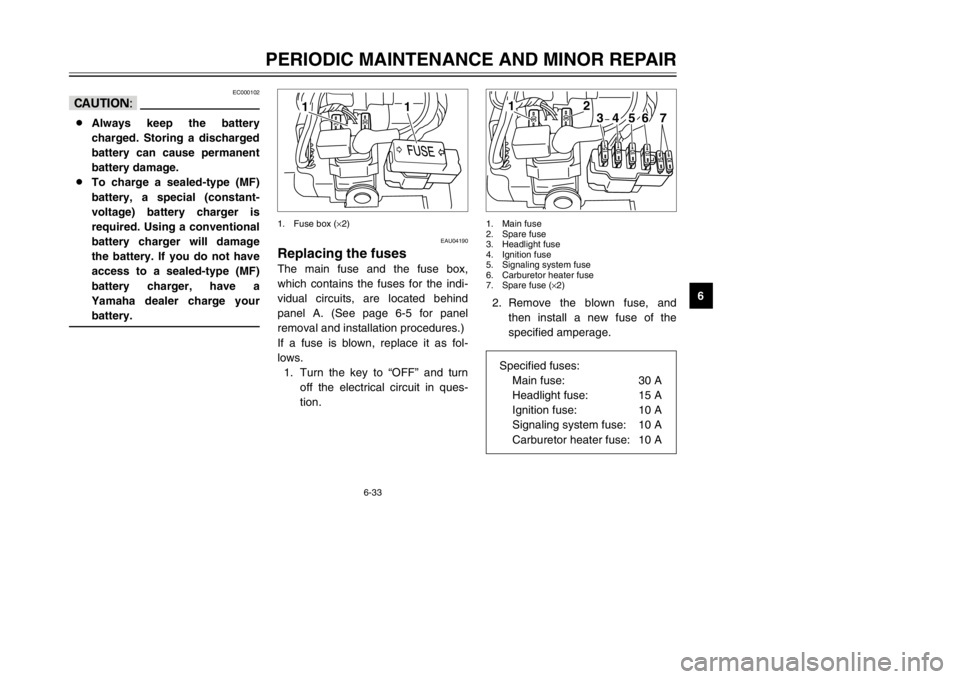
The main fuse and the fuse box,
which contains the fuses for the indi-
vidual circuits, are located behind
panel A. (See page 6-5 for panel
removal and installation procedures.)
If a fuse is blown, replace it as fol-
lows.
1. Turn the key to “OFF” and turn
off the electrical circuit in ques-
tion.
EC000102
cC8Always keep the battery
charged. Storing a discharged
battery can cause permanent
battery damage.
8To charge a sealed-type (MF)
battery, a special (constant-
voltage) battery charger is
required. Using a conventional
battery charger will damage
the battery. If you do not have
access to a sealed-type (MF)
battery charger, have a
Yamaha dealer charge your
battery.
2. Remove the blown fuse, and
then install a new fuse of the
specified amperage.
1
1
7
3
56
4
2
1
1. Fuse box (×2) 1. Main fuse
2. Spare fuse
3. Headlight fuse
4. Ignition fuse
5. Signaling system fuse
6. Carburetor heater fuse
7. Spare fuse (×2)
Specified fuses:
Main fuse: 30 A
Headlight fuse: 15 A
Ignition fuse: 10 A
Signaling system fuse: 10 A
Carburetor heater fuse: 10 A
5JX-28199-E2 honbun 10/11/01 2:14 PM Page 63
Page 65 of 86

6-34
PERIODIC MAINTENANCE AND MINOR REPAIR
6
EAU04189
Replacing the headlight bulb
Headlight bulb, replacing
This motorcycle is equipped with a
quartz bulb headlight. If the headlight
bulb burns out, replace it as follows.
1. Remove the headlight unit by
removing the screws.2. Disconnect the headlight cou-
pler, and then remove the bulb
cover.
1
2
1
1. Headlight unit
2. Screw (×2)1. Headlight coupler
EC000103
cCDo not use a fuse of a higher
amperage rating than recommend-
ed to avoid causing extensive
damage to the electrical system
and possibly a fire.3. Turn the key to “ON” and turn on
the electrical circuit in question to
check if the device operates.
4. If the fuse immediately blows
again, have a Yamaha dealer
check the electrical system.
5JX-28199-E2 honbun 10/11/01 2:14 PM Page 64
Page 66 of 86

6-35
PERIODIC MAINTENANCE AND MINOR REPAIR
6 3. Unhook the headlight bulb hold-
er, and then remove the defec-
tive bulb.
EW000119
wHeadlight bulbs get very hot.
Therefore, keep flammable prod-
ucts away from a lit headlight bulb,
and do not touch the bulb until it
has cooled down.4. Place a new headlight bulb into
position, and then secure it with
the bulb holder.
EC000105
cCDo not touch the glass part of the
headlight bulb to keep it free from
oil, otherwise the transparency of
the glass, the luminosity of the
bulb, and the bulb life will be
adversely affected. Thoroughly
clean off any dirt and fingerprints
on the headlight bulb using a cloth
moistened with alcohol or thinner.5. Install the headlight bulb cover,
and then connect the coupler.
1
a
1. Headlight bulb holder a. Do not touch this area.
1
1. Bulb cover
5JX-28199-E2 honbun 10/11/01 2:14 PM Page 65