fuel YAMAHA YBR125 2004 Owners Manual
[x] Cancel search | Manufacturer: YAMAHA, Model Year: 2004, Model line: YBR125, Model: YAMAHA YBR125 2004Pages: 83, PDF Size: 3.16 MB
Page 10 of 83
X
GASOLINE AND EXHAUST GAS
1. GASOLINE IS HIGHLY FLAMMABLE:
a. Always turn off the engine when refueling.
b. Take care not to spill any gasoline on the engine or exhaust system when refueling.
c. Never refuel while smoking or in the vicinity of an open flame.
2. Never start the engine or let it run for any length of time in a closed area. The exhaust fumes are poisonous and may cause
loss of consciousness and death within a short time. Always operate your motorcycle in an area that has adequate ventilation.
3. Always turn off the engine before leaving the machine unattended and remove the ignition key. When parking the machine,
note the following:
a. The engine and exhaust system may be hot. Park the machine in a place where pedestrians or children are not likely to
touch these hot areas.
b. Do not park the machine on a slope or soft ground; the machine may fall over.
c. Do not park the machine near a flammable source, e. g. a kerosene heater, or near an open flame. The machine could
catch fire.
4. When transporting the machine in another vehicle, be sure it is kept upright and that the fuel cock is turned to ìONî or ìRESî
(for vacuum type) / ìOFFî (for manual type).
If it should lean over, gasoline may leak out of the carburetor or fuel tank.
5. If you should swallow any gasoline, inhale a lot of gasoline vapor, or allow gasoline to get in your eyes, see your doctor
immediately. If any gasoline spills on your skin or clothing, immediately wash it off with soap and water and change your
clothes.
Page 11 of 83

CONTENTS
DESCRIPTION............................................................. 1-1
MACHINE IDENTIFICATION....................................... 2-1
Vehicle identification number ................................. 2-1
Engine serial number............................................ 2-1
CONTROL FUNCTIONS.............................................. 3-1
Main switch ............................................................ 3-1
Indicator lights ........................................................ 3-2
Speedometer..........................................................3-3
Fuel gauge............................................................. 3-3
Handlebar switches over left .................................. 3-4
Handlebar switches over right.............................. 3-5
Clutch lever............................................................ 3-6
Shift pedal............................................................. 3-6
Front brake lever................................................... 3-7
Rear brake pedal................................................... 3-7
Fuel tank cap......................................................... 3-8
Fuel cock............................................................... 3-9
Starter lever......................................................... 3-10
Kick starter .......................................................... 3-10
Steering lock....................................................... 3-11
Seat......................................................................3-12
Side covers......................................................... 3-13
Rear shock absorber adjustment ....................... 3-14
XIPRE-OPERATION CHECKS........................................ 4-1
Engine oil................................................................ 4-3
Tires........................................................................4-3
Fitting/Fasteners....................................................4-6
Switches................................................................ 4-6
Wheels ......................................................... 4-6
Fuel ........................................................... 4-7
OPERATION AND IMPORTANT RIDING POINTS....... 5-1
Starting a cold engine........................................... 5-2
Starting a warm engine .......................................... 5-2
Warming up the engine .......................................... 5-2
Shifting ................................................................... 5-3
Tips for reduccing fuel consumption...................... 5-4
Engine Break-in...................................................... 5-4
Parking ................................................................... 5-5
Page 12 of 83
PERIODIC MAINTENANCE AND MINOR REPAIRS..... 6-1
Tool kit..................................................................... 6-2
PERIODIC MAINTENANCE/LUBRICATION......... 6-3
Torque specifications............................................. 6-5
Engine oil................................................................ 6-6
Oil pressure............................................................ 6-9
Air filter.................................................................6-10
Carburetor adjustment.........................................6-12
Valve clearance adjustment.................................6-12
Idle speed adjustment..........................................6-13
Throttle cable adjustment....................................6-14
Spark plug inspection...........................................6-15
Front brake adjustment........................................6-16
Checking the brake shoes ...................................6-16
Rear brake adjustment.........................................6-17
Brake light switch adjustment ..............................6-18
Clutch adjustment................................................ 6-18
Drive chain slack check.......................................6-19
Drive chain slack adjustment...............................6-20
Drive chain lubrication..........................................6-21
Cable inspection and lubrication.......................... 6-21
Throttle cable and grip lubrication .......................6-22
Brake and shift pedals .........................................6-22
Brake and clutch levers .......................................6-22
Sidestand.............................................................6-22
Front fork inspection............................................6-23Steering inspection.............................................. 6-24
Wheel bearings.................................................... 6-24
Battery.................................................................. 6-25
Replenishing the battery fluid .............................. 6-26
Storage the battery.............................................. 6-27
Fuse replacement................................................ 6-27
Headlight bulb replacement................................. 6-28
Turn signal bulb replacement.............................. 6-30
Taillight bulb replacement.................................... 6-30
Front wheel removal............................................. 6-31
Front wheel installation........................................ 6-32
Rear wheel removal............................................. 6-32
Rear wheel installation......................................... 6-33
Troubleshooting.................................................... 6-34
Troubleshooting chart.......................................... 6-35
CLEANING AND STORAGE....................................... 7-1
CLEANING............................................................. 7-1
STORAGE.............................................................. 7-2
SPECIFICATIONS ........................................................ 8-1
XII
CONTENTS
DESCRIPTION............................................................. 1-1
MACHINE IDENTIFICATION....................................... 2-1
Vehicle identikfication number ............................... 2-1
Engine serial number............................................ 2-1
CONTROL FUNCTIONS.............................................. 3-1
Main switch ............................................................ 3-1
Indicator lights ........................................................ 3-2
Speedometer..........................................................3-3
Fuel gauge............................................................. 3-3
Handlebar switches over left .................................. 3-4
Handlebar switches over right.............................. 3-5
Clutch lever............................................................ 3-6
Shift pedal............................................................. 3-6
Front brake lever................................................... 3-7
Rear brake pedal................................................... 3-7
Fuel tank cap......................................................... 3-8
Fuel cock............................................................... 3-9
Starter lever......................................................... 3-10
Kick starter .......................................................... 3-10
Steering lock....................................................... 3-11
Seat......................................................................3-12
Side covers......................................................... 3-13
Rear shock absorber adjustment ....................... 3-14
XIPRE-OPERATION CHECKS........................................ 4-1
Engine oil................................................................ 4-3
Tires........................................................................4-3
Fitting/Fasteners....................................................4-6
Switches................................................................ 4-6
Wheels ......................................................... 4-6
Fuel ........................................................... 4-7
OPERATION AND IMPORTANT RIDING POINTS....... 5-1
Starting a cold engine........................................... 5-2
Starting a warm engine .......................................... 5-2
Warming up the engine .......................................... 5-2
Shifting ................................................................... 5-3
Tips for reduccing fuel consumption...................... 5-4
Engine Break-in...................................................... 5-4
Parking ................................................................... 5-5
Page 13 of 83
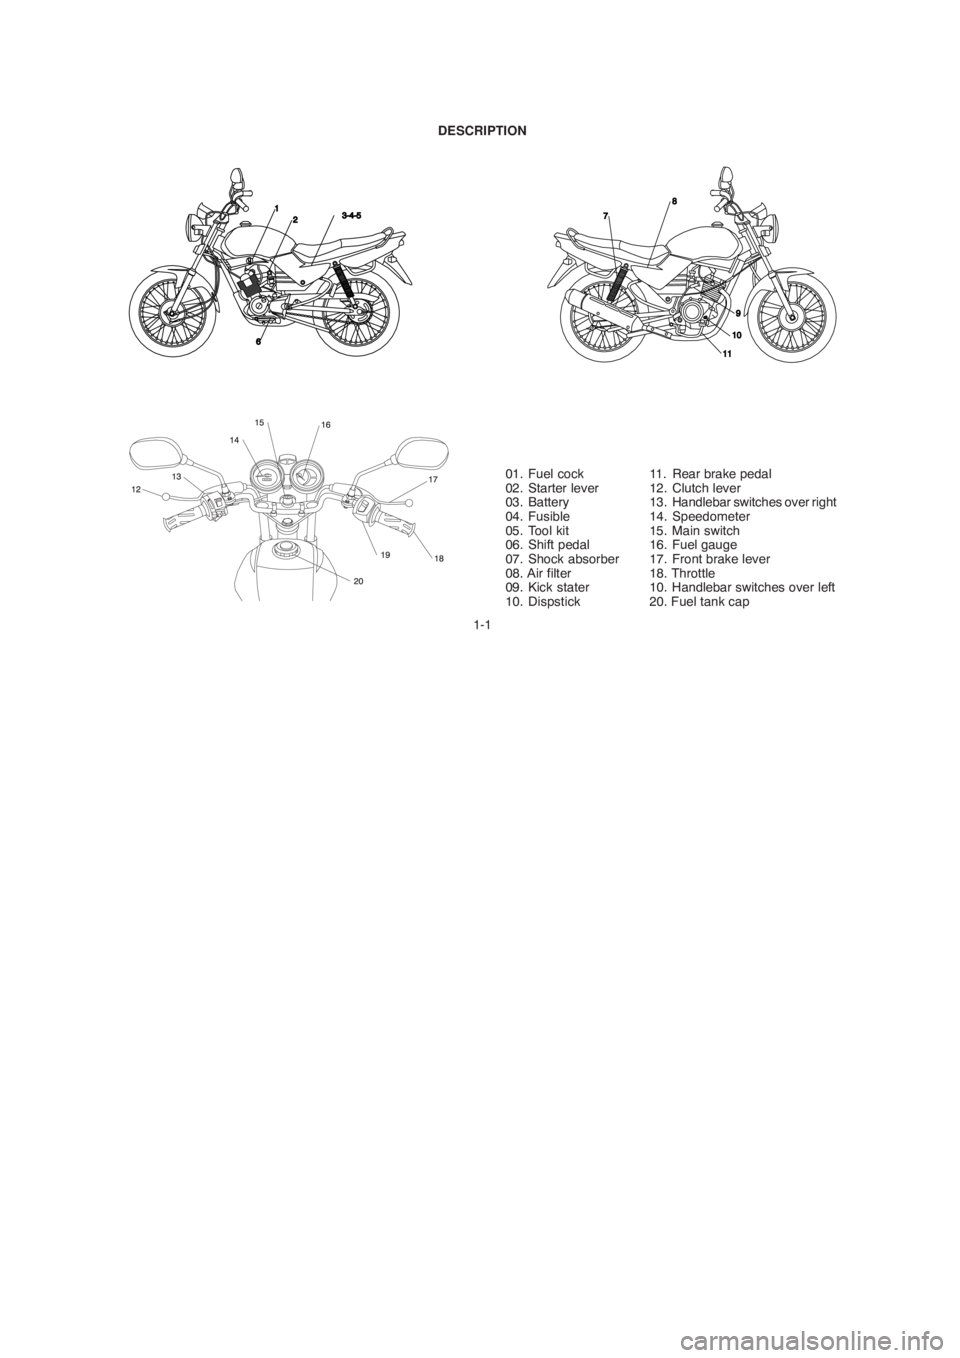
1-1 DESCRIPTION
01. Fuel cock
02. Starter lever
03. Battery
04. Fusible
05. Tool kit
06. Shift pedal
07. Shock absorber
08. Air filter
09. Kick stater
10. Dispstick11. Rear brake pedal
12. Clutch lever
13. Handlebar switches over right
14. Speedometer
15. Main switch
16. Fuel gauge
17. Front brake lever
18. Throttle
10. Handlebar switches over left
20. Fuel tank cap
Page 17 of 83
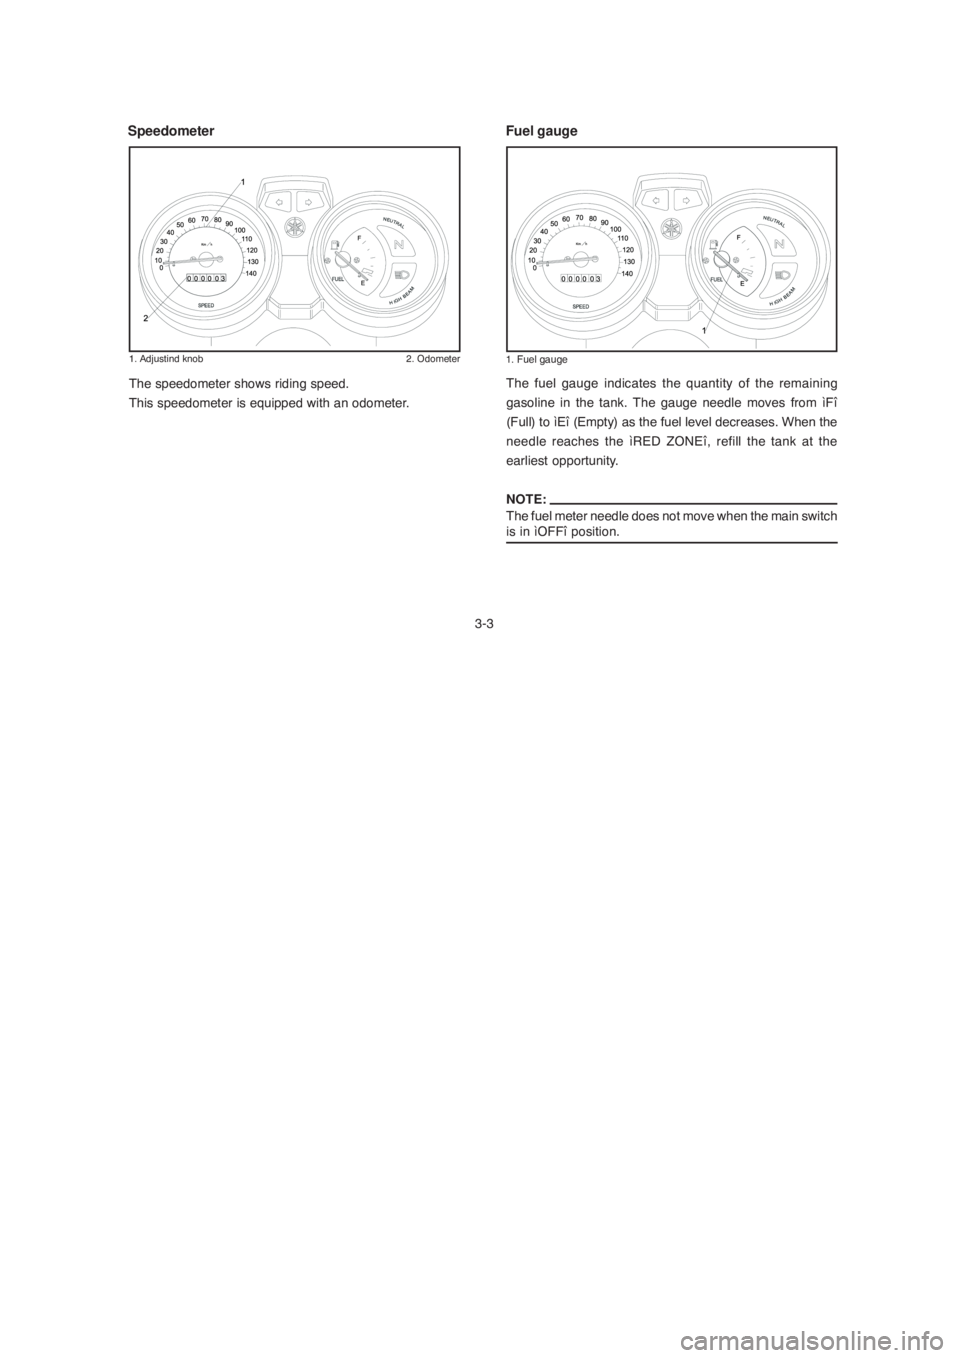
Fuel gauge
Speedometer
3-3The fuel gauge indicates the quantity of the remaining
gasoline in the tank. The gauge needle moves from ìFî
(Full) to ìEî (Empty) as the fuel level decreases. When the
needle reaches the ìRED ZONEî, refill the tank at the
earliest opportunity.
NOTE:
The fuel meter needle does not move when the main switch
is in ìOFFî position. The speedometer shows riding speed.
This speedometer is equipped with an odometer.
1. Adjustind knob 2. Odometer1. Fuel gauge
Page 22 of 83
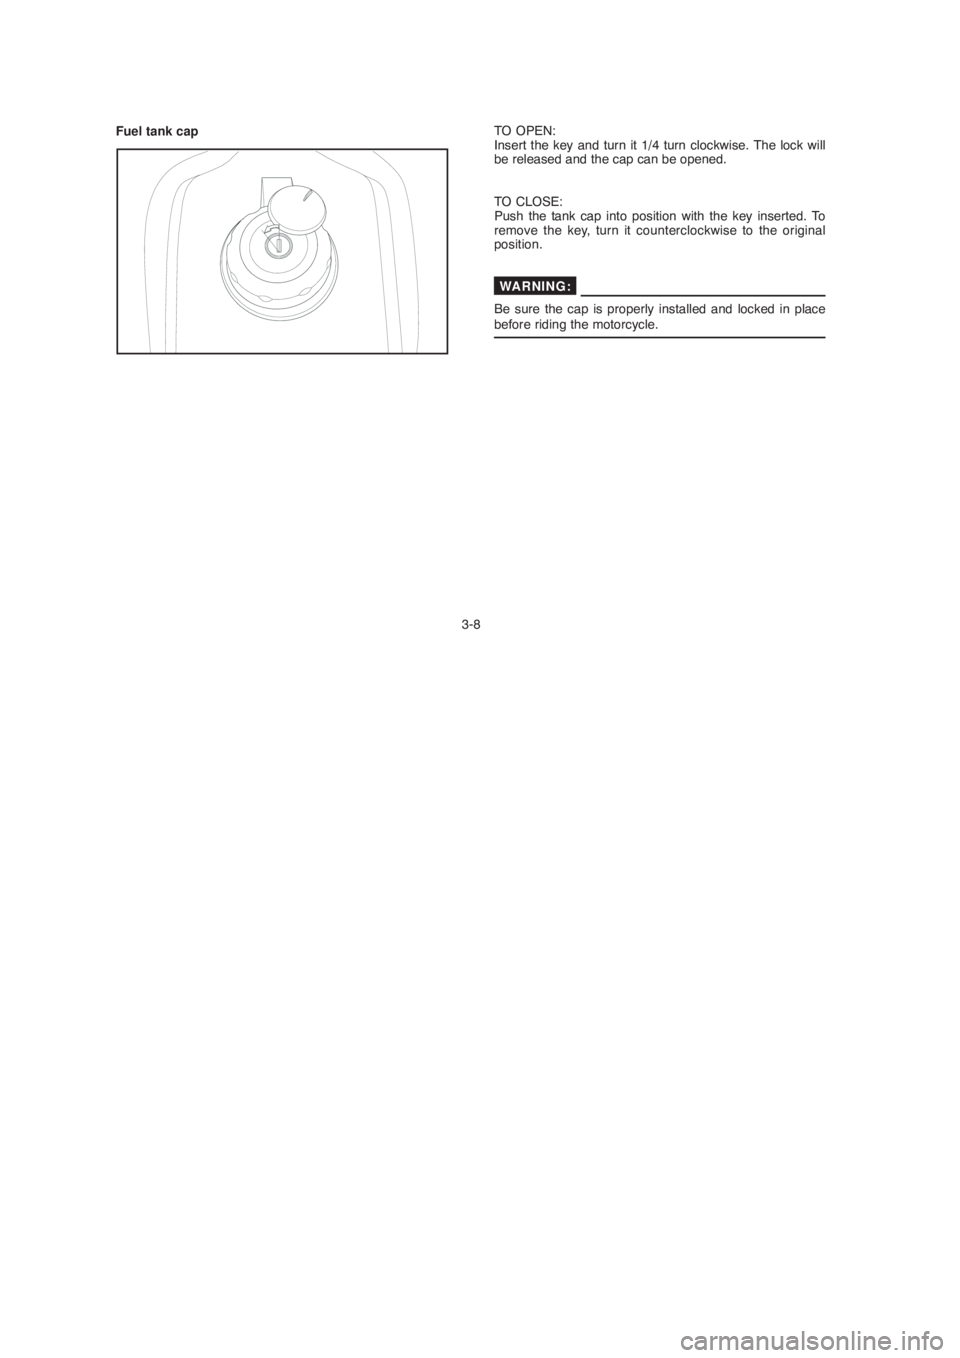
Fuel tank cap
3-8TO OPEN:
Insert the key and turn it 1/4 turn clockwise. The lock will
be released and the cap can be opened.
TO CLOSE:
Push the tank cap into position with the key inserted. To
remove the key, turn it counterclockwise to the original
position.
Be sure the cap is properly installed and locked in place
before riding the motorcycle.
WARNING:
Page 23 of 83
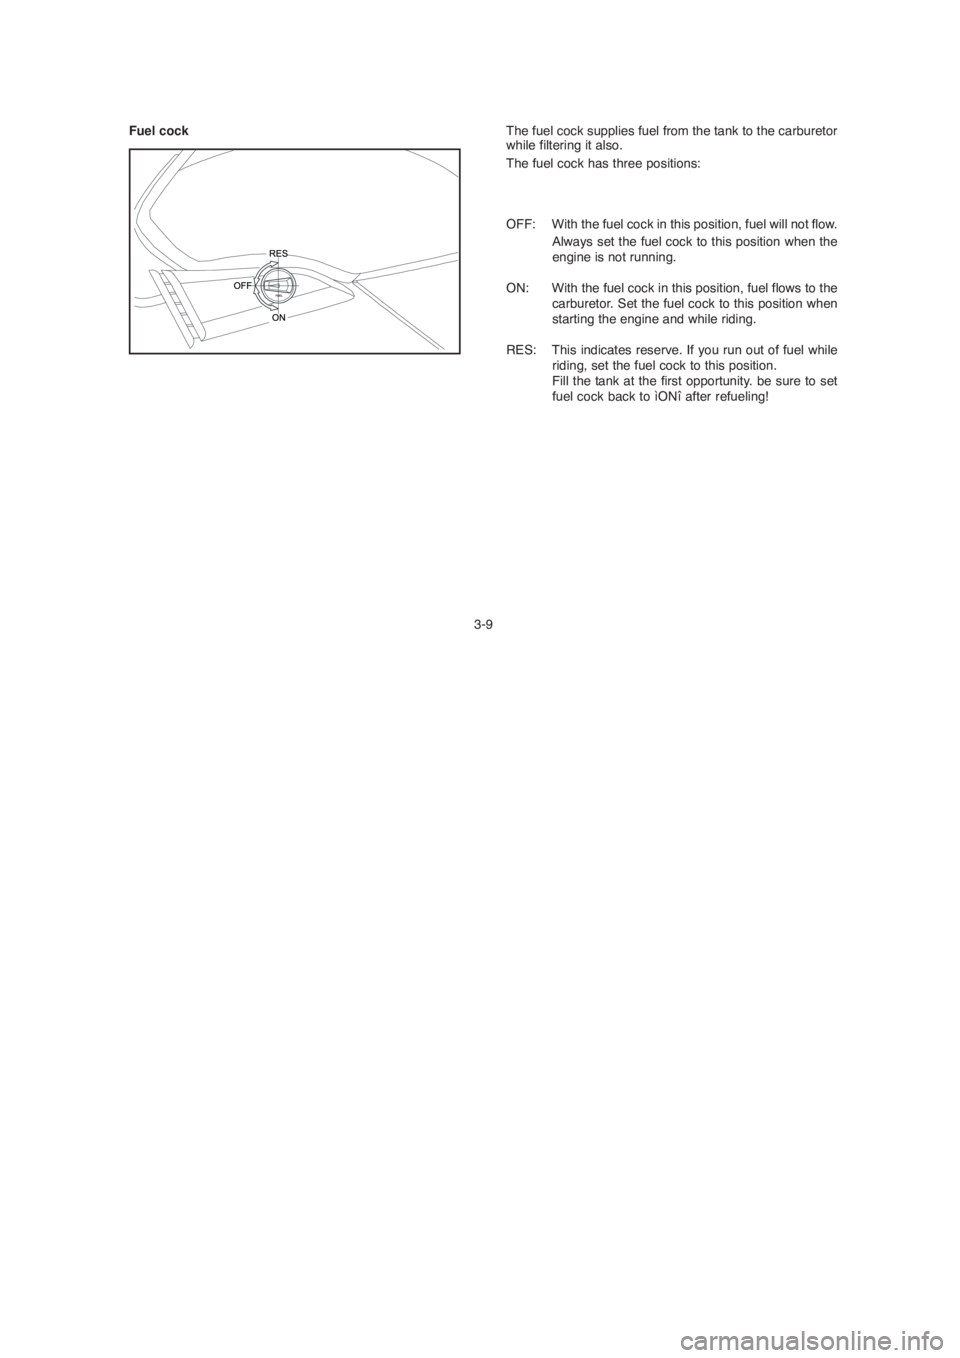
Fuel cock
3-9The fuel cock supplies fuel from the tank to the carburetor
while filtering it also.
The fuel cock has three positions:
OFF: With the fuel cock in this position, fuel will not flow.
Always set the fuel cock to this position when the
engine is not running.
ON: With the fuel cock in this position, fuel flows to the
carburetor. Set the fuel cock to this position when
starting the engine and while riding.
RES: This indicates reserve. If you run out of fuel while
riding, set the fuel cock to this position.
Fill the tank at the first opportunity. be sure to set
fuel cock back to ìONî after refueling!
Page 24 of 83
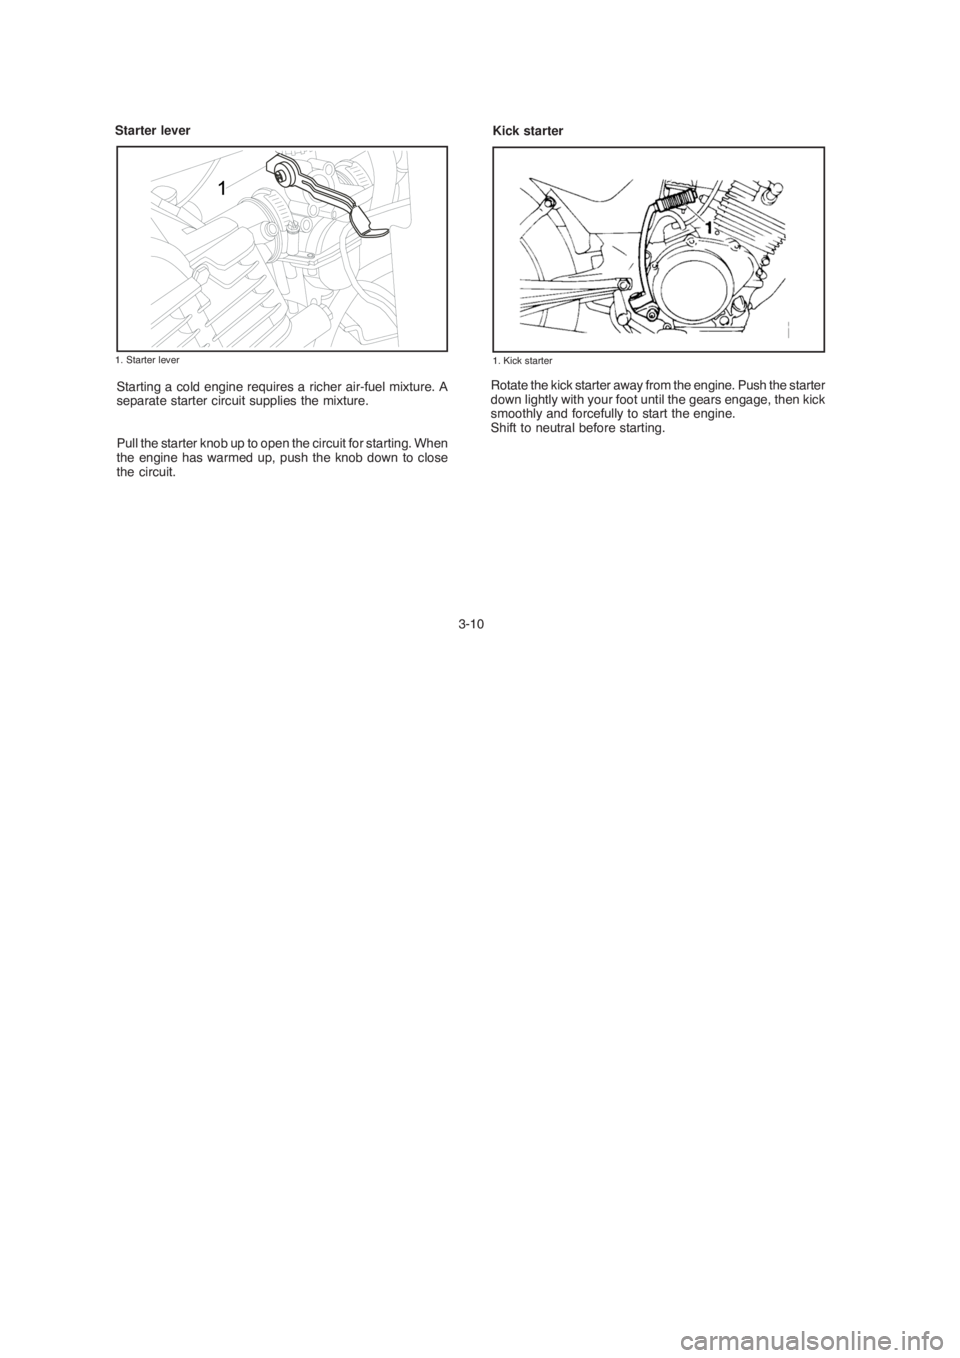
Starting a cold engine requires a richer air-fuel mixture. A
separate starter circuit supplies the mixture.
Pull the starter knob up to open the circuit for starting. When
the engine has warmed up, push the knob down to close
the circuit.
3-10 Starter lever
Rotate the kick starter away from the engine. Push the starter
down lightly with your foot until the gears engage, then kick
smoothly and forcefully to start the engine.
Shift to neutral before starting.
Kick starter
1. Starter lever
1. Kick starter
Page 30 of 83

4-2 NOTE:
Pre-operation checks should be made each time the motorcycle is used. Such an inspection can be thoroughly accomplished
in a very short time; and the added safety it assures is more than worth the time involved. If any maintenance service or
adjustment is needed, consult the chart above to refer to the pages in which the service or adjustment is described.
1. The engine, exhaust pipe, and muffler will be very hot after the engine has been run.
Be careful not to touch them or to allow any clothing item to contact them during inspection or repair.
2. If any item is not working properly, have it inspected and repaired before operating the motorcycle.
ITEMROUTINE
PAGE
Sidestand
Fittings / FastenersCheck all chassi fittings and fasteners.
Tighten / Adjust, if necessary
Check fuel level / top up as required.
Fuel tank
Lights, signals and switches
BatteryCheck electrolyte level.
Replenish with ìdistilled waterî if necessary.6-22
4-6 , 6-5
4-6 , 6-28 ~ 6-30
6-25 ~ 6-276-22
4-7
Check for proper operation
Front brake and clutch
lever pivotsCheck for smooth operation.
Lubricate if necessary
Check for smooth operation.
Lubricate if necessary
6-22 Check for smooth operation.
Lubricate if necessary Rear brake and shift pedal
shafts
WARNING:
Page 32 of 83
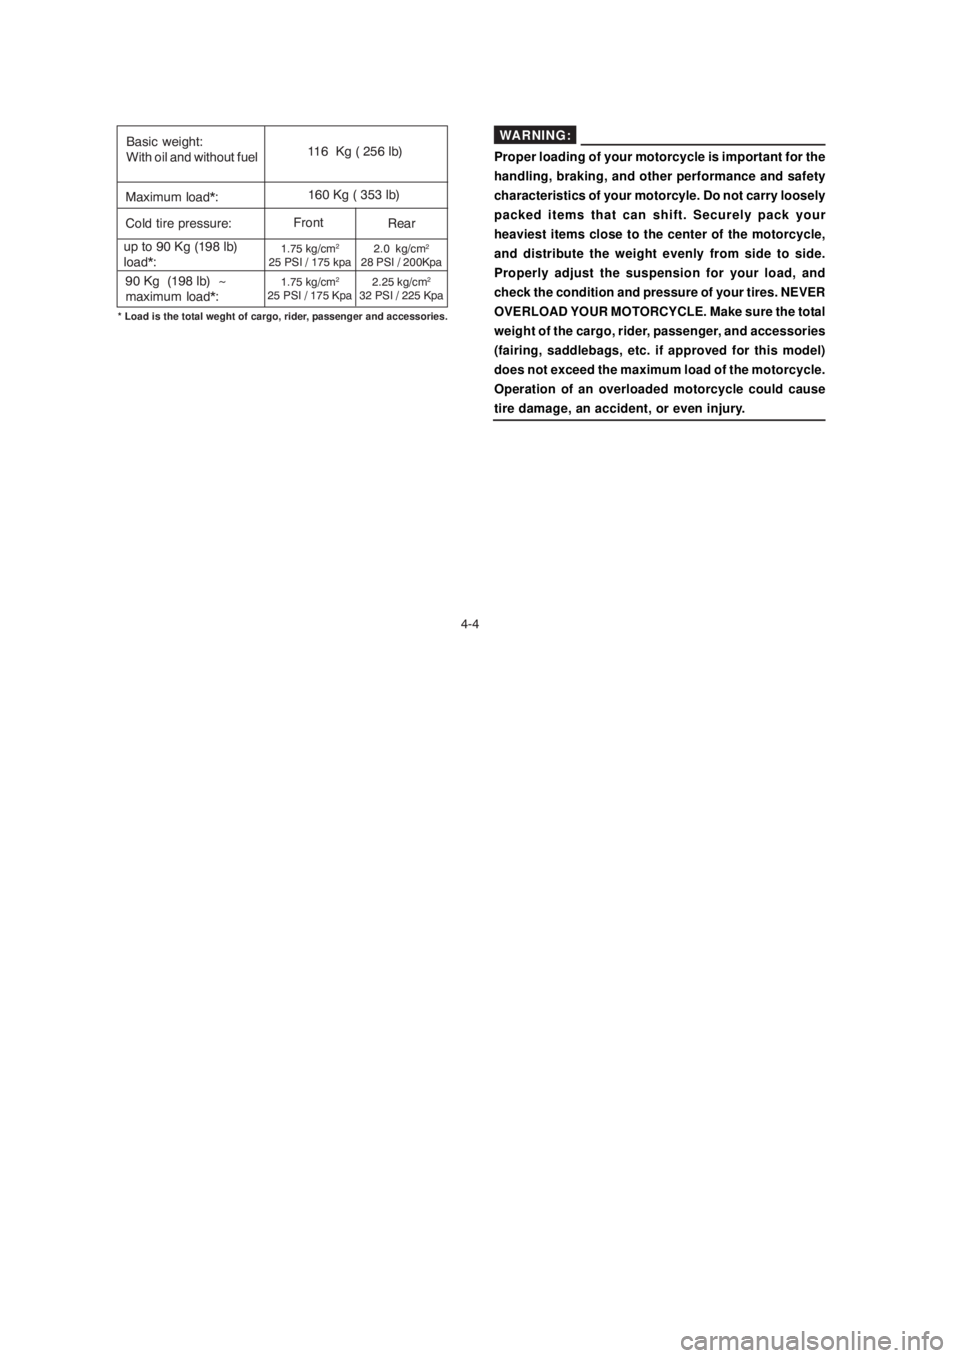
4-4
Basic weight:
With oil and without fuel
Maximum load*:
Cold tire pressure:
up to 90 Kg (198 lb)
load*:
90 Kg (198 lb) ~
maximum load*:116 Kg ( 256 lb)
160 Kg ( 353 lb)
Front
Rear
* Load is the total weght of cargo, rider, passenger and accessories.
1.75 kg/cm2
25 PSI / 175 kpa2.0 kg/cm
2
28 PSI / 200Kpa
1.75 kg/cm2
25 PSI / 175 Kpa2.25 kg/cm
2
32 PSI / 225 Kpa
Proper loading of your motorcycle is important for the
handling, braking, and other performance and safety
characteristics of your motorcyle. Do not carry loosely
packed items that can shift. Securely pack your
heaviest items close to the center of the motorcycle,
and distribute the weight evenly from side to side.
Properly adjust the suspension for your load, and
check the condition and pressure of your tires. NEVER
OVERLOAD YOUR MOTORCYCLE. Make sure the total
weight of the cargo, rider, passenger, and accessories
(fairing, saddlebags, etc. if approved for this model)
does not exceed the maximum load of the motorcycle.
Operation of an overloaded motorcycle could cause
tire damage, an accident, or even injury.
WARNING: