warning YAMAHA YD110 2005 User Guide
[x] Cancel search | Manufacturer: YAMAHA, Model Year: 2005, Model line: YD110, Model: YAMAHA YD110 2005Pages: 156, PDF Size: 1.49 MB
Page 58 of 156
![YAMAHA YD110 2005 User Guide u j[ksaA ;g lqfufpr djs fd lkeku]
e¨Vj&lkbZfdy pkyd] ;k=kh ¼lokj½ v©j
,lsljht+ t¨ bl ekWMy ds fy, LohÑr
fd, x, gS] dk dqy ot+u] e¨Vj&lkbZfdy
ds vf/kdre y¨M ls T;knk u g¨us ik,A
e¨Vj&lkbZfdy YAMAHA YD110 2005 User Guide u j[ksaA ;g lqfufpr djs fd lkeku]
e¨Vj&lkbZfdy pkyd] ;k=kh ¼lokj½ v©j
,lsljht+ t¨ bl ekWMy ds fy, LohÑr
fd, x, gS] dk dqy ot+u] e¨Vj&lkbZfdy
ds vf/kdre y¨M ls T;knk u g¨us ik,A
e¨Vj&lkbZfdy](/img/51/53675/w960_53675-57.png)
u j[ksaA ;g lqfuf'pr djs fd lkeku]
e¨Vj&lkbZfdy pkyd] ;k=kh ¼lokj½ v©j
,lsljht+ t¨ bl ekWMy ds fy, LohÑr
fd, x, gS] dk dqy ot+u] e¨Vj&lkbZfdy
ds vf/kdre y¨M ls T;knk u g¨us ik,A
e¨Vj&lkbZfdy ds vf/kdre y¨M ls T;knk
u g¨us ik,¡A e¨Vj&lkbZfdy d¨
*v¨ojy¨M^ dh fLFkfr esa pykus ij Vk;j
d¨ uqdlku g¨ ldrk gS] nq?kZVuk ?kV
ldrh gSA2. Tyre inspection
Always check the tyres before
operating the Motorcycle. If a tyre
tread shows crosswise lines
(minimum tread depth), if the tyre
has a nail or glass fragments in
it, or if the side wall is cracked,
contact a YMI dealer immediately
and have the tyre replaced.
Vk;j dh tk¡p
ges'kk e¨Vj&lkbZfdy pykus ls igys
Vk;j¨a dh tk¡p dj ysA ;fn Vk;j
dh VªsM] ØkWl dh gqbZ ykbusa n'kkZrh
gS ¼U;wure VªsM xgjkbZ½] ;fn Vk;j ds
vanj dhy vFkok 'kh'ks ds VqdMs fn[kkbZ
6.20
ns jgs g¨ vFkok Vk;j lkbZM ls
ØSd yx jgh g¨ r¨ rqjar
okbZñ,eñvkbZñ Mhyj ls laidZ djs
v©j Vk;j d¨ cnyok ysA
WARNING1. It is dangerous to ride with a
worn-out tyre. When a tyre
tread begins to show wear,
have a YMI dealer replace the
tyre immediately. psrkouh1.
f?kls gq, Vk;j ds lkFk xkM+h pykuk
[krjukd gSA tc Vk;j esa VªsMl esa
T+;nk f?klko 'kq# g¨ tk, r¨ rqjUr
okbZñ,eñvkbZñ Mhyj }kjk Vk;j cny
nsasaA
PERIODIC MAINTENANCE AND MINOR REPAIRlkef;d j[kj[kko rFkk ekewyh ejEer
Minimum tyre trade
depth:
(front and rear)
1.0 mmRear tyre size
fiNys Vk;j dk lkbt
:
2.75-18” 6PR
Front tyre size
vxys Vk;j dk lkbt
:
2.50-18” 4PR
U;wure Vk;j VªsM xgjkbZ
¼vxyh o fiNyh½
pg56_96.pmd2/25/2005, 9:59 AM 56
Page 61 of 156
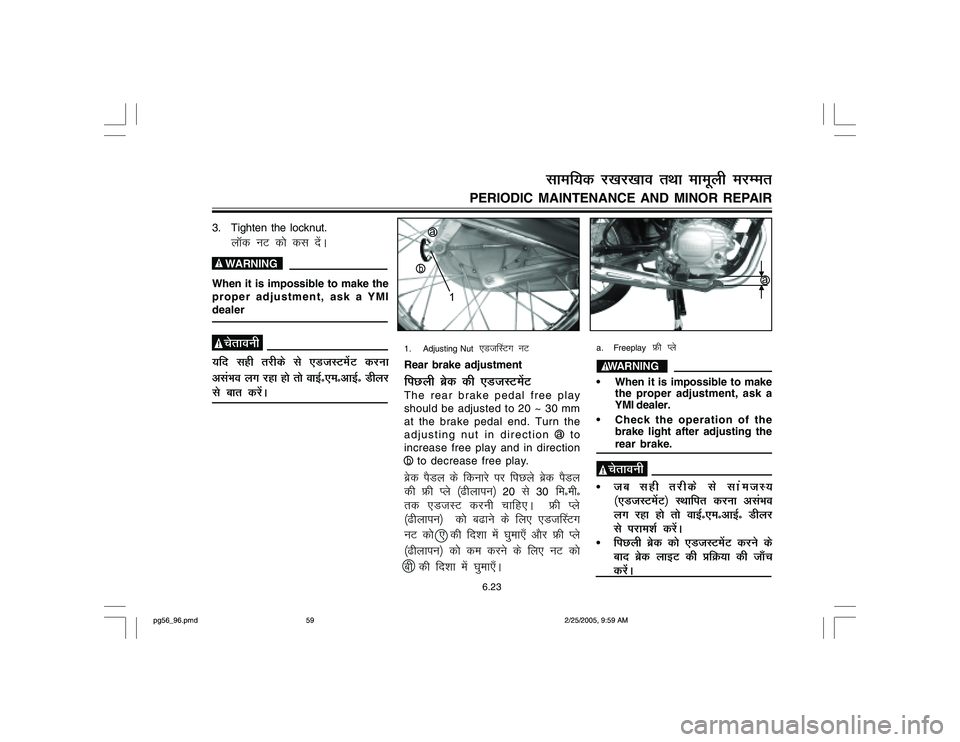
1. Adjusting Nut
,Mt¯LVx uV
Rear brake adjustment
fiNyh czsd dh ,MtLVesaVThe rear brake pedal free play
should be adjusted to 20 ~ 30 mm
at the brake pedal end. Turn the
adjusting nut in direction ç to
increase free play and in direction
è to decrease free play.czsd iSMy ds fdukjs ij fiNys czsd iSMy
dh Ýh Iys ¼
ls
30
feñehñ
rd ,MtLV djuh pkfg,A Ýh Iys
¼
¼
a. Freeplay
Ýh Iys
WARNING• When it is impossible to make
the proper adjustment, ask a
YMI dealer.
Check the operation of the
brake light after adjusting the
rear brake. psrkouh
tc lgh rjhds ls lkaetL;
¼,MtLVesaV½ LFkkfir djuk vlaHko
yx jgk g¨ r¨ okbZñ,eñvkbZñ Mhyj
ls ijke'kZ djsaA
fiNyh czsd d¨ ,MtLVesaV djus ds
ckn czsd ykbV dh çfØ;k dh tk¡p
djsaA
6.23
3. Tighten the locknut.
ykWd uV d¨ dl nsaA
WARNINGWhen it is impossible to make the
proper adjustment, ask a YMI
dealer psrkouh;fn lgh rjhds ls ,MtLVesaV djuk
vlaHko yx jgk g¨ r¨ okbZñ,eñvkbZñ Mhyj
ls ckr djsaA
PERIODIC MAINTENANCE AND MINOR REPAIR
lkef;d j[kj[kko rFkk ekewyh ejEer
ç
è
1ç
pg56_96.pmd2/25/2005, 9:59 AM 59
Page 65 of 156
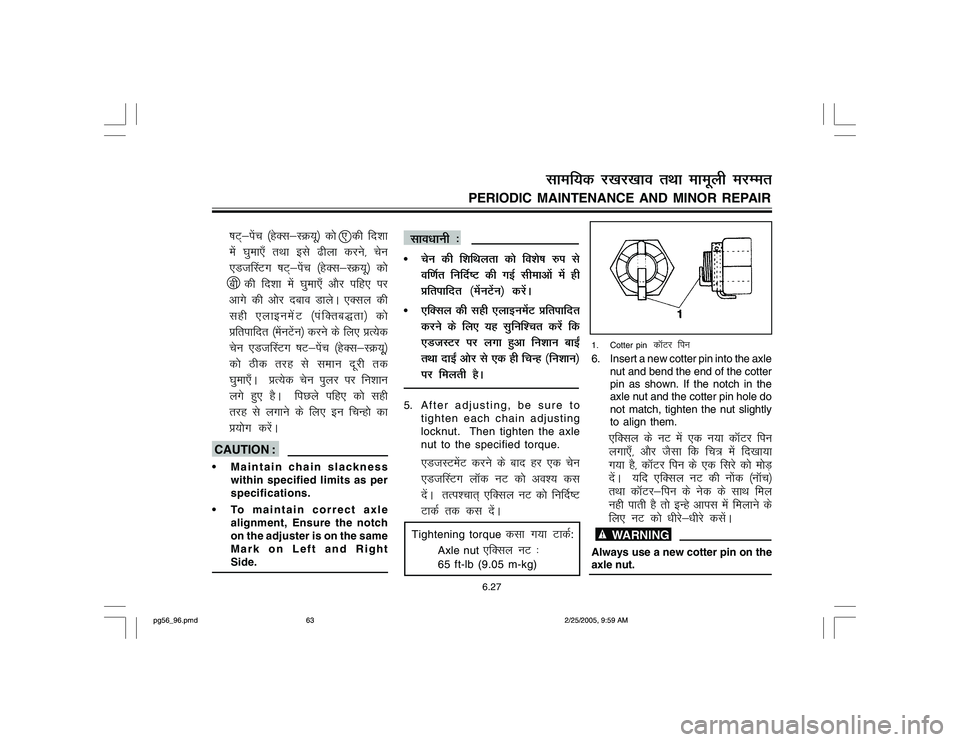
1. Cotter pin
dkWVj fiu
6. Insert a new cotter pin into the axle
nut and bend the end of the cotter
pin as shown. If the notch in the
axle nut and the cotter pin hole do
not match, tighten the nut slightly
to align them.
,fDly ds uV esa ,d u;k dkWVj fiu
yxk,¡] v©j tSlk fd fp=k esa fn[kk;k
x;k gS] dkWVj fiu ds ,d fljs d¨ e¨M+
nsaA ;fn ,fDly uV dh u¨ad ¼ukWp½
rFkk dkWVj&fiu ds usd ds lkFk fey
ugh ikrh gS r¨ bUgs vkil esa feykus ds
fy, uV d¨ /khjs&/khjs dlsaA
WARNINGAlways use a new cotter pin on the
axle nut.
lko/kkuh %
psu dh f'kfFkyrk d¨ fo'ks"k #i ls
of.kZr fufnZ"V dh xbZ lhekv¨a esa gh
çfrikfnr ¼esauVsau½ djsaA
,fDly dh lgh ,ykbuesaV çfrikfnr
djus ds fy, ;g lqfuf'pr djsa fd
,MtLVj ij yxk gqvk fu'kku ckb±
rFkk nkb± v¨j ls ,d gh fpUg ¼fu'kku½
ij feyrh gSA
5. After adjusting, be sure to
tighten each chain adjusting
locknut. Then tighten the axle
nut to the specified torque.
,MtLVesaV djus ds ckn gj ,d psu
,Mt¯LVx ykWd uV d¨ vo'; dl
nsaA rRi'pkr~ ,fDly uV d¨ fu£n"V
VkdZ rd dl nsaA
Tightening torque
dlk x;k VkdZ
:
Axle nut
,fDly uV %
65 ft-lb (9.05 m-kg)
"kV~&isap ¼gsDl&LØ;w½ d¨ , dh fn'kk
esa ?kqek,¡ rFkk bls
ch dh fn'kk esa ?kqek,¡ v©j ifg, ij
vkxs dh v¨j ncko MkysA ,Dly dh
lgh ,ykbuesaV ¼iafDrcðrk½ d¨
çfrikfnr ¼esauVsau½ djus ds fy, çR;sd
psu ,Mt¯LVx "kV&isap ¼gsDl&LØ;ww½
d¨ Bhd rjg ls leku nwjh rd
?kqek,¡A çR;sd psu iqyj ij fu'kku
yxs gq, gSA fiNys ifg, d¨ lgh
rjg ls yxkus ds fy, bu fpUg¨ dk
ç;¨x djsaA
CAUTION : Maintain chain slackness
within specified limits as per
specifications.
To maintain correct axle
alignment, Ensure the notch
on the adjuster is on the same
Mark on Left and Right
Side.
6.27
PERIODIC MAINTENANCE AND MINOR REPAIR
lkef;d j[kj[kko rFkk ekewyh ejEer
pg56_96.pmd2/25/2005, 9:59 AM 63
Page 66 of 156
psrkouh
,fDly uV ds fy, ges'kk u, dkWVj fiu
dk gh ç;¨x djsaA7. Adjust the free play in the brake
pedal.
czsd iSMy ds Ýh Iys d¨ ,MtLV
djsaA
p
WARNINGCheck the operation of the brake
light after adjusting the rear brake. psrkouhfiNyh czsd d¨ ,MtLV djus ds ckn
czsd dh cÙkh ¼ykbV½ dh çfØ;k d¨ tk¡p
ysaA
6.28
Drive chain lubricationMªkbo&psu dh Y;wczhds'kuThe chain consists of many parts
which work with each other. If the
chain is not maintained properly, it
will wear out quickly. Therefore, the
chain must be serviced regularly.
This service is especially
necessary when riding in dusty
areas.psu esa cgqr ls fgLls g¨rs gS t¨ ,d&nwljs
ds fy, dke djrs gSA ;fn psu dh
ns[kHkky lgh rjg ls u dh tk, r¨ ;g
tYnh f?kl tkrh gSA blfy, yxkrkj
bldh l£ol dk /;ku j[kuk pkfg,A
jsrhys bykd¨ esa e¨Vj&lkbZfdy pykrs
le; bl rjg dh l£ol djkuk cgqr
t#jh g¨ tkrk gSA1. The drive chain should be
lubricated every 5,000 km.
Mªkbo&psu d¨ çR;sd
5,000
fdñehñ
ds ckn Y;wczhdsV dj nsuh pkfg,A
2. To clean the chain thoroughly,
remove it from the Motorcycle,
dip it in solvent, and clean outas much dirt as possible.
Then, take the chain out of the
solvent to dry it, and then dip
the chain in oil of 20W40.
Remove the chain and hang it
on a peg for a while till the
excess oil drips down
completely. Then using a clean
cloth wipe the chain.
psu d¨ iw.kZr;k lkQ djus ds fy,
bls e¨Vj&lkbZfdy ls mrkj ysa] ækod
¼lkWyosaV½ esa Mqc¨ nsa v©j ftruk T;knk
laHko g¨ /kwy&feêh d¨ lkQ dj ysaA
mlds ckn psu d¨ lq[kkus ds fy,
ækod ls ckgj fudky ysa v©j fQj ls20W40
czkaM ds ¼vkW;y½ rsy esa iwjh
fHkx¨ nsaA rRi'pkr~ psu d¨ ckgj
fudky dj rc rd [kq¡Vh ij Vk¡x nsa]
tc rd fd Qkyrw rsy blesa ls iwjh
rjg fupqM+ u tk,A rc psu d¨ ,d
lkQ diM+s ls i¨aN ysaA
PERIODIC MAINTENANCE AND MINOR REPAIRlkef;d j[kj[kko rFkk ekewyh ejEer
pg56_96.pmd2/25/2005, 9:59 AM 64
Page 67 of 156
Throttle cable and grip
lubricationFkzkWVy dscy v©j fxzi Y;wczhdsV
djukAThe throttle twist grip assembly
should be greased at the time that
the cable is lubricated, since the
grip must be removed to get at the
end of the throttle cable. After
removing the screws, hold the end
of the cable up in the air and put in
several drops of lubricant. With the
throttle grip disassembled, coat the
metal surface of the grip assembly
with a suitable all purpose grease.ftl le; dscy dks Y;wczhdsaV fd;k tkrk
gS mlh le; ^FkzkWVy V~foLV fxzi vlsEcyh*rkj¨a d¨ tax&çfrj¨/kh rsy rFkk dscy ds
fdukj¨a ls yqczhdsV djsaA ;fn dscy lgh
rjhds ls dke ugh dj jgh g¨ r¨ okbZñ,eñvkbZñ
Mhyj ls bls cnyrs d¨ dgsaA
dh fxzlhax Hkh dh tkuh pkfg,] D;ksafd
fxzi dks FkzkVy dh dscy ds fljs rd ykus
ds fy,] bls ckgj fudky ysuk pkfg,A
isap gVkus ds ckn rkj ¼dscy½ ds ,d
fljs ¼fdukjs½ dks gok esa idM+s jgsa vkSj
ml ij Y;wczhdsaV dh cgqr lh cwansa MkysaA
FkzkWVy fxzi dks [kksyus ¼vyx&vyx djus½
ds lkFk fxzi vlsEcyh dks /kkrq ds ry ij
;Fkk;ksX;] cgqmís'kh; ¼vkWy ijit+½ xzhl
dh dks¯Vx dj nsaA
Cable inspection and
lubricationdscy dk fujh{k.k ,oa Y;wczhds'ku WARNINGDamage to the outer housing of
cables may lead to internal
rusting and interfere with the
cable movement. Replace
damaged cables as soon as
possible to prevent unsafe
conditions. psrkouhdscy ¼rkj¨a½ dh ckgjh gkůlx ds
{kfrxzLr g¨us ls ;g vanj ls tax idM+
ldrh gS v©j blls dscy d¨ Åij uhps
ewoesaV djus esa eqf'dy vk ldrh gSA
vlqjf{kr fLFkfr;¨a ¼gkykr¨aa½ ls cpus ds
fy, {kfrxzLr rkj¨a ¼dscy½ d¨ ftruh
tYnh g¨ lds cny nsaALubricate the cables and cable
ends with anticorrosive oil . If a
cable does not operate smoothly,
ask a YMI dealer to replace it.Recommended lubricant
çLrkfod yqczhdsVj %20W40 Type SG
6.29
PERIODIC MAINTENANCE AND MINOR REPAIR
lkef;d j[kj[kko rFkk ekewyh ejEer
pg56_96.pmd2/25/2005, 9:59 AM 65
Page 69 of 156
![YAMAHA YD110 2005 User Guide Front fork inspectionÝaV QksdZ dk fujh{k.k WARNINGSecurely support the Motorcycle
so there is no danger of it falling
over. psrkouhlqjf{kr rjhds ls eksVjlkbfdy dks lgkjk
nsa] ftlls blds fxjus dk YAMAHA YD110 2005 User Guide Front fork inspectionÝaV QksdZ dk fujh{k.k WARNINGSecurely support the Motorcycle
so there is no danger of it falling
over. psrkouhlqjf{kr rjhds ls eksVjlkbfdy dks lgkjk
nsa] ftlls blds fxjus dk](/img/51/53675/w960_53675-68.png)
Front fork inspectionÝaV QksdZ dk fujh{k.k WARNINGSecurely support the Motorcycle
so there is no danger of it falling
over. psrkouhlqjf{kr rjhds ls eksVjlkbfdy dks lgkjk
nsa] ftlls blds fxjus dk [krjk u jgssA1. Visual check
Check for scratches or
damage on the inner tube and
traces if oil leakage from the
front fork.
n f"Vxr ¼us=kh;½ tk¡p %
vkxs yxs QksdZ esa ls vR;f/kd rsy
fjlko vkSj vanj dh V~;wc ij [kjksapks
rFkk blds {kfrxzLr gksus dh tk¡p
djsaA
2. Operation check
Place the Motorcycle on a level
place.
izfØ;k dh tk¡p %
eksVjlkbfdy dks ,d ysoy fd;s gq,
¼likV½ LFkku ij [kM+k djsaA
a. Hold the Motorcycle in an
upright position and apply the
front brake.
eksVjlkbfdy dks lh/kk Åij mBkdj
j[ksa vkSj vxyh czsd dk mi;ksx djsaA
b. Push down hard on the
handlebars several times and
check if the fork bounds
smoothly.
gSafMyckjksa dk dbZ ckj tksj ls uhps
dh vksj nck,a vkSj bl ckr dh tk¡p
djsa fd D;k QksdZ vkjke ls ^mNky*
ys ysrk gSA
6.31
WARNING
If the center and/or sidestand does
not move smoothly, consult a YMI
dealer. psrkouh;fn eksVjlkbfdy ds chp okyk rFkk
lkbM dk LVS.M vkjke ls ¼fcuk fdlh
:dkoV½ ds dke ugha djrs gksa rks
okbZñ,eñvkbZñ Mhyj ls laidZ djsaA
PERIODIC MAINTENANCE AND MINOR REPAIR
lkef;d j[kj[kko rFkk ekewyh ejEer
pg56_96.pmd2/25/2005, 9:59 AM 67
Page 70 of 156
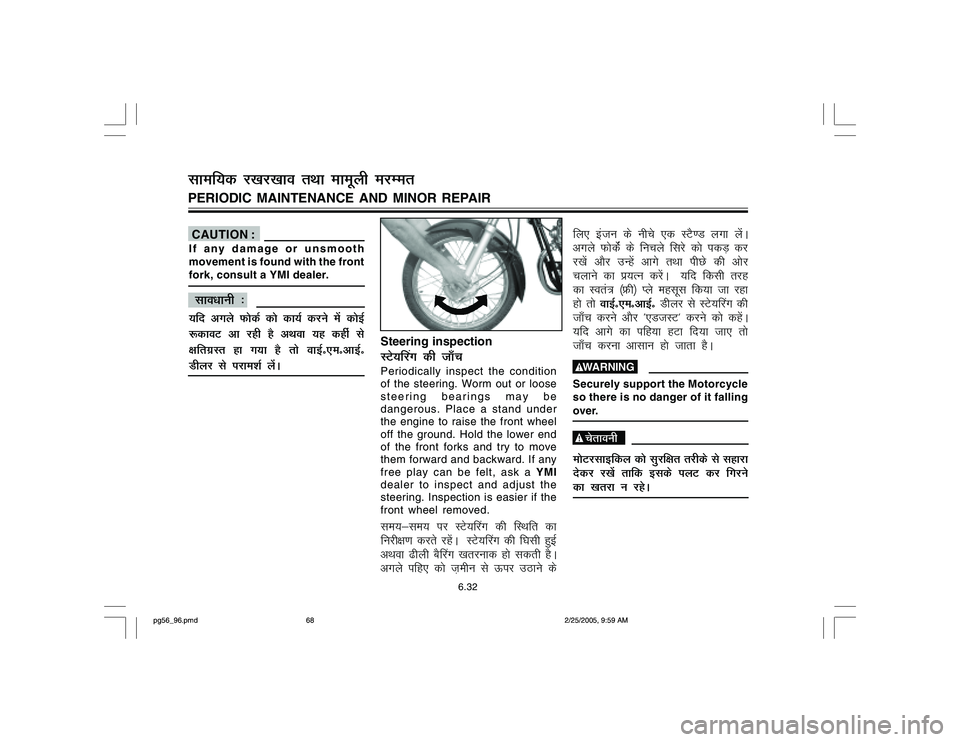
fy, batu ds uhps ,d LVS.M yxk ysaaA
vxys QksdsZa ds fupys fljs dks idM+ dj
j[ksa vkSj mUgsa vkxs rFkk ihNs dh vksj
pykus dk iz;Ru djsaA ;fn fdlh rjg
dk Lora=k ¼Ýh½ Iys eglwl fd;k tk jgk
gks rks okbZñ,eñvkbZñ Mhyj ls LVs;¯jx dh
tk¡p djus vkSj ^,MtLV* djus dks dgsaA
;fn vkxs dk ifg;k gVk fn;k tk, rks
tk¡p djuk vklku gks tkrk gSA WARNINGSecurely support the Motorcycle
so there is no danger of it falling
over. psrkouheksVjlkbfdy dks lqjf{kr rjhds ls lgkjk
nsdj j[ksa rkfd blds iyV dj fxjus
dk [krjk u jgsA
Steering inspectionLVs;¯jx dh tk¡pPeriodically inspect the condition
of the steering. Worm out or loose
steering bearings may be
dangerous. Place a stand under
the engine to raise the front wheel
off the ground. Hold the lower end
of the front forks and try to move
them forward and backward. If any
free play can be felt, ask a YMI
dealer to inspect and adjust the
steering. Inspection is easier if the
front wheel removed.le;≤ ij LVs;¯jx dh fLFkfr dk
fujh{k.k djrs jgasA LVs;¯jx dh f?klh gqbZ
vFkok
6.32
CAUTION :If any damage or unsmooth
movement is found with the front
fork, consult a YMI dealer. lko/kkuh %;fn vxys QksdZ dks dk;Z djus esa dksbZ
:dkoV vk jgh gS vFkok ;g dgha ls
{kfrxzLr gk x;k gS rks okbZñ,eñvkbZñ
Mhyj ls ijke'kZ ysaAPERIODIC MAINTENANCE AND MINOR REPAIRlkef;d j[kj[kko rFkk ekewyh ejEer
pg56_96.pmd2/25/2005, 9:59 AM 68
Page 72 of 156
Antidote
fo"k uk'kd %
EXTERNAL: Flush with water.ckgjh ¼okg~;½ %
ikuh ls vPNh rjg ls
/kks ysaA
INTERNAL: Drink large quantities
of water or milk. Follow with milk
of magnesia, beaten egg, or
vegetable oil. Call a physician
immediately.vkarfjd %
cgqr vf/kd ek=kk esa ikuh
vFkok nw/k ih ysaA ckn esa lQsn feV~Vh
;qDr nw/k] QsaVk gqvk vaMk vFkok ouLifr
rsy dk lsou djsaA fpfdRld dks rqjar
cqyk ysaA
EYES: Flush with water for 15
minutes and get prompt medical
attention Batteries produce
explosive gases. Keep sparks,
flame, cigarettes etc., away.
Ventilate when charging or using
in an enclosed space. Always
shield your eyes when working
near batteries. KEEP OUT OF
REACH OF CHILDREN.
vk¡[kas % vk¡[kksa dks
15
feuV rd ikuh ls
vPNh rjg ls /kks,a vkSj tYnh ls MkDVj
dks fn[kk,aA cSV~jh] ls foLQksVd xSsl
fudyrh gS] fpaxkjh vkx dh yiV ¼ykS½
rFkk flxjsV bR;kfn ls bls nwj j[ksaA
can LFkku ij bls pkt+Z djrs le;
vFkok iz;ksx djrs le; gok ds vkus&tkus
ds LFkku dks [kqyk j[ksaA cSV~jh ds ut+nhd
dke djrs le; ges'kk viuh vk¡[kksa dks
ENSURE THAT BATTERY ELECTROLYTE LEVEL IS MAINTAINED BETWEEN
MAX. AND MIN. MARKS. IF REQUIRED, ADD DISTILLED WATER ONLY
6.34
WARNINGBattery electrolyte is poisonous
and dangerous, causing severe
burns, etc. It contains sulfuric acid.
Avoid contact with skin, eyes or
clothing. psrkouhcSV~jh dk ^bysDV ªksykbZV* fo"kSyk vkSj
[krjukd gksrk gS ftlds laidZ esa vkuss
ij rst tyu bR;kfn gksrh gSA blesa
lY¶;wfjd vEy gksrk gSA bls Ropk]
vk¡[kksa rFkk diM+ksa ds lkFk laidZ gksus ls
cpk,aAPERIODIC MAINTENANCE AND MINOR REPAIRlkef;d j[kj[kko rFkk ekewyh ejEer
pg56_96.pmd2/25/2005, 9:59 AM 70
Page 73 of 156
Replenishing the battery fluidcSV~jh esa nzo ¼¶Y;wM½ dks iqu% HkjukA poorly maintained battery will
corrode and discharge quickly. The
battery fluid should be checked at
least once a month. The level
should be between the minimum
level and maximum level marks.
Use only distilled water if refilling
is necessary.lgh rjg ls ns[kHkky u djus ij cSV~jh
tax idM+ ysrh gS vkSj tYnh fMLpkt+Z gks
tkrh gSA cSV~jh ds nzo dks eghus esa de
ls de ,d ckj vo'; tk¡p ysuk pkfg,A
nzo dk Lrj ¼ysoy½ U;wre rFkk vf/kdre
fpUgksa ds e/; gksuh pkfg,A bls fQj ls
Hkjus ds fy, dsoy fMfLVYM okWVj dk
iz;ksx djsaA CAUTION :Normal tap water contains
minerals which are harmful to a
battery; therefore, refill only with
distilled water.
lko/kkuh %
Vadh ds lk/kkj.k ikuh esa [kfut inkFkZ
gksrs gSaA tks cSV~jh ds fy, gkfudkjd gks
ldrs gSaA blfy, dsoy fMfLVYM okWVj
ls gh bls iqu% HkjsA
WARNING
psrkouhbl ckr dk /;ku j[ksa fd cSV~jh dk nzo
eksVjlkbfdy dh pSu ij u fc[kjus
ik,A cSV~jh dk ¶Y;wM pSu dks det+ksj
dj ldrk gS] ftlls pSu dh dke djus
dh fe;kn de gks ldrh gS vkSj laHkor%
blls dksbZ nq?kZVuk Hkh ?kV ldrh gSA
lqfuf'pr djsa fd ^bysDV ªksykbZV* dk Lrj U;wure rFkk vf/kdre fu'kkuksa ds chp esa gh jgsA
;fn t+:jr iM+s rks dsoy ^fMfLVYM okWVj* dk gh iz;ksx djsaA
6.35
Take care not to spill battery fluid
on the chain causing shorter chain
life and possibly result in an
accident.
PERIODIC MAINTENANCE AND MINOR REPAIR
lkef;d j[kj[kko rFkk ekewyh ejEer
pg56_96.pmd2/25/2005, 9:59 AM 71
Page 76 of 156
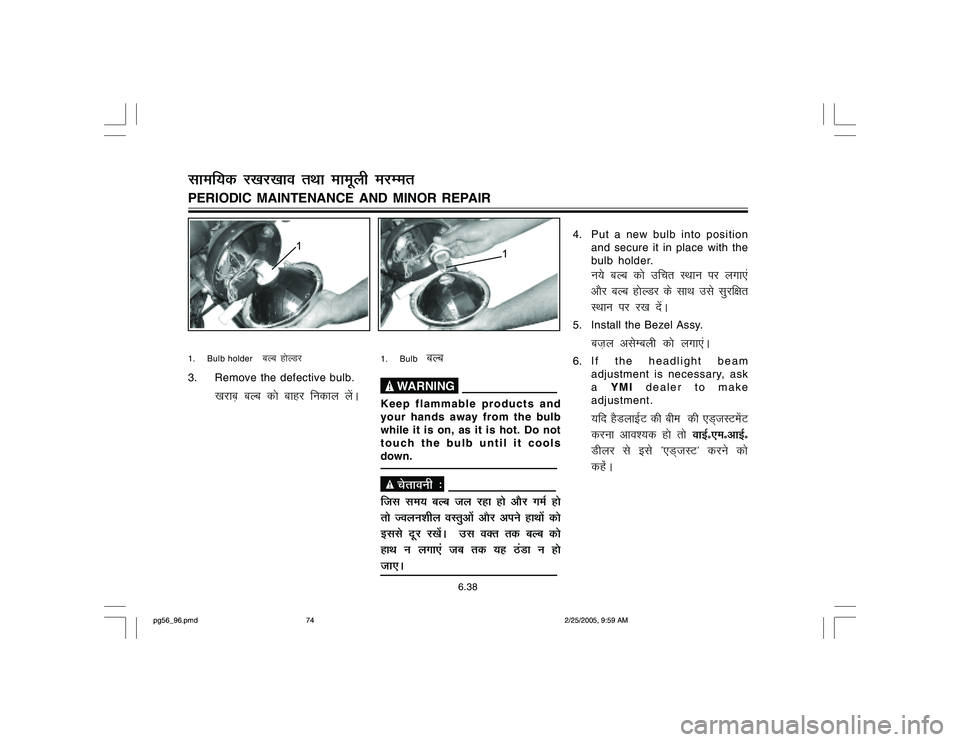
1. Bulb
cYc
WARNINGKeep flammable products and
your hands away from the bulb
while it is on, as it is hot. Do not
touch the bulb until it cools
down. psrkouh %ftl le; cYc ty jgk gks vkSSj xeZ gks
rks Toyu'khy oLrqvksa vkSj vius gkFkksa dks
blls nwj j[ksaA ml oDr rd cYc dks
gkFk u yxk,a tc rd ;g BaMk u gks
tk,A
1. Bulb holder
cYc gksYMj
3. Remove the defective bulb.
[kjkc+ cYc dks ckgj fudky ysaA
4. Put a new bulb into position
and secure it in place with the
bulb holder.
u;s cYc dks mfpr LFkku ij yxk,a
vkSj cYc gksYMj ds lkFk mls lqjf{kr
LFkku ij j[k nsaA
5. Install the Bezel Assy.
ct+y vlsEcyh dks yxk,aA
6. If the headlight beam
adjustment is necessary, ask
a YMI dealer to make
adjustment.
;fn gSMykbZV dh che dh ,M~tLVesaV
djuk vko';d gks rks okbZñ,eñvkbZñ
Mhyj ls bls ^,M~tLV* djus dks
dgasA
6.38
PERIODIC MAINTENANCE AND MINOR REPAIRlkef;d j[kj[kko rFkk ekewyh ejEer
1
1
pg56_96.pmd2/25/2005, 9:59 AM 74