warning YAMAHA YD110 2005 Owner's Manual
[x] Cancel search | Manufacturer: YAMAHA, Model Year: 2005, Model line: YD110, Model: YAMAHA YD110 2005Pages: 156, PDF Size: 1.49 MB
Page 78 of 156

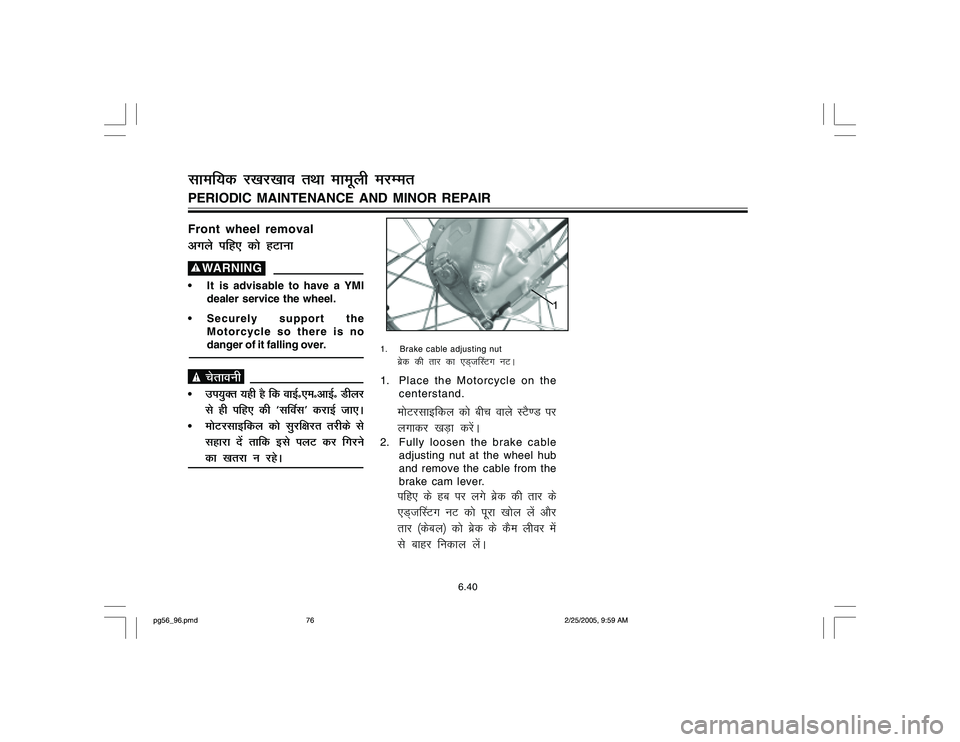
1. Brake cable adjusting nut
czsd dh rkj dk ,M~t¯LVx uVA
1. Place the Motorcycle on the
centerstand.eksVjlkbfdy dks chp okys LVS.M ij
yxkdj [kM+k djsaA
2. Fully loosen the brake cable
adjusting nut at the wheel hub
and remove the cable from the
brake cam lever.
ifg, ds gc ij yxs czsd dh rkj ds
,M~t¯LVx uV dks iwjk [kksy ysa vkSj
rkj ¼dscy½ dks cszd ds dSe yhoj esa
ls ckgj fudky ysaA
Front wheel removalvxys ifg, dks gVkuk WARNING It is advisable to have a YMI
dealer service the wheel.
Securely support the
Motorcycle so there is no
danger of it falling over. psrkouh
mi;qDr ;gh gS fd okbZñ,eñvkbZñ Mhyj
ls gh ifg, dh ^l£ol* djkbZ tk,A
eksVjlkbfdy dks lqjf{kjr rjhds ls
lgkjk nsa rkfd bls iyV dj fxjus
dk [krjk u jgsA
6.40
PERIODIC MAINTENANCE AND MINOR REPAIRlkef;d j[kj[kko rFkk ekewyh ejEer
1
pg56_96.pmd2/25/2005, 9:59 AM 76
Page 80 of 156

Rear wheel removalfiNys ifg, dks gVkuk
WARNING
It is advisable to service the
wheel by YMI dealer.
Securely support the
Motorcycle so there is no
danger of it falling over. psrkouh
mi;qDr ;gh gS fd ifg, dh ^l£ol*
okbZñ,eñvkbZñ Mhyj ls gh djkbZ tk,A
eksVjlkbfdy dk lqjf{kr rjhds ls
lgkjk nsdj [kM+k djsaA rkfd bls
iyV dj fxjus dk [krjk u jgsA
Axle nut torque
,Dly ds uV dk VkdZ %
33 ft.-lb (4.55 m-kg)
2. Make sure the axle nut is
properly torqued and a new
cotter pin is installed.
;g lqfuf'pr djsa fd ,Dly ds uV
dks lgh rjhds ls dlk
gqvk gks vkSj
ml ij u;k dkWVj fiu yxk gksA
WARNINGAlways use a new cotter pin. psrkouhges'kk dkWVj fiu dk iz;ksx djsaA3. Adjust the free play in the brake
lever.
czsd yhoj ds Ýh&Iys dks ,M~tLV
djsaA
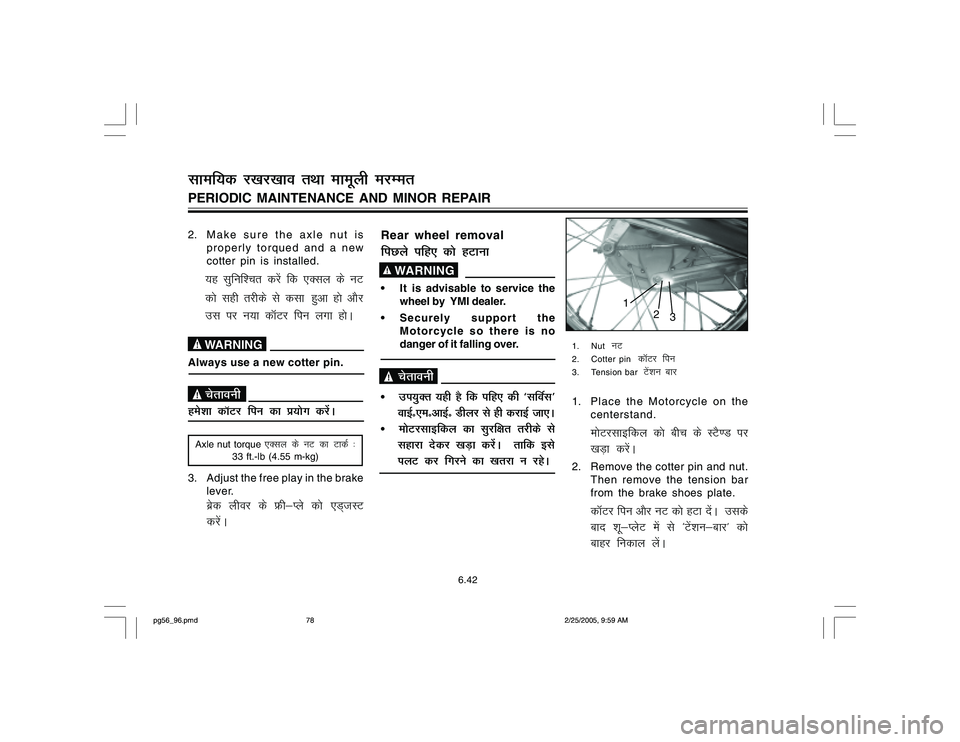
1. Nut
uV
2. Cotter pin
dkWVj fiu
3. Tension bar
Vsa'ku ckj
1. Place the Motorcycle on the
centerstand.
eksVjlkbfdy dks chp ds LVS.M ij
[kM+k djsaA
2. Remove the cotter pin and nut.
Then remove the tension bar
from the brake shoes plate.
dkWVj fiu vkSj uV dks gVk nsaA mlds
ckn 'kw&IysV esa ls ^Vsa'ku&ckj* dks
ckgj fudky ysaA
6.42
PERIODIC MAINTENANCE AND MINOR REPAIRlkef;d j[kj[kko rFkk ekewyh ejEer
2
1
3
pg56_96.pmd2/25/2005, 9:59 AM 78
Page 82 of 156

Rear wheel installationfiNys ifg, dks yxkuk1. Install the rear wheel and the
axle.
fiNys ifg, vkSj ,Dly dks yxk;saA
2. Install the axle nut.
,Dly ds uV dks yxk;saA
3. Insert the brake rod into the
brake cam lever and install the
brake free play adjusting nut.
czsd dh NM+ dks cszd ds dSe yhoj esa
cSBk,a ¼Mkysa½ vkSj ^czsd Ýh Iys ,M~t¯LVx
uV dks* ogka yxk nsaA
4. Install the tension bar on to the
brake shoe plate and tighten
the tension bar nut to the
specified tightening torque.
czsd 'kw IysV ij Vsa'ku ckWj dks yxk;sa
rFkk dk Vsa'ku ckWj uV dks fu£n"V
VkdZ ij dl nsaA
5. Take the Motorcycle off the
centerstand.
eksVjlkbfdy dks lsaVj LVS.M ls uhps
mrkj nsaA
Specified torque
fu£n"V VkdZ %
Tension bar nut
Vsa'ku&ckj dk uV %
14 ft-lb (1.9 mkg)
Axle nut
,Dly uV %
65 ft-lb (9.05 mkg)
6. Tighten the axle nut to the
specified tightening torque.
Then install a new cotter pin.
,Dly ds uV dks fu£n"V VkdZ rd ys
tkdj vPNh rjg ls dl nsaA
rRi'pkr~ u;k dkWVj fiu yxk,aA
WARNINGAlways use a new cotter pin. psrkouhges'kk u;s dkWVj&fiu dk iz;ksx djsaA7. Adjust the rear brake pedal free
play. (See page 6-23)
fiNyh czsd&iSMy dh Lora=k ¼Ýh½ Iys
dks ,M~tLV djsaA
¼i "B la[;k
6-23
ns[ksaa½
WARNINGCheck the operation of the brake
light after adjusting the rear
brake. psrkouhfiNyh czsd dks ,M~tLV djus ds ckn
czsd ykbV dh dk;Z&iz.kkyh dh tk¡p djsaA
6.44
PERIODIC MAINTENANCE AND MINOR REPAIRlkef;d j[kj[kko rFkk ekewyh ejEer
pg56_96.pmd2/25/2005, 9:59 AM 80
Page 84 of 156

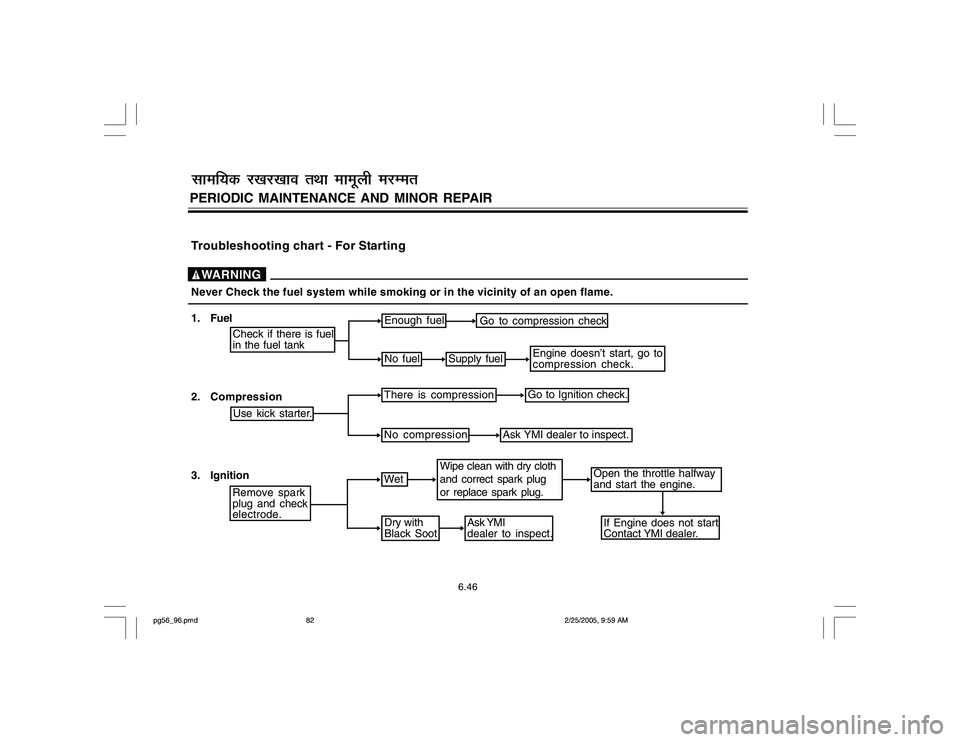
Enough fuel
Go to compression check
No fuel
Supply fuel
Engine doesn’t start, go to
compression check.
There is compression
Go to Ignition check.
No compression
Ask YMI dealer to inspect.
Wipe clean with dry cloth
and correct spark plug
or replace spark plug.
Wet
Open the throttle halfway
and start the engine.If Engine does not start
Contact YMI dealer.
Ask YMI
dealer to inspect.
Dry with
Black Soot
Check if there is fuel
in the fuel tankUse kick starter.Remove spark
plug and check
electrode.
Troubleshooting chart - For Starting
WARNINGNever Check the fuel system while smoking or in the vicinity of an open flame.
1. Fuel
2. Compression
3. Ignition
6.46
PERIODIC MAINTENANCE AND MINOR REPAIRlkef;d j[kj[kko rFkk ekewyh ejEer
pg56_96.pmd2/25/2005, 9:59 AM 82