brake YAMAHA YD110 2005 Owners Manual
[x] Cancel search | Manufacturer: YAMAHA, Model Year: 2005, Model line: YD110, Model: YAMAHA YD110 2005Pages: 156, PDF Size: 1.49 MB
Page 7 of 156
Clutch lever............................................. 3-3
Shift pedal............................................. 3-4
Front brake lever..................................... 3-4
Rear brake pedal.................................... 3-4
Fuel tank cap......................................... 3-5
Fuel...................................................... 3-5
Fuel cock.............................................. 3-6
Starter Lever .......................................... 3-7
KIck Starter............................................ 3-7
Seat...................................................... 3-8
Storage compartment............................ 3-9
Rear Shocker 3-9
Handle Seat/Stay Lock ..........................3-10
fo"k; & lwph
lM+d lqj{kk ds ladsrfooj.kck¡bZa vkÑfr
nk¡bZa vkÑfr
eq[; cVu ¼esu fLop½ de LVs;¯jx ykWd
bafMdsVj ykbV~l LihMksehVjTABLE OF CONTENTS
1
ROAD SAFETY TIPS............................... 1-1
2
DESCRIPTION........................................ 2-1
Left view.................................................. 2-1
Right view................................................ 2-2
Controls/Instruments................................ 2-3
3
INSTRUMENT AND CONTROL
FUNCTIONS............................................ 3-1
Main switch cum steering lock................. 3-1
Speedometer............................................3-2
Indicator Lights........................................ 3-2
Handlebar switches.................................. 3-3gSaMyckj fLop ¼cVu½fu;a=k.k vkSj ;a
=k
Dyp yhoj
f'k¶V iSMy
vxys czsd dk yhoj
fiNys czsd dk yhoj
b±/ku VSad dk
b±/ku dh VksaVh ¼dkWd½
LVkVZj yhoj
fdd LVkVZj
lhV
laxzg ¼LVksjst daikVZesaV½fj;j 'kkWdjgSaMy lhV@LVs ykWd
;a=k vkSj fu;a=k.k mi;ksx ¼QaD'kaUl½
PG1_55.pmd2/25/2005, 10:04 AM 5
Page 9 of 156
Front fork inspection ...................................6-31vxys QksdZ dh tk¡pSteering inspection.....................................6-32LVs;¯jx dh tk¡pWheel bearings..........................................6-33ifg, dh cs;¯jxBattery .......................................................6-33cSV~jhFuse replacement.......................................6-36¶;wt+ dks cnyukHeadlight bulb replacement........................6-37gSM ykbV ds cYc dk cnyukTurn signal and taillight bulb replacement ...6-39eqM+us okys ¼VuZ½ flXuy rFkk ihNs dh ykbV ds cYc dks
cnyukFront wheel removal....................................6-40vxys ifg, dks gVkukFront wheel installaion................................6-41vxys ifg, dks yxkukRear wheel removal....................................6-42fiNys ifg, dks gVkukRear wheel installation...............................6-44fiNys ifg, dks yxkuk
fo"k; & lwph
TABLE OF CONTENTS
Clutch lever free play adjustment..............6-22
Dyp yhoj dh
,sM~tLVesaV
Front brake adjustment................... ......6-22vxyh czsd dh ,sM~tLVesaVRear brake adjustment............................6-23fiNyh cszd dh ,sM~tLVesaVBrake light switch adjustment..................6-24czsd ykbV cVu ¼fLop½ dh ,sM~tLVesaVChecking the brake shoes.......................6-24czsd 'kwt dh tk¡pDrive chain slack check...........................6-25MªkbZo pSu dh
Page 13 of 156
5. Ride thoughtfully, planning your route well in advance.
l¨p&le> dj ;k=kk djsaA viuh ;k=kk ds ekxZ dh ;¨tuk igys ls cuk ysaA
6.Give proper Signals and use Horn and Headlights judiciously.
flxuy lgh rjhds ls nsa rFkk gkuZ ,oe~ gSMykbV dk ç;¨x foosdrk ls djsaA
7. Don’t ride in another motorist’s blind spot.
nwljh xkM+h ds pkyd dks vki ges'kk fn[kkbZ nsus pkfg,A
8. Always make pre-ride safety checks before you start the Engine.
batu LVkVZ ¼pkyw½ djus ls iwoZ okgu pykus ls iwoZ dh tkus okyh lqj{kk tk¡p dj ysaA
SAFE BRAKINGlqjf{kr czs¯dxUse the basic methods of braking effectively.czs¯dx ds lgh rjhd¨ dk ç;¨x djsaA1. Engine Brake : When the Throttle is released, compression backs up and acts as the Engine Brake.
If the riding condition allows, reduce speed by shifting the Gear down.
batu czsd % tc FkzkWVy d¨ N¨M+k tkrk gS] daçs'ku okfil Åij dh vksÎj vkrk gS rFkk batu dh czsd ds :i esa dk;Z djrk gSA
pykrs oDr vxj gks ldrk gS rks xkM+h d¨ fupys xh;j esa Mkydj xfr d¨ de djssaA
2. Front and Rear Brakes : It is important to apply equal force to the Front and Rear Brakes simultaneously.
vxyh rFkk fiNyh czsd % ;g vko';d gS fd vxyh rFkk fiNyh czsd ij lkFk&lkFk ,d tSlk ncko cuk;k tk,A
ROAD SAFETY TIPSlM+d lqj{kk ds lwpuk;sa
1.2
PG1_55.pmd2/25/2005, 10:04 AM 11
Page 14 of 156
CAUTION :
Use Front and Rear Brakes simultaneously.
Be sure not to disengage the clutch while braking.
While riding downhill always use Engine as a Brake and never ride in Neutral Gear.
While riding down hill do not switch off ignition while Engine is in gear. lko/kkuh %vxyh rFkk fiNyh czsd dk ç;¨x lkFk&lkFk djsaA
;g lqfuf'pr djsa fd czsd yxkrs le; Dyp ls laidZ d¨ u N¨M+k tk,A
fdlh igkM+h ls uhps dh vksÎj vkrs le; ges'kk batu d¨ czsd dh rjg ç;¨x djsa rFkk U;wVªy&xh;j esa xkM+h dHkh u
pyk,A
Å¡pkbZ ls uhps dh rjQ vkrs gq, tc batu xh;j esa g¨ r¨ bXuh'ku ¼Toyu½ ds cVu d¨ can u djsaAROAD SAFETY TIPSlM+d lqj{kk ds
lwpuk;sa
1.3
PG1_55.pmd2/25/2005, 10:04 AM 12
Page 18 of 156
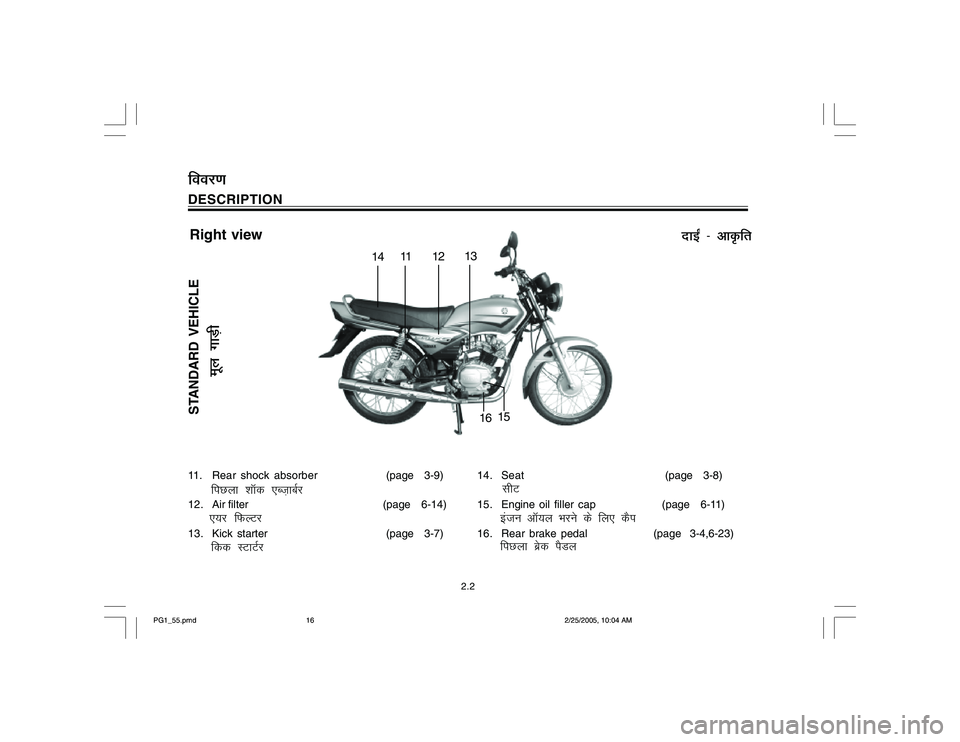
DESCRIPTION11. Rear shock absorber(page 3-9)
12. Air filter (page 6-14)
13. Kick starter (page 3-7)
fiNyk 'kkWd ,Ct+kcZj
,;j fQYVj
fdd LVkVZj
14. Seat(page 3-8)
15. Engine oil filler cap (page 6-11)
16. Rear brake pedal (page 3-4,6-23)
lhV
batu vkW;y Hkjus ds fy, dSi
fiNyk czsd iSMy
nkb± & vkÑfr
Right viewfooj.k
2.2
ewy xkM+h
STANDARD VEHICLE
1411 1 213
1615
PG1_55.pmd2/25/2005, 10:04 AM 16
Page 19 of 156
DESCRIPTION
fu;a=k.k@baLVªwesaV
Control / Instruments
fooj.k
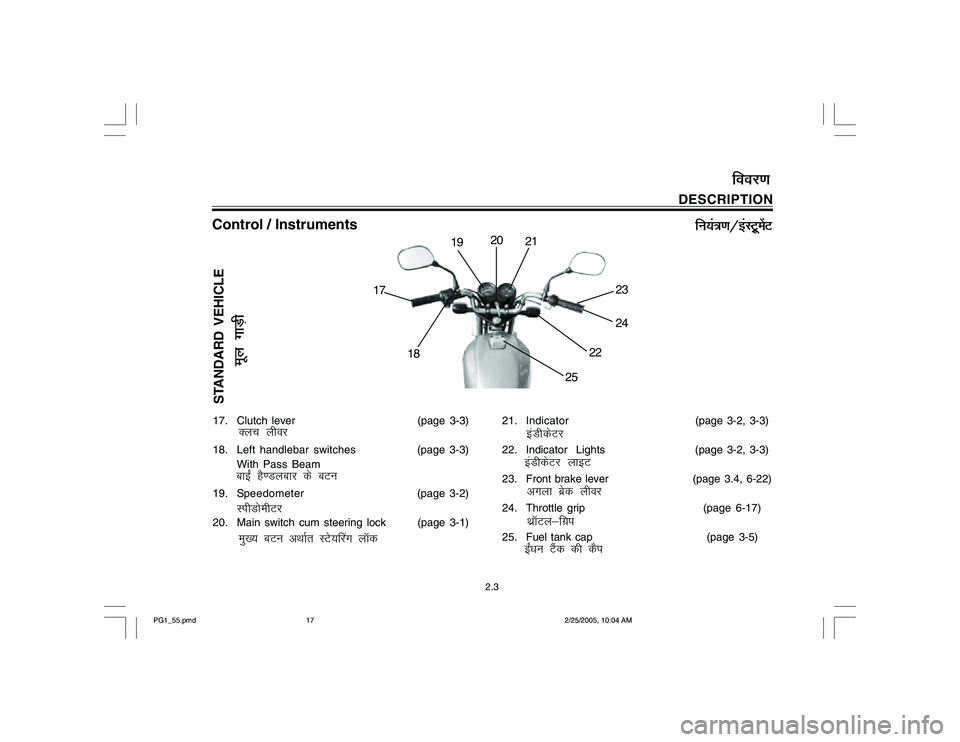
17. Clutch lever (page 3-3)
18. Left handlebar switches(page 3-3)
With Pass Beam
19. Speedometer(page 3-2)
20. Main switch cum steering lock (page 3-1)
Dyp yhoj
ckb± gS.Myckj ds cVu
LihMksehVj
eq[; cVu vFkkZr LVs;¯jx ykWd
21. Indicator(page 3-2, 3-3)
22. Indicator Lights (page 3-2, 3-3)
23. Front brake lever (page 3.4, 6-22)
24. Throttle grip(page 6-17)
25. Fuel tank cap (page 3-5)
baMhdsVj ykbV
vxyk czsd yhoj
FkzkWVy&fxzi
b±/ku VSad dh dSibaMhdsVj
2.3
ewy xkM+h
STANDARD VEHICLE
18 171920
21
23
24
22
25
PG1_55.pmd2/25/2005, 10:04 AM 17
Page 23 of 156
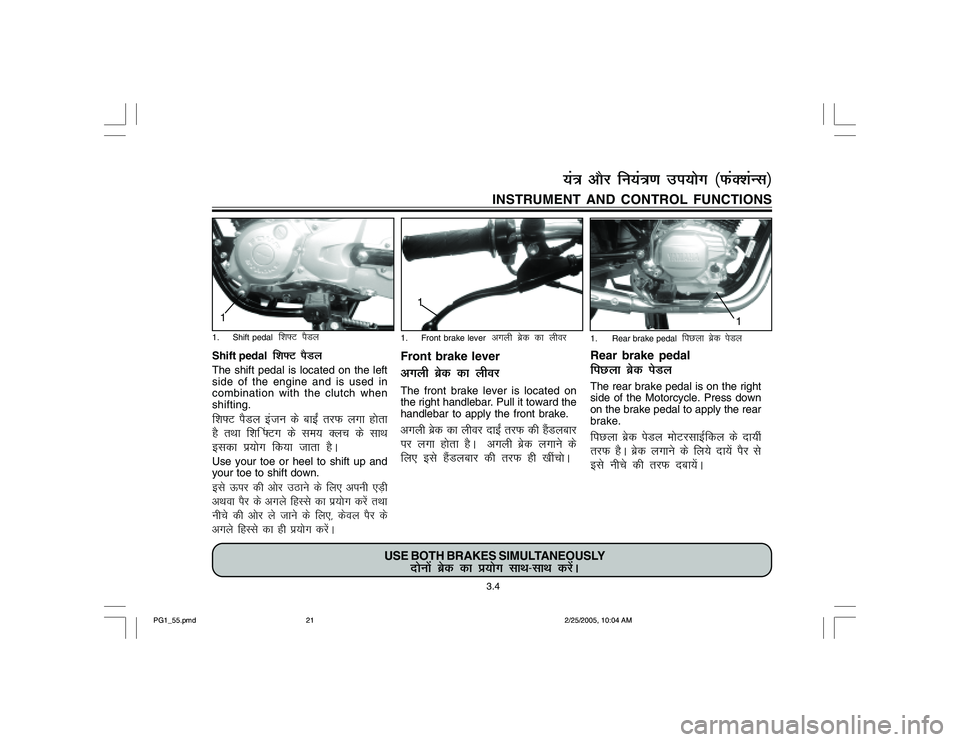
Shift pedal
f'k¶V iSMy
The shift pedal is located on the left
side of the engine and is used in
combination with the clutch when
shifting.f'k¶V iSMy batu ds ckb± rjQ yxk gksrk
gS rFkk f'k¯ ¶Vx ds le; Dyp ds lkFk
bldk iz;ksx fd;k tkrk gSAUse your toe or heel to shift up and
your toe to shift down.bls Åij dh vksj mBkus ds fy, viuh ,M+h
vFkok iSj ds vxys fgLls dk iz;ksx djsa rFkk
uhps dh vksj ys tkus ds fy,] dsoy iSj ds
vxys fgLls dk gh iz;ksx djsaA
Rear brake pedalfiNyk czsd isMyThe rear brake pedal is on the right
side of the Motorcycle. Press down
on the brake pedal to apply the rear
brake.fiNyk cszd isMy eksVjlkbZfdy ds nk;ha
rjQ gSA czsd yxkus ds fy;s nk;sa iSj ls
bls uhps dh rjQ nck;saA INSTRUMENT AND CONTROL FUNCTIONS
Front brake levervxyh czsd dk yhojThe front brake lever is located on
the right handlebar. Pull it toward the
handlebar to apply the front brake.vxyh czsd dk yhoj nkb± rjQ dh gSaMyckj
ij yxk gksrk gSA vxyh czsd yxkus ds
fy, bls gSaMyckj dh rjQ gh [khapksA
USE BOTH BRAKES SIMULTANEOUSLY
nksuksa cszd dk iz;ksx lkFk&lkFk djsaA
3.4
;a=k vkSj fu;a=k.k mi;ksx ¼QaD'kaUl½
11
11. Shift pedal
f'k¶V iSMy
1. Front brake lever
vxyh czsd dk yhoj
1. Rear brake pedal
fiNyk czsd isMy
PG1_55.pmd2/25/2005, 10:04 AM 21
Page 30 of 156
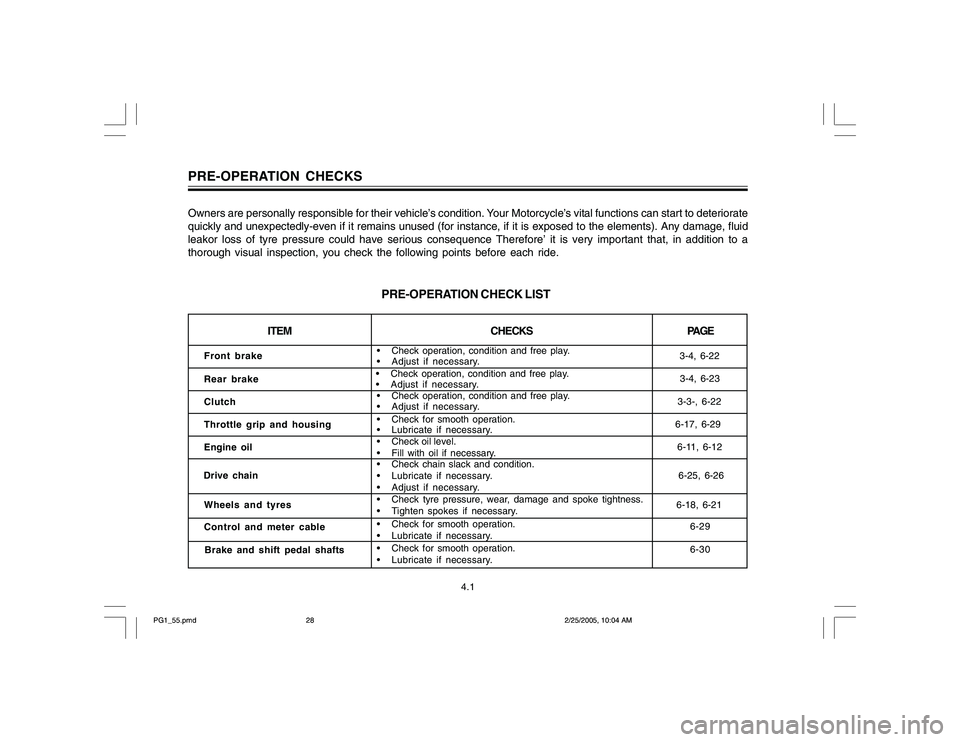
Owners are personally responsible for their vehicle’s condition. Your Motorcycle’s vital functions can start to deteriorate
quickly and unexpectedly-even if it remains unused (for instance, if it is exposed to the elements). Any damage, fluid
leakor loss of tyre pressure could have serious consequence Therefore’ it is very important that, in addition to a
thorough visual inspection, you check the following points before each ride.PRE-OPERATION CHECKS
PRE-OPERATION CHECK LIST
ITEMPAGE CHECKS
Front brake
Rear brake
Clutch
Throttle grip and housing
Engine oil
Drive chain
Wheels and tyres
Control and meter cable
Brake and shift pedal shafts
Check tyre pressure, wear, damage and spoke tightness.
Tighten spokes if necessary. Check operation, condition and free play.
Adjust if necessary.
Check for smooth operation.
Lubricate if necessary.
Check oil level.
Fill with oil if necessary.
Check chain slack and condition.
Lubricate if necessary.
Adjust if necessary.
Check for smooth operation.
Lubricate if necessary. Check for smooth operation.
Lubricate if necessary. Check operation, condition and free play.
Adjust if necessary. Check operation, condition and free play.
Adjust if necessary.3-4, 6-22
3-4, 6-23
3-3-, 6-22
6-17, 6-29
6-11, 6-12
6-29
6-30 6-25, 6-26
6-18, 6-21
4.1
PG1_55.pmd2/25/2005, 10:04 AM 28
Page 31 of 156
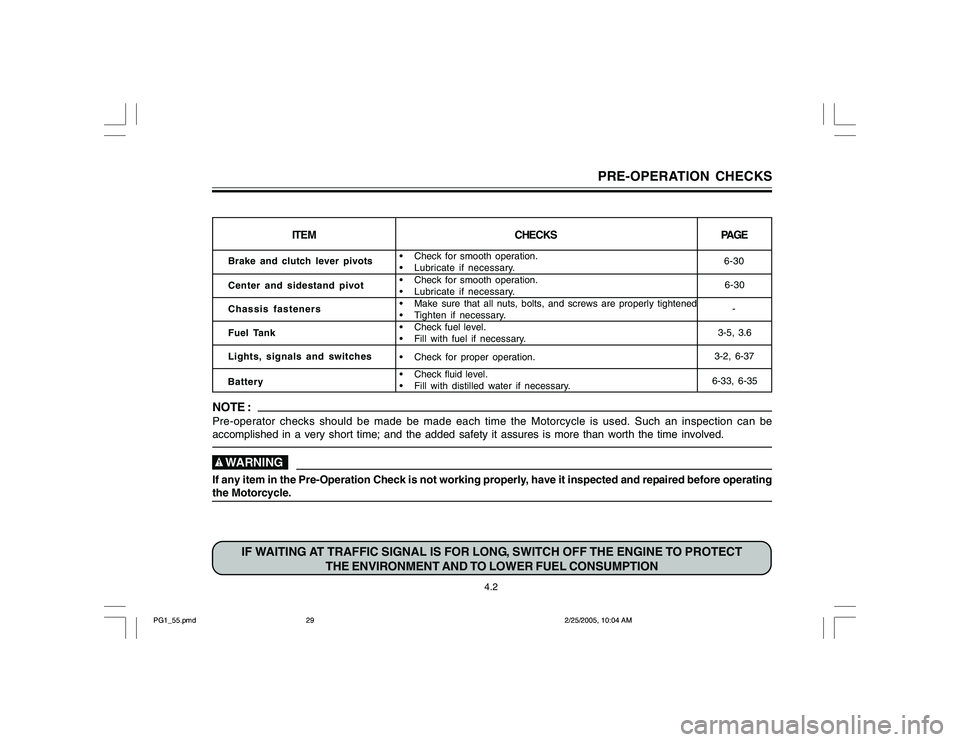
4.2
PRE-OPERATION CHECKS
IF WAITING AT TRAFFIC SIGNAL IS FOR LONG, SWITCH OFF THE ENGINE TO PROTECT
THE ENVIRONMENT AND TO LOWER FUEL CONSUMPTION
NOTE :Pre-operator checks should be made be made each time the Motorcycle is used. Such an inspection can be
accomplished in a very short time; and the added safety it assures is more than worth the time involved. WARNINGIf any item in the Pre-Operation Check is not working properly, have it inspected and repaired before operating
the Motorcycle.
ITEMPAGE CHECKS
Brake and clutch lever pivots
Center and sidestand pivot
Chassis fasteners
Fuel Tank
Lights, signals and switches
Battery
Check for smooth operation.
Lubricate if necessary.
Check for proper operation. Make sure that all nuts, bolts, and screws are properly tightened
Tighten if necessary.
Check fuel level.
Fill with fuel if necessary.6-30
6-30
-
3-5, 3.6
3-2, 6-37
6-33, 6-35 Check for smooth operation.
Lubricate if necessary.
Check fluid level.
Fill with distilled water if necessary.
PG1_55.pmd2/25/2005, 10:04 AM 29
Page 41 of 156
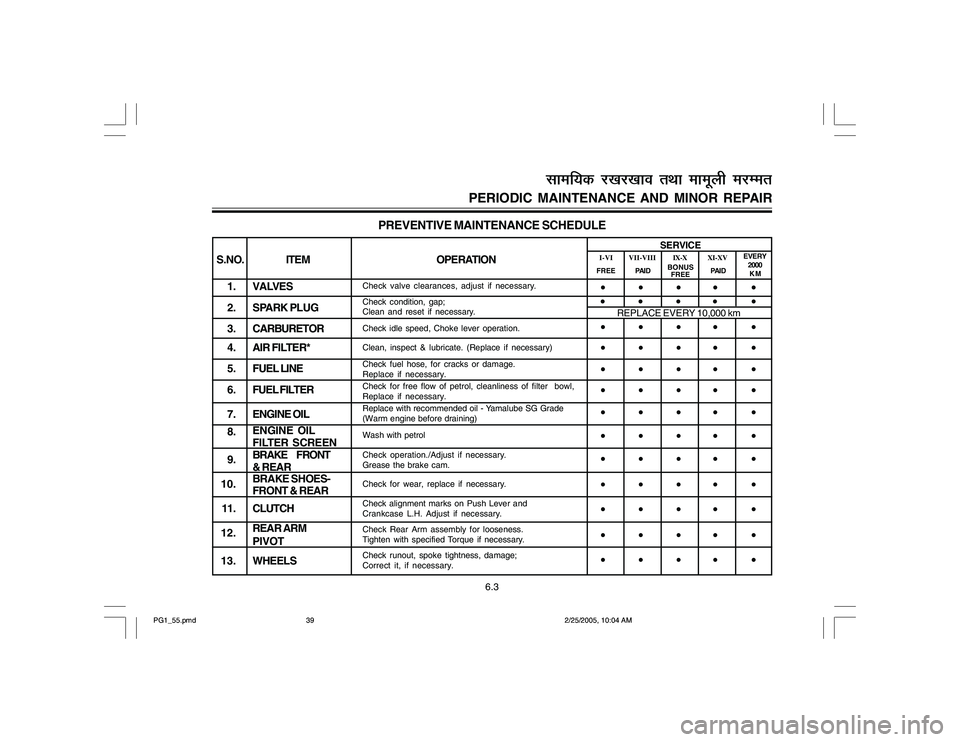
PREVENTIVE MAINTENANCE SCHEDULE
S.NO.ITEM OPERATION
1. VALVES
2. SPARK PLUG
3 . CARBURETOR
4. AIR FILTER*
5. FUEL LINE
6 . FUEL FILTER
7. ENGINE OIL
8.
9.
10.
11. CLUTCH
12.
1 3 . WHEELS
Check valve clearances, adjust if necessary.
Check condition, gap;
Clean and reset if necessary.
Check idle speed, Choke lever operation.
Clean, inspect & lubricate. (Replace if necessary)
Check fuel hose, for cracks or damage.
Replace if necessary.
Replace with recommended oil - Yamalube SG Grade
(Warm engine before draining)
Wash with petrol
Check operation./Adjust if necessary.
Grease the brake cam.
Check for wear, replace if necessary.
Check alignment marks on Push Lever and
Crankcase L.H. Adjust if necessary.
Check Rear Arm assembly for looseness.
Tighten with specified Torque if necessary.
Check runout, spoke tightness, damage;
Correct it, if necessary.Check for free flow of petrol, cleanliness of filter bowl,
Replace if necessary.
ENGINE OIL
FILTER SCREEN
BRAKE FRONT
& REAR
BRAKE SHOES-
FRONT & REAR
REAR ARM
PIVOT
REPLACE EVERY 10,000 km
•••
••
SERVICE
FREE
PAIDEVERY
2000
KM I-VIVII-VIIIIX-XXI-XV
BONUS
FREEPAID
6.3
PERIODIC MAINTENANCE AND MINOR REPAIR
lkef;d j[kj[kko rFkk ekewyh ejEer
•••
••
••• ••
••• ••
••• ••
••• ••
••• ••
••• ••
••• ••
••• ••
••• ••
••• •• ••• ••
PG1_55.pmd2/25/2005, 10:04 AM 39