bulb YAMAHA YFM350R 2012 Owners Manual
[x] Cancel search | Manufacturer: YAMAHA, Model Year: 2012, Model line: YFM350R, Model: YAMAHA YFM350R 2012Pages: 140, PDF Size: 4.03 MB
Page 10 of 140
Lubricating the swingarm pivots ............... 8-34
Lubricating the rear suspension relay arm and connecting arm pivoting points ........ 8-35
Lubricating the upper and lower arm pivots ...................................................... 8-36
Lubricating the steering shaft ................... 8-37
Battery ...................................................... 8-37
Replacing the fuse ................................... 8-40
Replacing a headlight bulb ....................... 8-40
Adjusting a headlight beam ...................... 8-42
Replacing the tail/brake light bulb ............ 8-43
Removing a wheel .................................... 8-43
Installing a wheel ...................................... 8-44
Troubleshooting ....................................... 8-44
Troubleshooting chart .............................. 8-46
CLEANING AND STORAGE .......................... 9-1 Cleaning ..................................................... 9-1
Storage ....................................................... 9-2
SPECIFICATIONS ...................................... 10-1
CONSUMER INFORMATION ...................... 11-1 Identification numbers .............................. 11-1
U1BS62E0.book Page 3 Monday, April 18, 2011 6:43 PM
Page 120 of 140

8-40
8
EBU25243Replacing the fuse The fuse holder is located under the seat. (See
page 4-12.)
If the fuse is blown, replace it as follows.1. Turn the key to “OFF ” and turn off all electrical
circuits.NOTICEECB00640To prevent accidental short-circuiting, turn off
the main switch when checking or replacing a
fuse.
2. Remove the blown fuse, and then install a new fuse of the specified amperage.
WARNING! Always use a fuse of the spec-
ified rating, and never use a substitute ob-
ject in place of the proper fuse. An
improper fuse or a substitute object can
cause damage to the electrical system,
which could lead to a fire.
[EWB02172]
3. Turn the key to “ ON” and turn on the electrical
circuits to check if the devices operate.
4. If the fuse immediately blows again, have a Yamaha dealer check the electrical system.EBU25542Replacing a headlight bulb If a headlight bulb burns out, replace it as follows.1. Remove the headlight bulb holder cover at the rear of the headlight by pulling it off.
1. Fuse
2. Spare fuse
Specified fuse:15.0 A
U1BS62E0.book Page 40 Monday, April 18, 2011 6:43 PM
Page 121 of 140
8-41
8
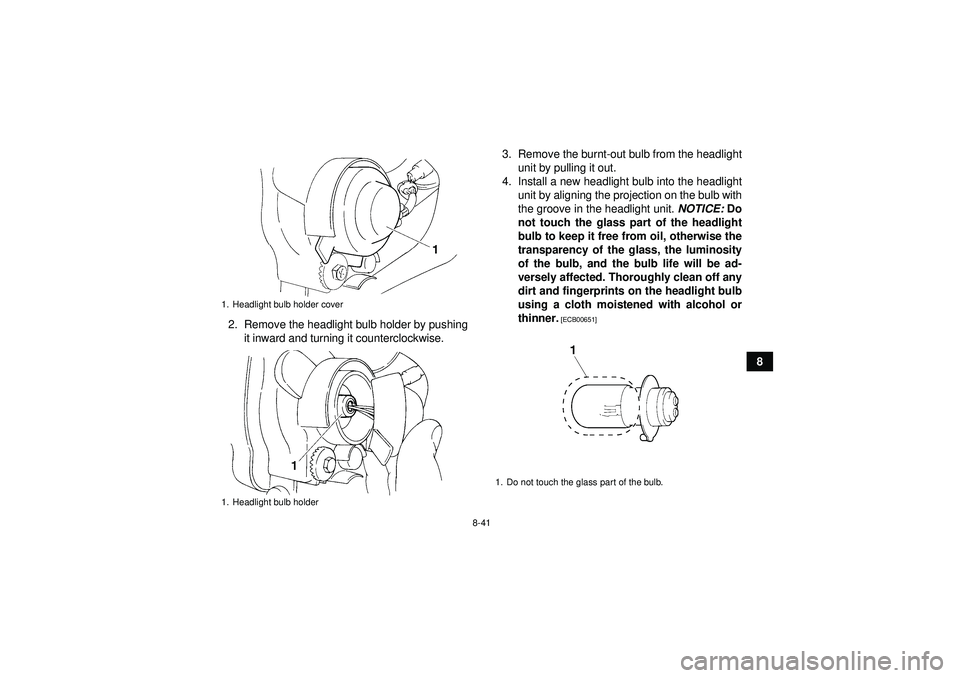
2. Remove the headlight bulb holder by pushing
it inward and turning it counterclockwise. 3. Remove the burnt-out bulb from the headlight
unit by pulling it out.
4. Install a new headlight bulb into the headlight unit by aligning the projection on the bulb with
the groove in the headlight unit. NOTICE: Do
not touch the glass part of the headlight
bulb to keep it free from oil, otherwise the
transparency of the glass, the luminosity
of the bulb, and the bulb life will be ad-
versely affected. Thoroughly clean off any
dirt and fingerprints on the headlight bulb
using a cloth moistened with alcohol or
thinner.
[ECB00651]
1. Headlight bulb holder cover
1. Headlight bulb holder
1. Do not touch the glass part of the bulb.
U1BS62E0.book Page 41 Monday, April 18, 2011 6:43 PM
Page 122 of 140
8-42
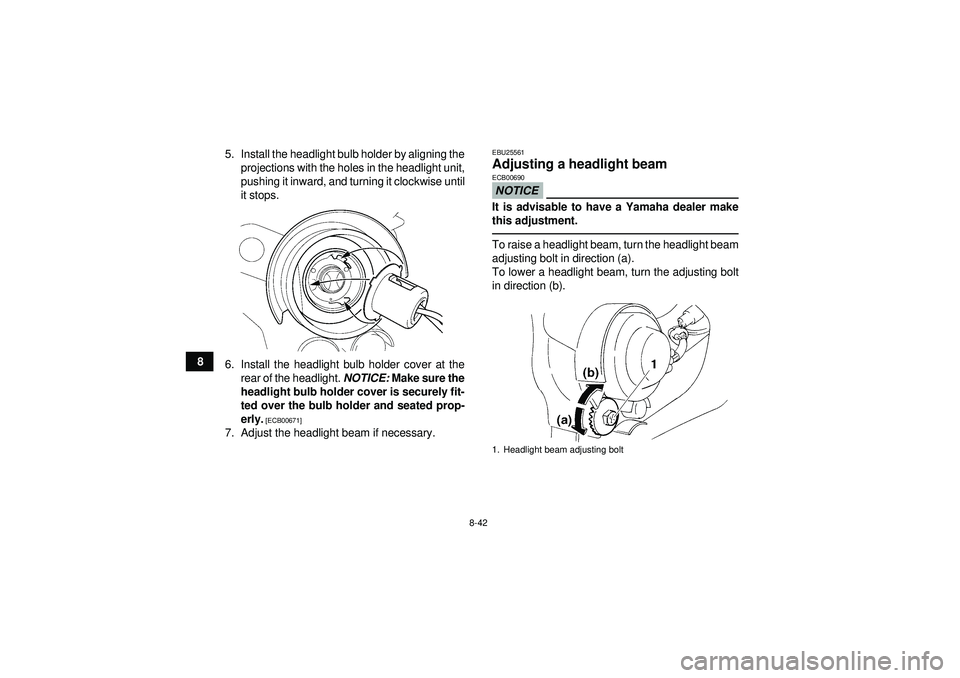
85. Install the headlight bulb holder by aligning the
projections with the holes in the headlight unit,
pushing it inward, and turning it clockwise until
it stops.
6. Install the headlight bulb holder cover at the rear of the headlight. NOTICE: Make sure the
headlight bulb holder cover is securely fit-
ted over the bulb holder and seated prop-
erly.
[ECB00671]
7. Adjust the headlight beam if necessary.
EBU25561Adjusting a headlight beam NOTICEECB00690It is advisable to have a Yamaha dealer make
this adjustment.To raise a headlight beam, turn the headlight beam
adjusting bolt in direction (a).
To lower a headlight beam, turn the adjusting bolt
in direction (b).1. Headlight beam adjusting bolt
U1BS62E0.book Page 42 Monday, April 18, 2011 6:43 PM
Page 123 of 140
8-43
8
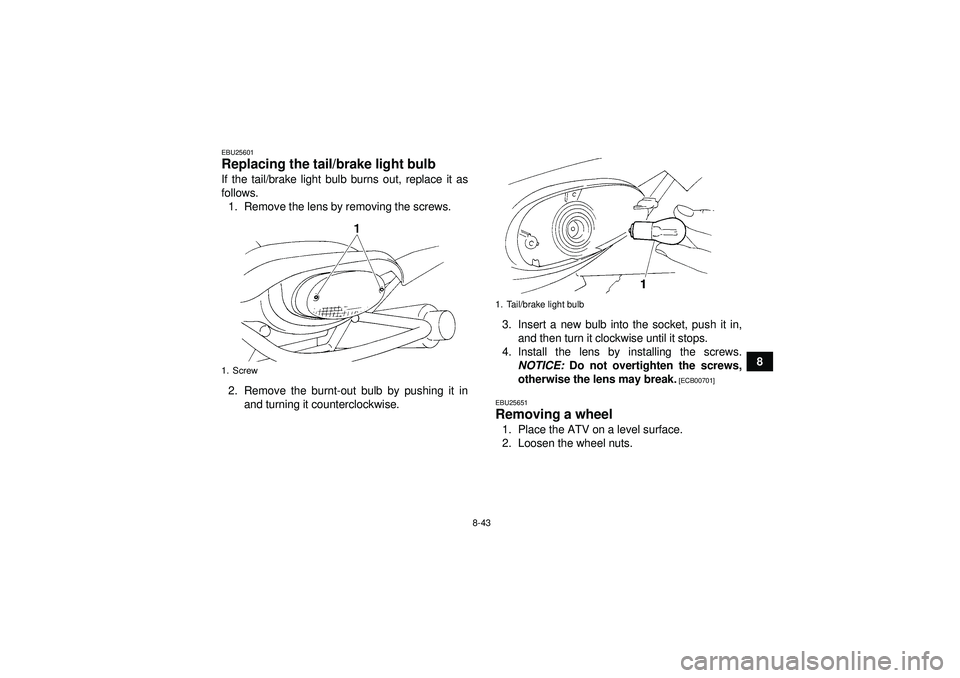
EBU25601Replacing the tail/brake light bulb If the tail/brake light bulb burns out, replace it as
follows.1. Remove the lens by removing the screws.
2. Remove the burnt-out bulb by pushing it in and turning it counterclockwise. 3. Insert a new bulb into the socket, push it in,
and then turn it clockwise until it stops.
4. Install the lens by installing the screws. NOTICE: Do not overtighten the screws,
otherwise the lens may break.
[ECB00701]
EBU25651
Removing a wheel 1. Place the ATV on a level surface.
2. Loosen the wheel nuts.
1. Screw
1. Tail/brake light bulb
U1BS62E0.book Page 43 Monday, April 18, 2011 6:43 PM
Page 133 of 140

10-4
10
Rim size:9 x 8.0ATFront brake:Type:
Disc brake
Operation: Right hand operation
Specified brake fluid: DOT 4Rear brake:Type:Disc brake
Operation: Right foot operation
Specified brake fluid:
DOT 4Front suspension:Type:Double wishbone
Spring/shock absorber type:
Coil spring/oil damper
Wheel travel: 200 mm (7.9 in)Rear suspension:Type:
Swingarm (link suspension)
Spring/shock absorber type: Coil spring/gas-oil damper
Wheel travel: 210 mm (8.3 in)
Electrical system:Ignition system:DC CDI
Charging system:
AC magnetoBattery:Model:YTZ10S
Voltage, capacity:
12 V, 8.6 AhHeadlight:Bulb type:Krypton bulbBulb voltage, wattage × quantity:Headlight:
12 V, 30.0/30.0 W × 2
Tail/brake light: 12 V, 5.0/21.0 W × 1
Neutral indicator light:
12 V, 1.7 W × 1
Reverse indicator light: 12 V, 1.7 W × 1Fuse:Fuse:
15.0 A
U1BS62E0.book Page 4 Monday, April 18, 2011 6:43 PM
Page 137 of 140

INDEX
AAccessories and loading ................................................ 6-8
Air filter element, cleaning ............................................ 8-15BBattery .......................................................................... 8-37
Brake and clutch levers, checking and lubricating ....... 8-33
Brake and shift pedals, checking and lubricating ......... 8-33
Brake fluid, changing ................................................... 8-25
Brake fluid level, checking ........................................... 8-23
Brake lever ..................................................................... 4-5
Brake lever free play, checking the front ...................... 8-25
Brake light switches ..................................................... 8-27
Brake pads, checking the front and rear ...................... 8-22
Brake pedal .................................................................... 4-5
Brake pedal height, checking ....................................... 8-25
Brakes .......................................................................... 8-22
Brakes, front and rear .................................................... 5-3CCables, checking and lubricating ................................. 8-32
Carburetor, adjusting ................................................... 8-20
Chassis fasteners .......................................................... 5-6
Cleaning ......................................................................... 9-1
Clutch lever .................................................................... 4-4
Clutch lever free play, adjusting ................................... 8-28DDrive chain ..................................................................... 5-4
Drive chain, lubricating ................................................. 8-31
Drive chain slack .......................................................... 8-29Drive select lever ........................................................... 4-7
Drive select lever and driving in reverse ........................ 6-3
EEngine break-in .............................................................. 6-6
Engine, cold start ........................................................... 6-1
Engine idling speed ..................................................... 8-20
Engine oil ....................................................................... 5-3
Engine oil and oil filter element .................................... 8-11
Engine, starting a warm ................................................. 6-3
Engine stop switch ......................................................... 4-2FFuel ......................................................................... 4-8, 5-3
Fuel cock ..................................................................... 4-10
Fuel tank cap ................................................................. 4-8
Fuse, replacing ............................................................ 8-40HHandlebar switches ....................................................... 4-2
Headlight beam, adjusting ........................................... 8-42
Headlight bulb, replacing ............................................. 8-40IIdentification numbers .................................................. 11-1
Indicator lights ................................................................ 4-2
Instruments, lights and switches .................................... 5-6LLabel locations ............................................................... 1-1
Light switch .................................................................... 4-3MMain switch .................................................................... 4-1
U1BS62E0.book Page 1 Monday, April 18, 2011 6:43 PM
Page 138 of 140
Maintenance and lubrication chart ................................. 8-5
Maintenance chart, emission control system ................. 8-3
Model label ................................................................... 11-2NNeutral indicator light ..................................................... 4-2OOwner’s manual and tool kit ........................................... 8-2PParking ........................................................................... 6-7
Parking brake free play, adjusting ................................ 8-26
Parking brake lever ........................................................ 4-6
Parking on a slope ......................................................... 6-7
Part locations ................................................................. 3-1RReverse indicator light .................................................... 4-2
Riding your ATV ............................................................. 7-1SSafety information .......................................................... 2-1
Seat .............................................................................. 4-12
Shifting ........................................................................... 6-4
Shift pedal ...................................................................... 4-7
Shock absorber assemblies, adjusting the front .......... 4-13
Shock absorber assembly, adjusting the rear .............. 4-14
Spark arrester, cleaning ............................................... 8-18
Spark plug, checking ...................................................... 8-9
Specifications ............................................................... 10-1
Speed limiter .................................................................. 4-3
Starter (choke) ............................................................. 4-11
Start switch ..................................................................... 4-3
Steering shaft, lubricating ............................................. 8-37
Storage ........................................................................... 9-2 Suspension, lubricating the upper and lower arm
pivots ......................................................................... 8-36
Suspension relay arm and connecting arm pivoting points, lubricating the rear ......................................... 8-35
Swingarm pivots, lubricating ........................................ 8-34
TTail/brake light bulb, replacing ..................................... 8-43
Throttle lever ........................................................... 4-3, 5-3
Throttle lever free play, adjusting ................................. 8-21
Tires ............................................................................... 5-4
Troubleshooting ........................................................... 8-44
Troubleshooting chart .................................................. 8-46VValve clearance ............................................................ 8-22
Vehicle identification number ....................................... 11-1WWheel hub bearings, checking ..................................... 8-34
Wheel, installing ........................................................... 8-44
Wheel, removing .......................................................... 8-43
U1BS62E0.book Page 2 Monday, April 18, 2011 6:43 PM