lock YAMAHA YFM600FWA 2001 Manuale de Empleo (in Spanish)
[x] Cancel search | Manufacturer: YAMAHA, Model Year: 2001, Model line: YFM600FWA, Model: YAMAHA YFM600FWA 2001Pages: 372, tamaño PDF: 10.01 MB
Page 226 of 372
7-53
WARNING
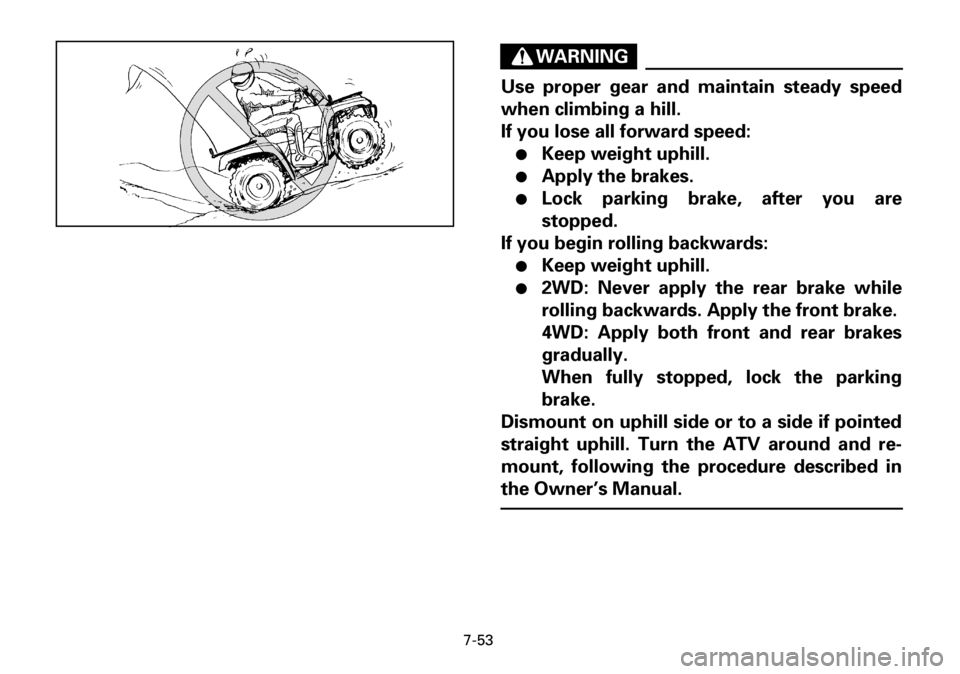
Use proper gear and maintain steady speed
when climbing a hill.
If you lose all forward speed:
●Keep weight uphill.
●Apply the brakes.
●Lock parking brake, after you are
stopped.
If you begin rolling backwards:
●Keep weight uphill.
●2WD: Never apply the rear brake while
rolling backwards. Apply the front brake.
4WD: Apply both front and rear brakes
gradually.
When fully stopped, lock the parking
brake.
Dismount on uphill side or to a side if pointed
straight uphill. Turn the ATV around and re-
mount, following the procedure described in
the Owner’s Manual.
Page 259 of 372
8-8
* It is recommended that these items be serviced by a Yamaha dealer.
** Lithium-soap-based grease
NOTE:
Recommended brake fluid: DOT 4
(If DOT 4 is not available, DOT 3 can be used.)
Brake fluid replacement:
1. When disassembling the master cylinder or caliper cylinder, replace the brake fluid. Normally
check the brake fluid level and add fluid as required.
2. On the inner parts of the master cylinder and caliper cylinder, replace the oil seals every two
years.
3. Replace the brake hoses every four years, or if cracked or damaged.
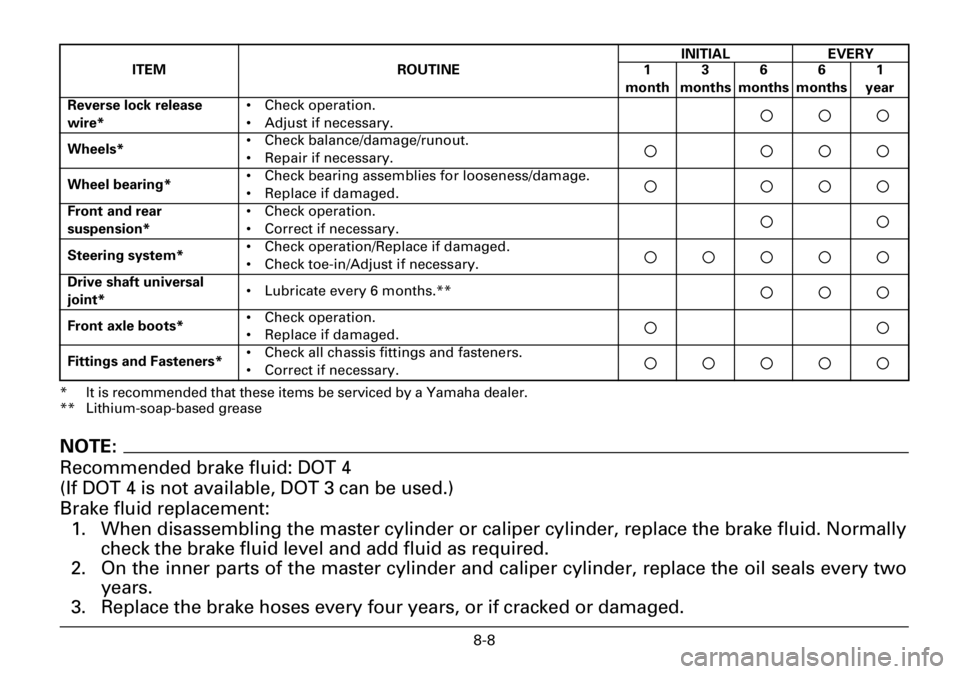
Reverse lock release
wire*• Check operation.
• Adjust if necessary.
Wheels*• Check balance/damage/runout.
• Repair if necessary.
Wheel bearing*• Check bearing assemblies for looseness/damage.
• Replace if damaged.
Front and rear
suspension*• Check operation.
• Correct if necessary.
Steering system*• Check operation/Replace if damaged.
• Check toe-in/Adjust if necessary.
Drive shaft universal
joint*• Lubricate every 6 months.**
Front axle boots*• Check operation.
• Replace if damaged.
Fittings and Fasteners*• Check all chassis fittings and fasteners.
• Correct if necessary.
ITEM ROUTINEINITIAL EVERY
1
month3
months6
months6
months1
year
Page 300 of 372
8-49
EBU00303
Valve clearance adjustment
The correct valve clearance changes with use,
resulting in improper fuel/air supply or engine
noise. To prevent this, the valve clearance
must be adjusted regularly. This adjustment
however, should be left to a professional
Yamaha service technician.
EBU00307
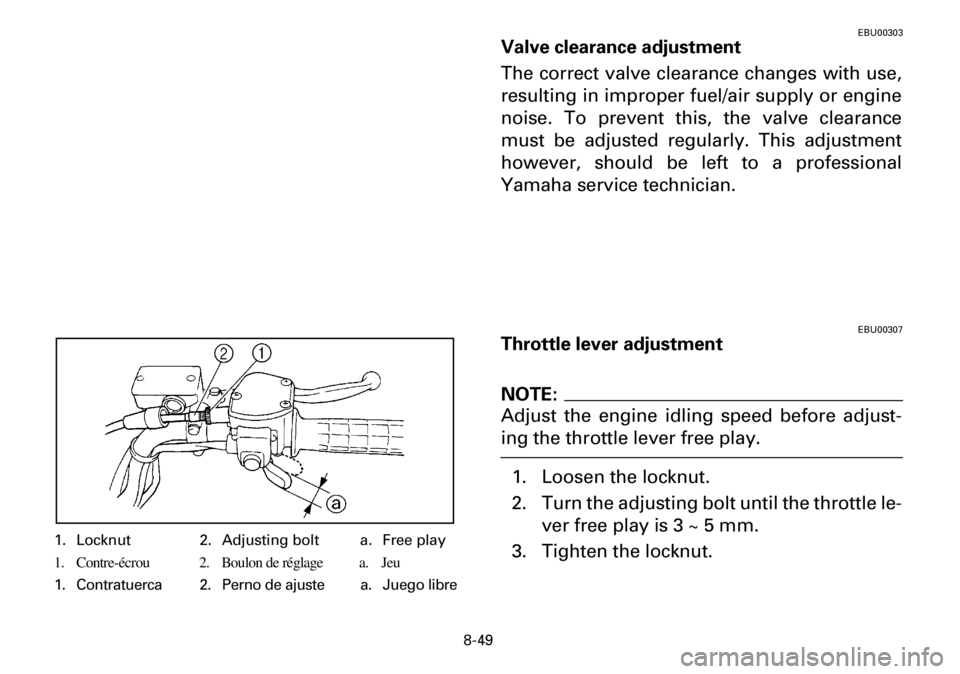
Throttle lever adjustment
NOTE:
Adjust the engine idling speed before adjust-
ing the throttle lever free play.
1. Loosen the locknut.
2. Turn the adjusting bolt until the throttle le-
ver free play is 3 ~ 5 mm.
3. Tighten the locknut.
1. Locknut 2. Adjusting bolt a. Free play
1. Contre-écrou 2. Boulon de réglage a. Jeu
1. Contratuerca 2. Perno de ajuste a. Juego libre
Page 306 of 372

8-55
3. Refill with the same type of brake fluid.
Mixing fluids may result in a harmful
chemical reaction and lead to poor brake
performance.
4. Be careful that water does not enter the
master cylinder when refilling. Water will
significantly lower the boiling point of the
fluid and may result in vapor lock.
5. Brake fluid may deteriorate painted sur-
faces or plastic parts. Always clean up
spilled fluid immediately.
6. Have a Yamaha dealer check the cause if
the brake fluid level goes down.
Page 310 of 372
8-59
EBU00318
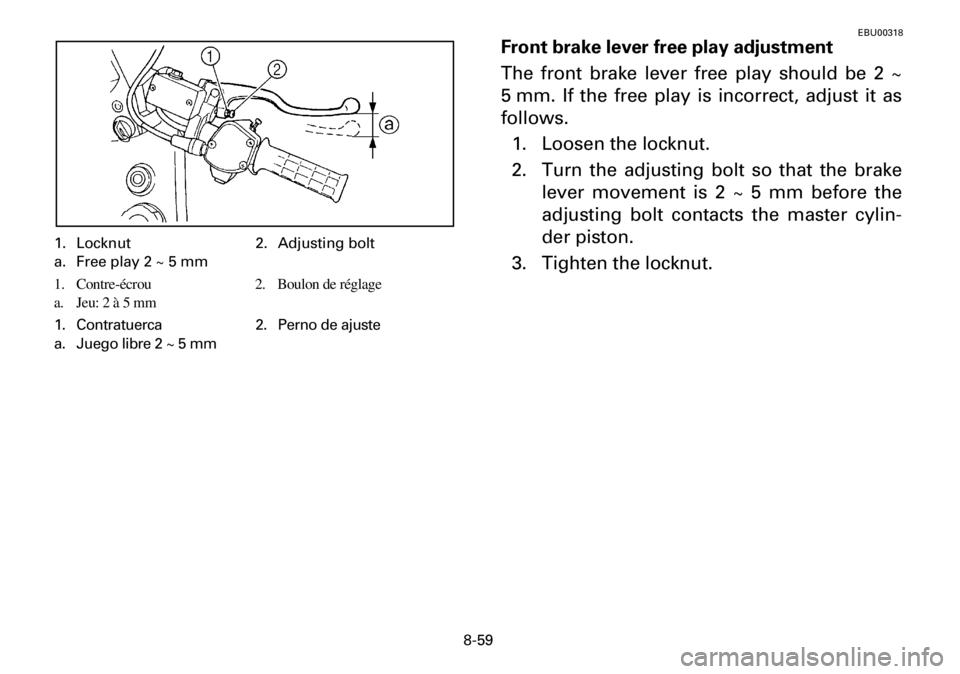
Front brake lever free play adjustment
The front brake lever free play should be 2 ~
5 mm. If the free play is incorrect, adjust it as
follows.
1. Loosen the locknut.
2. Turn the adjusting bolt so that the brake
lever movement is 2 ~ 5 mm before the
adjusting bolt contacts the master cylin-
der piston.
3. Tighten the locknut.
1. Locknut 2. Adjusting bolt
a. Free play 2 ~ 5 mm
1. Contre-écrou 2. Boulon de réglage
a. Jeu: 2 à 5 mm
1. Contratuerca 2. Perno de ajuste
a. Juego libre 2 ~ 5 mm
Page 314 of 372
8-63
EBU00332
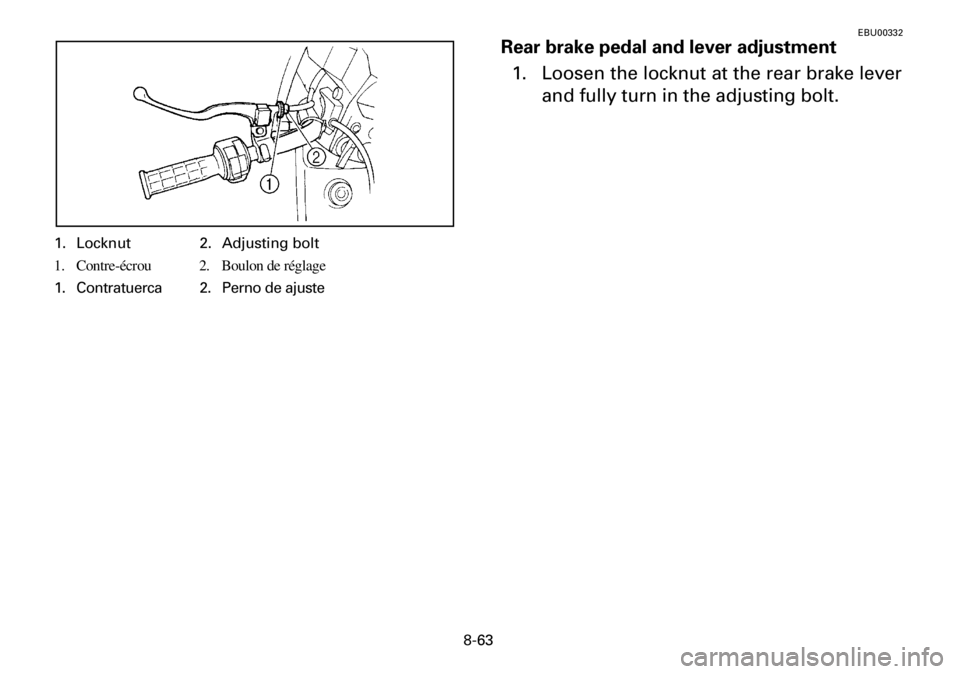
Rear brake pedal and lever adjustment
1. Loosen the locknut at the rear brake lever
and fully turn in the adjusting bolt.
1. Locknut 2. Adjusting bolt
1. Contre-écrou 2. Boulon de réglage
1. Contratuerca 2. Perno de ajuste
Page 318 of 372
8-67
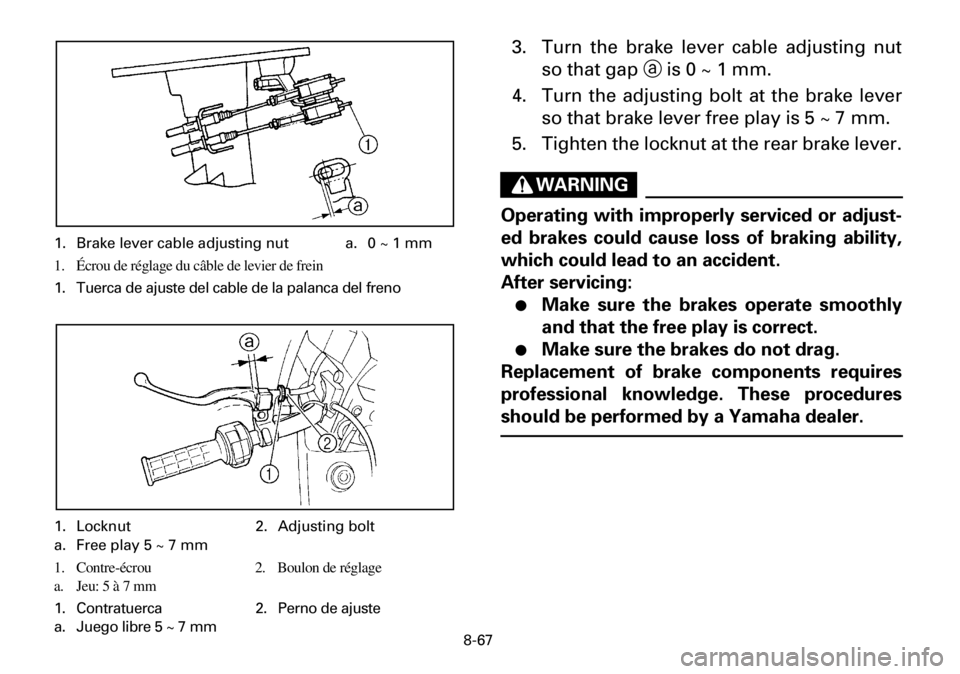
3. Turn the brake lever cable adjusting nut
so that gap a is 0 ~ 1 mm.
4. Turn the adjusting bolt at the brake lever
so that brake lever free play is 5 ~ 7 mm.
5. Tighten the locknut at the rear brake lever.
WARNING
Operating with improperly serviced or adjust-
ed brakes could cause loss of braking ability,
which could lead to an accident.
After servicing:
●Make sure the brakes operate smoothly
and that the free play is correct.
●Make sure the brakes do not drag.
Replacement of brake components requires
professional knowledge. These procedures
should be performed by a Yamaha dealer.
1. Brake lever cable adjusting nut a. 0 ~ 1 mm
1. Écrou de réglage du câble de levier de frein
1. Tuerca de ajuste del cable de la palanca del freno
1. Locknut 2. Adjusting bolt
a. Free play 5 ~ 7 mm
1. Contre-écrou 2. Boulon de réglage
a. Jeu: 5 à 7 mm
1. Contratuerca 2. Perno de ajuste
a. Juego libre 5 ~ 7 mm
Page 342 of 372

9-1
EBU00420
CLEANING AND STORAGE
A. CLEANING
Frequent, thorough cleaning of your machine
will not only enhance its appearance but will
improve its general performance and extend
the useful life of many components.
1. Before cleaning the machine:
a. Block off the end of the exhaust pipe to
prevent water entry. A plastic bag and
strong rubber band may be used.
b. Make sure the spark plug and all filler caps
are properly installed.
2. If the engine case is excessively greasy,
apply degreaser with a paint brush. Do
not apply degreaser to the wheel axles.
3. Rinse the dirt and degreaser off with a
garden hose. Use only enough pressure
to do the job.
Page 348 of 372
9-7
EBU00427
B. STORAGE
Long term storage (60 days or more) of your
machine will require some preventive proce-
dures to guard against deterioration. After
thoroughly cleaning the machine, prepare for
storage as follows:
1. Fill the fuel tank with fresh fuel and add
fuel stabilizer (if available).
NOTE:
Use of fuel stabilizer eliminates the need to
drain the fuel system. Consult a Yamaha dealer
if the fuel system is to be drained instead.
2. Remove the spark plug, pour about one
tablespoon of SAE 10W30 or 20W40 mo-
tor oil in the spark plug hole and reinstall
the spark plug. Ground the spark plug
wire and turn the engine over several
times to coat the cylinder wall with oil.
3. Lubricate all control cables.
4. Block up the frame to raise all wheels off
the ground.