lock YAMAHA YFM600FWA 2001 Manuale de Empleo (in Spanish)
[x] Cancel search | Manufacturer: YAMAHA, Model Year: 2001, Model line: YFM600FWA, Model: YAMAHA YFM600FWA 2001Pages: 372, tamaño PDF: 10.01 MB
Page 15 of 372

Switches ........................................... 5-21
Tires .................................................. 5-23
How to measure tire pressure ........ 5-27
Tire wear limit .................................. 5-29
OPERATION ........................................... 6-1
Starting a cold engine ....................... 6-3
Starting a warm engine ..................... 6-9
Warming up ........................................ 6-9
Drive select lever operation and
reverse driving ............................... 6-11
Reverse lock release wire ................ 6-15
Engine break-in ................................ 6-17
Parking .............................................. 6-19
Parking on a slope ........................... 6-21
Accessories and loading ................. 6-23
RIDING YOUR ATV ................................ 7-1
Getting to know your ATV ................. 7-3
Ride with care and good
judgement ........................................ 7-5
Be careful where you ride ............... 7-27
Turning your ATV ............................ 7-39
Climbing uphill ................................. 7-45
Riding downhill ................................ 7-55
Crossing a slope ............................... 7-59Crossing through shallow
water ............................................... 7-63
Riding over rough terrain ................ 7-67
Sliding and skidding ........................ 7-69
What to do if ..................................... 7-73
What to do ........................................ 7-73
PERIODIC MAINTENANCE AND
ADJUSTMENT ....................................... 8-1
Owner’s manual and tool kit ............. 8-3
Periodic maintenance/
lubrication ........................................ 8-7
Engine oil .......................................... 8-15
Final gear oil ..................................... 8-25
Differential gear oil .......................... 8-29
Front axle boots ............................... 8-33
Spark plug inspection ...................... 8-35
Air filter cleaning.............................. 8-39
Carburetor adjustment .................... 8-45
Idle speed adjustment ..................... 8-47
Valve clearance adjustment ............ 8-49
Throttle lever adjustment ................ 8-49
Front brake pad inspection ............. 8-51
Rear brake shoe inspection ............. 8-51
Inspecting the brake fluid level ....... 8-53
Brake fluid replacement .................. 8-57
6
7
8
Page 52 of 372
3-1
EBU00032
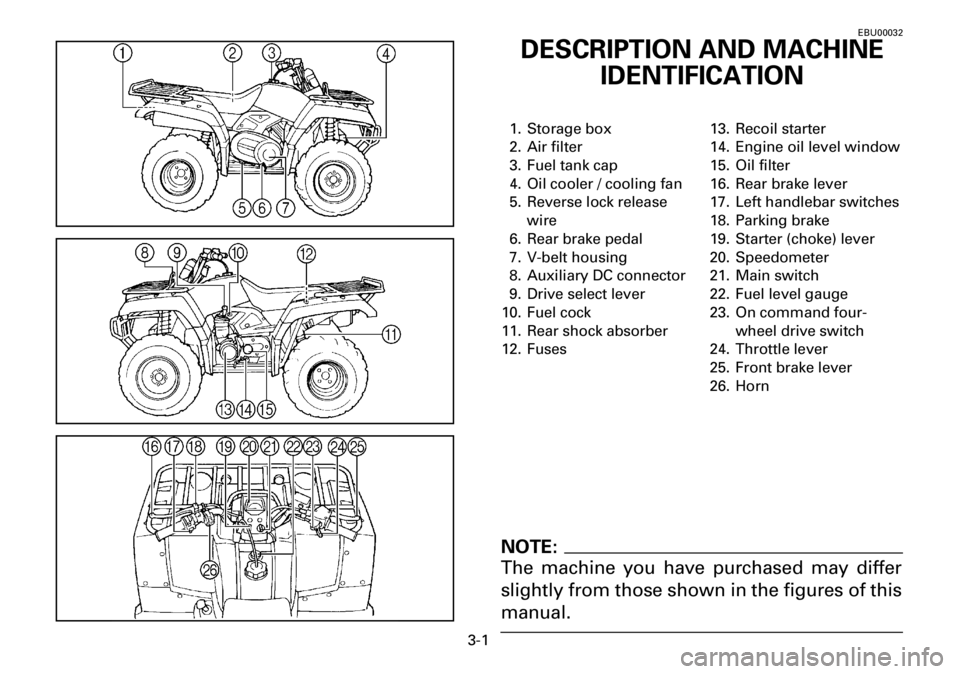
DESCRIPTION AND MACHINE
IDENTIFICATION
1. Storage box
2. Air filter
3. Fuel tank cap
4. Oil cooler / cooling fan
5. Reverse lock release
wire
6. Rear brake pedal
7. V-belt housing
8. Auxiliary DC connector
9. Drive select lever
10. Fuel cock
11. Rear shock absorber
12. Fuses13. Recoil starter
14. Engine oil level window
15. Oil filter
16. Rear brake lever
17. Left handlebar switches
18. Parking brake
19. Starter (choke) lever
20. Speedometer
21. Main switch
22. Fuel level gauge
23. On command four-
wheel drive switch
24. Throttle lever
25. Front brake lever
26. Horn
NOTE:
The machine you have purchased may differ
slightly from those shown in the figures of this
manual.
Page 80 of 372
4-21
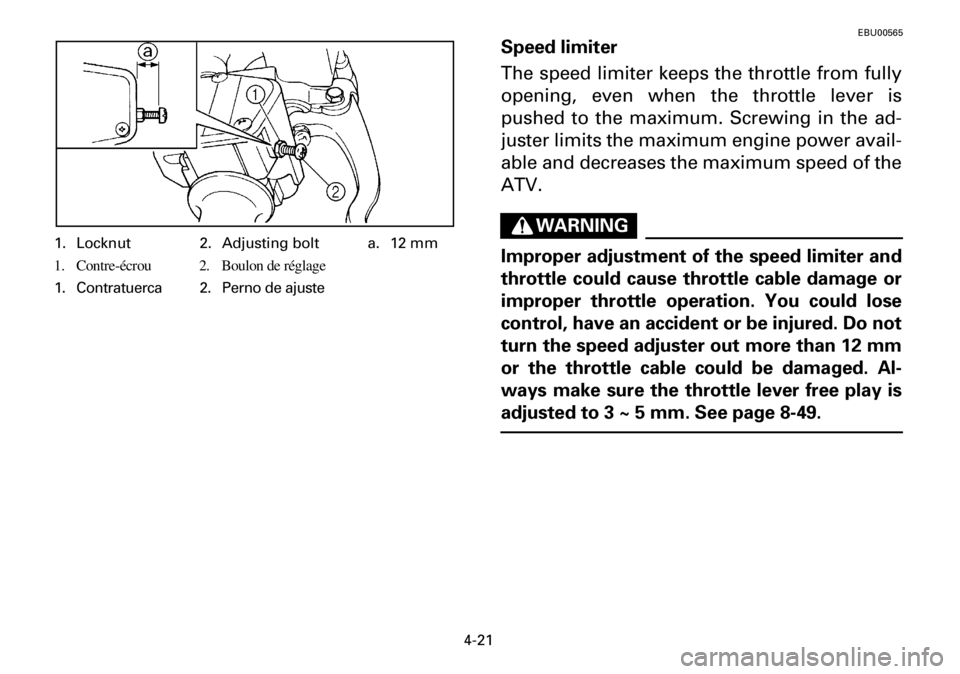
1. Locknut 2. Adjusting bolt a. 12 mm
1. Contre-écrou 2. Boulon de réglage
1. Contratuerca 2. Perno de ajuste
EBU00565
Speed limiter
The speed limiter keeps the throttle from fully
opening, even when the throttle lever is
pushed to the maximum. Screwing in the ad-
juster limits the maximum engine power avail-
able and decreases the maximum speed of the
ATV.
WARNING
Improper adjustment of the speed limiter and
throttle could cause throttle cable damage or
improper throttle operation. You could lose
control, have an accident or be injured. Do not
turn the speed adjuster out more than 12 mm
or the throttle cable could be damaged. Al-
ways make sure the throttle lever free play is
adjusted to 3 ~ 5 mm. See page 8-49.
Page 86 of 372
4-27
EBU00075
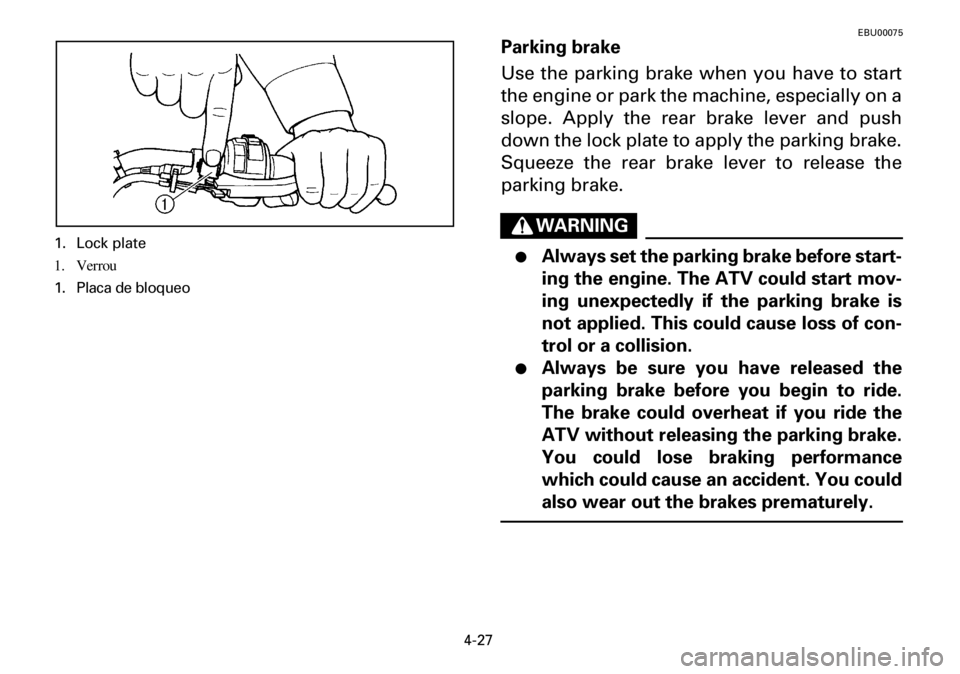
Parking brake
Use the parking brake when you have to start
the engine or park the machine, especially on a
slope. Apply the rear brake lever and push
down the lock plate to apply the parking brake.
Squeeze the rear brake lever to release the
parking brake.
WARNING
●Always set the parking brake before start-
ing the engine. The ATV could start mov-
ing unexpectedly if the parking brake is
not applied. This could cause loss of con-
trol or a collision.
●Always be sure you have released the
parking brake before you begin to ride.
The brake could overheat if you ride the
ATV without releasing the parking brake.
You could lose braking performance
which could cause an accident. You could
also wear out the brakes prematurely.
1. Lock plate
1. Verrou
1. Placa de bloqueo
Page 90 of 372
4-31
EBU00092
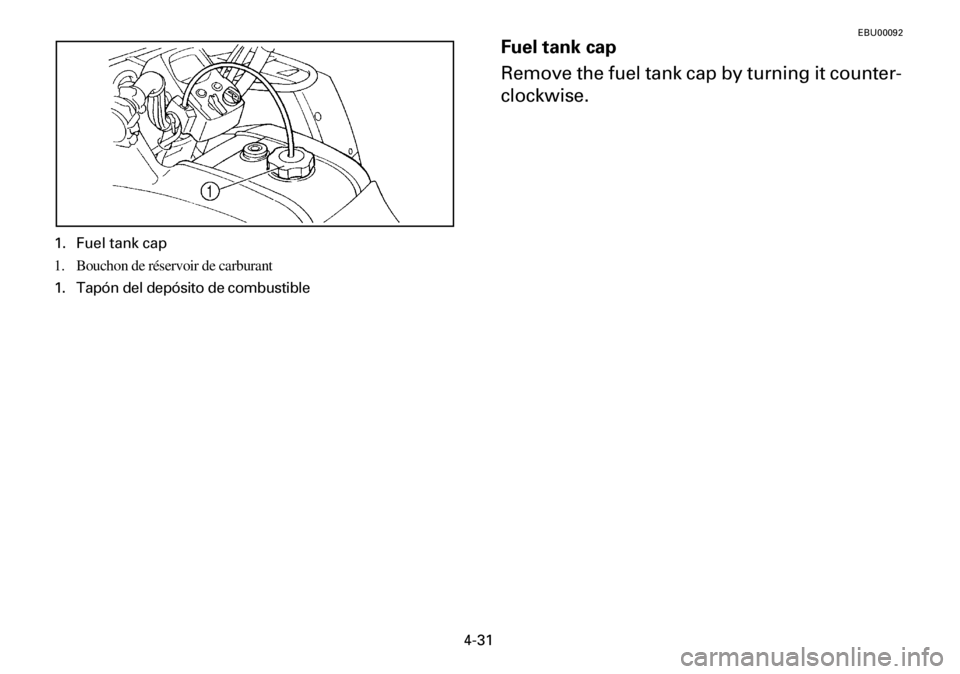
Fuel tank cap
Remove the fuel tank cap by turning it counter-
clockwise.
1. Fuel tank cap
1. Bouchon de réservoir de carburant
1. Tapón del depósito de combustible
Page 96 of 372
4-37
EBU00567
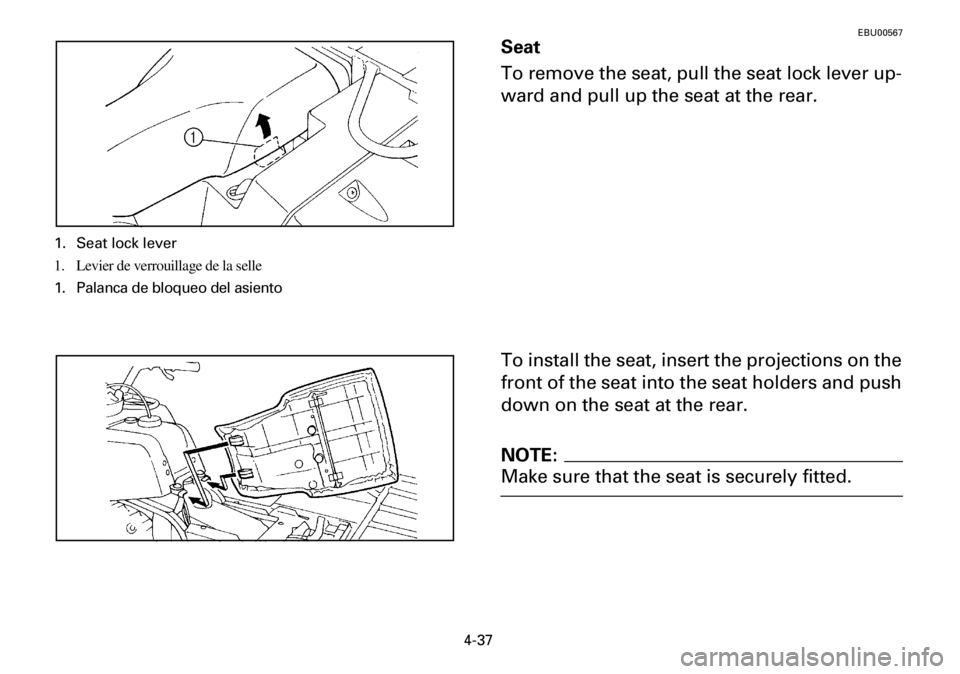
Seat
To remove the seat, pull the seat lock lever up-
ward and pull up the seat at the rear.
To install the seat, insert the projections on the
front of the seat into the seat holders and push
down on the seat at the rear.
NOTE:
Make sure that the seat is securely fitted.
1. Seat lock lever
1. Levier de verrouillage de la selle
1. Palanca de bloqueo del asiento
Page 156 of 372
6-15
e. Open the throttle lever gradually and con-
tinue to watch to the rear while backing.
WARNING
Improper operation in reverse could make you
hit an obstacle or person behind you, resulting
in serious injury. When you shift into reverse,
make sure there are no obstacles or people be-
hind you. When it is safe to proceed, go slow-
ly.
EBU00197
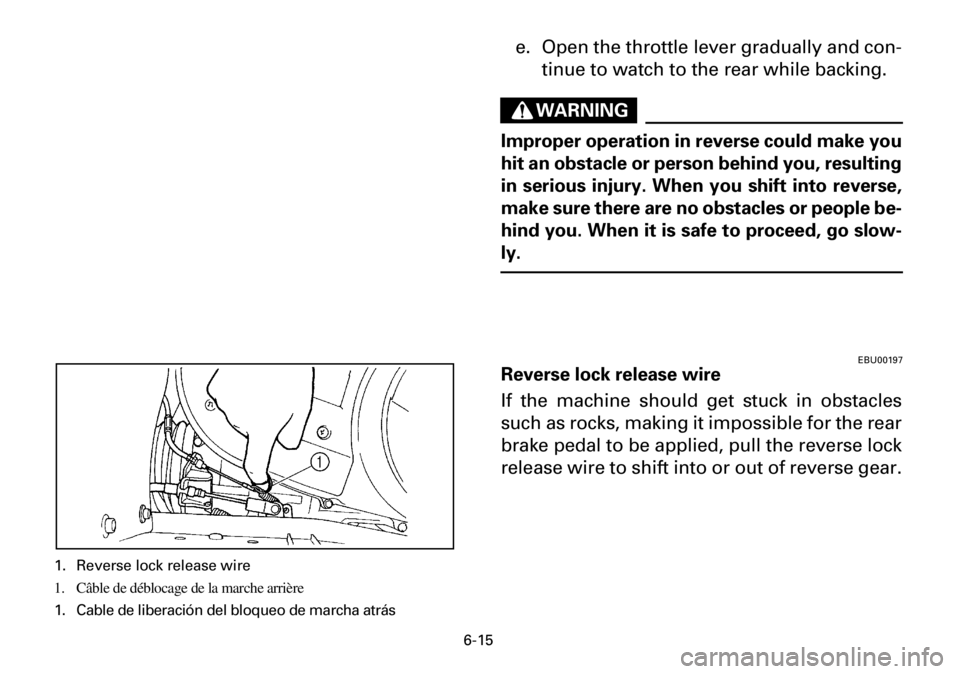
Reverse lock release wire
If the machine should get stuck in obstacles
such as rocks, making it impossible for the rear
brake pedal to be applied, pull the reverse lock
release wire to shift into or out of reverse gear.
1. Reverse lock release wire
1. Câble de déblocage de la marche arrière
1. Cable de liberación del bloqueo de marcha atrás
Page 160 of 372
6-19
1. 0 ~ 10 hours:
Avoid continuous operation above half
throttle. Allow a cooling off period of five
to ten minutes after every hour of opera-
tion. Vary the speed of the machine from
time to time. Do not operate it at one set
throttle position.
2. 10 ~ 20 hours:
Avoid prolonged operation above 3/4
throttle. Rev the machine freely but do not
use full throttle at any time.
3. After break-in:
Avoid prolonged full throttle operation.
Vary speeds occasionally.
EBU00211
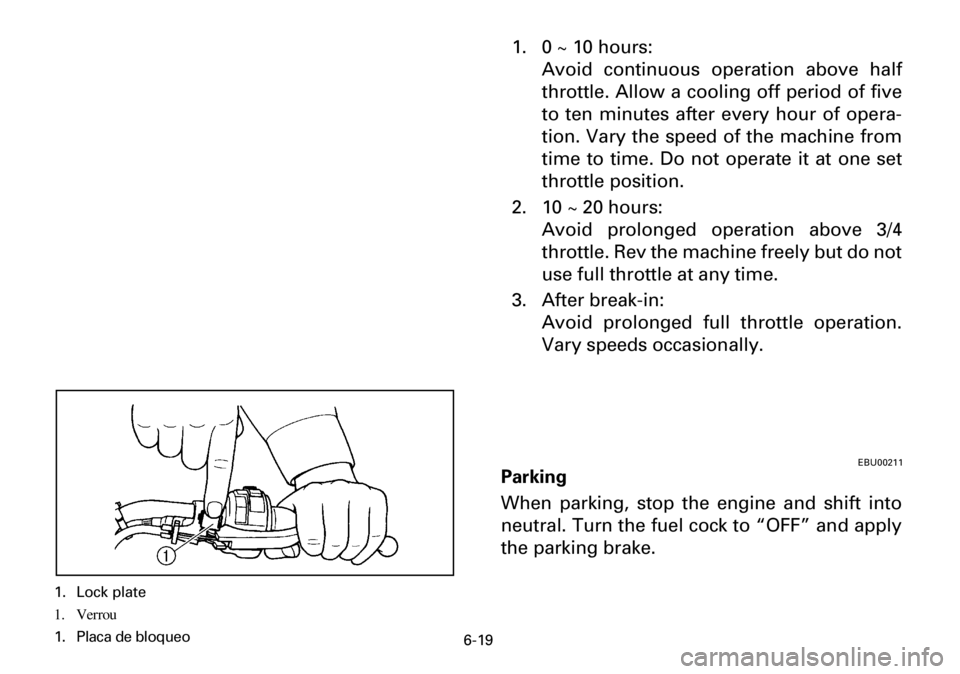
Parking
When parking, stop the engine and shift into
neutral. Turn the fuel cock to “OFF” and apply
the parking brake.
1. Lock plate
1. Verrou
1. Placa de bloqueo
Page 162 of 372
6-21
EBU00218
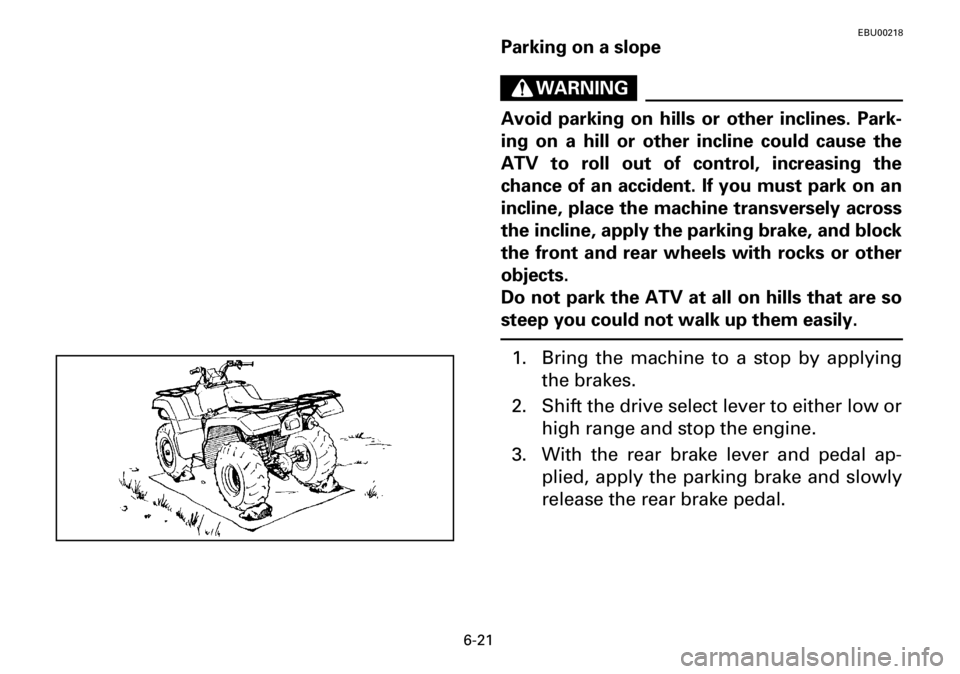
Parking on a slope
WARNING
Avoid parking on hills or other inclines. Park-
ing on a hill or other incline could cause the
ATV to roll out of control, increasing the
chance of an accident. If you must park on an
incline, place the machine transversely across
the incline, apply the parking brake, and block
the front and rear wheels with rocks or other
objects.
Do not park the ATV at all on hills that are so
steep you could not walk up them easily.
1. Bring the machine to a stop by applying
the brakes.
2. Shift the drive select lever to either low or
high range and stop the engine.
3. With the rear brake lever and pedal ap-
plied, apply the parking brake and slowly
release the rear brake pedal.
Page 190 of 372
7-17
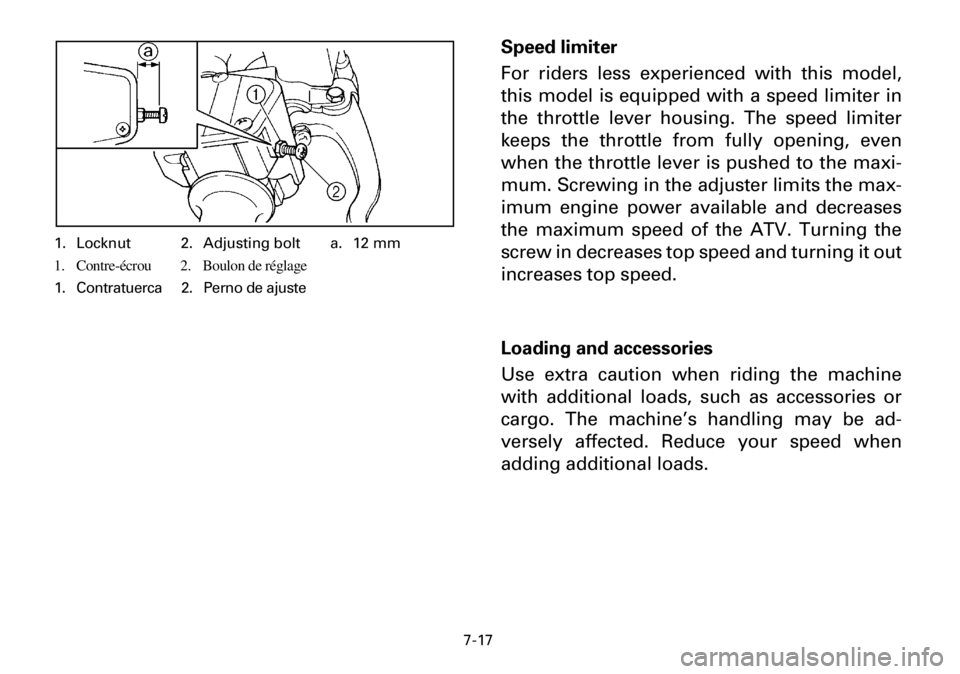
1. Locknut 2. Adjusting bolt a. 12 mm
1. Contre-écrou 2. Boulon de réglage
1. Contratuerca 2. Perno de ajuste
Speed limiter
For riders less experienced with this model,
this model is equipped with a speed limiter in
the throttle lever housing. The speed limiter
keeps the throttle from fully opening, even
when the throttle lever is pushed to the maxi-
mum. Screwing in the adjuster limits the max-
imum engine power available and decreases
the maximum speed of the ATV. Turning the
screw in decreases top speed and turning it out
increases top speed.
Loading and accessories
Use extra caution when riding the machine
with additional loads, such as accessories or
cargo. The machine’s handling may be ad-
versely affected. Reduce your speed when
adding additional loads.