battery YAMAHA YFM80R 2005 Owners Manual
[x] Cancel search | Manufacturer: YAMAHA, Model Year: 2005, Model line: YFM80R, Model: YAMAHA YFM80R 2005Pages: 343, PDF Size: 5.94 MB
Page 17 of 343

LOCATION OF THE WARNING AND
SPECIFICATION LABELS .......................1-1
SAFETY INFORMATION .........................2-1
DESCRIPTION AND MACHINE
IDENTIFICATION.....................................3-1
Identification number records ...............3-3
Key identification number .....................3-5
Vehicle identification number ...............3-7
Model label ...........................................3-9
CONTROL FUNCTIONS..........................4-1
Main switch ...........................................4-1
Indicator lights ......................................4-3
Handlebar switches ..............................4-3
Throttle lever ........................................4-7
Speed limiter ........................................4-9
Front brake lever ................................4-13Brake pedal and rear brake lever .......4-15
Parking brake .....................................4-17
Shift pedal ..........................................4-19
Fuel tank cap ......................................4-19
Fuel cock ............................................4-21
Choke lever ........................................4-23
Seat ....................................................4-25
PRE-OPERATION CHECKS ...................5-1
Front and rear brakes ...........................5-5
Fuel ......................................................5-9
Engine oil ............................................5-11
Final gear oil .......................................5-15
Throttle lever ......................................5-17
Fittings and fasteners .........................5-17
Switches .............................................5-17
Battery ................................................5-17
Tires ...................................................5-19
How to measure tire pressure ............5-23
Tire wear limit .....................................5-25
EBU00015
CONTENTS
1
2
3
4
5
5TH-9-63 ~3 17/3/04 11:25 AM Page 16
Page 19 of 343

Front brake lever free play
adjustment ........................................8-43
Rear brake lever and pedal
adjustment ........................................8-47
Clutch adjustment ...............................8-51
Cable inspection and lubrication ........8-53
Brake and shift pedal/brake
lever lubrication ................................8-55
Knuckle shaft and steering shaft
lubrication .........................................8-55
Wheel removal ...................................8-57
Wheel installation ...............................8-57
Battery ................................................8-59
Replenishing the battery fluid .............8-63
Fuse replacement ...............................8-67
Troubleshooting ..................................8-69
Troubleshooting chart .........................8-73CLEANING AND STORAGE....................9-1
A. Cleaning ...........................................9-1
B. Storage ............................................9-7
SPECIFICATIONS .................................10-1
Conversion Table ...................................11-19
10
11
5TH-9-63 ~3 17/3/04 11:25 AM Page 18
Page 93 of 343

5-1
EBU00113
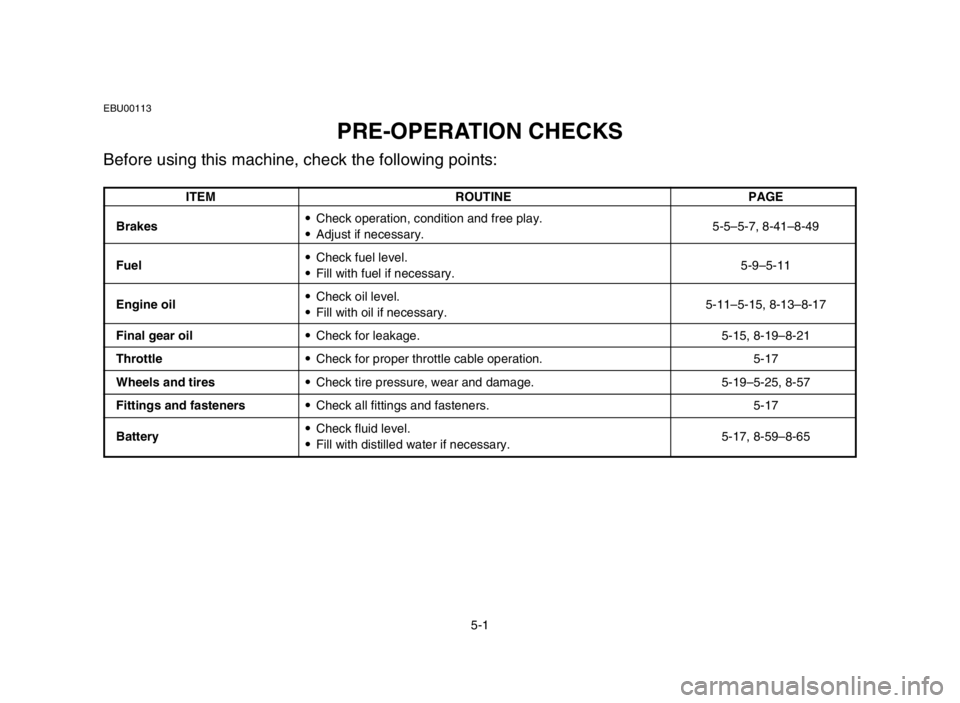
PRE-OPERATION CHECKS
Before using this machine, check the following points:
ITEM ROUTINE PAGE
Brakes9Check operation, condition and free play.
5-5–5-7, 8-41–8-49
9Adjust if necessary.
Fuel9Check fuel level.
9Fill with fuel if necessary.5-9–5-11
Engine oil9Check oil level.
9Fill with oil if necessary.5-11–5-15, 8-13–8-17
Final gear oil9Check for leakage. 5-15, 8-19–8-21
Throttle9Check for proper throttle cable operation. 5-17
Wheels and tires9Check tire pressure, wear and damage. 5-19–5-25, 8-57
Fittings and fasteners9Check all fittings and fasteners. 5-17
Battery9Check fluid level.
5-17, 8-59–8-65
9Fill with distilled water if necessary.
5TH-9-63 4~5 17/3/04 11:25 AM Page 26
Page 109 of 343

5-17
EBU01083
Throttle lever
Check to see that the throttle lever operates cor-
rectly. It must open smoothly and spring back to
the idle position when released. Have a Yamaha
dealer repair as necessary for proper operation.
EBU11620
Fittings and fasteners
Always check the tightness of chassis fittings
and fasteners before a ride. Take the machine
to a Yamaha dealer or refer to the Service
Manual for correct tightening torque.
EBU11700
Switches
Check the operation of all switches. Have a
Yamaha dealer repair as necessary for proper
operation.
EBU00499
Battery
Check fluid level and fill if necessary. Use only
distilled water if refilling is necessary. (See
pages 8-59–8-65.)
5TH-9-63 4~5 17/3/04 11:25 AM Page 42
Page 125 of 343

6-7
6. Completely close the throttle lever and
start the engine by pushing the start
switch.
NOTE:
If the engine fails to start, release the start
switch, then push it again. Pause a few seconds
before the next attempt. Each cranking should
be as short as possible to preserve battery ener-
gy. Do not crank the engine more than 10 sec-
onds on each attempt.
7. If the engine is started with the starter
(choke) in position 1, the choke lever
should be returned to position 2to warm
up the engine. If the engine is started with
the starter (choke) in position 2, keep the
starter (choke) in this position to warm up
the engine.
5TH-9-63 6 17/3/04 11:26 AM Page 6
Page 244 of 343

8-8 * Since these items require special tools, data and technical skills, have a Yamaha dealer perform the service.INITIAL EVERY
month 1 3 6 6 12
ITEM ROUTINEWhichever
km 320 1200 2400 2400 4800 comes first
(mi) (200) (750) (1500) (1500) (3000)
hours 20 75 150 150 300
Engine oil9Replace (warm engine before draining).2222
Final gear oil9Check oil level/oil leakage.
22
9Replace every 12 months.
Brakes*9Check operation.
22222
9Adjust if necessary.
Clutch*9Check operation.
2222
9Adjust if necessary.
Wheels*9Check balance/damage/runout.
2222
9Replace if necessary.
9Check bearing assemblies for looseness/
Wheel bearings*damage.2222
9Replace if damaged.
9Check operation.
Steering system*9Replace if damage.
22222
9Check toe-in
9Adjust if necessary.
Knuckle shafts/9Lubricate every 6 months with lithium-soap-based
222
steering shaft*grease.
Fittings and fasteners*9Check all chassis fittings and fasteners.
22222
9Correct if necessary.
9Check specific gravity.
Battery*9Check breather hose for correct routing.22222
9Correct if necessary.
5TH-9-63 8 17/3/04 11:24 AM Page 8-8
Page 295 of 343

8-59
EBU00379
Battery
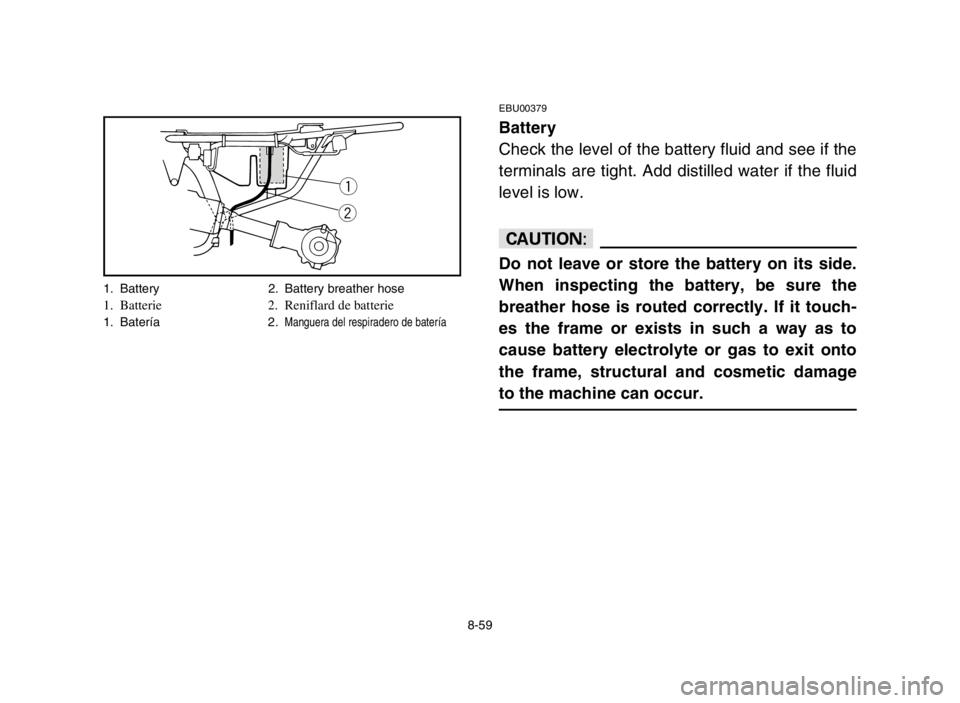
Check the level of the battery fluid and see if the
terminals are tight. Add distilled water if the fluid
level is low.
cC
Do not leave or store the battery on its side.
When inspecting the battery, be sure the
breather hose is routed correctly. If it touch-
es the frame or exists in such a way as to
cause battery electrolyte or gas to exit onto
the frame, structural and cosmetic damage
to the machine can occur.
q
w
1. Battery 2. Battery breather hose1. Batterie 2. Reniflard de batterie1. Batería 2.Manguera del respiradero de batería
5TH-9-63 8 17/3/04 11:24 AM Page 8-59
Page 297 of 343

8-61
w
Battery electrolyte is poisonous and danger-
ous, causing severe burns, etc. It contains
sulfuric acid. Avoid contact with skin, eyes
or clothing.
Antidote:
EXTERNAL: Flush with water.
INTERNAL: Drink large quantities of water or
milk. Follow with milk of magnesia, beaten
egg or vegetable oil. Call a physician imme-
diately.
EYES: Flush with water for 15 minutes and
get prompt medical attention.
Batteries produce explosive gases. Keep
sparks, flame, cigarettes or other sources of
ignition away. Ventilate when charging or
using in an enclosed space. Always shield
your eyes when working near batteries.
KEEP OUT OF REACH OF CHILDREN.
5TH-9-63 8 17/3/04 11:24 AM Page 8-61
Page 299 of 343

8-63
EBU11950
Replenishing the battery fluid
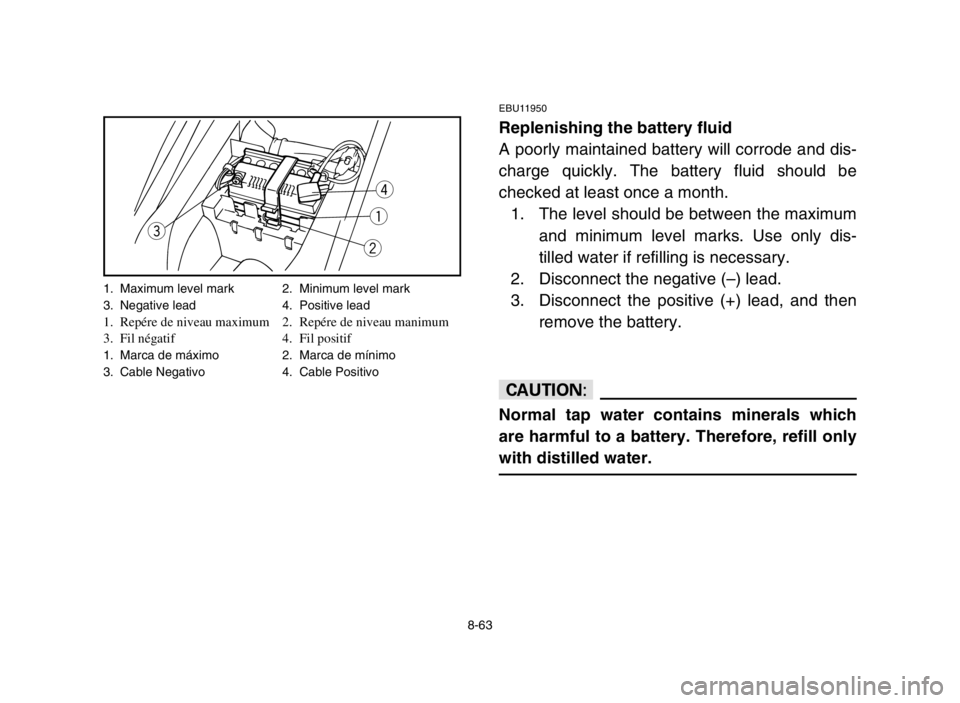
A poorly maintained battery will corrode and dis-
charge quickly. The battery fluid should be
checked at least once a month.
1. The level should be between the maximum
and minimum level marks. Use only dis-
tilled water if refilling is necessary.
2. Disconnect the negative (–) lead.
3. Disconnect the positive (+) lead, and then
remove the battery.
cC
Normal tap water contains minerals which
are harmful to a battery. Therefore, refill only
with distilled water.
q
wer
1. Maximum level mark 2. Minimum level mark
3. Negative lead 4. Positive lead
1. Repére de niveau maximum 2. Repére de niveau manimum
3. Fil négatif 4. Fil positif
1. Marca de máximo 2. Marca de mínimo
3. Cable Negativo 4. Cable Positivo
5TH-9-63 8 17/3/04 11:24 AM Page 8-63
Page 301 of 343

8-65
4. When the machine is not to be used for a
month or longer, remove the battery and
store it in a cool, dark place. Completely
recharge the battery before using.
5. If the battery is to be stored for a longer
period than the above, check the specific
gravity at least once a month and recharge
the battery when it is too low.
6. Always make sure the connections are cor-
rect when putting the battery back in the
machine. Make sure the breather hose is
properly connected and is not damaged or
obstructed.
5TH-9-63 8 17/3/04 11:24 AM Page 8-65