service YAMAHA YFM80R 2005 Owners Manual
[x] Cancel search | Manufacturer: YAMAHA, Model Year: 2005, Model line: YFM80R, Model: YAMAHA YFM80R 2005Pages: 343, PDF Size: 5.94 MB
Page 4 of 343

SBU01050
INTRODUCCIÓN
Le felicitamos por su compra de la máquina
Yamaha YFM80. Representa el resultado de
muchos años de experiencia de Yamaha en la
producción de motos deportivas y de turismo, y
de máquinas de competición que marcan el
ritmo de las carreras. Con la compra de esta
máquina Yamaha, podrá apreciar el alto grado
de perfección técnica y fiabilidad que han con-
vertido a Yamaha en el líder de estos campos.
El presente manual le proporcionará un buen
conocimiento básico de las características y el
manejo de la máquina.
También contiene indicaciones importantes
acerca de la seguridad. Además, aporta
información sobre las técnicas y habilidades
especiales necesarias para conducir la
máquina.
También indica los procedimientos básicos de
mantenimiento e inspección. Si tiene alguna
duda respecto al mantenimiento o manejo de la
máquina, consulte a su concesionario Yamaha.
FBU01050
INTRODUCTION
Félicitations pour l’achat du YFM80 de
Yamaha. Ce modèle représente le fruit de nom-
breuses années d’expérience Yamaha dans la
production de véhicules de sport, de tourisme et
de course. Ce véhicule permettra à son pilote de
pleinement apprécier la perfection technique et
la fiabilité qui ont fait de Yamaha un leader dans
ces domaines.
Ce manuel apporte une meilleure compréhen-
sion des caractéristiques et du fonctionnement
du véhicule.
Le manuel donne en outre des conseils impor-
tants relatifs à la sécurité. Il informe sur les
compétences et techniques particulières indis-
pensables au pilotage du véhicule.
Ce manuel explique également les procédés
d’inspection et d’entretien élémentaires. Les
concessionnaires Yamaha sont au service de leur
clientèle et répondront à toute question concer-
nant le fonctionnement ou l’entretien de ce véhi-
cule.
5TH-9-63 ~3 17/3/04 11:25 AM Page 3
Page 109 of 343

5-17
EBU01083
Throttle lever
Check to see that the throttle lever operates cor-
rectly. It must open smoothly and spring back to
the idle position when released. Have a Yamaha
dealer repair as necessary for proper operation.
EBU11620
Fittings and fasteners
Always check the tightness of chassis fittings
and fasteners before a ride. Take the machine
to a Yamaha dealer or refer to the Service
Manual for correct tightening torque.
EBU11700
Switches
Check the operation of all switches. Have a
Yamaha dealer repair as necessary for proper
operation.
EBU00499
Battery
Check fluid level and fill if necessary. Use only
distilled water if refilling is necessary. (See
pages 8-59–8-65.)
5TH-9-63 4~5 17/3/04 11:25 AM Page 42
Page 237 of 343

8-1
EBU00516
PERIODIC
MAINTENANCE AND
ADJUSTMENT
Periodic inspection, adjustment and lubrication
will keep your machine in the safest and most
efficient condition possible. Safety is an obliga-
tion of the machine owner. The most important
points of machine inspection, adjustment and
lubrication are explained on the following pages.
w
Never service an engine while it is running.
Moving parts can catch clothing or parts of
the body, causing injury. Electrical compo-
nents can cause shocks or can start fires.
Turn off the engine when performing mainte-
nance unless otherwise specified. Have a
Yamaha dealer perform service if you are not
familiar with machine service.
5TH-9-63 7 17/3/04 11:25 AM Page 224
Page 239 of 343
8-3
EBU01222
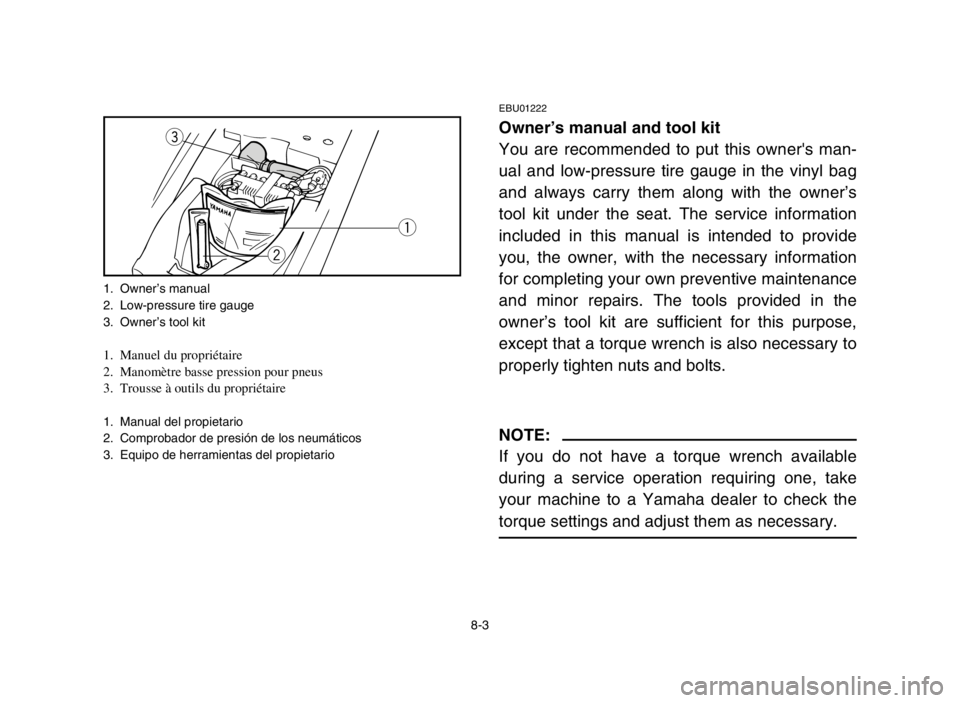
Owner’s manual and tool kit
You are recommended to put this owner's man-
ual and low-pressure tire gauge in the vinyl bag
and always carry them along with the owner’s
tool kit under the seat. The service information
included in this manual is intended to provide
you, the owner, with the necessary information
for completing your own preventive maintenance
and minor repairs. The tools provided in the
owner’s tool kit are sufficient for this purpose,
except that a torque wrench is also necessary to
properly tighten nuts and bolts.
NOTE:
If you do not have a torque wrench available
during a service operation requiring one, take
your machine to a Yamaha dealer to check the
torque settings and adjust them as necessary.
q
w
e
1. Owner’s manual
2. Low-pressure tire gauge
3. Owner’s tool kit
1. Manuel du propriétaire
2. Manomètre basse pression pour pneus
3. Trousse à outils du propriétaire
1. Manual del propietario
2. Comprobador de presión de los neumáticos
3. Equipo de herramientas del propietario
5TH-9-63 8 17/3/04 11:24 AM Page 8-3
Page 244 of 343

8-8 * Since these items require special tools, data and technical skills, have a Yamaha dealer perform the service.INITIAL EVERY
month 1 3 6 6 12
ITEM ROUTINEWhichever
km 320 1200 2400 2400 4800 comes first
(mi) (200) (750) (1500) (1500) (3000)
hours 20 75 150 150 300
Engine oil9Replace (warm engine before draining).2222
Final gear oil9Check oil level/oil leakage.
22
9Replace every 12 months.
Brakes*9Check operation.
22222
9Adjust if necessary.
Clutch*9Check operation.
2222
9Adjust if necessary.
Wheels*9Check balance/damage/runout.
2222
9Replace if necessary.
9Check bearing assemblies for looseness/
Wheel bearings*damage.2222
9Replace if damaged.
9Check operation.
Steering system*9Replace if damage.
22222
9Check toe-in
9Adjust if necessary.
Knuckle shafts/9Lubricate every 6 months with lithium-soap-based
222
steering shaft*grease.
Fittings and fasteners*9Check all chassis fittings and fasteners.
22222
9Correct if necessary.
9Check specific gravity.
Battery*9Check breather hose for correct routing.22222
9Correct if necessary.
5TH-9-63 8 17/3/04 11:24 AM Page 8-8
Page 253 of 343
8-17
7. Fill the engine with oil and install the dip-
stick.
cC
Be sure no foreign material enters the
crankcase.
8. Warm up the engine for several minutes at
idle speed. Check for oil leakage while
warming up.
cC
If oil leakage is found, stop the engine imme-
diately and check for the cause.
Recommended oil type:
20W50, 20W40, 15W40, 10W40,
10W30, 5W30
Recommended oil classification:
API Service SE, SF, SG type or higher
Oil quantity:
Periodic oil change:
0.8 L
5TH-9-63 8 17/3/04 11:24 AM Page 8-17
Page 254 of 343
8-18
7. Remplir d’huile le carter de moteur, puis
reposer la jauge.
fF
S’assurer qu’aucun corps étranger ne pénètre
dans le carter.
8. Faire chauffer le moteur pendant quelques
minutes en le laissant tourner au ralenti.
Pendant ce temps, s’assurer qu’il n’y a pas
de fuite d’huile.
fF
Si une fuite d’huile est détectée, couper immé-
diatement le moteur et en rechercher la cause.
7. Llene de aceite el motor y coloque la vari-
lla de nivel.
yY
Asegúrese de que no entren materias extra-
ñas en el cárter.
8. Mantenga el motor funcionando en ralentí
durante unos minutos para que se calien-
te. Mientras se calienta, compruebe si hay
fugas de aceite.
yY
Si encuentra alguna fuga de aceite, pare el
motor inmediatamente y averigüe la causa.
Tipo de aceite recomendado:
20W50, 20W40, 15W40, 10W40,
10W30, 5W30
Clasificación del aceite recomendado:
Servicio API, tipo SE, SF, SG o superior
Cantidad de aceite:
Cambio de aceite periódico:
0,8 LType d’huile recommandé:
20W50, 20W40, 15W40, 10W40,
10W30, 5W30
Classe d’huile recommandée:
Huiles de type API Service de classe SE,
SF, SG ou supérieures
Quantité d’huile:
Vidange périodique:
0,8 l
5TH-9-63 8 17/3/04 11:24 AM Page 8-18
Page 275 of 343

8-39
EBU00303
Valve clearance adjustment
The correct valve clearance changes with use,
resulting in improper fuel/air supply or engine
noise. To prevent this, the valve clearance must
be adjusted regularly. This adjustment however,
should be left to a professional Yamaha service
technician.
EBU00304
Cam chain adjustment
The cam chain becomes loose with use, result-
ing in improper valve timing and engine noise.
To prevent this, the cam chain tensioner must
be adjusted regularly. This adjustment should be
left to a Yamaha service technician.
5TH-9-63 8 17/3/04 11:24 AM Page 8-39
Page 281 of 343
8-45
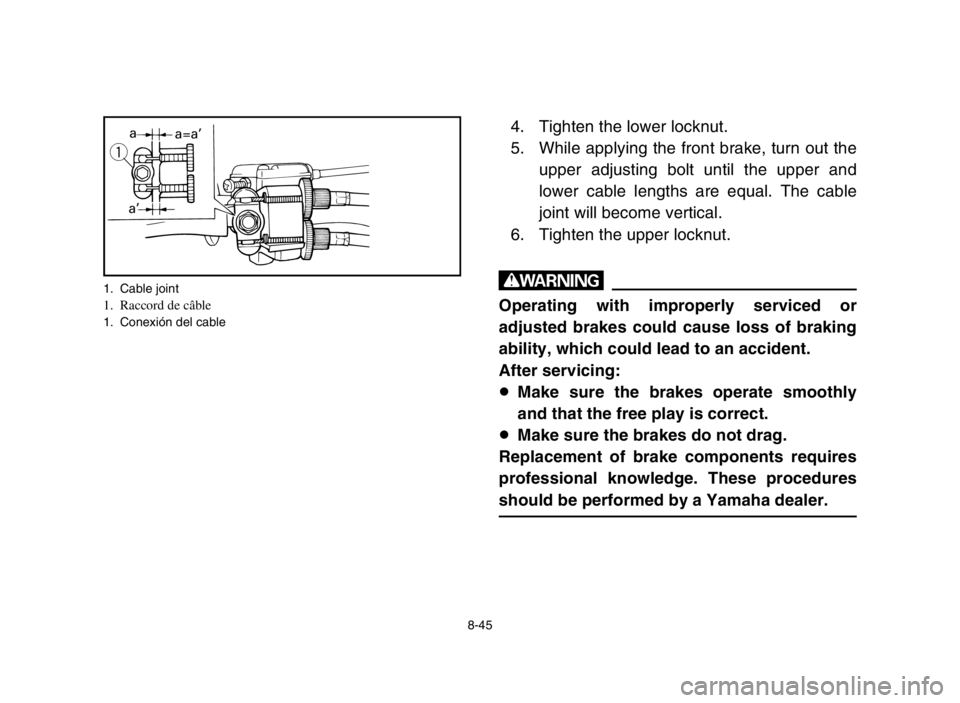
4. Tighten the lower locknut.
5. While applying the front brake, turn out the
upper adjusting bolt until the upper and
lower cable lengths are equal. The cable
joint will become vertical.
6. Tighten the upper locknut.
w
Operating with improperly serviced or
adjusted brakes could cause loss of braking
ability, which could lead to an accident.
After servicing:
8Make sure the brakes operate smoothly
and that the free play is correct.
8Make sure the brakes do not drag.
Replacement of brake components requires
professional knowledge. These procedures
should be performed by a Yamaha dealer.
q
a
a=a’
a’
1. Cable joint1. Raccord de câble1. Conexión del cable
5TH-9-63 8 17/3/04 11:24 AM Page 8-45
Page 285 of 343
8-49
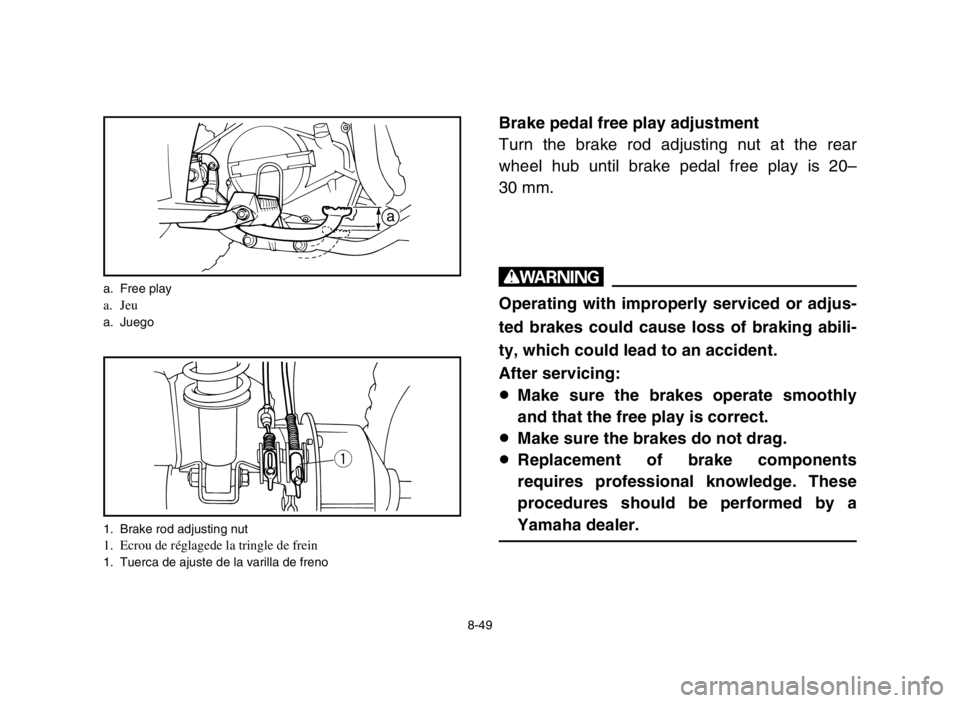
Brake pedal free play adjustment
Turn the brake rod adjusting nut at the rear
wheel hub until brake pedal free play is 20–
30 mm.
w
Operating with improperly serviced or adjus-
ted brakes could cause loss of braking abili-
ty, which could lead to an accident.
After servicing:
8Make sure the brakes operate smoothly
and that the free play is correct.
8Make sure the brakes do not drag.
8Replacement of brake components
requires professional knowledge. These
procedures should be performed by a
Yamaha dealer.
a
q
a. Free playa. Jeua. Juego
1. Brake rod adjusting nut
1. Ecrou de réglagede la tringle de frein1. Tuerca de ajuste de la varilla de freno
5TH-9-63 8 17/3/04 11:24 AM Page 8-49