check engine YAMAHA YFM90R 2009 Owners Manual
[x] Cancel search | Manufacturer: YAMAHA, Model Year: 2009, Model line: YFM90R, Model: YAMAHA YFM90R 2009Pages: 120, PDF Size: 9.14 MB
Page 9 of 120

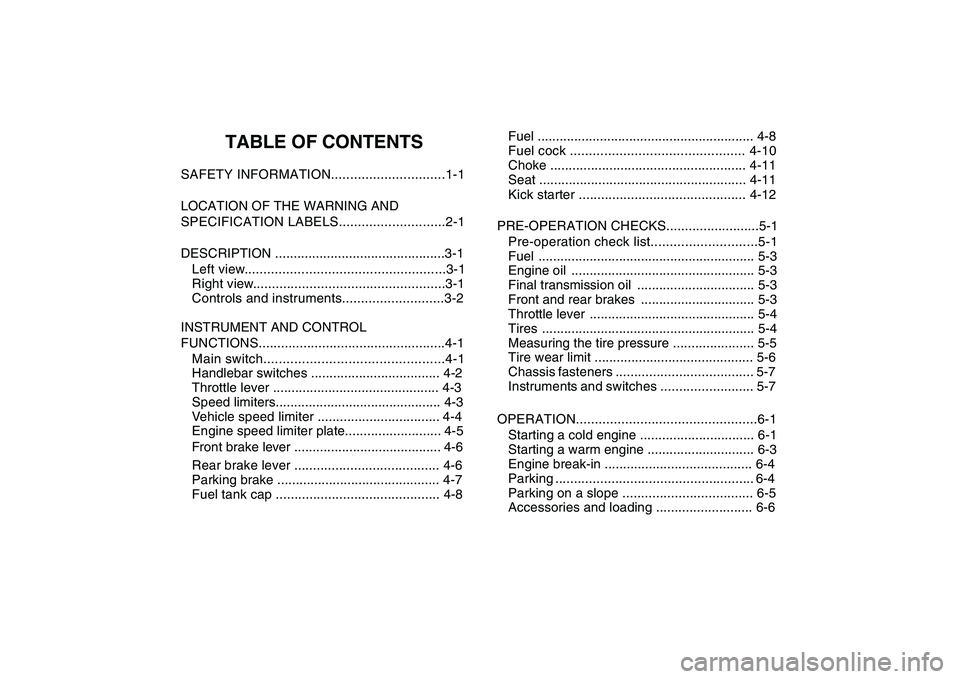
TABLE OF CONTENTS
SAFETY INFORMATION..............................1-1
LOCATION OF THE WARNING AND
SPECIFICATION LABELS............................2-1DESCRIPTION ..............................................3-1 Left view.....................................................3-1Right view...................................................3-1
Controls and instruments...........................3-2
INSTRUMENT AND CONTROL
FUNCTIONS..................................................4-1 Main switch...............................................4-1
Handlebar switches ................................... 4-2
Throttle lever ............................................. 4-3
Speed limiters............................................. 4-3
Front brake lever ........................................ 4-6
Rear brake lever ....................................... 4-6
Parking brake ............................................ 4-7
Fuel tank cap ............................................ 4-8 Fuel ........................................................... 4-8
Fuel cock .............................................. 4-10
Choke ..................................................... 4-11
Seat ........................................................ 4-11
PRE-OPERATION CHECKS.........................5-1 Pre-operation check list............................5-1
Fuel ........................................................... 5-3
Engine oil .................................................. 5-3
Final transmission oil ................................ 5-3
Front and rear brakes ............................... 5-3
Throttle lever ............................................. 5-4
Tires .......................................................... 5-4
Measuring the tire pressure ...................... 5-5
Tire wear limit ........................................... 5-6
Chassis fasteners ..................................... 5-7
Instruments and switches ......................... 5-7
OPERATION................................................6-1 Starting a cold engine ............................... 6-1
Starting a warm engine ............................. 6-3
Engine break-in ........................................ 6-4
Parking ..................................................... 6-4
Parking on a slope ................................... 6-5
Accessories and loading .......................... 6-6
Vehicle speed limiter ................................. 4-4
Engine speed limiter plate.......................... 4-5 Kick starter
............................................. 4-12
Page 10 of 120

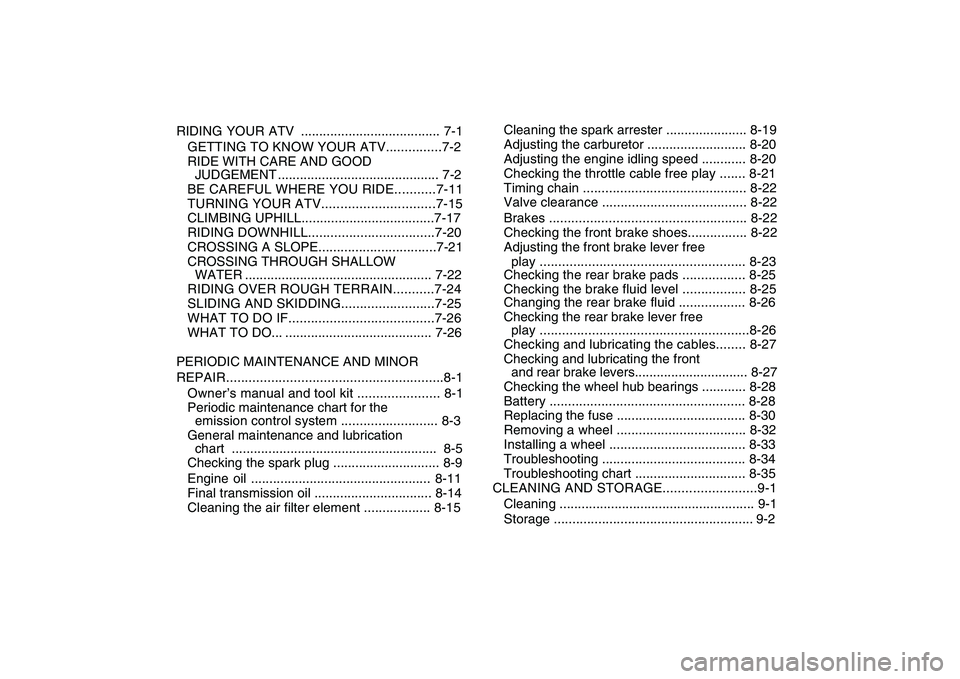
Cleaning the spark arrester ...................... 8-19
Adjusting the carburetor ........................... 8-20
Adjusting the engine idling speed ............ 8-20
Checking the throttle cable free play ....... 8-21
Timing chain ............................................ 8-22
Valve clearance ....................................... 8-22
Checking the front brake shoes................ 8-22
Adjusting the front brake lever free play ....................................................... 8-23
Checking the rear brake pads ................. 8-25
Checking the brake fluid level ................. 8-25
Changing the rear brake fluid .................. 8-26
Checking the rear brake lever free play ........................................................8-26
Checking and lubricating the cables........ 8-27
Checking and lubricating the front and rear brake levers............................... 8-27
Checking the wheel hub bearings ............ 8-28
Battery ..................................................... 8-28
Replacing the fuse ................................... 8-30
Removing a wheel ................................... 8-32
Installing a wheel ..................................... 8-33
Troubleshooting ....................................... 8-34
Troubleshooting chart .............................. 8-35
RIDING YOUR ATV ...................................... 7-1
GETTING TO KNOW YOUR ATV...............7-2
RIDE WITH CARE AND GOOD JUDGEMENT ............................................ 7-2
BE CAREFUL WHERE YOU RIDE...........7-11
TURNING YOUR ATV..............................7-15
CLIMBING UPHILL....................................7-17
RIDING DOWNHILL..................................7-20
CROSSING A SLOPE................................7-21
CROSSING THROUGH SHALLOW WATER ................................................... 7-22
RIDING OVER ROUGH TERRAIN...........7-24
SLIDING AND SKIDDING.........................7-25
WHAT TO DO IF.......................................7-26
WHAT TO DO... ........................................ 7-26
PERIODIC MAINTENANCE AND MINOR
REPAIR..........................................................8-1 Owner’s manual and tool kit ...................... 8-1
Periodic maintenance chart for the emission control system .......................... 8-3
General maintenance and lubrication chart ........................................................ 8-5
Checking the spark plug ............................. 8-9
Engine oil ................................................. 8-11
Final transmission oil ................................ 8-14
Cleaning the air filter element .................. 8-15 CLEANING AND STORAGE.........................9-1
Cleaning ..................................................... 9-1
Storage ...................................................... 9-2 Brakes ..................................................... 8-22
Page 14 of 120

1-3
1
Avoid crossing the side of a steep hill if possible.Always use proper procedures if you stall or roll
backwards when climbing a hill. To avoid stall-
ing, use the proper gear and maintain a steady
speed when climbing a hill. If you stall or roll
backwards, follow the special procedure for
braking described in this manual. Dismount on
the uphill side or to a side if pointed straight up-
hill. Turn the ATV around and remount, following
the procedure described in this manual.Always check for obstacles before operating in a
new area.Never attempt to operate over large obstacles,
such as large rocks or fallen trees. Always follow
proper procedures when operating over obsta-
cles as described in this manual.Always be careful when skidding or sliding.
Learn to safely control skidding or sliding by
practicing at low speeds and on level, smooth
terrain. On extremely slippery surfaces, such as
ice, go slowly and be very cautious in order to re-
duce the chance of skidding or sliding out of con-
trol.Never operate an ATV in fast flowing water or in
water deeper than that recommended in this
manual. Remember that wet brakes may havereduced stopping ability. Test your brakes after
leaving water. If necessary, apply them several
times to let friction dry out the linings.
Always use the size and type of tires specified in
this manual.Always maintain proper tire pressure as de-
scribed in this manual.Never modify an ATV through improper installa-
tion or use of accessories.Never exceed the stated load capacity for an
ATV. Cargo should be properly distributed and
securely attached. Reduce speed and follow in-
structions in this manual for carrying cargo or
pulling a trailer. Allow greater distance for brak-
ing.
WARNING
Always turn off the engine when refueling.Do not refuel right after the engine has been
running and is still very hot.Do not spill gasoline on the engine or ex-
haust pipe/muffler when refueling. Never re-
fuel while smoking, or in the vicinity of
sparks, open flames, or other sources of ig-
nition such as the pilot lights of water heat-
ers and clothes dryers. Gasoline can catch
Page 23 of 120

4-3
4
Throttle lever Once the engine is running, movement of the throt-
tle lever will increase the engine speed.
Regulate the speed of the ATV by varying the
throttle position. Because the throttle is spring-
loaded, the ATV will decelerate, and the engine will
return to an idle any time the hand is removed from
the throttle lever.
Before starting the engine, check the throttle to be
sure it is operating smoothly. Make sure it returns
to the idle position as soon as the lever is released.
Speed limitersYour ATV was delivered with two speed limiter
devices. A vehicle speed limiter adjusting screw
and a removable engine speed limiter plate.
Yamaha recommends that all beginning riders start
off with the vehicle speed limiter adjusting screw fully
turned in and the engine speed limiter plate installed
to limit the amount of speed available while they learn.
1. Throttle lever
1
WARNING
Malfunction of the throttle could make it diffi-
cult to speed up or slow down when you need
to. This could cause an accident. Check the op-
eration of the throttle lever before you start the
engine. If the throttle does not work smoothly,
check for the cause. Correct the problem be-fore riding the ATV or consult a Yamaha dealer.
Page 34 of 120

9
Make sure that operation is smooth, and check cable free play.Lubricate cable and lever housing if necessary.
Control cablesMake sure that operation is smooth. Lubricate if necessary. 8-27
Wheels and tiresCheck wheel condition, and replace if damaged.Check tire condition and tread depth. Replace if necessary.Check air pressure. Correct if necessary. 5-4, 5-5, 5-6
Brake leversMake sure that operation is smooth. Lubricate lever pivoting points
if necessary. 8-27
Chassis fastenersMake sure that all nuts, bolts and screws are properly tightened. 5-7
Instruments and switchesCheck operation, and correct if necessary. 5-7
2
5-2
9
Throttle lever 5-4, 8-21
5
PAGE
ROUTINE
METIT
Fuel
Check fuel line for leakage. Correct if necessary . 4-8, 5-3Check A TV for oil leakage. Correct if necessary .5-3, 8-11
Final transmission oil
5-3, 8-14
Check ATV for oil leakage. Correct if necessary.
Front brake
Check operation, and correct if necessary.Lubricate cable if necessary .Check lever free play , and adjust if necessary. 5-3, 8-22, 8-23
Engine oil
Check fuel level in fuel tank, and add recommended fuel if neces-
sary.Check brake pads for wear, and replace if necessary.
Check brake fluid level in reservoir, and add recommended brake fluid to specified level if necessary.
Check hydraulic system for leakage. Correct if necessary. Check operation. If soft or spongy, have Yamaha dealer bleed
hydraulic system.
Rear brake 5-3, 8-25, 8-26
Check oil level in engine, and add recommended oil to specified
level if necessary.
Page 35 of 120

5-3
FuelMake sure that there is sufficient fuel in the tank.
(See page 4-8.)
Engine oilMake sure that the engine oil is at the specified lev-
el. Add oil as necessary. (See page 8-11.)
Final transmission oilMake sure that the final transmission oil is at the
specified level. Add oil as necessary.
(See page 8-14.)Front and rear brakesRecommended brake fluid:
DOT4
3
Brake fluid leakage
Check to see if any brake fluid is leaking out of the
pipe joint or brake fluid reservoir. Apply the brake
firmly for one minute. If there is any leakage, have a
Yamaha dealer check the brake system.Brake leversCheck for correct free play in the brake levers. If
the free play is incorrect, adjust it. (See pages
8-23 and 8-26.)Check operation of the levers. They should
move smoothly and there should be a firm feel-
ATV checked by a Yamaha dealer.
6
Brake fluid level
Check the brake fluid level. Add fluid if necessary.
(See page 8-25.)
15
WARNING
Do not overfill the fuel tank. Fuel expands
when it heats up. If the fuel tank is overfilled,
fuel could spill out due to heat from the en-
gine or the sun.Be careful not to spill fuel, especially on the
engine or exhaust pipe which can cause a
fire and severe injury. Wipe up any spilled
fuel immediately.Do not refuel right after the engine has been
running and is still very hot.Be sure the fuel tank cap is closed securely.
ing when the brakes are applied. If not, have the
Page 43 of 120

Engine break-in There is never a more important period in the life of
your engine than the first 320 km (200 mi) or 20
hours of riding. For this reason, you should read
the following material carefully.
Since the engine is brand new, do not put an ex-
cessive load on it for the first 320 km (200 mi) or 20
hours. The various parts in the engine wear and
N O T I C E Do not tow the ATV for long distances. The
transmission is properly lubricated only when
the engine is running. Inadequate lubrication
may damage the transmission.
160–320 km (100–200 mi) or 10–20 hours
Avoid prolonged operation above 3/4 throttle. Rev
the engine freely, but do not use full throttle at any
time.
N O T I C E
If any engine trouble should occur during the
engine break-in period, immediately have a ParkingWhen parking the ATV, stop the engine, shift the
drive select lever into the drive position, apply the
parking brake, and then turn the fuel cock to “OFF”. Yamaha dealer check the ATV. 320 km (200 mi) or 20 hours and beyond
The ATV can now be operated normally.0–160 km (0–100 mi) or 0–10 hours
Avoid prolonged operation above 1/2 throttle. Vary
the speed of the ATV regularly. Do not operate it at
one set throttle position.
polish themselves to the correct operating clear-
ances. During this period, prolonged full-throttle
operation or any condition that might result in en-
gine overheating must be avoided.
6-4
6
Page 76 of 120

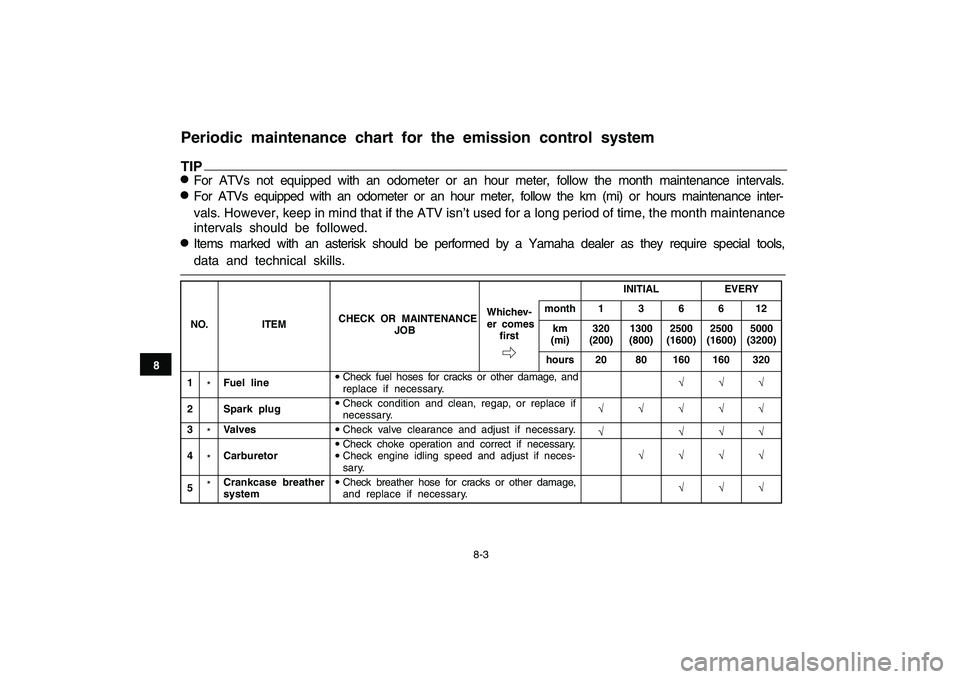
8-3
Periodic maintenance chart for the emission control system TIPFor ATVs not equipped with an odometer or an hour meter, follow the month maintenance intervals.For ATVs equipped with an odometer or an hour meter, follow the km (mi) or hours maintenance inter-
intervals should be followed.Items marked with an asterisk should be performed by a Yamaha dealer as they require special tools,data and technical skills.NO.ITEM CHECK OR MAINTENANCE
JOB INITIAL
EVERY
Whichev- er comes �rst month 1 3 6 6 12
km
(mi) 320
(200) 1300
(800) 2500
(1600) 2500
(1600) 5000
(3200)
hours 20 80 160 160 3201 *Fuel line
Check fuel hoses for cracks or other damage, and
replace if necessary. √ √ √
2 Spark plugCheck condition and clean, regap, or replace if
necessary. √ √ √ √ √
3 *ValvesCheck valve clearance and adjust if necessary.
√√ √ √
4 *CarburetorCheck choke operation and correct if necessary.Check engine idling speed and adjust if neces-
sary. √ √ √ √
5 *
Crankcase breather
systemCheck breather hose for cracks or other damage,
and replace if necessary. √ √ √
8
vals. However, keep in mind that if the ATV isn’t used for a long period of time, the month maintenance
Page 79 of 120

8-6
11
*Shock absorber
assemblies
Check operation and correct if necessary.Check for oil leakage and replace if necessary. √ √ √
12 *
Front knuckle piv-
otsLubricate with lithium-soap-based grease.
√ √ √
13 *Steering shaftLubricate with lithium-soap-based grease.
√ √ √
14 *Steering systemCheck operation and repair or replace if damaged.Check toe-in and adjust if necessary. √ √ √ √ √
Engine oilChange.Check ATV for oil leakage, and correct if neces-
sary. √
√ √ √Change.
NO.ITEM CHECK OR MAINTENANCE
JOB INITIAL
EVERY
Whichev- er comes �rst month 1 3 6 6 12
km
(mi) 320
(200) 1300
(800) 2500
(1600) 2500
(1600) 5000
(3200)
hours 20 80 160 160 32017
Check ATV for oil leakage, and correct if neces-
sary. √
√
18 *
Moving parts and
cablesLubricate.
√ √ √ √
8
9
*Wheel hub bearings
Check for looseness or damage, and replace if
necessary. √
√ √ √
10 *Chassis fastenersMake sure that all nuts, bolts, and screws are
properly tightened. √ √ √ √ √
1516
Engine oil strainer Clean.
√√ √
Final transmission oil
Page 82 of 120

8-9
8
Checking the spark plugThe spark plug is an important engine component,
which is easy to check. Since heat and deposits
will cause any spark plug to slowly erode, the spark
plug should be removed and checked in accor-
dance with the periodic maintenance and lubrica-
tion chart. In addition, the condition of the spark
plug can reveal the condition of the engine.
To remove the spark plug1. Remove the spark plug cap.
2. Remove the spark plug as shown, with thespark plug wrench included in the owner’s tool
kit.
1. Spark plug cap
1