YAMAHA YFZ450 2013 Owners Manual
Manufacturer: YAMAHA, Model Year: 2013, Model line: YFZ450, Model: YAMAHA YFZ450 2013Pages: 154, PDF Size: 3.77 MB
Page 131 of 154
8-49
8
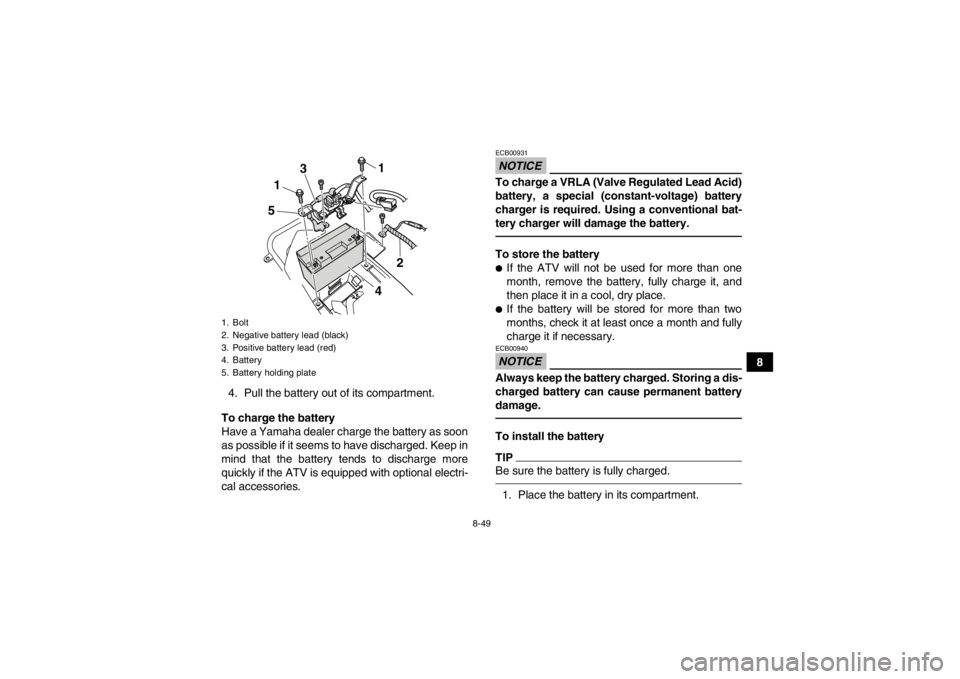
4. Pull the battery out of its compartment.
To charge the battery
Have a Yamaha dealer charge the battery as soon
as possible if it seems to have discharged. Keep in
mind that the battery tends to discharge more
quickly if the ATV is equipped with optional electri-
cal accessories.
NOTICEECB00931To charge a VRLA (Valve Regulated Lead Acid)
battery, a special (constant-voltage) battery
charger is required. Using a conventional bat-
tery charger will damage the battery.To store the battery●If the ATV will not be used for more than one
month, remove the battery, fully charge it, and
then place it in a cool, dry place.●If the battery will be stored for more than two
months, check it at least once a month and fully
charge it if necessary.NOTICEECB00940Always keep the battery charged. Storing a dis-
charged battery can cause permanent battery
damage.To install the batteryTIPBe sure the battery is fully charged.1. Place the battery in its compartment.
1. Bolt
2. Negative battery lead (black)
3. Positive battery lead (red)
4. Battery
5. Battery holding plate
1
1
5
2
3
4
U1PD61E0.book Page 49 Tuesday, February 14, 2012 10:06 AM
Page 132 of 154
8-50
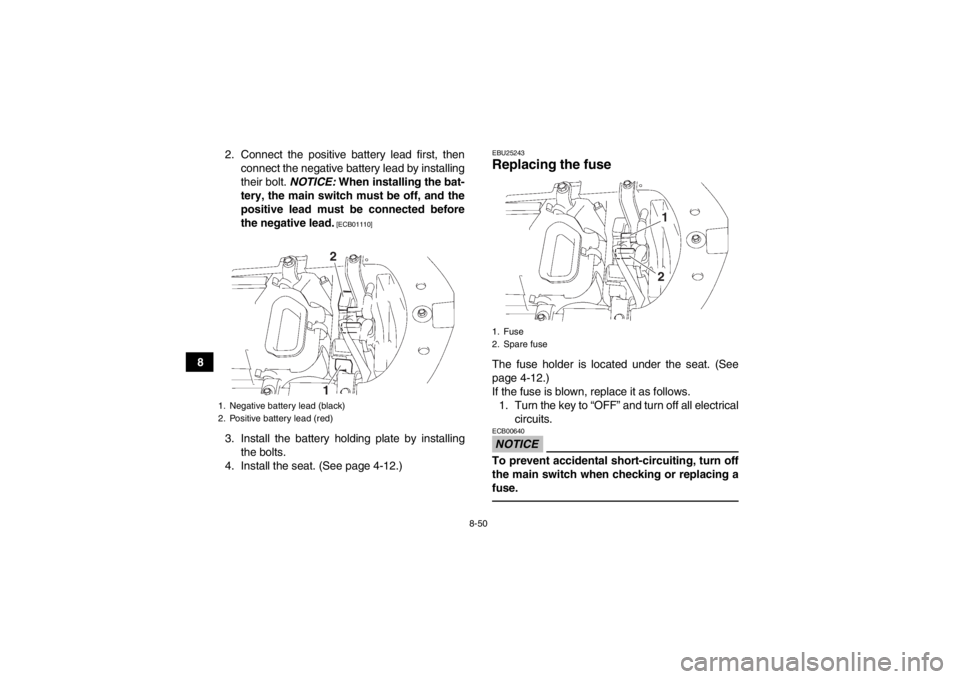
82. Connect the positive battery lead first, then
connect the negative battery lead by installing
their bolt. NOTICE: When installing the bat-
tery, the main switch must be off, and the
positive lead must be connected before
the negative lead.
[ECB01110]
3. Install the battery holding plate by installing the bolts.
4. Install the seat. (See page 4-12.)
EBU25243Replacing the fuse The fuse holder is located under the seat. (See
page 4-12.)
If the fuse is blown, replace it as follows. 1. Turn the key to “OFF” and turn off all electrical circuits.NOTICEECB00640To prevent accidental short-circuiting, turn off
the main switch when checking or replacing a
fuse.
1. Negative battery lead (black)
2. Positive battery lead (red)
2
1
1. Fuse
2. Spare fuse
1
2
U1PD61E0.book Page 50 Tuesday, February 14, 2012 10:06 AM
Page 133 of 154
8-51
8
2. Remove the blown fuse, and then install a
new fuse of the specified amperage.
WARNING! Always use a fuse of the spec- ified rating, and never use a substitute ob-
ject in place of the proper fuse. An
improper fuse or a substitute object can
cause damage to the electrical system,
which could lead to a fire.
[EWB02172]
3. Turn the key to “ON” and turn on the electrical circuits to check if the devices operate.
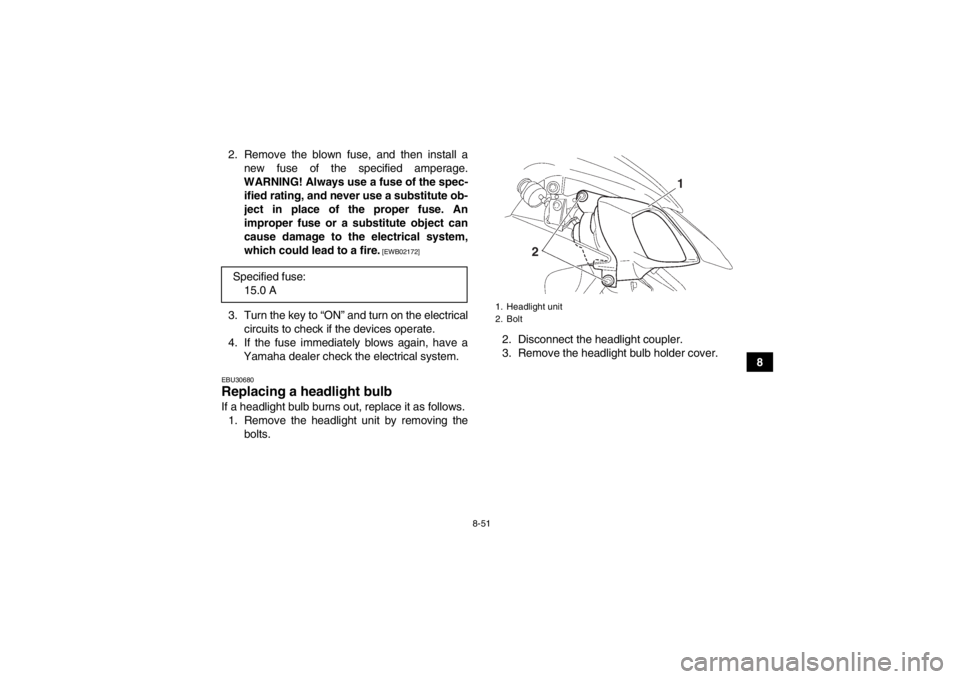
4. If the fuse immediately blows again, have a Yamaha dealer check the electrical system.EBU30680Replacing a headlight bulb If a headlight bulb burns out, replace it as follows.1. Remove the headlight unit by removing the bolts. 2. Disconnect the headlight coupler.
3. Remove the headlight bulb holder cover.
Specified fuse:
15.0 A
1. Headlight unit
2. Bolt
2 1
U1PD61E0.book Page 51 Tuesday, February 14, 2012 10:06 AM
Page 134 of 154
8-52
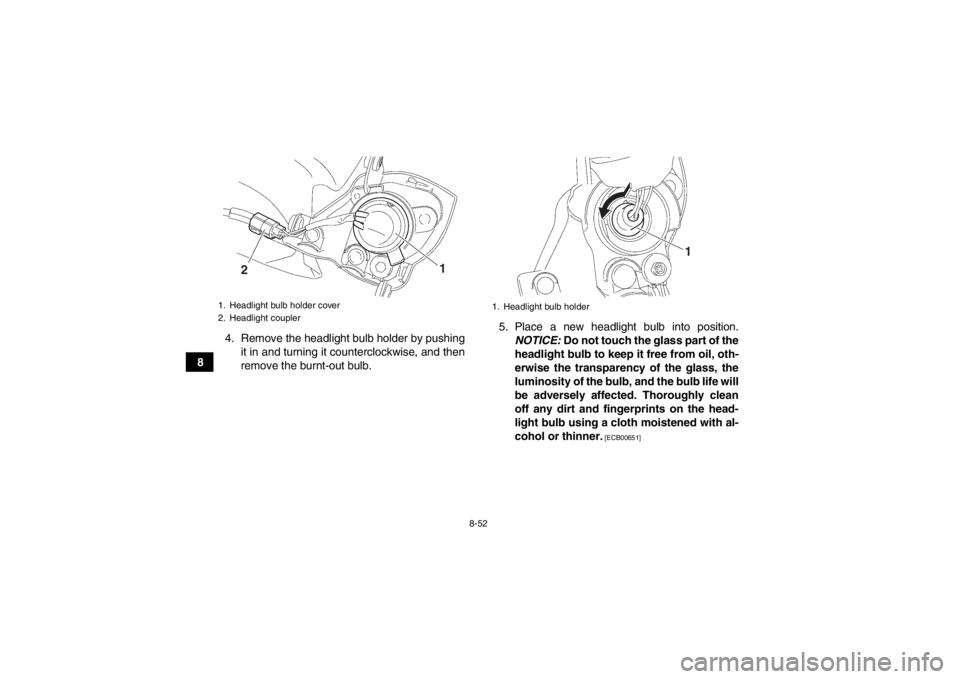
84. Remove the headlight bulb holder by pushing
it in and turning it counterclockwise, and then
remove the burnt-out bulb. 5. Place a new headlight bulb into position.
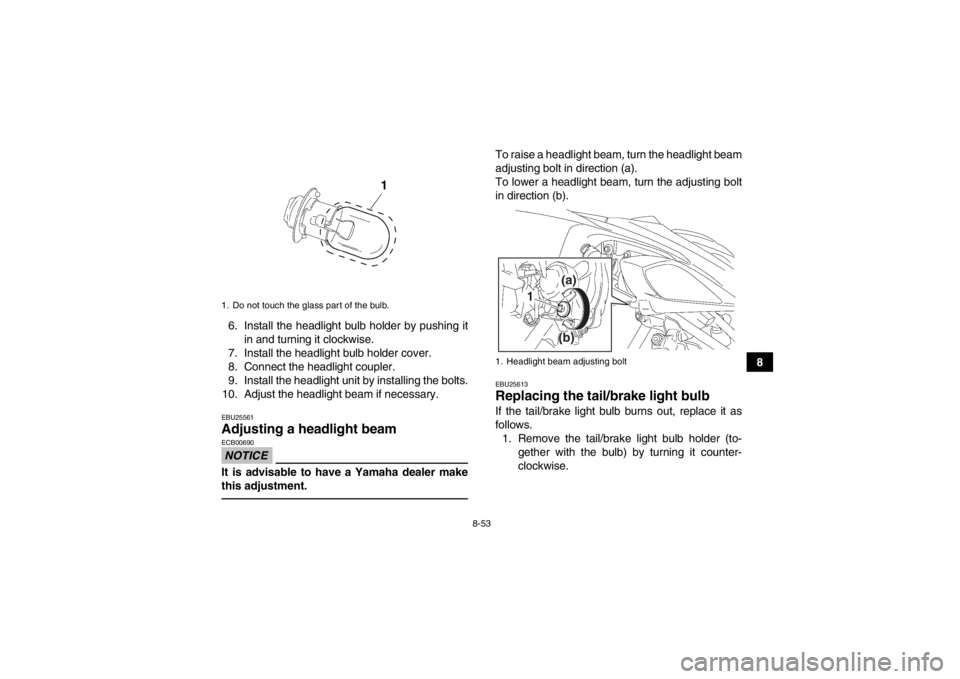
NOTICE: Do not touch the glass part of the
headlight bulb to keep it free from oil, oth-
erwise the transparency of the glass, the
luminosity of the bulb, and the bulb life will
be adversely affected. Thoroughly clean
off any dirt and fingerprints on the head-
light bulb using a cloth moistened with al-
cohol or thinner.
[ECB00651]
1. Headlight bulb holder cover
2. Headlight coupler
1
2
1. Headlight bulb holder
1
U1PD61E0.book Page 52 Tuesday, February 14, 2012 10:06 AM
Page 135 of 154
8-53
8
6. Install the headlight bulb holder by pushing it
in and turning it clockwise.
7. Install the headlight bulb holder cover.
8. Connect the headlight coupler.
9. Install the headlight unit by installing the bolts.
10. Adjust the headlight beam if necessary.
EBU25561Adjusting a headlight beam NOTICEECB00690It is advisable to have a Yamaha dealer make
this adjustment.
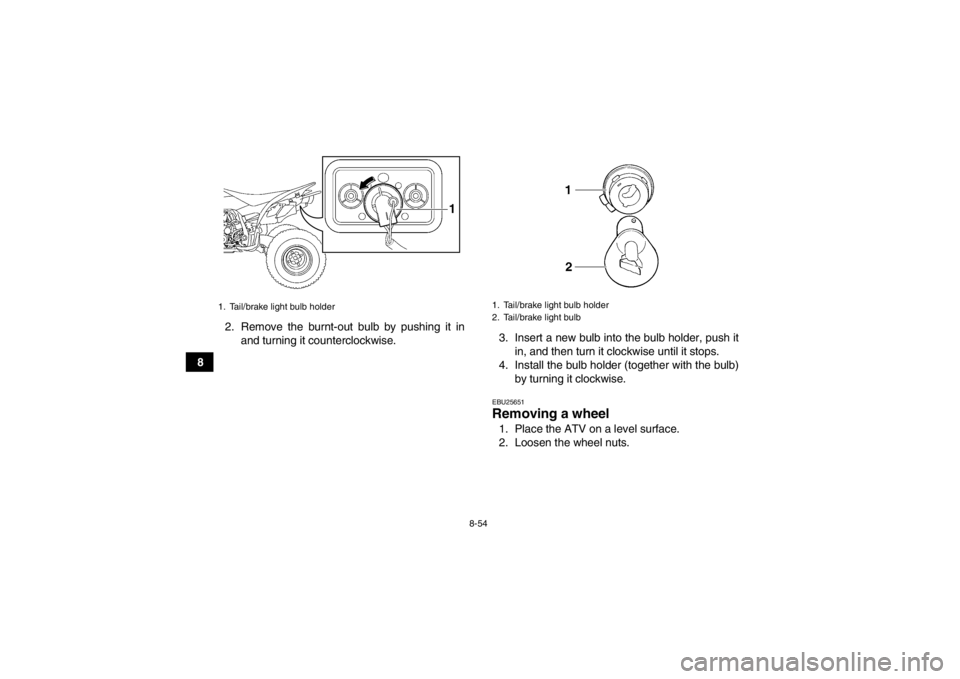
To raise a headlight beam, turn the headlight beam
adjusting bolt in direction (a).
To lower a headlight beam, turn the adjusting bolt
in direction (b).EBU25613Replacing the tail/brake light bulb If the tail/brake light bulb burns out, replace it as
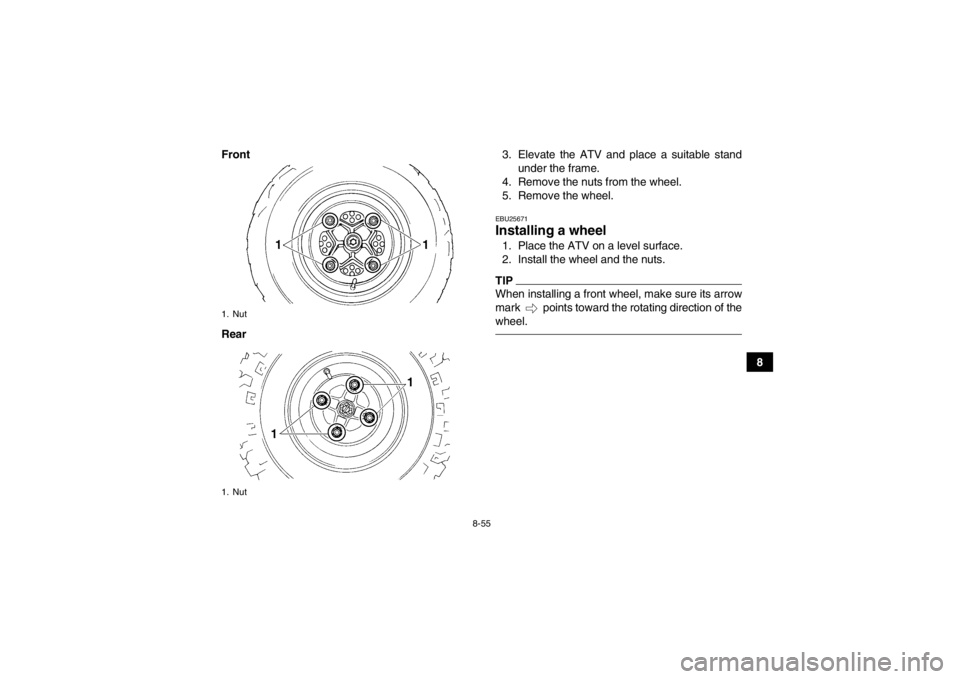
follows. 1. Remove the tail/brake light bulb holder (to- gether with the bulb) by turning it counter-
clockwise.
1. Do not touch the glass part of the bulb.
1
1. Headlight beam adjusting bolt
1 (a)
(b)
U1PD61E0.book Page 53 Tuesday, February 14, 2012 10:06 AM
Page 136 of 154
8-54
82. Remove the burnt-out bulb by pushing it in
and turning it counterclockwise. 3. Insert a new bulb into the bulb holder, push it
in, and then turn it clockwise until it stops.
4. Install the bulb holder (together with the bulb) by turning it clockwise.
EBU25651Removing a wheel 1. Place the ATV on a level surface.
2. Loosen the wheel nuts.
1. Tail/brake light bulb holder
1
1. Tail/brake light bulb holder
2. Tail/brake light bulb
U1PD61E0.book Page 54 Tuesday, February 14, 2012 10:06 AM
Page 137 of 154
8-55
8
Front
Rear
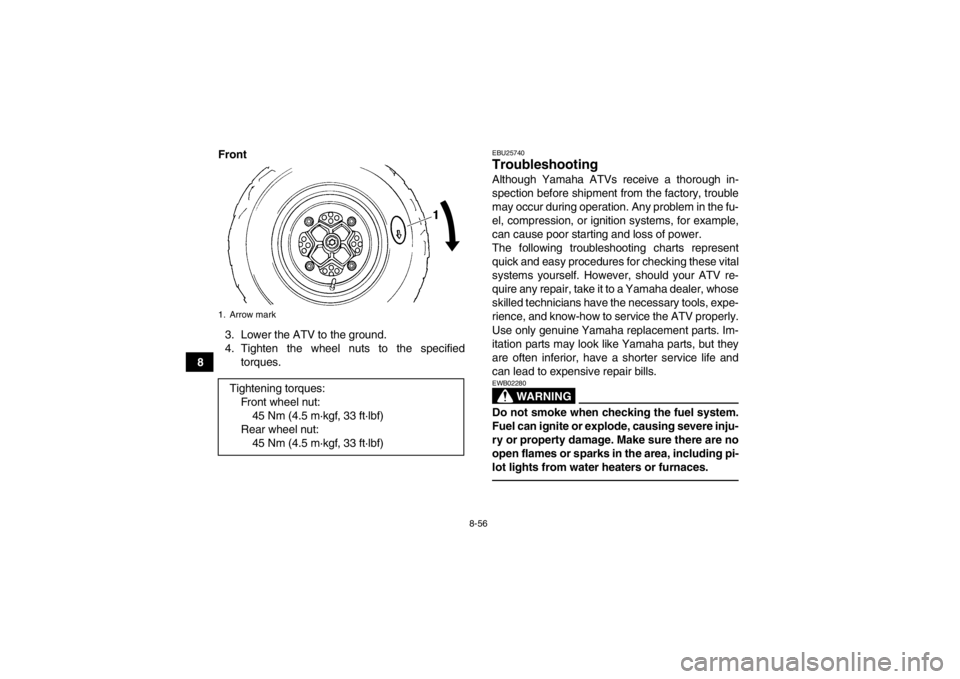
3. Elevate the ATV and place a suitable stand
under the frame.
4. Remove the nuts from the wheel.
5. Remove the wheel.
EBU25671Installing a wheel 1. Place the ATV on a level surface.
2. Install the wheel and the nuts.TIPWhen installing a front wheel, make sure its arrow
mark points toward the rotating direction of the
wheel.
1. Nut
1. NutU1PD61E0.book Page 55 Tuesday, February 14, 2012 10:06 AM
Page 138 of 154
8-56
8Front
3. Lower the ATV to the ground.
4. Tighten the wheel nuts to the specified torques.
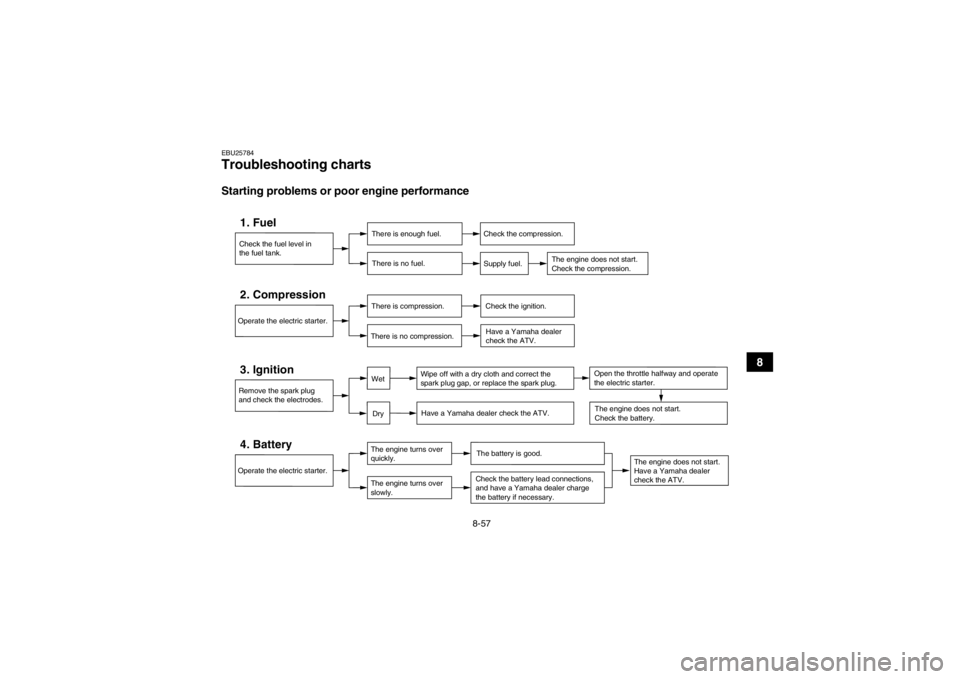
EBU25740Troubleshooting Although Yamaha ATVs receive a thorough in-
spection before shipment from the factory, trouble
may occur during operation. Any problem in the fu-
el, compression, or ignition systems, for example,
can cause poor starting and loss of power.
The following troubleshooting charts represent
quick and easy procedures for checking these vital
systems yourself. However, should your ATV re-
quire any repair, take it to a Yamaha dealer, whose
skilled technicians have the necessary tools, expe-
rience, and know-how to service the ATV properly.
Use only genuine Yamaha replacement parts. Im-
itation parts may look like Yamaha parts, but they
are often inferior, have a shorter service life and
can lead to expensive repair bills.
WARNING
EWB02280Do not smoke when checking the fuel system.
Fuel can ignite or explode, causing severe inju-
ry or property damage. Make sure there are no
open flames or sparks in the area, including pi-
lot lights from water heaters or furnaces.
1. Arrow markTightening torques:Front wheel nut:45 Nm (4.5 m·kgf, 33 ft·lbf)
Rear wheel nut: 45 Nm (4.5 m·kgf, 33 ft·lbf)
U1PD61E0.book Page 56 Tuesday, February 14, 2012 10:06 AM
Page 139 of 154
8-57
8
EBU25784Troubleshooting charts Starting problems or poor engine performance
Check the fuel level in
the fuel tank.1. Fuel
There is enough fuel.
There is no fuel.
Check the compression.
Supply fuel.
The engine does not start.
Check the compression.
Operate the electric starter.2. Compression
There is compression.
There is no compression.
Check the ignition. Have a Yamaha dealer
check the ATV.
Remove the spark plug
and check the electrodes.3. Ignition
Wipe off with a dry cloth and correct the
spark plug gap, or replace the spark plug.
Have a Yamaha dealer check the ATV.
The engine does not start.
Have a Yamaha dealer
check the ATV.
The engine does not start.
Check the battery.
Operate the electric starter.4. Battery
The engine turns over
quickly.
The engine turns over
slowly.
The battery is good.Check the battery lead connections,
and have a Yamaha dealer charge
the battery if necessary.
DryWet
Open the throttle halfway and operate
the electric starter.
U1PD61E0.book Page 57 Tuesday, February 14, 2012 10:06 AM
Page 140 of 154
8-58
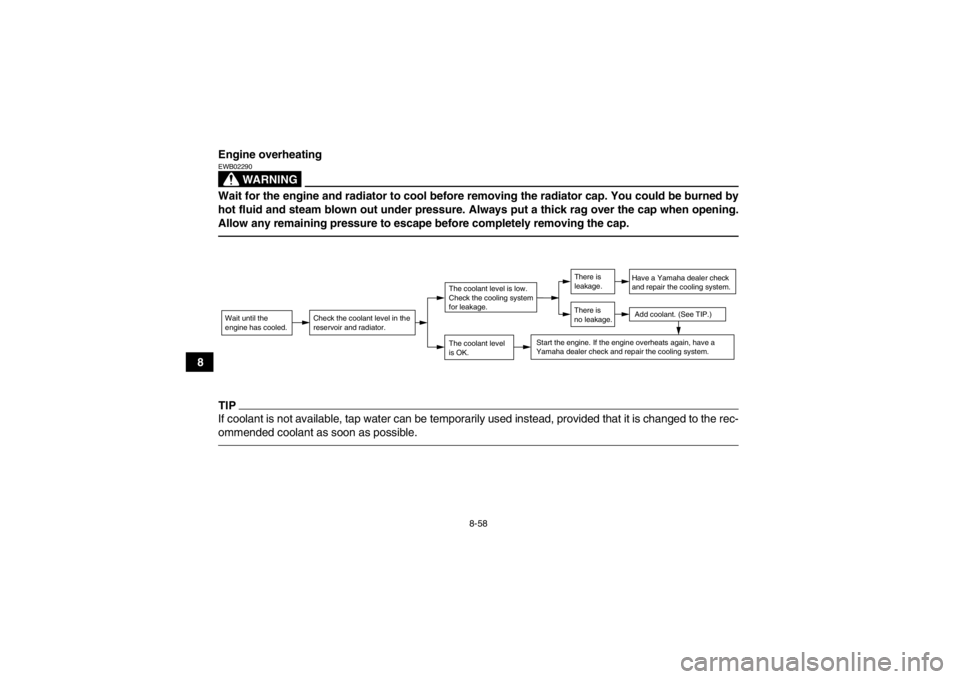
8Engine overheating
WARNING
EWB02290Wait for the engine and radiator to cool before
removing the radiator cap. You could be burned by
hot fluid and steam blown out under pressure. Always put a thick rag over the cap when opening.
Allow any remaining pressure to escape before completely removing the cap.TIPIf coolant is not available, tap water can be temporarily used instead, provided that it is changed to the rec-
ommended coolant as soon as possible.Wait until the
engine has cooled.
Check the coolant level in the
reservoir and radiator.
The coolant level
is OK.The coolant level is low.
Check the cooling system
for leakage.
Have a Yamaha dealer check
and repair the cooling system.Add coolant. (See TIP.)
Start the engine. If the engine overheats again, have a
Yamaha dealer check and repair the cooling system.
There is
leakage.
There is
no leakage.
U1PD61E0.book Page 58 Tuesday, February 14, 2012 10:06 AM