maintenance YAMAHA YFZ450R 2010 User Guide
[x] Cancel search | Manufacturer: YAMAHA, Model Year: 2010, Model line: YFZ450R, Model: YAMAHA YFZ450R 2010Pages: 154, PDF Size: 3.8 MB
Page 94 of 154
8-5
8
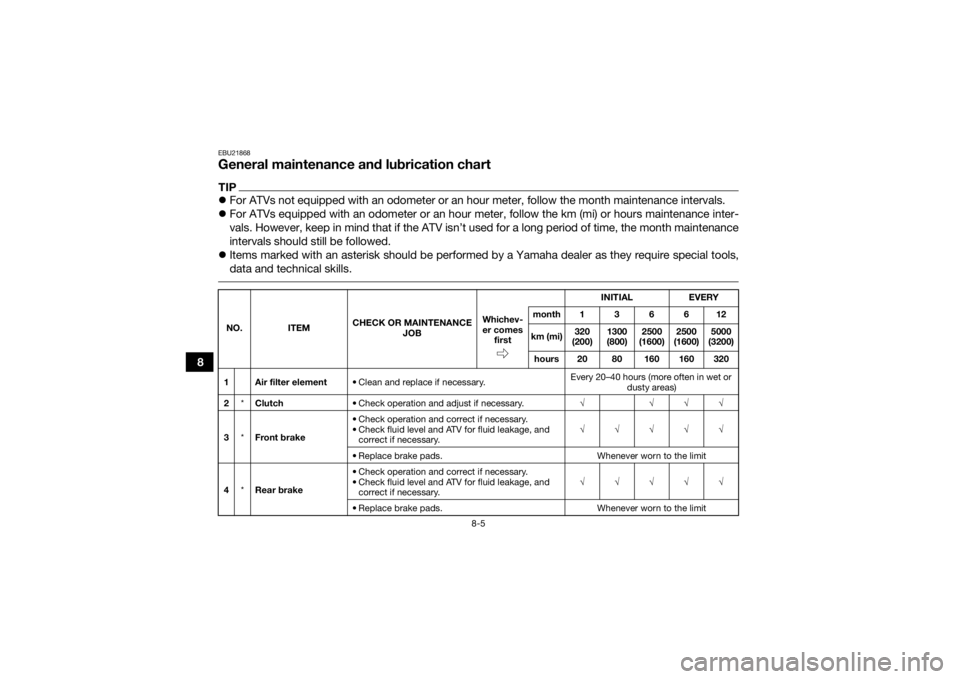
EBU21868General maintenance and lubrication chartTIPFor ATVs not equipped with an odometer or an hour meter, follow the month maintenance intervals.
For ATVs equipped with an odometer or an hour meter, follow the km (mi) or hours maintenance inter-
vals. However, keep in mind that if the ATV isn’t used for a long period of time, the month maintenance
intervals should still be followed.
Items marked with an asterisk should be performed by a Yamaha dealer as they require special tools,
data and technical skills. NO. ITEM CHECK OR MAINTENANCE
JOB INITIAL
EVERY
Whichev-
er comes first month136612
km (mi) 320
(200) 1300
(800) 2500
(1600) 2500
(1600) 5000
(3200)
hours 20 80 160 160 320
1 Air filter element • Clean and replace if necessary. Every 20–40 hours (more often in wet or
dusty areas)
2 *Clutch • Check operation and adjust if necessary. √ √√√
3 *Front brake • Check operation and correct if necessary.
• Check fluid level and ATV for fluid leakage, and
correct if necessary. √√√√√
• Replace brake pads. Whenever worn to the limit
4 *Rear brake • Check operation and correct if necessary.
• Check fluid level and ATV for fluid leakage, and
correct if necessary. √√√√√
• Replace brake pads. Whenever worn to the limit
U1TD61E0.book Page 5 Tuesday, July 8, 2014 11:30 AM
Page 95 of 154

8-6
8
5*Brake hoses • Check for cracks or other damage, and replace if
necessary. √√√√
• Replace. Every 4 years
6 *Brake fluid • Replace. Every 2 years
7 *Parking brake • Check operation and adjust if necessary. √√√√√
8 *Wheels • Check runout and for damage, and replace if nec-
essary. √ √√√
9 *Tires • Check tread depth and for damage, and replace if
necessary.
• Check air pressure and balance, and correct if necessary. √ √√√
10 *Wheel hub bearings • Check for looseness or damage, and replace if
necessary. √ √√√
11 *Swingarm pivots • Check operation and for excessive play, and re-
place bearings if necessary.
• Lubricate with lithium-soap-based grease. √√√
12 *Upper and lower
arm pivots • Lubricate with lithium-soap-based grease.
√√√
13 Drive chain • Check chain slack and adjust if necessary.
• Check rear wheel alignment and correct if neces-
sary.
• Clean and lubricate. √√√√√
NO. ITEM
CHECK OR MAINTENANCE
JOB INITIAL EVERY
Whichev- er comes first month136612
km (mi) 320
(200) 1300
(800) 2500
(1600) 2500
(1600) 5000
(3200)
hours 20 80 160 160 320
U1TD61E0.book Page 6 Tuesday, July 8, 2014 11:30 AM
Page 96 of 154

8-7
8
14*Drive chain roller • Check for wear and replace if necessary. √√√
15 *Chassis fasteners • Make sure that all nuts, bolts, and screws are
properly tightened. √√√√√
16 *Shock absorber as-
semblies • Check operation and correct if necessary.
• Check for oil leakage and replace if necessary.
√√√
17 *Rear suspension re-
lay arm and con-
necting arm
pivoting points • Check operation and correct if necessary.
√√√√
18 *Steering shaft • Lubricate with lithium-soap-based grease. √√√
19 *Steering system • Check operation and repair or replace if dam-
aged.
• Check toe-in and adjust if necessary. √√√√√
20 Engine oil • Change.
• Check ATV for oil leakage, and correct if neces-
sary. √ √√√
21 Engine oil filter ele-
ment
• Replace.
√√√
22 *Cooling system • Check coolant level and ATV for coolant leakage,
and correct if necessary. √√√√√
• Replace coolant. Every 2 years
NO. ITEM
CHECK OR MAINTENANCE
JOB INITIAL EVERY
Whichev-
er comes first month136612
km (mi) 320
(200) 1300
(800) 2500
(1600) 2500
(1600) 5000
(3200)
hours 20 80 160 160 320U1TD61E0.book Page 7 Tuesday, July 8, 2014 11:30 AM
Page 97 of 154
8-8
8
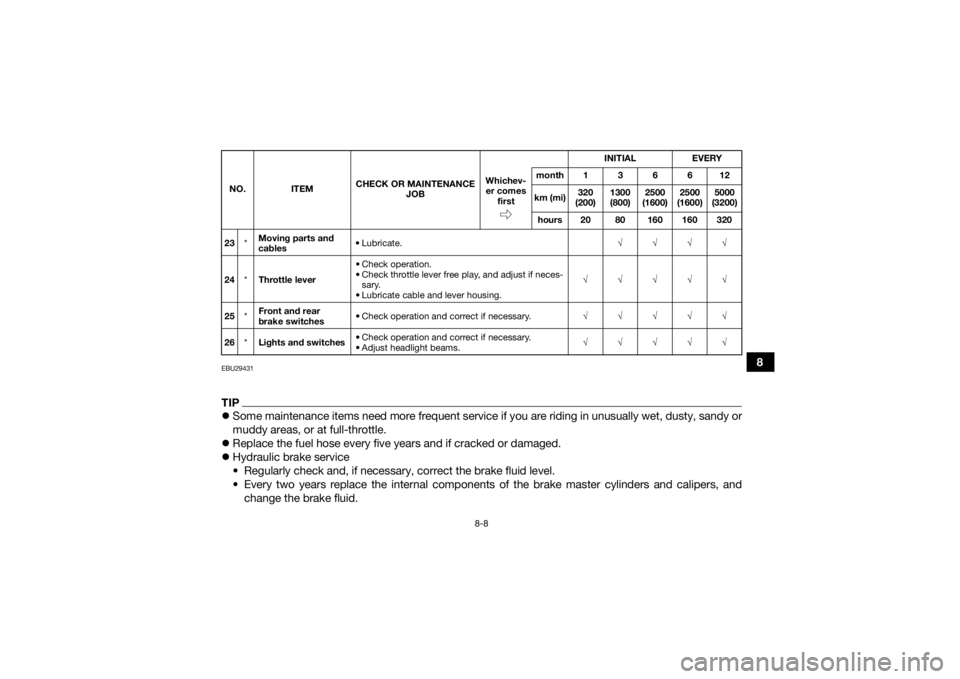
EBU29431TIPSome maintenance items need more frequent service if you are riding in unusually wet, dusty, sandy or
muddy areas, or at full-throttle.
Replace the fuel hose every five years and if cracked or damaged.
Hydraulic brake service
• Regularly check and, if necessary, correct the brake fluid level.
• Every two years replace the internal components of the brake master cylinders and calipers, and
change the brake fluid.23 *Moving parts and
cables •Lubricate.
√√√√
24 *Throttle lever • Check operation.
• Check throttle lever free play, and adjust if neces-
sary.
• Lubricate cable and lever housing. √√√√√
25 *Front and rear
brake switches • Check operation and correct if necessary.
√√√√√
26 *Lights and switches • Check operation and correct if necessary.
• Adjust headlight beams. √√√√√
NO. ITEM
CHECK OR MAINTENANCE
JOB INITIAL EVERY
Whichev- er comes first month136612
km (mi) 320
(200) 1300
(800) 2500
(1600) 2500
(1600) 5000
(3200)
hours 20 80 160 160 320U1TD61E0.book Page 8 Tuesday, July 8, 2014 11:30 AM
Page 99 of 154
8-10
8
EBU30131Removing and installing the cowling
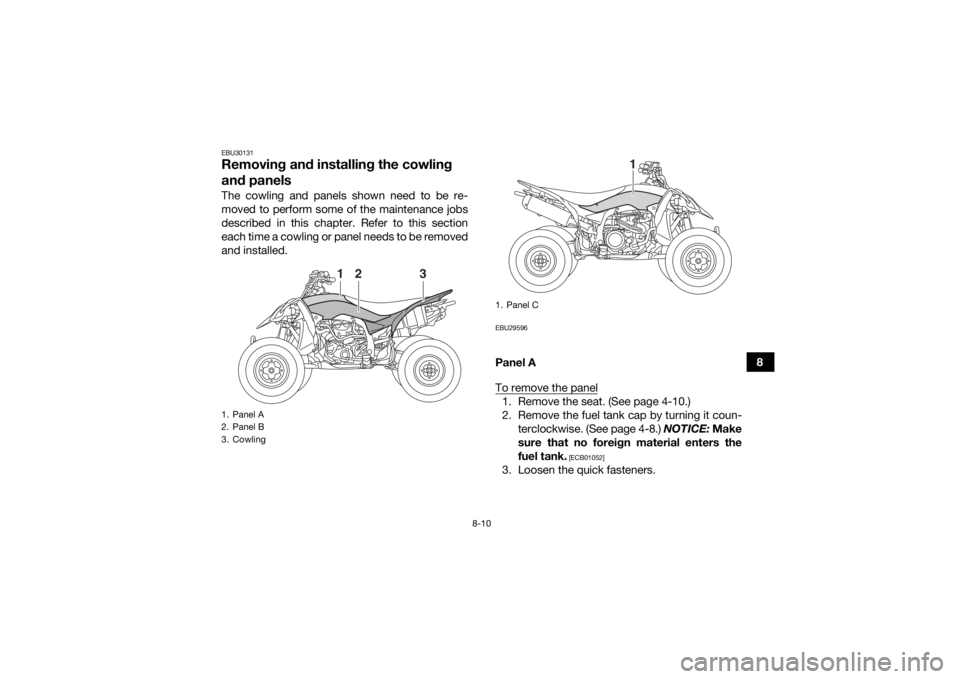
and panelsThe cowling and panels shown need to be re-
moved to perform some of the maintenance jobs
described in this chapter. Refer to this section
each time a cowling or panel needs to be removed
and installed.
EBU29596Panel A
To remove the panel1. Remove the seat. (See page 4-10.)
2. Remove the fuel tank cap by turning it coun-terclockwise. (See page 4-8.) NOTICE: Make
sure that no foreign material enters the
fuel tank.
[ECB01052]
3. Loosen the quick fasteners.
1. Panel A
2. Panel B
3. Cowling
1
2
3
1. Panel C
1
U1TD61E0.book Page 10 Tuesday, July 8, 2014 11:30 AM
Page 102 of 154
8-13
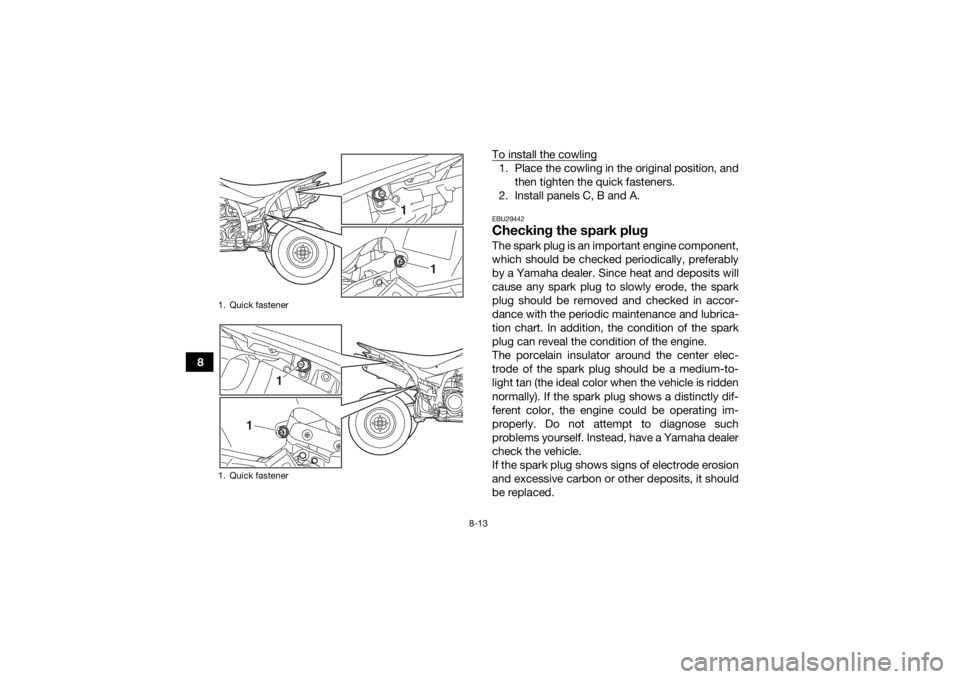
8To install the cowling
1. Place the cowling in the original position, and
then tighten the quick fasteners.
2. Install panels C, B and A.EBU29442Checking the spark plugThe spark plug is an important engine component,
which should be checked periodically, preferably
by a Yamaha dealer. Since heat and deposits will
cause any spark plug to slowly erode, the spark
plug should be removed and checked in accor-
dance with the periodic maintenance and lubrica-
tion chart. In addition, the condition of the spark
plug can reveal the condition of the engine.
The porcelain insulator around the center elec-
trode of the spark plug should be a medium-to-
light tan (the ideal color when the vehicle is ridden
normally). If the spark plug shows a distinctly dif-
ferent color, the engine could be operating im-
properly. Do not attempt to diagnose such
problems yourself. Instead, have a Yamaha dealer
check the vehicle.
If the spark plug shows signs of electrode erosion
and excessive carbon or other deposits, it should
be replaced.
1. Quick fastener
1. Quick fastener
1
1
1
1
U1TD61E0.book Page 13 Tuesday, July 8, 2014 11:30 AM
Page 103 of 154
8-14
8
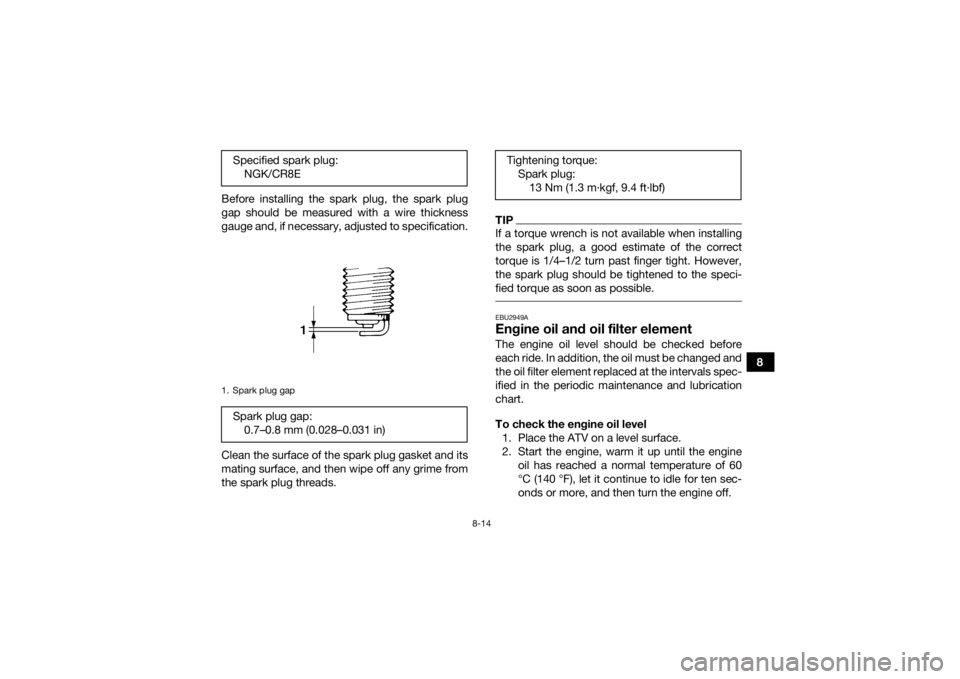
Before installing the spark plug, the spark plug
gap should be measured with a wire thickness
gauge and, if necessary, adjusted to specification.
Clean the surface of the spark plug gasket and its
mating surface, and then wipe off any grime from
the spark plug threads.
TIPIf a torque wrench is not available when installing
the spark plug, a good estimate of the correct
torque is 1/4–1/2 turn past finger tight. However,
the spark plug should be tightened to the speci-
fied torque as soon as possible. EBU2949AEngine oil and oil filter elementThe engine oil level should be checked before
each ride. In addition, the oil must be changed and
the oil filter element replaced at the intervals spec-
ified in the periodic maintenance and lubrication
chart.
To check the engine oil level
1. Place the ATV on a level surface.
2. Start the engine, warm it up until the engine oil has reached a normal temperature of 60
°C (140 °F), let it continue to idle for ten sec-
onds or more, and then turn the engine off.
Specified spark plug:
NGK/CR8E
1. Spark plug gapSpark plug gap:0.7–0.8 mm (0.028–0.031 in)
Tightening torque:Spark plug:13 Nm (1.3 m·kgf, 9.4 ft·lbf)
U1TD61E0.book Page 14 Tuesday, July 8, 2014 11:30 AM
Page 109 of 154
8-20
8
15. Install the engine guard by installing the bolts,
and then tighten them to the specified torque.
NOTICE: Be sure to apply LOCTITE
® to the
engine guard bolts before installing them.
[ECB00372]
EBU29861
CoolantThe coolant level should be checked before each
ride. In addition, the coolant must be changed at
the intervals specified in the periodic maintenance
and lubrication chart. Have a Yamaha dealer
change the coolant. WARNING! Never attempt
to remove the radiator cap when the engine is
hot.
[EWB02671]
EBU27945
To check the coolant level 1. Place the ATV on a level surface.
TIPThe coolant level must be checked on a cold en-
gine since the level varies with engine tempera-
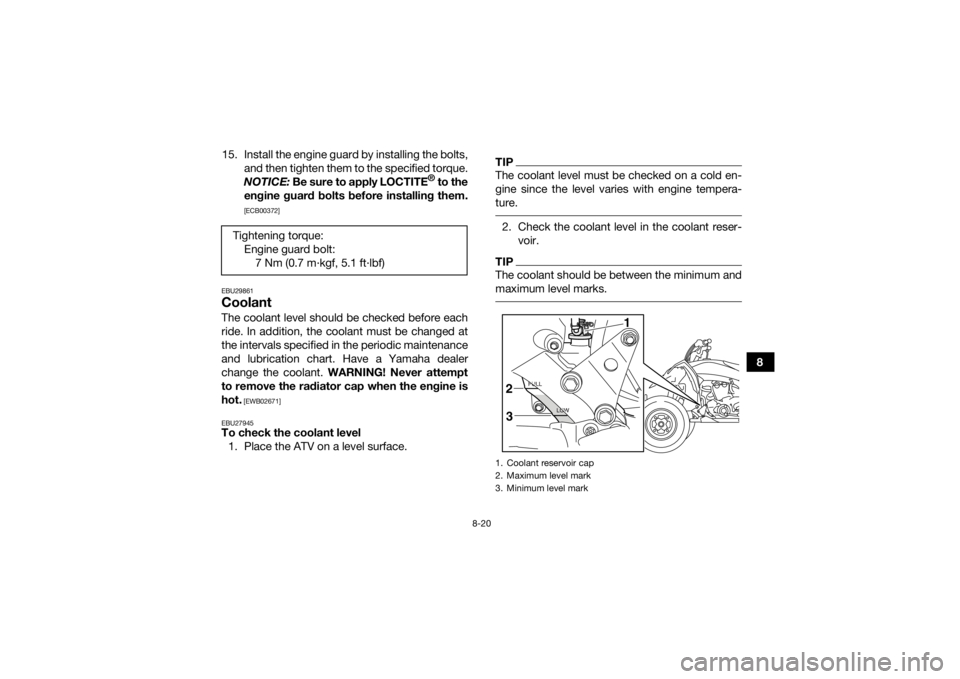
ture. 2. Check the coolant level in the coolant reser- voir.TIPThe coolant should be between the minimum and
maximum level marks.
Tightening torque:Engine guard bolt:7 Nm (0.7 m·kgf, 5.1 ft·lbf)
1. Coolant reservoir cap
2. Maximum level mark
3. Minimum level mark
1
2
3
U1TD61E0.book Page 20 Tuesday, July 8, 2014 11:30 AM
Page 110 of 154
8-21
83. If the coolant is at or below the minimum level
mark, remove the coolant reservoir cap, add
coolant or distilled water to the maximum lev-
el mark, and then install the reservoir cap.
NOTICE: If coolant is not available, use
distilled water or soft tap water instead.
Do not use hard water or salt water since
they are harmful to the engine. If water has
been used instead of coolant, replace it
with coolant as soon as possible, other-
wise the cooling system will not be pro-
tected against frost and corrosion. If water
has been added to the coolant, have a
Yamaha dealer check the antifreeze con-
tent of the coolant as soon as possible,
otherwise the effectiveness of the coolant
will be reduced.
[ECB01012]
TIP The radiator fan is automatically switched on or
off according to the coolant temperature in the
radiator.
If the engine overheats, see page 8-52 for fur-
ther instructions.
EBU26808Cleaning the air filter elementThe air filter element should be cleaned at the in-
tervals specified in the periodic maintenance and
lubrication chart. Clean or, if necessary, replace
the air filter element more frequently if you are rid-
ing in unusually wet or dusty areas.TIPThere is a check hose at the bottom of the air filter
case. If dust or water collects in this hose, empty
the hose and clean the air filter element and air fil-
ter case.
Coolant reservoir capacity (up to the maxi-
mum level mark):
0.25 L (0.26 US qt, 0.22 Imp.qt)
U1TD61E0.book Page 21 Tuesday, July 8, 2014 11:30 AM
Page 116 of 154
8-27
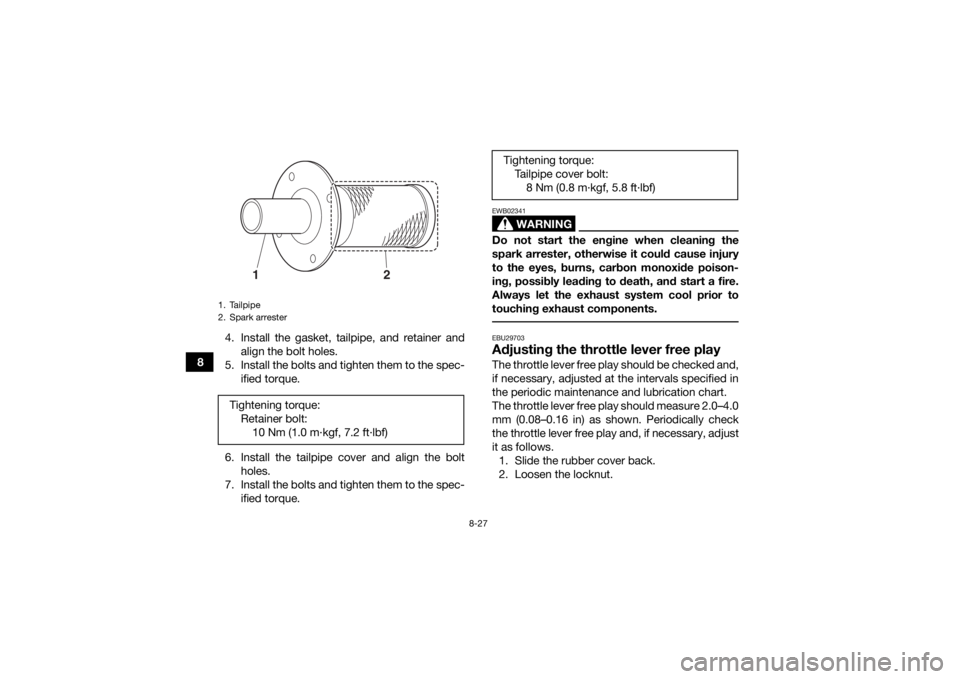
84. Install the gasket, tailpipe, and retainer and
align the bolt holes.
5. Install the bolts and tighten them to the spec- ified torque.
6. Install the tailpipe cover and align the bolt holes.
7. Install the bolts and tighten them to the spec- ified torque.
WARNING
EWB02341Do not start the engine when cleaning the
spark arrester, otherwise it could cause injury
to the eyes, burns, carbon monoxide poison-
ing, possibly leading to death, and start a fire.
Always let the exhaust system cool prior to
touching exhaust components. EBU29703Adjusting the throttle lever free playThe throttle lever free play should be checked and,
if necessary, adjusted at the intervals specified in
the periodic maintenance and lubrication chart.
The throttle lever free play should measure 2.0–4.0
mm (0.08–0.16 in) as shown. Periodically check
the throttle lever free play and, if necessary, adjust
it as follows.1. Slide the rubber cover back.
2. Loosen the locknut.
1. Tailpipe
2. Spark arresterTightening torque: Retainer bolt:10 Nm (1.0 m·kgf, 7.2 ft·lbf)
1
2
Tightening torque:Tailpipe cover bolt:8 Nm (0.8 m·kgf, 5.8 ft·lbf)
U1TD61E0.book Page 27 Tuesday, July 8, 2014 11:30 AM