YAMAHA YFZ50 2017 Owners Manual
Manufacturer: YAMAHA, Model Year: 2017, Model line: YFZ50, Model: YAMAHA YFZ50 2017Pages: 132, PDF Size: 4.84 MB
Page 111 of 132
8-29
8
TIPFor a thorough cleaning, have a Yamaha dealer re-
move the drive chain and soak it in solvent. 2. Spray Yamaha chain lubricant or other suit-able chain lubricant on the entire chain, mak-
ing sure that all side plates and rollers have
been sufficiently oiled.EBU24905Checking and lubricating the cablesThe operation and the condition of all control ca-
bles should be checked before each ride, and the
cables and cable ends should be lubricated if nec-
essary. If a cable is damaged or does not move
smoothly, have a Yamaha dealer check or replace
it.
WARNING
EWB02582Inspect cables frequently and replace if
damaged. Corrosion can result when the ca-
ble sheaths become damaged, and cables can also become frayed or kinked, which
could restrict the operation of controls and
lead to an accident or injury.
Always make sure all control cables work
smoothly before you begin riding in cold
weather. If the control cables are frozen or
do not work smoothly, you could be unable
to control the ATV, which could lead to an
accident or collision.
EBU28703Checking and lubricating the front and
rear brake leversThe operation of the front and rear brake levers
should be checked before each ride, and the lever
pivots should be lubricated if necessary.
Recommended lubricant: Yamaha cable lubricant or other suitable cable lubricantRecommended lubricant: Lithium-soap-based grease
UBW460E0.book Page 29 Monday, May 23, 2016 11:12 AM
Page 112 of 132
8-30
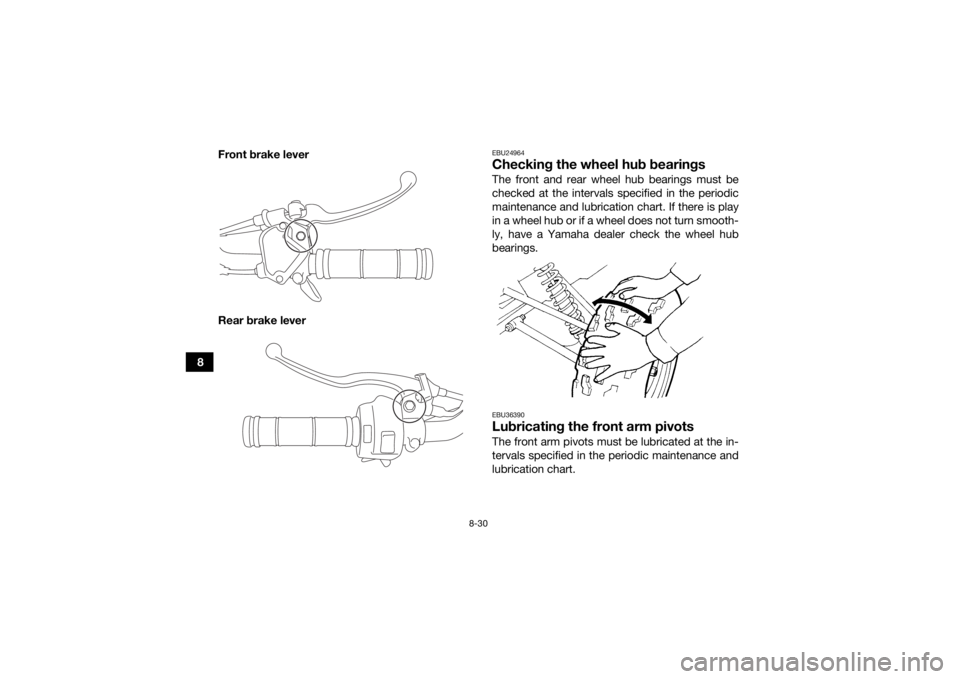
8Front brake lever
Rear brake lever
EBU24964Checking the wheel hub bearingsThe front and rear wheel hub bearings must be
checked at the intervals specified in the periodic
maintenance and lubrication chart. If there is play
in a wheel hub or if a wheel does not turn smooth-
ly, have a Yamaha dealer check the wheel hub
bearings.EBU36390Lubricating the front arm pivotsThe front arm pivots must be lubricated at the in-
tervals specified in the periodic maintenance and
lubrication chart.
UBW460E0.book Page 30 Monday, May 23, 2016 11:12 AM
Page 113 of 132
8-31
8
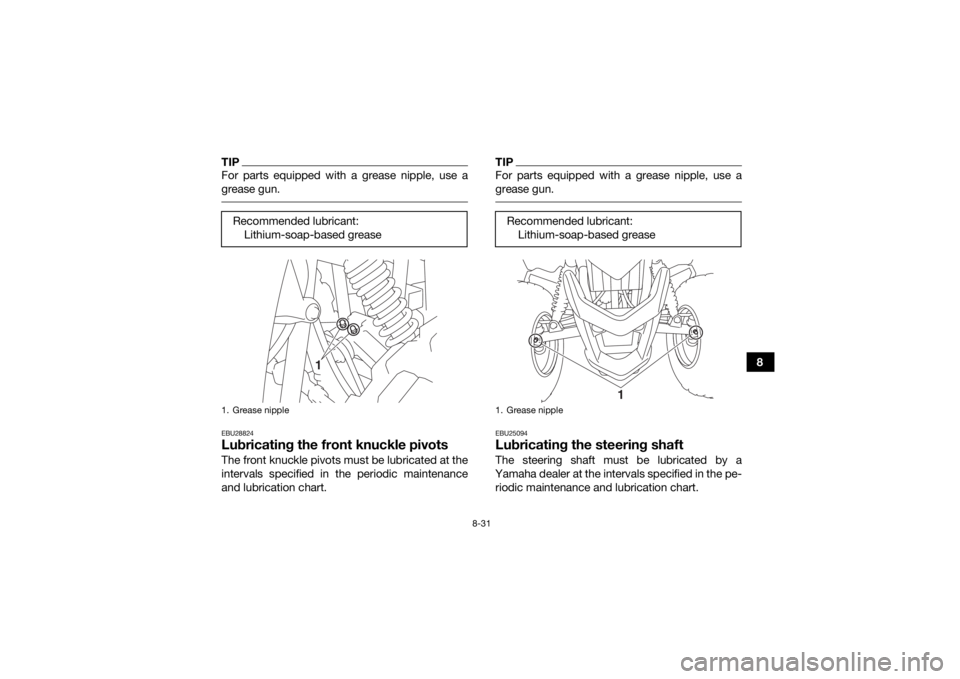
TIPFor parts equipped with a grease nipple, use a
grease gun. EBU28824Lubricating the front knuckle pivotsThe front knuckle pivots must be lubricated at the
intervals specified in the periodic maintenance
and lubrication chart.
TIPFor parts equipped with a grease nipple, use a
grease gun. EBU25094Lubricating the steering shaftThe steering shaft must be lubricated by a
Yamaha dealer at the intervals specified in the pe- riodic maintenance and lubrication chart.
Recommended lubricant:
Lithium-soap-based grease
1. Grease nipple
1
Recommended lubricant:Lithium-soap-based grease1. Grease nipple
1
UBW460E0.book Page 31 Monday, May 23, 2016 11:12 AM
Page 114 of 132
8-32
8
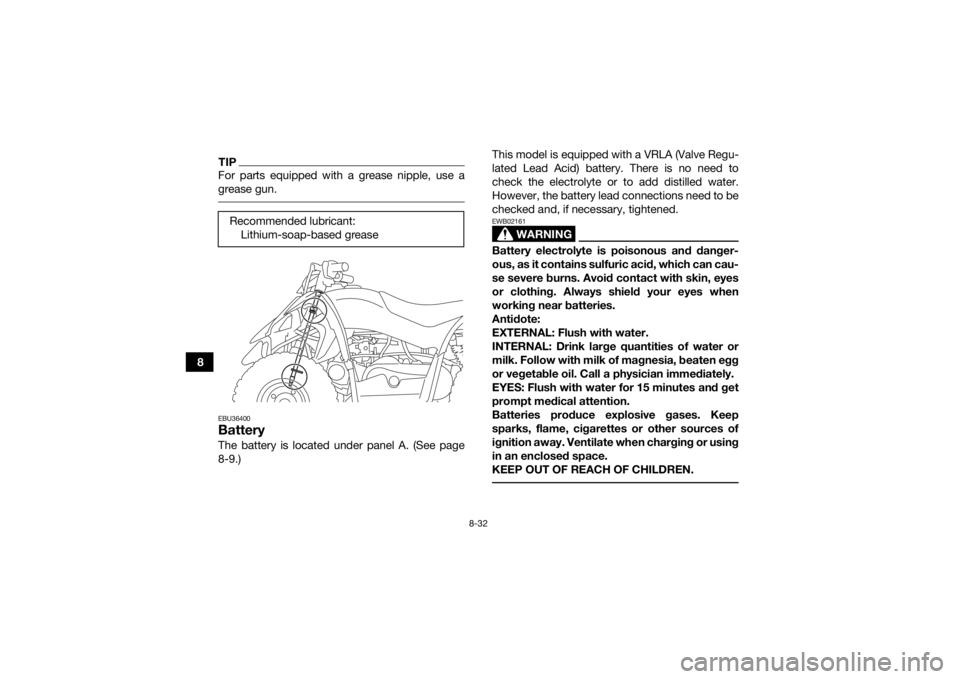
TIPFor parts equipped with a grease nipple, use a
grease gun. EBU36400BatteryThe battery is located under panel A. (See page
8-9.)This model is equipped with a VRLA (Valve Regu-
lated Lead Acid) battery. There is no need to
check the electrolyte or to add distilled water.
However, the battery lead connections need to be
checked and, if necessary, tightened.
WARNING
EWB02161Battery electrolyte is poisonous and danger-
ous, as it contains sulfuric acid, which can cau-
se severe burns. Avoid contact with skin, eyes
or clothing. Always shield your eyes when
working near batteries.
Antidote:
EXTERNAL: Flush with water.
INTERNAL: Drink large quantities of water or
milk. Follow with milk of magnesia, beaten egg
or vegetable oil. Call a physician immediately.
EYES: Flush with water for 15 minutes and get
prompt medical attention.
Batteries produce explosive gases. Keep
sparks, flame, cigarettes or other sources of
ignition away. Ventilate when charging or using
in an enclosed space.
KEEP OUT OF REACH OF CHILDREN.
Recommended lubricant:
Lithium-soap-based grease
UBW460E0.book Page 32 Monday, May 23, 2016 11:12 AM
Page 115 of 132
8-33
8
NOTICEECB00621Never attempt to remove the battery cell seals,
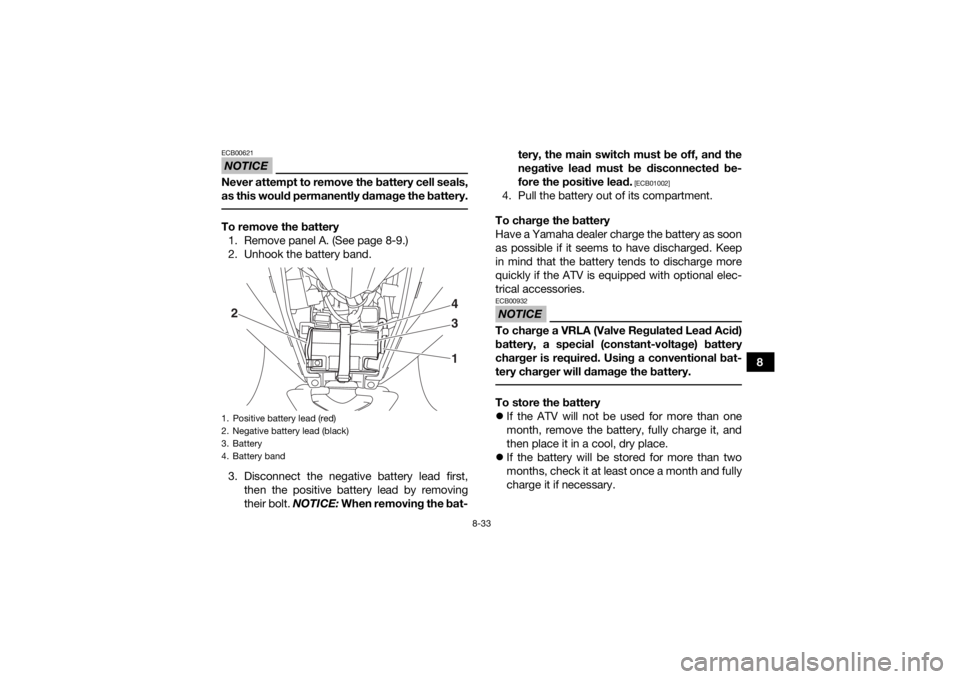
as this would permanently damage the battery. To remove the battery1. Remove panel A. (See page 8-9.)
2. Unhook the battery band.
3. Disconnect the negative battery lead first, then the positive battery lead by removing
their bolt. NOTICE: When removing the bat- tery, the main switch must be off, and the
negative lead must be disconnected be-
fore the positive lead.
[ECB01002]
4. Pull the battery out of its compartment.
To charge the battery
Have a Yamaha dealer charge the battery as soon
as possible if it seems to have discharged. Keep
in mind that the battery tends to discharge more
quickly if the ATV is equipped with optional elec-
trical accessories.NOTICEECB00932To charge a VRLA (Valve Regulated Lead Acid)
battery, a special (constant-voltage) battery
charger is required. Using a conventional bat-
tery charger will damage the battery. To store the battery
If the ATV will not be used for more than one
month, remove the battery, fully charge it, and
then place it in a cool, dry place.
If the battery will be stored for more than two
months, check it at least once a month and fully
charge it if necessary.
1. Positive battery lead (red)
2. Negative battery lead (black)
3. Battery
4. Battery band2 4
3
1
UBW460E0.book Page 33 Monday, May 23, 2016 11:12 AM
Page 116 of 132
8-34
8
NOTICEECB00941Always keep the battery charged. Storing a
discharged battery can cause permanent bat-
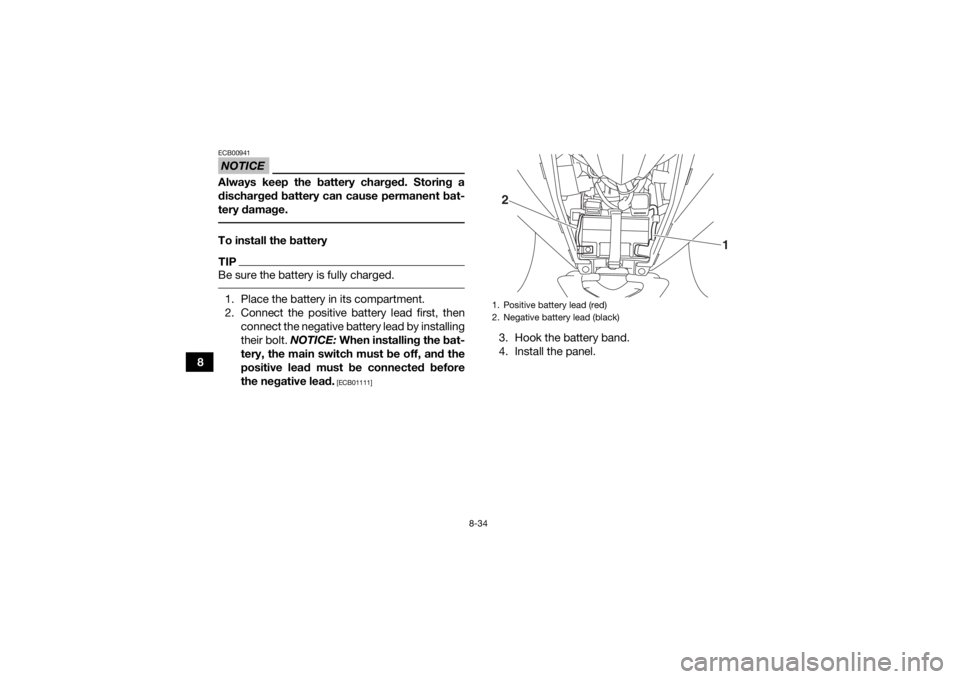
tery damage. To install the batteryTIPBe sure the battery is fully charged. 1. Place the battery in its compartment.
2. Connect the positive battery lead first, thenconnect the negative battery lead by installing
their bolt. NOTICE: When installing the bat-
tery, the main switch must be off, and the
positive lead must be connected before
the negative lead.
[ECB01111]
3. Hook the battery band.
4. Install the panel.1. Positive battery lead (red)
2. Negative battery lead (black)2
1
UBW460E0.book Page 34 Monday, May 23, 2016 11:12 AM
Page 117 of 132
8-35
8
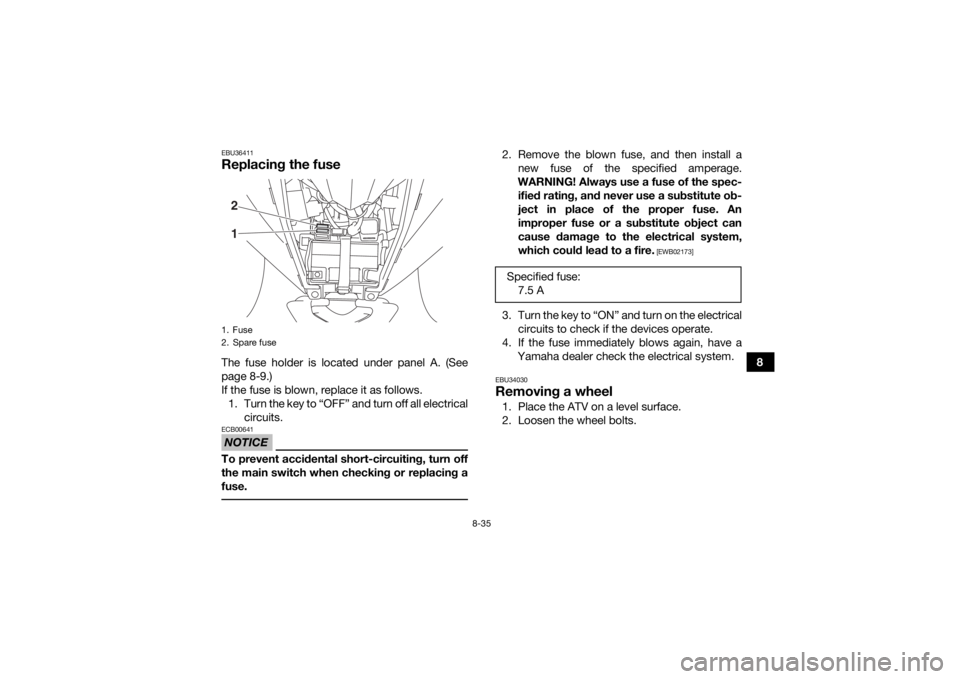
EBU36411Replacing the fuseThe fuse holder is located under panel A. (See
page 8-9.)
If the fuse is blown, replace it as follows.1. Turn the key to “OFF” and turn off all electrical circuits.NOTICEECB00641To prevent accidental short-circuiting, turn off
the main switch when checking or replacing a
fuse.
2. Remove the blown fuse, and then install anew fuse of the specified amperage.
WARNING! Always use a fuse of the spec- ified rating, and never use a substitute ob-
ject in place of the proper fuse. An
improper fuse or a substitute object can
cause damage to the electrical system,
which could lead to a fire.
[EWB02173]
3. Turn the key to “ON” and turn on the electrical circuits to check if the devices operate.
4. If the fuse immediately blows again, have a Yamaha dealer check the electrical system.EBU34030Removing a wheel1. Place the ATV on a level surface.
2. Loosen the wheel bolts.
1. Fuse
2. Spare fuse21
Specified fuse:7.5 A
UBW460E0.book Page 35 Monday, May 23, 2016 11:12 AM
Page 118 of 132
8-36
83. Elevate the ATV and place a suitable stand
under the frame.
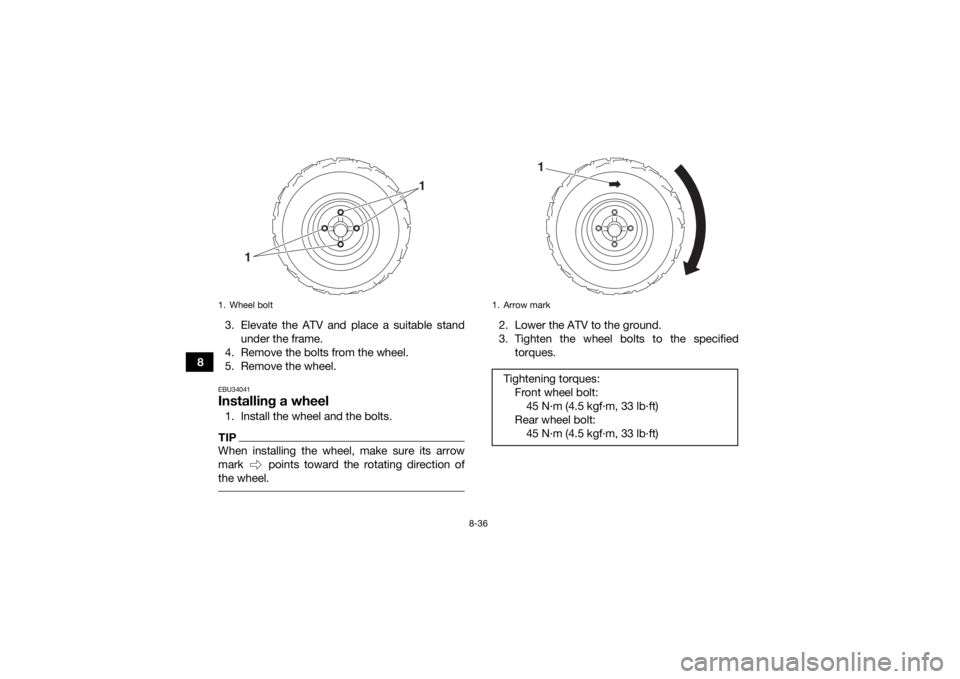
4. Remove the bolts from the wheel.
5. Remove the wheel.
EBU34041Installing a wheel1. Install the wheel and the bolts.TIPWhen installing the wheel, make sure its arrow
mark points toward the rotating direction of
the wheel.
2. Lower the ATV to the ground.
3. Tighten the wheel bolts to the specified torques.
1. Wheel bolt
1
1
1. Arrow markTightening torques:Front wheel bolt:45 N·m (4.5 kgf·m, 33 lb·ft)
Rear wheel bolt: 45 N·m (4.5 kgf·m, 33 lb·ft)
1
UBW460E0.book Page 36 Monday, May 23, 2016 11:12 AM
Page 119 of 132

8-37
8
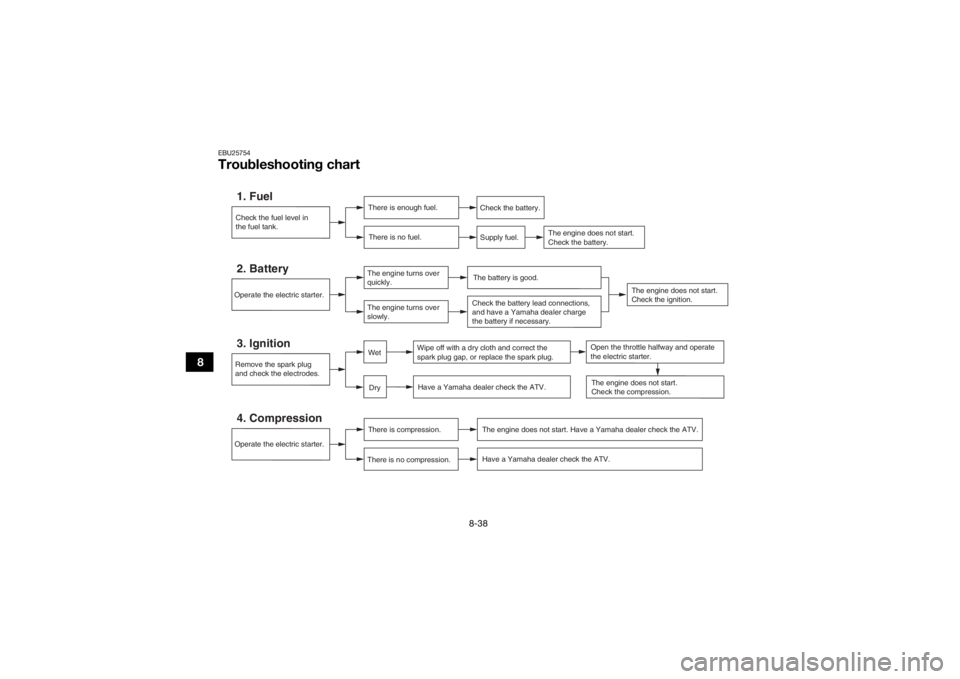
EBU25721TroubleshootingAlthough Yamaha ATVs receive a thorough in-
spection before shipment from the factory, trouble
may occur during operation. Any problem in the
fuel, compression, or ignition systems, for exam-
ple, can cause poor starting and loss of power.
The following troubleshooting chart represents a
quick and easy procedure for checking these vital
systems yourself. However, should your ATV re-
quire any repair, take it to a Yamaha dealer, whose
skilled technicians have the necessary tools, ex-
perience, and know-how to service the ATV prop-
erly.
Use only genuine Yamaha replacement parts. Im-
itation parts may look like Yamaha parts, but they
are often inferior, have a shorter service life and
can lead to expensive repair bills.
WARNING
EWB02281Do not smoke when checking the fuel system.
Fuel can ignite or explode, causing severe inju-
ry or property damage. Make sure there are no
open flames or sparks in the area, including pi-
lot lights from water heaters or furnaces. UBW460E0.book Page 37 Monday, May 23, 2016 11:12 AM
Page 120 of 132
8-38
8
EBU25754Troubleshooting chart
Check the fuel level in
the fuel tank.1. Fuel
There is enough fuel.There is no fuel.
Check the battery.
Supply fuel.
The engine does not start.
Check the battery.
The engine does not start.
Check the ignition.
Operate the electric starter.4. Compression
There is compression.
There is no compression.
The engine does not start. Have a Yamaha dealer check the ATV.Have a Yamaha dealer check the ATV.
Remove the spark plug
and check the electrodes.3. Ignition
Wipe off with a dry cloth and correct the
spark plug gap, or replace the spark plug. Have a Yamaha dealer check the ATV.
The engine does not start.
Check the compression.
Operate the electric starter.2. Battery
The engine turns over
quickly.
The engine turns over
slowly.
The battery is good.Check the battery lead connections,
and have a Yamaha dealer charge
the battery if necessary.
DryWet
Open the throttle halfway and operate
the electric starter.
UBW460E0.book Page 38 Monday, May 23, 2016 11:12 AM