check oil YAMAHA YXZ1000R 2016 User Guide
[x] Cancel search | Manufacturer: YAMAHA, Model Year: 2016, Model line: YXZ1000R, Model: YAMAHA YXZ1000R 2016Pages: 200, PDF Size: 4.58 MB
Page 140 of 200

8-22
8
8. Install the new oil filter cartridge with anoil filter wrench, and then tighten it to the
specified torque with a torque wrench. 9. Install the drain bolts, and then add the
specified amount of the recommended
engine oil. Check the engine oil level and
the vehicle for oil leakage. Install the en-
gine oil tank cover and panel C.
TIPRefer to steps 10–18 of the “To change the
engine oil” section for the oil filling procedure.
1. O-ringTightening torque:Oil filter cartridge:17 Nm (1.7 m·kgf, 12 ft·lbf)
1
1. Torque wrench
1
U2HC7LE0.book Page 22 Wednesday, October 7, 2015 12:09 PM
Page 143 of 200
8-25
8
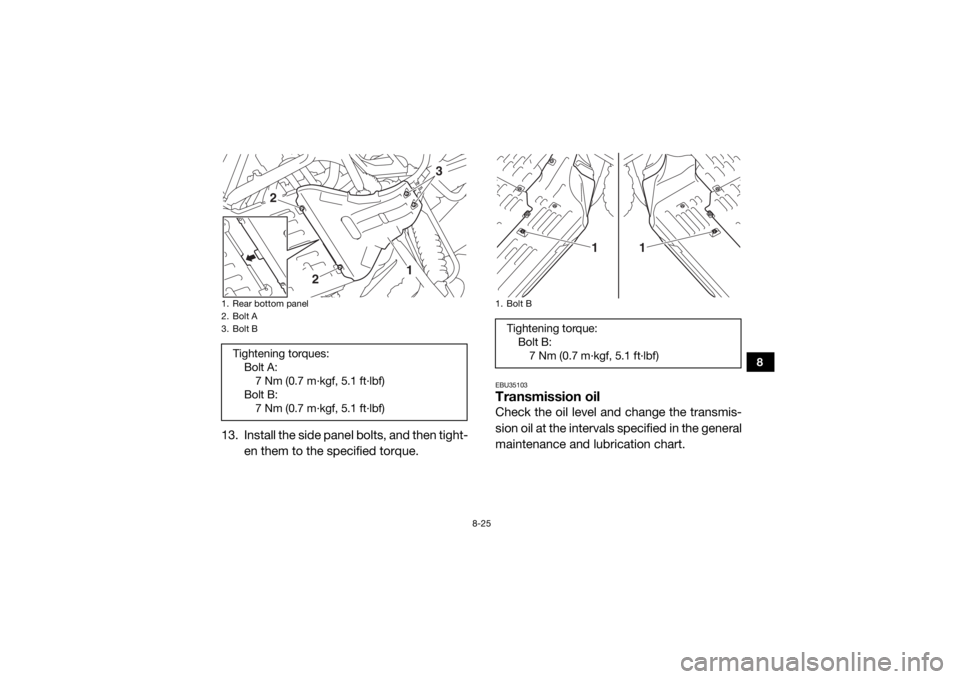
13. Install the side panel bolts, and then tight-en them to the specified torque.
EBU35103Transmission oilCheck the oil level and change the transmis-
sion oil at the intervals specified in the general
maintenance and lubrication chart.
1. Rear bottom panel
2. Bolt A
3. Bolt BTightening torques:Bolt A:7 Nm (0.7 m·kgf, 5.1 ft·lbf)
Bolt B: 7 Nm (0.7 m·kgf, 5.1 ft·lbf)
3
1
2
2
1. Bolt BTightening torque: Bolt B:7 Nm (0.7 m·kgf, 5.1 ft·lbf)
1
1
U2HC7LE0.book Page 25 Wednesday, October 7, 2015 12:09 PM
Page 144 of 200
8-26
8
NOTICEECB02910When checking or changing the transmis-
sion oil, make sure that no foreign material
enters the transmission. If necessary,
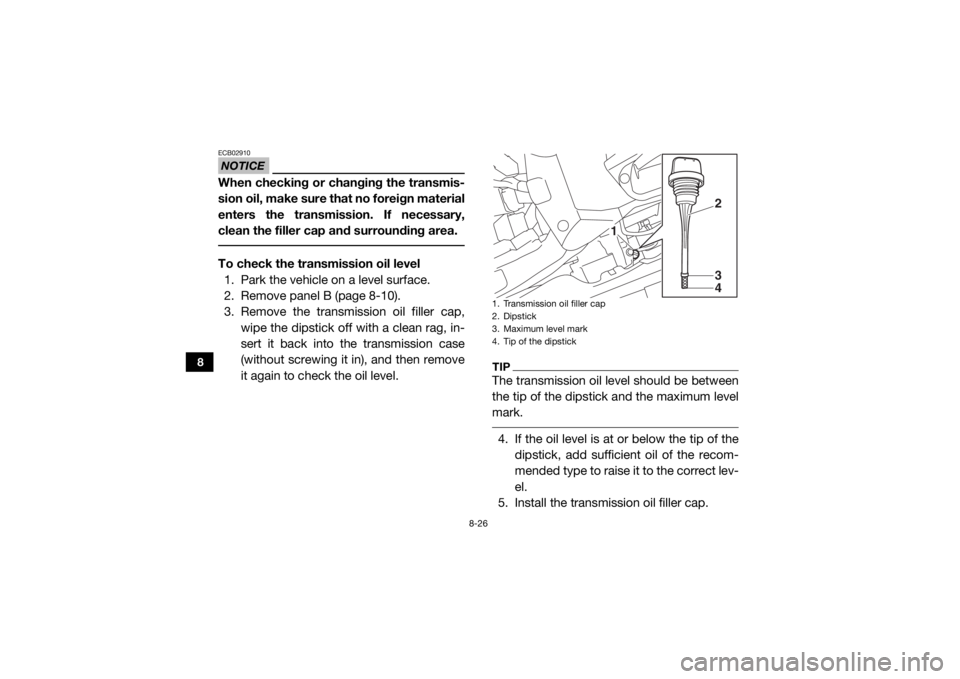
clean the filler cap and surrounding area. To check the transmission oil level1. Park the vehicle on a level surface.
2. Remove panel B (page 8-10).
3. Remove the transmission oil filler cap, wipe the dipstick off with a clean rag, in-
sert it back into the transmission case
(without screwing it in), and then remove
it again to check the oil level.
TIPThe transmission oil level should be between
the tip of the dipstick and the maximum level
mark. 4. If the oil level is at or below the tip of thedipstick, add sufficient oil of the recom-
mended type to raise it to the correct lev-
el.
5. Install the transmission oil filler cap.1. Transmission oil filler cap
2. Dipstick
3. Maximum level mark
4. Tip of the dipstick
1 2
34
U2HC7LE0.book Page 26 Wednesday, October 7, 2015 12:09 PM
Page 146 of 200

8-28
8
In order to prevent clutch slippage, do
not mix any chemical additives. TIPBe sure to wipe up any spilled oil. 7. Start the engine and drive the vehicle for
a few minutes to circulate the transmis-
sion oil.
8. Park the vehicle on a level surface, stop
the engine, and then check the transmis-
sion case for oil leakage.TIPIf oil is leaking confirm that the transmission
oil filler cap is properly installed and then have
a Yamaha dealer check the transmission. 9. Check the transmission oil level and cor-rect if necessary.
10. Install the panel.
EBU36050Final gear oilCheck the oil level and change the final gear
oil at the intervals specified in the general
maintenance and lubrication chart.
Checking the final gear oil level 1. Park the vehicle on a level surface.
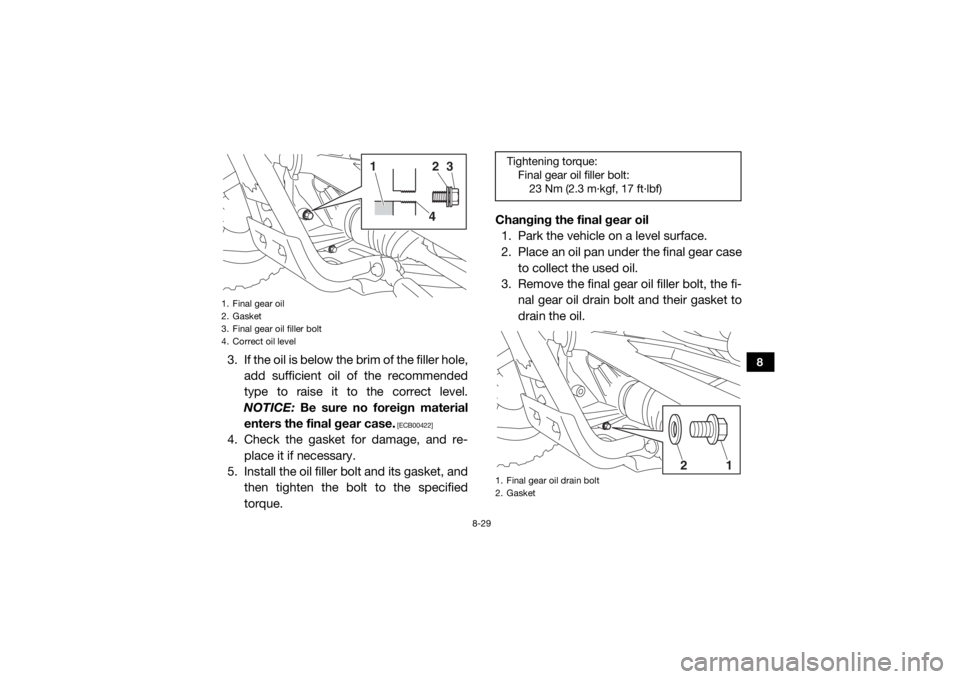
2. Remove the final gear oil filler bolt and its gasket, and then check the oil level in the
final gear case. The oil level should be at
the brim of the filler hole.
U2HC7LE0.book Page 28 Wednesday, October 7, 2015 12:09 PM
Page 147 of 200
8-29
8
3. If the oil is below the brim of the filler hole,add sufficient oil of the recommended
type to raise it to the correct level.
NOTICE: Be sure no foreign material
enters the final gear case.
[ECB00422]
4. Check the gasket for damage, and re- place it if necessary.
5. Install the oil filler bolt and its gasket, and then tighten the bolt to the specified
torque. Changing the final gear oil
1. Park the vehicle on a level surface.
2. Place an oil pan under the final gear case
to collect the used oil.
3. Remove the final gear oil filler bolt, the fi-
nal gear oil drain bolt and their gasket to
drain the oil.1. Final gear oil
2. Gasket
3. Final gear oil filler bolt
4. Correct oil level
24
3
1
Tightening torque:Final gear oil filler bolt:23 Nm (2.3 m·kgf, 17 ft·lbf)1. Final gear oil drain bolt
2. Gasket
21
U2HC7LE0.book Page 29 Wednesday, October 7, 2015 12:09 PM
Page 148 of 200
8-30
8
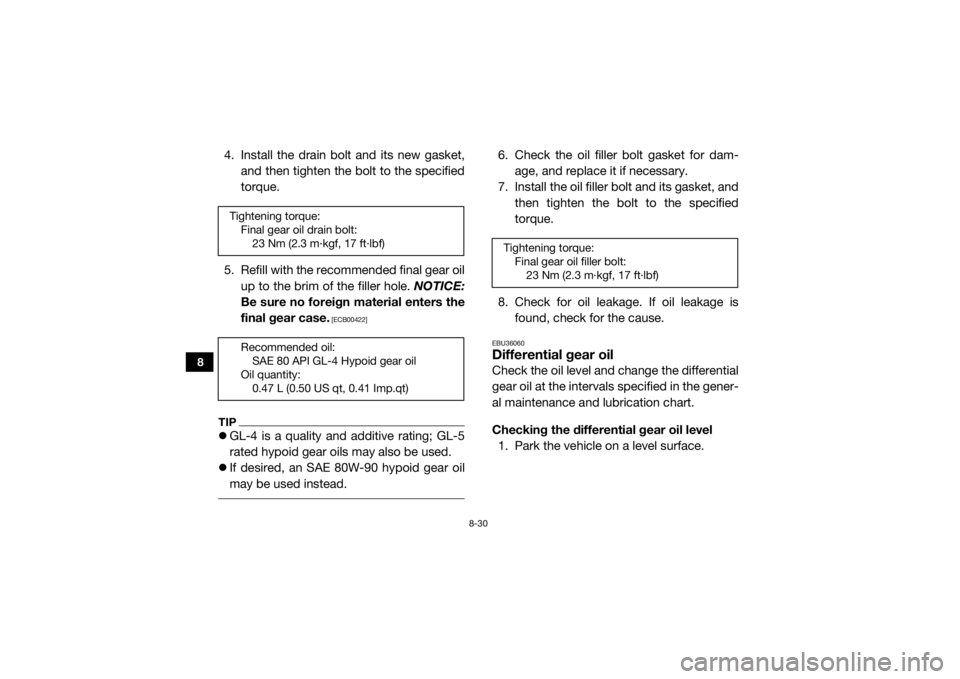
4. Install the drain bolt and its new gasket,and then tighten the bolt to the specified
torque.
5. Refill with the recommended final gear oil up to the brim of the filler hole. NOTICE:
Be sure no foreign material enters the
final gear case.
[ECB00422]
TIP GL-4 is a quality and additive rating; GL-5
rated hypoid gear oils may also be used.
If desired, an SAE 80W -90 hypoid gear oil
may be used instead.
6. Check the oil filler bolt gasket for dam- age, and replace it if necessary.
7. Install the oil filler bolt and its gasket, and then tighten the bolt to the specified
torque.
8. Check for oil leakage. If oil leakage is found, check for the cause.EBU36060Differential gear oilCheck the oil level and change the differential
gear oil at the intervals specified in the gener-
al maintenance and lubrication chart.
Checking the differential gear oil level
1. Park the vehicle on a level surface.
Tightening torque: Final gear oil drain bolt:23 Nm (2.3 m·kgf, 17 ft·lbf)
Recommended oil: SAE 80 API GL-4 Hypoid gear oil
Oil quantity: 0.47 L (0.50 US qt, 0.41 Imp.qt)
Tightening torque:Final gear oil filler bolt:23 Nm (2.3 m·kgf, 17 ft·lbf)
U2HC7LE0.book Page 30 Wednesday, October 7, 2015 12:09 PM
Page 149 of 200
8-31
8
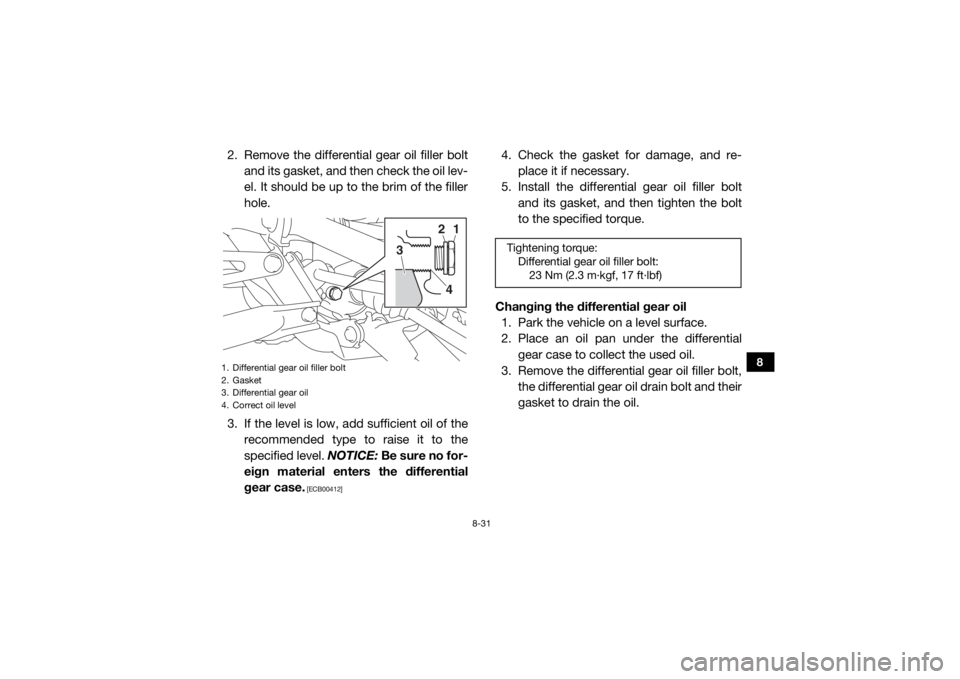
2. Remove the differential gear oil filler boltand its gasket, and then check the oil lev-
el. It should be up to the brim of the filler
hole.
3. If the level is low, add sufficient oil of the recommended type to raise it to the
specified level. NOTICE: Be sure no for-
eign material enters the differential
gear case.
[ECB00412]
4. Check the gasket for damage, and re- place it if necessary.
5. Install the differential gear oil filler bolt and its gasket, and then tighten the bolt
to the specified torque.
Changing the differential gear oil 1. Park the vehicle on a level surface.
2. Place an oil pan under the differential gear case to collect the used oil.
3. Remove the differential gear oil filler bolt, the differential gear oil drain bolt and their
gasket to drain the oil.
1. Differential gear oil filler bolt
2. Gasket
3. Differential gear oil
4. Correct oil level
1
2
3
4
Tightening torque:Differential gear oil filler bolt:23 Nm (2.3 m·kgf, 17 ft·lbf)
U2HC7LE0.book Page 31 Wednesday, October 7, 2015 12:09 PM
Page 150 of 200
8-32
8
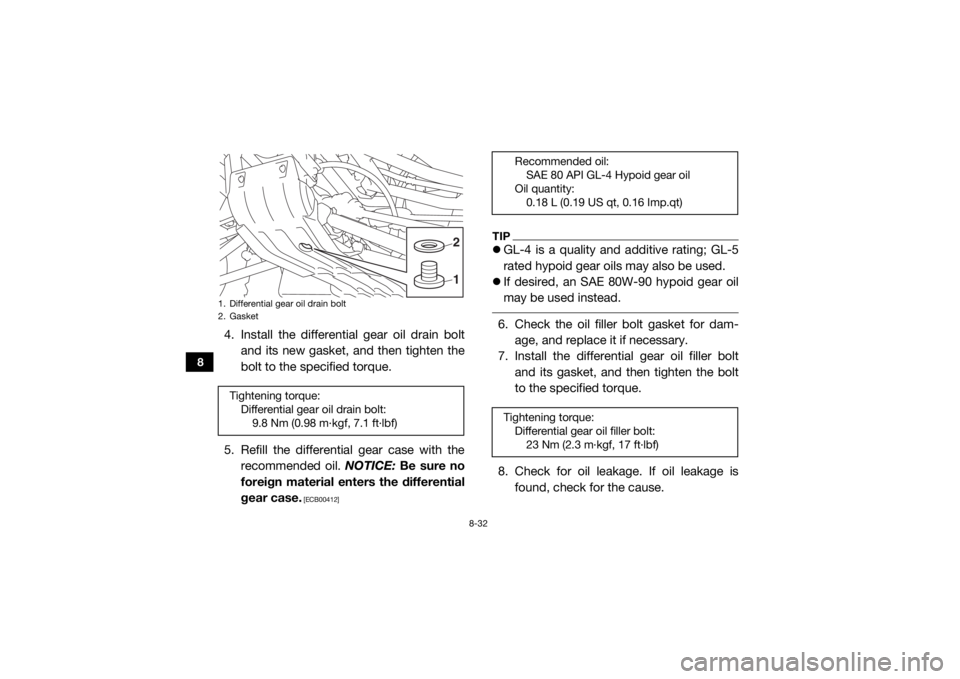
4. Install the differential gear oil drain boltand its new gasket, and then tighten the
bolt to the specified torque.
5. Refill the differential gear case with the recommended oil. NOTICE: Be sure no
foreign material enters the differential
gear case.
[ECB00412]
TIP GL-4 is a quality and additive rating; GL-5
rated hypoid gear oils may also be used.
If desired, an SAE 80W -90 hypoid gear oil
may be used instead. 6. Check the oil filler bolt gasket for dam-
age, and replace it if necessary.
7. Install the differential gear oil filler bolt
and its gasket, and then tighten the bolt
to the specified torque.
8. Check for oil leakage. If oil leakage is found, check for the cause.
1. Differential gear oil drain bolt
2. GasketTightening torque:Differential gear oil drain bolt:9.8 Nm (0.98 m·kgf, 7.1 ft·lbf)
1 2
Recommended oil:SAE 80 API GL-4 Hypoid gear oil
Oil quantity: 0.18 L (0.19 US qt, 0.16 Imp.qt)
Tightening torque: Differential gear oil filler bolt:23 Nm (2.3 m·kgf, 17 ft·lbf)
U2HC7LE0.book Page 32 Wednesday, October 7, 2015 12:09 PM
Page 155 of 200

8-37
8
EBU35423Air filter maintenanceThis model is equipped with two air filter ele-
ments, a primary foam-type air filter and a
secondary paper-type air filter.
The primary air filter is easily accessed and
should be cleaned and oiled every 300–600
km (200–400 mi).
The secondary air filter is more difficult to ac-
cess, cannot be cleaned, and should be re-
placed by a Yamaha dealer every 2000–5000
km (1200–3000 mi).
TIPService the air filters more frequently when
operating in wet or dusy environments. Whenever air filter maintenance is performed:
check the air inlet for obstructions and the
air filter case for dirt and foreign matter.
check the air filter case check hoses for dirt
or water and clean as necessary.
check the air filter case joints and the rub-
ber joints to and from the throttle body for
proper fit and sealing.
tighten all fittings securely to avoid the pos-
sibility of unfiltered air entering the engine.NOTICEECB02270Never operate the engine with the air filter
element removed. Doing so would allow
unfiltered air to enter, causing rapid en-
gine wear and possible engine damage.
1. Primary air filter
2. Secondary air filter
1
2
U2HC7LE0.book Page 37 Wednesday, October 7, 2015 12:09 PM
Page 164 of 200
8-46
8
WARNING
EWB03910Improper maintenance can result in loss of
braking ability or clutch operation. Ob-
serve these precautions:
Insufficient brake or clutch fluid may al-
low air to enter the brake or clutch sys-
tem, reducing braking or clutch
performance.
Clean the filler caps before removing.
Use only DOT 4 brake fluid from a sealed
container.
Use only the specified brake fluid; other-
wise, the rubber seals may deteriorate,
causing leakage.
Refill with the same type of brake fluid.
Adding a brake fluid other than DOT 4
may result in a harmful chemical reac-
tion.
Be careful that water or dust does not
enter the brake or clutch fluid reservoir
when refilling. Water will significantly
lower the boiling point of the fluid and
may result in vapor lock.
NOTICEECB01161Brake fluid may damage painted surfaces
or plastic parts. Always clean up spilled
fluid immediately. As the brake pads wear, it is normal for the
brake fluid level to gradually go down. A low
brake fluid level may indicate worn brake
pads or brake system leakage; therefore, be
sure to check the brake pads for wear and the
brake system for leakage. A low clutch fluid
level may indicate clutch system leakage;
therefore, be sure to check the clutch system
for leakage. If the brake or clutch fluid level
goes down suddenly, have a Yamaha dealer
check and repair the vehicle before any fur-
ther operation.
U2HC7LE0.book Page 46 Wednesday, October 7, 2015 12:09 PM