check engine YAMAHA YXZ1000R 2017 Owner's Manual
[x] Cancel search | Manufacturer: YAMAHA, Model Year: 2017, Model line: YXZ1000R, Model: YAMAHA YXZ1000R 2017Pages: 218, PDF Size: 5.08 MB
Page 156 of 218
8-20
8
15. Install and tighten the engine oil tank fillercap.
16. Start the engine, and then let it idle for several minutes while checking it for oil
leakage. If oil is leaking, immediately turn
the engine off and check for the cause.
17. Turn the engine off, wait at least ten mi- nutes, and then check the oil level and
correct it if necessary.
18. Install the engine oil tank cover by install- ing the bolts.
19. Install the panel.
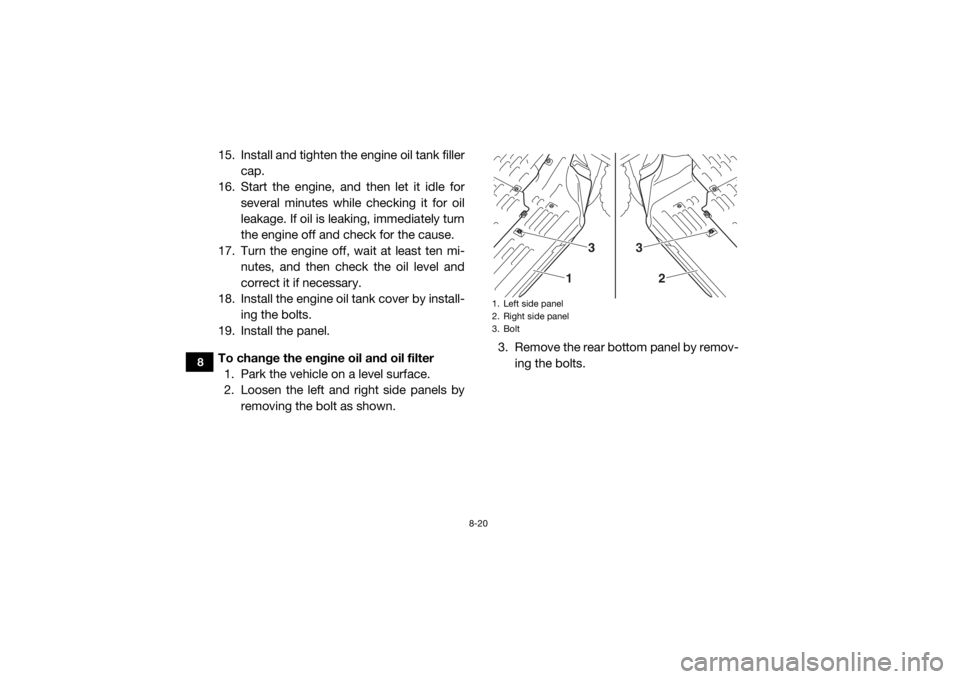
To change the engine oil and oil filter 1. Park the vehicle on a level surface.
2. Loosen the left and right side panels by removing the bolt as shown. 3. Remove the rear bottom panel by remov-
ing the bolts.
1. Left side panel
2. Right side panel
3. Bolt
3
1
3
2
UB577AE0.book Page 20 Wednesday, June 8, 2016 9:35 AM
Page 159 of 218

8-23
8
9. Install the drain bolts, and then add thespecified amount of the recommended
engine oil. Check the engine oil level and
the vehicle for oil leakage. Install the en-
gine oil tank cover and panel C.TIPRefer to steps 11–19 of the “To change the
engine oil” section for the oil filling procedure.
10. Slide the front portion of the center bot- tom panel into place as shown, and then
hook the left and right sides of the center
bottom panel into place.
1. Torque wrench
1
1. Center bottom panel
1
UB577AE0.book Page 23 Wednesday, June 8, 2016 9:35 AM
Page 165 of 218
8-29
8
8. Start the engine and drive the vehicle fora few minutes to circulate the transmis-
sion oil.
9. Park the vehicle on a level surface, stop the engine, and then check the transmis-
sion case for oil leakage.TIPIf oil is leaking confirm that the transmission
oil filler cap is properly installed and then have
a Yamaha dealer check the transmission. 10. Check the transmission oil level and cor- rect if necessary.
11. Install the panel.EBU36050Final gear oilCheck the oil level and change the final gear
oil at the intervals specified in the general
maintenance and lubrication chart.
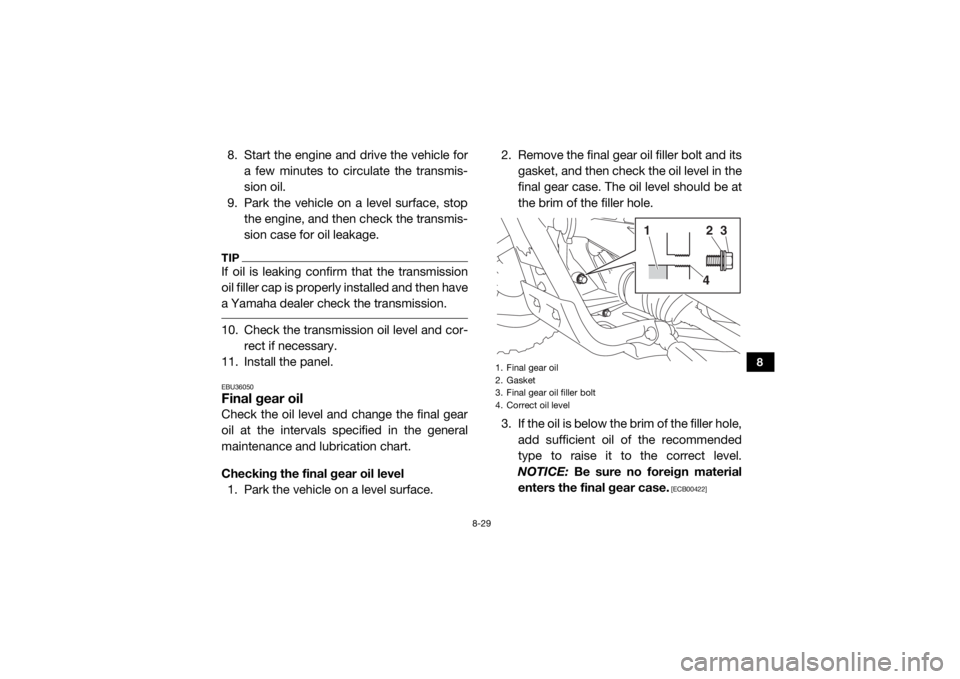
Checking the final gear oil level 1. Park the vehicle on a level surface. 2. Remove the final gear oil filler bolt and its
gasket, and then check the oil level in the
final gear case. The oil level should be at
the brim of the filler hole.
3. If the oil is below the brim of the filler hole, add sufficient oil of the recommended
type to raise it to the correct level.
NOTICE: Be sure no foreign material
enters the final gear case.
[ECB00422]
1. Final gear oil
2. Gasket
3. Final gear oil filler bolt
4. Correct oil level
24
3
1
UB577AE0.book Page 29 Wednesday, June 8, 2016 9:35 AM
Page 170 of 218
8-34
8
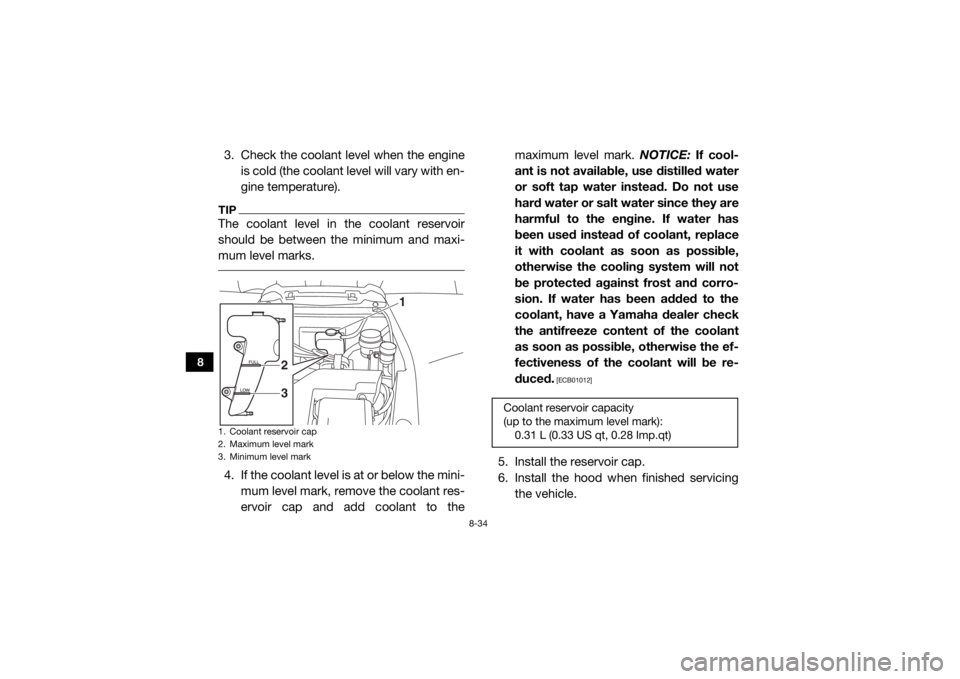
3. Check the coolant level when the engineis cold (the coolant level will vary with en-
gine temperature).TIPThe coolant level in the coolant reservoir
should be between the minimum and maxi-
mum level marks. 4. If the coolant level is at or below the mini-
mum level mark, remove the coolant res-
ervoir cap and add coolant to the maximum level mark.
NOTICE: If cool-
ant is not available, use distilled water
or soft tap water instead. Do not use
hard water or salt water since they are
harmful to the engine. If water has
been used instead of coolant, replace
it with coolant as soon as possible,
otherwise the cooling system will not
be protected against frost and corro-
sion. If water has been added to the
coolant, have a Yamaha dealer check
the antifreeze content of the coolant
as soon as possible, otherwise the ef-
fectiveness of the coolant will be re-
duced.
[ECB01012]
5. Install the reservoir cap.
6. Install the hood when finished servicing
the vehicle.
1. Coolant reservoir cap
2. Maximum level mark
3. Minimum level mark
1
32
Coolant reservoir capacity
(up to the maximum level mark):0.31 L (0.33 US qt, 0.28 Imp.qt)
UB577AE0.book Page 34 Wednesday, June 8, 2016 9:35 AM
Page 171 of 218

8-35
8
TIPThe radiator fan automatically switches on
or off according to the temperature of the
coolant in the radiator.
If the engine overheats, see page 8-67 for
instructions. EBU32400Axle bootsCheck the axle boots for holes or tears.
If any damage is found, have them replaced
by a Yamaha dealer.
EBU35121Checking the spark plugsThe spark plug is an important engine com-
ponent which should be periodically
checked, preferably by a Yamaha dealer.
Since heat and deposits will cause any spark
plug to slowly erode, the spark plugs should
be removed and checked in accordance with
the periodic maintenance chart for the emis-
sion control system. In addition, the condition
of the spark plugs can reveal the condition of
the engine.
1. Front axle boot
1
1
1. Rear axle boot
1
1
UB577AE0.book Page 35 Wednesday, June 8, 2016 9:35 AM
Page 172 of 218

8-36
8
The porcelain insulator around the center
electrode of each spark plug should be a me-
dium-to-light tan color (the ideal color when
the vehicle is ridden normally), and all spark
plugs installed in the engine should have a
similar color. If any spark plug shows a dis-
tinctly different color, the engine could be op-
erating improperly. Do not attempt to
diagnose such problems yourself. Instead,
have a Yamaha dealer check the vehicle.
If a spark plug shows signs of electrode ero-
sion and excessive carbon or other deposits,
it should be replaced.
Before installing a spark plug, the spark plug
gap should be measured with a wire thick-
ness gauge and, if necessary, adjusted to
specification.Clean the surface of the spark plug gasket
and its mating surface, and then wipe off any
grime from the spark plug threads.Specified spark plug:
NGK/CR9EB
1. Spark plug gapSpark plug gap:0.7–0.8 mm (0.028–0.031 in)
Tightening torque: Spark plug:13 N·m (1.3 kgf·m, 9.4 lb·ft)
1
UB577AE0.book Page 36 Wednesday, June 8, 2016 9:35 AM
Page 174 of 218

8-38
8
TIPService the air filters more frequently when
operating in wet or dusy environments. Whenever air filter maintenance is performed:
check the air inlet for obstructions and the
air filter case for dirt and foreign matter.
check the air filter case check hoses for dirt
or water and clean as necessary.
check the air filter cas e joints and the rub-
ber joints to and from the throttle body for
proper fit and sealing.
tighten all fittings securely to avoid the pos-
sibility of unfiltered air entering the engine.NOTICEECB02270Never operate the engine with the air filter
element removed. Doing so would allow
unfiltered air to enter, causing rapid en-
gine wear and possible engine damage. Additionally, the fuel injection system
would be affected, resulting in poor engine
performance and possible overheating.
Clean the primary air filter as follows.
1. Remove panel C (page 8-10).
2. Remove the air filter case cover by turn- ing the air filter case cover lock counter-
clockwise.TIPMake sure that the match mark on the cover
lock is aligned with the open match mark on
the air filter case cover.
UB577AE0.book Page 38 Wednesday, June 8, 2016 9:35 AM
Page 178 of 218
8-42
8
EBU35141Cleaning the spark arrester
WARNING
EWB03370Hot exhaust system may cause burns. To
avoid burns or fires, make sure that the en-
gine is stopped and the exhaust system is
cool before cleaning the spark arrester. Do
not start the engine while cleaning the ex-
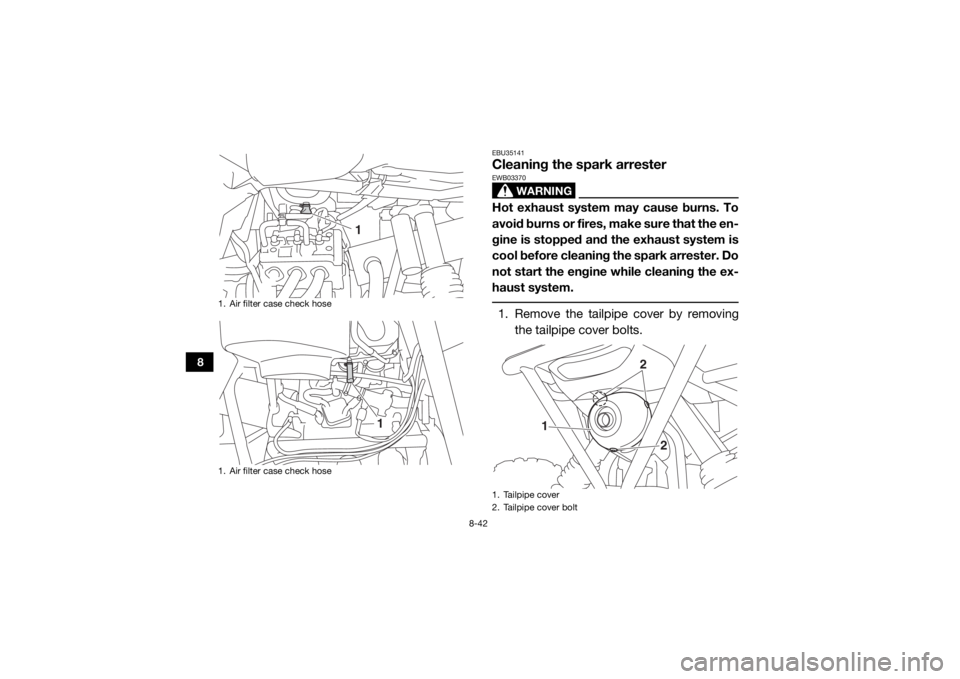
haust system. 1. Remove the tailpipe cover by removingthe tailpipe cover bolts.
1. Air filter case check hose
1. Air filter case check hose
1
1
1. Tailpipe cover
2. Tailpipe cover bolt
1
2
2
UB577AE0.book Page 42 Wednesday, June 8, 2016 9:35 AM
Page 180 of 218
8-44
8
8. Install the tailpipe cover bolts and tightenthem to the specified torque.EBU32460Valve clearanceThe correct valve clearance changes with
use, resulting in improper fuel/air supply or
engine noise. To preven t this, the valve clear-
ance must be adjusted regularly. This adjust-
ment however, should be left to a
professional Yamaha service technician.EBU32470BrakesReplacement of brake components requires
professional knowledge. Brake service
should be performed by a Yamaha dealer.
WARNING
EWB02572Operating with improperly serviced or ad-
justed brakes could lead to a loss in brak-
ing ability and an accident. EBU35150Checking the front and rear brake padsCheck each brake pad for damage and mea-
sure the lining thickness. If a brake pad is
damaged or if the lining thickness is less than
1.0 mm (0.04 in), have a Yamaha dealer re-
place the brake pads as a set.
The wheels need to be removed to check the
brake pads. (See pages 8-54, 8-56 for wheel
removal and installation procedures.)
Tightening torque: Tailpipe cover bolt:8 N·m (0.8 kgf·m, 5.8 lb·ft)
UB577AE0.book Page 44 Wednesday, June 8, 2016 9:35 AM
Page 202 of 218

8-66
8
EBU35910Troubleshooting chartsStarting problems or poor engine performanceCheck the fuel level in
the fuel tank.1. Fuel
There is enough fuel.There is no fuel.
Check the battery.
Supply fuel.
The engine does not start.
Check the battery.
Operate the electric starter.4. Compression
There is compression.
There is no compression.
The engine does not start.
Have a Yamaha dealer check the vehicle.Have a Yamaha dealer check the vehicle.
Remove the spark plugs
and check the electrodes.3. Ignition
Wipe off with a dry cloth and correct the
spark plug gaps, or replace the spark plugs. Have a Yamaha dealer check the vehicle.
The engine does not start.
Check the compression.
Operate the electric starter.2. Battery
The engine turns over
quickly.
The engine turns over
slowly.
The battery is good.
DryWet
Operate the electric starter.
Check the battery lead connections,
and have a Yamaha dealer charge
the battery if necessary.
The engine does not start.
Check the ignition.
UB577AE0.book Page 66 Wednesday, June 8, 2016 9:35 AM