brake light YAMAHA YXZ1000R 2018 Owners Manual
[x] Cancel search | Manufacturer: YAMAHA, Model Year: 2018, Model line: YXZ1000R, Model: YAMAHA YXZ1000R 2018Pages: 224, PDF Size: 5.68 MB
Page 6 of 224

EBU31120
CONTENTS
LOCATION OF THE WARNING AND
SPECIFICATION LABELS ....................... 1-1
SAFETY INFORMATION ......................... 2-1
DESCRIPTION......................................... 3-1Left view ............................................... 3-1
Right view ............................................. 3-2
Controls and instruments ..................... 3-3
INSTRUMENT AND CONTROL
FUNCTIONS............................................ 4-1 Main switch .......................................... 4-1
Indicator lights and warning lights ....... 4-2
Multi-function meter unit .................... 4-10
Light switch ........................................ 4-20
Interior light switch (for equipped models) ............................................. 4-20
On–Command drive knob “2WD/4WD/DIFF LOCK” .................. 4-21
Accelerator pedal ............................... 4-22 Brake pedal ........................................ 4-22
Parking brake lever ............................ 4-23
YCC-S system.................................... 4-23
Drive select lever and shift paddles ... 4-24
Fuel tank cap...................................... 4-25
Doors .................................................. 4-25
Seats .................................................. 4-26
Adjusting the driver seat position....... 4-27
Adjusting the steering wheel
position ............................................. 4-28
Rearview mirror (for equipped
models) ............................................. 4-29
Seat belts ........................................... 4-29
Glove compartment ........................... 4-30
Storage compartments ...................... 4-30
Cup holders ........................................ 4-32
Cargo bed .......................................... 4-33
Flag pole bracket ............................... 4-34
Front shock absorbers ....................... 4-34
Rear shock absorbers ........................ 4-44
Auxiliary DC jack ................................ 4-55UB0F7AE0.book Page 1 Monday, November 6, 2017 2:30 PM
Page 7 of 224

FOR YOUR SAFETY –
PRE-OPERATION CHECKS .................... 5-1Front and rear brakes ........................... 5-3
Fuel ....................................................... 5-3
Engine oil .............................................. 5-5
Transmission ........................................ 5-6
Coolant ................................................. 5-6
Final gear .............................................. 5-6
Differential gear .................................... 5-6
Accelerator pedal ................................. 5-6
Seat belts ............................................. 5-7
Passenger handhold ............................ 5-7
Steering ................................................ 5-7
Drive select lever and shift paddles ..... 5-7
YCC-S clutch ....................................... 5-8
Fittings and fasteners ........................... 5-8
Instruments, lights and switches .......... 5-8
Control cables ...................................... 5-8
Tires ...................................................... 5-8
OPERATION ............................................ 6-1 Engine break-in .................................... 6-1
Starting the engine ............................... 6-2 Shifting and reverse driving ..................6-3
Dynamic clutch engagement ................6-7
Launch system operation .....................6-7
Selecting the drive mode ....................6-10
Parking ................................................6-12
Loading ...............................................6-12
BASIC GUIDE FOR SAFE USE ...............7-1 KNOW YOUR VEHICLE ........................7-1
LEARNING TO OPERATE YOUR VEHICLE ...........................................7-12
PERIODIC MAINTENANCE AND
ADJUSTMENT .........................................8-1 Owner’s Manual and tool kit .................8-2
Maintenance charts ..............................8-4
Hood ...................................................8-11
Panels .................................................8-11
Engine oil and oil filter.........................8-16
Transmission oil ..................................8-27
Final gear oil .......................................8-29
Differential gear oil ..............................8-32
Coolant ...............................................8-34UB0F7AE0.book Page 2 Monday, November 6, 2017 2:30 PM
Page 8 of 224

Axle boots .......................................... 8-36
Checking the spark plugs .................. 8-37
Air filter maintenance.......................... 8-38
Cleaning the air filter case check hoses ................................................ 8-42
Cleaning the spark arrester ................ 8-43
Valve clearance .................................. 8-45
Brakes ................................................ 8-45
Checking the front and rear brake pads.................................................. 8-45
Checking the parking brake pads ...... 8-46
Checking the brake and YCC-S
clutch fluid levels .............................. 8-46
Brake and YCC-S clutch fluid
replacement...................................... 8-48
YCC-S clutch ..................................... 8-48
Checking the brake pedal .................. 8-49
Checking the accelerator pedal ......... 8-49
Parking brake lever free play adjustment........................................ 8-50
Brake light switch ............................... 8-51
Cable inspection and lubrication........ 8-51
Pedal lubrication................................. 8-52 Checking the stabilizer bushes...........8-52
Upper and lower arm pivot
lubrication (left and right) ..................8-53
Rear knuckle upper and lower pivot lubrication (left and right) ..................8-54
Drive shaft universal joint lubrication .........................................8-54
Steering shaft lubrication....................8-54
Wheel removal ....................................8-55
Checking and tightening the bead lock (YXZ10YESJ) .............................8-55
Tire replacement .................................8-56
Wheel installation................................8-57
Battery ................................................8-57
Jump-starting .....................................8-61
Fuse replacement ...............................8-63
Headlights...........................................8-65
Headlight beam adjustment ...............8-65
Tail/brake light ....................................8-66
Interior lights (for equipped models) ...8-66
Troubleshooting ..................................8-66
Troubleshooting charts .......................8-68
UB0F7AE0.book Page 3 Monday, November 6, 2017 2:30 PM
Page 38 of 224

3-3
3
EBU31200Controls and instrumentsThe vehicle you have purchased may differ slightly from those shown in the figures of this man-
ual.
36
7
9
8
1
2
4
5
14
12
10,11
15 13
1. Steering wheel
2. Shift paddle “ ”
3. Multi-function meter unit
4. Shift paddle “ ”
5. Main switch
6. Drive select lever
7. Parking brake lever
8. Interior light switch (for equipped models)
9. Passenger handhold
10.Helmet indicator light
11.Seat belt indicator light
12.Light switch
13.On-Command drive knob
14.Accelerator pedal
15.Brake pedal
UB0F7AE0.book Page 3 Monday, November 6, 2017 2:30 PM
Page 40 of 224

4-2
4
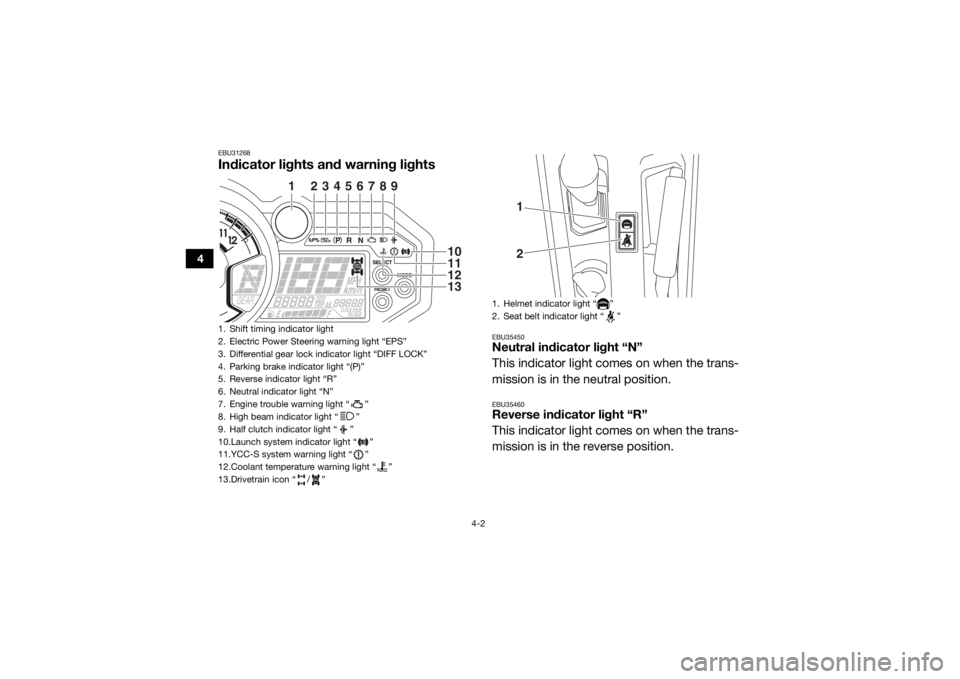
EBU31268Indicator lights and warning lights
EBU35450Neutral indicator light “N”
This indicator light comes on when the trans-
mission is in the neutral position.EBU35460Reverse indicator light “R”
This indicator light comes on when the trans-
mission is in the reverse position.
1. Shift timing indicator light
2. Electric Power Steering warning light “EPS”
3. Differential gear lock indicator light “DIFF LOCK”
4. Parking brake indicator light “(P)”
5. Reverse indicator light “R”
6. Neutral indicator light “N”
7. Engine trouble warning light “ ”
8. High beam indicator light “ ”
9. Half clutch indicator light “ ”
10.Launch system indicator light “ ”
11.YCC-S system warning light “ ”
12.Coolant temperature warning light “ ”
13.Drivetrain icon “ / ”
1
2
3
4
5
6
7
8
9
10111213
1. Helmet indicator light “ ”
2. Seat belt indicator light “ ”
12
UB0F7AE0.book Page 2 Monday, November 6, 2017 2:30 PM
Page 41 of 224

4-3
4
EBU34910Parking brake indicator light “(P)”
This indicator light comes on when the park-
ing brake is applied.EBU36450High beam indicator light “ ”
This indicator light comes on when the high
beam of the headlight is switched on.EBU35851Differential gear lock indicator light “DIFF
LOCK”
This indicator light comes on when the front
differential gear is locked.TIPWhen the On–Command drive knob is set to
“DIFF LOCK”, the indicator light will flash until
the differential is locked. Turn the steering
wheel back and forth or drive slowly to help
the differential gear lock to engage.
EBU34921Drivetrain icon “ / ”
The drivetrain icon indicates what type of
drive mode is currently selected. When 2WD
is selected, the icon will turn off. When 4WD
is selected, “ ” is displayed. And when 4WD
with differential lock is selected “ ” is dis-
played.TIP See pages 4-21 and 6-10 for more informa-
tion on selecting the drive mode.
Due to the synchronizing mechanism in the
differential gear case, the drivetrain icon
may not come on until the vehicle starts
moving.
When the On-Command drive knob is set
to “DIFF LOCK” or “4WD”, the drivetrain
icon and the differential gear lock indicator
light will flash until the differential gear is
completely locked or unlocked. If the icon
and the indicator light continue to flash, the
differential is not completely locked or un-
locked. In this case, start moving slowly
UB0F7AE0.book Page 3 Monday, November 6, 2017 2:30 PM
Page 47 of 224

4-9
4
Do not shift the transmission into neutral
if the vehicle is stopped on an incline un-
less the parking brake is applied or vehi-
cle movement is secured by other
means. Otherwise, when the transmis-
sion is shifted into neutral, the vehicle
may roll downhill and possibly cause an
accident, serious injury or death. EBU31360Helmet indicator light “ ”
The indicator light comes on and stays on
while the key is turned to “ ” (on) to remind
the occupants to always wear a helmet. If the
indicator light does not come on when the key
is turned to “ ” (on), have a Yamaha dealer
check the electrical circuit.EBU31370Seat belt indicator light “ ”
The indicator light comes on when the key is
turned to “ ” (on) to remind the occupants
to fasten their seat belt. The indicator light
stays on until the driver seat belt is properly latched. If the indicator light does not come
on when the key is turned to “ ” (on), or if
the indicator light remains on after the driver
seat belt is properly latched, have a Yamaha
dealer check the electrical circuit.UB0F7AE0.book Page 9 Monday, November 6, 2017 2:30 PM
Page 61 of 224

4-23
4
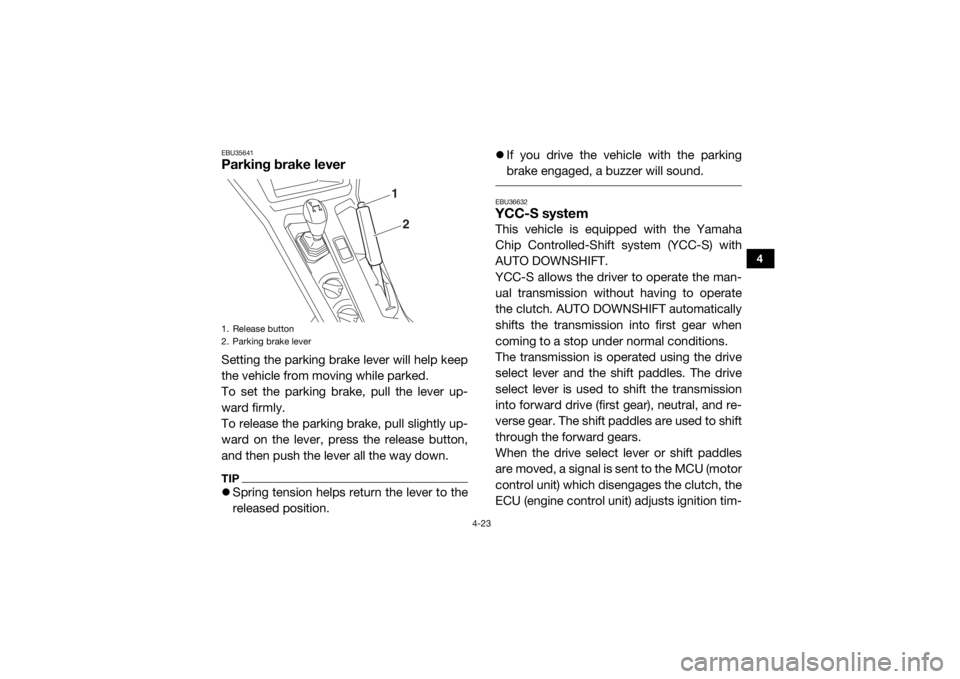
EBU35641Parking brake leverSetting the parking brake lever will help keep
the vehicle from moving while parked.
To set the parking brake, pull the lever up-
ward firmly.
To release the parking brake, pull slightly up-
ward on the lever, press the release button,
and then push the lever all the way down.TIPSpring tension helps return the lever to the
released position.
If you drive the vehicle with the parking
brake engaged, a buzzer will sound.
EBU36632YCC-S systemThis vehicle is equipped with the Yamaha
Chip Controlled-Shift system (YCC-S) with
AUTO DOWNSHIFT.
YCC-S allows the driver to operate the man-
ual transmission without having to operate
the clutch. AUTO DOWNSHIFT automatically
shifts the transmission into first gear when
coming to a stop under normal conditions.
The transmission is operated using the drive
select lever and the shift paddles. The drive
select lever is used to shift the transmission
into forward drive (first gear), neutral, and re-
verse gear. The shift paddles are used to shift
through the forward gears.
When the drive select lever or shift paddles
are moved, a signal is sent to the MCU (motor
control unit) which disengages the clutch, the
ECU (engine control unit) adjusts ignition tim-
1. Release button
2. Parking brake lever
12
UB0F7AE0.book Page 23 Monday, November 6, 2017 2:30 PM
Page 96 of 224

5-2
5
Drivetrain• Check front differential, transmission case, and rear final
gear for leakage. 5-6, 5-6, 5-6, 8-27,
8-29, 8-32
Coolant • Check coolant level in reservoir.
• Fill with coolant if necessary. 5-6, 8-34
Accelerator pedal • Check free play and for proper operation. 5-6
Seat belts • Check for proper operation and belt wear. 5-7
Passenger handhold • Check for stability and proper fastening. 5-7, 7-8
Steering • Check for proper operation. 5-7
Drive select lever and
shift paddles • Check for proper operation. 5-7
YCC-S clutch • Check operation.
• Check fluid level in reservoir.
• If necessary, add specified brake fluid to specified level.
• Check hydraulic system for leakage.
5-8
Fittings and fasteners • Check all fittings and fasteners. 5-8
Instruments, lights and
switches • Check for proper operation. 3-3, 4-2, 5-8, 8-65,
8-65
Wheels and tires • Check tire pressure and for wear and damage. 5-8, 8-55, 8-57
Axle boots • Check for damage. 8-36
ITEM ROUTINE PAGEUB0F7AE0.book Page 2 Monday, November 6, 2017 2:30 PM
Page 106 of 224

6-2
6
10–20 hours:
Avoid prolonged operation above 6300 r/min.
After break-in:
The vehicle may now be operated normally.EBU36560Starting the engine1. Turn the key to “ ” (on).NOTICEECB03340The coolant temperature warning light,
YCC-S system warning light, and engine
trouble warning light should come on, then
go off.
The EPS warning light should come on,
then go off when the engine is started.
To avoid possible damage, do not operate
the vehicle if a warning light does not work
as described above. 2. Press the brake pedal.
3. Shift the transmission into neutral.
When the transmission is in the neutral
position, the transmission gear display
shows “N” and the neutral indicator
light should come on.
The engine can be started in any gear if
the brake pedal is applied. However, it
is recommended to shift into neutral
before starting the engine.
4. With your foot off the accelerator pedal, start the engine by turning the key to “ ”
(start).
If the engine fails to start, release the key, and
then try starting it again. Wait a few seconds
before the next attempt. Each attempt should
be as short as possible, to preserve battery
energy. NOTICE: Do not crank the engine
more than 5 seconds on each attempt, or
starter damage could occur. Wait at least
5 seconds between each operation of the
electric starter to let it cool.
[ECB02140]
Do not turn the key to the “ ” (start) position
with the engine running; otherwise, damage
to the electric starter may result.
UB0F7AE0.book Page 2 Monday, November 6, 2017 2:30 PM