YAMAHA YXZ1000R 2021 Owners Manual
Manufacturer: YAMAHA, Model Year: 2021, Model line: YXZ1000R, Model: YAMAHA YXZ1000R 2021Pages: 200, PDF Size: 4.96 MB
Page 181 of 200

9-64
9
NOTICEECB00641To prevent accidental short-circuiting,
turn off the main switch when checking or
replacing a fuse. 2. Remove panel A. (See page 9-10.)
3. Remove the blown fuse, and then install anew fuse of the specified amperage.
WARNING! Always use a fuse of the specified amperage. Never use any
material in place of the proper fuse.
Using an improper fuse can cause
damage to the electrical system and
may lead to a fire.
[EWB03440]
Specified fuses: Main fuse:50.0 A
Fuel injection system fuse: 15.0 A
Headlight fuse: 15.0 A
Ignition fuse: 15.0 A
Auxiliary DC jack fuse: 10.0 A
Signaling system fuse: 10.0 A
Four-wheel-drive motor fuse: 10.0 A
Sub radiator fan motor fuse: 30.0 A
Radiator fan motor fuse: 30.0 A
Backup fuse: 10.0 A
EPS fuse: 40.0 A
Accessory fuse: 15.0 A
UB5J7CE0.book Page 64 Thursday, November 26, 2020 1:37 PM
Page 182 of 200

9-65
9
4. Turn the key to “ ” (on) and turn on theelectrical circuit in question to check if
the device operates. If the fuse blows
again immediately, have a Yamaha dealer
check the electrical system.
5. Install the panel.EBU35261HeadlightsThis model is equipped with LED headlights.
There are no user replaceable bulbs. If one or
more headlights do not come on, check for a
loose connection, check the headlight fuse,
and then have a Yamaha dealer check the ve-
hicle.TIP When the headlights are set to low beam,
only the top half of each lamp will illuminate.
When the headlights are set to high beam,
both halves of each lamp will illuminate.
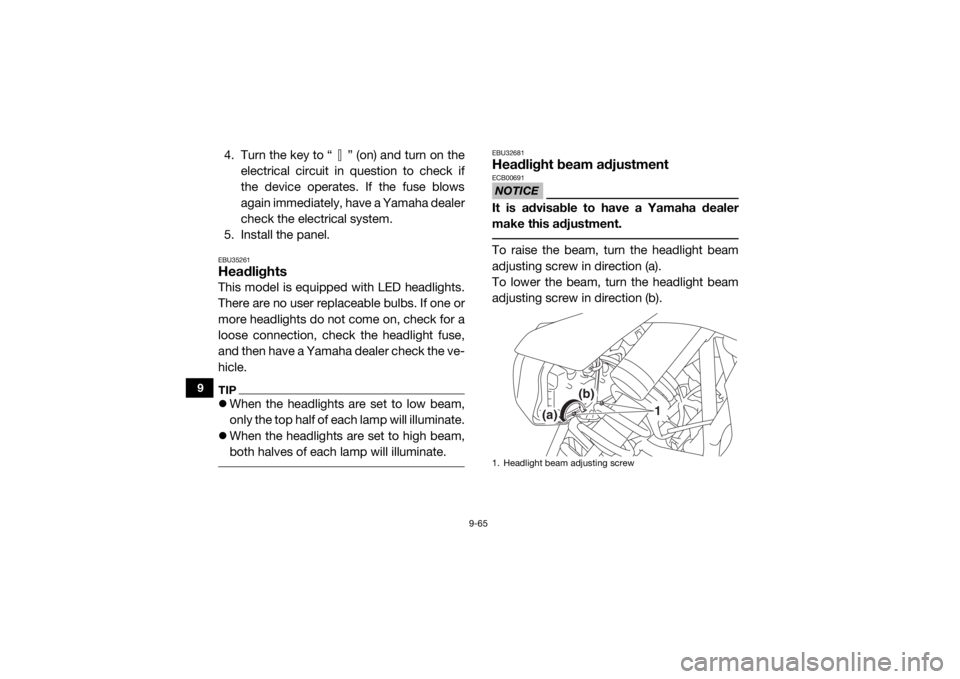
EBU32681Headlight beam adjustmentNOTICEECB00691It is advisable to have a Yamaha dealer
make this adjustment. To raise the beam, turn the headlight beam
adjusting screw in direction (a).
To lower the beam, turn the headlight beam
adjusting screw in direction (b).1. Headlight beam adjusting screw
(a)
(b)
1
UB5J7CE0.book Page 65 Thursday, November 26, 2020 1:37 PM
Page 183 of 200

9-66
9
EBU37910Brake/tail lightThis model is equipped with an LED brake/tail
light, there are no replaceable bulbs.
If the brake/tail light does not come on, check
for a loose connection, check the fuses, and
then have a Yamaha dealer check the vehicle.EBU32700TroubleshootingAlthough Yamaha vehicles receive an inspec-
tion before shipment from the factory, trouble
may occur during operation. Any problem inthe fuel, compression, or ignition systems can
cause poor starting and loss of power. The
troubleshooting chart describes a quick, easy
procedure for making checks. If your vehicle
requires any repair, take it to a Yamaha deal-
er.
The skilled technicians at a Yamaha dealer-
ship have the tools, experience, and know-
how to properly service your vehicle. Use only
genuine Yamaha parts on your vehicle. Imita-
tion parts may look like Yamaha parts, but
they are often inferior. Consequently, they
have a shorter service life and can lead to ex-
pensive repair bills.
WARNING
EWB03450When checking the fuel system, do not
smoke and make sure there are no open
flames or sparks in the area, including pilot
lights from water heaters or furnaces.
1. Headlight beam adjusting screw
(b)
(a)
1
UB5J7CE0.book Page 66 Thursday, November 26, 2020 1:37 PM
Page 184 of 200

9-67
9
Gasoline or gasoline vapors can ignite or
explode, causing severe injury or property
damage. UB5J7CE0.book Page 67 Thursday, November 26, 2020 1:37 PM
Page 185 of 200

9-68
9
EBU35911Troubleshooting chartsStarting problems or poor engine performanceCheck the fuel level in
the fuel tank.1. Fuel
There is enough fuel.
There is no fuel.
Check the battery.
Supply fuel.
The engine does not start.
Check the battery.
Operate the electric starter.4. Compression
There is compression.
There is no compression.
The engine does not start.
Have a Yamaha dealer check the vehicle.Have a Yamaha dealer check the vehicle.
Remove the spark plugs
and check the electrodes.3. Ignition
Wipe off with a dry cloth and correct the
spark plug gaps, or replace the spark plugs. Have a Yamaha dealer check the vehicle.
The engine does not start.
Check the compression.
Operate the electric starter.2. Battery
The engine turns over
quickly.
The engine turns over
slowly.
The battery is good.
DryWet
Operate the electric starter.
Check the battery lead connections,
and have a Yamaha dealer charge
the battery if necessary.
The engine does not start.
Check the ignition.
UB5J7CE0.book Page 68 Thursday, November 26, 2020 1:37 PM
Page 186 of 200

9-69
9
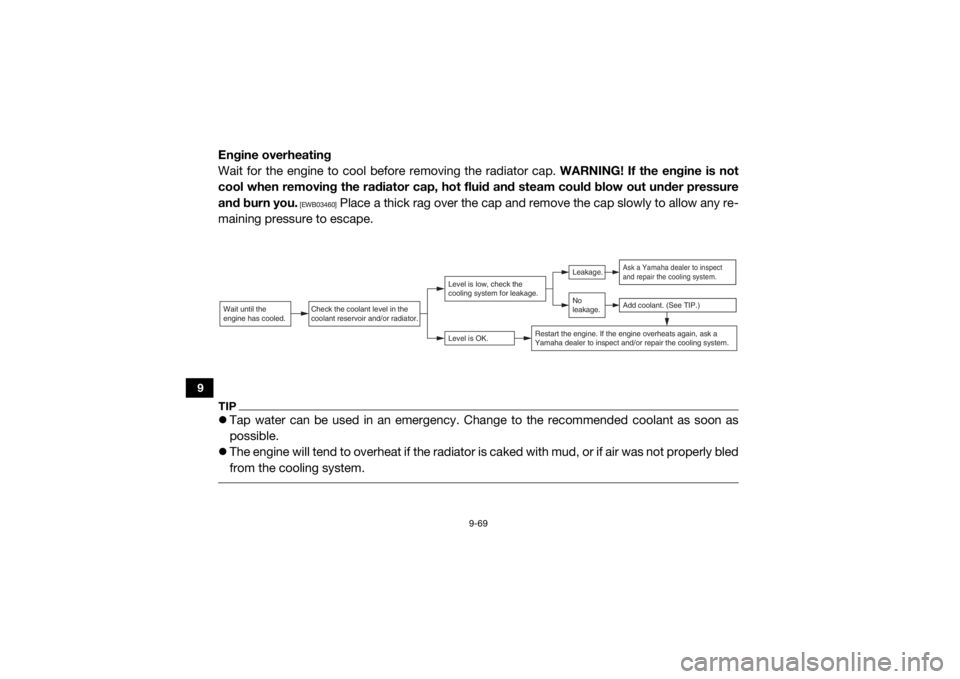
Engine overheating
Wait for the engine to cool before removing the radiator cap. WARNING! If the engine is not
cool when removing the radiator cap, hot fluid and steam could blow out under pressure
and burn you.
[EWB03460]
Place a thick rag over the cap and remove the cap slowly to allow any re-
maining pressure to escape.
TIP Tap water can be used in an emergency. Ch ange to the recommended coolant as soon as
possible.
The engine will tend to overheat if the radiator is caked with mud, or if air was not properly bled
from the cooling system. Wait until the
engine has cooled.
Check the coolant level in the
coolant reservoir and/or radiator.
Level is OK.Level is low, check the
cooling system for leakage.
No
leakage.Leakage.
Ask a Yamaha dealer to inspect
and repair the cooling system.Add coolant. (See TIP.)
Restart the engine. If the engine overheats again, ask a
Yamaha dealer to inspect and/or repair the cooling system.
UB5J7CE0.book Page 69 Thursday, November 26, 2020 1:37 PM
Page 187 of 200

10-1
10
EBU32720
CLEANING AND STORAGE
EBU35920CleaningFrequent, thorough cleaning of your vehicle
will not only enhance its appearance but will
improve its general performance and extend
the useful life of many components.1. Before cleaning the vehicle: a. Block off the end of the exhaust pipeto prevent water entry. A plastic bag
and strong rubber band may be used.
b. Make sure the spark plugs and all filler caps are properly installed.
2. If the engine case is excessively greasy, apply degreaser with a paint brush. Do
not apply degreaser to the wheel axles.
3. Rinse the dirt and degreaser off with a garden hose. Use only enough pressure
to do the job. WARNING! Test the
brakes after washing. Apply the
brakes several times at slow speeds to
let friction dry the brakes. Wet brakes may have reduced stopping ability, in-
creasing the chance of an accident.
[EWB03471]
NOTICE: Excessive water pres-
sure may cause water seepage and
deterioration of wheel bearings,
brakes, transmission seals and electri-
cal devices. Many expensive repair
bills have resulted from improper high-
pressure detergent applications such
as those available in coin-operated car
washers.
[ECB00712]
4. Once the majority of the dirt has been hosed off, wash all surfaces with warm
water and mild, detergent-type soap. An
old toothbrush or bottle brush is handy
for hard-to-get-at places.
5. Rinse the vehicle off immediately with
clean water and dry all surfaces with a
clean chamois towel or soft, absorbent
cloth.
6. Clean the seats with a vinyl upholstery cleaner to keep the covers pliable and
glossy.
UB5J7CE0.book Page 1 Thursday, November 26, 2020 1:37 PM
Page 188 of 200

10-2
10
7. Automotive-type wax may be applied toall painted and chrome-plated surfaces.
Avoid combination cleaner-waxes. Many
contain abrasives which may scratch the
paint or protective finish. When finished,
start the engine and let it idle for several
minutes.EBU32741StorageLong term storage (60 days or more) of your
vehicle will require some preventive proce-
dures to guard against deterioration. Make
any necessary repairs before storing the vehi-
cle.
After thoroughly cleaning the vehicle, prepare
for storage as follows:
1. Fill the fuel tank with fresh fuel and add the specified amount of Fuel Med Rx or
another high-quality fuel stabilizer prod-
uct. Follow the instructions on the prod- uct label. Operate the vehicle for at least
5 minutes to distribute treated fuel
through the fuel system.
2. Remove the spark plugs and pour one ta- blespoon of fresh engine oil into each cyl-
inder and then re-install the spark plugs.
Remove the spark plug wires and ground
them. Operate the electric starter to turn
the engine over several times and coat
the cylinder walls with oil.
3. Lubricate all control cables.
4. Put the frame on stands or blocks to raise all wheels off the ground.
5. Tie a plastic bag over the exhaust pipe outlet to prevent moisture from entering.
Specified amount:1 oz of stabilizer to each gallon of fuel (or
7.5 ml of stabilizer to each liter of fuel)
UB5J7CE0.book Page 2 Thursday, November 26, 2020 1:37 PM
Page 189 of 200

10-3
10
6. If storing in a humid or salt-air atmo-sphere, coat all exposed metal surfaces
with a light film of oil. Do not apply oil to
any rubber parts or the seat covers.
7. Remove the battery and charge it. Store
it in a dry place and recharge it once a
month. Do not store the battery in an ex-
cessively warm or cold place [less than 0
°C (30 °F) or more than 30 °C (90 °F)].
Use of fuel stabilizer eliminates the need to
drain the fuel system. Consult a Yamaha
dealer if the fuel system needs to be drained.
UB5J7CE0.book Page 3 Thursday, November 26, 2020 1:37 PM
Page 190 of 200

11-1
11
EBU32751
SPECIFICATIONS
Dimensions:Overall length:3147 mm (123.9 in)
Overall width: 1626 mm (64.0 in)
Overall height:
1751 mm (68.9 in)
Wheelbase: 2300 mm (90.6 in)
Ground clearance: 342 mm (13.5 in)
Minimum turning radius:
6.0 m (19.69 ft)
Maximum water depth: 40 cm (16 in)Weight:Technical permissible mass (Maximum load + curb weight):
1065.0 kg (2348 lb)
Curb weight: 690.0 kg (1521 lb)Loading:Maximum load:
328.0 kg (723 lb)
(Total weight of operator, passenger, cargo, and
accessories)Noise and vibration level:Noise level (77/311/EEC):
83.0 dB(A) at 4250 r/min Uncertainty of measurement:
3.0 dB(A)
A-weighted sound power level: 100.0 dB(A) at 4250 r/min
Uncertainty of measurement: 3.0 dB(A)
Vibration on seat (EN1032, ISO5008):
Will not exceed 0.5 m/s²
Uncertainty of measurement: 0.1 m/s²
Vibration on handle (EN1032, ISO5008): Will not exceed 2.5 m/s²
Uncertainty of measurement:
0.5 m/s²
Engine:Combustion cycle:4-stroke
Cooling system:
Liquid cooled
Valve train: DOHC
Cylinder arrangement: Inline
Number of cylinders:
3-cylinder
Displacement: 998 cm³
Bore × stroke:
80.0 × 66.2 mm (3.15 × 2.61 in)
UB5J7CE0.book Page 1 Thursday, November 26, 2020 1:37 PM