transmission YAMAHA YXZ1000R 2021 User Guide
[x] Cancel search | Manufacturer: YAMAHA, Model Year: 2021, Model line: YXZ1000R, Model: YAMAHA YXZ1000R 2021Pages: 200, PDF Size: 4.96 MB
Page 89 of 200

7-4
7
Always use the clutch when changing
gears. The engine and drivetrain are not
designed to withstand the shock of
forced shifting and can be damaged by
shifting without using the clutch. To start out and accelerate
1. Take your foot off the accelerator pedal,
apply the brake, and then release the
parking brake if applied. NOTICE: Al-
ways take your foot off the accelerator
pedal before shifting gears, otherwise
damage to the engine and drivetrain
may result.
[ECB02930]
2. Press the clutch pedal to disengage the
clutch.
3. Shift into first gear by moving the shift le-
ver forward. (The transmission gear dis-
play will show “1” when the transmission
gears have properly engaged.)
4. Release the brake pedal. 5. Press the accelerator pedal gradually and
at the same time, release the clutch pedal
slowly.
6. Once the vehicle has attained adequate speed, release the accelerator pedal, and
at the same time, quickly press the clutch
pedal.
7. Shift the transmission into second gear.
(Make sure not to shift the transmission
into neutral.)
8. Press the accelerator pedal gradually and
release the clutch pedal slowly.
9. Follow the same procedure when shifting to the next higher gear.
To decelerate
When slowing down or stopping, release the
accelerator pedal and press the brake pedal
smoothly and evenly. As you slow down, shift
to a lower gear. Be sure that the engine has
sufficiently slowed before engaging a lower
gear. Improper use of the brake or shifting
UB5J7CE0.book Page 4 Thursday, November 26, 2020 1:37 PM
Page 90 of 200

7-5
7
can cause the tires to lose traction, reducing
control and increasing the possibility of an ac-
cident.
WARNING
EWB00712Make sure the engine has sufficiently
slowed before shifting to a lower gear. En-
gaging a lower gear when the engine
speed is too high could make the wheels
stop rotating and lose traction. This could
cause loss of control, an accident and inju-
ry. It could also cause engine or drivetrain
damage. Recommended shift points
The recommended shift points during accel-
eration and deceleration are shown in the ta-
ble below.To drive in reverse
WARNING
EWB03300Before you shift into reverse, make sure
there are no obstacles or people behind
you. When it is safe to proceed, go slowly.
Hitting an obstacle or
person could result
in serious inju ry or death. 1. Stop the vehicle and continue to apply
the brake pedal.
2. Check behind you.
3. Press the clutch pedal, and pull the re- verse gear lock lever.
4. Shift the transmission into reverse.Shift up points: 1st → 2nd: 19 km/h (12 mi/h)
2nd → 3rd: 33 km/h (21 mi/h)
3rd → 4th: 44 km/h (27 mi/h)
4th → 5th: 53 km/h (33 mi/h)
Shift down points: 5th → 4th: 30 km/h (19 mi/h)
4th → 3rd: 17 km/h (11 mi/h)
UB5J7CE0.book Page 5 Thursday, November 26, 2020 1:37 PM
Page 91 of 200

7-6
7
TIPWhen in reverse, the transmission gear dis-
play should show “R” and the reverse indica-
tor light should come on. 5. Release the reverse gear lock lever and the parking brake, if applied.
6. Check behind you and then release the brake pedal.
7. Press the accelerator pedal gradually and
release the clutch pedal slowly. Continue
to watch to the rear while driving in re-
verse.
1. Reverse gear lock lever “REV.”
1. Shift lever
2. Reverse gear
1
1
2
R 1
N 2
3
4
5
UB5J7CE0.book Page 6 Thursday, November 26, 2020 1:37 PM
Page 110 of 200
8-15
8
Braking
When slowing down or stopping, take your
foot off the accelerator pedal and press the
brake pedal smoothly. Abrupt or improper
use of the brakes can cause the tires to lose
traction, reducing control of the vehicle and
increasing the possibility of an accident.
Braking ability is affected by type of terrain. In
most cases, gradual application of the brakes
is more effective than abrupt braking, partic-
ularly on loose surfaces, such as gravel. Al-
ways allow for greater braking distance on
rough, loose, or slippery surfaces.
Engine compression braking will also help
slow the vehicle down. With the transmission
still in gear, take your foot off the accelerator
and allow the drivetrain and engine to absorb
vehicle speed. Downshift as necessary. Ap-
plication of the brakes provides additional
stopping power. Leaving the vehicle
Do not get out of the vehicle while the engine
is running. Take the key with when you leave
the vehicle. There is a serious risk of injury or
death because:
Children or other unauthorized persons
may attempt to operate the vehicle.
Objects tossed into the vehicle may strike
the shift lever and accidently engage the
transmission.
The parking brake may not keep the vehicle
from moving.
Parking on a flat area
Even when parking on a seemingly flat area, it
is good practice to leave the transmission in
gear to prevent the vehicle from rolling.
Therefore, shift into first or reverse gear, stop
the engine and always apply the parking
brake.UB5J7CE0.book Page 15 Thursday, November 26, 2020 1:37 PM
Page 111 of 200

8-16
8
Parking on a slope
The parking brake is located on the rear drive
shaft. When the drivetrain is in “2WD” mode,
only the rear wheels will be locked. Therefore,
switch the drive mode to “DIFF. LOCK” be-
fore stopping the engine to lock all four
wheels when parking. In addition to the park-
ing brake, leave the transmission in gear to
help prevent the vehicle from rolling.
If you park on a hill that is too steep, the vehi-
cle may roll out of control. Never park on hills
that are so steep you cannot walk up them
easily. If you must park on an incline, follow
these instructions:1. First, bring the vehicle to a stop and con- tinue to apply the brake pedal.
2. Switch the drive mode to “DIFF. LOCK”
and shift into first gear when parking up-
hill, or reverse gear when parking down-
hill.
TIPYou may need to turn the steering wheel left
and right or release the clutch slightly to help
the differential lock into place. 3. Stop the engine (turn the key to “ ”[off]).
4. With the brake pedal still being applied, set the parking brake.
5. Finally, get out of the vehicle and block
the front and rear wheels with rocks or
other objects.
Loading
Be aware that vehicle load includes the total
combined weight of the operator, passenger,
any installed accessories, and any luggage or
cargo brought on board or stored in the cargo
bed. Make sure that the gross vehicle weight
(vehicle load plus weight of the vehicle itself)
never exceeds 1065 kg (2348 lb).
UB5J7CE0.book Page 16 Thursday, November 26, 2020 1:37 PM
Page 113 of 200

8-18
8
sense and remember that some hills are too
steep for you to climb or descend. Use proper
driving techniques to avoid rearward, for-
ward, or sideways rollovers on hills and
slopes.
Drive straight up and down inclines, not
across them. If crossing a hill is unavoidable,
drive slowly. Turn downhill immediately if you
feel the vehicle may tip.
If you think or feel the vehicle may tip or
roll:
Brace yourself by pressing your feet firmly
on the floorboard and keep a firm grip on
the steering wheel or passenger handhold.
Do not put your hands or feet outside of the
vehicle for any reason.
Uphill
Do not attempt to climb hills until you have
mastered basic maneuv ers on flat ground.
Drive straight up hills, and avoid crossing the
side of a hill, which increases your risk of roll- over. Practice first on gentle slopes before at-
tempting steeper hills. Always check the
terrain carefully before attempting any hill.
To climb a hill, you need traction, momentum,
and steady throttle. For more traction and
control for climbing steeper and/or rougher
slopes, shift into low gear and select “4WD”
or “DIFF. LOCK”. Travel fast enough to main-
tain momentum, but not so fast that you can-
not react to changes in the terrain as you
climb.
Slow down when you reach the crest of the
hill if you cannot see clearly what is on the
other side – there could be another person, an
obstacle, or a sharp drop-off.
If you start to lose traction or momentum
when climbing, and decide you will be unable
to continue, use the brakes to stop. Do not at-
tempt to turn the vehicle around. With your
foot on the brake pedal, look behind you and
plan your descent. Press the clutch pedal and
shift the transmission into reverse so you can
use engine braking to slow your descent. Re-UB5J7CE0.book Page 18 Thursday, November 26, 2020 1:37 PM
Page 123 of 200
9-6
9
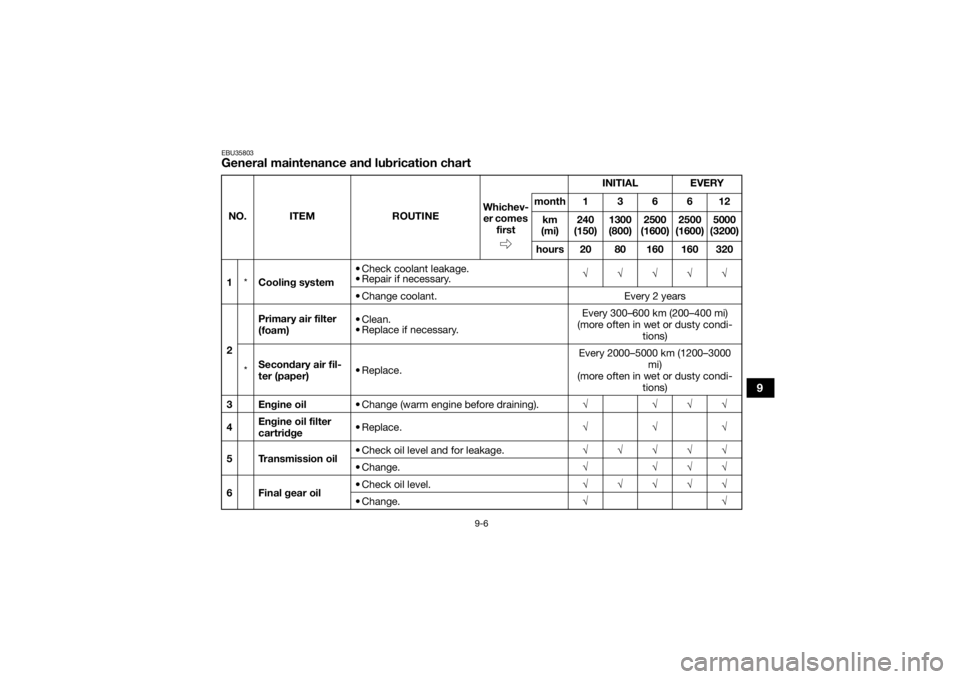
EBU35803General maintenance and lubrication chartNO. ITEMROUTINE INITIAL
EVERY
Whichev- er comes first month 1 3 6 6 12
km
(mi) 240
(150) 1300
(800) 2500
(1600) 2500
(1600) 5000
(3200)
hours 20 80 160 160 320
1 *Cooling system • Check coolant leakage.
• Repair if necessary.
√√√√√
• Change coolant. Every 2 years
2 Primary air filter
(foam)
•Clean.
• Replace if necessary. Every 300–600 km (200–400 mi)
(more often in wet or dusty condi-
tions)
* Secondary air fil-
ter (paper)
• Replace. Every 2000–5000 km (1200–3000
mi)
(more often in wet or dusty condi-
tions)
3Engine oil • Change (warm engine before draining). √√√√
4 Engine oil filter
cartridge • Replace.
√√√
5 Transmission oil • Check oil level and for leakage.
√√√√√
• Change. √√√√
6 Final gear oil • Check oil level.
√√√√√
• Change. √√
UB5J7CE0.book Page 6 Thursday, November 26, 2020 1:37 PM
Page 144 of 200

9-27
9
EBU38630Why YamalubeYAMALUBE oil is a Genuine YAMAHA Partborn of the engineers’ passion and belief that
engine oil is an important liquid engine com-
ponent. We form teams of specialists in the
fields of mechanical engineering, chemistry,
electronics and track testing, and have them
develop the engine together with the oil it will use. Yamalube oils take full advantage of the
base oil’s qualities and blend in the ideal ba-
lance of additives to make sure the final oil
clears our performance standards. Thus,
Yamalube mineral, semisynthetic and syn-
thetic oils have their own distinct characters
and value. Yamaha’s experience gained over
many years of research and development into
oil since the 1960’s helps make Yamalube the
best choice for your Yamaha engine.
EBU35108Transmission oilCheck the oil level and change the transmis-
sion oil at the intervals specified in the period-
ic maintenance chart.
1. Bolt BTightening torque: Bolt B:7 N·m (0.7 kgf·m, 5.2 lb·ft)
1
1
UB5J7CE0.book Page 27 Thursday, November 26, 2020 1:37 PM
Page 145 of 200

9-28
9
NOTICEECB02910When checking or changing the transmis-
sion oil, make sure that no foreign material
enters the transmission. If necessary,
clean the filler cap and surrounding area. To check the transmission oil level1. Park the vehicle on a level surface.
2. Remove panel B. (See page 9-10.)
3. Remove the transmission oil filler cap, wipe the dipstick clean, insert it back into
the transmission case (without screwing
it in), and then remove it again.
TIPThe transmission oil level should be between
the tip of the dipstick and the maximum level
mark. 4. If the oil level is at or below the tip of thedipstick, add oil.
Recommended oil:YA M A L U B ESAE 5W-30, 10W-30, 10W-40, 15W-40,
20W-40 or 20W-50
Oil quantity: 1.50 L (1.59 US qt, 1.32 Imp.qt)
1. Transmission oil filler cap
2. O-ring
3. Dipstick
4. Maximum level mark
5. Tip of the dipstick
1 3
245
UB5J7CE0.book Page 28 Thursday, November 26, 2020 1:37 PM
Page 146 of 200

9-29
9
TIPAdd a sufficient amount to raise to the maxi-
mum level mark, but do not overfill. 5. Check the O-ring for damage, and re-place it if necessary.
6. Install the transmission oil filler cap.
7. Install the panel.
To change the transmission oil 1. Place an oil pan under the transmission case to collect the used oil.
2. Remove the transmission oil filler cap.
3. Remove the transmission oil drain bolt and gasket.
TIPOil will flow out immediately when the drain
bolt is loosened. Take care not to lose the
bolt. 4. After draining the oil, install the transmis-sion oil drain bolt with a new gasket.
5. Tighten the drain bolt to the specified torque.1. Transmission oil drain bolt
2. Gasket2
1
UB5J7CE0.book Page 29 Thursday, November 26, 2020 1:37 PM