oil YAMAHA YZ125LC 2001 Owner's Manual
[x] Cancel search | Manufacturer: YAMAHA, Model Year: 2001, Model line: YZ125LC, Model: YAMAHA YZ125LC 2001Pages: 558, PDF Size: 13.11 MB
Page 122 of 558
3-1
MAINTENANCE INTERVALS
INSP
ADJ
EC300000
REGULAR INSPECTION AND ADJUSTMENTS
EC310051
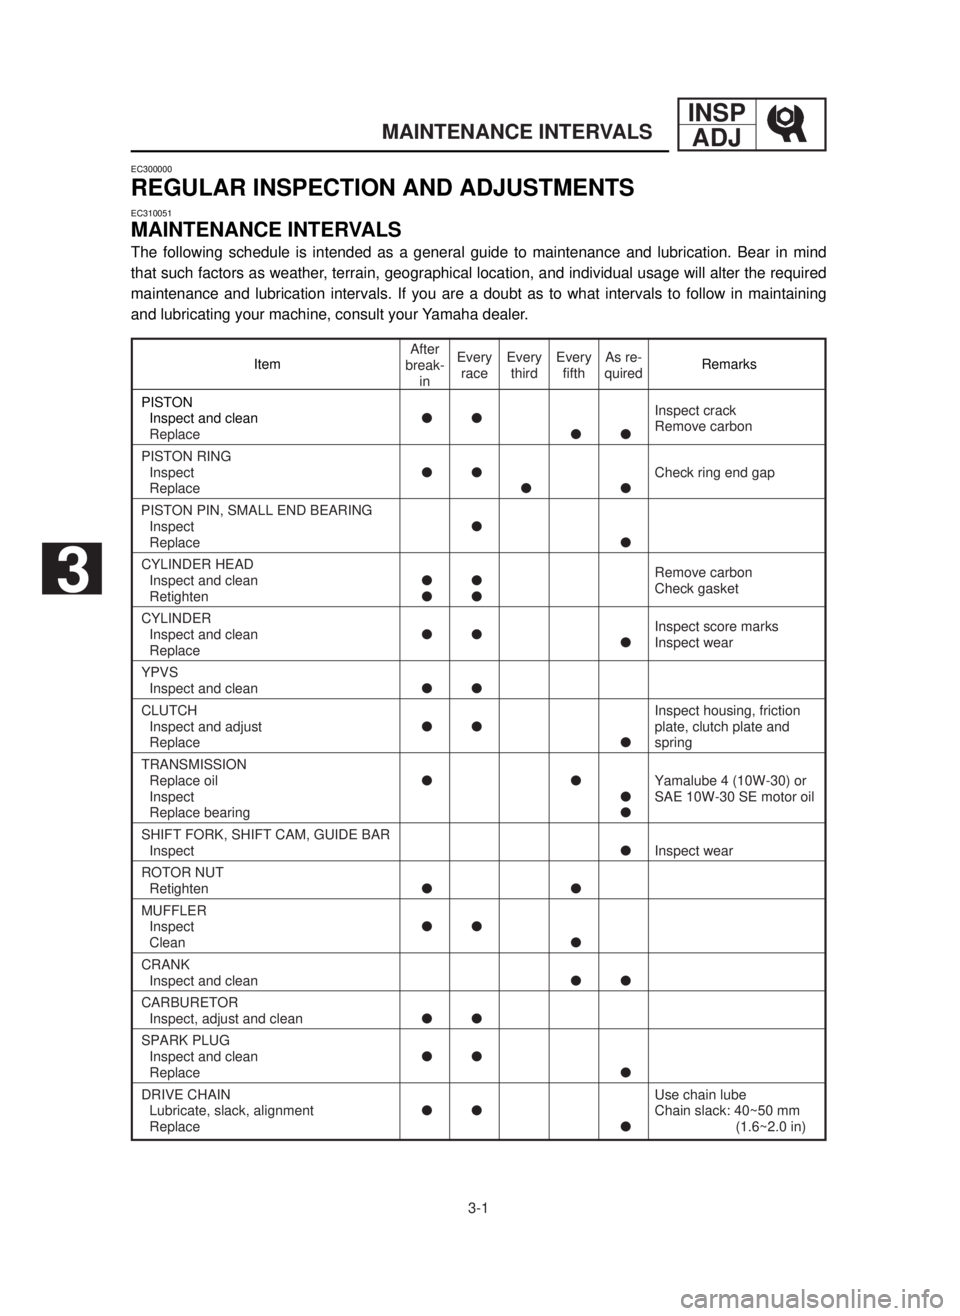
MAINTENANCE INTERVALS
The following schedule is intended as a general guide to maintenance and lubrication. Bear in mind
that such factors as weather, terrain, geographical location, and individual usage will alter the required
maintenance and lubrication intervals. If you are a doubt as to what intervals to follow in maintaining
and lubricating your machine, consult your Yamaha dealer.
Item Remarks
PISTON
Inspect and cleanllInspect crack
ReplacellRemove carbon
PISTON RING
InspectllCheck ring end gap
Replacell
PISTON PIN, SMALL END BEARING
Inspectl
Replacel
CYLINDER HEAD
Inspect and cleanllRemove carbon
RetightenllCheck gasket
CYLINDER
Inspect and cleanll
lInspect score marks
ReplaceInspect wear
YPVS
Inspect and cleanll
CLUTCHInspect housing, friction
Inspect and adjustllplate, clutch plate and
Replacelspring
TRANSMISSION
Replace oilllYamalube 4 (10W-30) or
InspectlSAE 10W-30 SE motor oil
Replace bearingl
SHIFT FORK, SHIFT CAM, GUIDE BAR
InspectlInspect wear
ROTOR NUT
Retightenll
MUFFLER
Inspectll
Cleanl
CRANK
Inspect and cleanll
CARBURETOR
Inspect, adjust and cleanll
SPARK PLUG
Inspect and cleanll
Replacel
DRIVE CHAIN Use chain lube
Lubricate, slack, alignmentllChain slack: 40~50 mm
Replacel(1.6~2.0 in)
After
break-
inEvery
raceEvery
thirdEvery
fifthAs re-
quired
3
5MV-9-30-3A 6/19/00 1:52 PM Page 2
Page 123 of 558
3-2
MAINTENANCE INTERVALS
INSP
ADJ
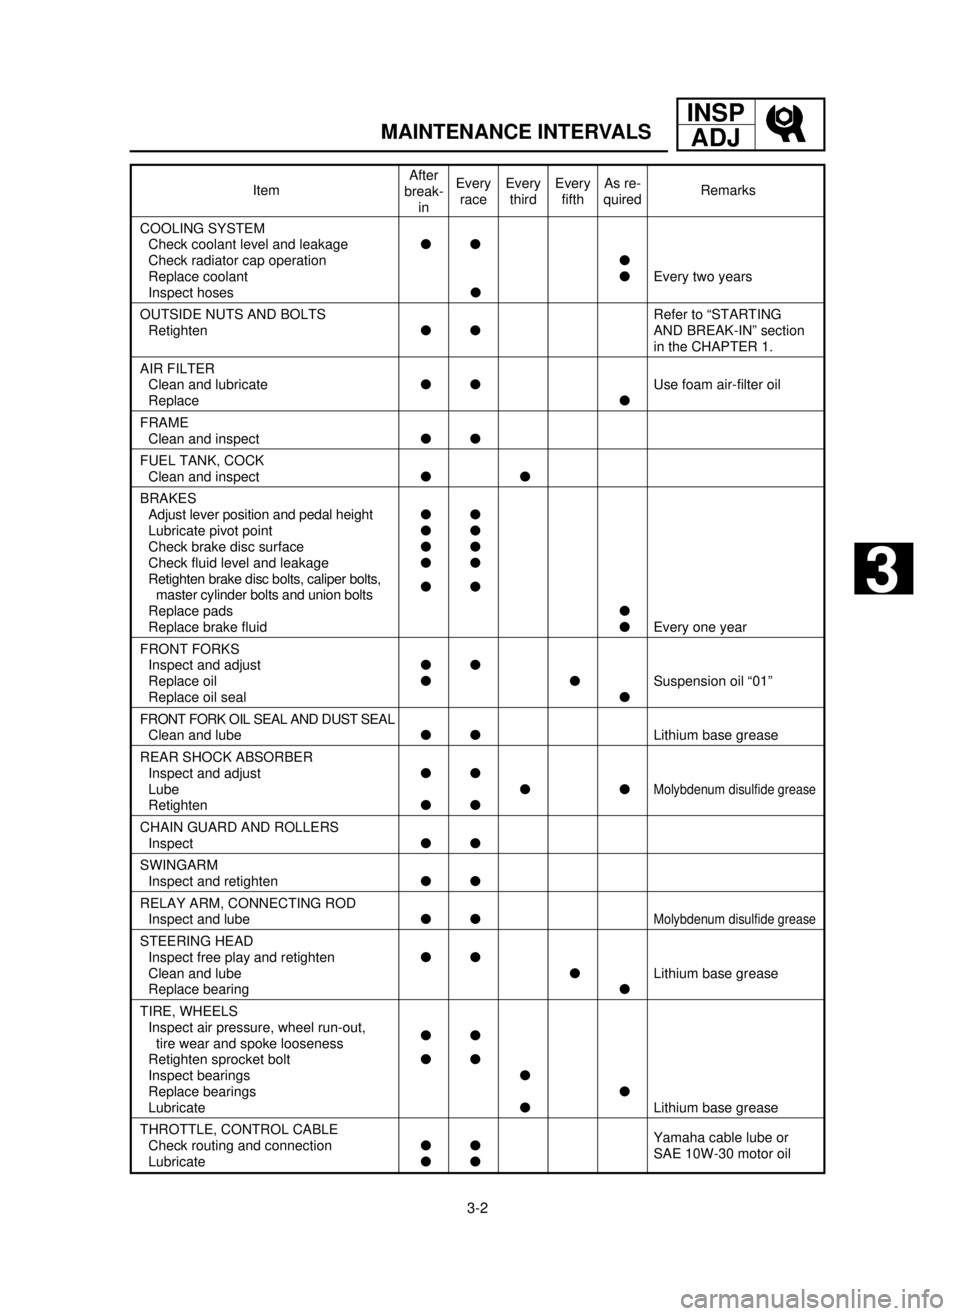
Item Remarks
COOLING SYSTEM
Check coolant level and leakagell
Check radiator cap operationl
Replace coolantlEvery two years
Inspect hosesl
OUTSIDE NUTS AND BOLTS Refer to “STARTING
RetightenllAND BREAK-IN” section
in the CHAPTER 1.
AIR FILTER
Clean and lubricatellUse foam air-filter oil
Replacel
FRAME
Clean and inspectll
FUEL TANK, COCK
Clean and inspectll
BRAKES
Adjust lever position and pedal heightll
Lubricate pivot pointll
Check brake disc surfacell
Check fluid level and leakagell
Retighten brake disc bolts, caliper bolts,
ll
master cylinder bolts and union bolts
Replace padsl
Replace brake fluidlEvery one year
FRONT FORKS
Inspect and adjustll
Replace oilllSuspension oil “01”
Replace oil seall
FRONT FORK OIL SEAL AND DUST SEAL
Clean and lubellLithium base grease
REAR SHOCK ABSORBER
Inspect and adjustll
Lube ll
Molybdenum disulfide grease
Retightenll
CHAIN GUARD AND ROLLERS
Inspectll
SWINGARM
Inspect and retightenll
RELAY ARM, CONNECTING ROD
Inspect and lubellMolybdenum disulfide grease
STEERING HEAD
Inspect free play and retightenll
Clean and lubelLithium base grease
Replace bearingl
TIRE, WHEELS
Inspect air pressure, wheel run-out,
ll
tire wear and spoke looseness
Retighten sprocket boltll
Inspect bearingsl
Replace bearingsl
LubricatelLithium base grease
THROTTLE, CONTROL CABLE
Check routing and connectionllYamaha cable lube or
LubricatellSAE 10W-30 motor oil
After
break-
inEvery
raceEvery
thirdEvery
fifthAs re-
quired
3
5MV-9-30-3A 6/19/00 1:52 PM Page 3
Page 127 of 558

3-3
PROGRAMME D’ENTRETIEN
INSP
ADJ
PartieAprès Chaque Chaque Chaque Si
Remarques
rodage coursetrois- cinquiè- nécessa-
ième me ire
PNEU; ROUES
Contrôler la pression de gonflage,
le voile de roue et l’usure des
66pneus et voir s’il n’y a pas de
rayon détendu
Resserrer les boulons de la roue
66dentée
Contrôler les roulements6
Changer les roulements6
Graisser6
ACCELERATEUR, CABLES DE
COMMANDE
Contrôler le chaminement et le
66branchement
Graisser66
Graisse à base de lithium
Yamaha lube pour câble ou
Huile moteur SAE 10W-30
5MV-9-30-3A 6/19/00 1:52 PM Page 7
Page 134 of 558

3-4
PRE-OPERATION INSPECTION AND MAINTENANCE
INSP
ADJ
EC320000
PRE-OPERATION INSPECTION AND MAINTENANCE
Before riding for break-in operation, practice or a race, make sure the machine is in good operating
condition.
Before using this machine, check the following points.
EC321000
GENERAL INSPECTION AND MAINTENANCE
Item Routine Page
Coolant Check that coolant is filled up to the radiator filler cap.
Check the cooling system for leakage.P3-5~9
Fuel Check that a fresh mixture of oil and gasoline is filled in
the fuel tank. Check the fuel line for leakage.P1-12
Transmission oil Check that the oil level is correct. Check the crankcase
for leakage.P3-12~14
Gear shifter and clutch Check that gears can be shifted correctly in order and
that the clutch operates smoothly.P3-9
Throttle grip/Housing Check that the throttle grip operation and free play
are correctly adjusted. Lubricate the throttle grip and P3-10~11
housing, if necessary.
Brakes Check the play of front brake and effect of front and
rear brake.P3-17~23
Chain Check chain slack and alignment. Check that the chain
is lubricated properly.P3-24~26
Wheels Check for excessive wear and tire pressure. Check for
loose spokes and have no excessive play.P3-34~35
Steering Check that the handlebar can be turned smoothly and
have no excessive play.P3-35~36
Front forks and Check that they operate smoothly and there is no oil
rear shock absorber leakage.P3-26~33
Cables (wires) Check that the clutch and throttle cables move smooth-
ly. Check that they are not caught when the handlebars —
are turned or when the front forks travel up and down.
Muffler Check that the muffler is tightly mounted and has no
cracks.P3-15~16
Sprocket Check that the driven sprocket tightening bolt is
not loose.P3-24
Lubrication Check for smooth operation. Lubricate if necessary. P3-37
Bolts and nuts Check the chassis and engine for loose bolts and nuts. P1-16
Lead connectors Check that the CDI magneto, CDI unit, and ignition coil
are connected tightly.P1-6
Settings Is the machine set suitably for the condition of the
racing course and weather or by taking into account the
P7-1~24
results of test runs before racing? Are inspection and
maintenance completely done?
5MV-9-30-3A 6/19/00 1:52 PM Page 14
Page 142 of 558
3-7
INSP
ADJ
RADIATOR CAP INSPECTION
cC
9Do not mix more than one type of ethyl-
ene glycol antifreeze containing corro-
sion inhibitors for aluminum engine.
9Do not use water containing impurities
or oil.
7. Install:
9Radiator cap
Start the engine and warm it up for a sev-
eral minutes.
8. Check:
9Coolant level
Coolant level low ÕAdd coolant.
EC355000
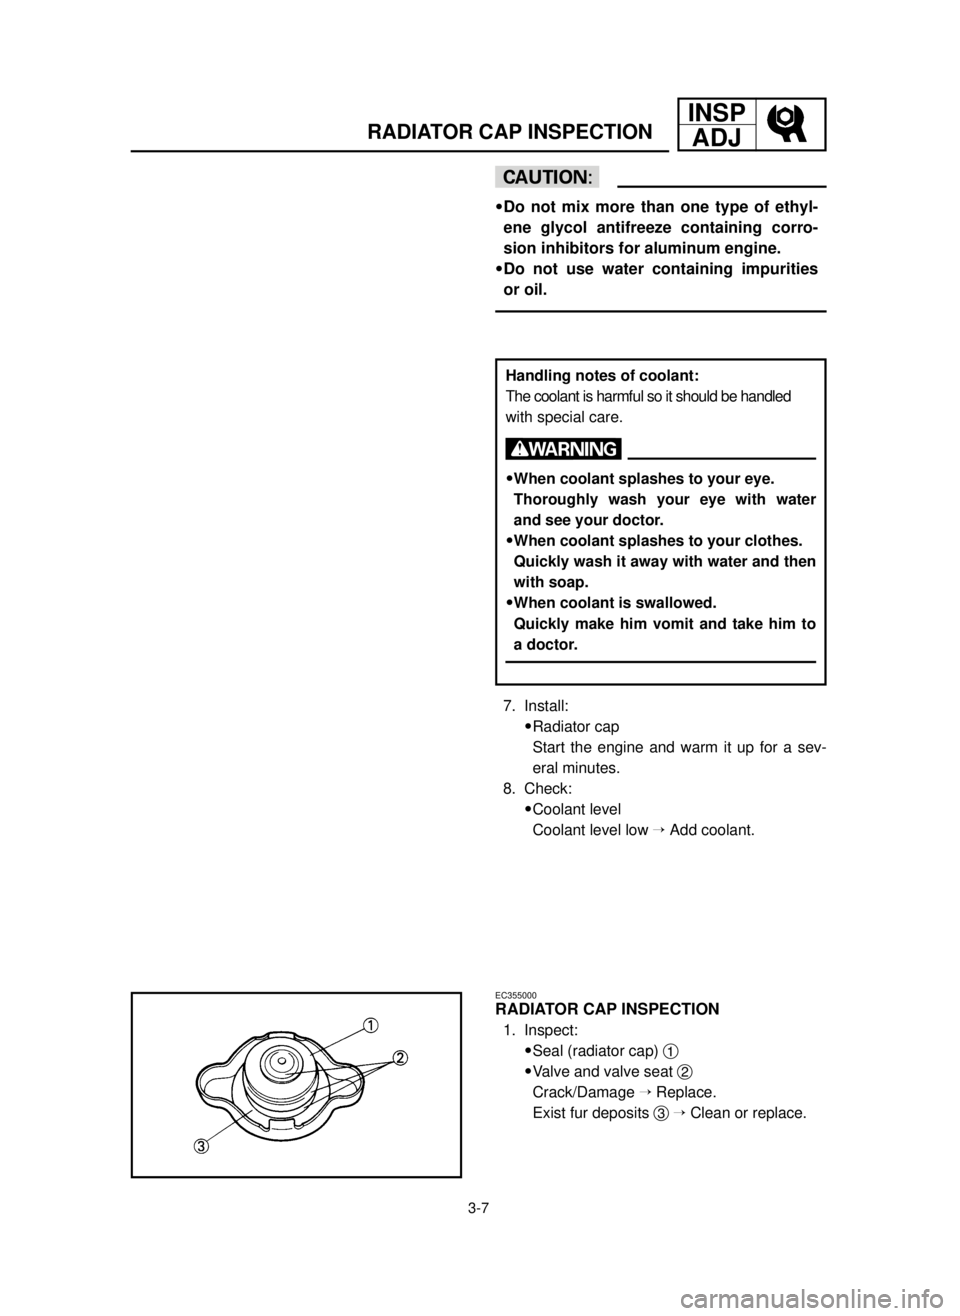
RADIATOR CAP INSPECTION
1. Inspect:
9Seal (radiator cap) 1
9Valve and valve seat 2
Crack/Damage ÕReplace.
Exist fur deposits 3ÕClean or replace.
Handling notes of coolant:
The coolant is harmful so it should be handled
with special care.
w
9When coolant splashes to your eye.
Thoroughly wash your eye with water
and see your doctor.
9When coolant splashes to your clothes.
Quickly wash it away with water and then
with soap.
9When coolant is swallowed.
Quickly make him vomit and take him to
a doctor.
5MV-9-30-3A 6/19/00 1:52 PM Page 22
Page 152 of 558
3-12
INSP
ADJ
TRANSMISSION OIL LEVEL CHECK
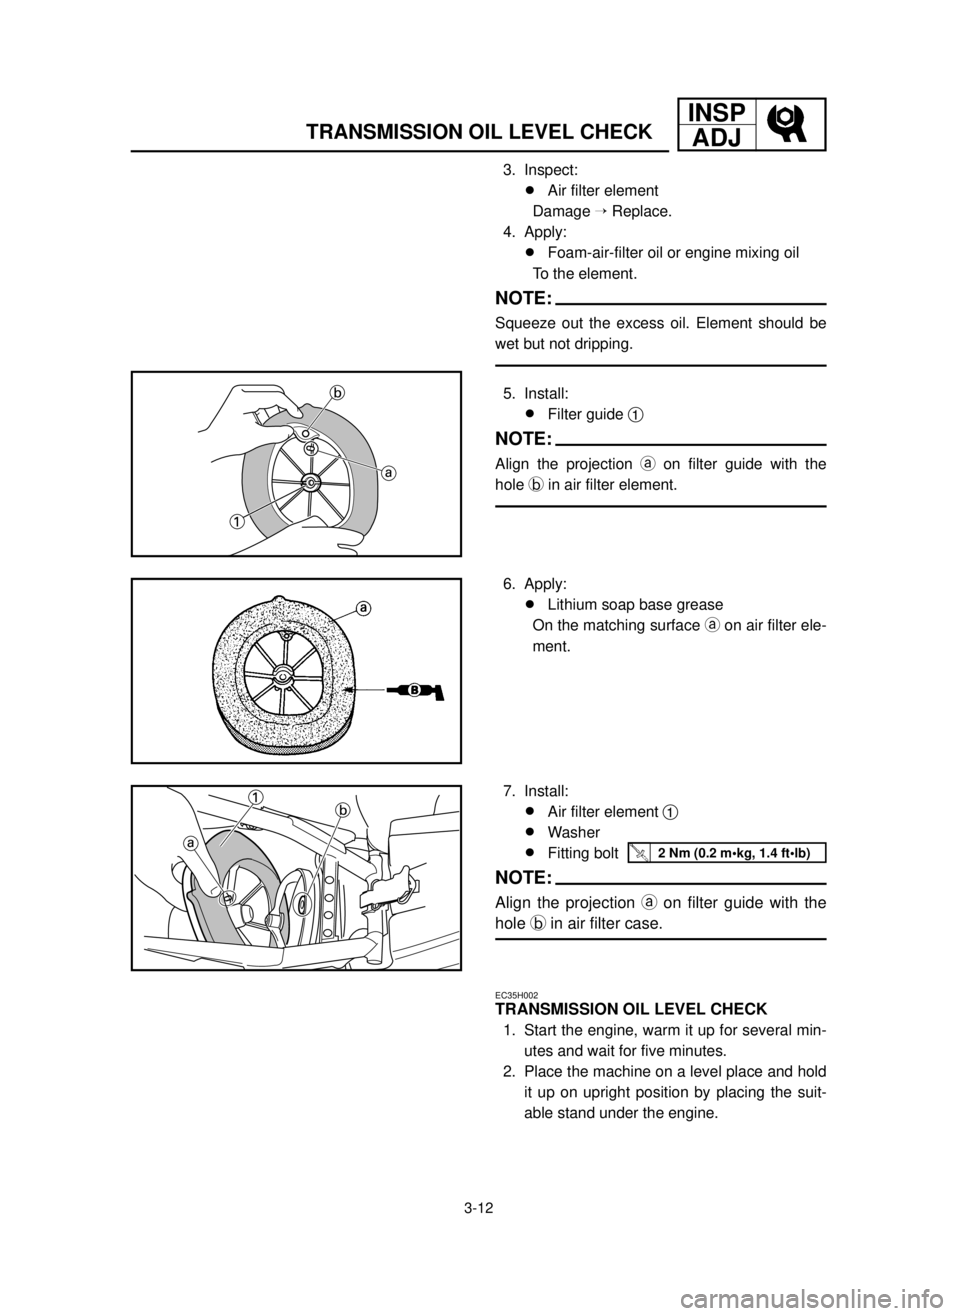
3. Inspect:
9Air filter element
Damage ÕReplace.
4. Apply:
9Foam-air-filter oil or engine mixing oil
To the element.
NOTE:
Squeeze out the excess oil. Element should be
wet but not dripping.
5. Install:
9Filter guide 1
NOTE:
Align the projection aon filter guide with the
hole bin air filter element.
6. Apply:
9Lithium soap base grease
On the matching surface aon air filter ele-
ment.
7. Install:
9Air filter element 1
9Washer
9Fitting bolt
NOTE:
Align the projection aon filter guide with the
hole bin air filter case.
EC35H002
TRANSMISSION OIL LEVEL CHECK
1. Start the engine, warm it up for several min-
utes and wait for five minutes.
2. Place the machine on a level place and hold
it up on upright position by placing the suit-
able stand under the engine.
2 Nm (0.2 m•kg, 1.4 ft•lb)
5MV-9-30-3A 6/19/00 1:52 PM Page 32
Page 154 of 558

3-13
INSP
ADJ
TRANSMISSION OIL REPLACEMENT
3. Check:
9Transmission oil level
EC35K002
TRANSMISSION OIL REPLACEMENT
1. Start the engine and warm it up for several
minutes and wait for five minute.
2. Place the machine on a level place and hold
it on upright position by placing the suitable
stand under the engine.
3. Place a suitable container under the engine.
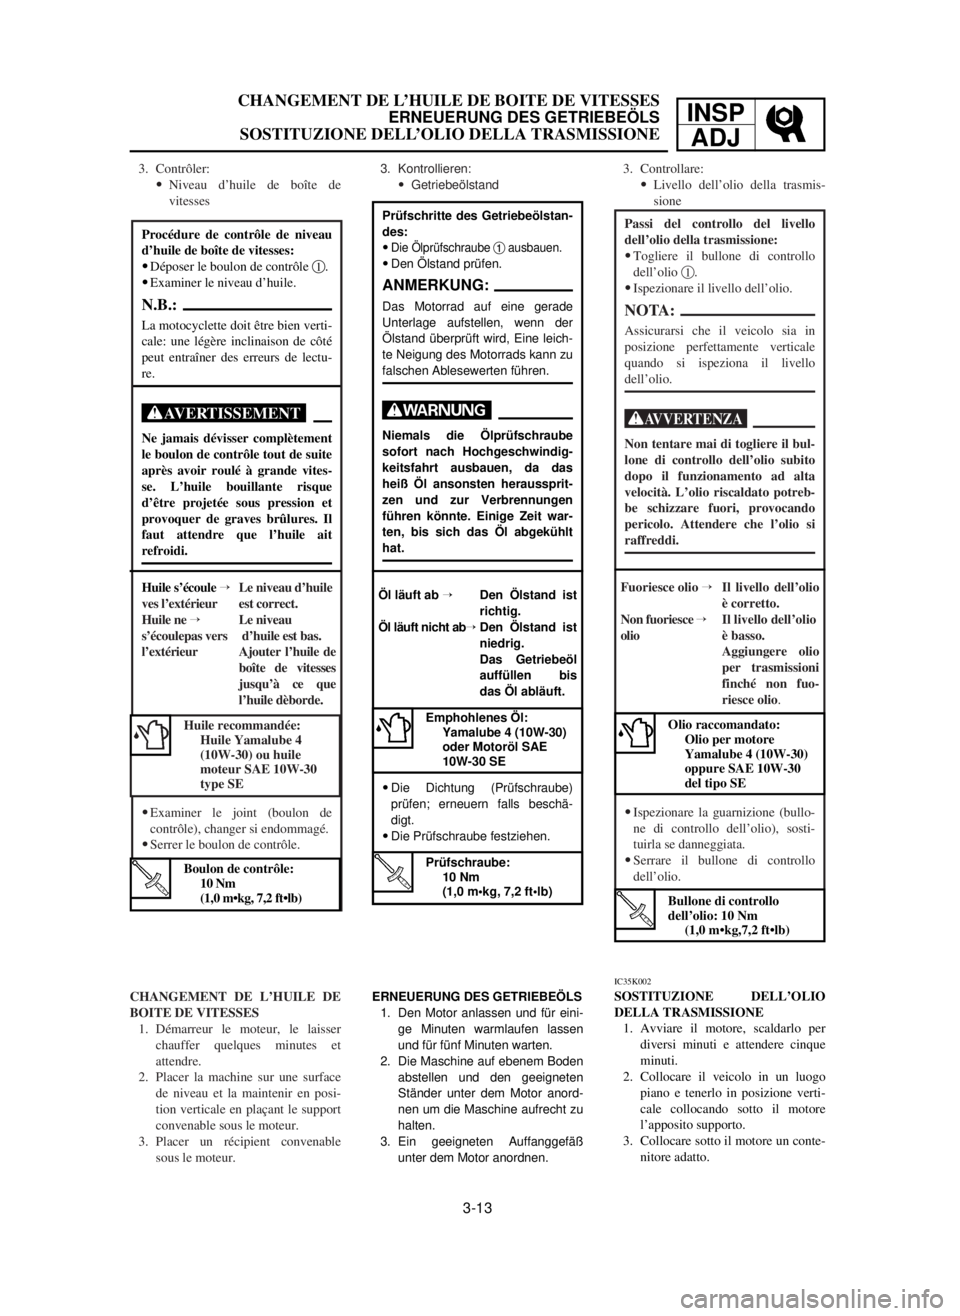
Transmission oil level checking steps:
9Remove the oil check bolt 1.
9Inspect the oil level.
NOTE:
Be sure the machine is positioned straight
up when inspecting the oil level.
w
Never attempt to remove the oil check bolt
just after high speed operation. The heat-
ed oil could spout out, causing danger.
Wait until the oil cools down.
Oil flows out ÕOil level is correct.
Oil does not flow out ÕOil level is low.
Add transmission
oil until oil flows
out.
9Inspect the gasket (oil check bolt),
replace if damaged.
9Tighten the oil check bolt.
Recommended oil:
Yamalube 4 (10W-30) or SAE
10W-30 type SE motor oil
Oil check bolt:
10 Nm (1.0 m•kg, 7.2 ft•lb)
5MV-9-30-3A 6/19/00 1:52 PM Page 34
Page 155 of 558
3-13
CHANGEMENT DE L’HUILE DE BOITE DE VITESSES
ERNEUERUNG DES GETRIEBEÖLS
SOSTITUZIONE DELL’OLIO DELLA TRASMISSIONE
INSP
ADJ
Prüfschritte des Getriebeölstan-
des:
9
Die Ölprüfschraube 1ausbauen.
9Den Ölstand prüfen.
ANMERKUNG:
Das Motorrad auf eine gerade
Unterlage aufstellen, wenn der
Ölstand überprüft wird, Eine leich-
te Neigung des Motorrads kann zu
falschen Ablesewerten führen.
W
Niemals die Ölprüfschraube
sofort nach Hochgeschwindig-
keitsfahrt ausbauen, da das
heiß Öl ansonsten heraussprit-
zen und zur Verbrennungen
führen könnte. Einige Zeit war-
ten, bis sich das Öl abgekühlt
hat.
Öl läuft ab ÕDen Ölstand ist
richtig.
Öl läuft nicht abÕDen Ölstand ist
niedrig.
Das Getriebeöl
auffüllen bis
das Öl abläuft.
9Die Dichtung (Prüfschraube)
prüfen; erneuern falls beschä-
digt.
9Die Prüfschraube festziehen.
Emphohlenes Öl:
Yamalube 4 (10W-30)
oder Motoröl SAE
10W-30 SE
Procédure de contrôle de niveau
d’huile de boîte de vitesses:
9Déposer le boulon de contrôle 1.
9Examiner le niveau d’huile.
N.B.:
La motocyclette doit être bien verti-
cale: une légère inclinaison de côté
peut entraîner des erreurs de lectu-
re.
XG
Ne jamais dévisser complètement
le boulon de contrôle tout de suite
après avoir roulé à grande vites-
se. L’huile bouillante risque
d’être projetée sous pression et
provoquer de graves brûlures. Il
faut attendre que l’huile ait
refroidi.
Huile s’écoule ÕLe niveau d’huile
ves l’extérieur est correct.
Huile ne ÕLe niveau
s’écoulepas vers d’huile est bas.
l’extérieur Ajouter l’huile de
boîte de vitesses
jusqu’à ce que
l’huile dèborde.
9Examiner le joint (boulon de
contrôle), changer si endommagé.
9Serrer le boulon de contrôle.
3. Kontrollieren:
9Getriebeölstand3. Contrôler:
9Niveau d’huile de boîte de
vitesses
CHANGEMENT DE L’HUILE DE
BOITE DE VITESSES
1. Démarreur le moteur, le laisser
chauffer quelques minutes et
attendre.
2. Placer la machine sur une surface
de niveau et la maintenir en posi-
tion verticale en plaçant le support
convenable sous le moteur.
3. Placer un récipient convenable
sous le moteur.3. Controllare:
9Livello dell’olio della trasmis-
sione
Passi del controllo del livello
dell’olio della trasmissione:
9Togliere il bullone di controllo
dell’olio 1.
9Ispezionare il livello dell’olio.
NOTA:
Assicurarsi che il veicolo sia in
posizione perfettamente verticale
quando si ispeziona il livello
dell’olio.
T
Non tentare mai di togliere il bul-
lone di controllo dell’olio subito
dopo il funzionamento ad alta
velocità. L’olio riscaldato potreb-
be schizzare fuori, provocando
pericolo. Attendere che l’olio si
raffreddi.
Fuoriesce olio ÕIl livello dell’olio
è corretto.
Non fuoriesce ÕIl livello dell’olio
olio è basso.
Aggiungere olio
per trasmissioni
finché non fuo-
riesce olio.
9Ispezionare la guarnizione (bullo-
ne di controllo dell’olio), sosti-
tuirla se danneggiata.
9Serrare il bullone di controllo
dell’olio.
Huile recommandée:
Huile Yamalube 4
(10W-30) ou huile
moteur SAE 10W-30
type SE
Boulon de contrôle:
10 Nm
(1,0 m•kg, 7,2 ft•lb)
Olio raccomandato:
Olio per motore
Yamalube 4 (10W-30)
oppure SAE 10W-30
del tipo SE
Bullone di controllo
dell’olio: 10 Nm
(1,0 m•kg,7,2 ft•lb)
Prüfschraube:
10 Nm
(1,0 m•kg, 7,2 ft•lb)
ERNEUERUNG DES GETRIEBEÖLS
1. Den Motor anlassen und für eini-
ge Minuten warmlaufen lassen
und für fünf Minuten warten.
2. Die Maschine auf ebenem Boden
abstellen und den geeigneten
Ständer unter dem Motor anord-
nen um die Maschine aufrecht zu
halten.
3. Ein geeigneten Auffanggefäß
unter dem Motor anordnen.
IC35K002
SOSTITUZIONE DELL’OLIO
DELLA TRASMISSIONE
1. Avviare il motore, scaldarlo per
diversi minuti e attendere cinque
minuti.
2. Collocare il veicolo in un luogo
piano e tenerlo in posizione verti-
cale collocando sotto il motore
l’apposito supporto.
3. Collocare sotto il motore un conte-
nitore adatto.
5MV-9-30-3A 6/19/00 1:52 PM Page 35
Page 156 of 558

3-14
INSP
ADJ
PILOT AIR SCREW ADJUSTMENT
4. Remove:
9Oil drain bolt 1
9Oil filler cap 2
Drain the transmission oil.
5. Install:
9Aluminum washer
9Oil drain bolt 1
6. Fill:
9Transmission oil
7. Check:
9Oil leakage
8. Check:
9Transmission oil level
9. Install:
9Oil filler cap 2
EC35L002
PILOT AIR SCREW ADJUSTMENT
1. Adjust:
9Pilot air screw 1
Recommended oil:
Yamalube 4 (10W-30) or SAE
10W-30 type SE motor oil
Oil capacity
(periodic oil change):
0.65 L (0.57 Imp qt, 0.69 US qt)
Adjustment steps:
9Screw in the pilot air screw until it is
lightly seated.
9Back out by the specified number of
turns.
Pilot air screw:
1-1/4 turns out
*1-1/2 turns out
20 Nm (2.0 m•kg, 14 ft•lb)
*For EUROPE
5MV-9-30-3A 6/19/00 1:52 PM Page 36
Page 176 of 558

3-24
SPROCKETS INSPECTION/DRIVE CHAIN INSPECTION
INSP
ADJ
EC368000
SPROCKETS INSPECTION
1. Inspect:
9Sprocket teeth a
Excessive wear ÕReplace.
NOTE:
Replace the drive, driven sprockets and drive
chain as a set.
EC369002
DRIVE CHAIN INSPECTION
1. Remove:
9Master link clip
9Joint 1
9Drive chain 2
2. Clean:
9Drive chain
Place it in kerosene, and brush off as much
dirt as possible. Then remove the chain
from the kerosene and dry the chain.
3. Measure:
9Drive chain length (10 links) a
Out of specificationÕReplace.
4. Check:
9Drive chain stiffness a
Clean and oil the chain and hold as
illustrated.
StiffÕReplace drive chain.
Drive chain length (10 links):
Limit: 152.5 mm (6.004 in)
5MV-9-30-3B 6/19/00 1:49 PM Page 12