lock YAMAHA YZ125LC 2011 User Guide
[x] Cancel search | Manufacturer: YAMAHA, Model Year: 2011, Model line: YZ125LC, Model: YAMAHA YZ125LC 2011Pages: 166, PDF Size: 8.49 MB
Page 54 of 166
3-13
CHASSIS
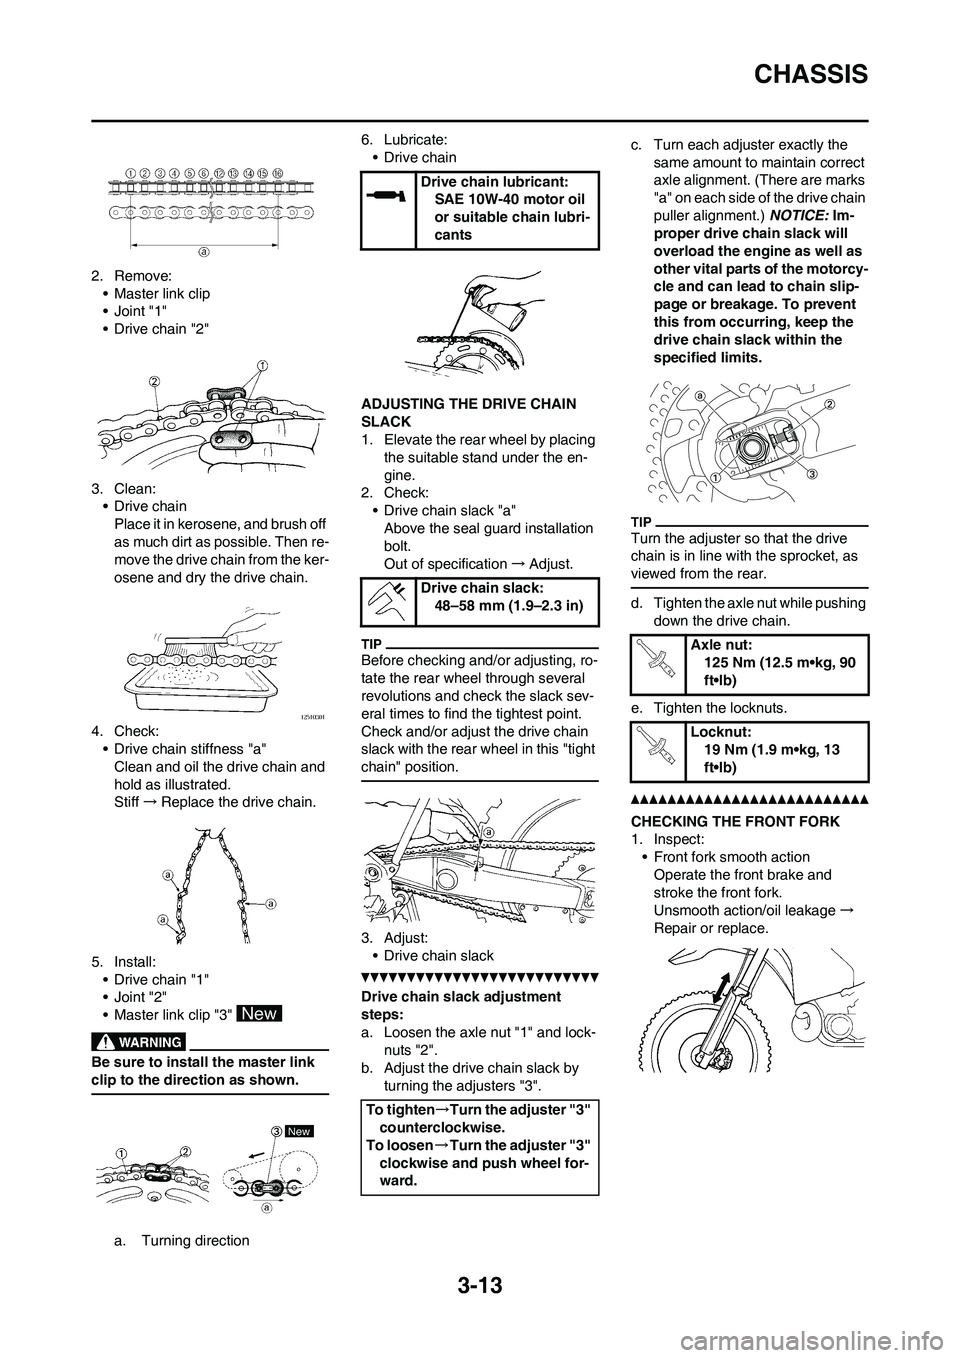
2. Remove:
• Master link clip
•Joint "1"
• Drive chain "2"
3. Clean:
• Drive chain
Place it in kerosene, and brush off
as much dirt as possible. Then re-
move the drive chain from the ker-
osene and dry the drive chain.
4. Check:
• Drive chain stiffness "a"
Clean and oil the drive chain and
hold as illustrated.
Stiff→Replace the drive chain.
5. Install:
• Drive chain "1"
•Joint "2"
• Master link clip "3"
Be sure to install the master link
clip to the direction as shown.
a. Turning direction6. Lubricate:
• Drive chain
ADJUSTING THE DRIVE CHAIN
SLACK
1. Elevate the rear wheel by placing
the suitable stand under the en-
gine.
2. Check:
• Drive chain slack "a"
Above the seal guard installation
bolt.
Out of specification→Adjust.
Before checking and/or adjusting, ro-
tate the rear wheel through several
revolutions and check the slack sev-
eral times to find the tightest point.
Check and/or adjust the drive chain
slack with the rear wheel in this "tight
chain" position.
3. Adjust:
• Drive chain slack
Drive chain slack adjustment
steps:
a. Loosen the axle nut "1" and lock-
nuts "2".
b. Adjust the drive chain slack by
turning the adjusters "3".c. Turn each adjuster exactly the
same amount to maintain correct
axle alignment. (There are marks
"a" on each side of the drive chain
puller alignment.) NOTICE: Im-
proper drive chain slack will
overload the engine as well as
other vital parts of the motorcy-
cle and can lead to chain slip-
page or breakage. To prevent
this from occurring, keep the
drive chain slack within the
specified limits.
Turn the adjuster so that the drive
chain is in line with the sprocket, as
viewed from the rear.
d. Tighten the axle nut while pushing
down the drive chain.
e. Tighten the locknuts.
CHECKING THE FRONT FORK
1. Inspect:
• Front fork smooth action
Operate the front brake and
stroke the front fork.
Unsmooth action/oil leakage→
Repair or replace.
Drive chain lubricant:
SAE 10W-40 motor oil
or suitable chain lubri-
cants
Drive chain slack:
48–58 mm (1.9–2.3 in)
To tighten→Turn the adjuster "3"
counterclockwise.
To loosen→Turn the adjuster "3"
clockwise and push wheel for-
ward.
Axle nut:
125 Nm (12.5 m•kg, 90
ft•lb)
Locknut:
19 Nm (1.9 m•kg, 13
ft•lb)
Page 56 of 166
3-15
CHASSIS
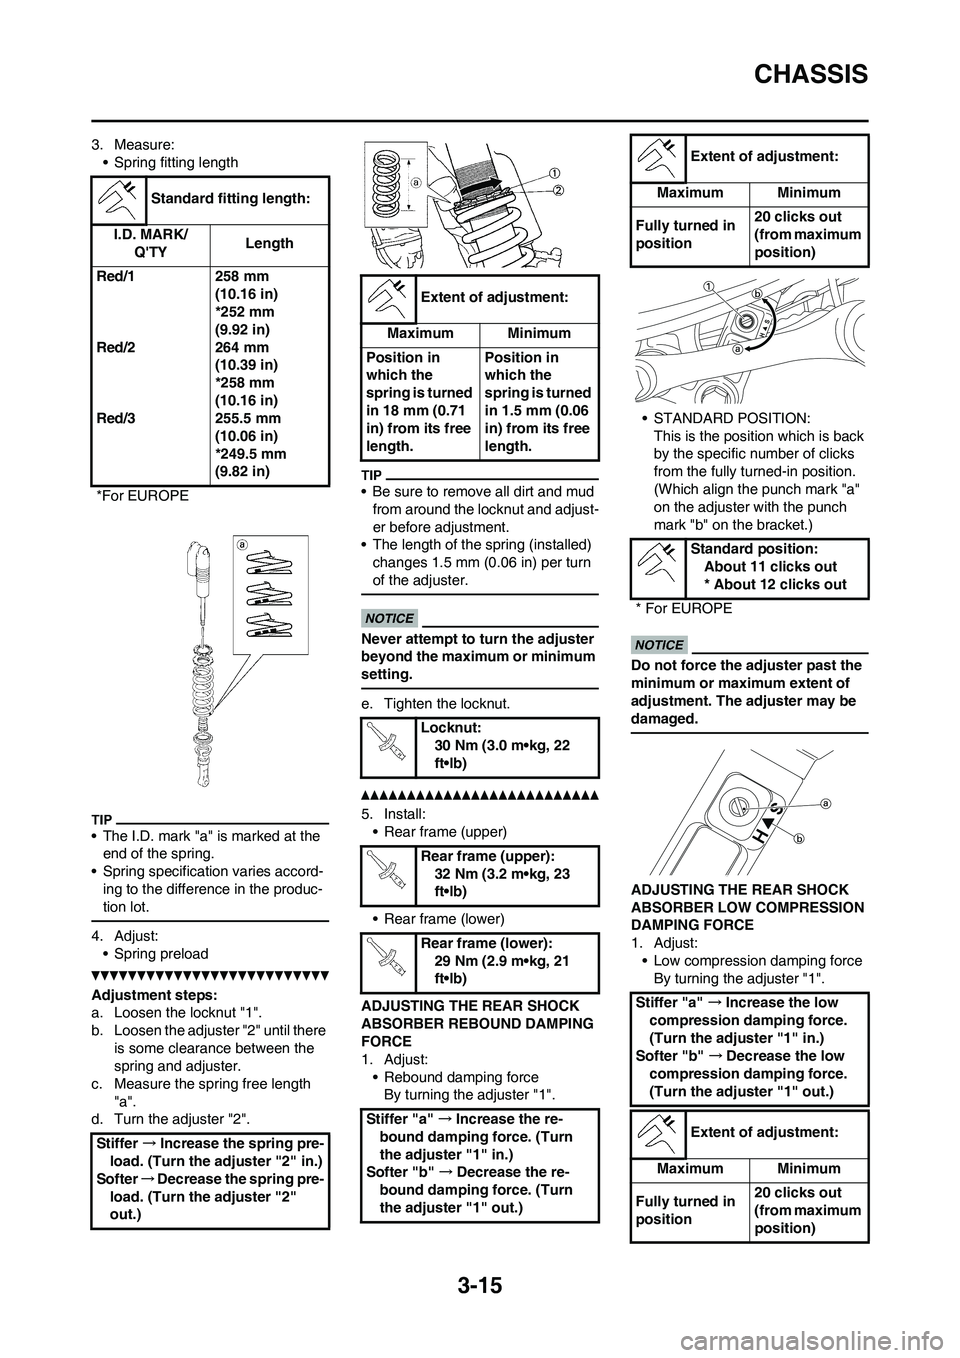
3. Measure:
• Spring fitting length
• The I.D. mark "a" is marked at the
end of the spring.
• Spring specification varies accord-
ing to the difference in the produc-
tion lot.
4. Adjust:
• Spring preload
Adjustment steps:
a. Loosen the locknut "1".
b. Loosen the adjuster "2" until there
is some clearance between the
spring and adjuster.
c. Measure the spring free length
"a".
d. Turn the adjuster "2".
• Be sure to remove all dirt and mud
from around the locknut and adjust-
er before adjustment.
• The length of the spring (installed)
changes 1.5 mm (0.06 in) per turn
of the adjuster.
Never attempt to turn the adjuster
beyond the maximum or minimum
setting.
e. Tighten the locknut.
5. Install:
• Rear frame (upper)
• Rear frame (lower)
ADJUSTING THE REAR SHOCK
ABSORBER REBOUND DAMPING
FORCE
1. Adjust:
• Rebound damping force
By turning the adjuster "1".• STANDARD POSITION:
This is the position which is back
by the specific number of clicks
from the fully turned-in position.
(Which align the punch mark "a"
on the adjuster with the punch
mark "b" on the bracket.)
Do not force the adjuster past the
minimum or maximum extent of
adjustment. The adjuster may be
damaged.
ADJUSTING THE REAR SHOCK
ABSORBER LOW COMPRESSION
DAMPING FORCE
1. Adjust:
• Low compression damping force
By turning the adjuster "1". Standard fitting length:
I.D. MARK/
Q'TYLength
Red/1
Red/2
Red/3258 mm
(10.16 in)
*252 mm
(9.92 in)
264 mm
(10.39 in)
*258 mm
(10.16 in)
255.5 mm
(10.06 in)
*249.5 mm
(9.82 in)
*For EUROPE
Stiffer →Increase the spring pre-
load. (Turn the adjuster "2" in.)
Softer→Decrease the spring pre-
load. (Turn the adjuster "2"
out.)
Extent of adjustment:
Maximum Minimum
Position in
which the
spring is turned
in 18 mm (0.71
in) from its free
length.Position in
which the
spring is turned
in 1.5 mm (0.06
in) from its free
length.
Locknut:
30 Nm (3.0 m•kg, 22
ft•lb)
Rear frame (upper):
32 Nm (3.2 m•kg, 23
ft•lb)
Rear frame (lower):
29 Nm (2.9 m•kg, 21
ft•lb)
Stiffer "a" →Increase the re-
bound damping force. (Turn
the adjuster "1" in.)
Softer "b" →Decrease the re-
bound damping force. (Turn
the adjuster "1" out.)
Extent of adjustment:
Maximum Minimum
Fully turned in
position20 clicks out
(from maximum
position)
Standard position:
About 11 clicks out
* About 12 clicks out
* For EUROPE
Stiffer "a" →Increase the low
compression damping force.
(Turn the adjuster "1" in.)
Softer "b" →Decrease the low
compression damping force.
(Turn the adjuster "1" out.)
Extent of adjustment:
Maximum Minimum
Fully turned in
position20 clicks out
(from maximum
position)
Page 58 of 166
3-17
CHASSIS
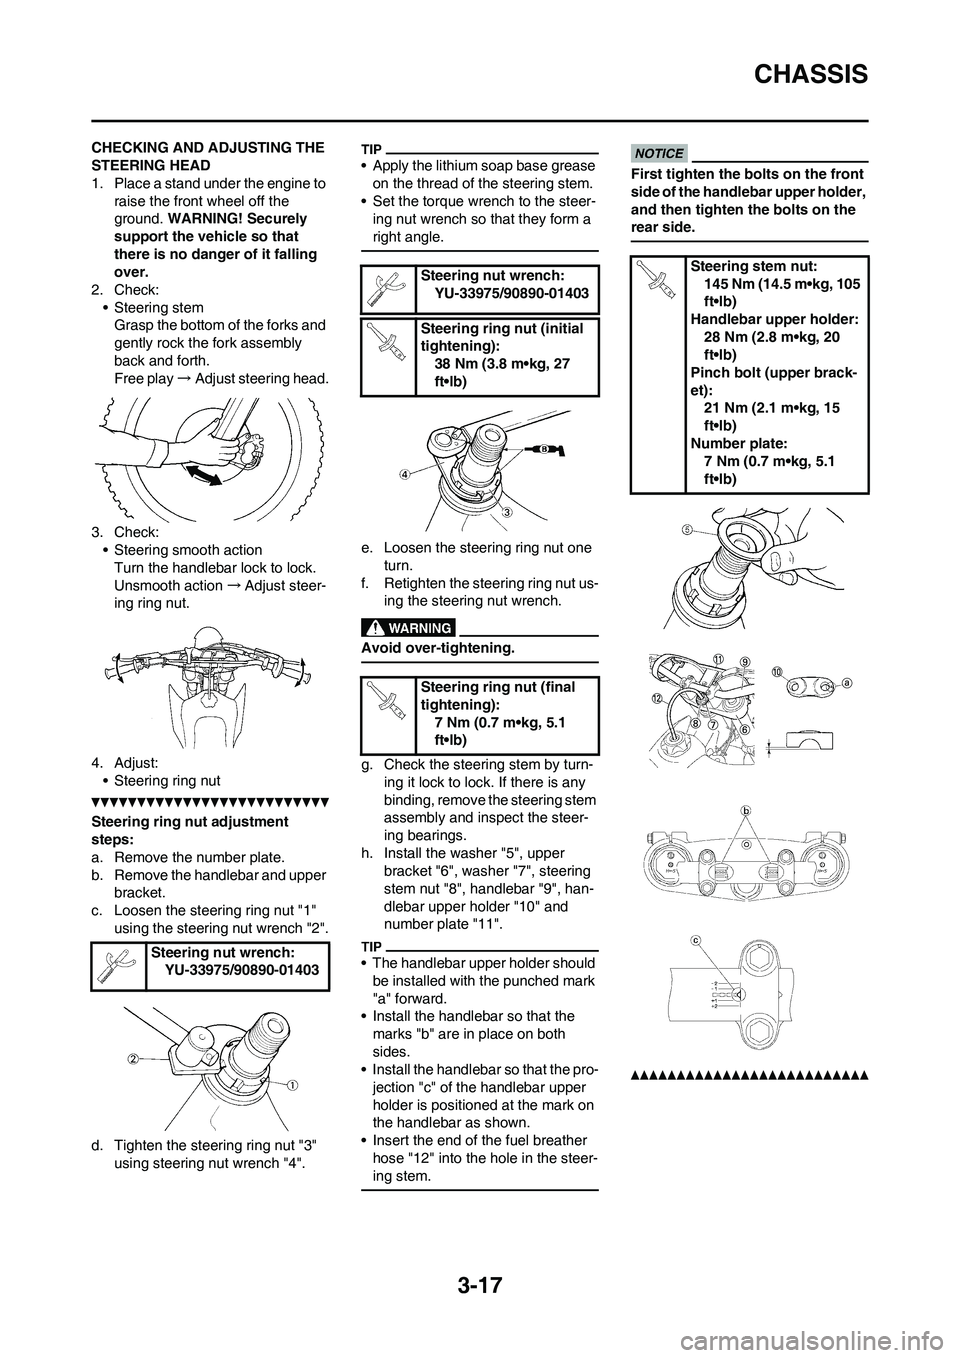
CHECKING AND ADJUSTING THE
STEERING HEAD
1. Place a stand under the engine to
raise the front wheel off the
ground. WARNING! Securely
support the vehicle so that
there is no danger of it falling
over.
2. Check:
• Steering stem
Grasp the bottom of the forks and
gently rock the fork assembly
back and forth.
Free play→Adjust steering head.
3. Check:
• Steering smooth action
Turn the handlebar lock to lock.
Unsmooth action→Adjust steer-
ing ring nut.
4. Adjust:
• Steering ring nut
Steering ring nut adjustment
steps:
a. Remove the number plate.
b. Remove the handlebar and upper
bracket.
c. Loosen the steering ring nut "1"
using the steering nut wrench "2".
d. Tighten the steering ring nut "3"
using steering nut wrench "4".
• Apply the lithium soap base grease
on the thread of the steering stem.
• Set the torque wrench to the steer-
ing nut wrench so that they form a
right angle.
e. Loosen the steering ring nut one
turn.
f. Retighten the steering ring nut us-
ing the steering nut wrench.
Avoid over-tightening.
g. Check the steering stem by turn-
ing it lock to lock. If there is any
binding, remove the steering stem
assembly and inspect the steer-
ing bearings.
h. Install the washer "5", upper
bracket "6", washer "7", steering
stem nut "8", handlebar "9", han-
dlebar upper holder "10" and
number plate "11".
• The handlebar upper holder should
be installed with the punched mark
"a" forward.
• Install the handlebar so that the
marks "b" are in place on both
sides.
• Install the handlebar so that the pro-
jection "c" of the handlebar upper
holder is positioned at the mark on
the handlebar as shown.
• Insert the end of the fuel breather
hose "12" into the hole in the steer-
ing stem.
First tighten the bolts on the front
side of the handlebar upper holder,
and then tighten the bolts on the
rear side.
Steering nut wrench:
YU-33975/90890-01403
Steering nut wrench:
YU-33975/90890-01403
Steering ring nut (initial
tightening):
38 Nm (3.8 m•kg, 27
ft•lb)
Steering ring nut (final
tightening):
7 Nm (0.7 m•kg, 5.1
ft•lb)Steering stem nut:
145 Nm (14.5 m•kg, 105
ft•lb)
Handlebar upper holder:
28 Nm (2.8 m•kg, 20
ft•lb)
Pinch bolt (upper brack-
et):
21 Nm (2.1 m•kg, 15
ft•lb)
Number plate:
7 Nm (0.7 m•kg, 5.1
ft•lb)
Page 60 of 166
3-19
ELECTRICAL
ELECTRICAL
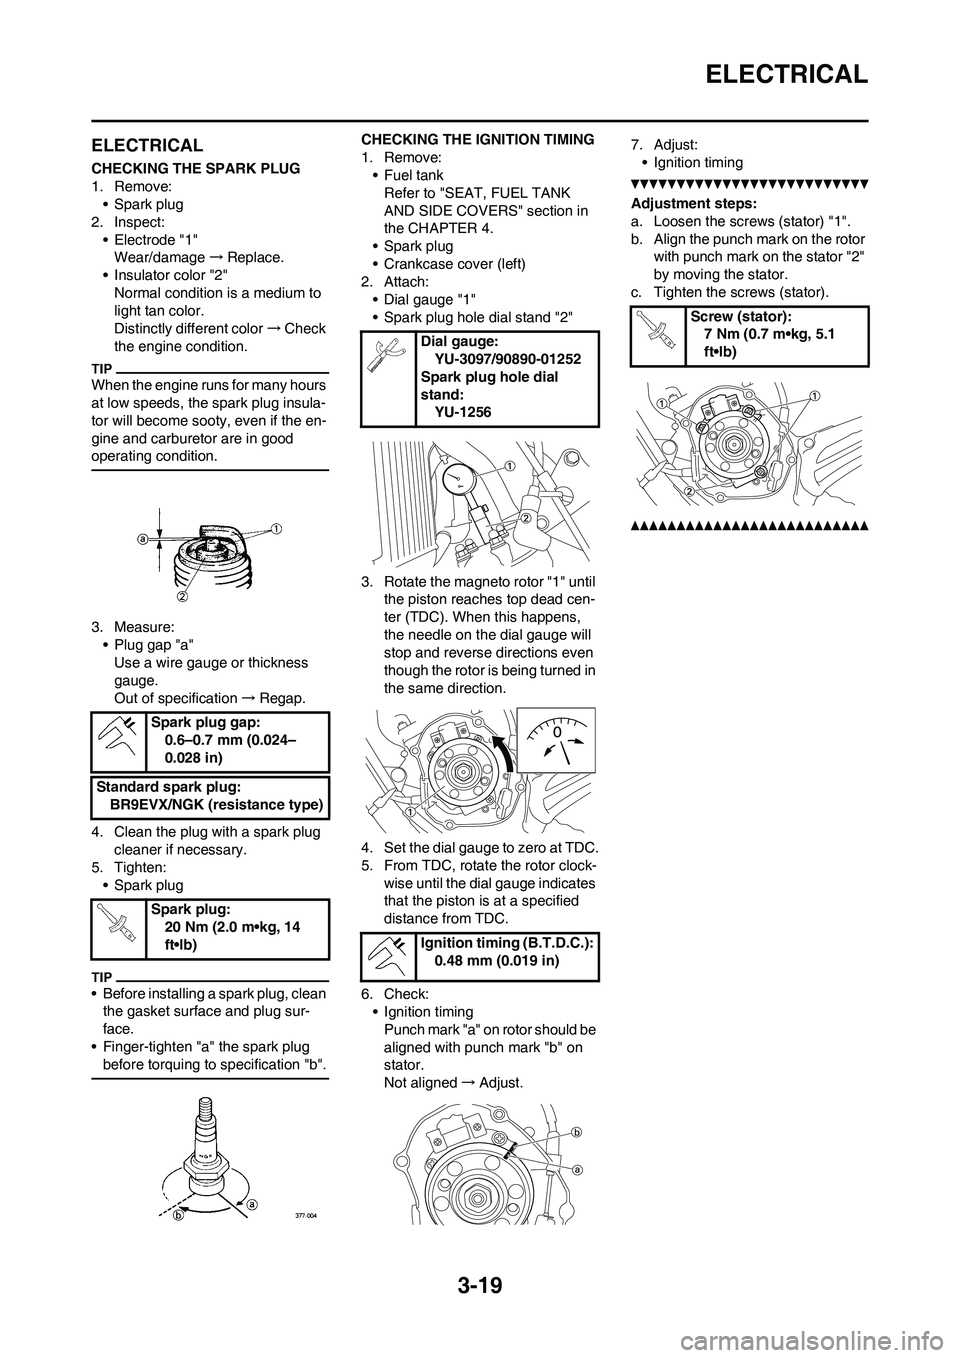
CHECKING THE SPARK PLUG
1. Remove:
• Spark plug
2. Inspect:
• Electrode "1"
Wear/damage→Replace.
• Insulator color "2"
Normal condition is a medium to
light tan color.
Distinctly different color→Check
the engine condition.
When the engine runs for many hours
at low speeds, the spark plug insula-
tor will become sooty, even if the en-
gine and carburetor are in good
operating condition.
3. Measure:
• Plug gap "a"
Use a wire gauge or thickness
gauge.
Out of specification→Regap.
4. Clean the plug with a spark plug
cleaner if necessary.
5. Tighten:
• Spark plug
• Before installing a spark plug, clean
the gasket surface and plug sur-
face.
• Finger-tighten "a" the spark plug
before torquing to specification "b".
CHECKING THE IGNITION TIMING
1. Remove:
•Fuel tank
Refer to "SEAT, FUEL TANK
AND SIDE COVERS" section in
the CHAPTER 4.
• Spark plug
• Crankcase cover (left)
2. Attach:
• Dial gauge "1"
• Spark plug hole dial stand "2"
3. Rotate the magneto rotor "1" until
the piston reaches top dead cen-
ter (TDC). When this happens,
the needle on the dial gauge will
stop and reverse directions even
though the rotor is being turned in
the same direction.
4. Set the dial gauge to zero at TDC.
5. From TDC, rotate the rotor clock-
wise until the dial gauge indicates
that the piston is at a specified
distance from TDC.
6. Check:
• Ignition timing
Punch mark "a" on rotor should be
aligned with punch mark "b" on
stator.
Not aligned→Adjust.7. Adjust:
• Ignition timing
Adjustment steps:
a. Loosen the screws (stator) "1".
b. Align the punch mark on the rotor
with punch mark on the stator "2"
by moving the stator.
c. Tighten the screws (stator).
Spark plug gap:
0.6–0.7 mm (0.024–
0.028 in)
Standard spark plug:
BR9EVX/NGK (resistance type)
Spark plug:
20 Nm (2.0 m•kg, 14
ft•lb)
Dial gauge:
YU-3097/90890-01252
Spark plug hole dial
stand:
YU-1256
Ignition timing (B.T.D.C.):
0.48 mm (0.019 in)
Screw (stator):
7 Nm (0.7 m•kg, 5.1
ft•lb)
Page 66 of 166
4-6
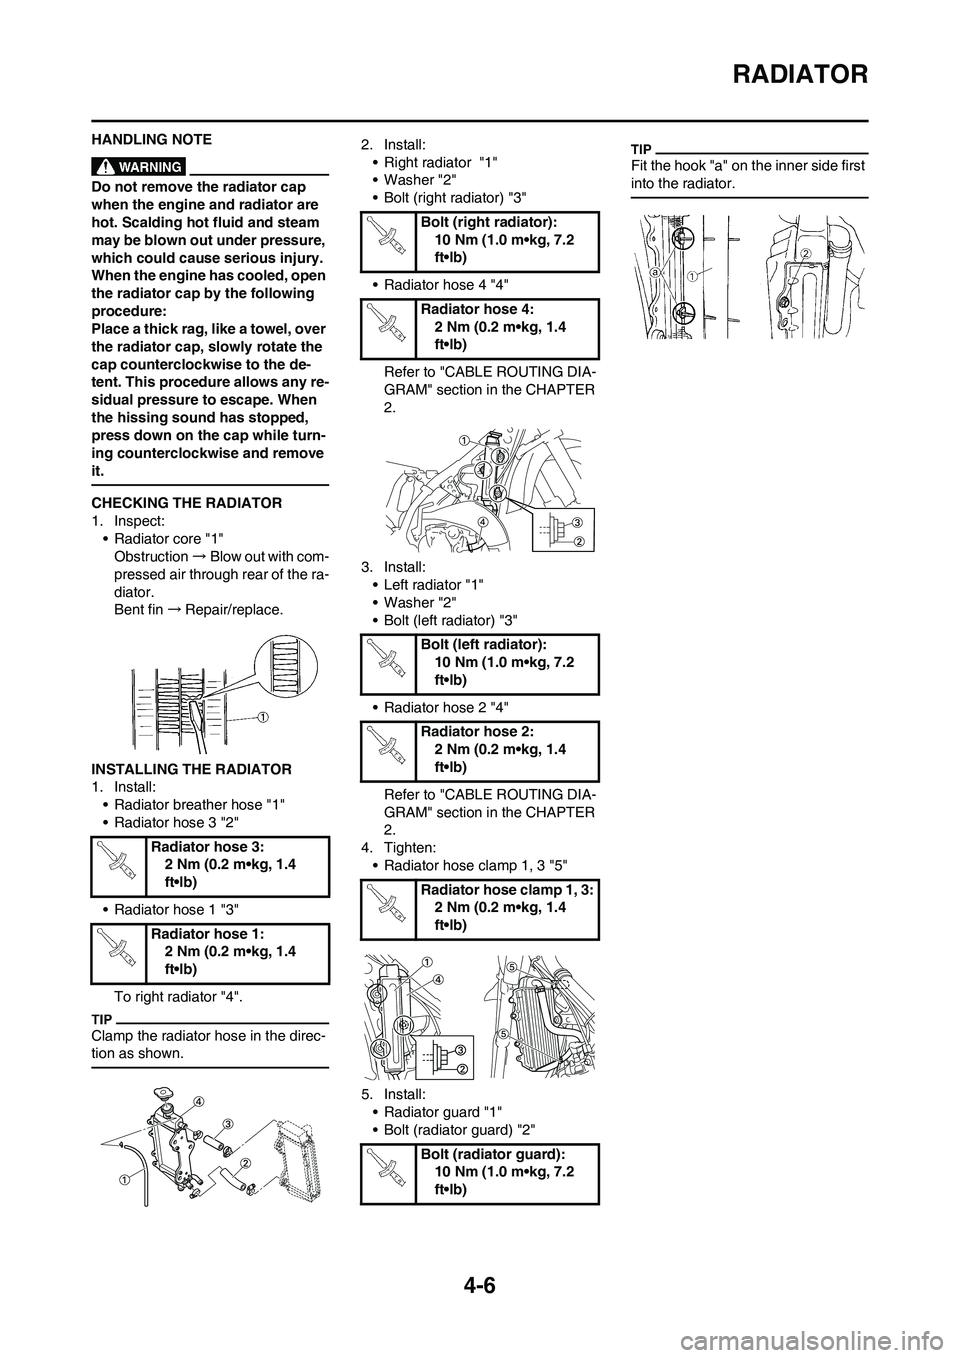
RADIATOR
HANDLING NOTE
Do not remove the radiator cap
when the engine and radiator are
hot. Scalding hot fluid and steam
may be blown out under pressure,
which could cause serious injury.
When the engine has cooled, open
the radiator cap by the following
procedure:
Place a thick rag, like a towel, over
the radiator cap, slowly rotate the
cap counterclockwise to the de-
tent. This procedure allows any re-
sidual pressure to escape. When
the hissing sound has stopped,
press down on the cap while turn-
ing counterclockwise and remove
it.
CHECKING THE RADIATOR
1. Inspect:
• Radiator core "1"
Obstruction→Blow out with com-
pressed air through rear of the ra-
diator.
Bent fin→Repair/replace.
INSTALLING THE RADIATOR
1. Install:
• Radiator breather hose "1"
• Radiator hose 3 "2"
• Radiator hose 1 "3"
To right radiator "4".
Clamp the radiator hose in the direc-
tion as shown.
2. Install:
• Right radiator "1"
• Washer "2"
• Bolt (right radiator) "3"
• Radiator hose 4 "4"
Refer to "CABLE ROUTING DIA-
GRAM" section in the CHAPTER
2.
3. Install:
• Left radiator "1"
• Washer "2"
• Bolt (left radiator) "3"
• Radiator hose 2 "4"
Refer to "CABLE ROUTING DIA-
GRAM" section in the CHAPTER
2.
4. Tighten:
• Radiator hose clamp 1, 3 "5"
5. Install:
• Radiator guard "1"
• Bolt (radiator guard) "2"
Fit the hook "a" on the inner side first
into the radiator.
Radiator hose 3:
2 Nm (0.2 m•kg, 1.4
ft•lb)
Radiator hose 1:
2 Nm (0.2 m•kg, 1.4
ft•lb)
Bolt (right radiator):
10 Nm (1.0 m•kg, 7.2
ft•lb)
Radiator hose 4:
2 Nm (0.2 m•kg, 1.4
ft•lb)
Bolt (left radiator):
10 Nm (1.0 m•kg, 7.2
ft•lb)
Radiator hose 2:
2 Nm (0.2 m•kg, 1.4
ft•lb)
Radiator hose clamp 1, 3:
2 Nm (0.2 m•kg, 1.4
ft•lb)
Bolt (radiator guard):
10 Nm (1.0 m•kg, 7.2
ft•lb)
Page 69 of 166
4-9
CARBURETOR AND REED VALVE
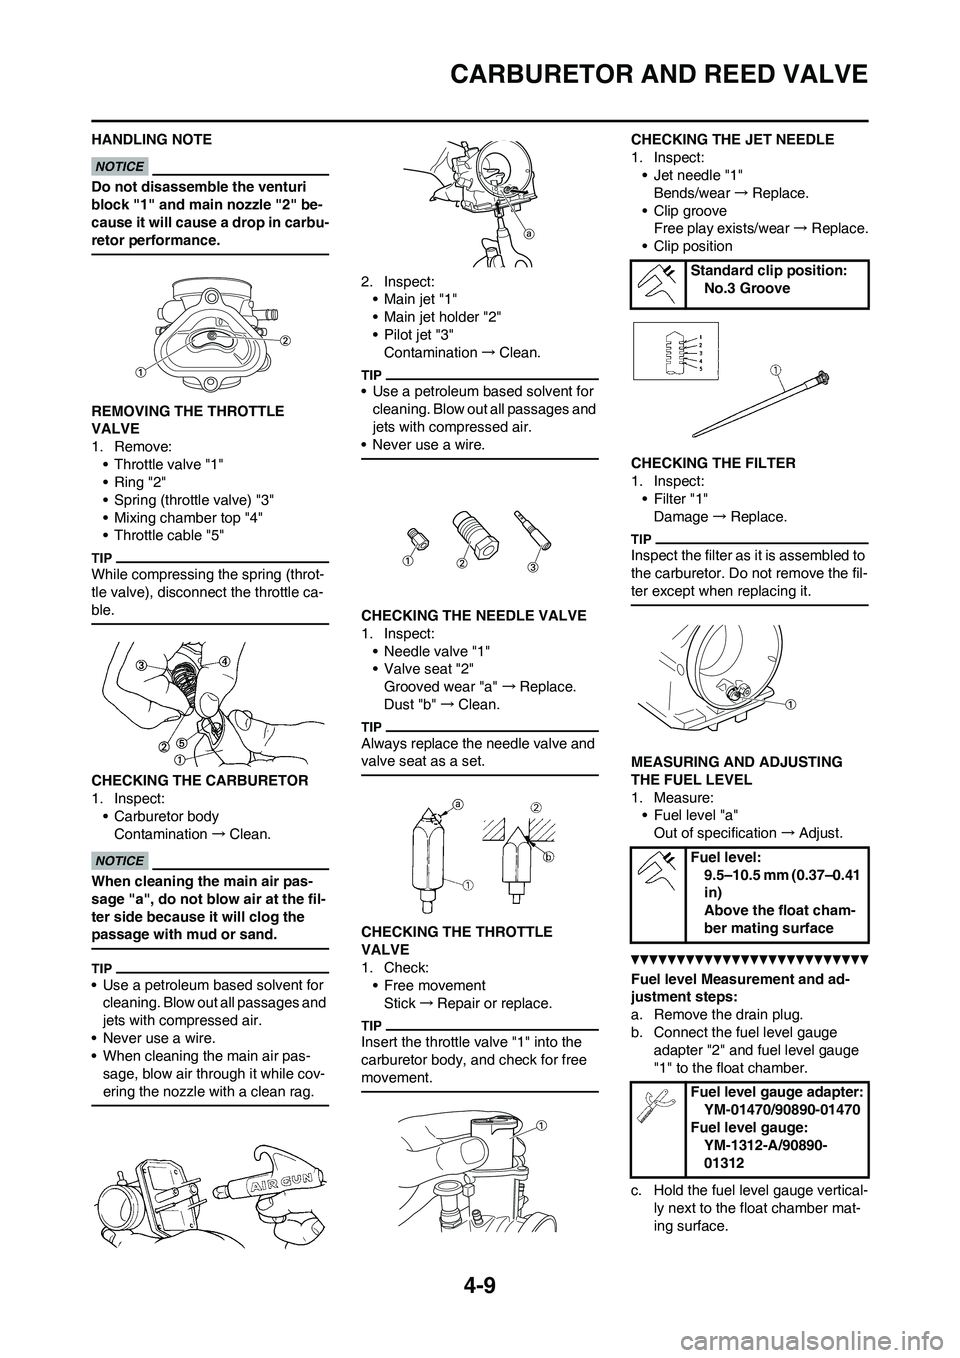
HANDLING NOTE
Do not disassemble the venturi
block "1" and main nozzle "2" be-
cause it will cause a drop in carbu-
retor performance.
REMOVING THE THROTTLE
VALVE
1. Remove:
• Throttle valve "1"
• Ring "2"
• Spring (throttle valve) "3"
• Mixing chamber top "4"
• Throttle cable "5"
While compressing the spring (throt-
tle valve), disconnect the throttle ca-
ble.
CHECKING THE CARBURETOR
1. Inspect:
• Carburetor body
Contamination→Clean.
When cleaning the main air pas-
sage "a", do not blow air at the fil-
ter side because it will clog the
passage with mud or sand.
• Use a petroleum based solvent for
cleaning. Blow out all passages and
jets with compressed air.
• Never use a wire.
• When cleaning the main air pas-
sage, blow air through it while cov-
ering the nozzle with a clean rag.
2. Inspect:
•Main jet "1"
• Main jet holder "2"
• Pilot jet "3"
Contamination→Clean.
• Use a petroleum based solvent for
cleaning. Blow out all passages and
jets with compressed air.
• Never use a wire.
CHECKING THE NEEDLE VALVE
1. Inspect:
• Needle valve "1"
• Valve seat "2"
Grooved wear "a" →Replace.
Dust "b" →Clean.
Always replace the needle valve and
valve seat as a set.
CHECKING THE THROTTLE
VALVE
1. Check:
• Free movement
Stick→Repair or replace.
Insert the throttle valve "1" into the
carburetor body, and check for free
movement.
CHECKING THE JET NEEDLE
1. Inspect:
• Jet needle "1"
Bends/wear→Replace.
• Clip groove
Free play exists/wear→Replace.
• Clip position
CHECKING THE FILTER
1. Inspect:
•Filter "1"
Damage→Replace.
Inspect the filter as it is assembled to
the carburetor. Do not remove the fil-
ter except when replacing it.
MEASURING AND ADJUSTING
THE FUEL LEVEL
1. Measure:
• Fuel level "a"
Out of specification→Adjust.
Fuel level Measurement and ad-
justment steps:
a. Remove the drain plug.
b. Connect the fuel level gauge
adapter "2" and fuel level gauge
"1" to the float chamber.
c. Hold the fuel level gauge vertical-
ly next to the float chamber mat-
ing surface.
Standard clip position:
No.3 Groove
Fuel level:
9.5–10.5 mm (0.37–0.41
in)
Above the float cham-
ber mating surface
Fuel level gauge adapter:
YM-01470/90890-01470
Fuel level gauge:
YM-1312-A/90890-
01312
Page 70 of 166
4-10
CARBURETOR AND REED VALVE
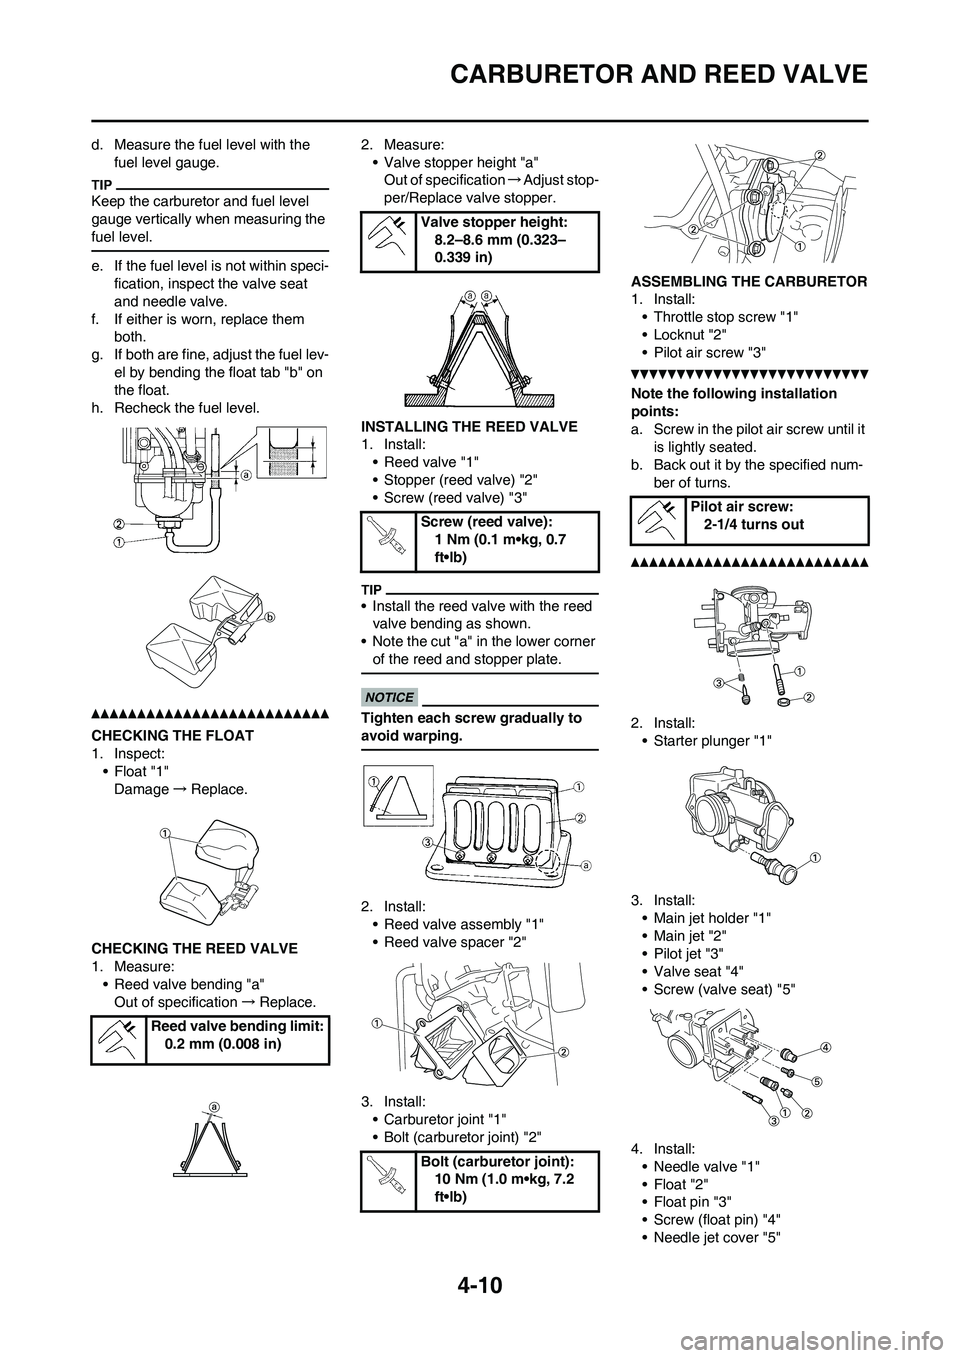
d. Measure the fuel level with the
fuel level gauge.
Keep the carburetor and fuel level
gauge vertically when measuring the
fuel level.
e. If the fuel level is not within speci-
fication, inspect the valve seat
and needle valve.
f. If either is worn, replace them
both.
g. If both are fine, adjust the fuel lev-
el by bending the float tab "b" on
the float.
h. Recheck the fuel level.
CHECKING THE FLOAT
1. Inspect:
• Float "1"
Damage→Replace.
CHECKING THE REED VALVE
1. Measure:
• Reed valve bending "a"
Out of specification→Replace.2. Measure:
• Valve stopper height "a"
Out of specification→Adjust stop-
per/Replace valve stopper.
INSTALLING THE REED VALVE
1. Install:
• Reed valve "1"
• Stopper (reed valve) "2"
• Screw (reed valve) "3"
• Install the reed valve with the reed
valve bending as shown.
• Note the cut "a" in the lower corner
of the reed and stopper plate.
Tighten each screw gradually to
avoid warping.
2. Install:
• Reed valve assembly "1"
• Reed valve spacer "2"
3. Install:
• Carburetor joint "1"
• Bolt (carburetor joint) "2"ASSEMBLING THE CARBURETOR
1. Install:
• Throttle stop screw "1"
• Locknut "2"
• Pilot air screw "3"
Note the following installation
points:
a. Screw in the pilot air screw until it
is lightly seated.
b. Back out it by the specified num-
ber of turns.
2. Install:
• Starter plunger "1"
3. Install:
• Main jet holder "1"
•Main jet "2"
• Pilot jet "3"
• Valve seat "4"
• Screw (valve seat) "5"
4. Install:
• Needle valve "1"
• Float "2"
• Float pin "3"
• Screw (float pin) "4"
• Needle jet cover "5" Reed valve bending limit:
0.2 mm (0.008 in)
Valve stopper height:
8.2–8.6 mm (0.323–
0.339 in)
Screw (reed valve):
1 Nm (0.1 m•kg, 0.7
ft•lb)
Bolt (carburetor joint):
10 Nm (1.0 m•kg, 7.2
ft•lb)
Pilot air screw:
2-1/4 turns out
Page 71 of 166
4-11
CARBURETOR AND REED VALVE
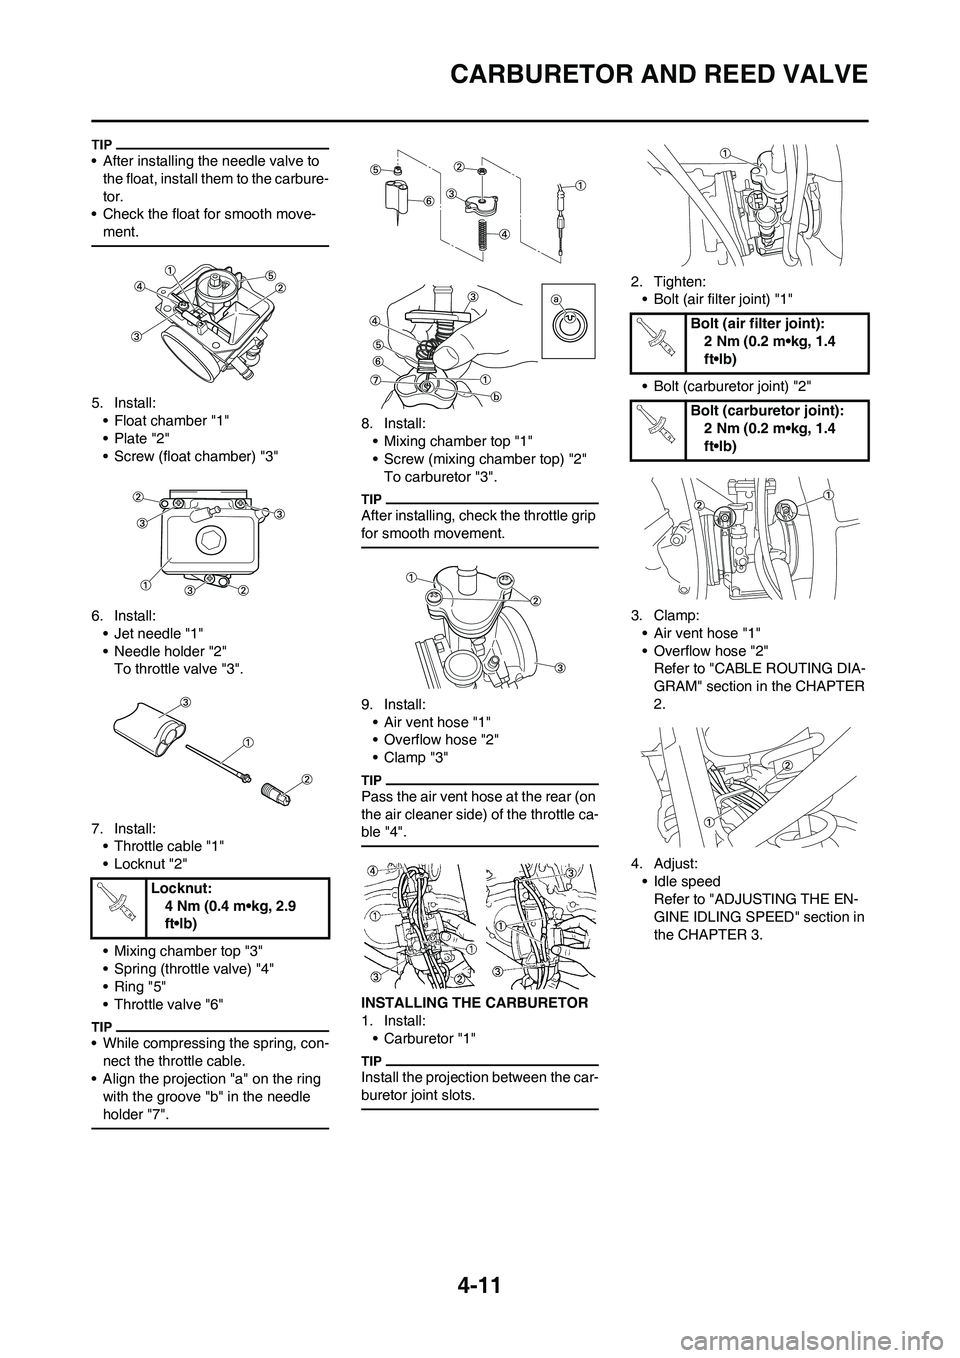
• After installing the needle valve to
the float, install them to the carbure-
tor.
• Check the float for smooth move-
ment.
5. Install:
• Float chamber "1"
• Plate "2"
• Screw (float chamber) "3"
6. Install:
• Jet needle "1"
• Needle holder "2"
To throttle valve "3".
7. Install:
• Throttle cable "1"
• Locknut "2"
• Mixing chamber top "3"
• Spring (throttle valve) "4"
• Ring "5"
• Throttle valve "6"
• While compressing the spring, con-
nect the throttle cable.
• Align the projection "a" on the ring
with the groove "b" in the needle
holder "7".
8. Install:
• Mixing chamber top "1"
• Screw (mixing chamber top) "2"
To carburetor "3".
After installing, check the throttle grip
for smooth movement.
9. Install:
• Air vent hose "1"
• Overflow hose "2"
•Clamp "3"
Pass the air vent hose at the rear (on
the air cleaner side) of the throttle ca-
ble "4".
INSTALLING THE CARBURETOR
1. Install:
• Carburetor "1"
Install the projection between the car-
buretor joint slots.
2. Tighten:
• Bolt (air filter joint) "1"
• Bolt (carburetor joint) "2"
3. Clamp:
• Air vent hose "1"
• Overflow hose "2"
Refer to "CABLE ROUTING DIA-
GRAM" section in the CHAPTER
2.
4. Adjust:
• Idle speed
Refer to "ADJUSTING THE EN-
GINE IDLING SPEED" section in
the CHAPTER 3. Locknut:
4 Nm (0.4 m•kg, 2.9
ft•lb)
Bolt (air filter joint):
2 Nm (0.2 m•kg, 1.4
ft•lb)
Bolt (carburetor joint):
2 Nm (0.2 m•kg, 1.4
ft•lb)
Page 80 of 166
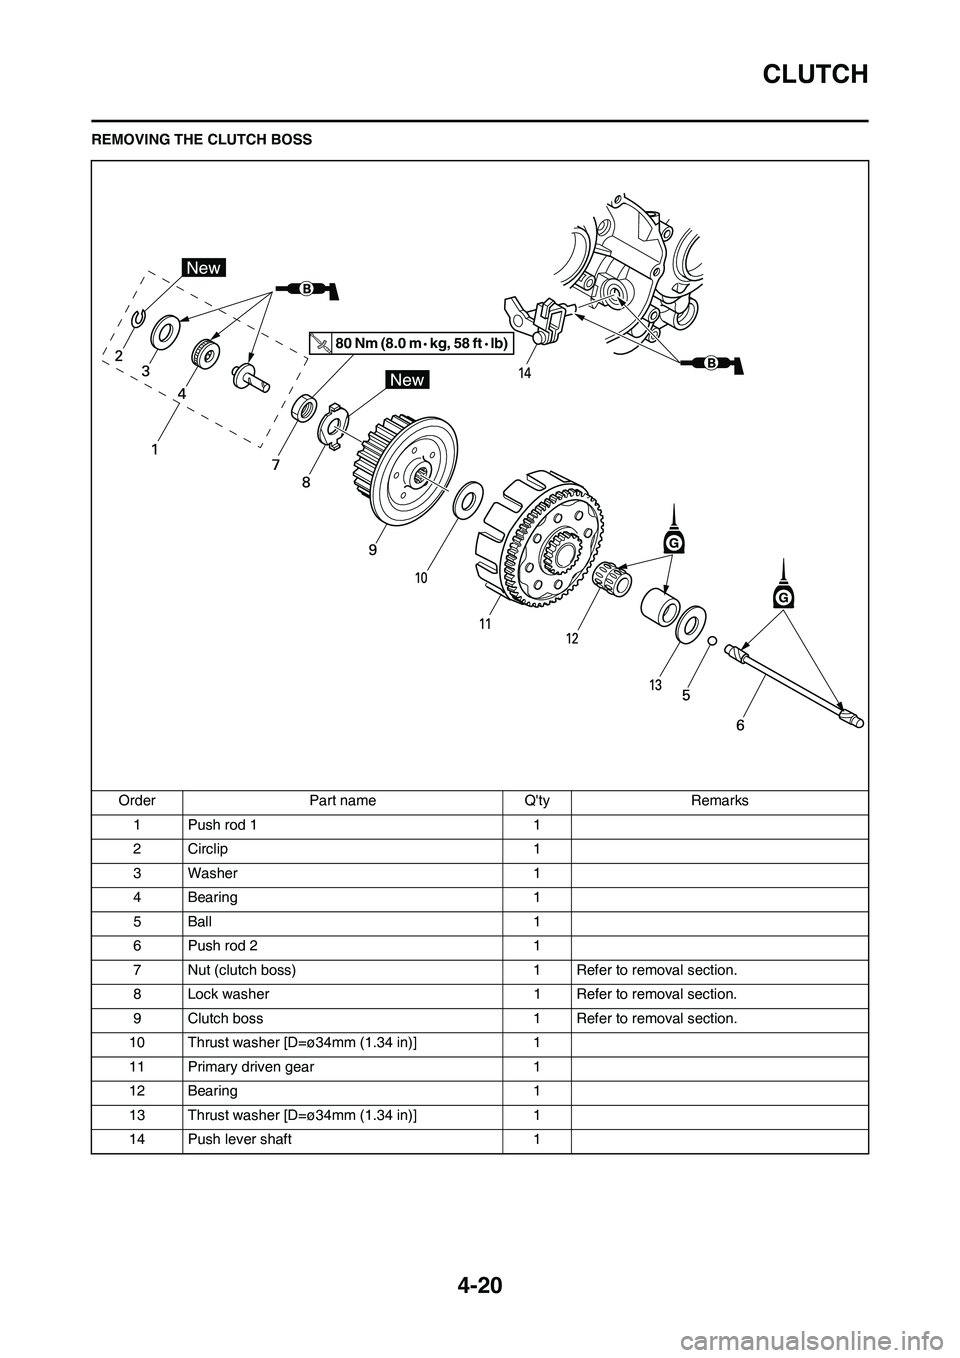
4-20
CLUTCH
REMOVING THE CLUTCH BOSS
Order Part name Q'ty Remarks
1 Push rod 1 1
2 Circlip 1
3 Washer 1
4 Bearing 1
5Ball 1
6 Push rod 2 1
7 Nut (clutch boss) 1 Refer to removal section.
8 Lock washer 1 Refer to removal section.
9 Clutch boss 1 Refer to removal section.
10 Thrust washer [D=ø34mm (1.34 in)] 1
11 Primary driven gear 1
12 Bearing 1
13 Thrust washer [D=ø34mm (1.34 in)] 1
14 Push lever shaft 1
80 Nm (8.0 m kg, 58 ft lb)
Page 81 of 166
4-21
CLUTCH
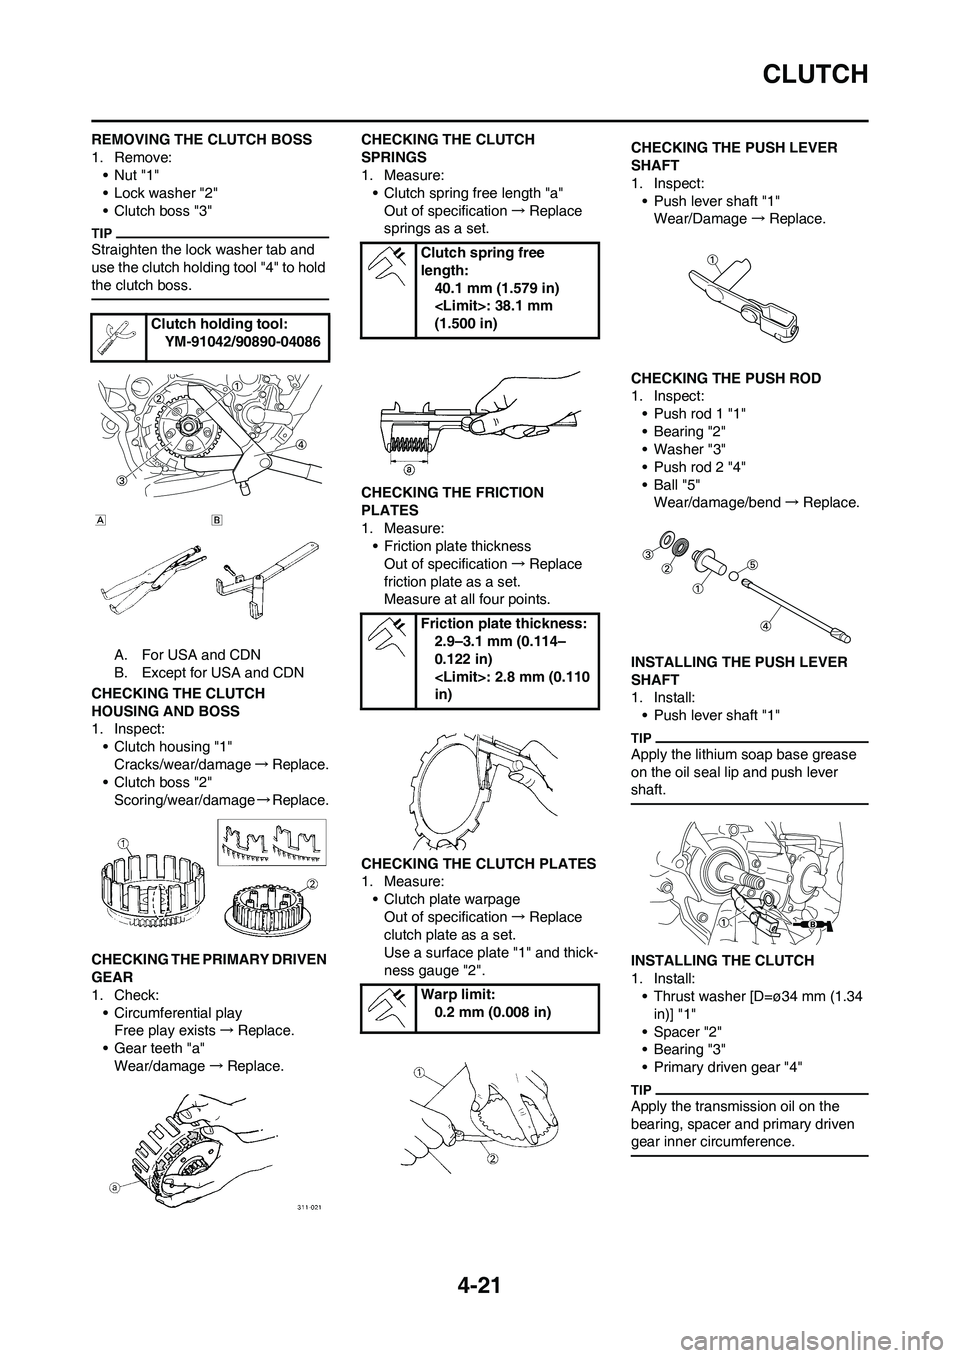
REMOVING THE CLUTCH BOSS
1. Remove:
•Nut "1"
• Lock washer "2"
• Clutch boss "3"
Straighten the lock washer tab and
use the clutch holding tool "4" to hold
the clutch boss.
A. For USA and CDN
B. Except for USA and CDN
CHECKING THE CLUTCH
HOUSING AND BOSS
1. Inspect:
• Clutch housing "1"
Cracks/wear/damage→Replace.
• Clutch boss "2"
Scoring/wear/damage→Replace.
CHECKING THE PRIMARY DRIVEN
GEAR
1. Check:
• Circumferential play
Free play exists→Replace.
• Gear teeth "a"
Wear/damage→Replace.CHECKING THE CLUTCH
SPRINGS
1. Measure:
• Clutch spring free length "a"
Out of specification→Replace
springs as a set.
CHECKING THE FRICTION
PLATES
1. Measure:
• Friction plate thickness
Out of specification→Replace
friction plate as a set.
Measure at all four points.
CHECKING THE CLUTCH PLATES
1. Measure:
• Clutch plate warpage
Out of specification→Replace
clutch plate as a set.
Use a surface plate "1" and thick-
ness gauge "2".CHECKING THE PUSH LEVER
SHAFT
1. Inspect:
• Push lever shaft "1"
Wear/Damage→Replace.
CHECKING THE PUSH ROD
1. Inspect:
• Push rod 1 "1"
• Bearing "2"
• Washer "3"
• Push rod 2 "4"
•Ball "5"
Wear/damage/bend→Replace.
INSTALLING THE PUSH LEVER
SHAFT
1. Install:
• Push lever shaft "1"
Apply the lithium soap base grease
on the oil seal lip and push lever
shaft.
INSTALLING THE CLUTCH
1. Install:
• Thrust washer [D=ø34 mm (1.34
in)] "1"
• Spacer "2"
• Bearing "3"
• Primary driven gear "4"
Apply the transmission oil on the
bearing, spacer and primary driven
gear inner circumference.
Clutch holding tool:
YM-91042/90890-04086
Clutch spring free
length:
40.1 mm (1.579 in)
(1.500 in)
Friction plate thickness:
2.9–3.1 mm (0.114–
0.122 in)
in)
Warp limit:
0.2 mm (0.008 in)