bolt pattern YAMAHA YZ125LC 2011 Owners Manual
[x] Cancel search | Manufacturer: YAMAHA, Model Year: 2011, Model line: YZ125LC, Model: YAMAHA YZ125LC 2011Pages: 166, PDF Size: 8.49 MB
Page 74 of 166

4-14
CYLINDER HEAD, CYLINDER AND PISTON
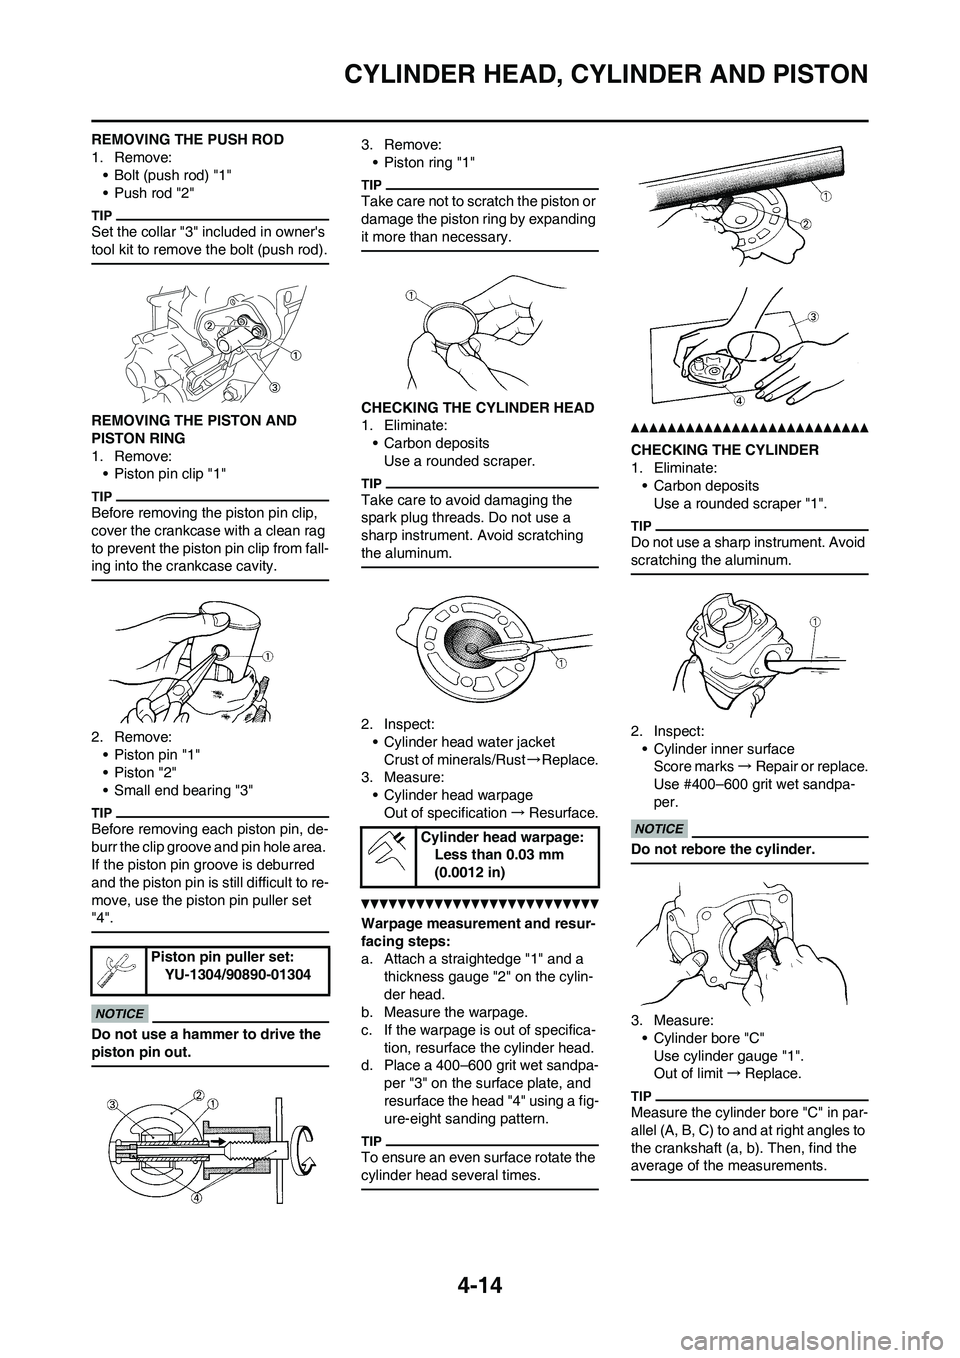
REMOVING THE PUSH ROD
1. Remove:
• Bolt (push rod) "1"
• Push rod "2"
Set the collar "3" included in owner's
tool kit to remove the bolt (push rod).
REMOVING THE PISTON AND
PISTON RING
1. Remove:
• Piston pin clip "1"
Before removing the piston pin clip,
cover the crankcase with a clean rag
to prevent the piston pin clip from fall-
ing into the crankcase cavity.
2. Remove:
• Piston pin "1"
• Piston "2"
• Small end bearing "3"
Before removing each piston pin, de-
burr the clip groove and pin hole area.
If the piston pin groove is deburred
and the piston pin is still difficult to re-
move, use the piston pin puller set
"4".
Do not use a hammer to drive the
piston pin out.
3. Remove:
• Piston ring "1"
Take care not to scratch the piston or
damage the piston ring by expanding
it more than necessary.
CHECKING THE CYLINDER HEAD
1. Eliminate:
• Carbon deposits
Use a rounded scraper.
Take care to avoid damaging the
spark plug threads. Do not use a
sharp instrument. Avoid scratching
the aluminum.
2. Inspect:
• Cylinder head water jacket
Crust of minerals/Rust→Replace.
3. Measure:
• Cylinder head warpage
Out of specification→Resurface.
Warpage measurement and resur-
facing steps:
a. Attach a straightedge "1" and a
thickness gauge "2" on the cylin-
der head.
b. Measure the warpage.
c. If the warpage is out of specifica-
tion, resurface the cylinder head.
d. Place a 400–600 grit wet sandpa-
per "3" on the surface plate, and
resurface the head "4" using a fig-
ure-eight sanding pattern.
To ensure an even surface rotate the
cylinder head several times.
CHECKING THE CYLINDER
1. Eliminate:
• Carbon deposits
Use a rounded scraper "1".
Do not use a sharp instrument. Avoid
scratching the aluminum.
2. Inspect:
• Cylinder inner surface
Score marks→Repair or replace.
Use #400–600 grit wet sandpa-
per.
Do not rebore the cylinder.
3. Measure:
• Cylinder bore "C"
Use cylinder gauge "1".
Out of limit→Replace.
Measure the cylinder bore "C" in par-
allel (A, B, C) to and at right angles to
the crankshaft (a, b). Then, find the
average of the measurements.
Piston pin puller set:
YU-1304/90890-01304
Cylinder head warpage:
Less than 0.03 mm
(0.0012 in)
Page 78 of 166

4-18
CYLINDER HEAD, CYLINDER AND PISTON
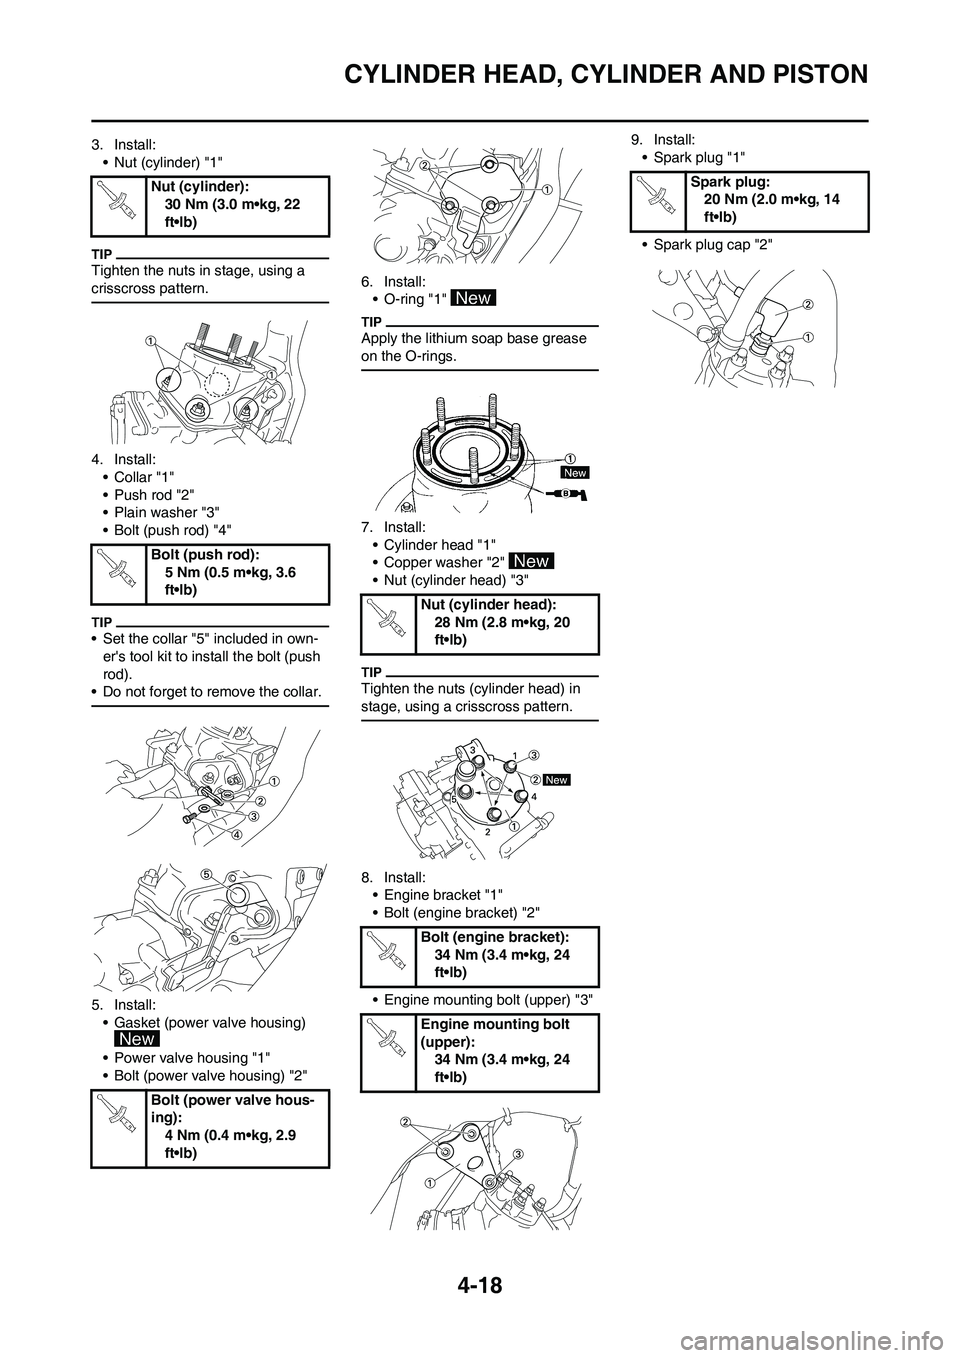
3. Install:
• Nut (cylinder) "1"
Tighten the nuts in stage, using a
crisscross pattern.
4. Install:
•Collar "1"
• Push rod "2"
• Plain washer "3"
• Bolt (push rod) "4"
• Set the collar "5" included in own-
er's tool kit to install the bolt (push
rod).
• Do not forget to remove the collar.
5. Install:
• Gasket (power valve housing)
• Power valve housing "1"
• Bolt (power valve housing) "2" 6. Install:
• O-ring "1"
Apply the lithium soap base grease
on the O-rings.
7. Install:
• Cylinder head "1"
• Copper washer "2"
• Nut (cylinder head) "3"
Tighten the nuts (cylinder head) in
stage, using a crisscross pattern.
8. Install:
• Engine bracket "1"
• Bolt (engine bracket) "2"
• Engine mounting bolt (upper) "3"9. Install:
• Spark plug "1"
• Spark plug cap "2" Nut (cylinder):
30 Nm (3.0 m•kg, 22
ft•lb)
Bolt (push rod):
5 Nm (0.5 m•kg, 3.6
ft•lb)
Bolt (power valve hous-
ing):
4 Nm (0.4 m•kg, 2.9
ft•lb)
Nut (cylinder head):
28 Nm (2.8 m•kg, 20
ft•lb)
Bolt (engine bracket):
34 Nm (3.4 m•kg, 24
ft•lb)
Engine mounting bolt
(upper):
34 Nm (3.4 m•kg, 24
ft•lb)
Spark plug:
20 Nm (2.0 m•kg, 14
ft•lb)
Page 82 of 166
![YAMAHA YZ125LC 2011 Owners Manual 4-22
CLUTCH
2. Install:
• Thrust washer [D=ø34 mm (1.34
in)] "1"
• Clutch boss "2"
3. Install:
• Lock washer "1"
• Nut (clutch boss) "2"
Use the clutch holding tool "3" to hold
the clutc YAMAHA YZ125LC 2011 Owners Manual 4-22
CLUTCH
2. Install:
• Thrust washer [D=ø34 mm (1.34
in)] "1"
• Clutch boss "2"
3. Install:
• Lock washer "1"
• Nut (clutch boss) "2"
Use the clutch holding tool "3" to hold
the clutc](/img/51/53908/w960_53908-81.png)
4-22
CLUTCH
2. Install:
• Thrust washer [D=ø34 mm (1.34
in)] "1"
• Clutch boss "2"
3. Install:
• Lock washer "1"
• Nut (clutch boss) "2"
Use the clutch holding tool "3" to hold
the clutch boss.
A. For USA and CDN
B. Except for USA and CDN
4. Bend the lock washer "1" tab.5. Install:
• Friction plate "1"
• Clutch plate "2"
• Install the clutch plates and friction
plates alternately on the clutch
boss, starting with a friction plate
and ending with a friction plate.
• Apply the transmission oil on the
friction plates and clutch plates.
6. Install:
•Bearing "1"
• Washer "2"
• Circlip "3"
To push rod 1 "4".
Apply the lithium soap base grease
on the bearing and washer.
7. Install:
• Push rod 2 "1"
• Ball "2"
• Push rod 1 "3"
Apply the transmission oil on the
push rod 1, 2 and ball.
8. Install:
• Pressure plate "1"9. Install:
• Clutch spring "1"
• Bolt (clutch spring) "2"
Tighten the bolts in stage, using a
crisscross pattern.
10. Install:
• Dowel pin "1"
• Gasket (clutch cover) "2"
11. Install:
• Clutch cover "1"
• Bolt (clutch cover)
Tighten the bolts in stage, using a
crisscross pattern.
12. Install:
• O-ring "1"
• Clutch cable "2"
Apply the lithium soap base grease
on the O-ring.
Nut (clutch boss):
80 Nm (8.0 m•kg, 58
ft•lb)
Clutch holding tool:
YM-91042/90890-04086
Bolt (clutch spring):
10 Nm (1.0 m•kg, 7.2
ft•lb)
Bolt (clutch cover):
10 Nm (1.0 m•kg, 7.2
ft•lb)
Page 87 of 166

4-27
KICK SHAFT AND SHIFT SHAFT
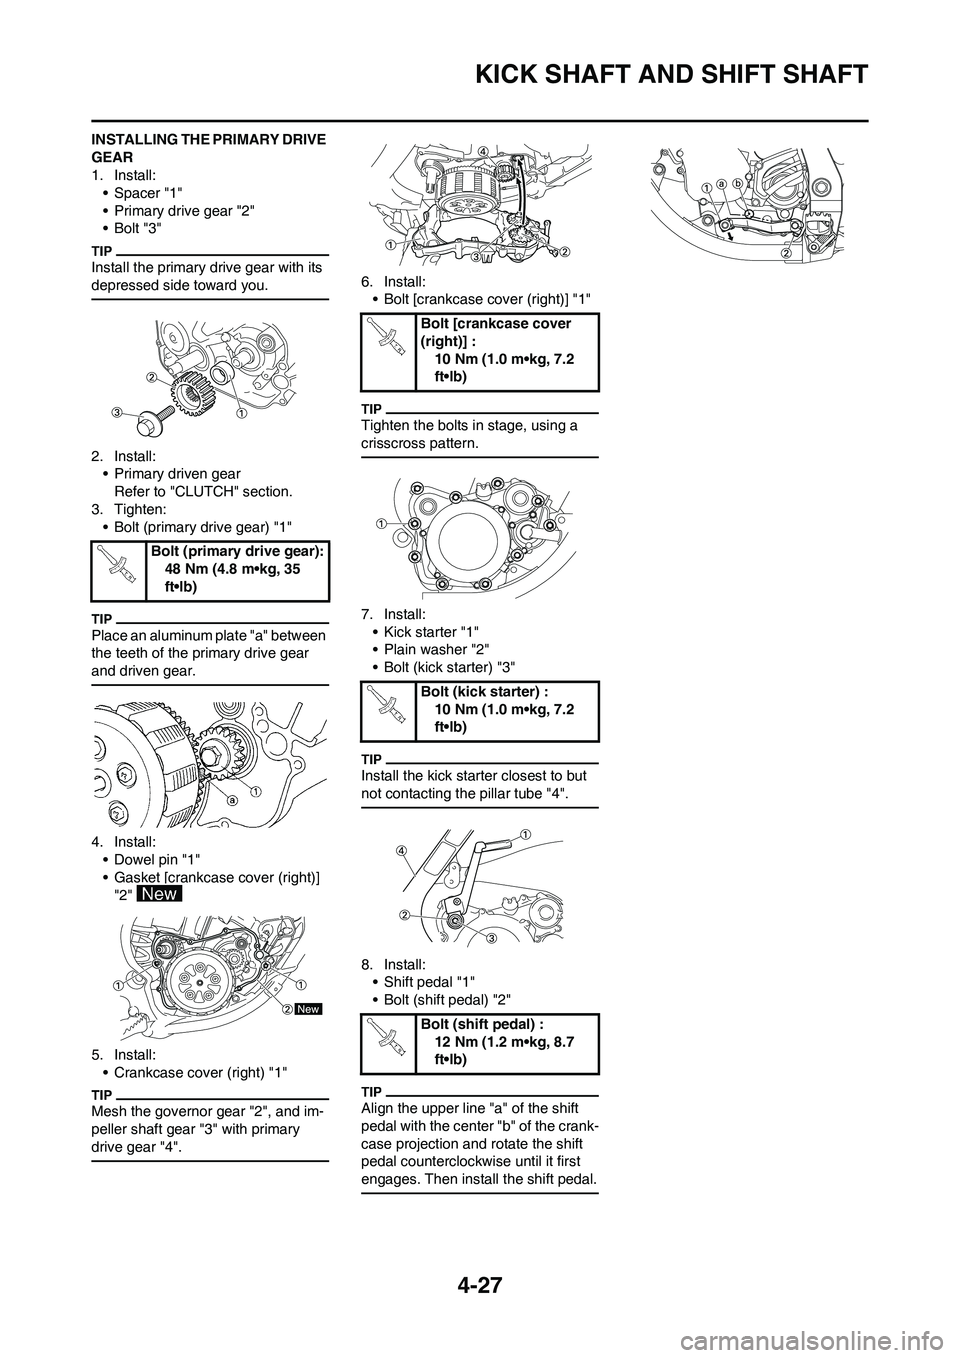
INSTALLING THE PRIMARY DRIVE
GEAR
1. Install:
• Spacer "1"
• Primary drive gear "2"
•Bolt "3"
Install the primary drive gear with its
depressed side toward you.
2. Install:
• Primary driven gear
Refer to "CLUTCH" section.
3. Tighten:
• Bolt (primary drive gear) "1"
Place an aluminum plate "a" between
the teeth of the primary drive gear
and driven gear.
4. Install:
• Dowel pin "1"
• Gasket [crankcase cover (right)]
"2"
5. Install:
• Crankcase cover (right) "1"
Mesh the governor gear "2", and im-
peller shaft gear "3" with primary
drive gear "4".
6. Install:
• Bolt [crankcase cover (right)] "1"
Tighten the bolts in stage, using a
crisscross pattern.
7. Install:
• Kick starter "1"
• Plain washer "2"
• Bolt (kick starter) "3"
Install the kick starter closest to but
not contacting the pillar tube "4".
8. Install:
• Shift pedal "1"
• Bolt (shift pedal) "2"
Align the upper line "a" of the shift
pedal with the center "b" of the crank-
case projection and rotate the shift
pedal counterclockwise until it first
engages. Then install the shift pedal.
Bolt (primary drive gear):
48 Nm (4.8 m•kg, 35
ft•lb)
Bolt [crankcase cover
(right)] :
10 Nm (1.0 m•kg, 7.2
ft•lb)
Bolt (kick starter) :
10 Nm (1.0 m•kg, 7.2
ft•lb)
Bolt (shift pedal) :
12 Nm (1.2 m•kg, 8.7
ft•lb)
Page 110 of 166

5-4
FRONT WHEEL AND REAR WHEEL
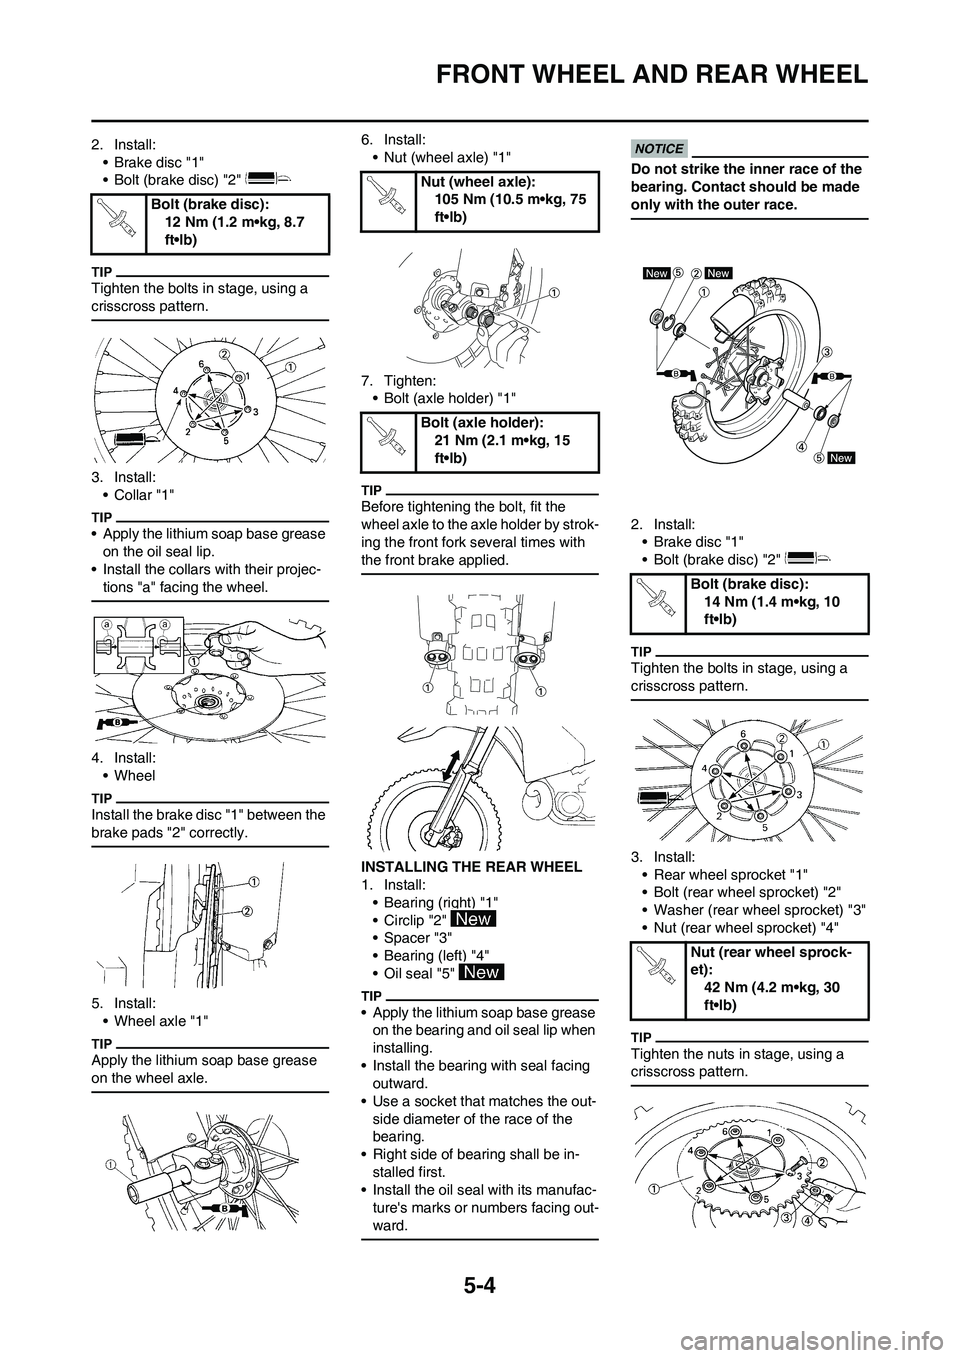
2. Install:
• Brake disc "1"
• Bolt (brake disc) "2"
Tighten the bolts in stage, using a
crisscross pattern.
3. Install:
•Collar "1"
• Apply the lithium soap base grease
on the oil seal lip.
• Install the collars with their projec-
tions "a" facing the wheel.
4. Install:
• Wheel
Install the brake disc "1" between the
brake pads "2" correctly.
5. Install:
• Wheel axle "1"
Apply the lithium soap base grease
on the wheel axle.
6. Install:
• Nut (wheel axle) "1"
7. Tighten:
• Bolt (axle holder) "1"
Before tightening the bolt, fit the
wheel axle to the axle holder by strok-
ing the front fork several times with
the front brake applied.
INSTALLING THE REAR WHEEL
1. Install:
• Bearing (right) "1"
• Circlip "2"
• Spacer "3"
• Bearing (left) "4"
• Oil seal "5"
• Apply the lithium soap base grease
on the bearing and oil seal lip when
installing.
• Install the bearing with seal facing
outward.
• Use a socket that matches the out-
side diameter of the race of the
bearing.
• Right side of bearing shall be in-
stalled first.
• Install the oil seal with its manufac-
ture's marks or numbers facing out-
ward.
Do not strike the inner race of the
bearing. Contact should be made
only with the outer race.
2. Install:
• Brake disc "1"
• Bolt (brake disc) "2"
Tighten the bolts in stage, using a
crisscross pattern.
3. Install:
• Rear wheel sprocket "1"
• Bolt (rear wheel sprocket) "2"
• Washer (rear wheel sprocket) "3"
• Nut (rear wheel sprocket) "4"
Tighten the nuts in stage, using a
crisscross pattern.
Bolt (brake disc):
12 Nm (1.2 m•kg, 8.7
ft•lb)
Nut (wheel axle):
105 Nm (10.5 m•kg, 75
ft•lb)
Bolt (axle holder):
21 Nm (2.1 m•kg, 15
ft•lb)
Bolt (brake disc):
14 Nm (1.4 m•kg, 10
ft•lb)
Nut (rear wheel sprock-
et):
42 Nm (4.2 m•kg, 30
ft•lb)