YAMAHA YZ125LC 2013 Owners Manual
Manufacturer: YAMAHA, Model Year: 2013, Model line: YZ125LC, Model: YAMAHA YZ125LC 2013Pages: 168, PDF Size: 8.19 MB
Page 131 of 168
5-23
FRONT FORK
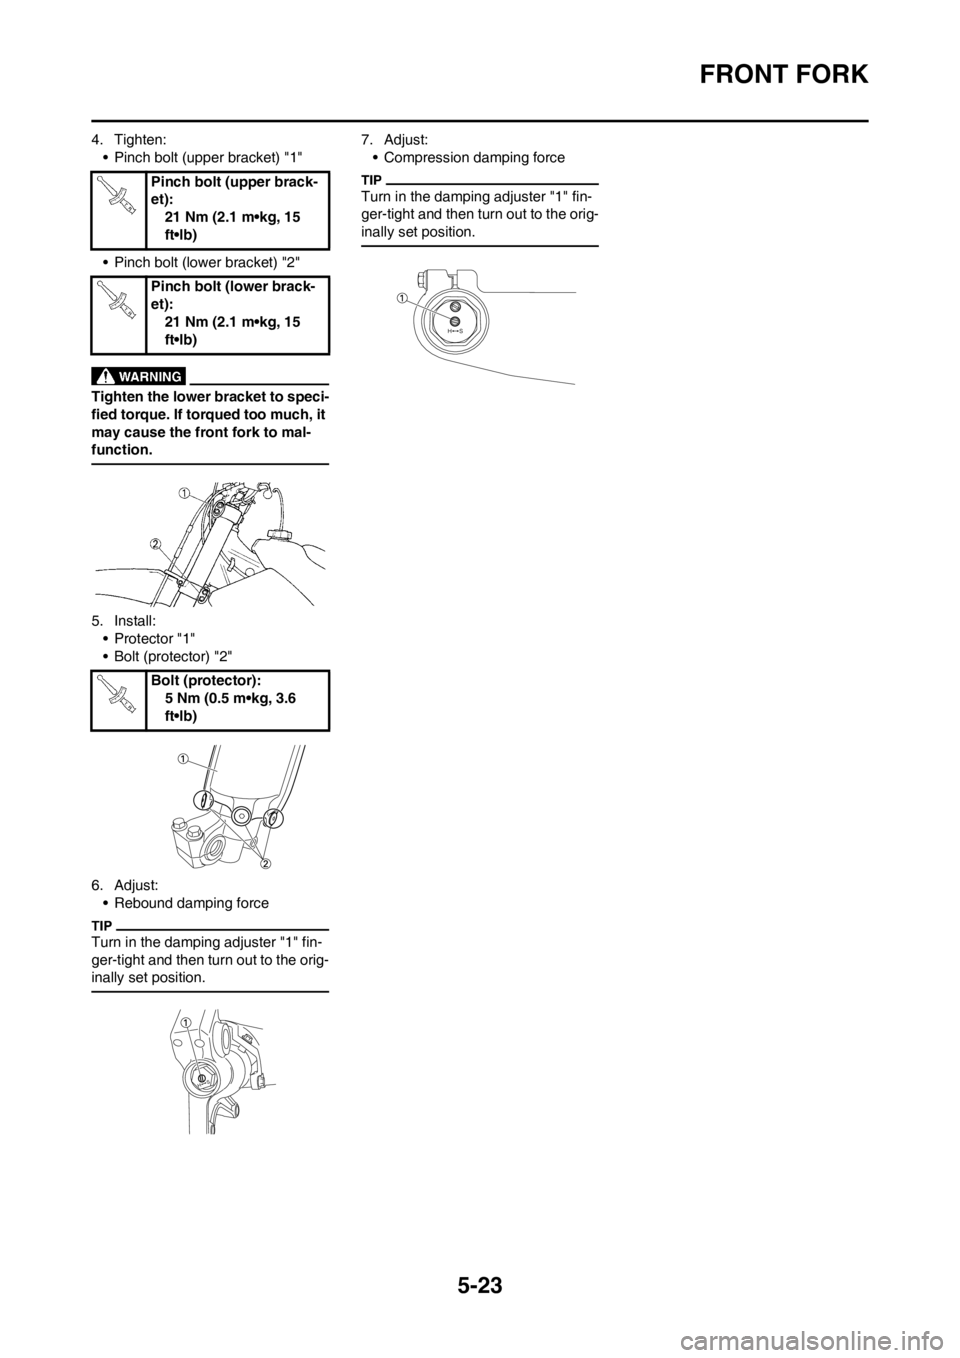
4. Tighten:
• Pinch bolt (upper bracket) "1"
• Pinch bolt (lower bracket) "2"
Tighten the lower bracket to speci-
fied torque. If torqued too much, it
may cause the front fork to mal-
function.
5. Install:
• Protector "1"
• Bolt (protector) "2"
6. Adjust:
• Rebound damping force
Turn in the damping adjuster "1" fin-
ger-tight and then turn out to the orig-
inally set position.
7. Adjust:
• Compression damping force
Turn in the damping adjuster "1" fin-
ger-tight and then turn out to the orig-
inally set position.Pinch bolt (upper brack-
et):
21 Nm (2.1 m•kg, 15
ft•lb)
Pinch bolt (lower brack-
et):
21 Nm (2.1 m•kg, 15
ft•lb)
Bolt (protector):
5 Nm (0.5 m•kg, 3.6
ft•lb)
Page 132 of 168
5-24
HANDLEBAR
HANDLEBAR
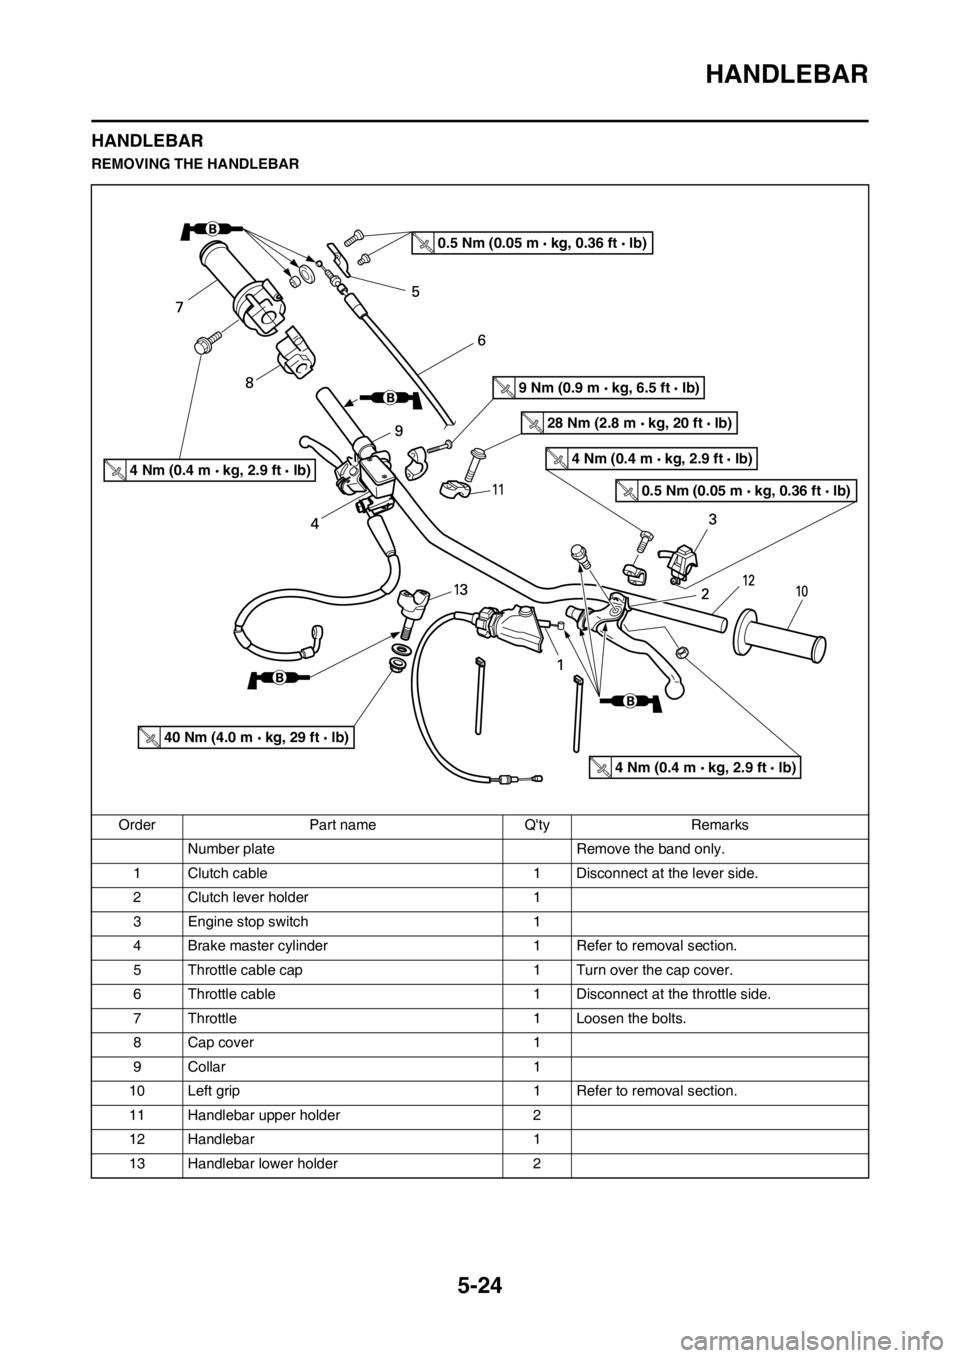
REMOVING THE HANDLEBAR
Order Part name Q'ty Remarks
Number plate Remove the band only.
1 Clutch cable 1 Disconnect at the lever side.
2 Clutch lever holder 1
3 Engine stop switch 1
4 Brake master cylinder 1 Refer to removal section.
5 Throttle cable cap 1 Turn over the cap cover.
6 Throttle cable 1 Disconnect at the throttle side.
7 Throttle 1 Loosen the bolts.
8 Cap cover 1
9 Collar 1
10 Left grip 1 Refer to removal section.
11 Handlebar upper holder 2
12 Handlebar 1
13 Handlebar lower holder 2
4 Nm (0.4 m kg, 2.9 ft lb)4 Nm (0.4 m kg, 2.9 ft lb)
4 Nm (0.4 m kg, 2.9 ft lb)
9 Nm (0.9 m kg, 6.5 ft lb)
28 Nm (2.8 m kg, 20 ft lb)
40 Nm (4.0 m kg, 29 ft lb)
0.5 Nm (0.05 m kg, 0.36 ft lb)
0.5 Nm (0.05 m kg, 0.36 ft lb)
Page 133 of 168
5-25
HANDLEBAR
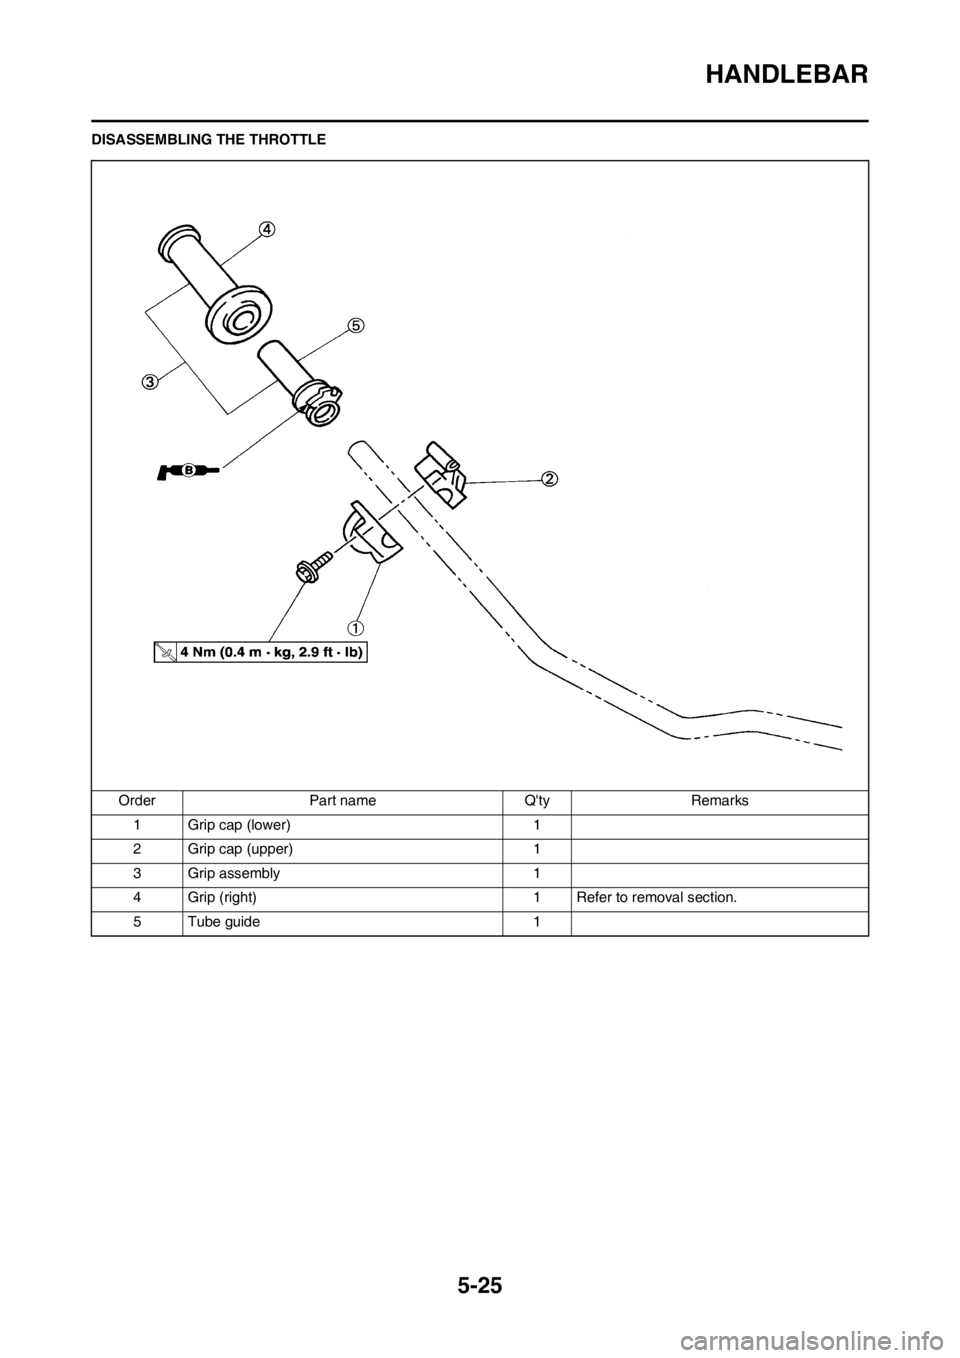
DISASSEMBLING THE THROTTLE
Order Part name Q'ty Remarks
1 Grip cap (lower) 1
2 Grip cap (upper) 1
3 Grip assembly 1
4 Grip (right) 1 Refer to removal section.
5 Tube guide 1
Page 134 of 168
5-26
HANDLEBAR
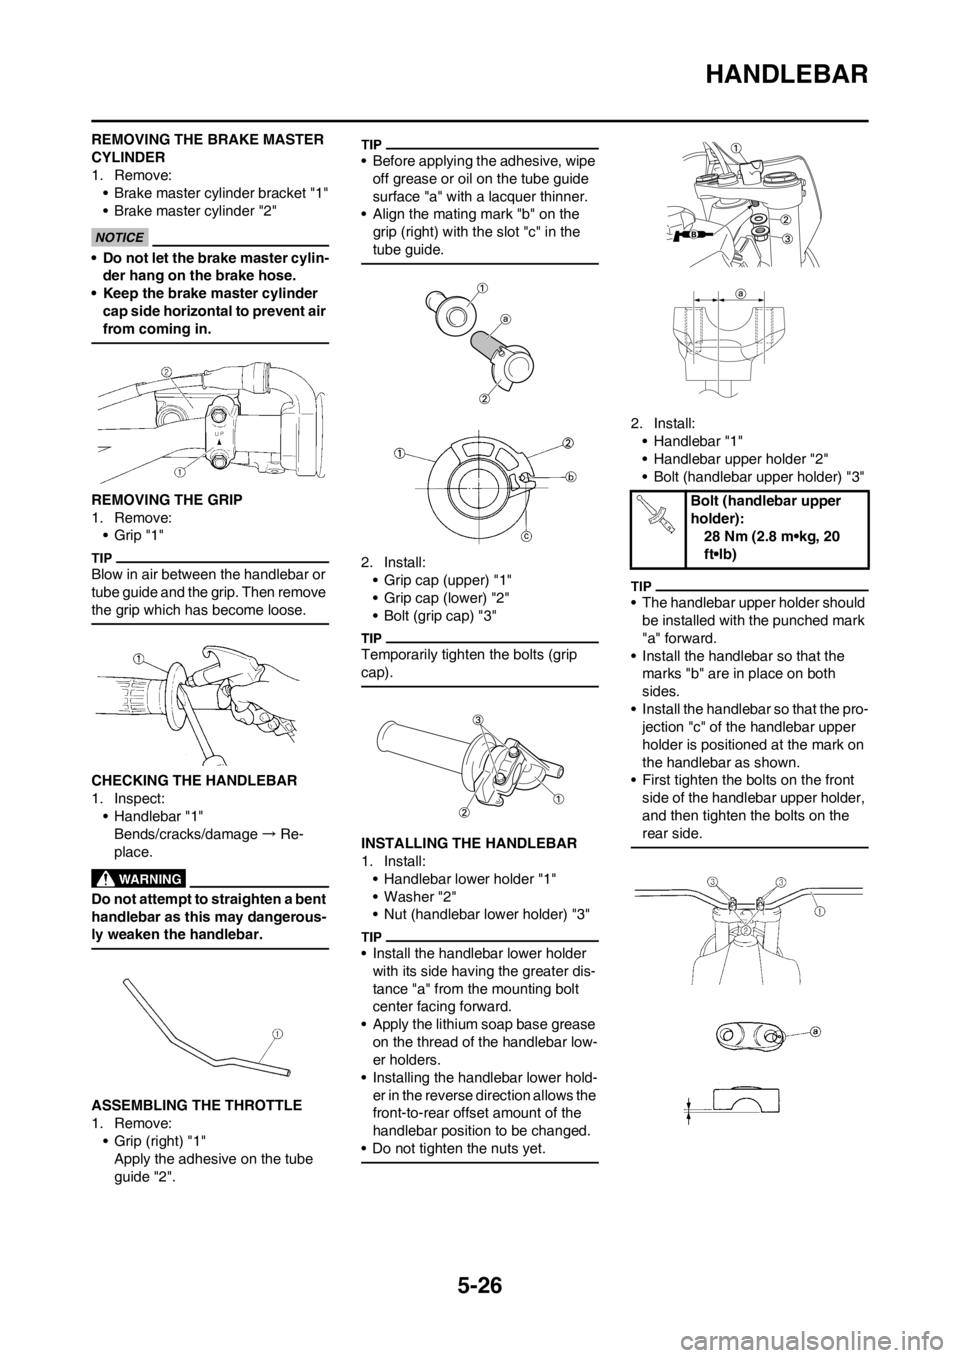
REMOVING THE BRAKE MASTER
CYLINDER
1. Remove:
• Brake master cylinder bracket "1"
• Brake master cylinder "2"
• Do not let the brake master cylin-
der hang on the brake hose.
• Keep the brake master cylinder
cap side horizontal to prevent air
from coming in.
REMOVING THE GRIP
1. Remove:
•Grip "1"
Blow in air between the handlebar or
tube guide and the grip. Then remove
the grip which has become loose.
CHECKING THE HANDLEBAR
1. Inspect:
• Handlebar "1"
Bends/cracks/damage → Re-
place.
Do not attempt to straighten a bent
handlebar as this may dangerous-
ly weaken the handlebar.
ASSEMBLING THE THROTTLE
1. Remove:
• Grip (right) "1"
Apply the adhesive on the tube
guide "2".
• Before applying the adhesive, wipe
off grease or oil on the tube guide
surface "a" with a lacquer thinner.
• Align the mating mark "b" on the
grip (right) with the slot "c" in the
tube guide.
2. Install:
• Grip cap (upper) "1"
• Grip cap (lower) "2"
• Bolt (grip cap) "3"
Temporarily tighten the bolts (grip
cap).
INSTALLING THE HANDLEBAR
1. Install:
• Handlebar lower holder "1"
• Washer "2"
• Nut (handlebar lower holder) "3"
• Install the handlebar lower holder
with its side having the greater dis-
tance "a" from the mounting bolt
center facing forward.
• Apply the lithium soap base grease
on the thread of the handlebar low-
er holders.
• Installing the handlebar lower hold-
er in the reverse direction allows the
front-to-rear offset amount of the
handlebar position to be changed.
• Do not tighten the nuts yet.
2. Install:
• Handlebar "1"
• Handlebar upper holder "2"
• Bolt (handlebar upper holder) "3"
• The handlebar upper holder should
be installed with the punched mark
"a" forward.
• Install the handlebar so that the
marks "b" are in place on both
sides.
• Install the handlebar so that the pro-
jection "c" of the handlebar upper
holder is positioned at the mark on
the handlebar as shown.
• First tighten the bolts on the front
side of the handlebar upper holder,
and then tighten the bolts on the
rear side.
Bolt (handlebar upper
holder):
28 Nm (2.8 m•kg, 20
ft•lb)
Page 135 of 168
5-27
HANDLEBAR
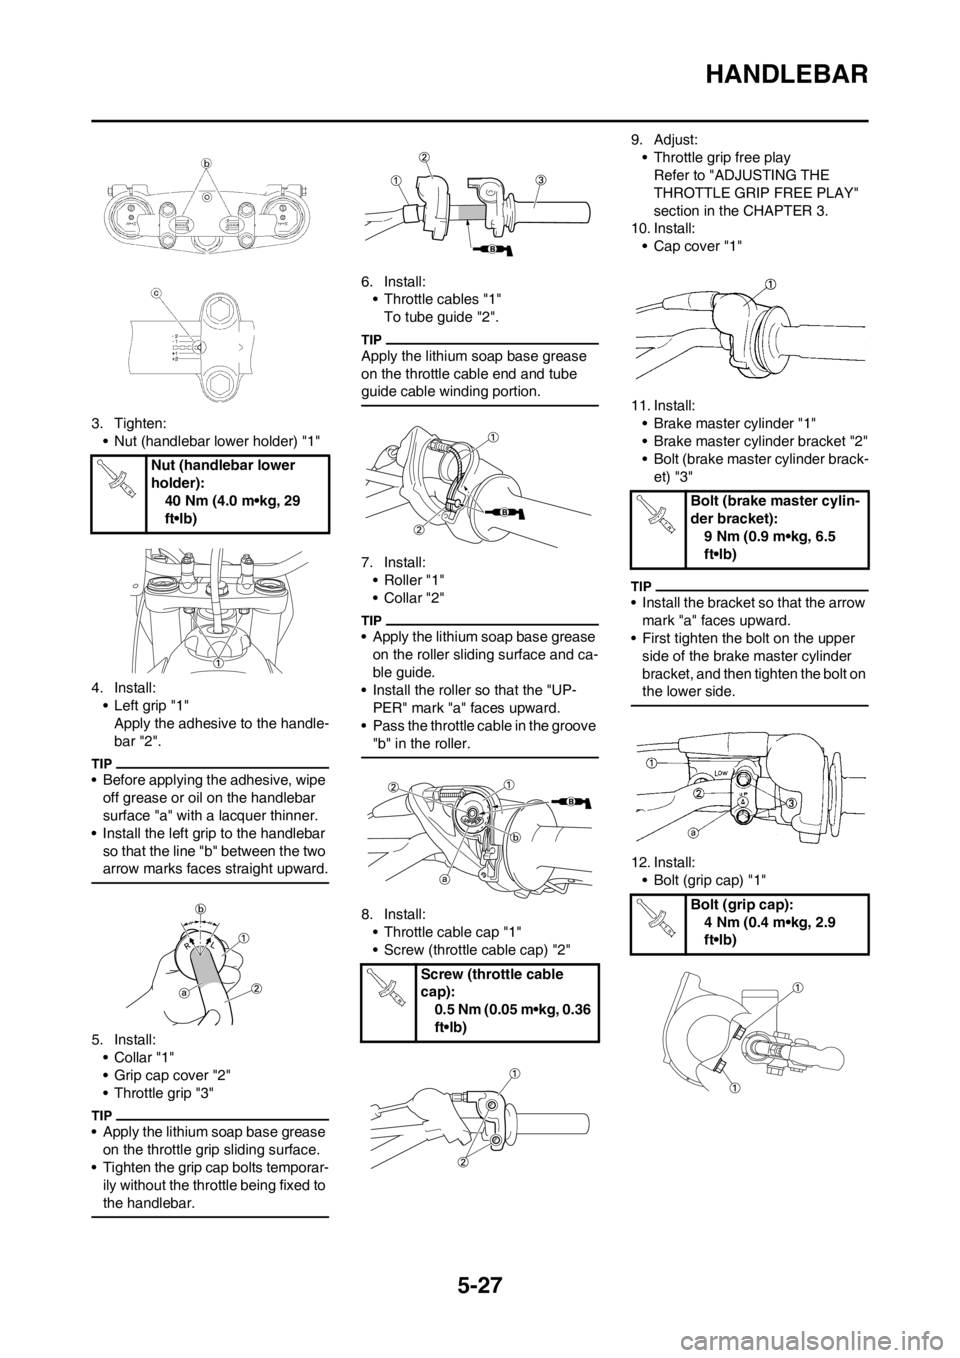
3. Tighten:
• Nut (handlebar lower holder) "1"
4. Install:
• Left grip "1"
Apply the adhesive to the handle-
bar "2".
• Before applying the adhesive, wipe
off grease or oil on the handlebar
surface "a" with a lacquer thinner.
• Install the left grip to the handlebar
so that the line "b" between the two
arrow marks faces straight upward.
5. Install:
•Collar "1"
• Grip cap cover "2"
• Throttle grip "3"
• Apply the lithium soap base grease
on the throttle grip sliding surface.
• Tighten the grip cap bolts temporar-
ily without the throttle being fixed to
the handlebar.
6. Install:
• Throttle cables "1"
To tube guide "2".
Apply the lithium soap base grease
on the throttle cable end and tube
guide cable winding portion.
7. Install:
• Roller "1"
• Collar "2"
• Apply the lithium soap base grease
on the roller sliding surface and ca-
ble guide.
• Install the roller so that the "UP-
PER" mark "a" faces upward.
• Pass the throttle cable in the groove
"b" in the roller.
8. Install:
• Throttle cable cap "1"
• Screw (throttle cable cap) "2"9. Adjust:
• Throttle grip free play
Refer to "ADJUSTING THE
THROTTLE GRIP FREE PLAY"
section in the CHAPTER 3.
10. Install:
• Cap cover "1"
11. Install:
• Brake master cylinder "1"
• Brake master cylinder bracket "2"
• Bolt (brake master cylinder brack-
et) "3"
• Install the bracket so that the arrow
mark "a" faces upward.
• First tighten the bolt on the upper
side of the brake master cylinder
bracket, and then tighten the bolt on
the lower side.
12. Install:
• Bolt (grip cap) "1" Nut (handlebar lower
holder):
40 Nm (4.0 m•kg, 29
ft•lb)
Screw (throttle cable
cap):
0.5 Nm (0.05 m•kg, 0.36
ft•lb)
Bolt (brake master cylin-
der bracket):
9 Nm (0.9 m•kg, 6.5
ft•lb)
Bolt (grip cap):
4 Nm (0.4 m•kg, 2.9
ft•lb)
Page 136 of 168
5-28
HANDLEBAR
After tightening the bolts, check
that the throttle grip "2" moves
smoothly. If it does not, retighten
the bolts for adjustment.
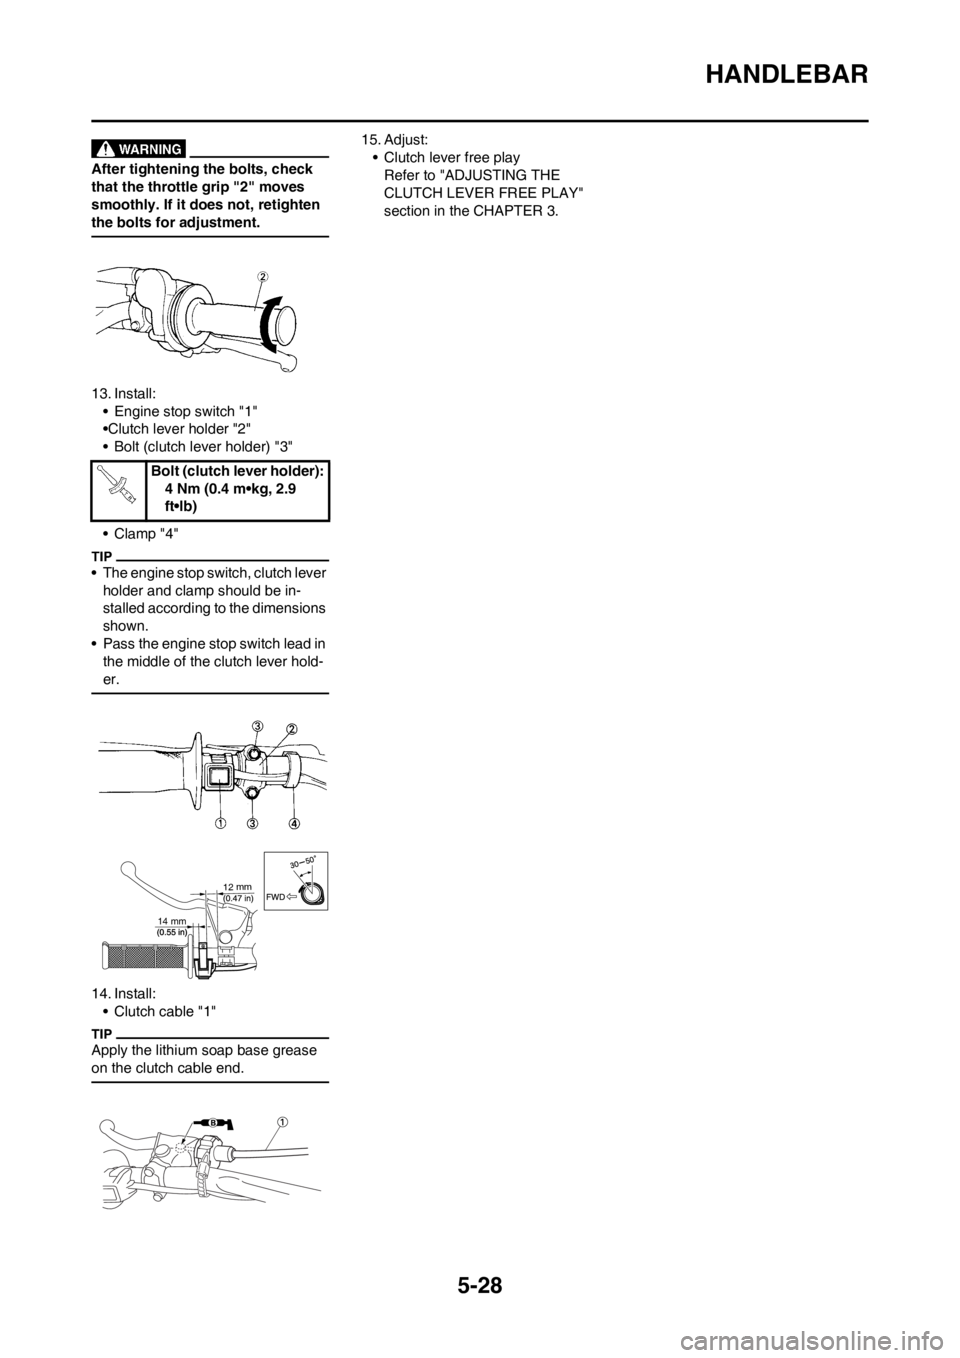
13. Install:
• Engine stop switch "1"
•Clutch lever holder "2"
• Bolt (clutch lever holder) "3"
• Clamp "4"
• The engine stop switch, clutch lever
holder and clamp should be in-
stalled according to the dimensions
shown.
• Pass the engine stop switch lead in
the middle of the clutch lever hold-
er.
14. Install:
• Clutch cable "1"
Apply the lithium soap base grease
on the clutch cable end.
15. Adjust:
• Clutch lever free play
Refer to "ADJUSTING THE
CLUTCH LEVER FREE PLAY"
section in the CHAPTER 3.
Bolt (clutch lever holder):
4 Nm (0.4 m•kg, 2.9
ft•lb)
(0.55 in)14 mm
12 mm
Page 137 of 168
5-29
STEERING
STEERING
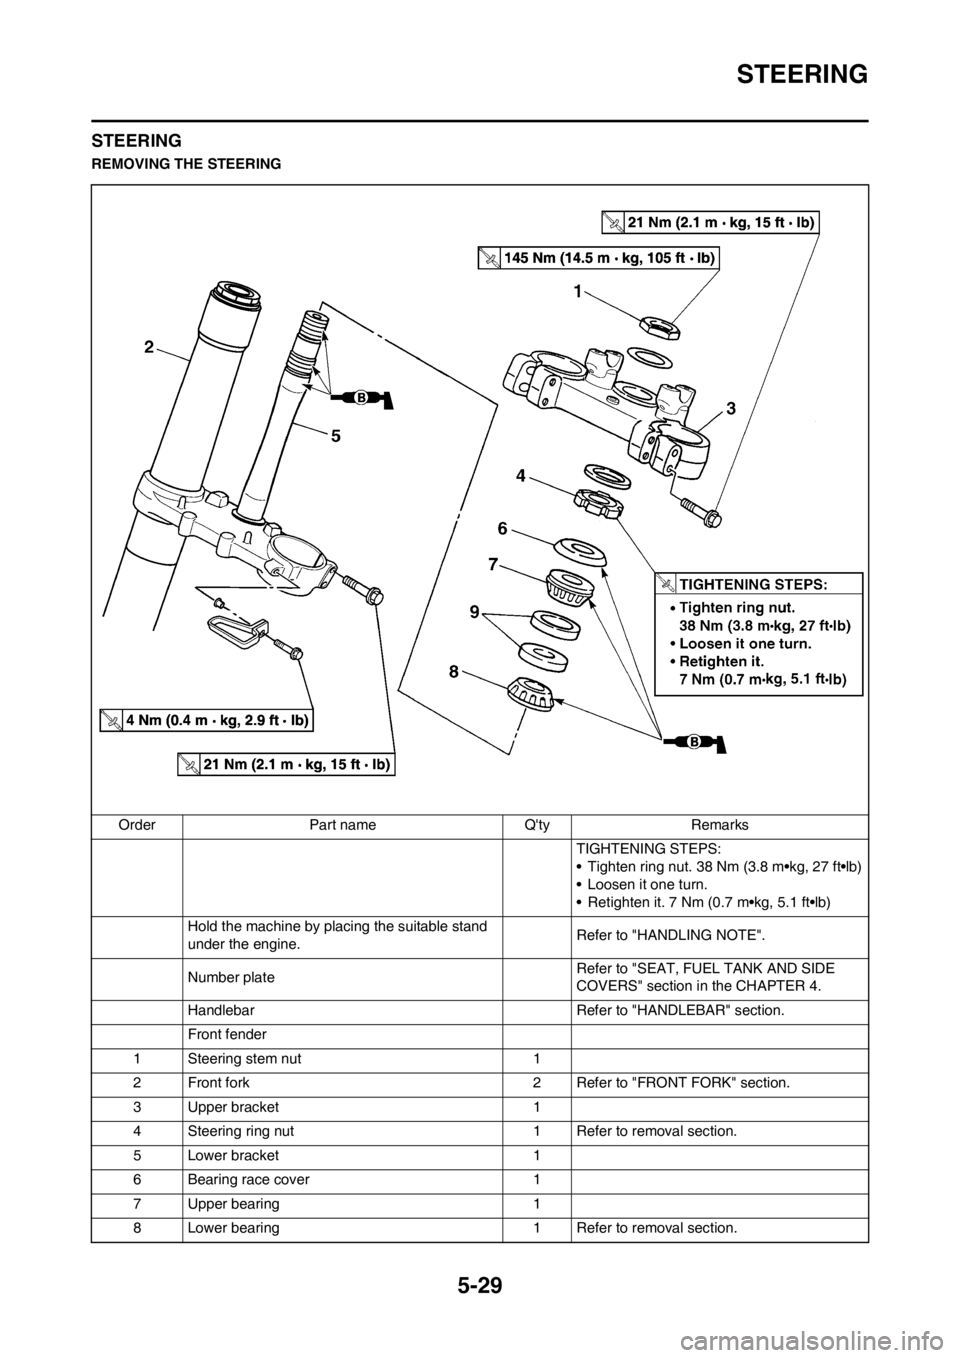
REMOVING THE STEERING
Order Part name Q'ty Remarks
TIGHTENING STEPS:
• Tighten ring nut. 38 Nm (3.8 m•kg, 27 ft•lb)
• Loosen it one turn.
• Retighten it. 7 Nm (0.7 m•kg, 5.1 ft•lb)
Hold the machine by placing the suitable stand
under the engine.Refer to "HANDLING NOTE".
Number plateRefer to "SEAT, FUEL TANK AND SIDE
COVERS" section in the CHAPTER 4.
Handlebar Refer to "HANDLEBAR" section.
Front fender
1 Steering stem nut 1
2 Front fork 2 Refer to "FRONT FORK" section.
3 Upper bracket 1
4 Steering ring nut 1 Refer to removal section.
5 Lower bracket 1
6 Bearing race cover 1
7 Upper bearing 1
8 Lower bearing 1 Refer to removal section.
Page 138 of 168
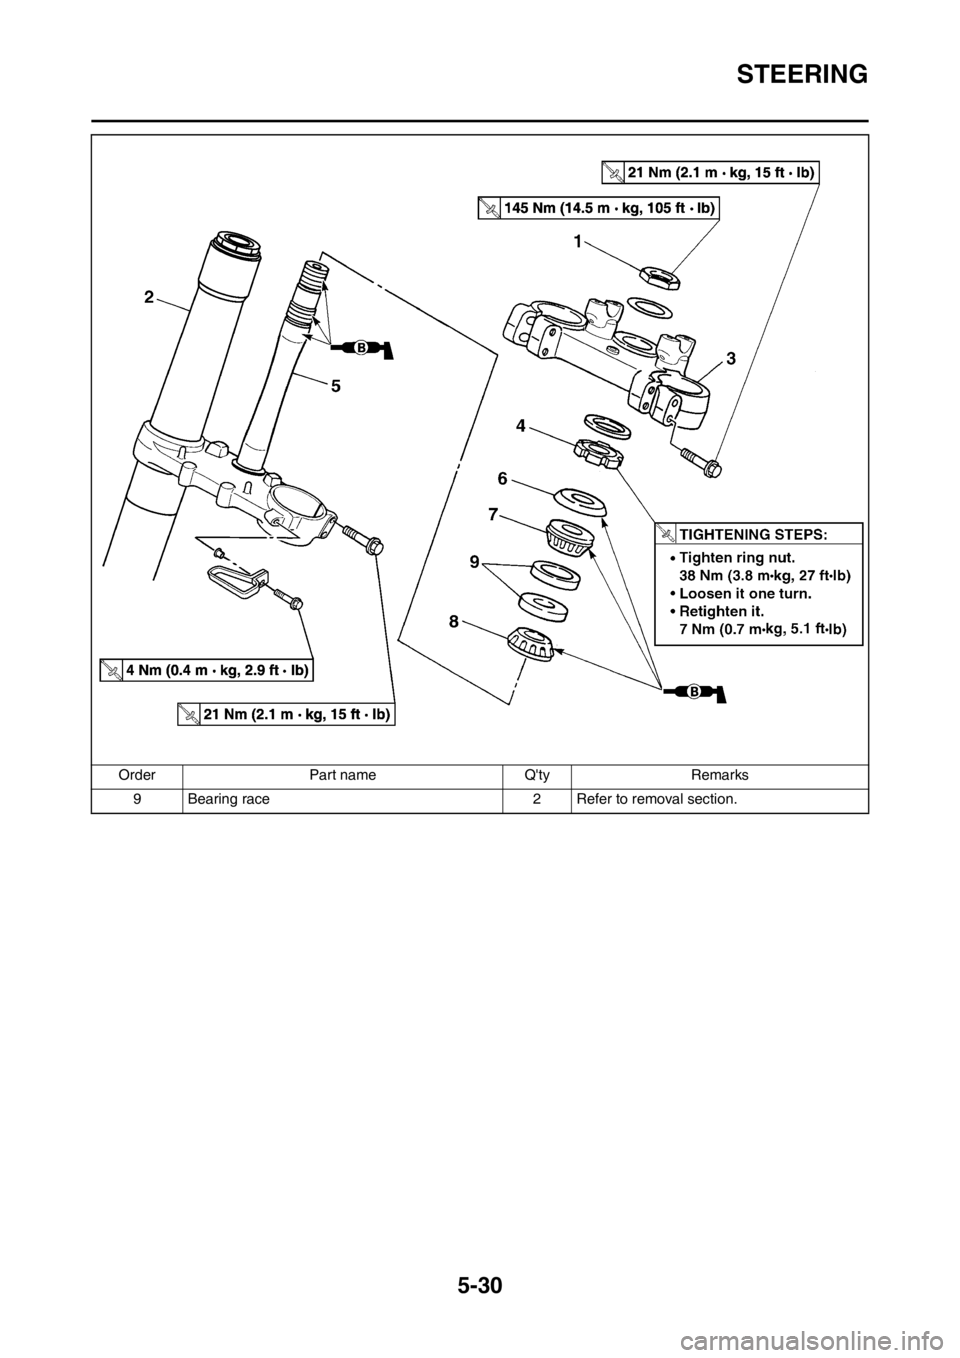
5-30
STEERING
9 Bearing race 2 Refer to removal section. Order Part name Q'ty Remarks
Page 139 of 168
5-31
STEERING
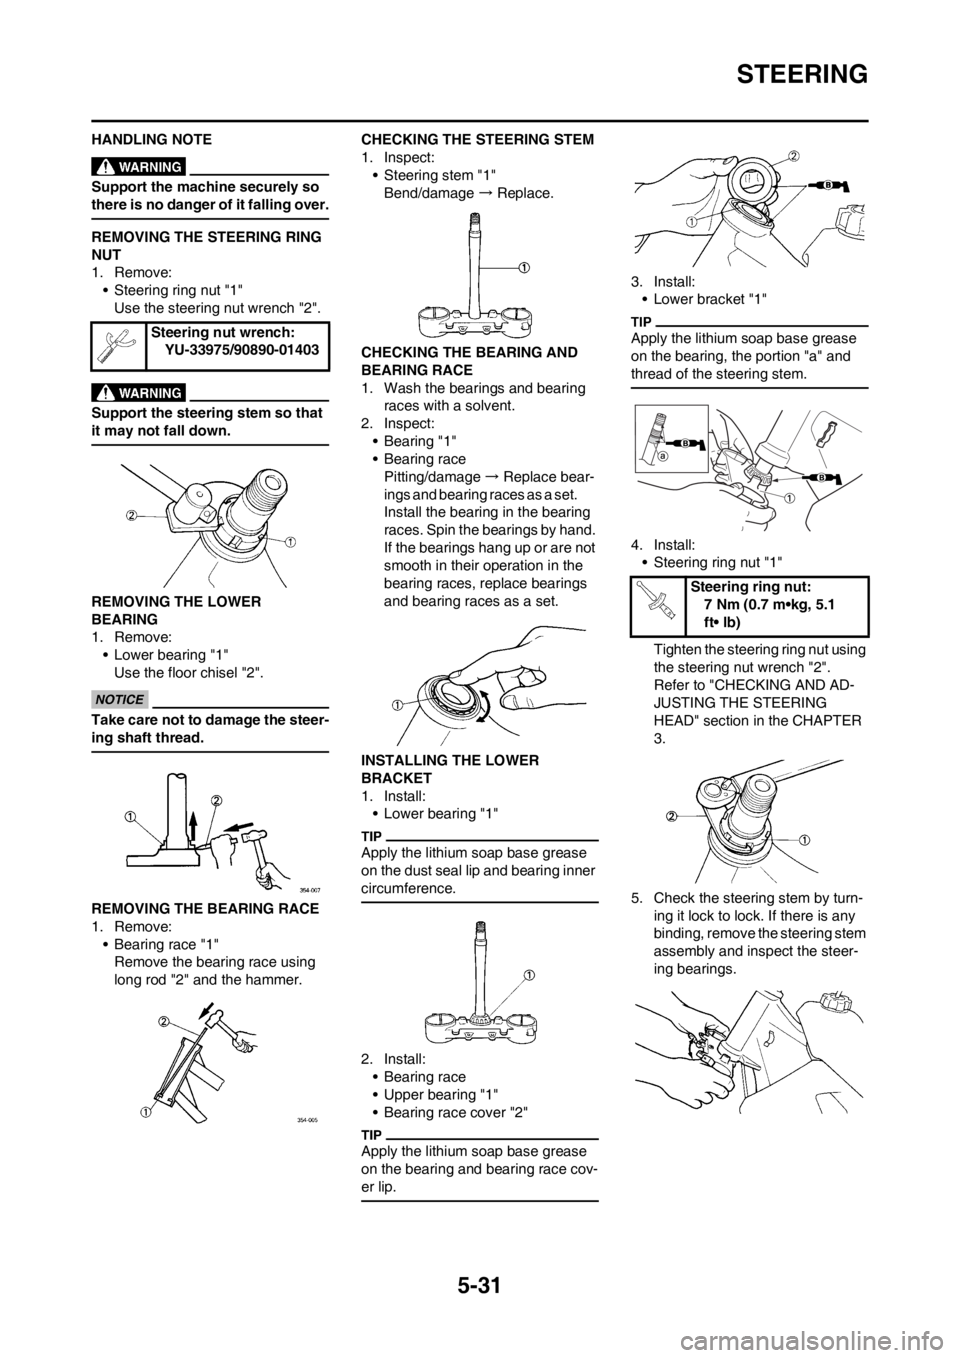
HANDLING NOTE
Support the machine securely so
there is no danger of it falling over.
REMOVING THE STEERING RING
NUT
1. Remove:
• Steering ring nut "1"
Use the steering nut wrench "2".
Support the steering stem so that
it may not fall down.
REMOVING THE LOWER
BEARING
1. Remove:
• Lower bearing "1"
Use the floor chisel "2".
Take care not to damage the steer-
ing shaft thread.
REMOVING THE BEARING RACE
1. Remove:
• Bearing race "1"
Remove the bearing race using
long rod "2" and the hammer.CHECKING THE STEERING STEM
1. Inspect:
• Steering stem "1"
Bend/damage → Replace.
CHECKING THE BEARING AND
BEARING RACE
1. Wash the bearings and bearing
races with a solvent.
2. Inspect:
•Bearing "1"
• Bearing race
Pitting/damage → Replace bear-
ings and bearing races as a set.
Install the bearing in the bearing
races. Spin the bearings by hand.
If the bearings hang up or are not
smooth in their operation in the
bearing races, replace bearings
and bearing races as a set.
INSTALLING THE LOWER
BRACKET
1. Install:
• Lower bearing "1"
Apply the lithium soap base grease
on the dust seal lip and bearing inner
circumference.
2. Install:
• Bearing race
• Upper bearing "1"
• Bearing race cover "2"
Apply the lithium soap base grease
on the bearing and bearing race cov-
er lip.
3. Install:
• Lower bracket "1"
Apply the lithium soap base grease
on the bearing, the portion "a" and
thread of the steering stem.
4. Install:
• Steering ring nut "1"
Tighten the steering ring nut using
the steering nut wrench "2".
Refer to "CHECKING AND AD-
JUSTING THE STEERING
HEAD" section in the CHAPTER
3.
5. Check the steering stem by turn-
ing it lock to lock. If there is any
binding, remove the steering stem
assembly and inspect the steer-
ing bearings. Steering nut wrench:
YU-33975/90890-01403
Steering ring nut:
7 Nm (0.7 m•kg, 5.1
ft• lb)
Page 140 of 168
5-32
STEERING
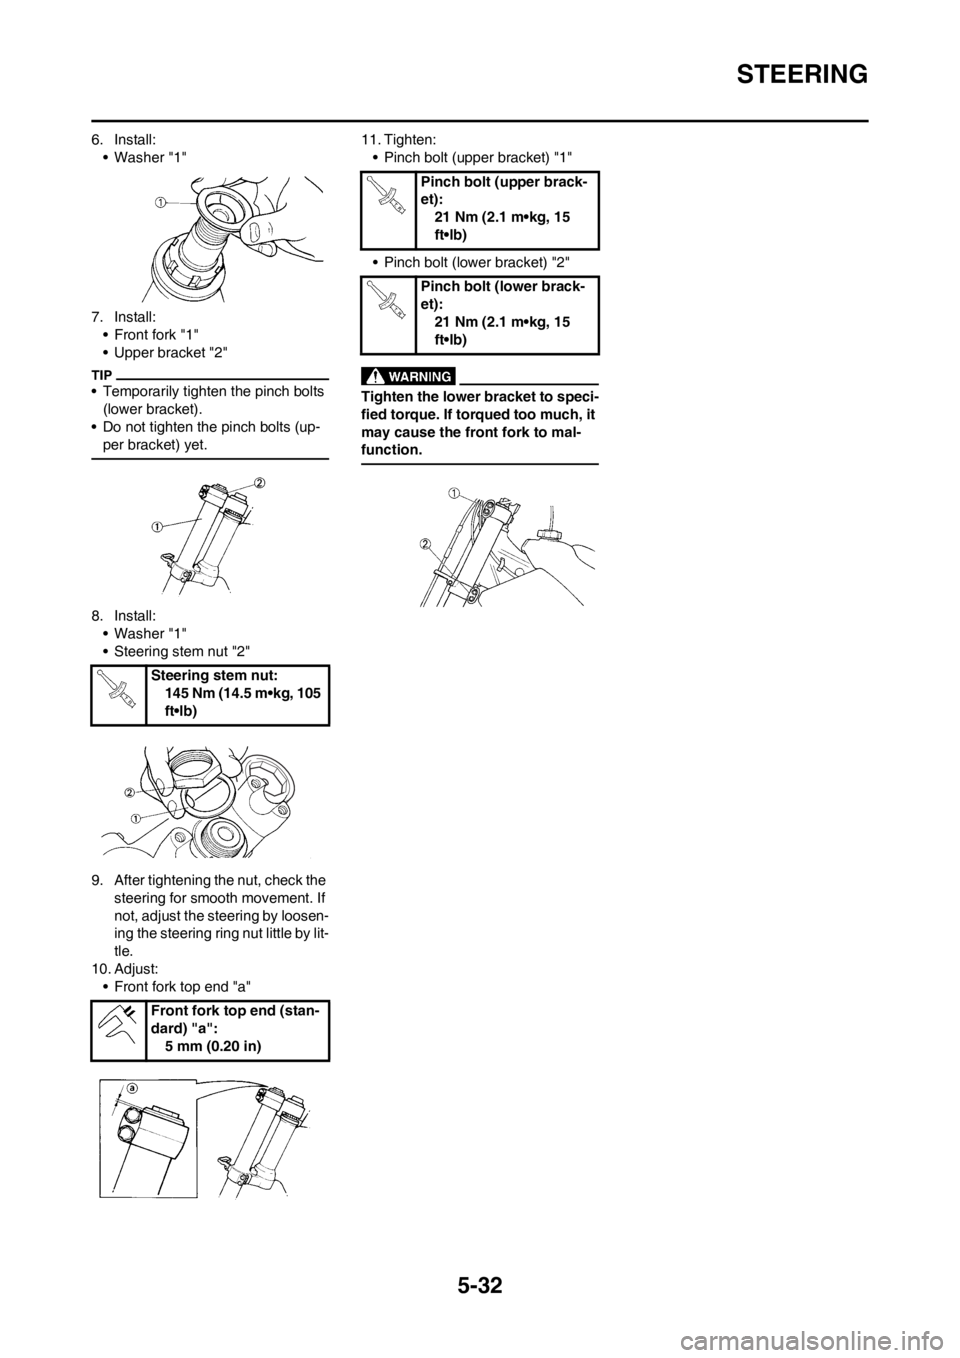
6. Install:
• Washer "1"
7. Install:
• Front fork "1"
• Upper bracket "2"
• Temporarily tighten the pinch bolts
(lower bracket).
• Do not tighten the pinch bolts (up-
per bracket) yet.
8. Install:
• Washer "1"
• Steering stem nut "2"
9. After tightening the nut, check the
steering for smooth movement. If
not, adjust the steering by loosen-
ing the steering ring nut little by lit-
tle.
10. Adjust:
• Front fork top end "a"11. Tighten:
• Pinch bolt (upper bracket) "1"
• Pinch bolt (lower bracket) "2"
Tighten the lower bracket to speci-
fied torque. If torqued too much, it
may cause the front fork to mal-
function.
Steering stem nut:
145 Nm (14.5 m•kg, 105
ft•lb)
Front fork top end (stan-
dard) "a":
5 mm (0.20 in)
Pinch bolt (upper brack-
et):
21 Nm (2.1 m•kg, 15
ft•lb)
Pinch bolt (lower brack-
et):
21 Nm (2.1 m•kg, 15
ft•lb)