warning YAMAHA YZ250F 2005 Notices Demploi (in French)
[x] Cancel search | Manufacturer: YAMAHA, Model Year: 2005, Model line: YZ250F, Model: YAMAHA YZ250F 2005Pages: 668, PDF Size: 15.74 MB
Page 210 of 668
3 - 25
INSP
ADJ
FRONT BRAKE ADJUSTMENT
3. Install:
Protector (rear brake)
Reservoir float (front brake)
Diaphragm
Brake master cylinder cap
NOTE:
If bleeding is difficult, it may be necessary to
let the brake fluid system stabilize for a few
hours. Repeat the bleeding procedure when
the tiny bubbles in the system have disap-
peared.
j. Add brake fluid to the level line on the
reservoir.
WARNING
Check the operation of the brake after
bleeding the brake system.
EC362040
FRONT BRAKE ADJUSTMENT
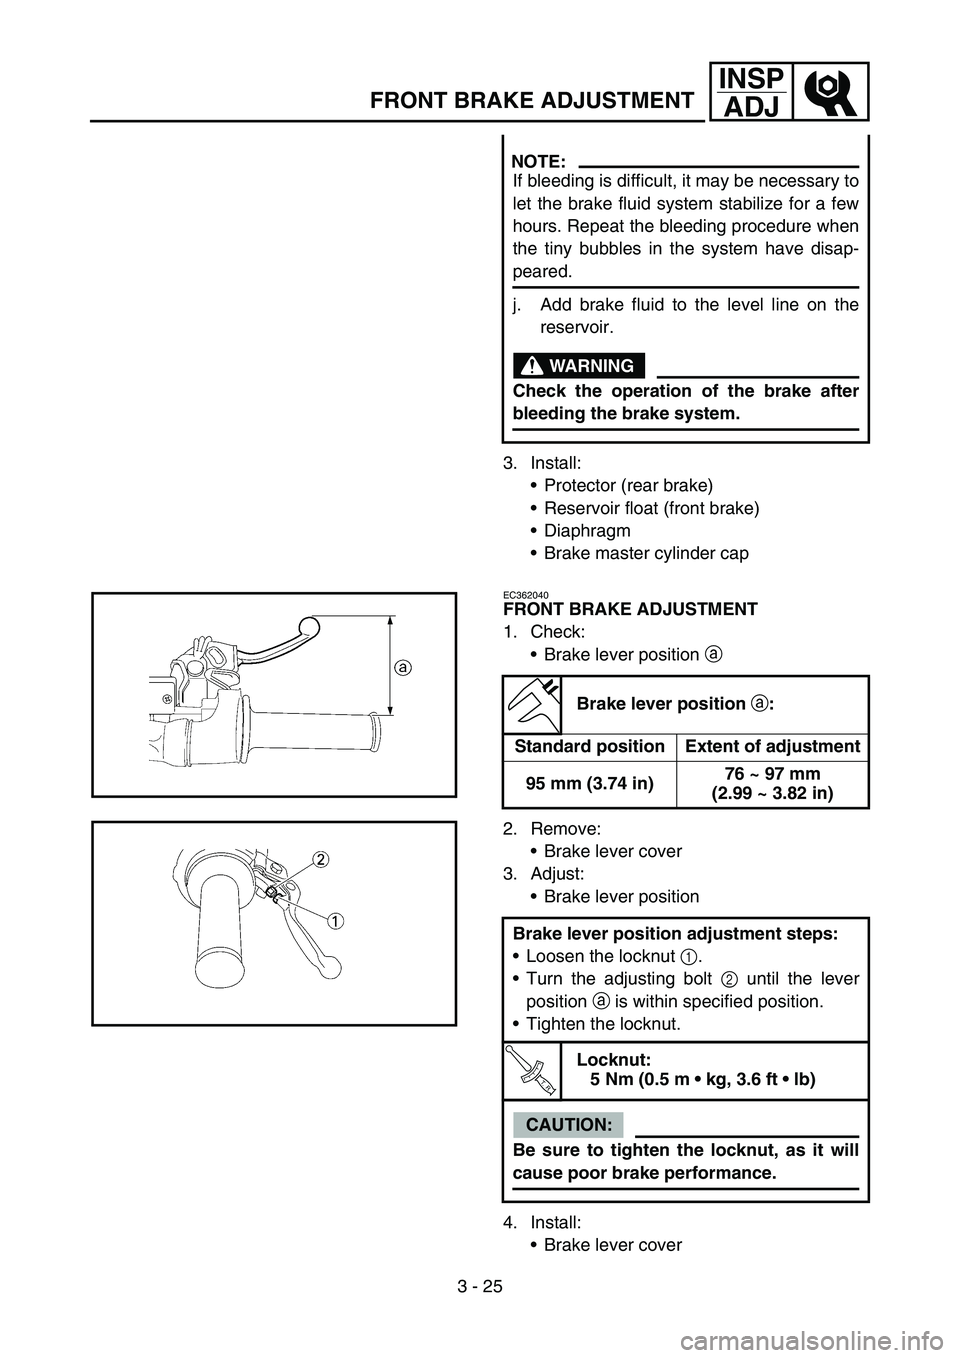
1. Check:
Brake lever position a
2. Remove:
Brake lever cover
3. Adjust:
Brake lever position
4. Install:
Brake lever cover
Brake lever position
a:
Standard position Extent of adjustment
95 mm (3.74 in)76 ~ 97 mm
(2.99 ~ 3.82 in)
Brake lever position adjustment steps:
Loosen the locknut 1.
Turn the adjusting bolt 2 until the lever
position a is within specified position.
Tighten the locknut.
T R..
Locknut:
5 Nm (0.5 m kg, 3.6 ft lb)
CAUTION:
Be sure to tighten the locknut, as it will
cause poor brake performance.
Page 212 of 668
3 - 26
INSP
ADJREAR BRAKE ADJUSTMENT/
FRONT BRAKE PAD INSPECTION AND REPLACEMENT
EC364002
REAR BRAKE ADJUSTMENT
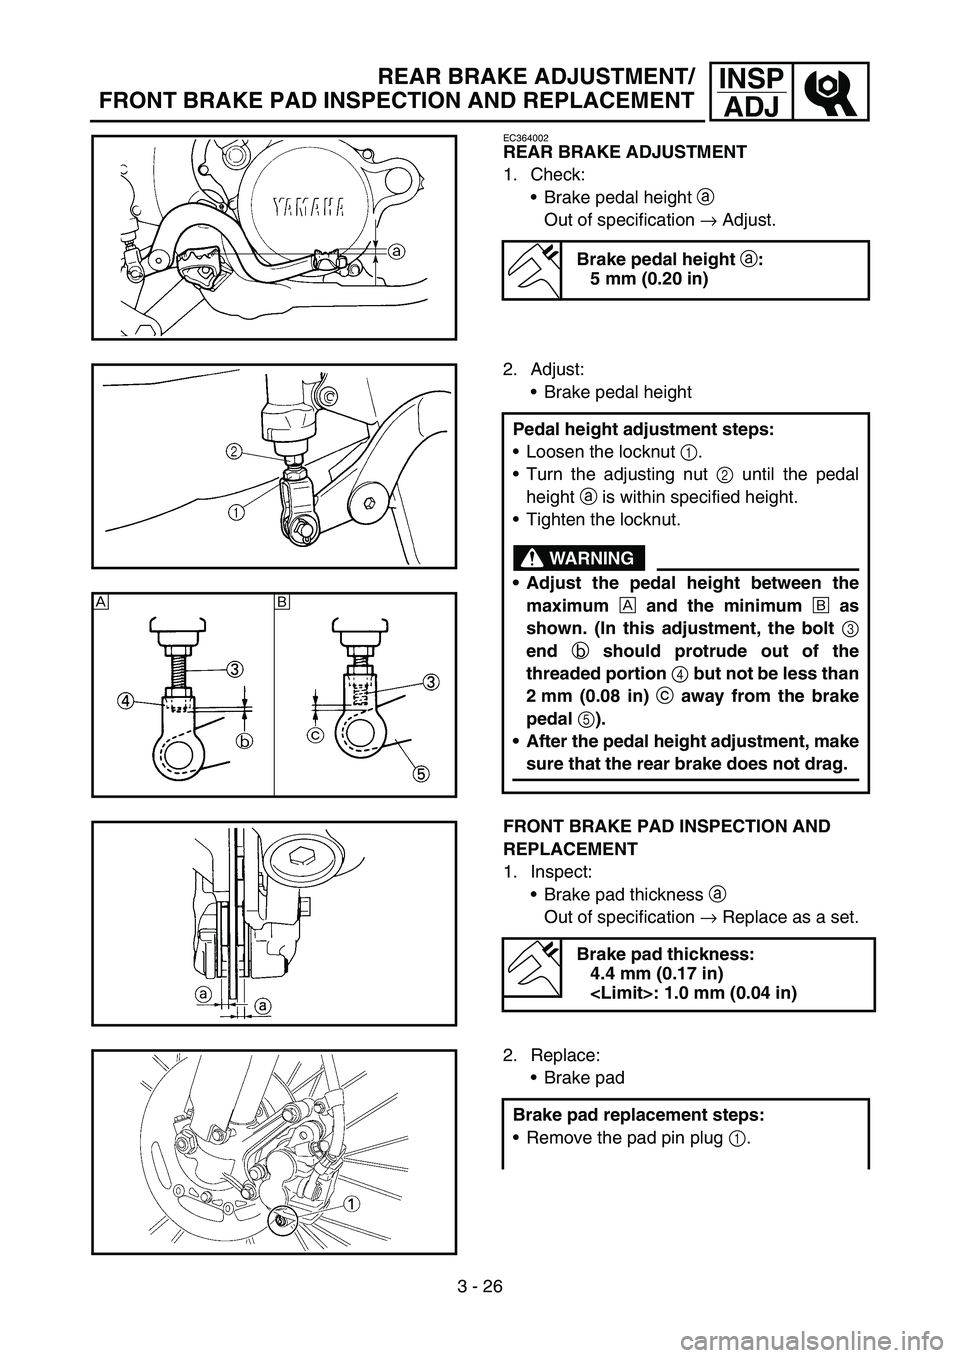
1. Check:
Brake pedal height a
Out of specification → Adjust.
Brake pedal height
a:
5 mm (0.20 in)
2. Adjust:
Brake pedal height
Pedal height adjustment steps:
Loosen the locknut 1.
Turn the adjusting nut 2 until the pedal
height a is within specified height.
Tighten the locknut.
WARNING
Adjust the pedal height between the
maximum
È and the minimum
É as
shown. (In this adjustment, the bolt
3
end
b should protrude out of the
threaded portion
4 but not be less than
2 mm (0.08 in)
c away from the brake
pedal
5).
After the pedal height adjustment, make
sure that the rear brake does not drag.
È
É
FRONT BRAKE PAD INSPECTION AND
REPLACEMENT
1. Inspect:
Brake pad thickness a
Out of specification → Replace as a set.
Brake pad thickness:
4.4 mm (0.17 in)
2. Replace:
Brake pad
Brake pad replacement steps:
Remove the pad pin plug 1.
Page 220 of 668
3 - 30
INSP
ADJREAR BRAKE PAD INSULATOR INSPECTION/
BRAKE FLUID LEVEL INSPECTION
3. Inspect:
Brake fluid level
Refer to “BRAKE FLUID LEVEL INSPEC-
TION” section.
4. Check:
Brake pedal operation
A softy or spongy feeling → Bleed brake
system.
Refer to “BRAKE SYSTEM AIR BLEED-
ING” section.
EC36b000
REAR BRAKE PAD INSULATOR
INSPECTION
1. Remove:
Brake pad
Refer to “REAR BRAKE PAD INSPEC-
TION AND REPLACEMENT” section.
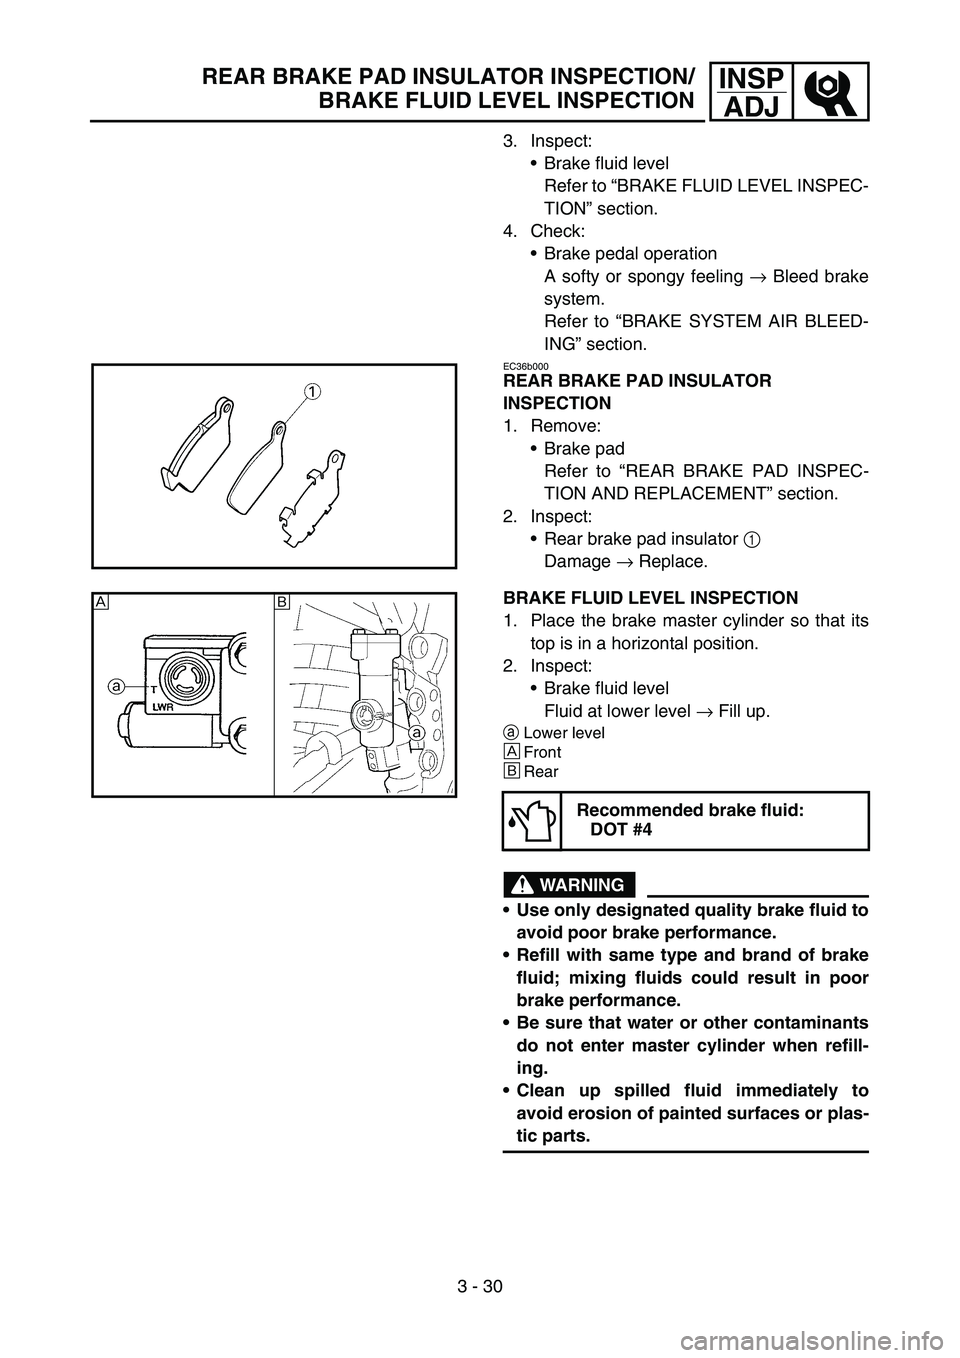
2. Inspect:
Rear brake pad insulator 1
Damage → Replace.
BRAKE FLUID LEVEL INSPECTION
1. Place the brake master cylinder so that its
top is in a horizontal position.
2. Inspect:
Brake fluid level
Fluid at lower level → Fill up.
aLower level
ÈFront
ÉRear
WARNING
Use only designated quality brake fluid to
avoid poor brake performance.
Refill with same type and brand of brake
fluid; mixing fluids could result in poor
brake performance.
Be sure that water or other contaminants
do not enter master cylinder when refill-
ing.
Clean up spilled fluid immediately to
avoid erosion of painted surfaces or plas-
tic parts.
Recommended brake fluid:
DOT #4
ÈÉ
Page 230 of 668
3 - 35
INSP
ADJFRONT FORK COMPRESSION DAMPING FORCE
ADJUSTMENT
STANDARD POSITION:
This is the position which is back by the spe-
cific number of clicks from the fully turned-in
position.
* For EUROPE
CAUTION:
Do not force the adjuster past the minimum
or maximum extent of adjustment. The
adjuster may be damaged.
WARNING
Always adjust each front fork to the same
setting. Uneven adjustment can cause poor
handling and loss of stability.
Extent of adjustment
Maximum Minimum
Fully turned in
position20 clicks out (from
maximum position)
Standard position:
12 clicks out
* 13 clicks out
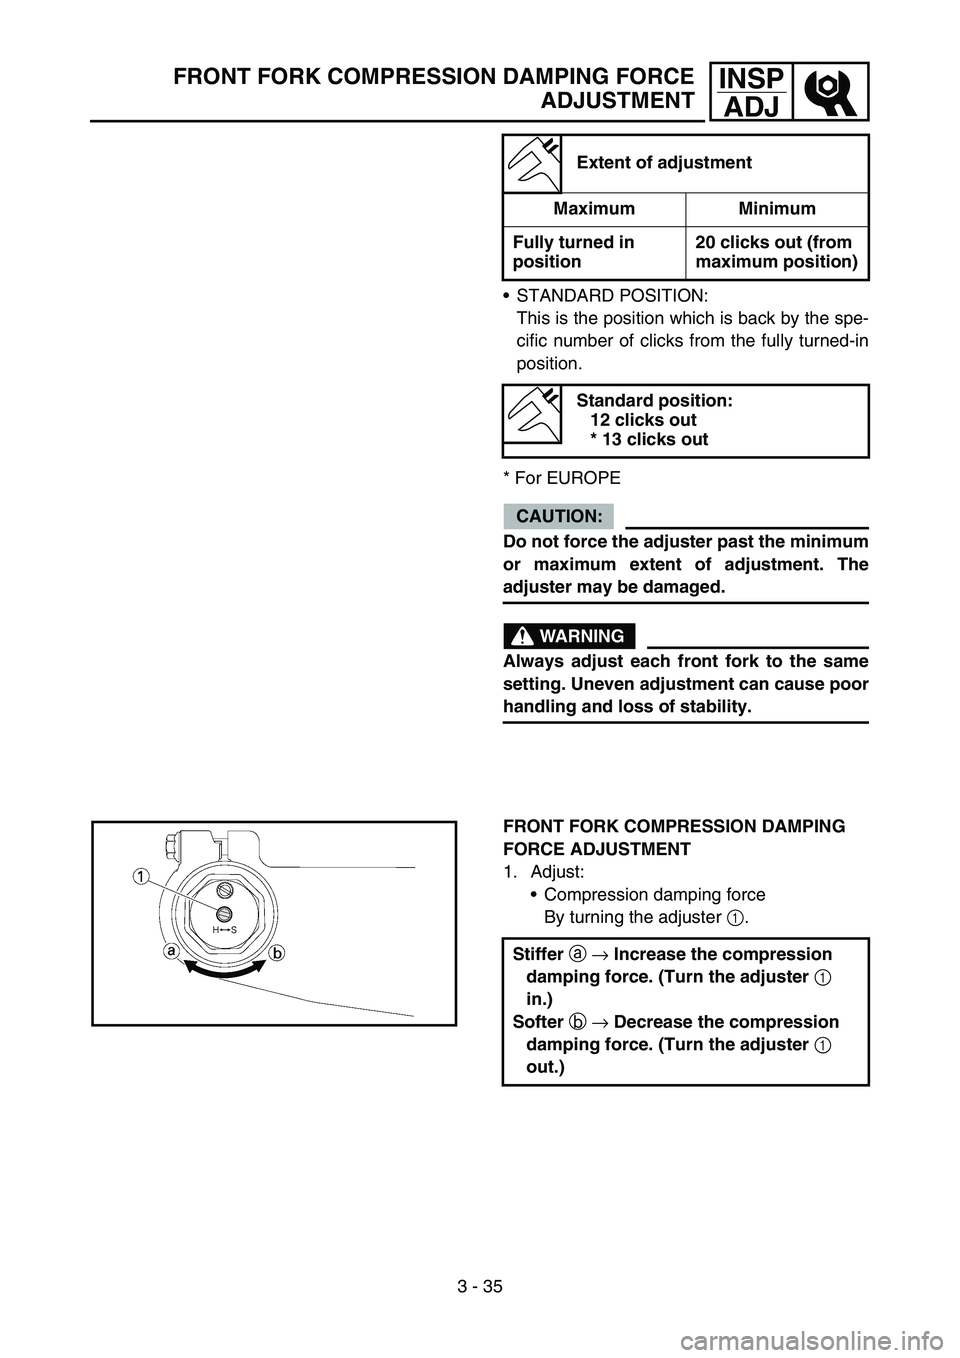
FRONT FORK COMPRESSION DAMPING
FORCE ADJUSTMENT
1. Adjust:
Compression damping force
By turning the adjuster 1.
Stiffer
a
→ Increase the compression
damping force. (Turn the adjuster
1
in.)
Softer
b
→ Decrease the compression
damping force. (Turn the adjuster
1
out.)
Page 232 of 668
3 - 36
INSP
ADJ
REAR SHOCK ABSORBER INSPECTION
Extent of adjustment
Maximum Minimum
Fully turned in
position20 clicks out
(from maximum
position)
STANDARD POSITION:
This is the position which is back by the spe-
cific number of clicks from the fully turned-in
position.
CAUTION:
Do not force the adjuster past the minimum
or maximum extent of adjustment. The
adjuster may be damaged.
WARNING
Always adjust each front fork to the same
setting. Uneven adjustment can cause poor
handling and loss of stability.
Standard position:
11 clicks out
EC36K000
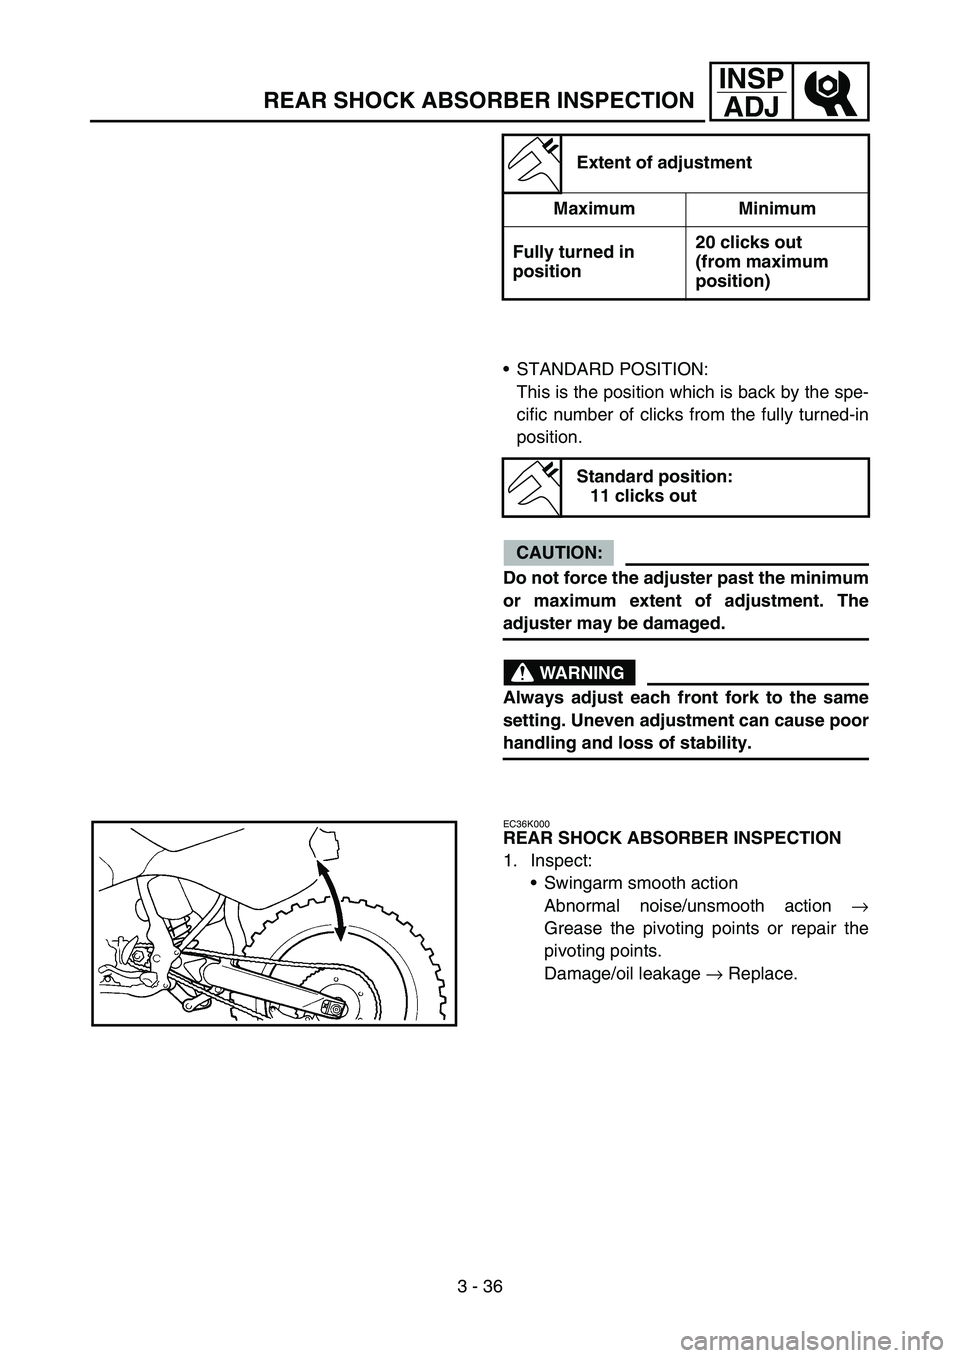
REAR SHOCK ABSORBER INSPECTION
1. Inspect:
Swingarm smooth action
Abnormal noise/unsmooth action →
Grease the pivoting points or repair the
pivoting points.
Damage/oil leakage → Replace.
Page 246 of 668
3 - 43
INSP
ADJ
STEERING HEAD INSPECTION AND ADJUSTMENT
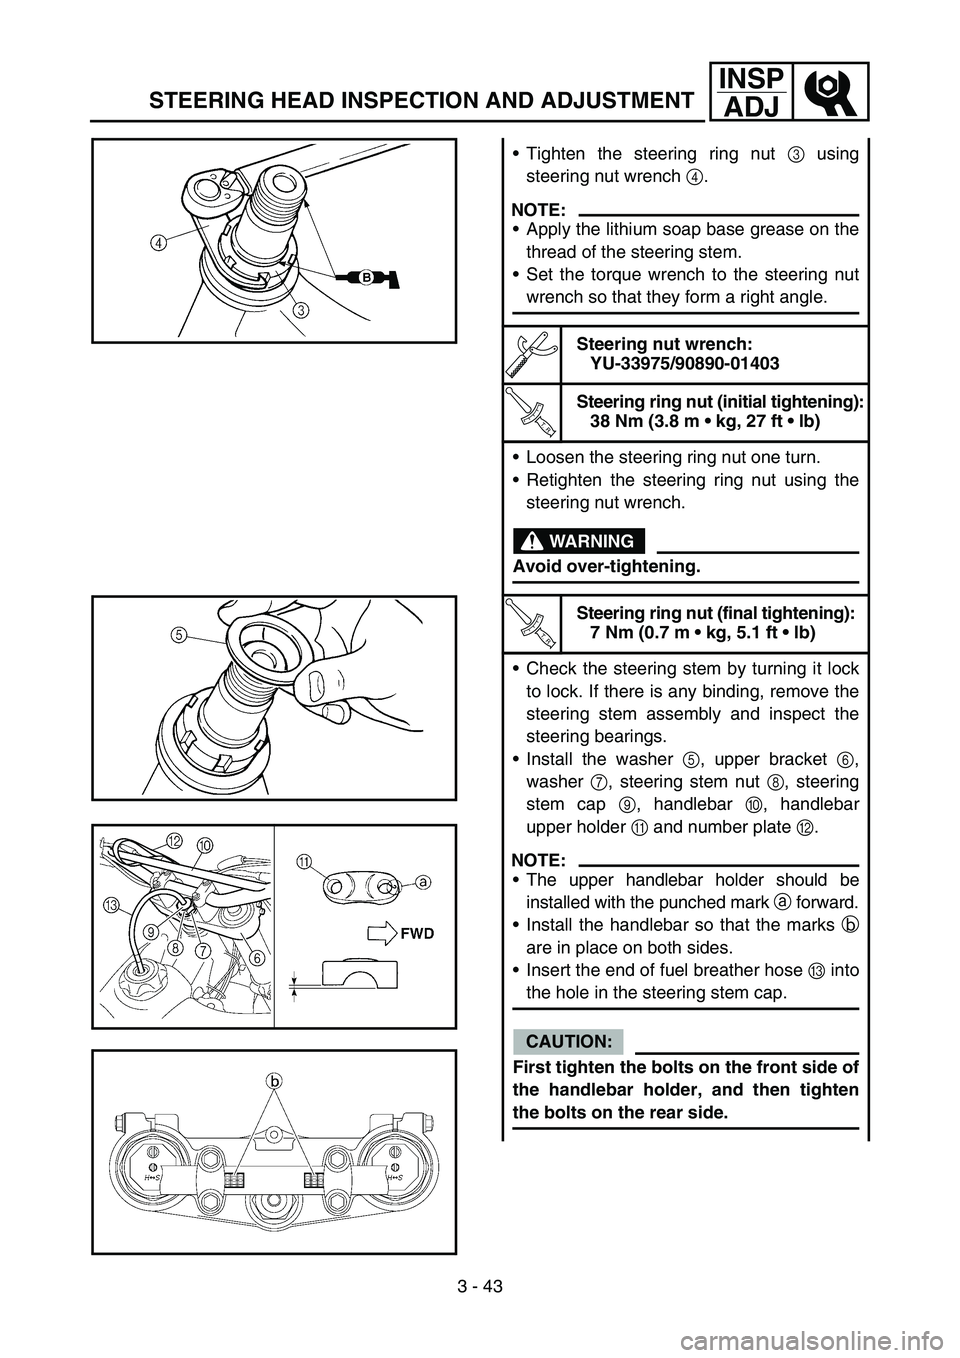
Tighten the steering ring nut 3 using
steering nut wrench 4.
NOTE:
Apply the lithium soap base grease on the
thread of the steering stem.
Set the torque wrench to the steering nut
wrench so that they form a right angle.
Steering nut wrench:
YU-33975/90890-01403
T R..
Steering ring nut (initial tightening):
38 Nm (3.8 m kg, 27 ft lb)
Loosen the steering ring nut one turn.
Retighten the steering ring nut using the
steering nut wrench.
WARNING
Avoid over-tightening.
T R..
Steering ring nut (final tightening):
7 Nm (0.7 m kg, 5.1 ft lb)
Check the steering stem by turning it lock
to lock. If there is any binding, remove the
steering stem assembly and inspect the
steering bearings.
Install the washer 5, upper bracket 6,
washer 7, steering stem nut 8, steering
stem cap 9, handlebar 0, handlebar
upper holder A and number plate B.
NOTE:
The upper handlebar holder should be
installed with the punched mark a forward.
Install the handlebar so that the marks b
are in place on both sides.
Insert the end of fuel breather hose C into
the hole in the steering stem cap.
CAUTION:
First tighten the bolts on the front side of
the handlebar holder, and then tighten
the bolts on the rear side.
Page 266 of 668
4 - 6
ENGRADIATOR
EC456000
HANDLING NOTE
WARNING
Do not remove the radiator cap when the
engine and radiator are hot. Scalding hot
fluid and steam may be blown out under
pressure, which could cause serious
injury.
When the engine has cooled, open the radi-
ator cap by the following procedure:
Place a thick rag, like a towel, over the radi-
ator cap, slowly rotate the cap counter-
clockwise to the detent. This procedure
allows any residual pressure to escape.
When the hissing sound has stopped,
press down on the cap while turning coun-
terclockwise and remove it.
EC454000
INSPECTION
EC444100
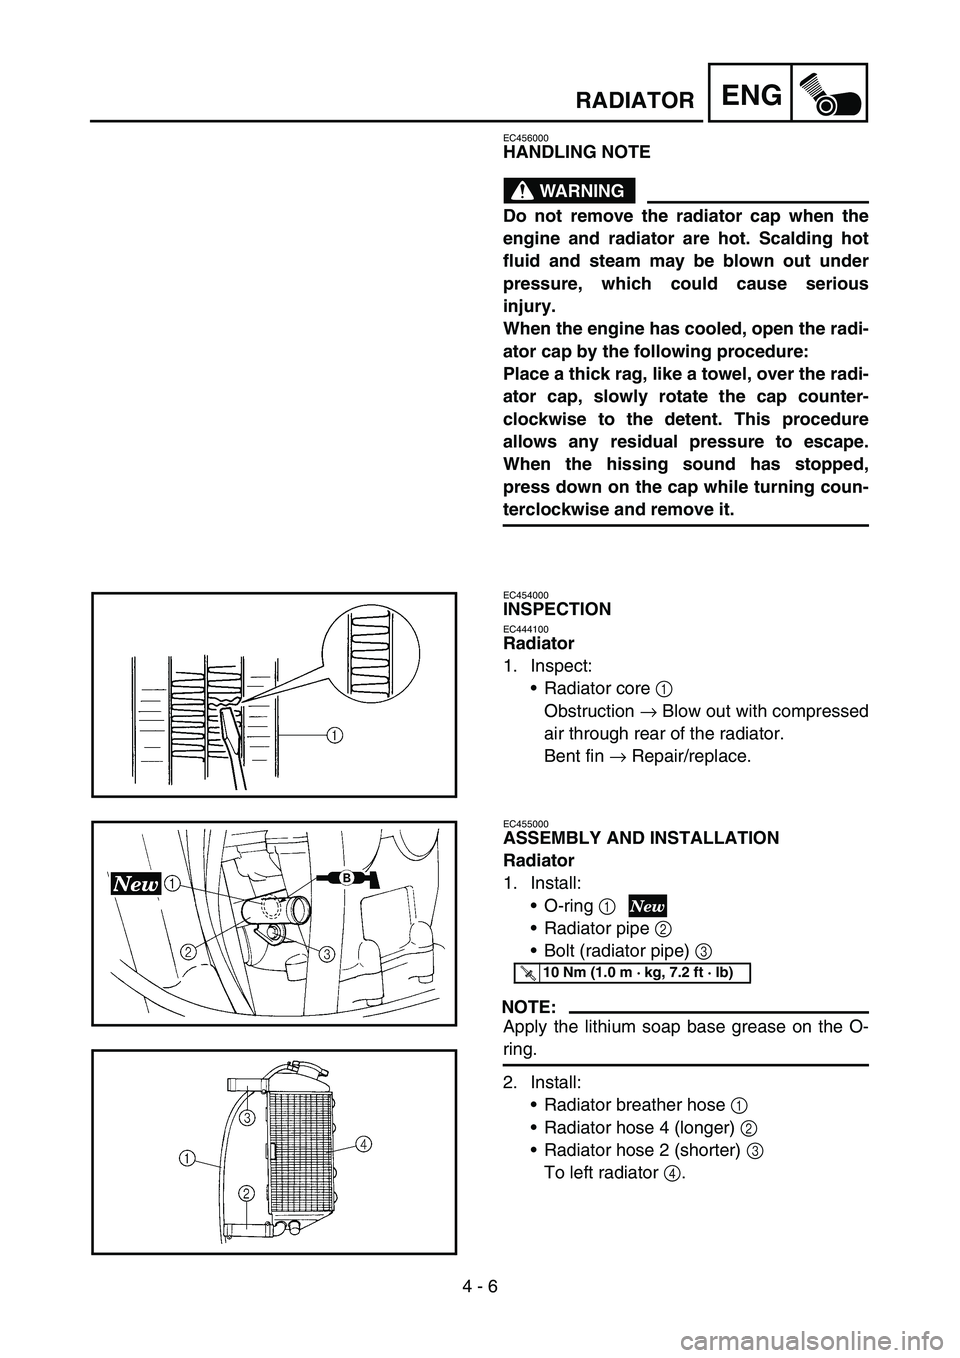
Radiator
1. Inspect:
Radiator core 1
Obstruction → Blow out with compressed
air through rear of the radiator.
Bent fin → Repair/replace.
EC455000
ASSEMBLY AND INSTALLATION
Radiator
1. Install:
O-ring 1
Radiator pipe 2
Bolt (radiator pipe) 3
NOTE:
Apply the lithium soap base grease on the O-
ring.
2. Install:
Radiator breather hose 1
Radiator hose 4 (longer) 2
Radiator hose 2 (shorter) 3
To left radiator 4.
T R..10 Nm (1.0 m · kg, 7.2 ft · lb)
Page 418 of 668
4 - 82
ENGENGINE REMOVAL
EC4M0000
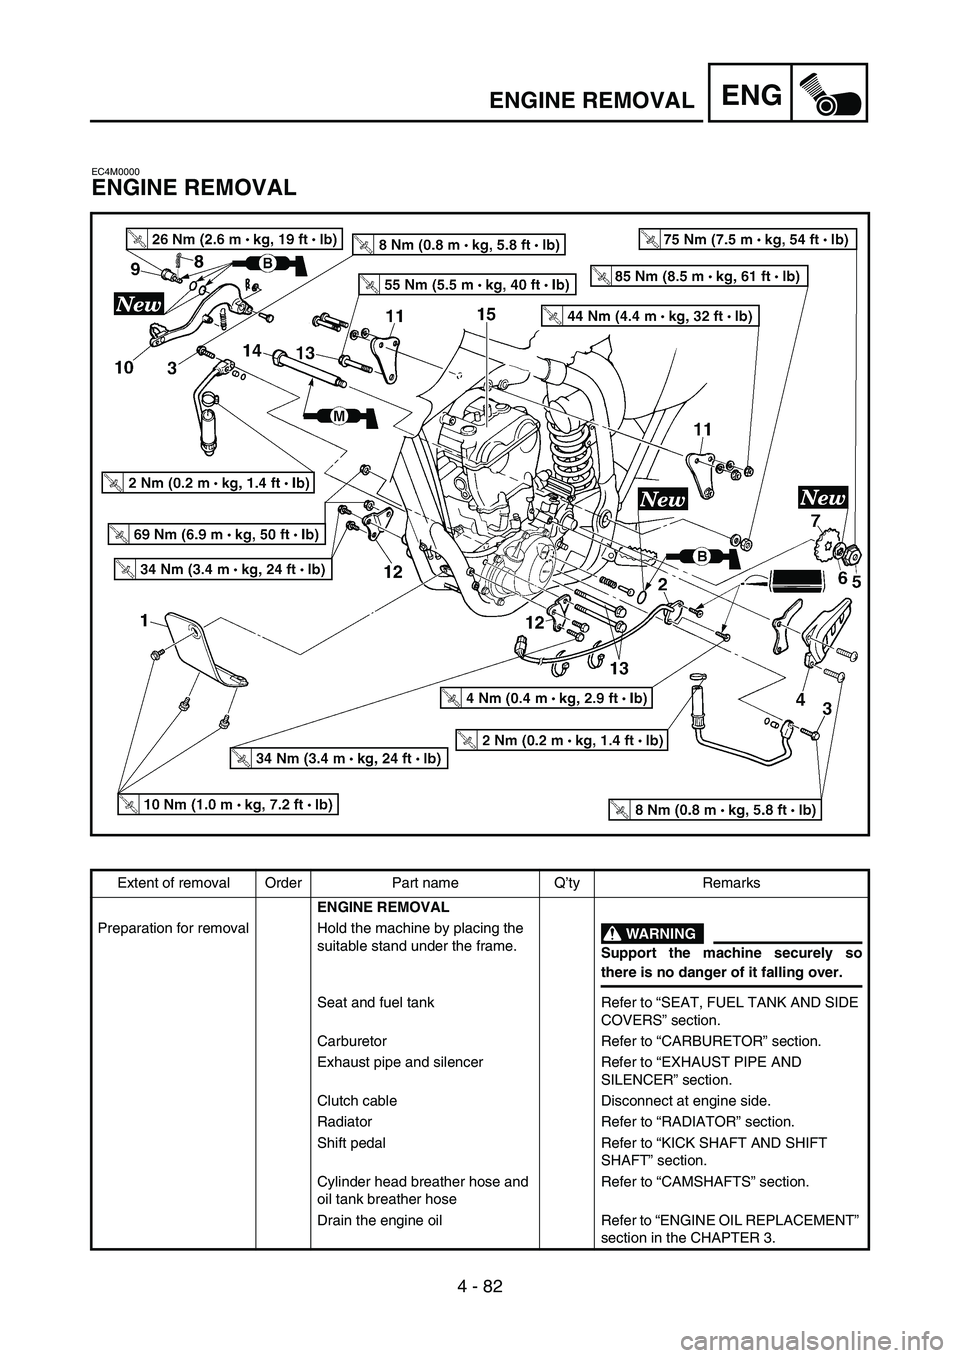
ENGINE REMOVAL
Extent of removal Order Part name Q’ty Remarks
ENGINE REMOVAL
Preparation for removal Hold the machine by placing the
suitable stand under the frame.
WARNING
Support the machine securely so
there is no danger of it falling over.
Seat and fuel tank Refer to “SEAT, FUEL TANK AND SIDE
COVERS” section.
Carburetor Refer to “CARBURETOR” section.
Exhaust pipe and silencer Refer to “EXHAUST PIPE AND
SILENCER” section.
Clutch cable Disconnect at engine side.
Radiator Refer to “RADIATOR” section.
Shift pedal Refer to “KICK SHAFT AND SHIFT
SHAFT” section.
Cylinder head breather hose and
oil tank breather hoseRefer to “CAMSHAFTS” section.
Drain the engine oil Refer to “ENGINE OIL REPLACEMENT”
section in the CHAPTER 3.
Page 456 of 668
5 - 1
CHAS
EC500000
CHASSIS
EC590000
FRONT WHEEL AND REAR WHEEL
EC598000
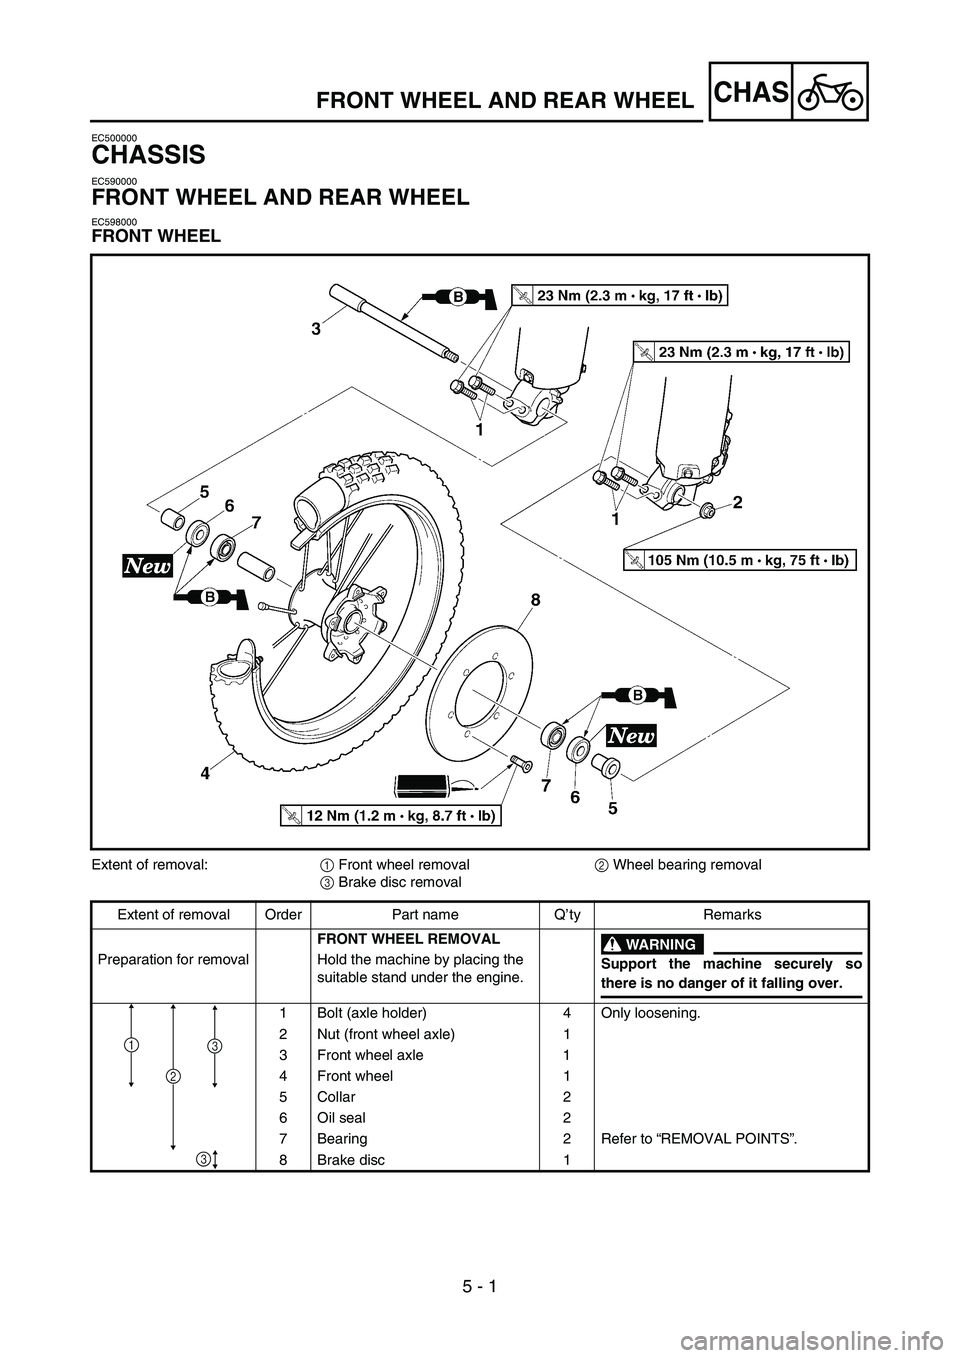
FRONT WHEEL
FRONT WHEEL AND REAR WHEEL
Extent of removal:
1 Front wheel removal
2 Wheel bearing removal
3 Brake disc removal
Extent of removal Order Part name Q’ty Remarks
FRONT WHEEL REMOVAL
WARNING
Support the machine securely so
there is no danger of it falling over. Preparation for removal Hold the machine by placing the
suitable stand under the engine.
1 Bolt (axle holder) 4 Only loosening.
2 Nut (front wheel axle) 1
3 Front wheel axle 1
4 Front wheel 1
5 Collar 2
6 Oil seal 2
7 Bearing 2 Refer to “REMOVAL POINTS”.
8 Brake disc 1
2
31
3
Page 458 of 668
5 - 2
CHAS
EC598100
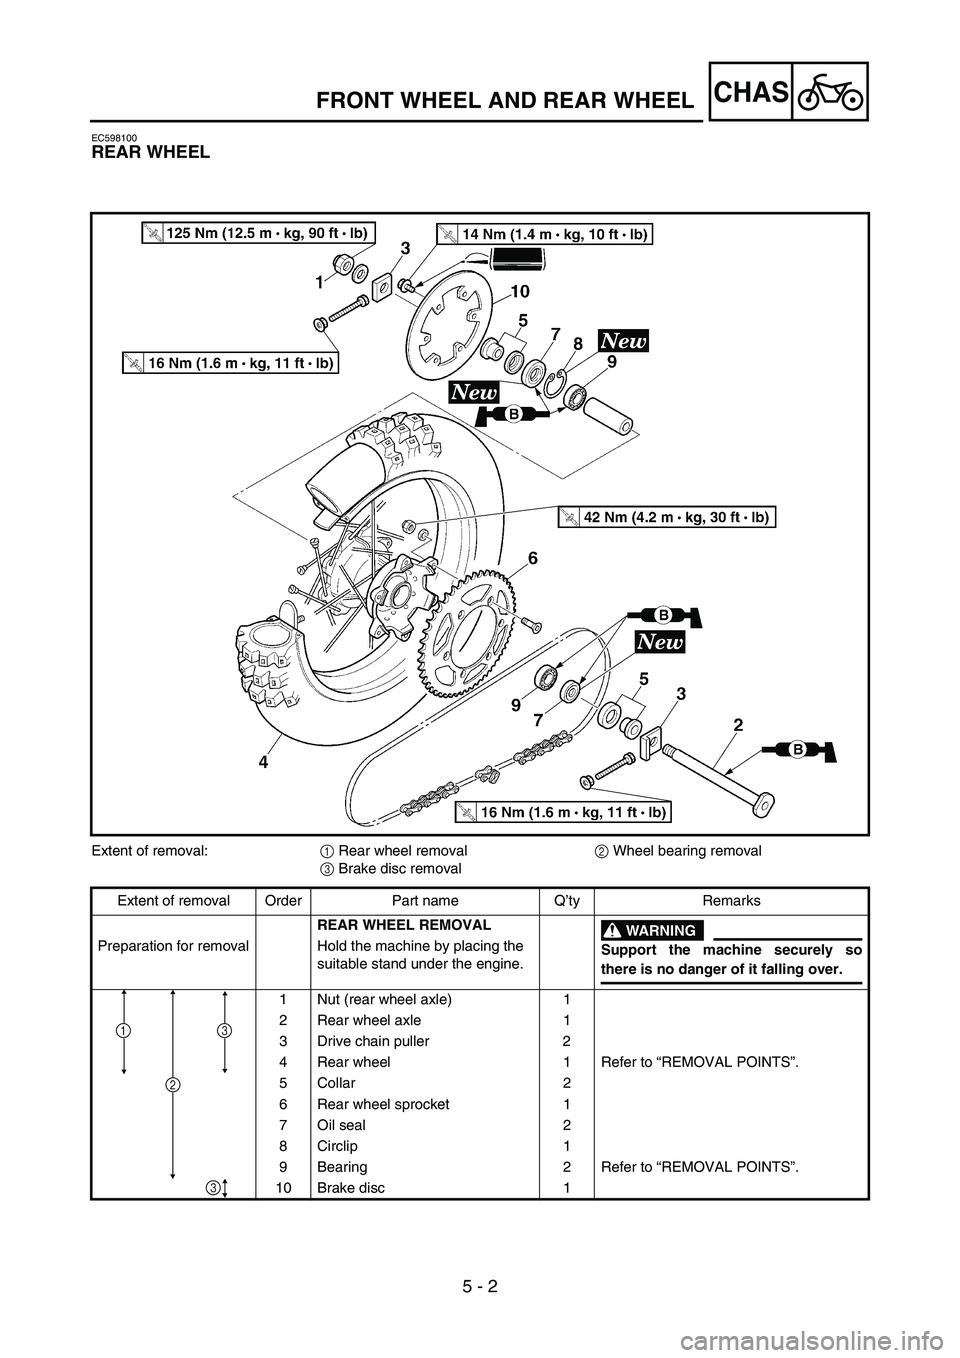
REAR WHEEL
Extent of removal:
1 Rear wheel removal
2 Wheel bearing removal
3 Brake disc removal
Extent of removal Order Part name Q’ty Remarks
REAR WHEEL REMOVAL
WARNING
Support the machine securely so
there is no danger of it falling over. Preparation for removal Hold the machine by placing the
suitable stand under the engine.
1 Nut (rear wheel axle) 1
2 Rear wheel axle 1
3 Drive chain puller 2
4 Rear wheel 1 Refer to “REMOVAL POINTS”.
5 Collar 2
6 Rear wheel sprocket 1
7 Oil seal 2
8 Circlip 1
9 Bearing 2 Refer to “REMOVAL POINTS”.
10 Brake disc 1
2
31
3
FRONT WHEEL AND REAR WHEEL