warning YAMAHA YZ250F 2005 Notices Demploi (in French)
[x] Cancel search | Manufacturer: YAMAHA, Model Year: 2005, Model line: YZ250F, Model: YAMAHA YZ250F 2005Pages: 668, PDF Size: 15.74 MB
Page 462 of 668
5 - 4
CHASFRONT WHEEL AND REAR WHEEL
EC514200
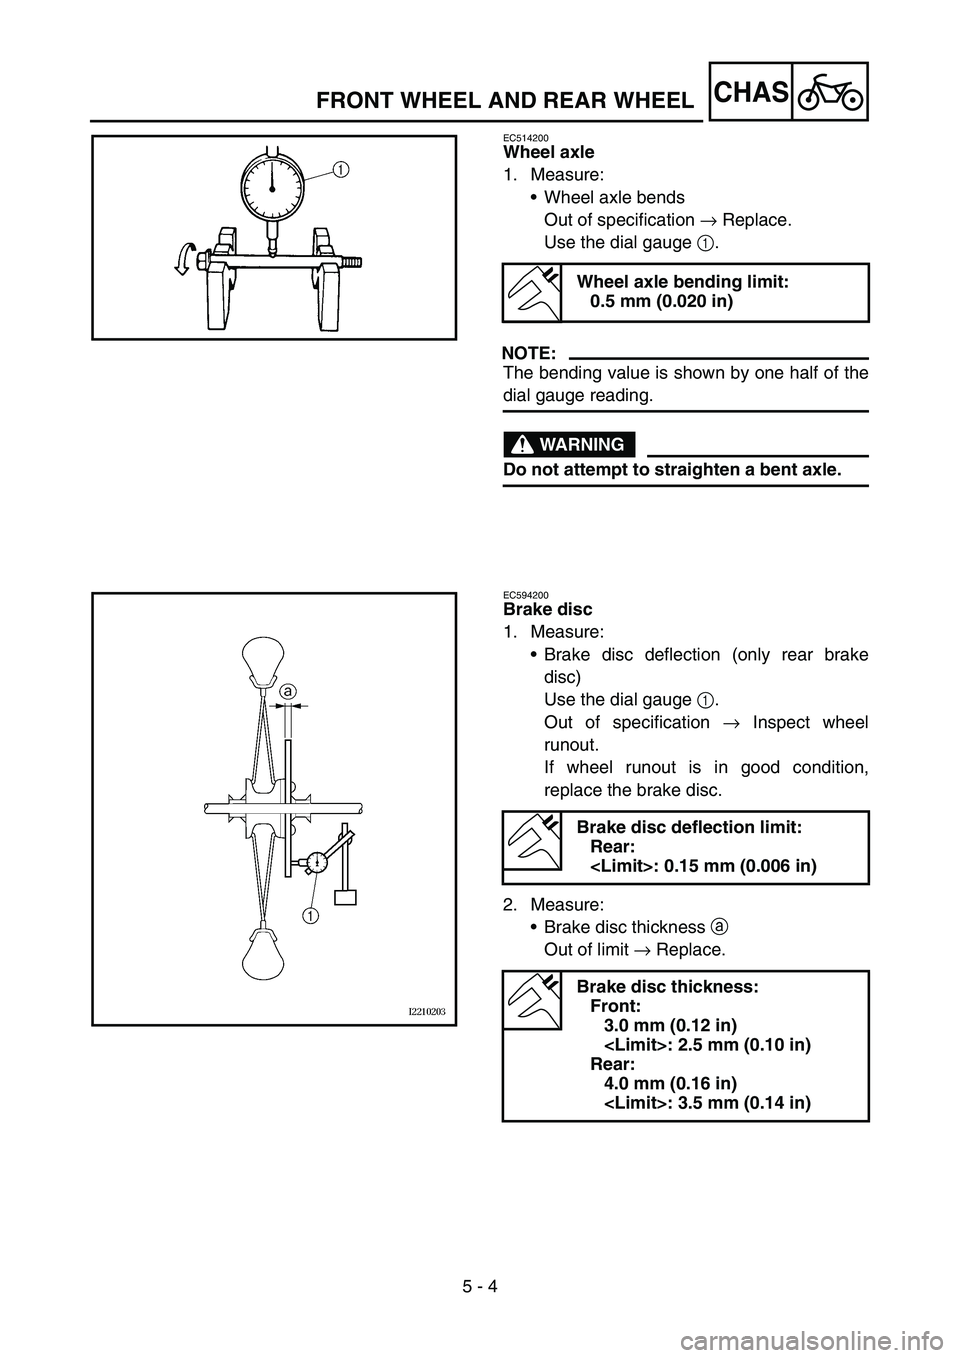
Wheel axle
1. Measure:
Wheel axle bends
Out of specification → Replace.
Use the dial gauge 1.
NOTE:
The bending value is shown by one half of the
dial gauge reading.
WARNING
Do not attempt to straighten a bent axle.
Wheel axle bending limit:
0.5 mm (0.020 in)
EC594200
Brake disc
1. Measure:
Brake disc deflection (only rear brake
disc)
Use the dial gauge 1.
Out of specification → Inspect wheel
runout.
If wheel runout is in good condition,
replace the brake disc.
2. Measure:
Brake disc thickness a
Out of limit → Replace.
Brake disc deflection limit:
Rear:
Brake disc thickness:
Front:
3.0 mm (0.12 in)
Rear:
4.0 mm (0.16 in)
Page 474 of 668
5 - 10
CHASFRONT BRAKE AND REAR BRAKE
EC5A0000
FRONT BRAKE AND REAR BRAKE
EC5A8000
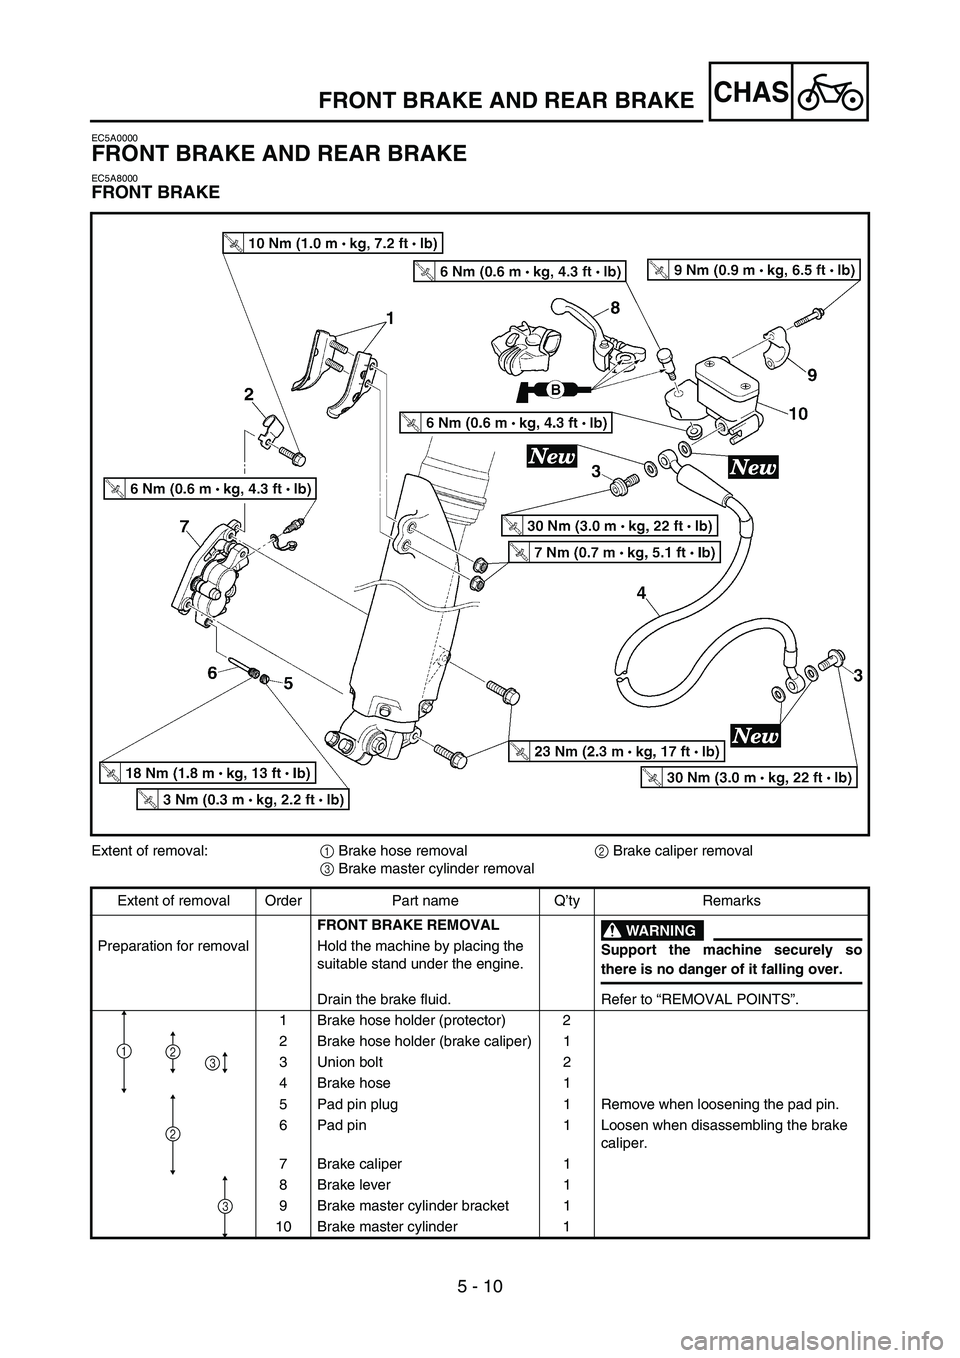
FRONT BRAKE
Extent of removal:
1 Brake hose removal
2 Brake caliper removal
3 Brake master cylinder removal
Extent of removal Order Part name Q’ty Remarks
FRONT BRAKE REMOVAL
WARNING
Support the machine securely so
there is no danger of it falling over. Preparation for removal Hold the machine by placing the
suitable stand under the engine.
Drain the brake fluid. Refer to “REMOVAL POINTS”.
1 Brake hose holder (protector) 2
2 Brake hose holder (brake caliper) 1
3 Union bolt 2
4 Brake hose 1
5 Pad pin plug 1 Remove when loosening the pad pin.
6 Pad pin 1 Loosen when disassembling the brake
caliper.
7 Brake caliper 1
8Brake lever 1
9 Brake master cylinder bracket 1
10 Brake master cylinder 1
3
3
2
2
1
Page 476 of 668
5 - 11
CHAS
EC5A8100
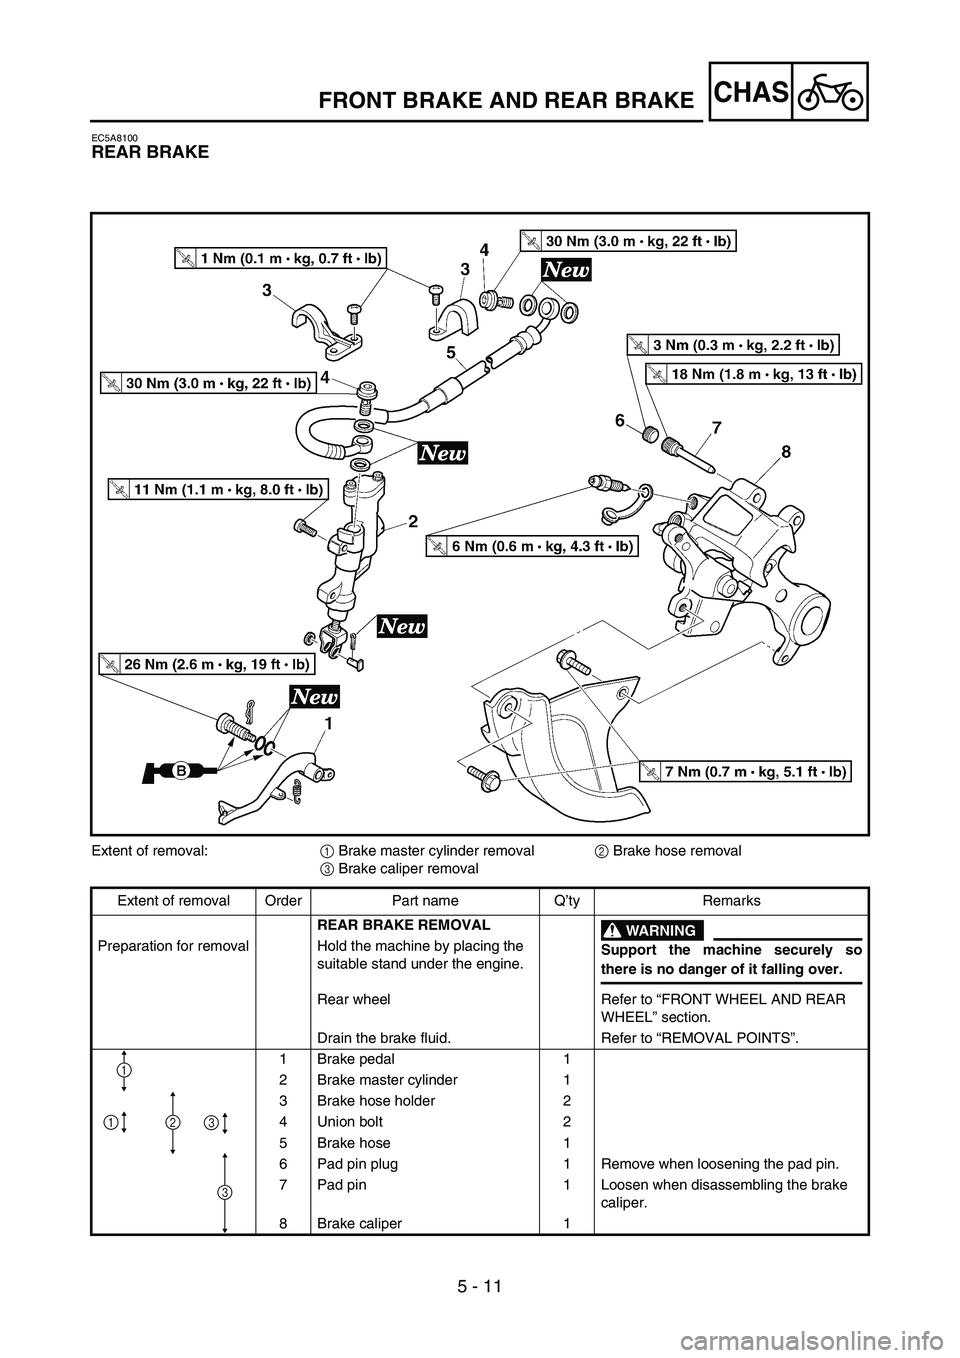
REAR BRAKE
Extent of removal:
1 Brake master cylinder removal
2 Brake hose removal
3 Brake caliper removal
Extent of removal Order Part name Q’ty Remarks
REAR BRAKE REMOVAL
WARNING
Support the machine securely so
there is no danger of it falling over. Preparation for removal Hold the machine by placing the
suitable stand under the engine.
Rear wheel Refer to “FRONT WHEEL AND REAR
WHEEL” section.
Drain the brake fluid. Refer to “REMOVAL POINTS”.
1 Brake pedal 1
2 Brake master cylinder 1
3 Brake hose holder 2
4 Union bolt 2
5 Brake hose 1
6 Pad pin plug 1 Remove when loosening the pad pin.
7 Pad pin 1 Loosen when disassembling the brake
caliper.
8 Brake caliper 1
3
32
1
1
FRONT BRAKE AND REAR BRAKE
Page 482 of 668
![YAMAHA YZ250F 2005 Notices Demploi (in French) 5 - 14
CHASFRONT BRAKE AND REAR BRAKE
EC5A3000
REMOVAL POINTS
Brake fluid
1. Remove:
[Front]
Brake master cylinder cap 1
[Rear]
Brake master cylinder cap 1
Protector
NOTE:
Do not remove the diaph YAMAHA YZ250F 2005 Notices Demploi (in French) 5 - 14
CHASFRONT BRAKE AND REAR BRAKE
EC5A3000
REMOVAL POINTS
Brake fluid
1. Remove:
[Front]
Brake master cylinder cap 1
[Rear]
Brake master cylinder cap 1
Protector
NOTE:
Do not remove the diaph](/img/51/53958/w960_53958-481.png)
5 - 14
CHASFRONT BRAKE AND REAR BRAKE
EC5A3000
REMOVAL POINTS
Brake fluid
1. Remove:
[Front]
Brake master cylinder cap 1
[Rear]
Brake master cylinder cap 1
Protector
NOTE:
Do not remove the diaphragm.
È
Front
ÉRear
2. Connect the transparent hose 2 to the
bleed screw 1 and place a suitable con-
tainer under its end.
È
Front
ÉRear
È
É
3. Loosen the bleed screw and drain the
brake fluid while pulling the lever in or
pushing down on the pedal.
CAUTION:
Do not reuse the drained brake fluid.
Brake fluid may erode painted surfaces or
plastic parts. Always clean up spilled
fluid immediately.
ÈÉ
Brake caliper piston
1. Remove:
Brake caliper piston
Use compressed air and proceed care-
fully.
WARNING
Cover piston with rag and use extreme
caution when expelling piston from cylin-
der.
Never attempt to pry out piston.
È
Front
ÉRear
Caliper piston removal steps:
Insert a piece of rag into the brake caliper
to lock one brake caliper.
Carefully force the piston out of the brake
caliper cylinder with compressed air.
È
É
Page 484 of 668
5 - 15
CHASFRONT BRAKE AND REAR BRAKE
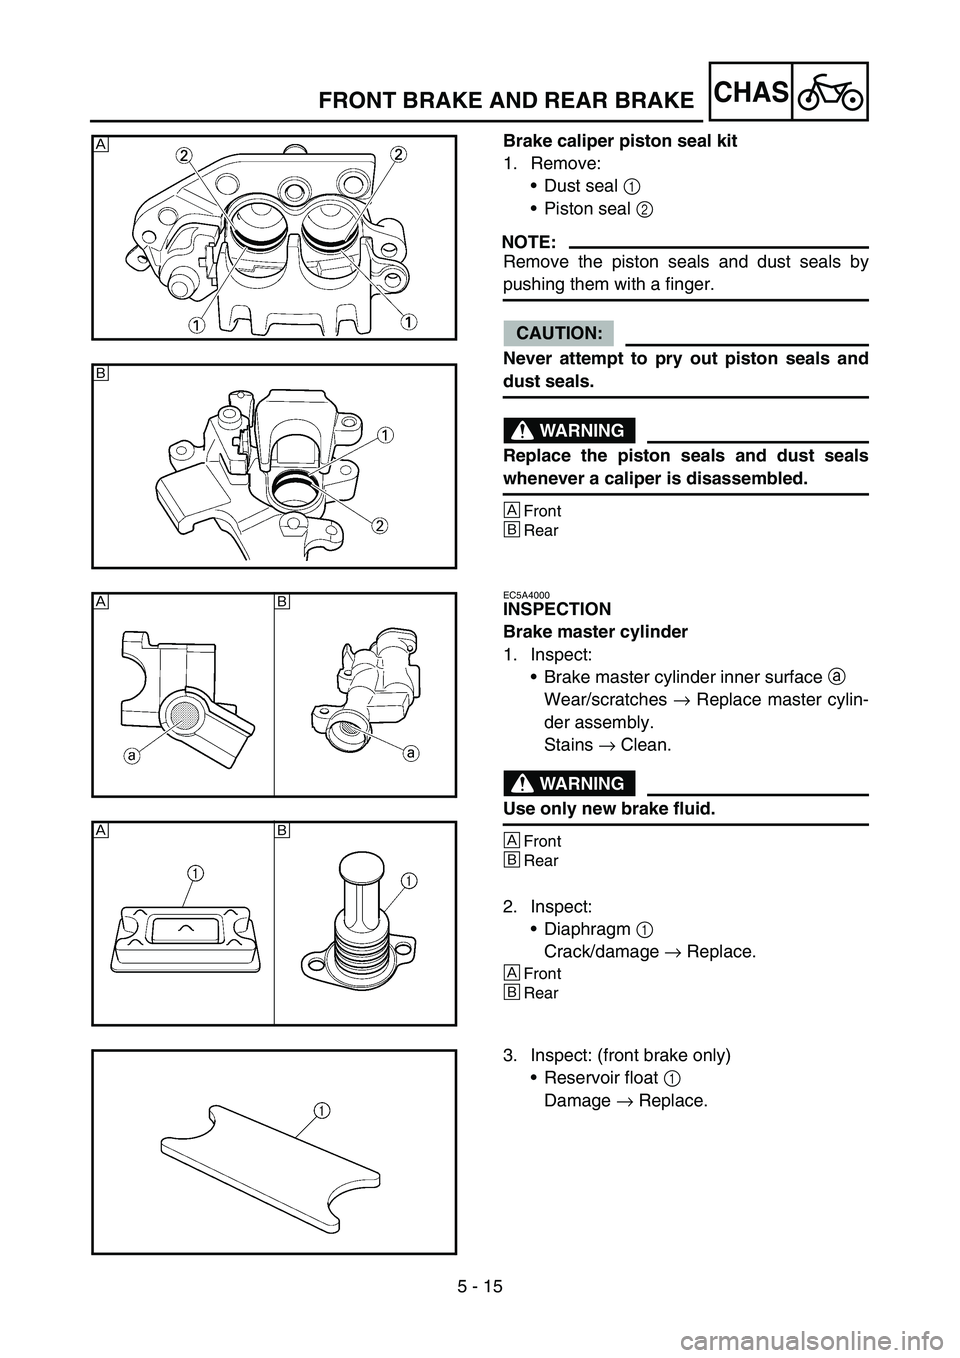
Brake caliper piston seal kit
1. Remove:
Dust seal 1
Piston seal 2
NOTE:
Remove the piston seals and dust seals by
pushing them with a finger.
CAUTION:
Never attempt to pry out piston seals and
dust seals.
WARNING
Replace the piston seals and dust seals
whenever a caliper is disassembled.
È
Front
ÉRear
È
É
EC5A4000
INSPECTION
Brake master cylinder
1. Inspect:
Brake master cylinder inner surface a
Wear/scratches → Replace master cylin-
der assembly.
Stains → Clean.
WARNING
Use only new brake fluid.
È
Front
ÉRear
2. Inspect:
Diaphragm 1
Crack/damage → Replace.
È
Front
ÉRear
ÈÉ
ÈÉ
3. Inspect: (front brake only)
Reservoir float 1
Damage → Replace.
Page 486 of 668
5 - 16
CHAS
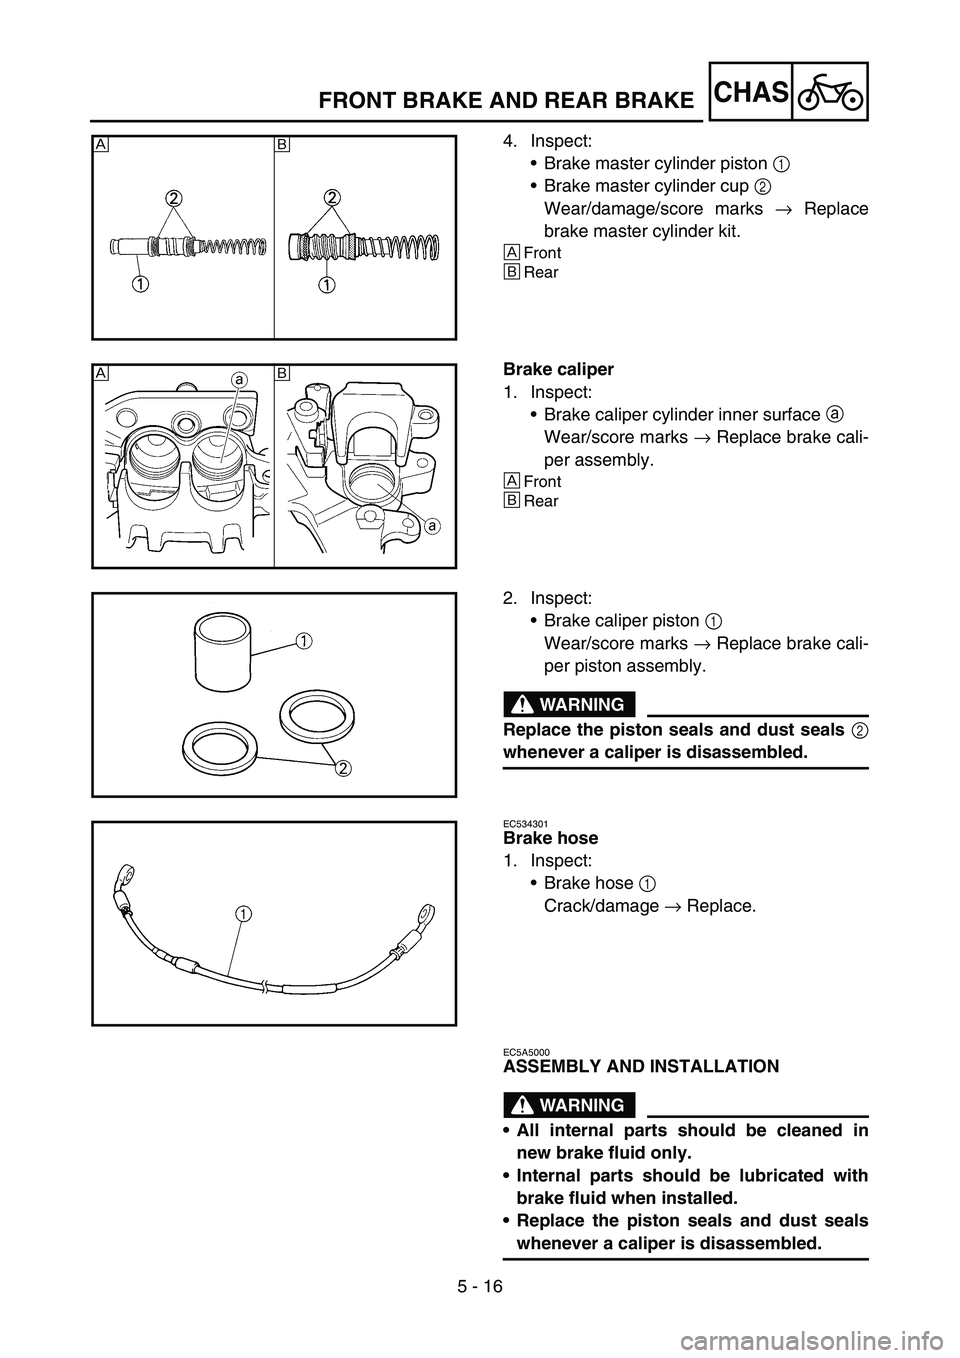
4. Inspect:
Brake master cylinder piston 1
Brake master cylinder cup 2
Wear/damage/score marks → Replace
brake master cylinder kit.
È
Front
ÉRear
ÈÉ
Brake caliper
1. Inspect:
Brake caliper cylinder inner surface a
Wear/score marks → Replace brake cali-
per assembly.
È
Front
ÉRear
ÈÉ
2. Inspect:
Brake caliper piston 1
Wear/score marks → Replace brake cali-
per piston assembly.
WARNING
Replace the piston seals and dust seals 2
whenever a caliper is disassembled.
EC534301
Brake hose
1. Inspect:
Brake hose 1
Crack/damage → Replace.
EC5A5000
ASSEMBLY AND INSTALLATION
WARNING
All internal parts should be cleaned in
new brake fluid only.
Internal parts should be lubricated with
brake fluid when installed.
Replace the piston seals and dust seals
whenever a caliper is disassembled.
FRONT BRAKE AND REAR BRAKE
Page 488 of 668

5 - 17
CHAS
Brake caliper piston
1. Clean:
Brake caliper
Piston seal
Dust seal
Brake caliper piston
Clean them with brake fluid.
2. Install:
Piston seal 1
Dust seal 2
WARNING
Always use new piston seals and dust
seals.
NOTE:
Fit the piston seals and dust seals onto the slot
on brake caliper correctly.
È
Front
ÉRear
È
É
3. Install:
Brake caliper piston 1
NOTE:
Apply the brake fluid on the piston wall.
CAUTION:
Install the piston with its shallow
depressed side a facing the brake cali-
per.
Never force to insert.
È
Front
ÉRear
Front brake caliper
1. Install:
Pad support 1
Brake pad 2
Pad pin 3
NOTE:
Install the brake pads with their projections
a into the brake caliper recesses b.
Temporarily tighten the pad pin at this point.
È
É
FRONT BRAKE AND REAR BRAKE
Page 492 of 668
5 - 19
CHASFRONT BRAKE AND REAR BRAKE
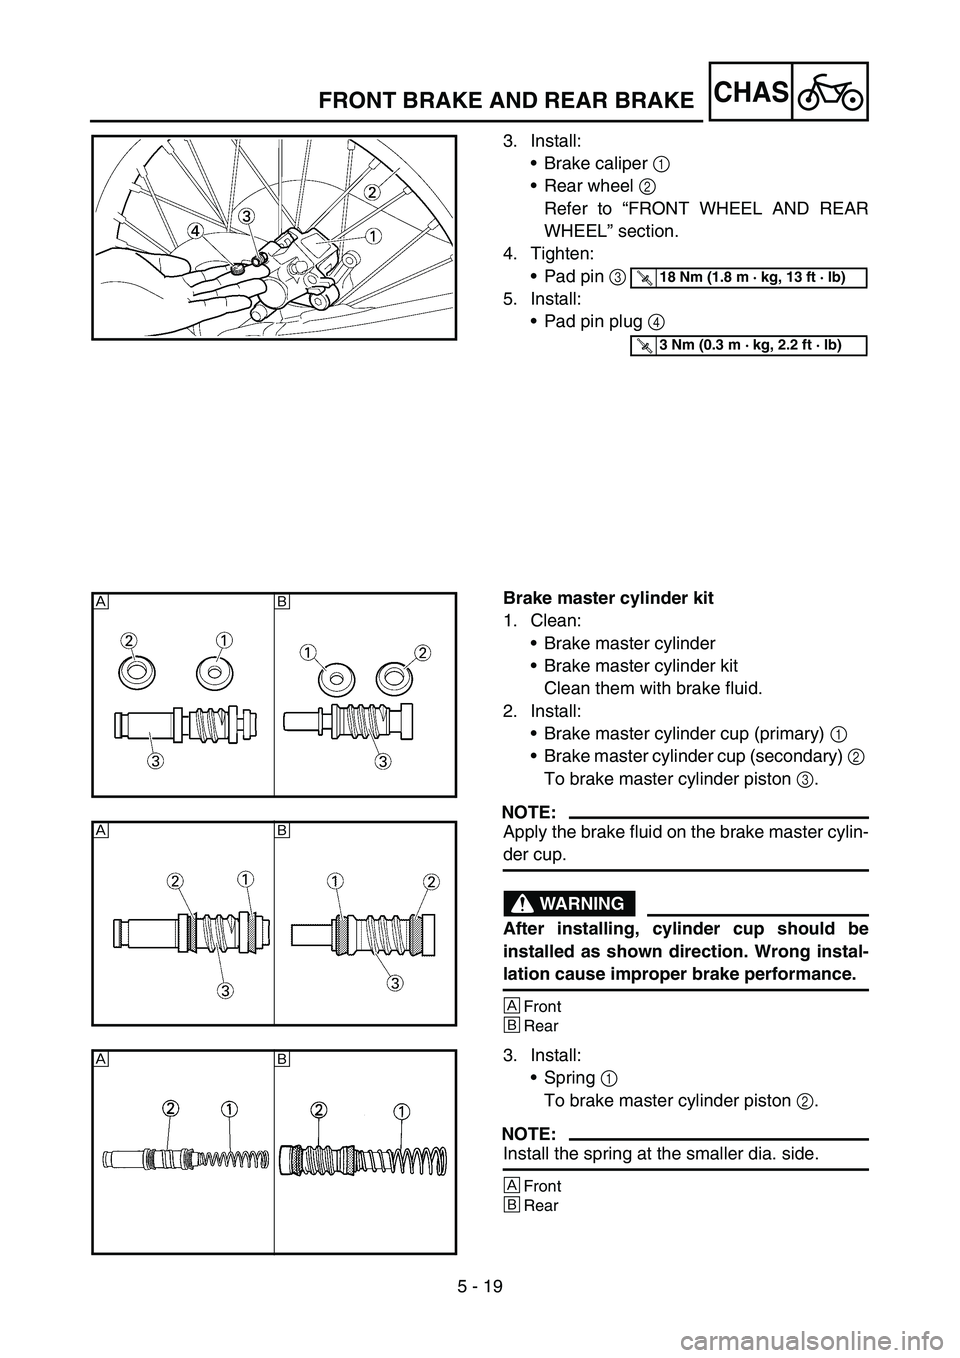
3. Install:
Brake caliper 1
Rear wheel 2
Refer to “FRONT WHEEL AND REAR
WHEEL” section.
4. Tighten:
Pad pin 3
5. Install:
Pad pin plug 4
T R..18 Nm (1.8 m · kg, 13 ft · lb)
T R..3 Nm (0.3 m · kg, 2.2 ft · lb)
Brake master cylinder kit
1. Clean:
Brake master cylinder
Brake master cylinder kit
Clean them with brake fluid.
2. Install:
Brake master cylinder cup (primary) 1
Brake master cylinder cup (secondary) 2
To brake master cylinder piston 3.
NOTE:
Apply the brake fluid on the brake master cylin-
der cup.
WARNING
After installing, cylinder cup should be
installed as shown direction. Wrong instal-
lation cause improper brake performance.
È
Front
ÉRear
ÈÉ
ÈÉ
3. Install:
Spring 1
To brake master cylinder piston 2.
NOTE:
Install the spring at the smaller dia. side.
È
Front
ÉRear
ÈÉ
Page 496 of 668
5 - 21
CHASFRONT BRAKE AND REAR BRAKE
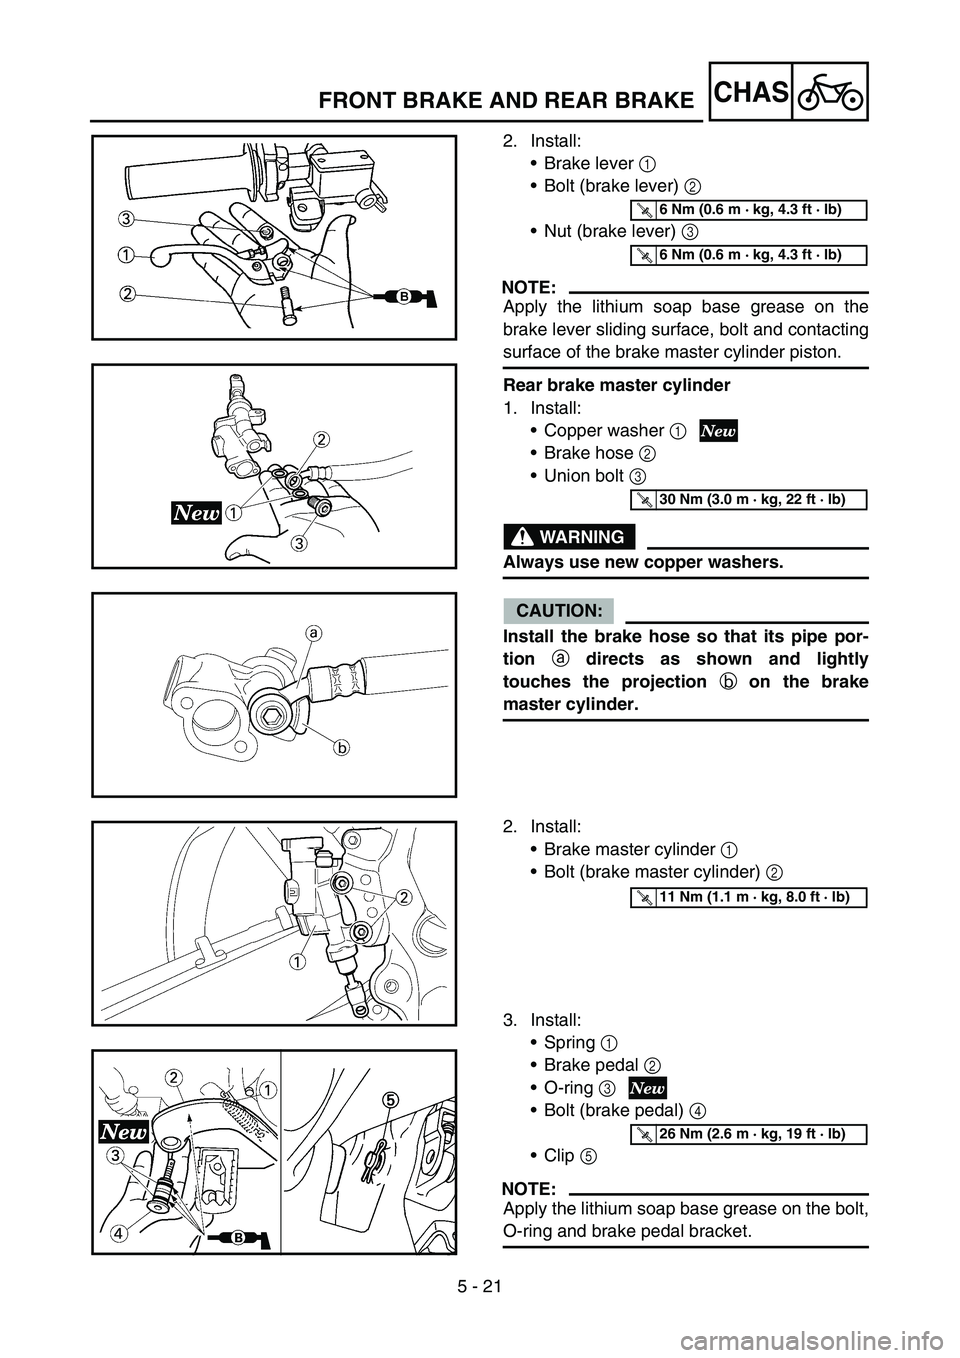
2. Install:
Brake lever 1
Bolt (brake lever) 2
Nut (brake lever) 3
NOTE:
Apply the lithium soap base grease on the
brake lever sliding surface, bolt and contacting
surface of the brake master cylinder piston.
Rear brake master cylinder
1. Install:
Copper washer 1
Brake hose 2
Union bolt 3
WARNING
Always use new copper washers.
CAUTION:
Install the brake hose so that its pipe por-
tion
a directs as shown and lightly
touches the projection
b on the brake
master cylinder.
T R..6 Nm (0.6 m · kg, 4.3 ft · lb)
T R..6 Nm (0.6 m · kg, 4.3 ft · lb)
T R..30 Nm (3.0 m · kg, 22 ft · lb)
2. Install:
Brake master cylinder 1
Bolt (brake master cylinder) 2
3. Install:
Spring 1
Brake pedal 2
O-ring 3
Bolt (brake pedal) 4
Clip 5
NOTE:
Apply the lithium soap base grease on the bolt,
O-ring and brake pedal bracket.
T R..11 Nm (1.1 m · kg, 8.0 ft · lb)
T R..26 Nm (2.6 m · kg, 19 ft · lb)
Page 498 of 668
5 - 22
CHASFRONT BRAKE AND REAR BRAKE
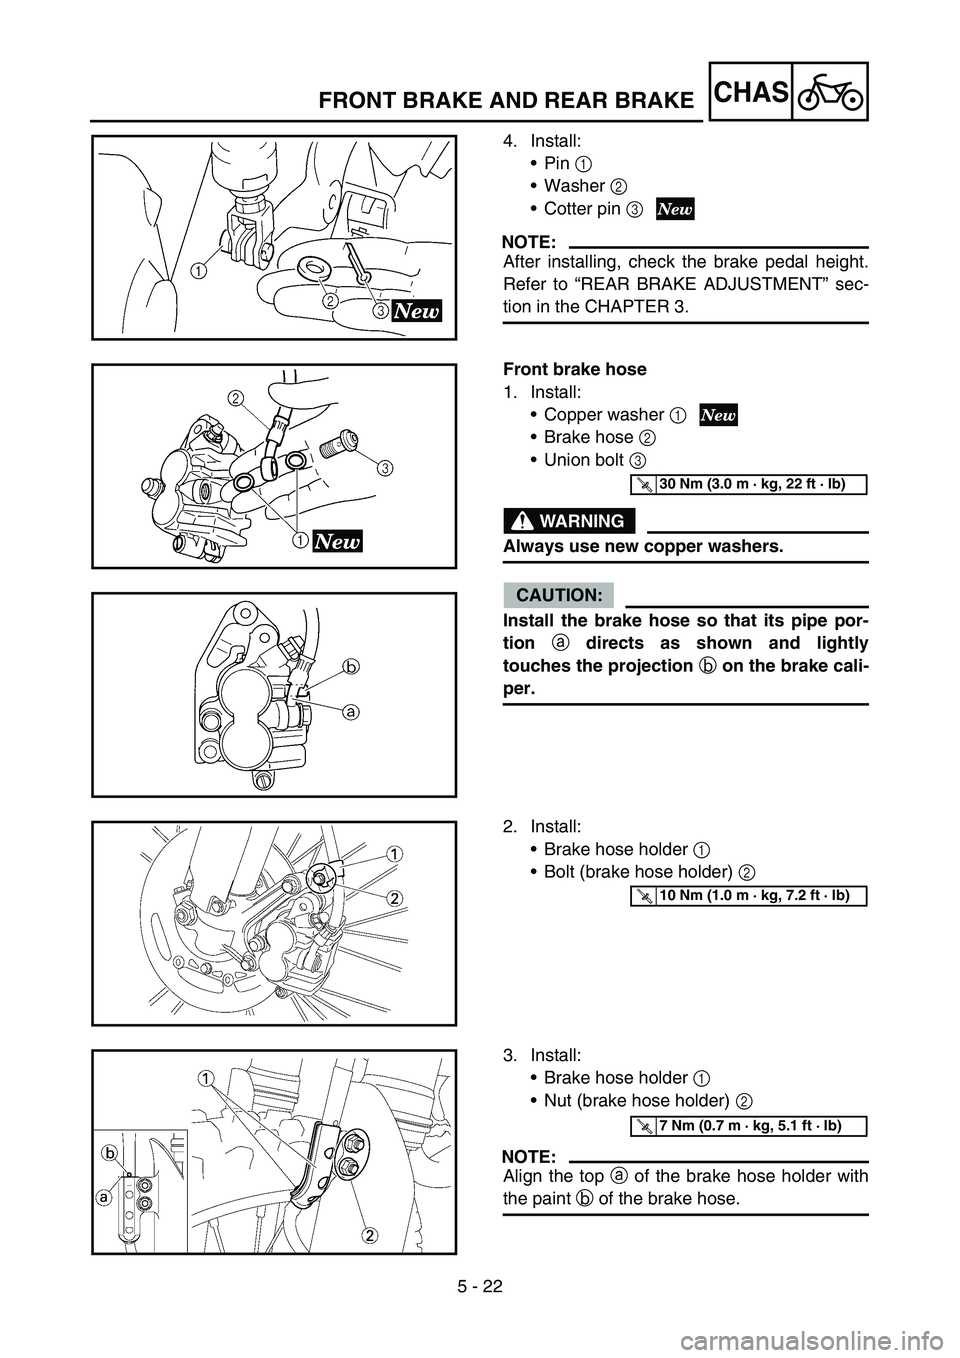
4. Install:
Pin 1
Washer 2
Cotter pin 3
NOTE:
After installing, check the brake pedal height.
Refer to “REAR BRAKE ADJUSTMENT” sec-
tion in the CHAPTER 3.
Front brake hose
1. Install:
Copper washer 1
Brake hose 2
Union bolt 3
WARNING
Always use new copper washers.
CAUTION:
Install the brake hose so that its pipe por-
tion
a directs as shown and lightly
touches the projection
b on the brake cali-
per.
T R..30 Nm (3.0 m · kg, 22 ft · lb)
2. Install:
Brake hose holder 1
Bolt (brake hose holder) 2
T R..10 Nm (1.0 m · kg, 7.2 ft · lb)
3. Install:
Brake hose holder 1
Nut (brake hose holder) 2
NOTE:
Align the top a of the brake hose holder with
the paint b of the brake hose.
T R..7 Nm (0.7 m · kg, 5.1 ft · lb)