YAMAHA YZ250LC 2001 Owners Manual
Manufacturer: YAMAHA, Model Year: 2001, Model line: YZ250LC, Model: YAMAHA YZ250LC 2001Pages: 578, PDF Size: 14.12 MB
Page 261 of 578

ENG
4-25
CULASSE, CYLINDRE ET PISTON
ZYLINDERKOPF, ZYLINDER UND KOLBEN
TESTA CILINDRO, CILINDRO E PISTONE
Leistungsventil
1. Prüfen:
9Leistungsventil 1, 2 1
Verschleiß/BeschädigungÕ
Erneuern.
RußbelagÕErneuern.
9Verbindungshebel 2
9Riemenscheibe 3
9Ventilwelle 4
9Pleuelstange 5
9Beilegescheibe 6
Abnutzung/BeschädigungÕ
Erneuern.
9Feder 1, 2 7
GebrochenÕErneuern.Clapet de puissance
1. Examiner:
9Clapet de puissance 1, 2 1
Usure/endommagement
Õ
Changer.
Dépôts de carbone
ÕDéposer.
9Levier articulé 2
9Poulie 3
9Arbre à tiroirs 4
9Tige de raccordement 5
9Rondelle ordinaire 6
Usure/endommagement
Õ
Changer.
9Ressort 1, 2 7
Cassé
ÕRemplacer.
IC474840Valvola di potenza
1. Ispezionare:
9Valvola di potenza 1, 2 1
Usura/Danni
ÕSostiturla.
Depositi carboniosi
ÕToglierli.
9Leva del biscottino 2
9Puleggia 3
9Gambo della valvola 4
9Bielletta 5
9Rosetta 6
Usura/Danni
ÕSostituirli.
9Molla 1, 2 7
Rotta
ÕSostituirla
Orifice de soupape de puissance sur
cylindre
1. Déposer:
9Dépôts de calamine
De la surface de l’orifice de la
soupape de puissance a.
N.B.:
Eviter d’utiliser un outil acéré, éviter de
rayer l’aluminium.
Leistungsventilbohrung im Zylinder
1. Ausbauen:
9Rußablagerungen
Aus der Leistungsventil-Boh-
rung a.
ANMERKUNG:
Kein scharfkantiges Instrument ver-
wenden. Kratzer auf dem Aluminium
vermeiden.
IC474901
Foro della valvola di potenza sul
cilindro
1. Togliere:
9Depositi carboniosi
Dalla superficie del foro della
valvola di potenza a.
NOTA:
Non usare uno strumento appuntito.
Evitare di graffiare l’alluminio.
3. Combinazione:
Combinare il pistone e il cilindro
in base alla tabella che segue.
NOTA:
Quando si acquista un cilindro, non è
possibile indicarne le dimensioni. Sce-
gliere il pistone che corrisponde alla
tabella sopra-riportata.
3. Kombination:
Kolben und Zylinder gemäß
nachfolgender Tabelle kombinie-
ren.
ANMERKUNG:
Wenn Sie einen Zylinder kaufen, kön-
nen Sie seine Größe nicht bestimmen.
Wählen Sie einen zur obigen Tabelle
passenden Kolben.
3. Combinaison:
Combiner le piston et le cylindre à
l’aide du tableau suivant.
N.B.:
Lors de l’achat d’un cylindre il n’est
pas possible de choisir sa taille. Choisir
le piston dans la table ci-dessus.
Zylinder- Kolbenmarkierungmarkierung (farben)
A A (rot)
B B (orange)
C C (grün)
D D (violett)
Tacca del Tacca del pistone cilindro (colore)
A A (rossa)
B B (arancione)
C C (verde)
D D (porpora)
Marque de Marque de pistoncylindre (couleur)
A A (rouge)
B B (orange)
C C (vert)
D D (pourpre)
5MW-9-30-4A 7/3/00 5:33 PM Page 51
Page 262 of 578

ENG
4-26
CYLINDER HEAD, CYLINDER AND PISTON
EC475000
ASSEMBLY AND INSTALLATION
EC475192
Power valve
1. Install:
9Power valve 1 1
9Valve holder 2
9Bolt (valve holder) 3
NOTE:
9Install the power valve 1 with its gouge afac-
ing upside.
9Apply the molybdenum disulfide oil on the
power valve 1.
2. Install:
9Power valve 2 1
9Link rod 2
9Plain washer 3
9Screw (link rod) 4
NOTE:
Install the link rod with the cuts ain its arm
ends fitting over the pins bon the power valves
2.
3. Install:
9Thrust plate 1
9Screw (thrust plate) 2
NOTE:
Be sure to install the thrust plate to the cylinder
before installing the valve shaft.
6 Nm (0.6 m•kg, 4.3 ft•lb)
6 Nm (0.6 m•kg, 4.3 ft•lb)
6 Nm (0.6 m•kg, 4.3 ft•lb)
5MW-9-30-4A 7/3/00 5:34 PM Page 52
Page 263 of 578

ENG
4-26
CULASSE, CYLINDRE ET PISTON
ZYLINDERKOPF, ZYLINDER UND KOLBEN
TESTA CILINDRO, CILINDRO E PISTONE
2. Installare:
9Valvola di potenza 2 1
9Portavalvola 2
9Rosetta 3
9Vite (portavalvola) 4
NOTA:
Montare la bielletta con i tagli anelle
estremità del braccio in corrispondenza
dei perni bsulle valvole di potenza 2.
2. Einbauen:
9Leistungsventil 2 1
9Ventilhalterung 2
9Beilegescheibe 3
9Schraube (Ventilhalterung) 4
ANMERKUNG:
Pleuelstange mit den Einschnitten a
an den Enden der Arme passend über
den Stiften ban den Leistungsventil
2 einbauen.
2. Monter:
9Clapet de puissance 2 1
9Support de soupape 2
9Rondelle ordinaire 3
9Vis (support de soupape) 4
N.B.:
Installer la tige de raccordement avec
les encoches adans les extrémités du
bras sur les ergots bdes clapet de
puissance 2.
REMONTAGE ET
MONTAGE
Clapet de puissance
1. Monter:
9Clapet de puissance 1 1
9Support de soupape2
9Boulon (support de soupape) 3
N.B.:
9Installer la clapet de puissance 1 avec
l’encoche avers le haut.
9Appliquer de l’huile au bisulfure de
molybdène sur le clapet de puissance
1.
IC475000
MONTAGGIO E
INSTALLAZIONE
IC475192
Valvola di potenza
1. Installare:
9Valvola di potenza 1 1
9Portavalvola 2
9Bullone (portavalvola) 3
NOTA:
9Montare la valvola di potenza 1 con il
taglio arivolto verso l’alto.
9Applicare olio al bisolfuro di molib-
deno sulla valvola di potenza 1.
MONTAGE UND EINBAU
Leistungsventil
1. Einbauen:
9Leistungsventil 1 1
9Ventilhalterung 2
9Schraube (Ventilhalterung) 3
ANMERKUNG:
9Leistungsventil 1 mit dem Einschnitt
anach oben einbauen.
9Molybdändisulfidöl auf das Lei-
stungsventil 1 auftragen.
6 Nm (0,6 m•kg, 4,3 ft•lb)
6 Nm (0,6 m•kg,4,3 ft•lb)
6 Nm (0,6 m•kg, 4,3 ft•lb)
6 Nm (0,6 m•kg, 4,3 ft•lb)
6 Nm (0,6 m•kg, 4,3 ft•lb)
6 Nm (0,6 m•kg, 4,3 ft•lb)
3. Monter:
9Plateau de buté 1
9Vis (plateau de buté 2
N.B.:
Installer la plaquette de butée sur le
cylindre avant d’installer l’axe du cla-
pet.
3. Einbauen:
9Druckscheibe 1
9Schraube (Druckscheibe) 2
ANMERKUNG:
Sich vergewissern, daß man die
Druckscheibe am Zylinder anbringt
ehe man den Ventilschaft einbaut.
3. Installare:
9Disco di spinta 1
9Vite (disco di spinta) 2
NOTA:
Prima di montare l’albero della valvo-
la, montare la piastra di spinta sul cilin-
dro.
6 Nm (0,6 m•kg,4,3 ft•lb)6 Nm (0,6 m•kg, 4,3 ft•lb)6 Nm (0,6 m•kg, 4,3 ft•lb)
5MW-9-30-4A 7/3/00 5:34 PM Page 53
Page 264 of 578
4-27
CYLINDER HEAD, CYLINDER AND PISTONENG
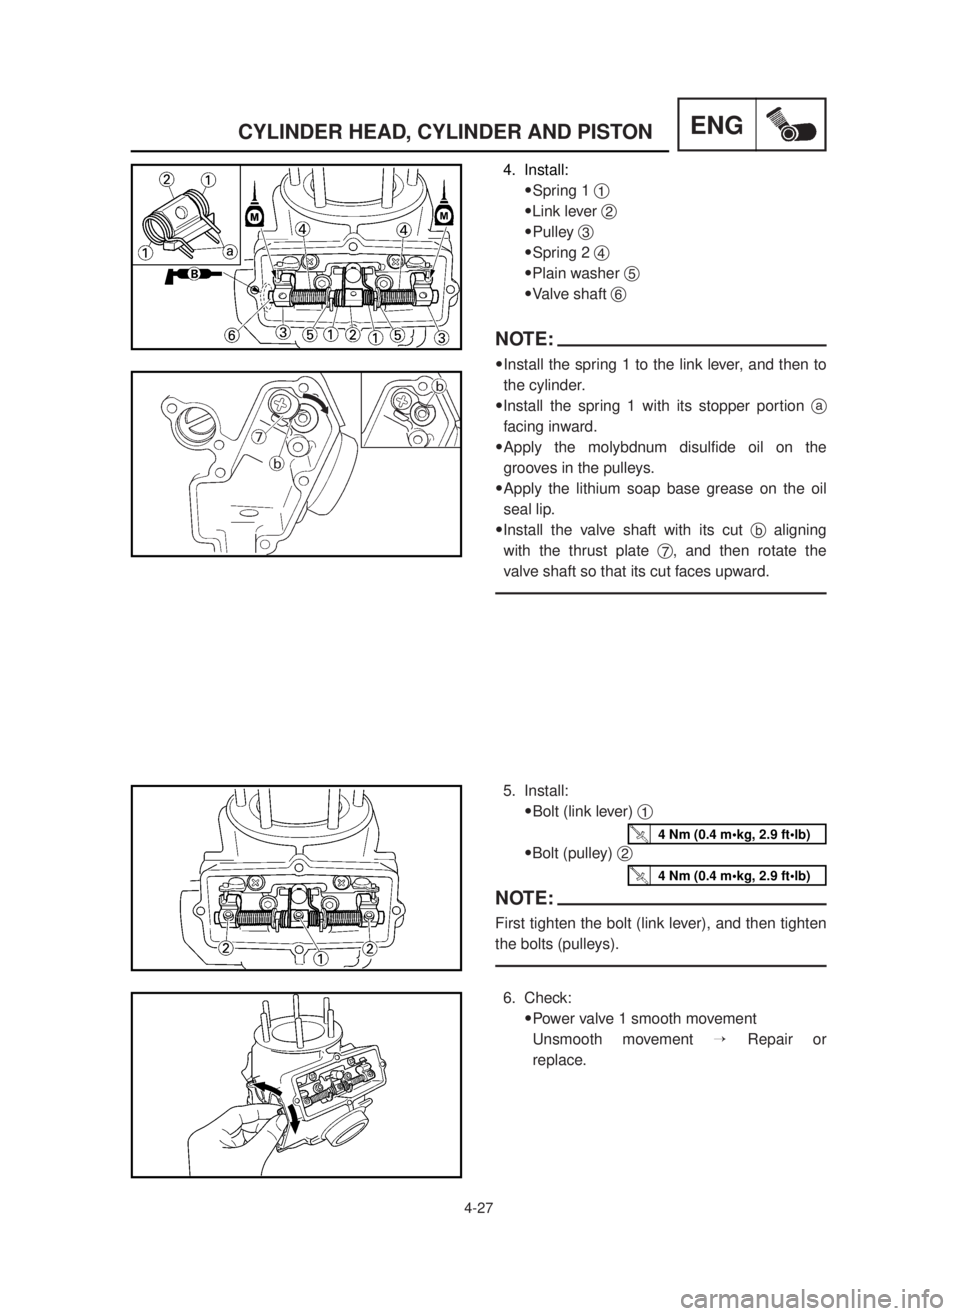
4. Install:
9Spring 1 1
9Link lever 2
9Pulley 3
9Spring 2 4
9Plain washer 5
9Valve shaft 6
NOTE:
9Install the spring 1 to the link lever, and then to
the cylinder.
9Install the spring 1 with its stopper portion a
facing inward.
9Apply the molybdnum disulfide oil on the
grooves in the pulleys.
9Apply the lithium soap base grease on the oil
seal lip.
9Install the valve shaft with its cut baligning
with the thrust plate 7, and then rotate the
valve shaft so that its cut faces upward.
5. Install:
9Bolt (link lever) 1
9Bolt (pulley) 2
NOTE:
First tighten the bolt (link lever), and then tighten
the bolts (pulleys).
6. Check:
9Power valve 1 smooth movement
Unsmooth movement ÕRepair or
replace.
4 Nm (0.4 m•kg, 2.9 ft•lb)
4 Nm (0.4 m•kg, 2.9 ft•lb)
5MW-9-30-4B 7/3/00 6:23 PM Page 2
Page 265 of 578
4-27
CULASSE, CYLINDER ET PISTON
ZYLINDERKOPF, ZYLINDER UND KOLBEN
TESTA CILINDRO, CILINDRO E PISTONEENG
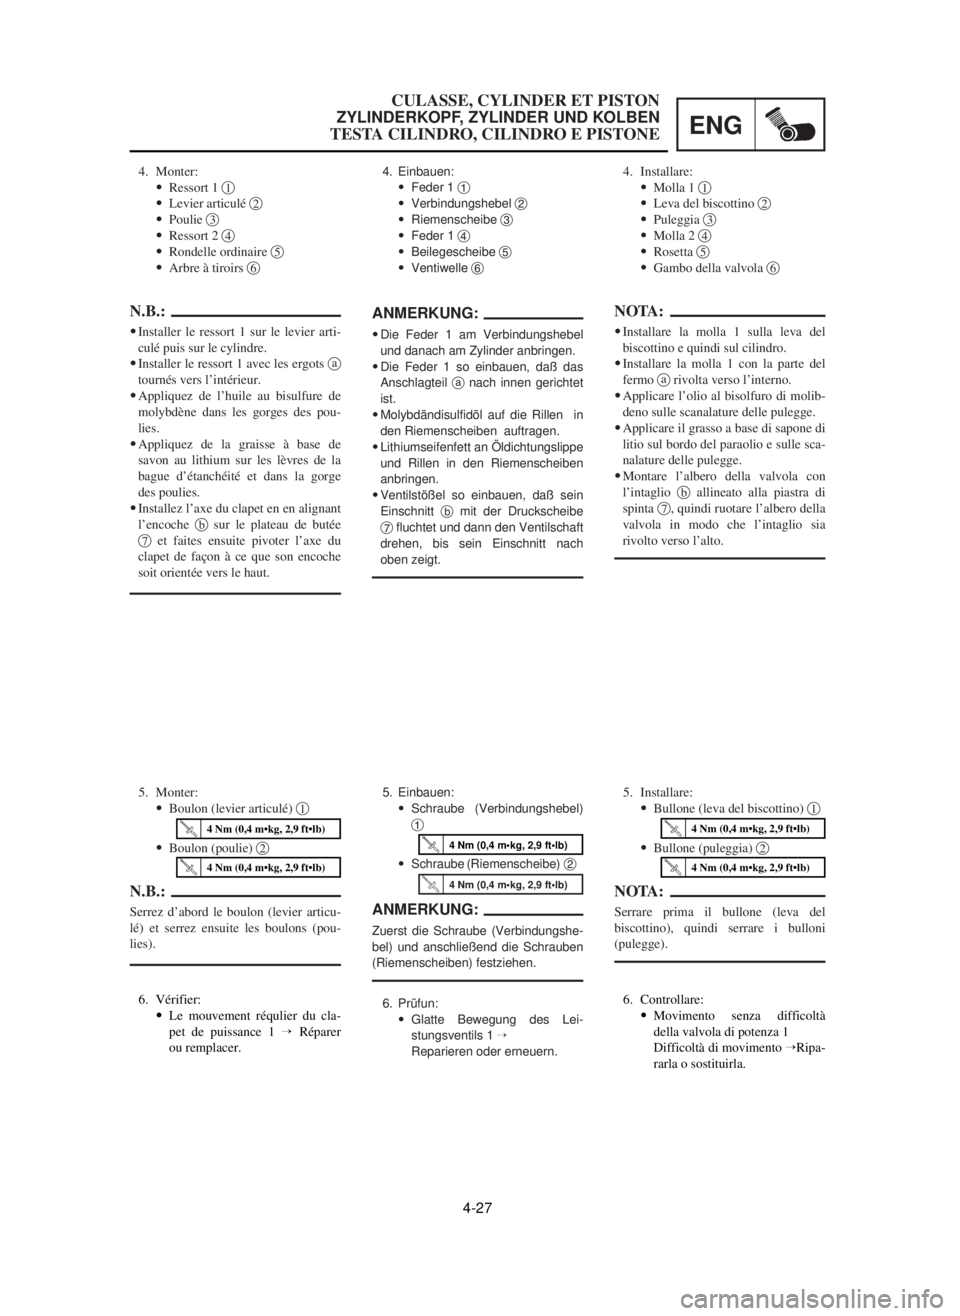
4. Monter:
9Ressort 1 1
9Levier articulé 2
9Poulie 3
9Ressort 2 4
9Rondelle ordinaire 5
9Arbre à tiroirs 6
N.B.:
9Installer le ressort 1 sur le levier arti-
culé puis sur le cylindre.
9Installer le ressort 1 avec les ergots a
tournés vers l’intérieur.
9Appliquez de l’huile au bisulfure de
molybdène dans les gorges des pou-
lies.
9Appliquez de la graisse à base de
savon au lithium sur les lèvres de la
bague d’étanchéité et dans la gorge
des poulies.
9Installez l’axe du clapet en en alignant
l’encoche bsur le plateau de butée
7et faites ensuite pivoter l’axe du
clapet de façon à ce que son encoche
soit orientée vers le haut.
4. Einbauen:
9Feder 1 1
9Verbindungshebel 2
9Riemenscheibe 3
9Feder 1 4
9Beilegescheibe 5
9Ventiwelle 6
ANMERKUNG:
9Die Feder 1 am Verbindungshebel
und danach am Zylinder anbringen.
9Die Feder 1 so einbauen, daß das
Anschlagteil anach innen gerichtet
ist.
9Molybdändisulfidöl auf die Rillen in
den Riemenscheiben auftragen.
9Lithiumseifenfett an Öldichtungslippe
und Rillen in den Riemenscheiben
anbringen.
9Ventilstößel so einbauen, daß sein
Einschnitt bmit der Druckscheibe
7fluchtet und dann den Ventilschaft
drehen, bis sein Einschnitt nach
oben zeigt.
4. Installare:
9Molla 1 1
9Leva del biscottino 2
9Puleggia 3
9Molla 2 4
9Rosetta 5
9Gambo della valvola 6
NOTA:
9Installare la molla 1 sulla leva del
biscottino e quindi sul cilindro.
9Installare la molla 1 con la parte del
fermo arivolta verso l’interno.
9Applicare l’olio al bisolfuro di molib-
deno sulle scanalature delle pulegge.
9Applicare il grasso a base di sapone di
litio sul bordo del paraolio e sulle sca-
nalature delle pulegge.
9Montare l’albero della valvola con
l’intaglio ballineato alla piastra di
spinta 7, quindi ruotare l’albero della
valvola in modo che l’intaglio sia
rivolto verso l’alto.
5. Monter:
9Boulon (levier articulé) 1
9Boulon (poulie) 2
N.B.:
Serrez d’abord le boulon (levier articu-
lé) et serrez ensuite les boulons (pou-
lies).
5. Einbauen:
9Schraube (Verbindungshebel)
1
9Schraube (Riemenscheibe) 2
ANMERKUNG:
Zuerst die Schraube (Verbindungshe-
bel) und anschließend die Schrauben
(Riemenscheiben) festziehen.
6. Prüfun:
9Glatte Bewegung des Lei-
stungsventils 1 Õ
Reparieren oder erneuern.
5. Installare:
9Bullone (leva del biscottino) 1
9Bullone (puleggia) 2
NOTA:
Serrare prima il bullone (leva del
biscottino), quindi serrare i bulloni
(pulegge).
4 Nm (0,4 m•kg, 2,9 ft•lb)
4 Nm (0,4 m•kg, 2,9 ft•lb)
4 Nm (0,4 m•kg, 2,9 ft•lb)
4 Nm (0,4 m•kg, 2,9 ft•lb)
4 Nm (0,4 m•kg, 2,9 ft•lb)
4 Nm (0,4 m•kg, 2,9 ft•lb)
6. Vérifier:
9Le mouvement réqulier du cla-
pet de puissance 1 Õ Réparer
ou remplacer.6. Controllare:
9Movimento senza difficoltà
della valvola di potenza 1
Difficoltà di movimento ÕRipa-
rarla o sostituirla.
5MW-9-30-4B 7/3/00 6:23 PM Page 3
Page 266 of 578

4-28
CYLINDER HEAD, CYLINDER AND PISTONENG
7. Install:
9O-ring 1
9Side holder 2
9Screw (side holder) 3
9YPVS breather hose 4
NOTE:
9Apply the lithium soap base grease on the O-
rings.
9Install the side holder with its projection a
facing upward.
8. Install:
9Gasket (power valve cover) 1
9Power valve cover 2
9Screw (power valve cover) 3
NOTE:
9Install the gasket with its cut afacing down-
ward and the seal print side toward the power
valve cover.
9Install the power valve cover so that the arrow
mark bfaces upward.
EC475233
Piston ring and piston
1. Install:
9Piston ring 1
NOTE:
9Take care not to scratch the piston or damage
the piston ring.
9Align the piston ring gap with the pin 2.
9After installing the piston ring, check the
smooth movement of it.
2. Install:
9Gasket (cylinder) 1
9Small end bearing 2
9Dowel pin 3
NOTE:
9Apply the engine oil onto the bearing (crank-
shaft and connecting rod) and connecting rod
big end washers.
9Install the gasket with the seal print side toward
the crankcase.
4 Nm (0.4 m•kg, 2.9 ft•lb)
4 Nm (0.4 m•kg, 2.9 ft•lb)
5MW-9-30-4B 7/3/00 6:24 PM Page 4
Page 267 of 578

CULASSE, CYLINDER ET PISTON
ZYLINDERKOPF, ZYLINDER UND KOLBEN
TESTA CILINDRO, CILINDRO E PISTONEENG
4-28
7. Installare:
9Anello di tenuta 1
9Supporto laterale 2
9Vite (supporto laterale) 3
9Sfiato YPVS 4
NOTA:
9Applicare sugli anelli di tenuta il gras-
so a base di sapone di litio.
9Montare il supporto laterale con la
sporgenza arivolta verso l’alto.
8. Installare:
9Guarnizione (coperchio della
valvola di potenza) 1
9Coperchio della valvola di
potenza 2
9Vite (coperchio della valvola di
potenza) 3
NOTA:
9Mettere la guarnizione con l’intaglio
arivolto verso il basso e il lato stam-
pato rivolto verso il coperchio della
valvola di potenza.
9Montare la protezione della valvola di
potenza con la sporgenza bsul retro
rivolta verso l’alto
7. Einbauen:
9O-ring 1
9Seitenhalterung 2
9Schraube (Seitenhalterung) 3
9YPVS-Belüftungsschlauch 4
ANMERKUNG:
9Das Lithiumfett auf O-Ringe auftra-
gen.
9Seitenhalterung mit dem Vorsprung
anach oben einbauen.
8. Einbauen:
9Dichtung (Leistungsventil-
deckel) 1
9Leistungsventildeckel 2
9Schraube (Leistungsventil-
deckel) 3
ANMERKUNG:
9Dichtung mit dem Einschnitt anach
unten und mit der bedruckten Dich-
tungsseite zum Leistungsventil ein-
bauen.
9Leitungsventildeckel mit dem Vor-
sprung ban der Rückseite nach
oben einbauen.
7. Monter:
9Joint torique 1
9Béquille latérale 2
9Vis (béquille latérale) 3
9Tube de reniflard YPVS 4
N.B.:
9Appliquer de la graisse à base de
savon au lithium sur le joint torique.
9Installer la béquille latérale avec sa
saillie aorientée vers le haut.
8. Monter:
9Joint (couvercle du clapet de
puissance) 1
9Covercle du clapet de puissance
2
9Vis (couvercle du clapet de
puissance) 3
N.B.:
9Installer le joint d’étanchéité avec
l’encoche avers le bas et le côté
imprimé du joint vers le couvercle du
clapet de puissance.
9Installer le couvercle du clapet de
puissance en orientant vers le haut la
saillie bà l’arrière.
2. Installare:
9Guarnizione (cilindro) 1
9Cuscinetto dell’estremità picco-
la 2
9Perno di riferimento 3
NOTA:
9Applicare l’olio per motore al cusci-
netto (albero a gomiti, biella e rondel-
le dell’estremità grande della biella).
9Die Dichtung mit der bedrucketen
Seite gegen das Kurbelgehäuse geri-
chtet einbauen.
Kolbenring und Kolben
1. Ausbauen:
9Kolbenring 1
ANMERKUNG:
9Darauf achten, daß der Kolben nicht
zerkratzt und der Kolbenring nicht
beschädigt wird.
9Den Kolbenringspalt mit dem Stift 2
ansrichten.
9Nach dem Einbau des Kolbenringes,
diesen auf glatte Bewegung prüfen.
IC475233Fascia elastica e pistone
1. Installare:
9Fascia elastica 1
NOTA:
9Fare attenzione a non graffiare il
pistone e a non danneggiare la fascia
elastica.
9Allineare la luce della fascia elastica
con il perno 2.
9Dopo avere installato la fascia elasti-
ca, controllare che si muova senza dif-
ficoltà.
Segment et piston
1. Monter:
9Segment 1
N.B.:
9Faire attention à ne pas rayer le piston
ni endommager le segment de piston.
9Aligner la coupe de segment avec
l’axe du piston 2.
9Après avoir reposé le segment de pis-
ton, vérifier si son mouvement est
régulier.
4 Nm (0,4 m•kg, 2,9 ft•lb)
4 Nm (0,4 m•kg, 2,9 ft•lb)4 Nm (0,4 m•kg, 2,9 ft•lb)
2. Monter:
9Joint (cylindre) 1
9Coussinet de pied de bielle 2
9Goujons 3
N.B.:
9Appliquer de l’huile moteur sur le
roulement (vilebrequin, bielle et ron-
delles de tête de bielle).
9Monter le joint en tournant le côté
avec le cachet vers le vilebrequin.
2. Ausbauen:
9Dichtung (Zylinder) 1
9Pleuelfußlager 2
9Paßstifte 3
ANMERKUNG:
9Motoröl auf Lager auftragen (Kurbel-
welle, Pleuelstange und Unterleg-
scheibe)
9Die Dichtung mit der bedrucketen
Seite gegen das Kurbelgehäuse
gerichtet einbauen.
4 Nm (0,4 m•kg, 2,9 ft•lb)4 Nm (0,4 m•kg, 2,9 ft•lb)4 Nm (0,4 m•kg, 2,9 ft•lb)
5MW-9-30-4B 7/3/00 6:24 PM Page 5
Page 268 of 578
4-29
CYLINDER HEAD, CYLINDER AND PISTONENG
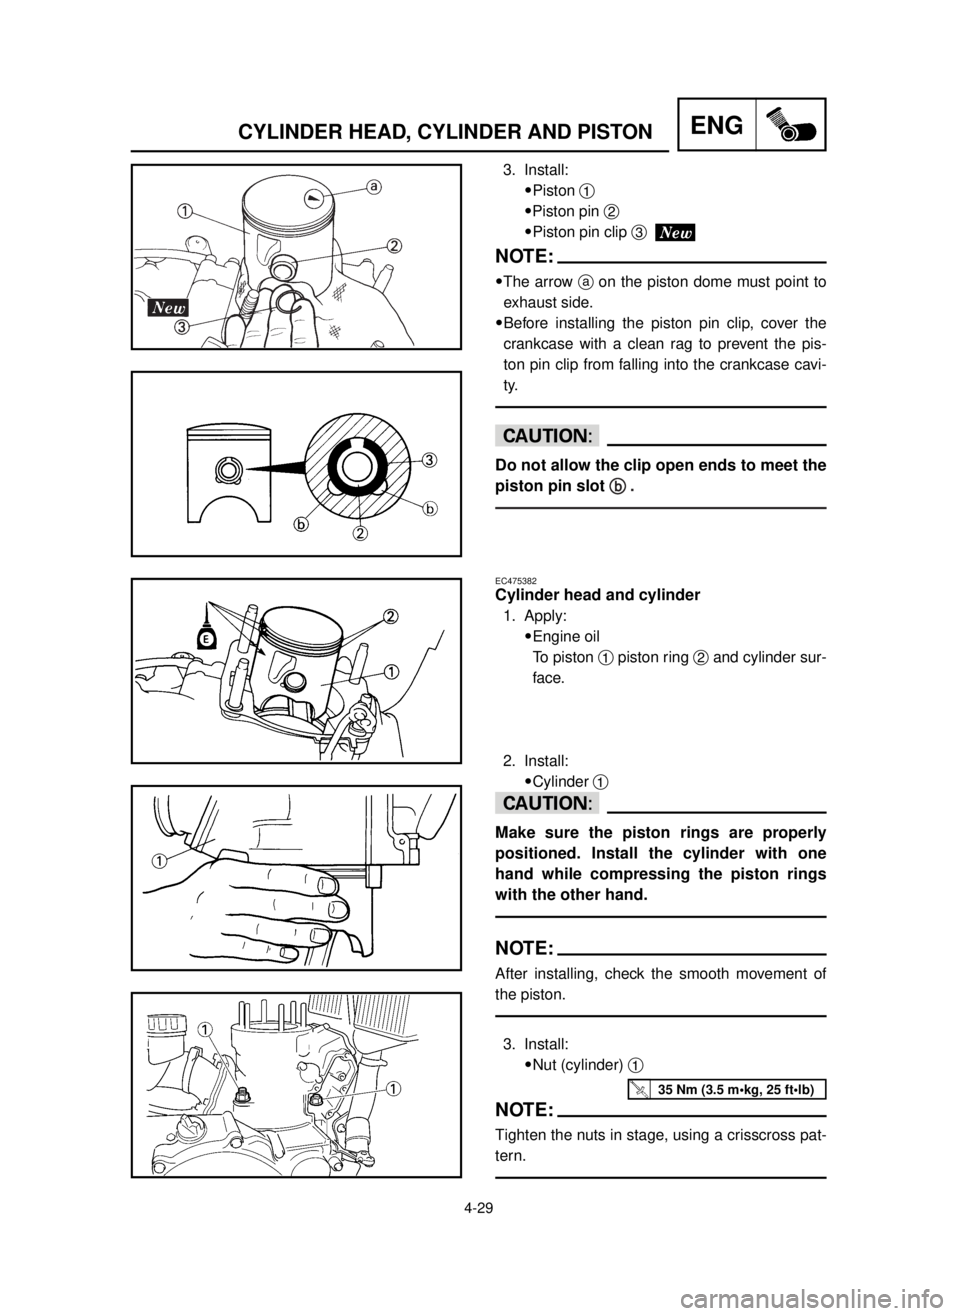
EC475382
Cylinder head and cylinder
1. Apply:
9Engine oil
To piston 1piston ring 2and cylinder sur-
face.
2. Install:
9Cylinder 1
cC
Make sure the piston rings are properly
positioned. Install the cylinder with one
hand while compressing the piston rings
with the other hand.
NOTE:
After installing, check the smooth movement of
the piston.
3. Install:
9Nut (cylinder) 1
NOTE:
Tighten the nuts in stage, using a crisscross pat-
tern.
3. Install:
9Piston 1
9Piston pin 2
9Piston pin clip 3
NOTE:
9The arrow aon the piston dome must point to
exhaust side.
9Before installing the piston pin clip, cover the
crankcase with a clean rag to prevent the pis-
ton pin clip from falling into the crankcase cavi-
ty.
cC
Do not allow the clip open ends to meet the
piston pin slot b b
.
35 Nm (3.5 m•kg, 25 ft•lb)
5MW-9-30-4B 7/3/00 6:25 PM Page 6
Page 269 of 578
4-29
CULASSE, CYLINDER ET PISTON
ZYLINDERKOPF, ZYLINDER UND KOLBEN
TESTA CILINDRO, CILINDRO E PISTONEENG
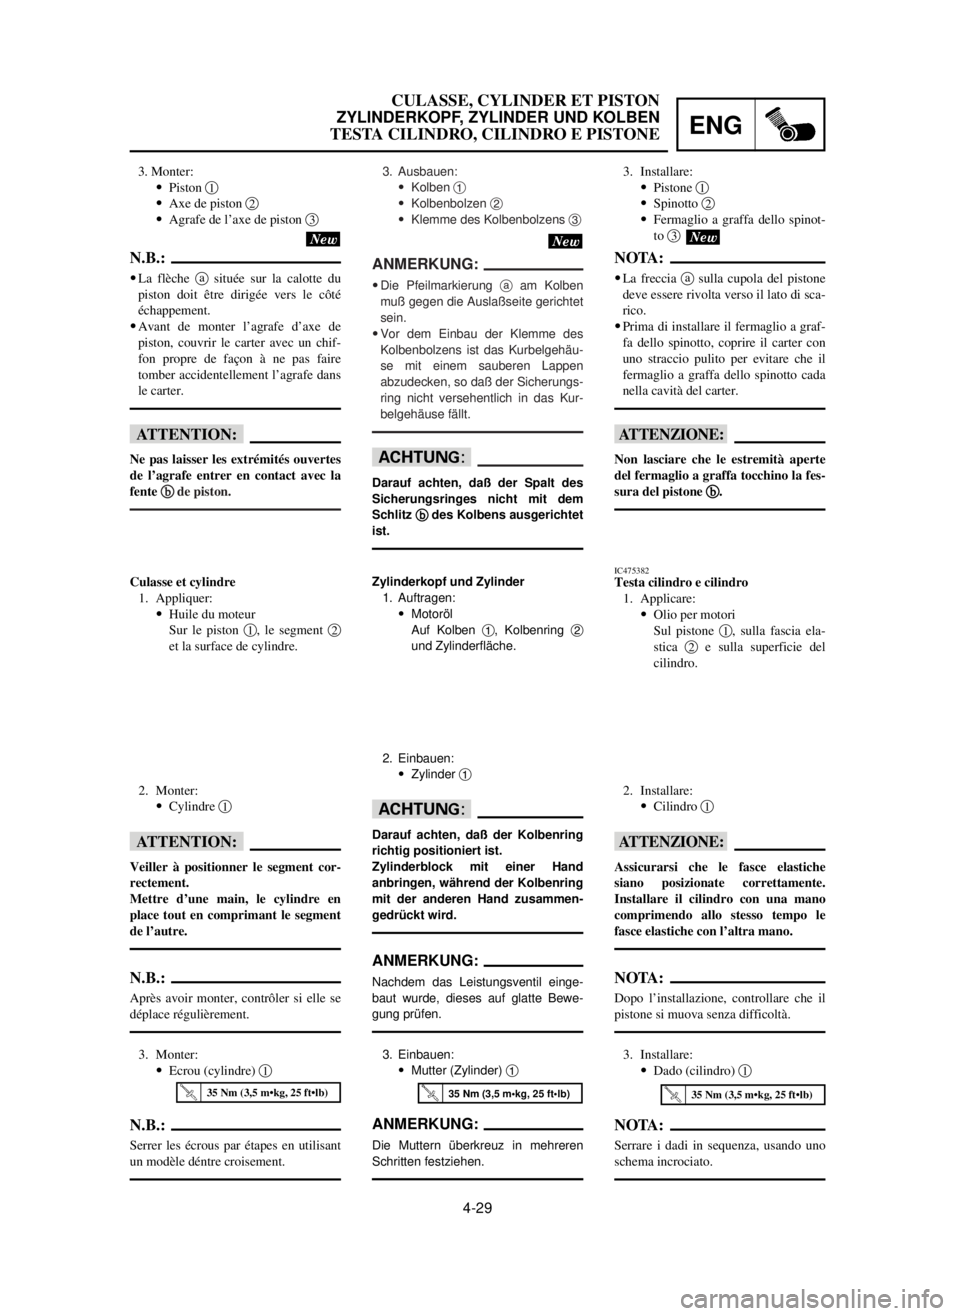
2. Installare:
9Cilindro 1
iI
Assicurarsi che le fasce elastiche
siano posizionate correttamente.
Installare il cilindro con una mano
comprimendo allo stesso tempo le
fasce elastiche con l’altra mano.
NOTA:
Dopo l’installazione, controllare che il
pistone si muova senza difficoltà.
3. Installare:
9Dado (cilindro) 1
NOTA:
Serrare i dadi in sequenza, usando uno
schema incrociato.
2. Einbauen:
9Zylinder 1
dD
Darauf achten, daß der Kolbenring
richtig positioniert ist.
Zylinderblock mit einer Hand
anbringen, während der Kolbenring
mit der anderen Hand zusammen-
gedrückt wird.
ANMERKUNG:
Nachdem das Leistungsventil einge-
baut wurde, dieses auf glatte Bewe-
gung prüfen.
3. Einbauen:
9Mutter (Zylinder) 1
ANMERKUNG:
Die Muttern überkreuz in mehreren
Schritten festziehen.
2. Monter:
9Cylindre 1
fF
Veiller à positionner le segment cor-
rectement.
Mettre d’une main, le cylindre en
place tout en comprimant le segment
de l’autre.
N.B.:
Après avoir monter, contrôler si elle se
déplace régulièrement.
3. Monter:
9Ecrou (cylindre) 1
N.B.:
Serrer les écrous par étapes en utilisant
un modèle déntre croisement.
Zylinderkopf und Zylinder
1. Auftragen:
9Motoröl
Auf Kolben 1, Kolbenring 2
und Zylinderfläche.Culasse et cylindre
1. Appliquer:
9Huile du moteur
Sur le piston 1, le segment 2
et la surface de cylindre.IC475382Testa cilindro e cilindro
1. Applicare:
9Olio per motori
Sul pistone 1, sulla fascia ela-
stica 2e sulla superficie del
cilindro.
35 Nm (3,5 m•kg, 25 ft•lb)35 Nm (3,5 m•kg, 25 ft•lb)35 Nm (3,5 m•kg, 25 ft•lb)
3. Monter:
9Piston 1
9Axe de piston 2
9Agrafe de l’axe de piston 3
N.B.:
9La flèche asituée sur la calotte du
piston doit être dirigée vers le côté
échappement.
9Avant de monter l’agrafe d’axe de
piston, couvrir le carter avec un chif-
fon propre de façon à ne pas faire
tomber accidentellement l’agrafe dans
le carter.
fF
Ne pas laisser les extrémités ouvertes
de l’agrafe entrer en contact avec la
fente b b
de piston.
3. Ausbauen:
9Kolben 1
9Kolbenbolzen 2
9Klemme des Kolbenbolzens 3
ANMERKUNG:
9Die Pfeilmarkierung aam Kolben
muß gegen die Auslaßseite gerichtet
sein.
9Vor dem Einbau der Klemme des
Kolbenbolzens ist das Kurbelgehäu-
se mit einem sauberen Lappen
abzudecken, so daß der Sicherungs-
ring nicht versehentlich in das Kur-
belgehäuse fällt.
dD
Darauf achten, daß der Spalt des
Sicherungsringes nicht mit dem
Schlitz b b
des Kolbens ausgerichtet
ist.
3. Installare:
9Pistone 1
9Spinotto 2
9Fermaglio a graffa dello spinot-
to 3
NOTA:
9La freccia asulla cupola del pistone
deve essere rivolta verso il lato di sca-
rico.
9Prima di installare il fermaglio a graf-
fa dello spinotto, coprire il carter con
uno straccio pulito per evitare che il
fermaglio a graffa dello spinotto cada
nella cavità del carter.
iI
Non lasciare che le estremità aperte
del fermaglio a graffa tocchino la fes-
sura del pistone b b
.
5MW-9-30-4B 7/3/00 6:25 PM Page 7
Page 270 of 578
4-30
CYLINDER HEAD, CYLINDER AND PISTONENG
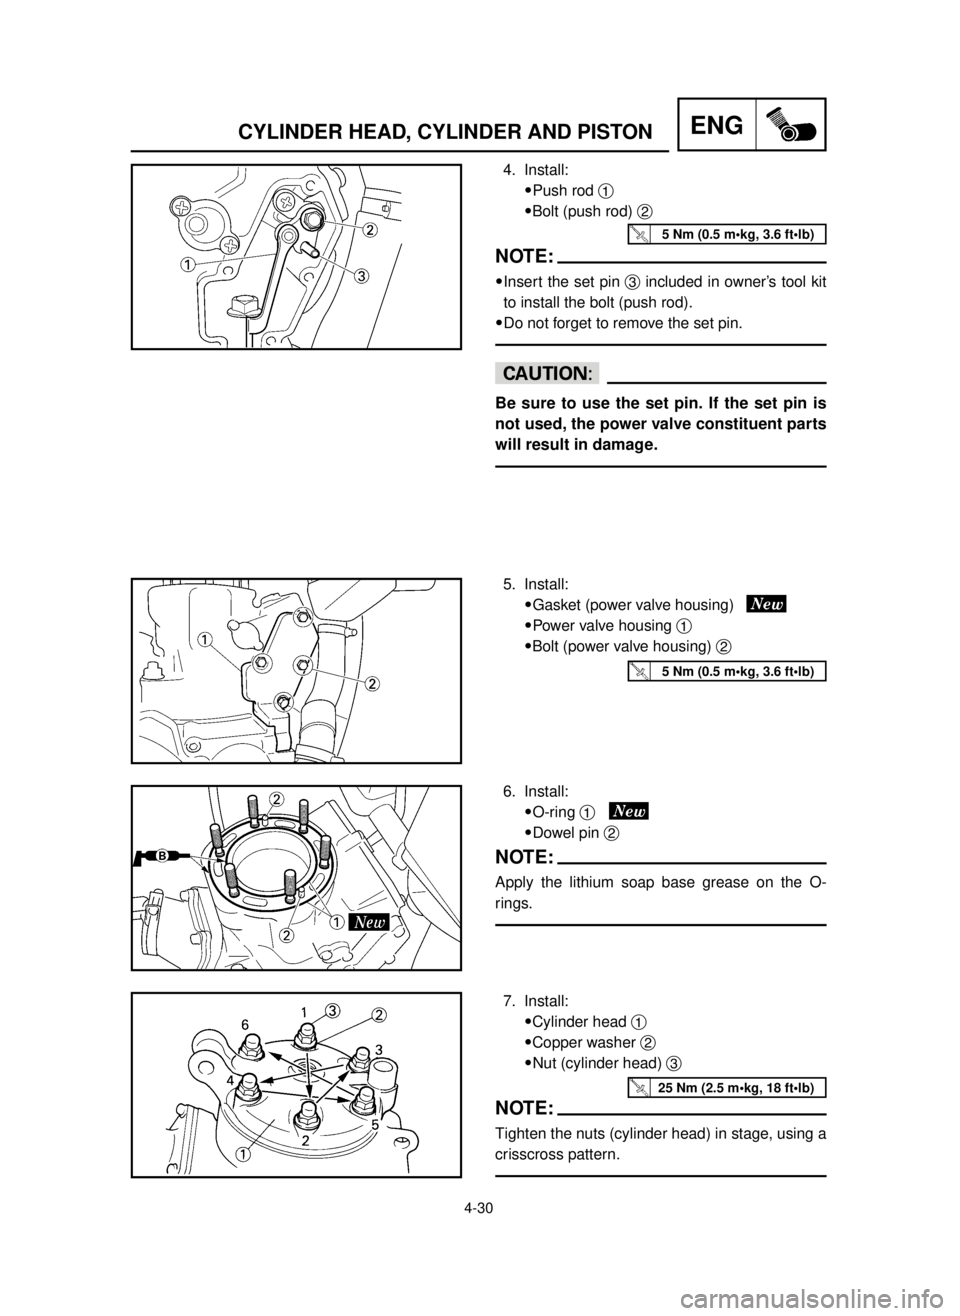
4. Install:
9Push rod 1
9Bolt (push rod) 2
NOTE:
9Insert the set pin 3included in owner’s tool kit
to install the bolt (push rod).
9Do not forget to remove the set pin.
cC
Be sure to use the set pin. If the set pin is
not used, the power valve constituent parts
will result in damage.
5. Install:
9Gasket (power valve housing)
9Power valve housing 1
9Bolt (power valve housing) 2
6. Install:
9O-ring 1
9Dowel pin 2
NOTE:
Apply the lithium soap base grease on the O-
rings.
7. Install:
9Cylinder head 1
9Copper washer 2
9Nut (cylinder head) 3
NOTE:
Tighten the nuts (cylinder head) in stage, using a
crisscross pattern.
5 Nm (0.5 m•kg, 3.6 ft•lb)
5 Nm (0.5 m•kg, 3.6 ft•lb)
25 Nm (2.5 m•kg, 18 ft•lb)
5MW-9-30-4B 7/3/00 6:26 PM Page 8