key YAMAHA YZ426F 2000 Owners Manual
[x] Cancel search | Manufacturer: YAMAHA, Model Year: 2000, Model line: YZ426F, Model: YAMAHA YZ426F 2000Pages: 608, PDF Size: 45.52 MB
Page 12 of 608
EC080000
HOW TO USE
THIS MANUAL
EC081000
PARTICULARLY IMPORTANT
INFORMATION
The Safety Alert Symbol means ATTENTION!
BECOME ALERT! YOUR SAFETY IS
INVOLVED!
Failure to follow WARNING instructions could
result in severe injury or death to the machine
operator, a bystander, or a person inspecting
or repairing the machine.
A CAUTION indicates special precautions that
must be taken to avoid damage to the
machine.
NOTE:
A NOTE provides key information to make pro-
cedures easier or clearer.
WARNING
CAUTION:
EC082000
FINDING THE REQUIRED PAGE
1. This manual consists of seven chapters;
“General Information”, “Specifications”,
“Regular inspection and adjustments”,
“Engine”, “Chassis”, “Electrical” and
“Tuning”.
2. The table of contents is at the beginning
of the manual. Look over the general lay-
out of the book before finding then
required chapter and item.
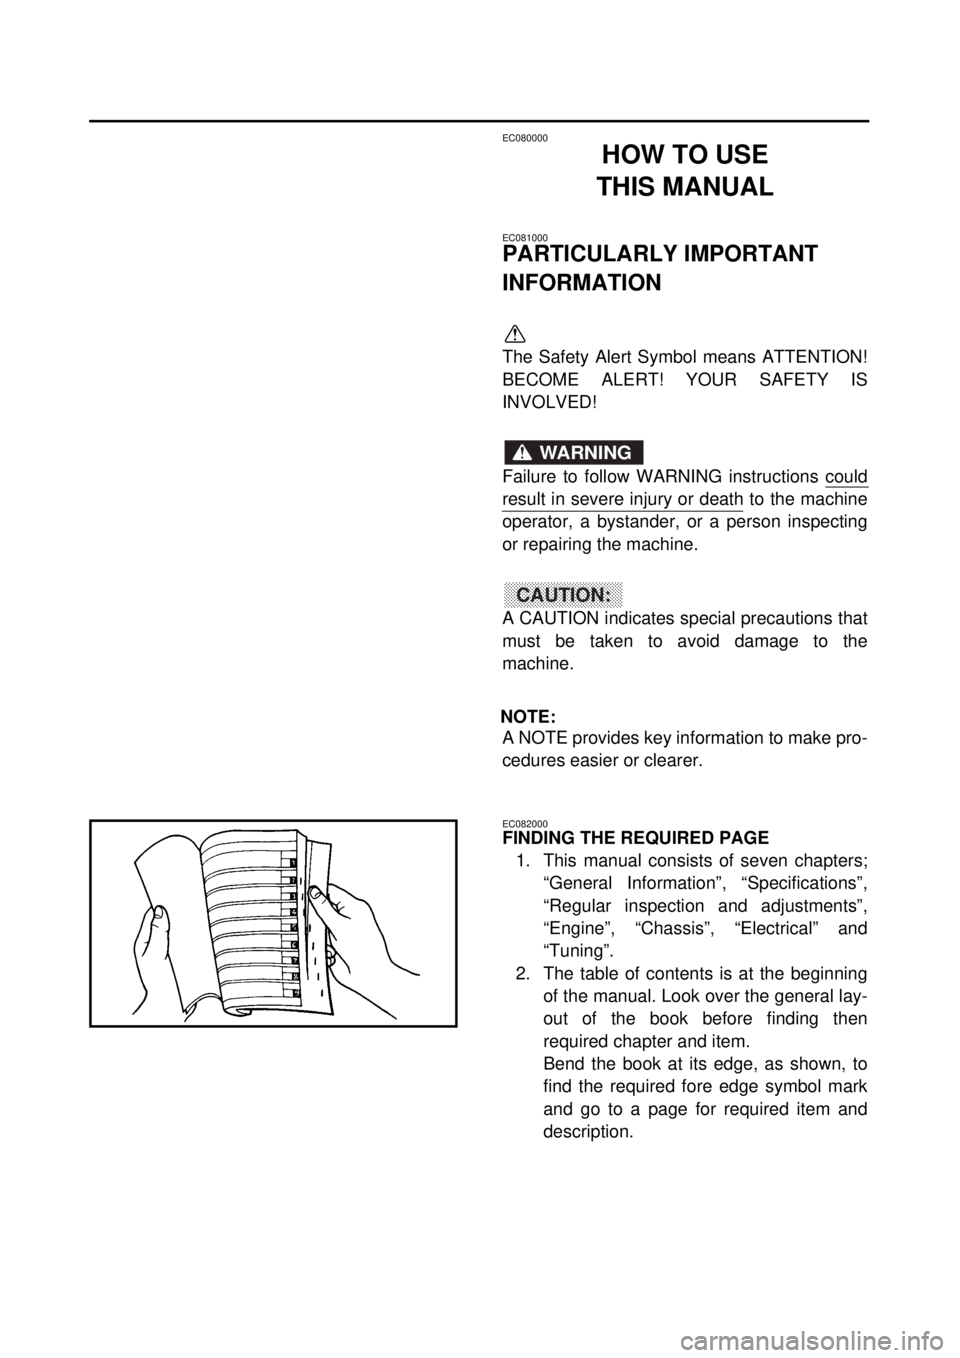
Bend the book at its edge, as shown, to
find the required fore edge symbol mark
and go to a page for required item and
description.
Page 164 of 608
3 - 12
INSP
ADJ
AIR FILTER CLEANING
EC35G040
AIR FILTER CLEANING
NOTE:
Proper air filter maintenance is the biggest key
to preventing premature engine wear and
damage.
CAUTION:
Never run the engine without the air filter
element in place; this would allow dirt and
dust to enter the engine and cause rapid
wear and possible engine damage.
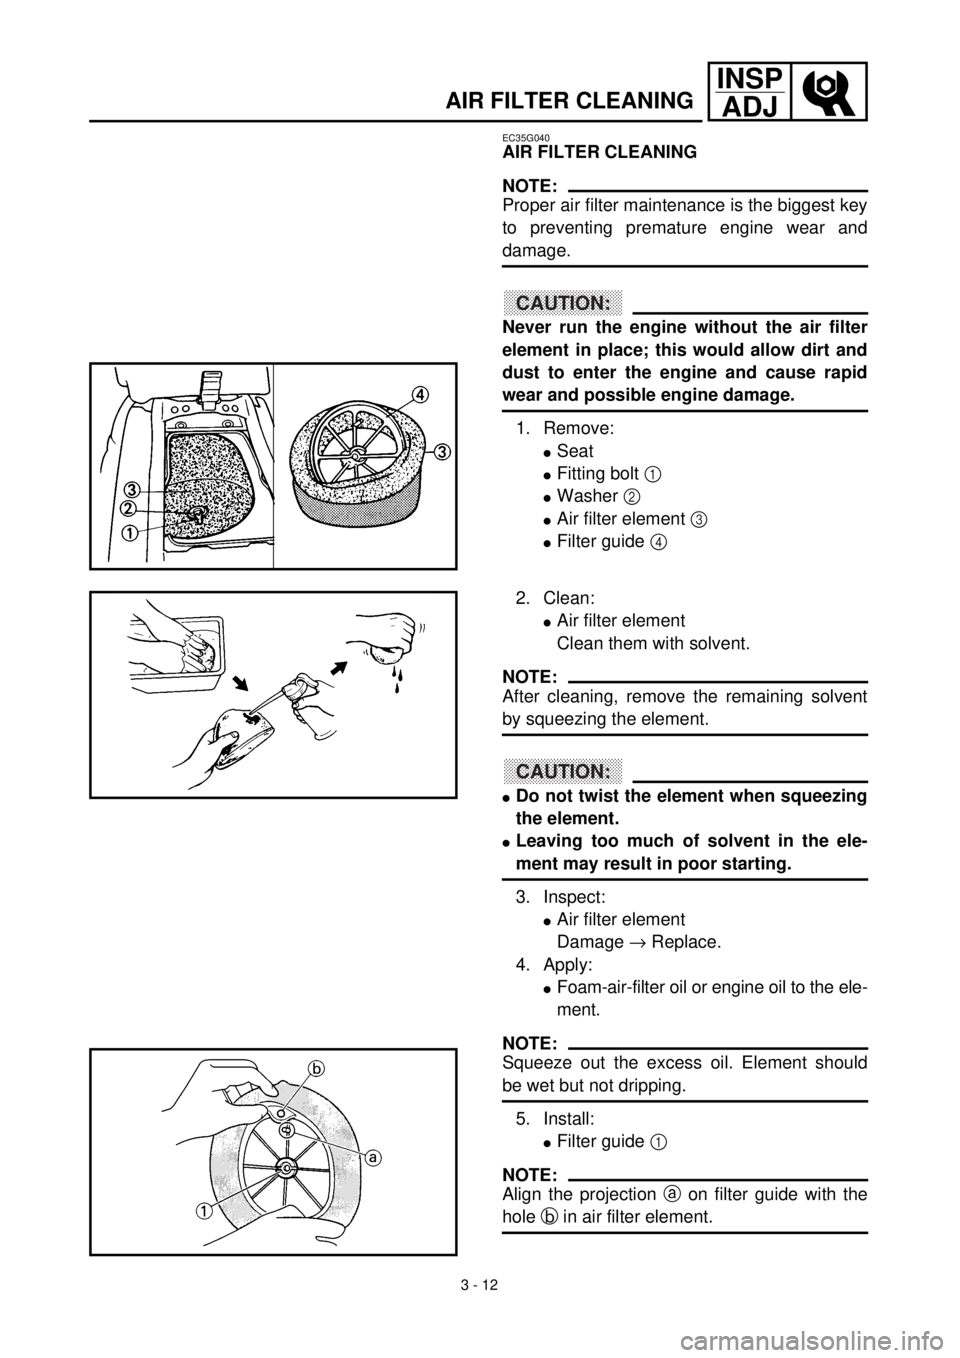
1. Remove:
lSeat
lFitting bolt 1
lWasher 2
lAir filter element 3
lFilter guide 4
2. Clean:
lAir filter element
Clean them with solvent.
NOTE:
After cleaning, remove the remaining solvent
by squeezing the element.
CAUTION:
lDo not twist the element when squeezing
the element.
lLeaving too much of solvent in the ele-
ment may result in poor starting.
3. Inspect:
lAir filter element
Damage ® Replace.
4. Apply:
lFoam-air-filter oil or engine oil to the ele-
ment.
NOTE:
Squeeze out the excess oil. Element should
be wet but not dripping.
5. Install:
lFilter guide 1
NOTE:
Align the projection a on filter guide with the
hole b in air filter element.
Page 340 of 608
ENG
4 - 53
BALANCER
BALANCER
BALANCER
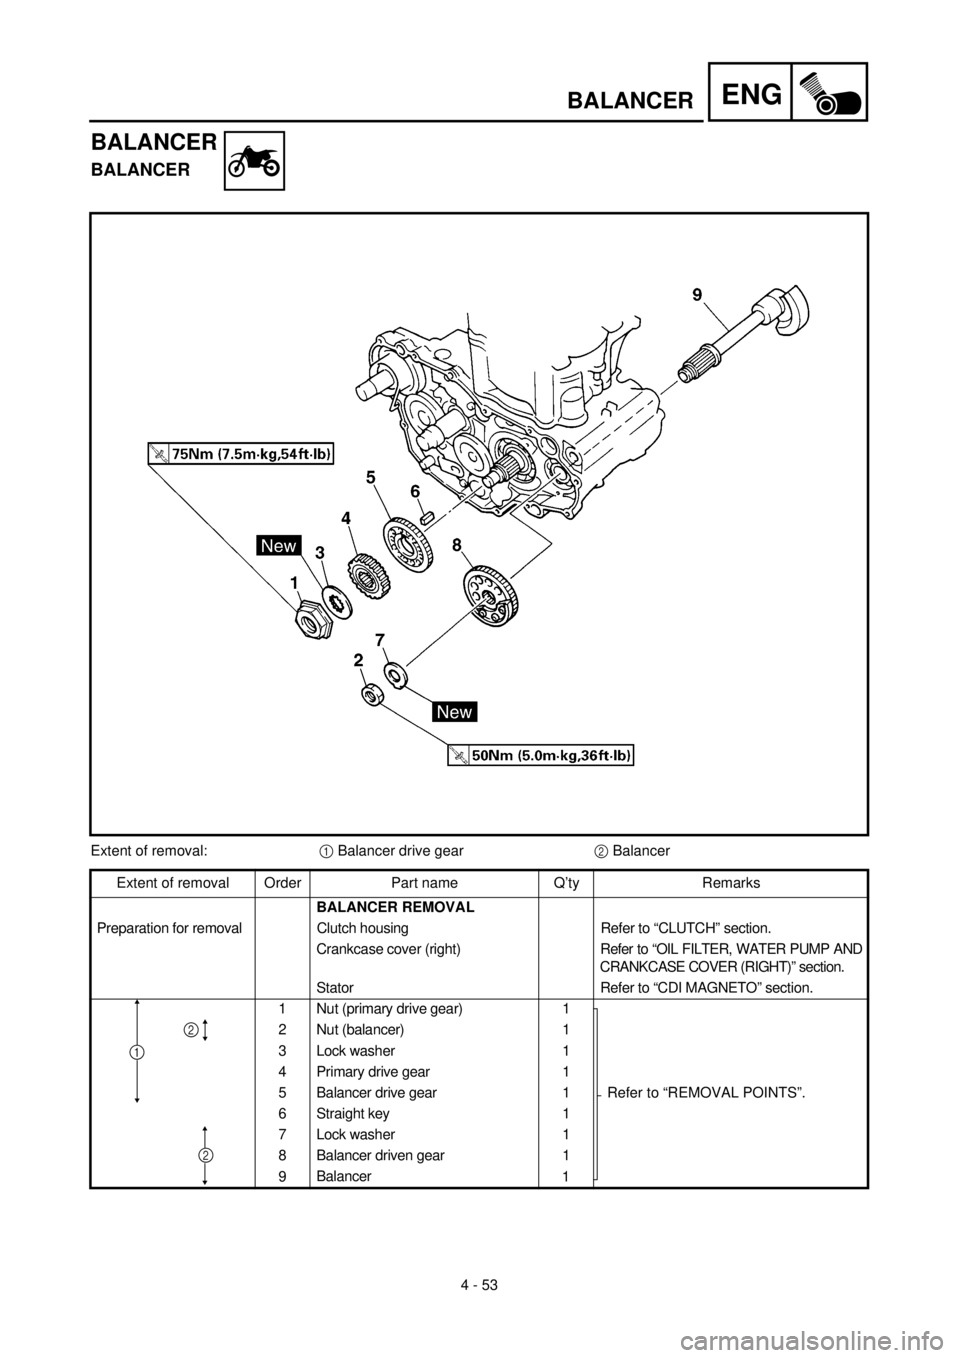
Extent of removal:1 Balancer drive gear2 Balancer
Extent of removal Order Part name Q’ty Remarks
BALANCER REMOVAL
Preparation for removal Clutch housing Refer to “CLUTCH” section.
Crankcase cover (right)Refer to “OIL FILTER, WATER PUMP AND
CRANKCASE COVER (RIGHT)” section.
Stator Refer to “CDI MAGNETO” section.
1 Nut (primary drive gear) 1
Refer to “REMOVAL POINTS”. 2 Nut (balancer) 1
3 Lock washer 1
4 Primary drive gear 1
5 Balancer drive gear 1
6 Straight key 1
7 Lock washer 1
8 Balancer driven gear 1
9Balancer
1
2
1
2
Page 344 of 608
4 - 55
ENGBALANCER
ASSEMBLY AND INSTALLATION
Balancer, balancer drive gear and balancer
driven gear
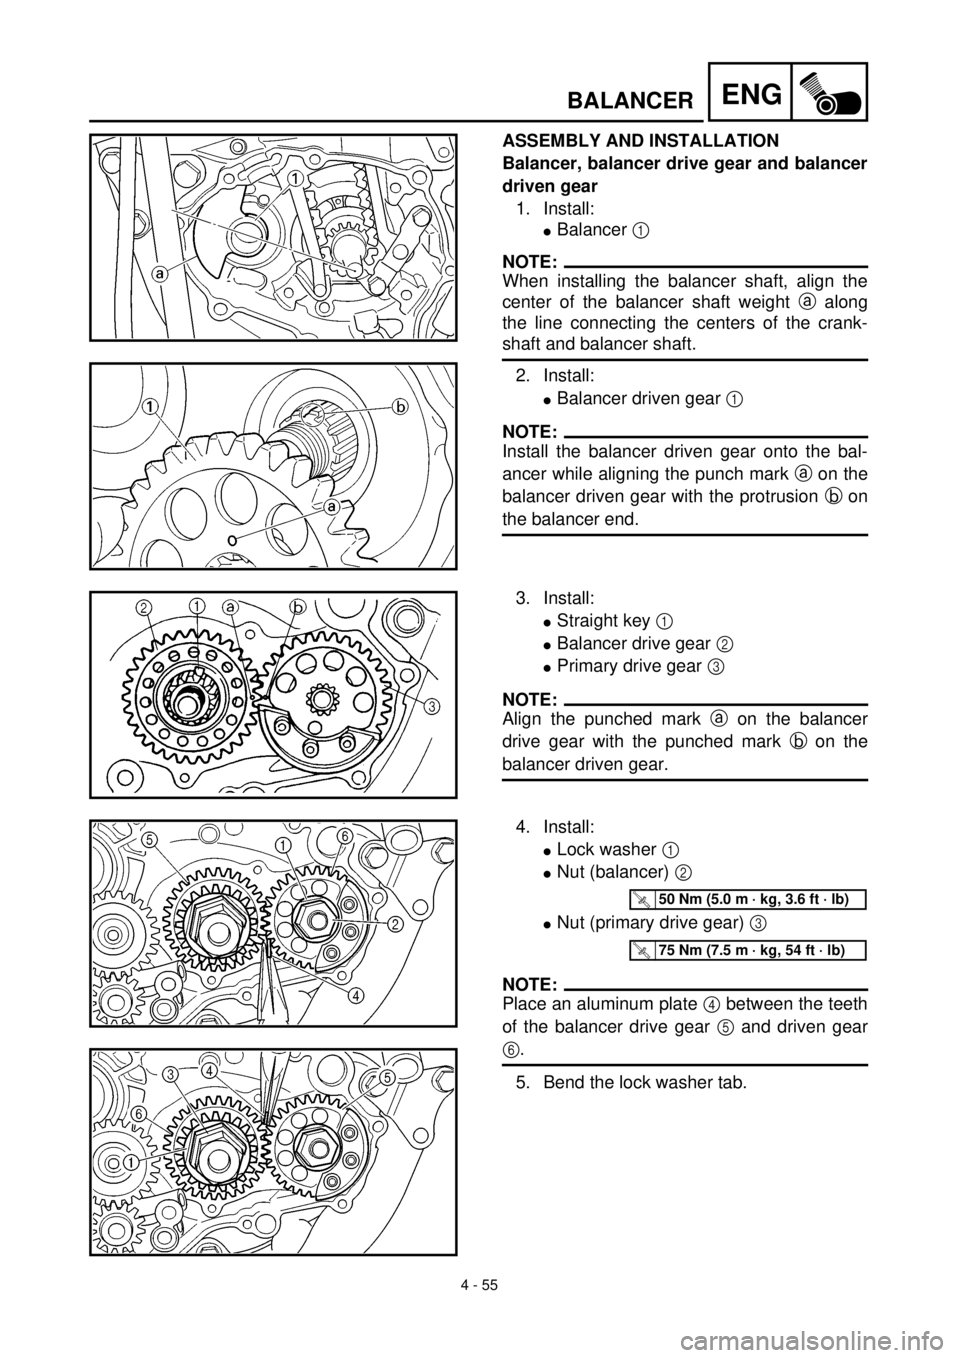
1. Install:
lBalancer 1
NOTE:
When installing the balancer shaft, align the
center of the balancer shaft weight a along
the line connecting the centers of the crank-
shaft and balancer shaft.
2. Install:
lBalancer driven gear 1
NOTE:
Install the balancer driven gear onto the bal-
ancer while aligning the punch mark a on the
balancer driven gear with the protrusion b on
the balancer end.
3. Install:
lStraight key 1
lBalancer drive gear 2
lPrimary drive gear 3
NOTE:
Align the punched mark a on the balancer
drive gear with the punched mark b on the
balancer driven gear.
4. Install:
lLock washer 1
lNut (balancer) 2
lNut (primary drive gear) 3
NOTE:
Place an aluminum plate 4 between the teeth
of the balancer drive gear 5 and driven gear
6.
5. Bend the lock washer tab.
T R..50 Nm (5.0 m · kg, 3.6 ft · lb)
T R..75 Nm (7.5 m · kg, 54 ft · lb)
Page 368 of 608
ENG
4 - 67
CDI MAGNETO
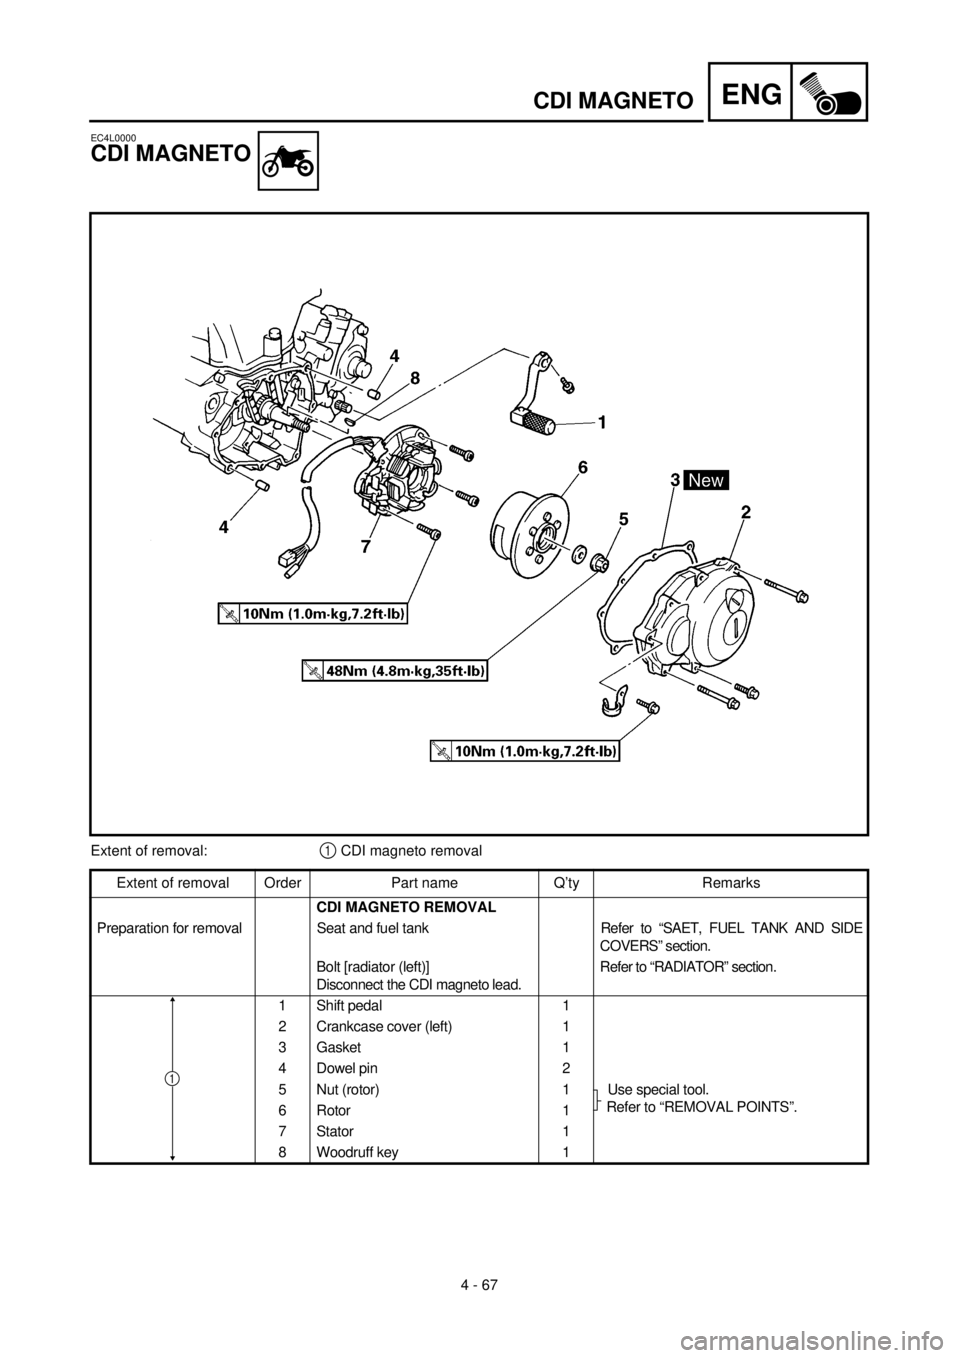
EC4L0000
CDI MAGNETO
Extent of removal:1 CDI magneto removal
Extent of removal Order Part name Q’ty Remarks
CDI MAGNETO REMOVAL
Preparation for removal Seat and fuel tankRefer to “SAET, FUEL TANK AND SIDE
COVERS” section.
Bolt [radiator (left)]
Disconnect the CDI magneto lead.Refer to “RADIATOR” section.
1 Shift pedal 1
2 Crankcase cover (left) 1
3 Gasket 1
4 Dowel pin 2
5 Nut (rotor) 1 Use special tool.
Refer to “REMOVAL POINTS”.
6 Rotor 1
7 Stator 1
8 Woodruff key 1
1
Page 370 of 608
4 - 68
ENGCDI MAGNETO
EC4L3000
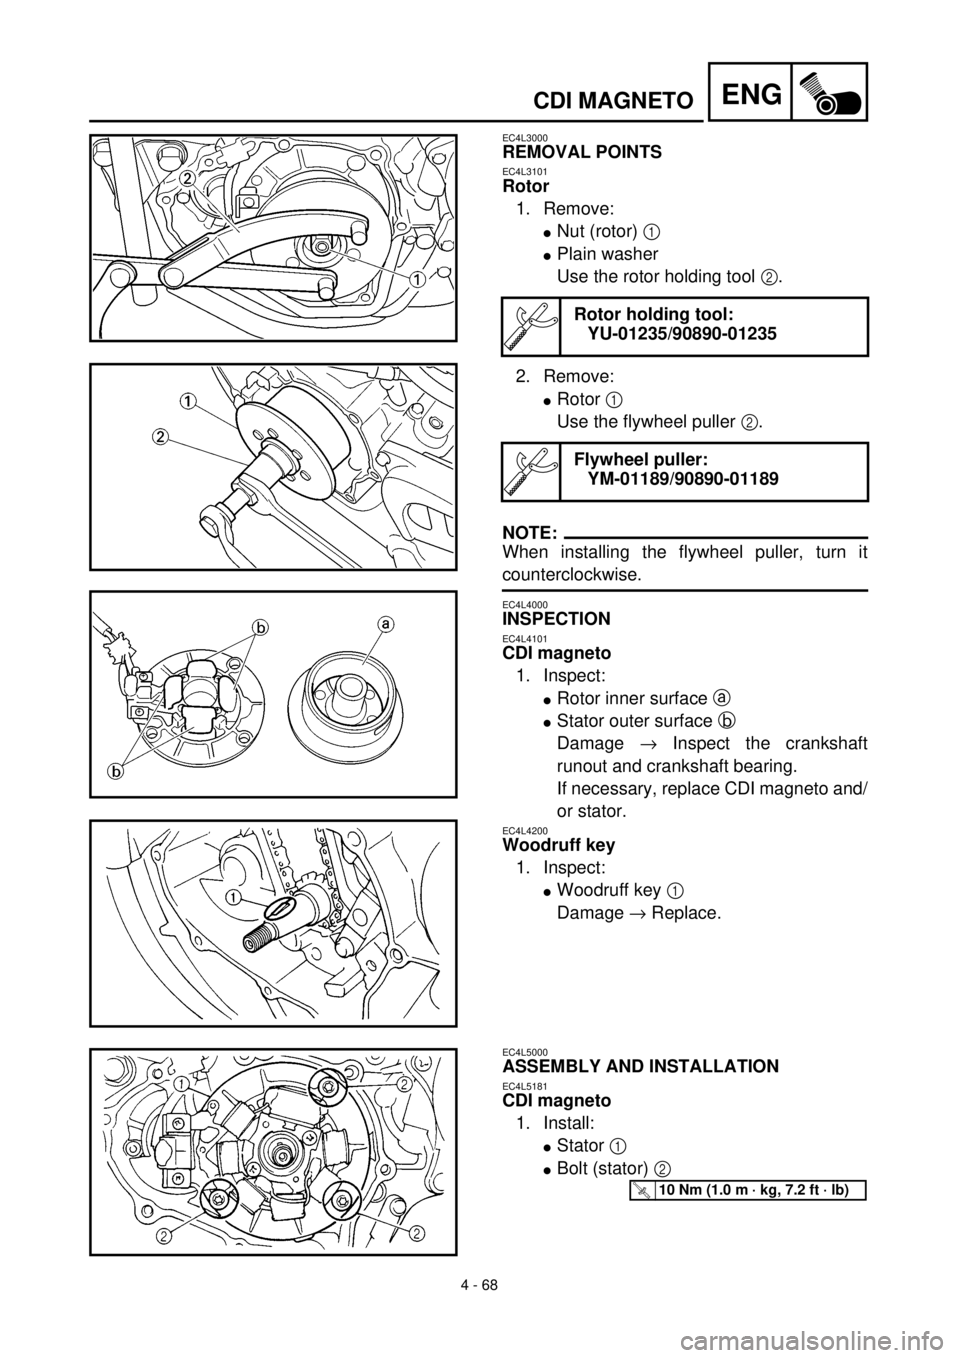
REMOVAL POINTS
EC4L3101
Rotor
1. Remove:
lNut (rotor) 1
lPlain washer
Use the rotor holding tool 2.
2. Remove:
lRotor 1
Use the flywheel puller 2.
NOTE:
When installing the flywheel puller, turn it
counterclockwise.
EC4L4000
INSPECTION
EC4L4101
CDI magneto
1. Inspect:
lRotor inner surface a
lStator outer surface b
Damage ® Inspect the crankshaft
runout and crankshaft bearing.
If necessary, replace CDI magneto and/
or stator.
EC4L4200
Woodruff key
1. Inspect:
lWoodruff key 1
Damage ® Replace.
Rotor holding tool:
YU-01235/90890-01235
Flywheel puller:
YM-01189/90890-01189
EC4L5000
ASSEMBLY AND INSTALLATION
EC4L5181
CDI magneto
1. Install:
lStator 1
lBolt (stator) 2
T R..10 Nm (1.0 m · kg, 7.2 ft · lb)
Page 372 of 608
4 - 69
ENGCDI MAGNETO
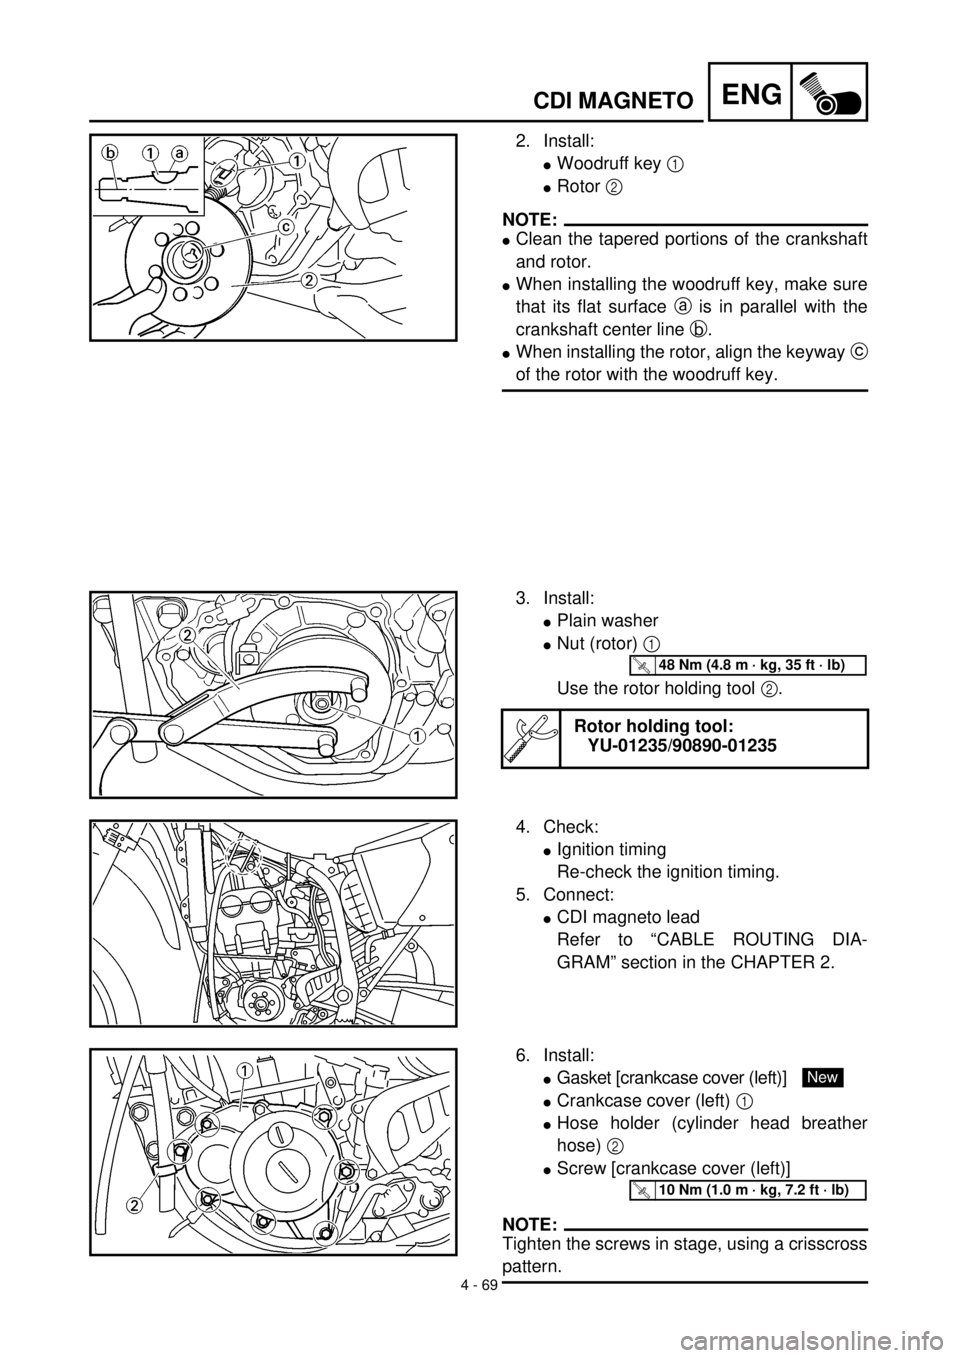
2. Install:
lWoodruff key 1
lRotor 2
NOTE:
lClean the tapered portions of the crankshaft
and rotor.
lWhen installing the woodruff key, make sure
that its flat surface a is in parallel with the
crankshaft center line b.
lWhen installing the rotor, align the keyway c
of the rotor with the woodruff key.
3. Install:
lPlain washer
lNut (rotor) 1
Use the rotor holding tool 2.
Rotor holding tool:
YU-01235/90890-01235
T R..48 Nm (4.8 m · kg, 35 ft · lb)
4. Check:
lIgnition timing
Re-check the ignition timing.
5. Connect:
lCDI magneto lead
Refer to “CABLE ROUTING DIA-
GRAM” section in the CHAPTER 2.
6. Install:
lGasket [crankcase cover (left)]
lCrankcase cover (left) 1
lHose holder (cylinder head breather
hose) 2
lScrew [crankcase cover (left)]
NOTE:
Tighten the screws in stage, using a crisscross
pattern.
New
T R..10 Nm (1.0 m · kg, 7.2 ft · lb)