maintenance YAMAHA YZ450F 2005 Notices Demploi (in French)
[x] Cancel search | Manufacturer: YAMAHA, Model Year: 2005, Model line: YZ450F, Model: YAMAHA YZ450F 2005Pages: 646, PDF Size: 16.06 MB
Page 144 of 646

3 - 3
INSP
ADJ
MAINTENANCE INTERVALS
FRONT FORK OIL SEAL AND DUST
SEAL
Clean and lube Lithium base grease
PROTECTOR GUIDE
Replace
REAR SHOCK ABSORBER
(After
rain ride)Inspect and adjust
Lube
Molybdenum disulfide
grease
Retighten
CHAIN GUARD AND ROLLERS
Inspect
SWINGARM
Molybdenum disulfide
grease
Inspect, lube and retighten
RELAY ARM, CONNECTING ROD
Molybdenum disulfide
grease
Inspect, lube and retighten
STEERING HEAD
Inspect free play and retighten
Clean and lube Lithium base grease
Replace bearing
TIRE, WHEELS
Inspect air pressure, wheel run-out,
tire wear and spoke looseness
Retighten sprocket bolt
Inspect bearings
Replace bearings
Lubricate Lithium base grease
THROTTLE, CONTROL CABLE
Yamaha cable lube or
SAE 10W-30 motor oil Check routing and connection
Lubricate
HOT STARTER, CLUTCH LEVER
Inspect free playItemAfter
break-inEvery
race
Every
third
(or
500 km)Every
fifth
(or
1,000 km)As re-
quiredRemarks
Page 151 of 646

3 - 4
INSP
ADJ
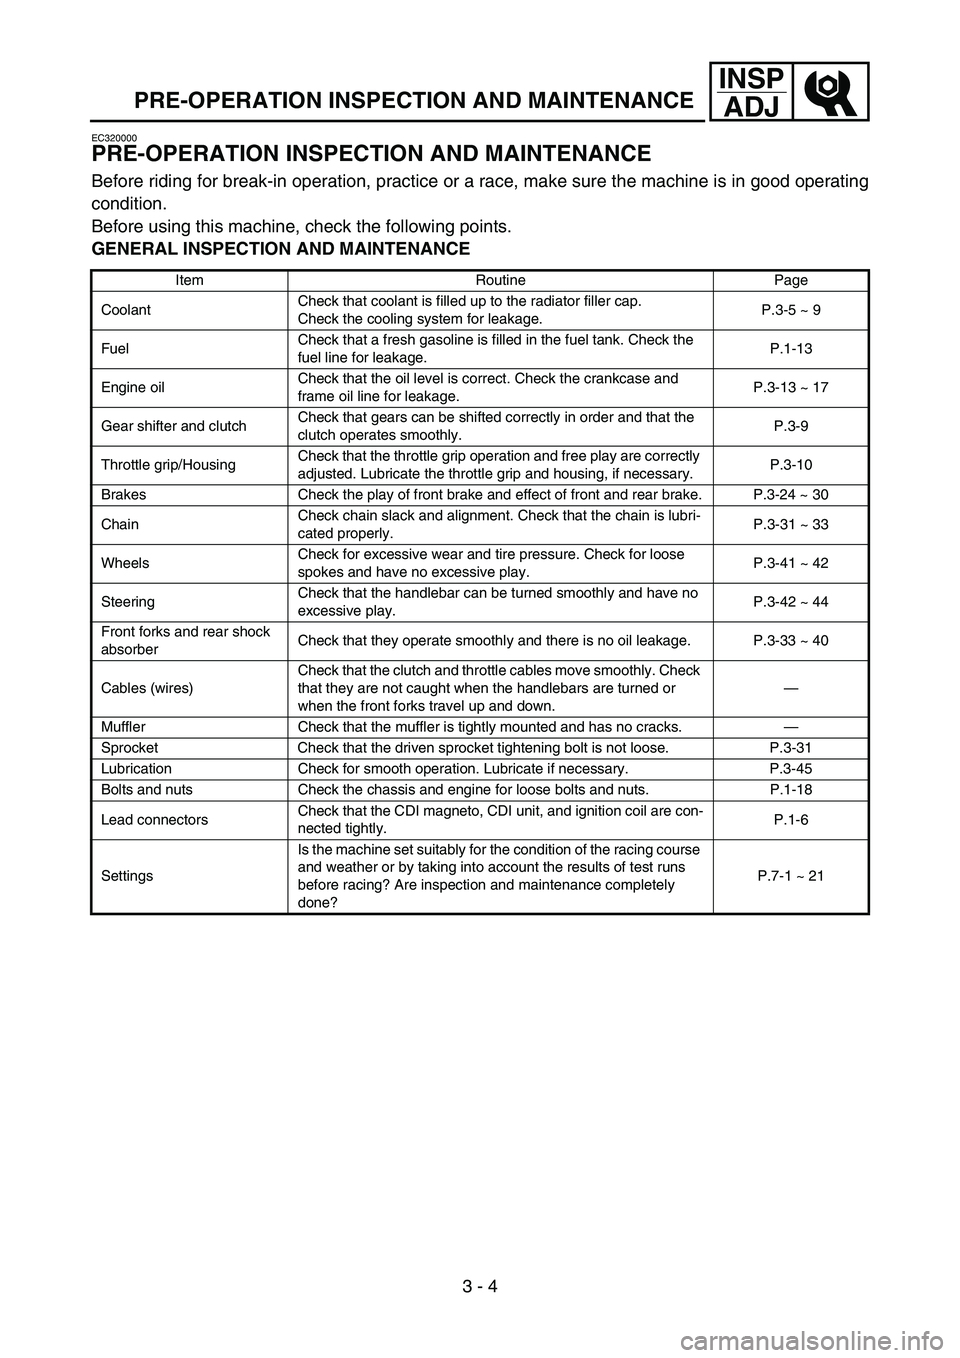
PRE-OPERATION INSPECTION AND MAINTENANCE
EC320000
PRE-OPERATION INSPECTION AND MAINTENANCE
Before riding for break-in operation, practice or a race, make sure the machine is in good operating
condition.
Before using this machine, check the following points.
GENERAL INSPECTION AND MAINTENANCE
Item Routine Page
CoolantCheck that coolant is filled up to the radiator filler cap.
Check the cooling system for leakage.P.3-5 ~ 9
FuelCheck that a fresh gasoline is filled in the fuel tank. Check the
fuel line for leakage.P.1-13
Engine oilCheck that the oil level is correct. Check the crankcase and
frame oil line for leakage.P.3-13 ~ 17
Gear shifter and clutchCheck that gears can be shifted correctly in order and that the
clutch operates smoothly.P.3-9
Throttle grip/HousingCheck that the throttle grip operation and free play are correctly
adjusted. Lubricate the throttle grip and housing, if necessary.P.3-10
Brakes Check the play of front brake and effect of front and rear brake. P.3-24 ~ 30
ChainCheck chain slack and alignment. Check that the chain is lubri-
cated properly.P.3-31 ~ 33
WheelsCheck for excessive wear and tire pressure. Check for loose
spokes and have no excessive play.P.3-41 ~ 42
SteeringCheck that the handlebar can be turned smoothly and have no
excessive play.P.3-42 ~ 44
Front forks and rear shock
absorberCheck that they operate smoothly and there is no oil leakage. P.3-33 ~ 40
Cables (wires)Check that the clutch and throttle cables move smoothly. Check
that they are not caught when the handlebars are turned or
when the front forks travel up and down.—
Muffler Check that the muffler is tightly mounted and has no cracks.—
Sprocket Check that the driven sprocket tightening bolt is not loose. P.3-31
Lubrication Check for smooth operation. Lubricate if necessary. P.3-45
Bolts and nuts Check the chassis and engine for loose bolts and nuts. P.1-18
Lead connectorsCheck that the CDI magneto, CDI unit, and ignition coil are con-
nected tightly.P.1-6
SettingsIs the machine set suitably for the condition of the racing course
and weather or by taking into account the results of test runs
before racing? Are inspection and maintenance completely
done?P.7-1 ~ 21
Page 166 of 646

3 - 11
INSP
ADJHOT STARTER LEVER ADJUSTMENT/
AIR FILTER CLEANING
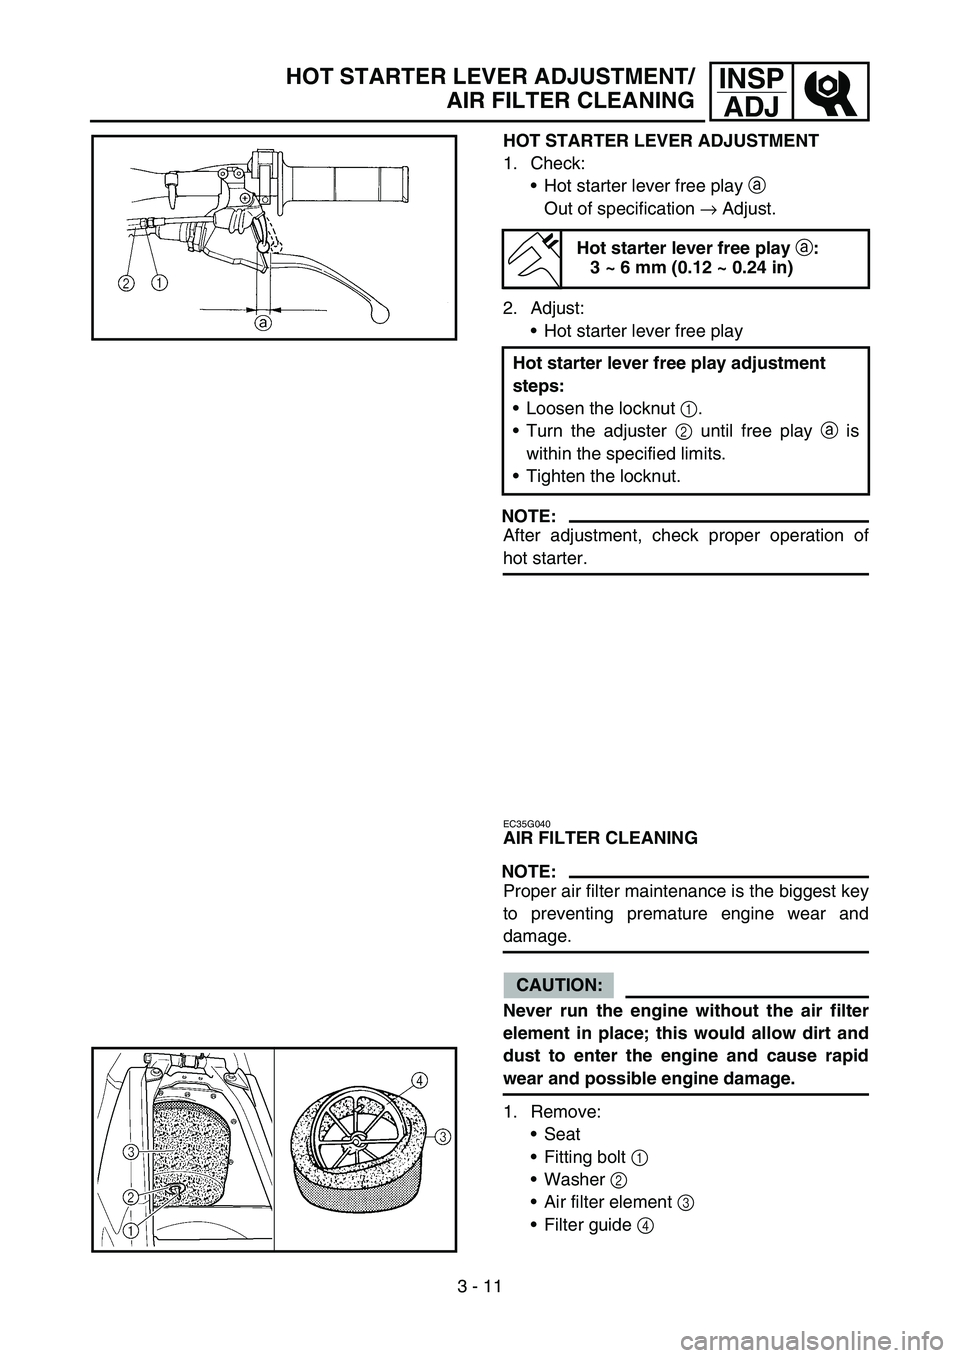
HOT STARTER LEVER ADJUSTMENT
1. Check:
Hot starter lever free play a
Out of specification → Adjust.
2. Adjust:
Hot starter lever free play
NOTE:
After adjustment, check proper operation of
hot starter.
Hot starter lever free play
a:
3 ~ 6 mm (0.12 ~ 0.24 in)
Hot starter lever free play adjustment
steps:
Loosen the locknut 1.
Turn the adjuster 2 until free play a is
within the specified limits.
Tighten the locknut.
EC35G040
AIR FILTER CLEANING
NOTE:
Proper air filter maintenance is the biggest key
to preventing premature engine wear and
damage.
CAUTION:
Never run the engine without the air filter
element in place; this would allow dirt and
dust to enter the engine and cause rapid
wear and possible engine damage.
1. Remove:
Seat
Fitting bolt 1
Washer 2
Air filter element 3
Filter guide 4