clock YAMAHA YZ450F 2008 Owners Manual
[x] Cancel search | Manufacturer: YAMAHA, Model Year: 2008, Model line: YZ450F, Model: YAMAHA YZ450F 2008Pages: 188, PDF Size: 11.75 MB
Page 27 of 188
2-5
MAINTENANCE SPECIFICATIONS
Stem-to-guide clearance (IN) 0.010–0.037 mm (0.0004–0.0015 in) 0.08 mm (0.003
in)
Stem-to-guide clearance (EX) 0.020–0.047 mm (0.0008–0.0019 in) 0.10 mm (0.004
in)
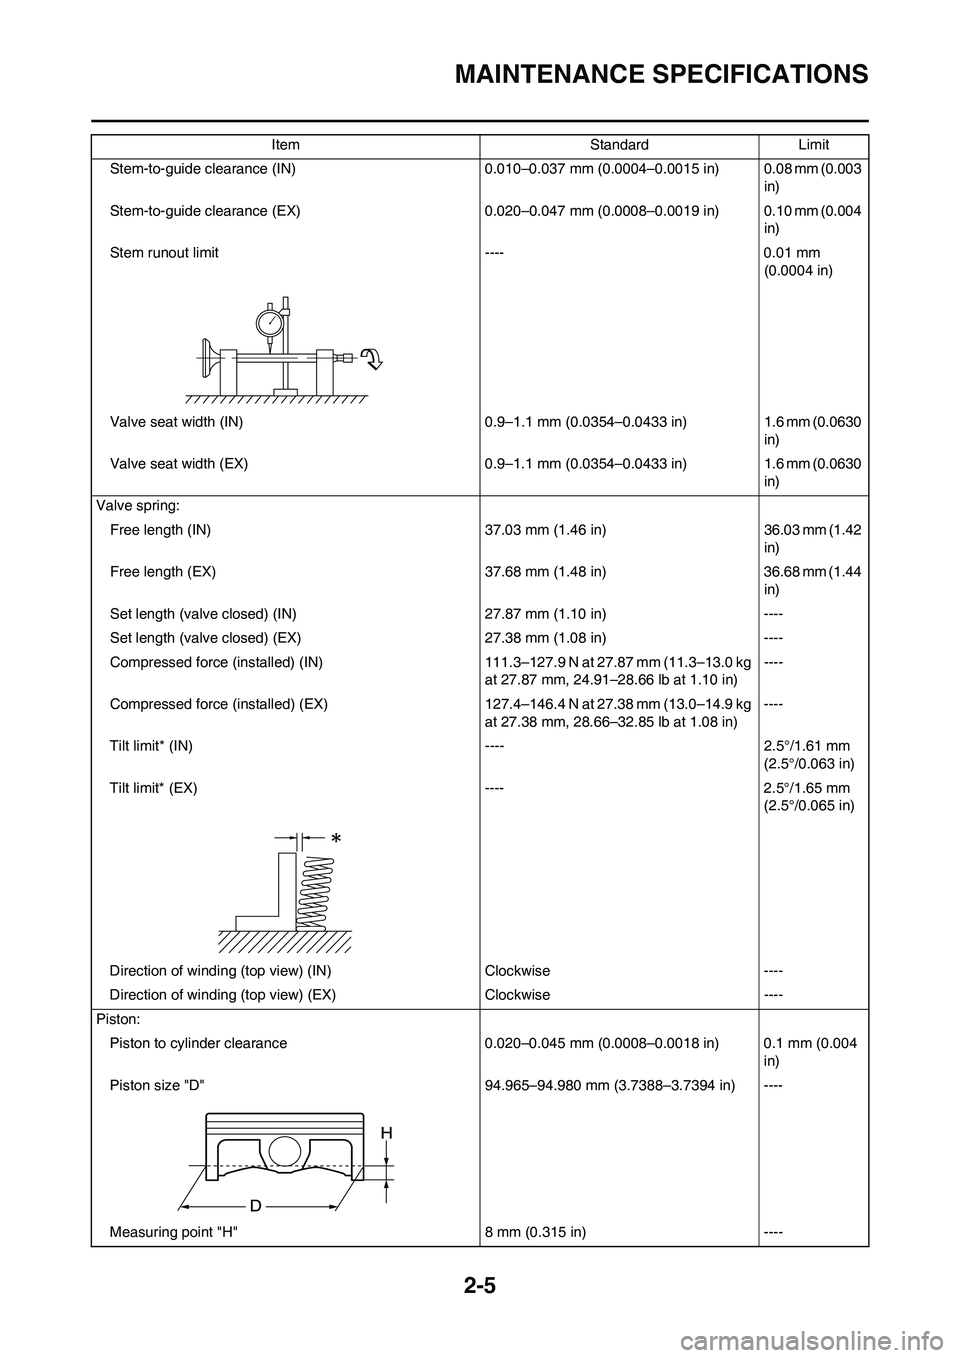
Stem runout limit ---- 0.01 mm
(0.0004 in)
Valve seat width (IN) 0.9–1.1 mm (0.0354–0.0433 in) 1.6 mm (0.0630
in)
Valve seat width (EX) 0.9–1.1 mm (0.0354–0.0433 in) 1.6 mm (0.0630
in)
Valve spring:
Free length (IN) 37.03 mm (1.46 in) 36.03 mm (1.42
in)
Free length (EX) 37.68 mm (1.48 in) 36.68 mm (1.44
in)
Set length (valve closed) (IN) 27.87 mm (1.10 in) ----
Set length (valve closed) (EX) 27.38 mm (1.08 in) ----
Compressed force (installed) (IN) 111.3–127.9 N at 27.87 mm (11.3–13.0 kg
at 27.87 mm, 24.91–28.66 lb at 1.10 in)----
Compressed force (installed) (EX) 127.4–146.4 N at 27.38 mm (13.0–14.9 kg
at 27.38 mm, 28.66–32.85 lb at 1.08 in)----
Tilt limit* (IN) ---- 2.5°/1.61 mm
(2.5°/0.063 in)
Tilt limit* (EX) ---- 2.5°/1.65 mm
(2.5°/0.065 in)
Direction of winding (top view) (IN) Clockwise ----
Direction of winding (top view) (EX) Clockwise ----
Piston:
Piston to cylinder clearance 0.020–0.045 mm (0.0008–0.0018 in) 0.1 mm (0.004
in)
Piston size "D" 94.965–94.980 mm (3.7388–3.7394 in) ----
Measuring point "H" 8 mm (0.315 in) ---- Item Standard Limit
Page 51 of 188
3-5
ENGINE
ENGINE
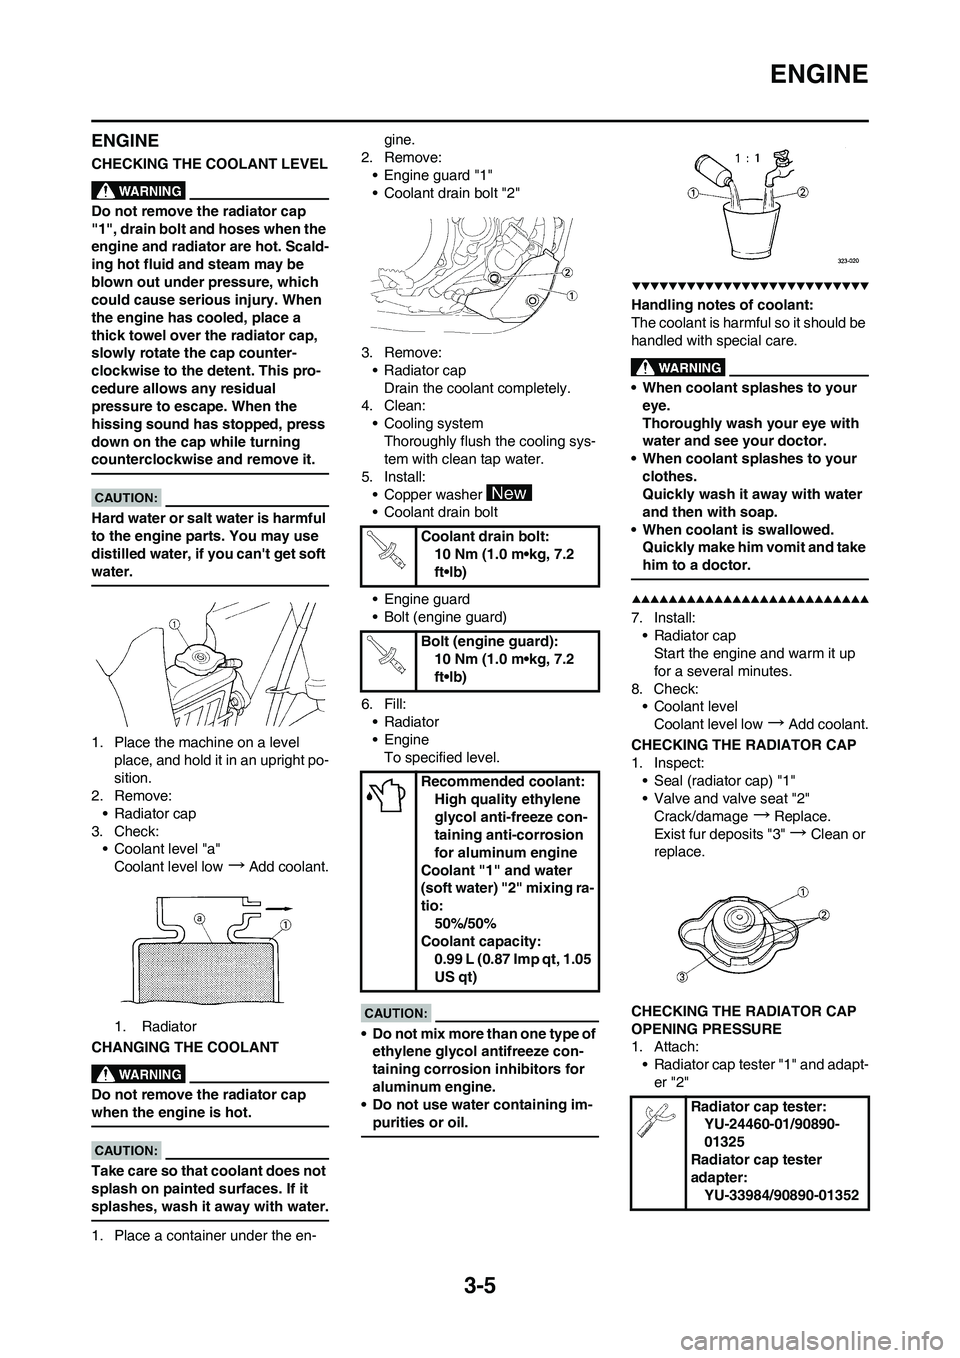
CHECKING THE COOLANT LEVEL
Do not remove the radiator cap
"1", drain bolt and hoses when the
engine and radiator are hot. Scald-
ing hot fluid and steam may be
blown out under pressure, which
could cause serious injury. When
the engine has cooled, place a
thick towel over the radiator cap,
slowly rotate the cap counter-
clockwise to the detent. This pro-
cedure allows any residual
pressure to escape. When the
hissing sound has stopped, press
down on the cap while turning
counterclockwise and remove it.
Hard water or salt water is harmful
to the engine parts. You may use
distilled water, if you can't get soft
water.
1. Place the machine on a level
place, and hold it in an upright po-
sition.
2. Remove:
• Radiator cap
3. Check:
• Coolant level "a"
Coolant level low
→Add coolant.
1. Radiator
CHANGING THE COOLANT
Do not remove the radiator cap
when the engine is hot.
Take care so that coolant does not
splash on painted surfaces. If it
splashes, wash it away with water.
1. Place a container under the en-gine.
2. Remove:
• Engine guard "1"
• Coolant drain bolt "2"
3. Remove:
• Radiator cap
Drain the coolant completely.
4. Clean:
• Cooling system
Thoroughly flush the cooling sys-
tem with clean tap water.
5. Install:
• Copper washer
• Coolant drain bolt
• Engine guard
• Bolt (engine guard)
6. Fill:
• Radiator
•Engine
To specified level.
• Do not mix more than one type of
ethylene glycol antifreeze con-
taining corrosion inhibitors for
aluminum engine.
• Do not use water containing im-
purities or oil.
Handling notes of coolant:
The coolant is harmful so it should be
handled with special care.
• When coolant splashes to your
eye.
Thoroughly wash your eye with
water and see your doctor.
• When coolant splashes to your
clothes.
Quickly wash it away with water
and then with soap.
• When coolant is swallowed.
Quickly make him vomit and take
him to a doctor.
7. Install:
• Radiator cap
Start the engine and warm it up
for a several minutes.
8. Check:
• Coolant level
Coolant level low
→Add coolant.
CHECKING THE RADIATOR CAP
1. Inspect:
• Seal (radiator cap) "1"
• Valve and valve seat "2"
Crack/damage
→Replace.
Exist fur deposits "3"
→Clean or
replace.
CHECKING THE RADIATOR CAP
OPENING PRESSURE
1. Attach:
• Radiator cap tester "1" and adapt-
er "2"
Coolant drain bolt:
10 Nm (1.0 m•kg, 7.2
ft•lb)
Bolt (engine guard):
10 Nm (1.0 m•kg, 7.2
ft•lb)
Recommended coolant:
High quality ethylene
glycol anti-freeze con-
taining anti-corrosion
for aluminum engine
Coolant "1" and water
(soft water) "2" mixing ra-
tio:
50%/50%
Coolant capacity:
0.99 L (0.87 Imp qt, 1.05
US qt)
Radiator cap tester:
YU-24460-01/90890-
01325
Radiator cap tester
adapter:
YU-33984/90890-01352
Page 56 of 188
3-10
ENGINE
ADJUSTING THE VALVE
CLEARANCE
• The valve clearance should be ad-
justed when the engine is cool to
the touch.
• The piston must be at Top Dead
Center (T.D.C.) on compression
stroke to check or adjust the valve
clearance.
1. Remove:
• Seat
• Fuel tank
Refer to "SEAT, FUEL TANK
AND SIDE COVERS" section in
the CHAPTER 4.
2. Remove:
• Spark plug
• Engine upper bracket
• Hot starter plunger
Refer to "CARBURETOR" section
in the CHAPTER 4.
• Cylinder head cover
Refer to "CAMSHAFTS" section
in the CHAPTER 4.
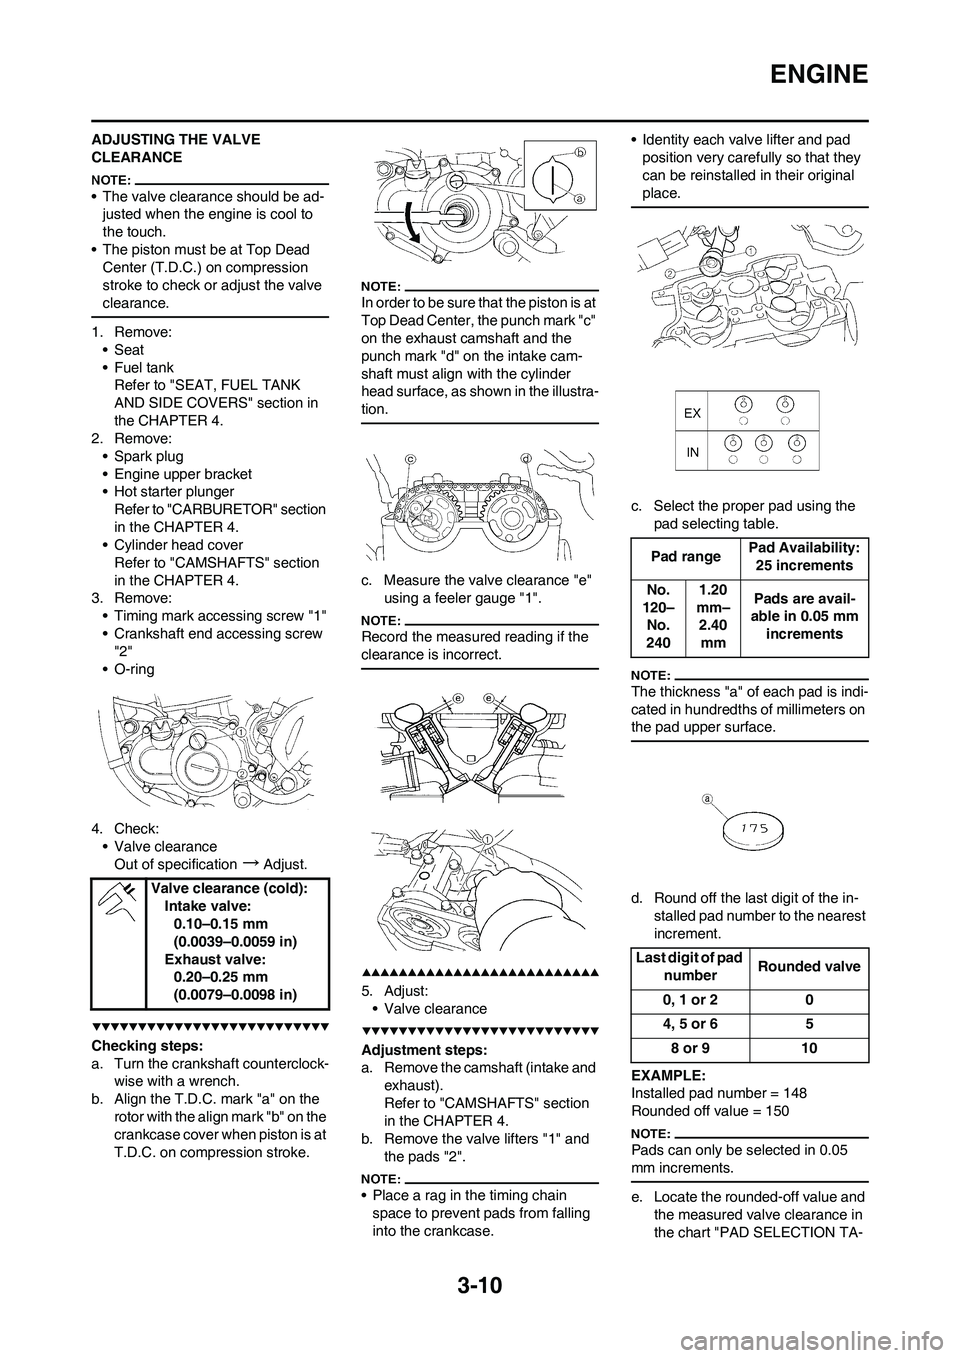
3. Remove:
• Timing mark accessing screw "1"
• Crankshaft end accessing screw
"2"
• O-ring
4. Check:
• Valve clearance
Out of specification
→Adjust.
Checking steps:
a. Turn the crankshaft counterclock-
wise with a wrench.
b. Align the T.D.C. mark "a" on the
rotor with the align mark "b" on the
crankcase cover when piston is at
T.D.C. on compression stroke.
In order to be sure that the piston is at
Top Dead Center, the punch mark "c"
on the exhaust camshaft and the
punch mark "d" on the intake cam-
shaft must align with the cylinder
head surface, as shown in the illustra-
tion.
c. Measure the valve clearance "e"
using a feeler gauge "1".
Record the measured reading if the
clearance is incorrect.
5. Adjust:
• Valve clearance
Adjustment steps:
a. Remove the camshaft (intake and
exhaust).
Refer to "CAMSHAFTS" section
in the CHAPTER 4.
b. Remove the valve lifters "1" and
the pads "2".
• Place a rag in the timing chain
space to prevent pads from falling
into the crankcase.• Identity each valve lifter and pad
position very carefully so that they
can be reinstalled in their original
place.
c. Select the proper pad using the
pad selecting table.
The thickness "a" of each pad is indi-
cated in hundredths of millimeters on
the pad upper surface.
d. Round off the last digit of the in-
stalled pad number to the nearest
increment.
EXAMPLE:
Installed pad number = 148
Rounded off value = 150
Pads can only be selected in 0.05
mm increments.
e. Locate the rounded-off value and
the measured valve clearance in
the chart "PAD SELECTION TA- Valve clearance (cold):
Intake valve:
0.10–0.15 mm
(0.0039–0.0059 in)
Exhaust valve:
0.20–0.25 mm
(0.0079–0.0098 in)
Pad rangePad Availability:
25 increments
No.
120–
No.
2401.20
mm–
2.40
mmPads are avail-
able in 0.05 mm
increments
Last digit of pad
numberRounded valve
0, 1 or 2 0
4, 5 or 6 5
8 or 9 10
Page 62 of 188
3-16
CHASSIS
CHECKING THE DRIVE CHAIN
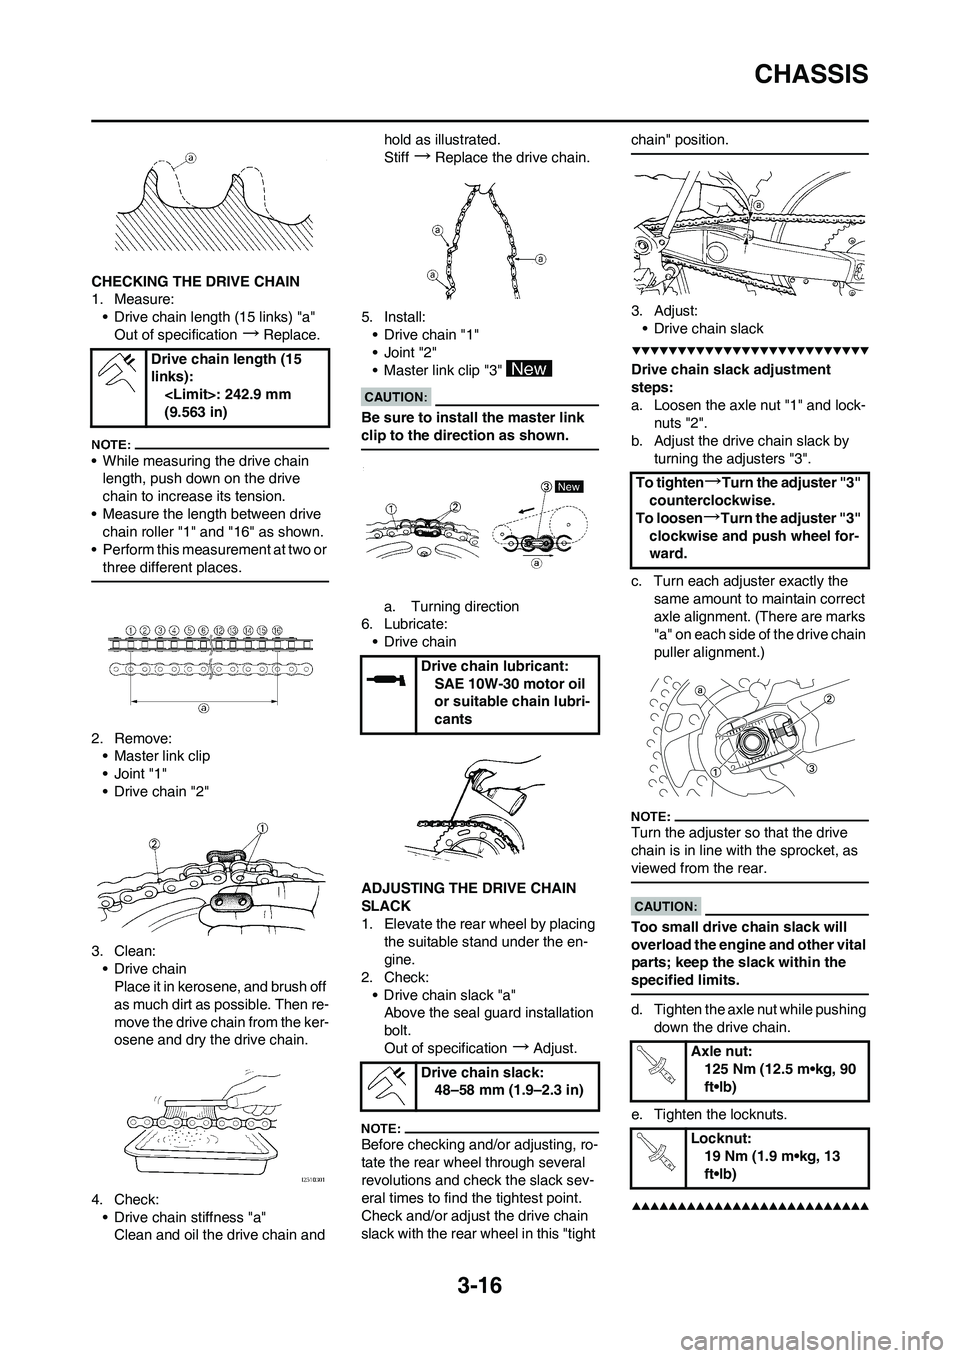
1. Measure:
• Drive chain length (15 links) "a"
Out of specification
→Replace.
• While measuring the drive chain
length, push down on the drive
chain to increase its tension.
• Measure the length between drive
chain roller "1" and "16" as shown.
• Perform this measurement at two or
three different places.
2. Remove:
• Master link clip
•Joint "1"
• Drive chain "2"
3. Clean:
• Drive chain
Place it in kerosene, and brush off
as much dirt as possible. Then re-
move the drive chain from the ker-
osene and dry the drive chain.
4. Check:
• Drive chain stiffness "a"
Clean and oil the drive chain and hold as illustrated.
Stiff
→Replace the drive chain.
5. Install:
• Drive chain "1"
•Joint "2"
• Master link clip "3"
Be sure to install the master link
clip to the direction as shown.
a. Turning direction
6. Lubricate:
• Drive chain
ADJUSTING THE DRIVE CHAIN
SLACK
1. Elevate the rear wheel by placing
the suitable stand under the en-
gine.
2. Check:
• Drive chain slack "a"
Above the seal guard installation
bolt.
Out of specification
→Adjust.
Before checking and/or adjusting, ro-
tate the rear wheel through several
revolutions and check the slack sev-
eral times to find the tightest point.
Check and/or adjust the drive chain
slack with the rear wheel in this "tight chain" position.
3. Adjust:
• Drive chain slack
Drive chain slack adjustment
steps:
a. Loosen the axle nut "1" and lock-
nuts "2".
b. Adjust the drive chain slack by
turning the adjusters "3".
c. Turn each adjuster exactly the
same amount to maintain correct
axle alignment. (There are marks
"a" on each side of the drive chain
puller alignment.)
Turn the adjuster so that the drive
chain is in line with the sprocket, as
viewed from the rear.
Too small drive chain slack will
overload the engine and other vital
parts; keep the slack within the
specified limits.
d. Tighten the axle nut while pushing
down the drive chain.
e. Tighten the locknuts.
Drive chain length (15
links):
(9.563 in)
Drive chain lubricant:
SAE 10W-30 motor oil
or suitable chain lubri-
cants
Drive chain slack:
48–58 mm (1.9–2.3 in)
To tighten→Turn the adjuster "3"
counterclockwise.
To loosen
→Turn the adjuster "3"
clockwise and push wheel for-
ward.
Axle nut:
125 Nm (12.5 m•kg, 90
ft•lb)
Locknut:
19 Nm (1.9 m•kg, 13
ft•lb)
Page 74 of 188

4-6
RADIATOR
HANDLING NOTE
Do not remove the radiator cap
when the engine and radiator are
hot. Scalding hot fluid and steam
may be blown out under pressure,
which could cause serious injury.
When the engine has cooled, open
the radiator cap by the following
procedure:
Place a thick rag, like a towel, over
the radiator cap, slowly rotate the
cap counterclockwise to the de-
tent. This procedure allows any re-
sidual pressure to escape. When
the hissing sound has stopped,
press down on the cap while turn-
ing counterclockwise and remove
it.
CHECKING THE RADIATOR
1. Inspect:
• Radiator core "1"
Obstruction
→Blow out with com-
pressed air through rear of the ra-
diator.
Bent fin
→Repair/replace.
INSTALLING THE RADIATOR
1. Install:
• Pipe 1 "1"
• Radiator hose 1 "2"
• Pipe 2 "3"
• Radiator hose 3 "4"
• Radiator hose 4 "5"2. Install:
• Radiator hose 2 "1"
• Left radiator "2"
3. Install:
• Radiator breather hose "1"
• Right radiator "2"
Refer to "CABLE ROUTING DIA-
GRAM" section in the CHAPTER
2.
4. Install:
• Radiator guard "1"
First fit the inner hook portion "a" and
then the outer one "b" onto the radia-
tor.
Pipe 1:
10 Nm (1.0 m•kg, 7.2
ft•lb)
Radiator hose 1:
2 Nm (0.2 m•kg, 1.4
ft•lb)
Pipe 2:
10 Nm (1.0 m•kg, 7.2
ft•lb)
Radiator hose 3:
2 Nm (0.2 m•kg, 1.4
ft•lb)
Radiator hose 4:
2 Nm (0.2 m•kg, 1.4
ft•lb)
Radiator hose 2:
2 Nm (0.2 m•kg, 1.4
ft•lb)
Left radiator:
10 Nm (1.0 m•kg, 7.2
ft•lb)
Right radiator:
10 Nm (1.0 m•kg, 7.2
ft•lb)
Page 84 of 188
4-16
CAMSHAFTS
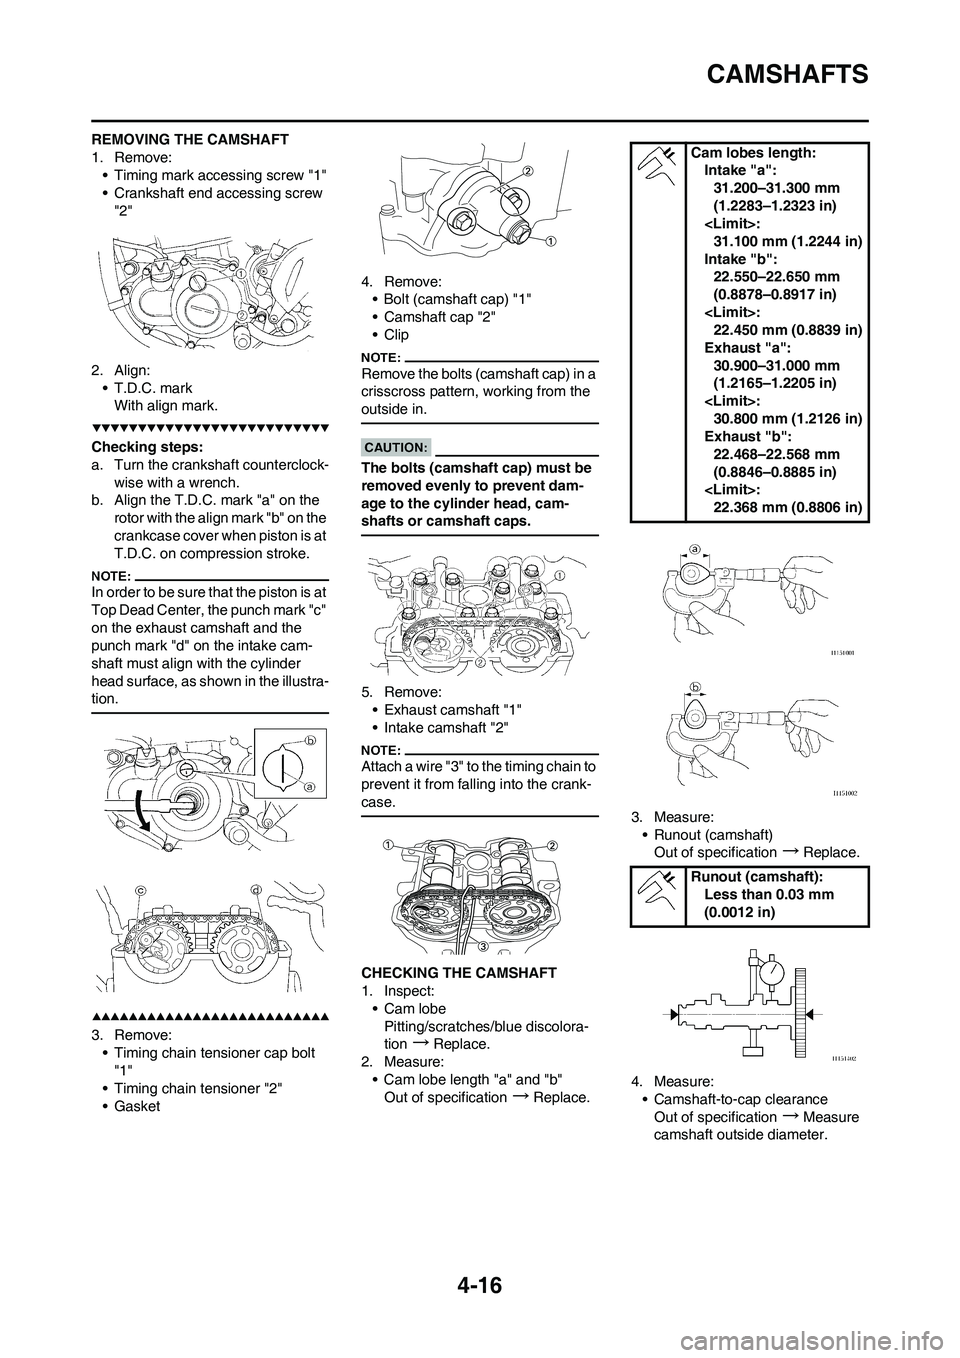
REMOVING THE CAMSHAFT
1. Remove:
• Timing mark accessing screw "1"
• Crankshaft end accessing screw
"2"
2. Align:
• T.D.C. mark
With align mark.
Checking steps:
a. Turn the crankshaft counterclock-
wise with a wrench.
b. Align the T.D.C. mark "a" on the
rotor with the align mark "b" on the
crankcase cover when piston is at
T.D.C. on compression stroke.
In order to be sure that the piston is at
Top Dead Center, the punch mark "c"
on the exhaust camshaft and the
punch mark "d" on the intake cam-
shaft must align with the cylinder
head surface, as shown in the illustra-
tion.
3. Remove:
• Timing chain tensioner cap bolt
"1"
• Timing chain tensioner "2"
• Gasket4. Remove:
• Bolt (camshaft cap) "1"
• Camshaft cap "2"
• Clip
Remove the bolts (camshaft cap) in a
crisscross pattern, working from the
outside in.
The bolts (camshaft cap) must be
removed evenly to prevent dam-
age to the cylinder head, cam-
shafts or camshaft caps.
5. Remove:
• Exhaust camshaft "1"
• Intake camshaft "2"
Attach a wire "3" to the timing chain to
prevent it from falling into the crank-
case.
CHECKING THE CAMSHAFT
1. Inspect:
• Cam lobe
Pitting/scratches/blue discolora-
tion
→Replace.
2. Measure:
• Cam lobe length "a" and "b"
Out of specification
→Replace.3. Measure:
• Runout (camshaft)
Out of specification
→Replace.
4. Measure:
• Camshaft-to-cap clearance
Out of specification
→Measure
camshaft outside diameter.
Cam lobes length:
Intake "a":
31.200–31.300 mm
(1.2283–1.2323 in)
31.100 mm (1.2244 in)
Intake "b":
22.550–22.650 mm
(0.8878–0.8917 in)
22.450 mm (0.8839 in)
Exhaust "a":
30.900–31.000 mm
(1.2165–1.2205 in)
30.800 mm (1.2126 in)
Exhaust "b":
22.468–22.568 mm
(0.8846–0.8885 in)
22.368 mm (0.8806 in)
Runout (camshaft):
Less than 0.03 mm
(0.0012 in)
Page 85 of 188
4-17
CAMSHAFTS
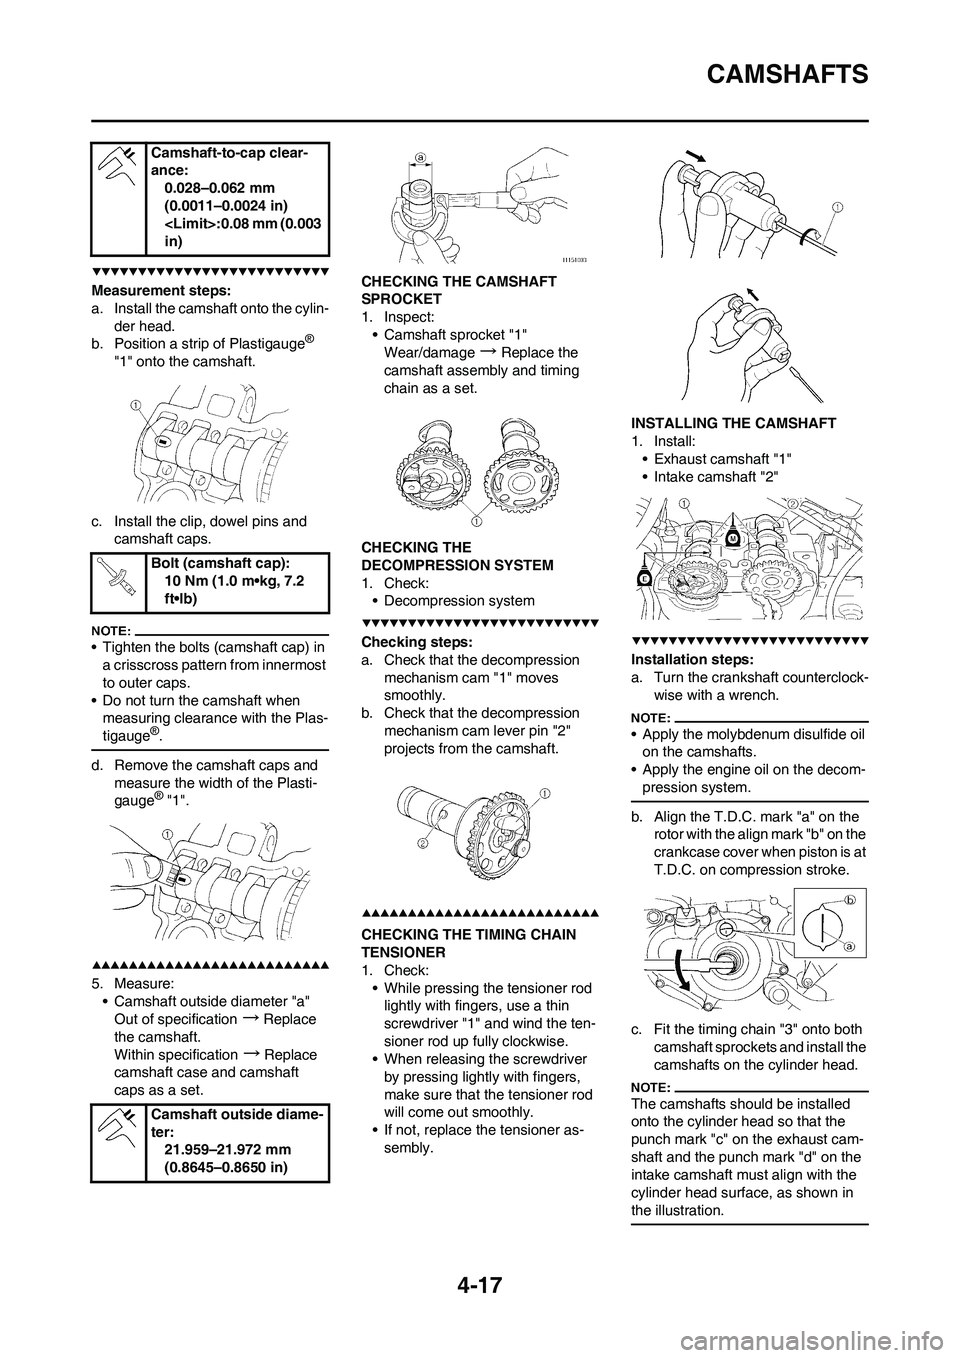
Measurement steps:
a. Install the camshaft onto the cylin-
der head.
b. Position a strip of Plastigauge
®
"1" onto the camshaft.
c. Install the clip, dowel pins and
camshaft caps.
• Tighten the bolts (camshaft cap) in
a crisscross pattern from innermost
to outer caps.
• Do not turn the camshaft when
measuring clearance with the Plas-
tigauge
®.
d. Remove the camshaft caps and
measure the width of the Plasti-
gauge
® "1".
5. Measure:
• Camshaft outside diameter "a"
Out of specification
→Replace
the camshaft.
Within specification
→Replace
camshaft case and camshaft
caps as a set.CHECKING THE CAMSHAFT
SPROCKET
1. Inspect:
• Camshaft sprocket "1"
Wear/damage
→Replace the
camshaft assembly and timing
chain as a set.
CHECKING THE
DECOMPRESSION SYSTEM
1. Check:
• Decompression system
Checking steps:
a. Check that the decompression
mechanism cam "1" moves
smoothly.
b. Check that the decompression
mechanism cam lever pin "2"
projects from the camshaft.
CHECKING THE TIMING CHAIN
TENSIONER
1. Check:
• While pressing the tensioner rod
lightly with fingers, use a thin
screwdriver "1" and wind the ten-
sioner rod up fully clockwise.
• When releasing the screwdriver
by pressing lightly with fingers,
make sure that the tensioner rod
will come out smoothly.
• If not, replace the tensioner as-
sembly.INSTALLING THE CAMSHAFT
1. Install:
• Exhaust camshaft "1"
• Intake camshaft "2"
Installation steps:
a. Turn the crankshaft counterclock-
wise with a wrench.
• Apply the molybdenum disulfide oil
on the camshafts.
• Apply the engine oil on the decom-
pression system.
b. Align the T.D.C. mark "a" on the
rotor with the align mark "b" on the
crankcase cover when piston is at
T.D.C. on compression stroke.
c. Fit the timing chain "3" onto both
camshaft sprockets and install the
camshafts on the cylinder head.
The camshafts should be installed
onto the cylinder head so that the
punch mark "c" on the exhaust cam-
shaft and the punch mark "d" on the
intake camshaft must align with the
cylinder head surface, as shown in
the illustration.
Camshaft-to-cap clear-
ance:
0.028–0.062 mm
(0.0011–0.0024 in)
in)
Bolt (camshaft cap):
10 Nm (1.0 m•kg, 7.2
ft•lb)
Camshaft outside diame-
ter:
21.959–21.972 mm
(0.8645–0.8650 in)
Page 86 of 188
4-18
CAMSHAFTS
Do not turn the crankshaft during
the camshaft installation. Damage
or improper valve timing will re-
sult.
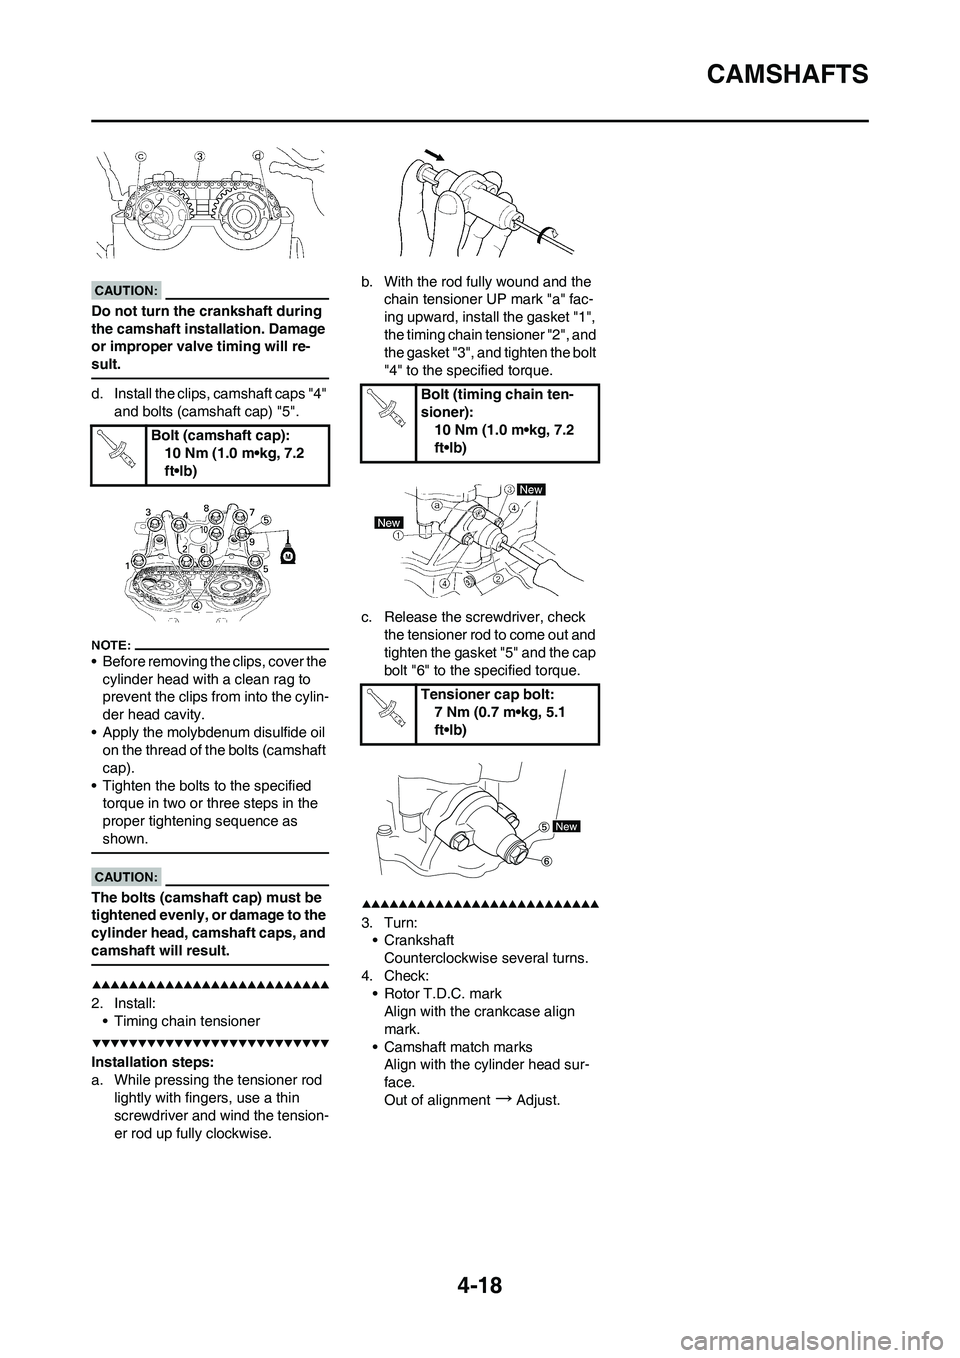
d. Install the clips, camshaft caps "4"
and bolts (camshaft cap) "5".
• Before removing the clips, cover the
cylinder head with a clean rag to
prevent the clips from into the cylin-
der head cavity.
• Apply the molybdenum disulfide oil
on the thread of the bolts (camshaft
cap).
• Tighten the bolts to the specified
torque in two or three steps in the
proper tightening sequence as
shown.
The bolts (camshaft cap) must be
tightened evenly, or damage to the
cylinder head, camshaft caps, and
camshaft will result.
2. Install:
• Timing chain tensioner
Installation steps:
a. While pressing the tensioner rod
lightly with fingers, use a thin
screwdriver and wind the tension-
er rod up fully clockwise.b. With the rod fully wound and the
chain tensioner UP mark "a" fac-
ing upward, install the gasket "1",
the timing chain tensioner "2", and
the gasket "3", and tighten the bolt
"4" to the specified torque.
c. Release the screwdriver, check
the tensioner rod to come out and
tighten the gasket "5" and the cap
bolt "6" to the specified torque.
3. Turn:
• Crankshaft
Counterclockwise several turns.
4. Check:
• Rotor T.D.C. mark
Align with the crankcase align
mark.
• Camshaft match marks
Align with the cylinder head sur-
face.
Out of alignment
→Adjust. Bolt (camshaft cap):
10 Nm (1.0 m•kg, 7.2
ft•lb)
Bolt (timing chain ten-
sioner):
10 Nm (1.0 m•kg, 7.2
ft•lb)
Tensioner cap bolt:
7 Nm (0.7 m•kg, 5.1
ft•lb)
Page 112 of 188
4-44
KICK SHAFT AND SHIFT SHAFT
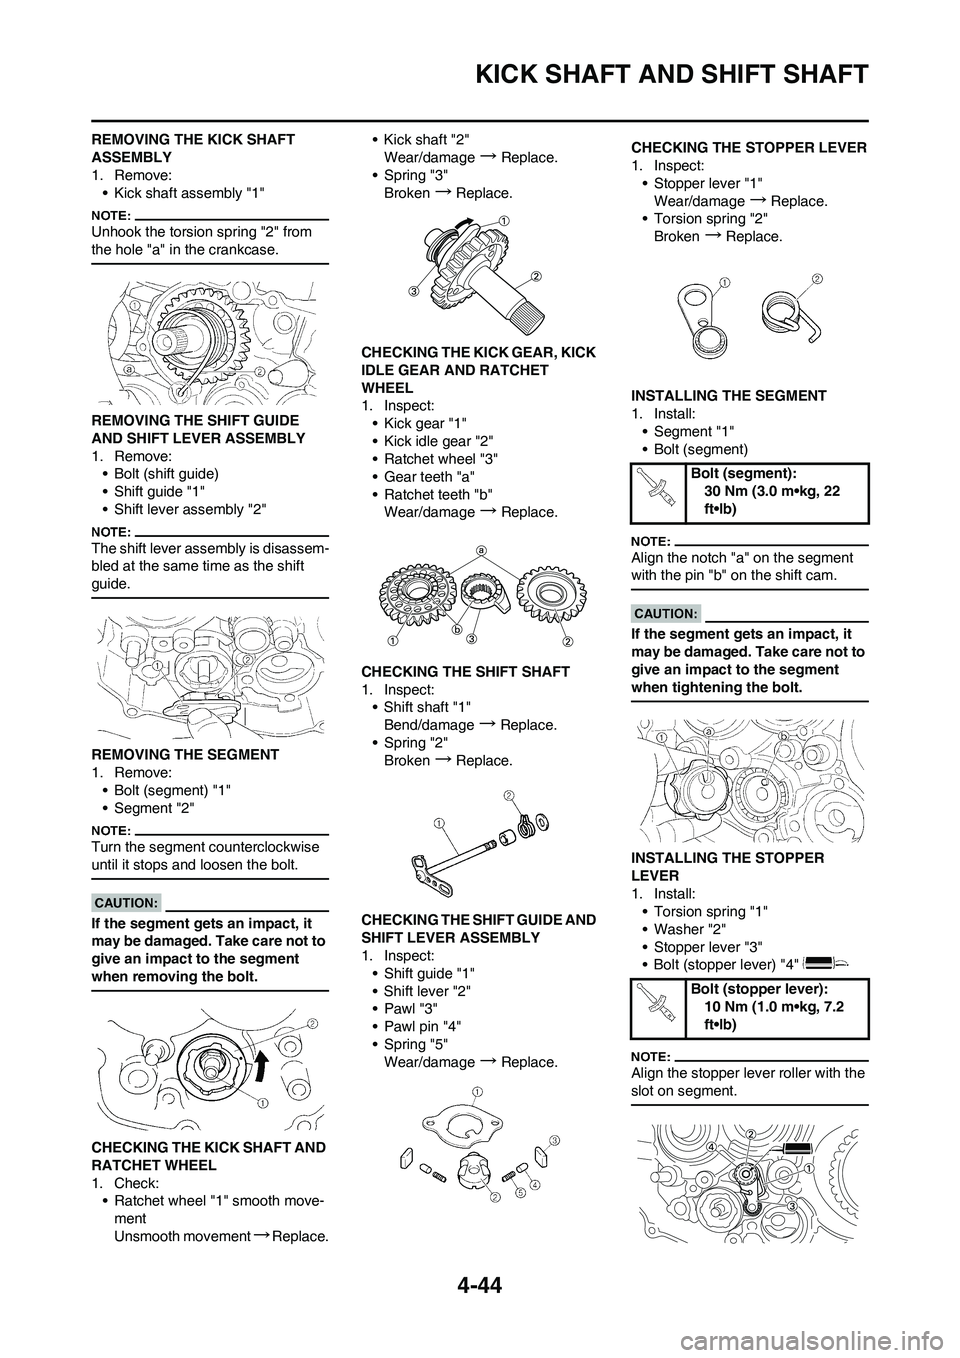
REMOVING THE KICK SHAFT
ASSEMBLY
1. Remove:
• Kick shaft assembly "1"
Unhook the torsion spring "2" from
the hole "a" in the crankcase.
REMOVING THE SHIFT GUIDE
AND SHIFT LEVER ASSEMBLY
1. Remove:
• Bolt (shift guide)
• Shift guide "1"
• Shift lever assembly "2"
The shift lever assembly is disassem-
bled at the same time as the shift
guide.
REMOVING THE SEGMENT
1. Remove:
• Bolt (segment) "1"
• Segment "2"
Turn the segment counterclockwise
until it stops and loosen the bolt.
If the segment gets an impact, it
may be damaged. Take care not to
give an impact to the segment
when removing the bolt.
CHECKING THE KICK SHAFT AND
RATCHET WHEEL
1. Check:
• Ratchet wheel "1" smooth move-
ment
Unsmooth movement
→Replace.• Kick shaft "2"
Wear/damage
→Replace.
• Spring "3"
Broken
→Replace.
CHECKING THE KICK GEAR, KICK
IDLE GEAR AND RATCHET
WHEEL
1. Inspect:
• Kick gear "1"
• Kick idle gear "2"
• Ratchet wheel "3"
• Gear teeth "a"
• Ratchet teeth "b"
Wear/damage
→Replace.
CHECKING THE SHIFT SHAFT
1. Inspect:
• Shift shaft "1"
Bend/damage
→Replace.
• Spring "2"
Broken
→Replace.
CHECKING THE SHIFT GUIDE AND
SHIFT LEVER ASSEMBLY
1. Inspect:
• Shift guide "1"
• Shift lever "2"
• Pawl "3"
• Pawl pin "4"
• Spring "5"
Wear/damage
→Replace.CHECKING THE STOPPER LEVER
1. Inspect:
• Stopper lever "1"
Wear/damage
→Replace.
• Torsion spring "2"
Broken
→Replace.
INSTALLING THE SEGMENT
1. Install:
• Segment "1"
• Bolt (segment)
Align the notch "a" on the segment
with the pin "b" on the shift cam.
If the segment gets an impact, it
may be damaged. Take care not to
give an impact to the segment
when tightening the bolt.
INSTALLING THE STOPPER
LEVER
1. Install:
• Torsion spring "1"
• Washer "2"
• Stopper lever "3"
• Bolt (stopper lever) "4"
Align the stopper lever roller with the
slot on segment.
Bolt (segment):
30 Nm (3.0 m•kg, 22
ft•lb)
Bolt (stopper lever):
10 Nm (1.0 m•kg, 7.2
ft•lb)
Page 114 of 188
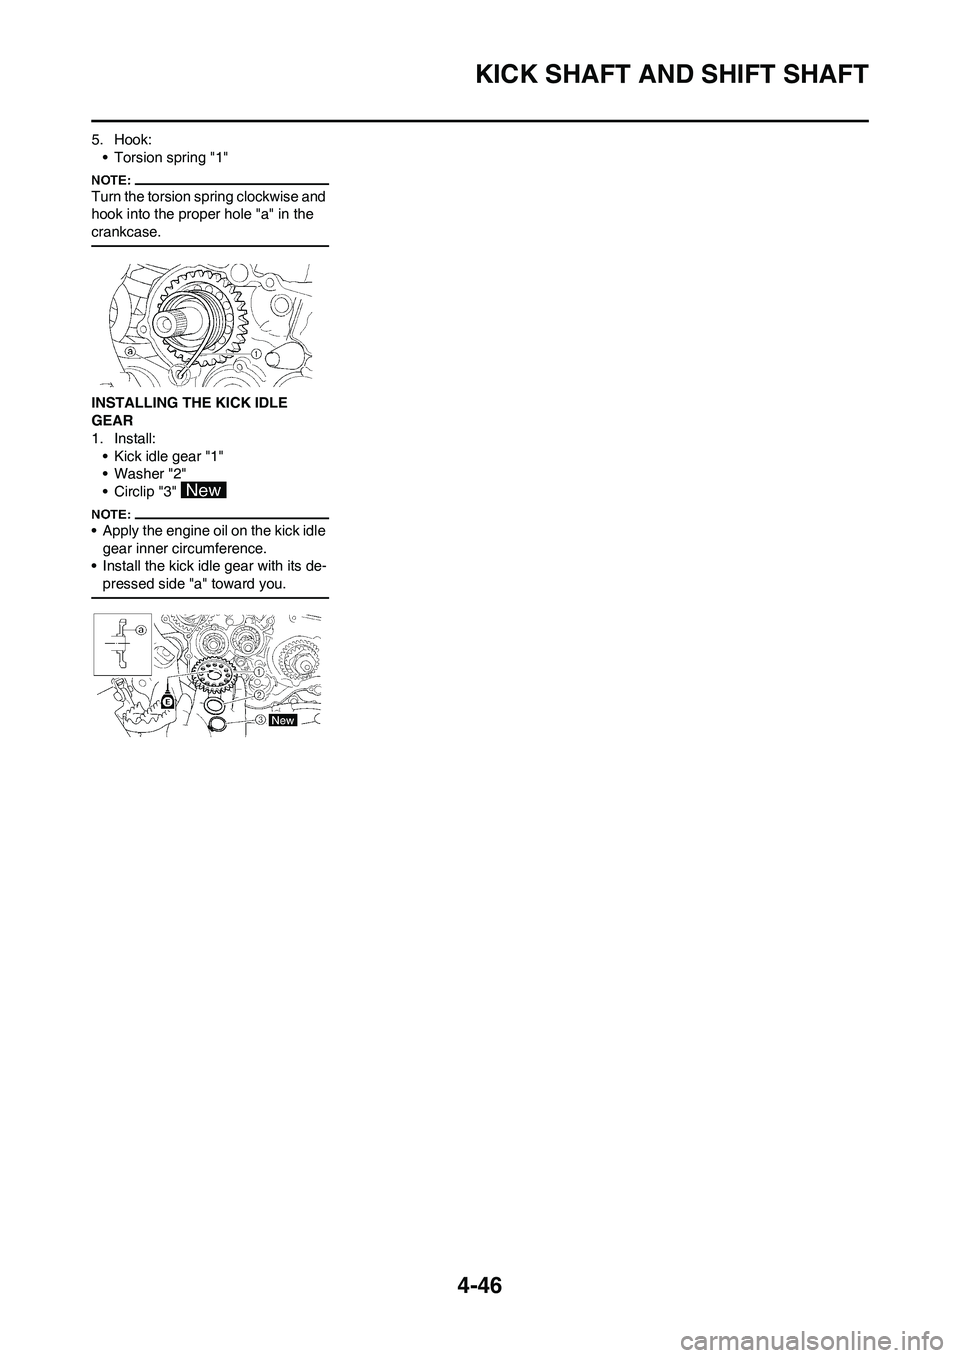
4-46
KICK SHAFT AND SHIFT SHAFT
5. Hook:
• Torsion spring "1"
Turn the torsion spring clockwise and
hook into the proper hole "a" in the
crankcase.
INSTALLING THE KICK IDLE
GEAR
1. Install:
• Kick idle gear "1"
• Washer "2"
• Circlip "3"
• Apply the engine oil on the kick idle
gear inner circumference.
• Install the kick idle gear with its de-
pressed side "a" toward you.