oil filter YAMAHA YZ450F 2008 Owners Manual
[x] Cancel search | Manufacturer: YAMAHA, Model Year: 2008, Model line: YZ450F, Model: YAMAHA YZ450F 2008Pages: 188, PDF Size: 11.75 MB
Page 10 of 188
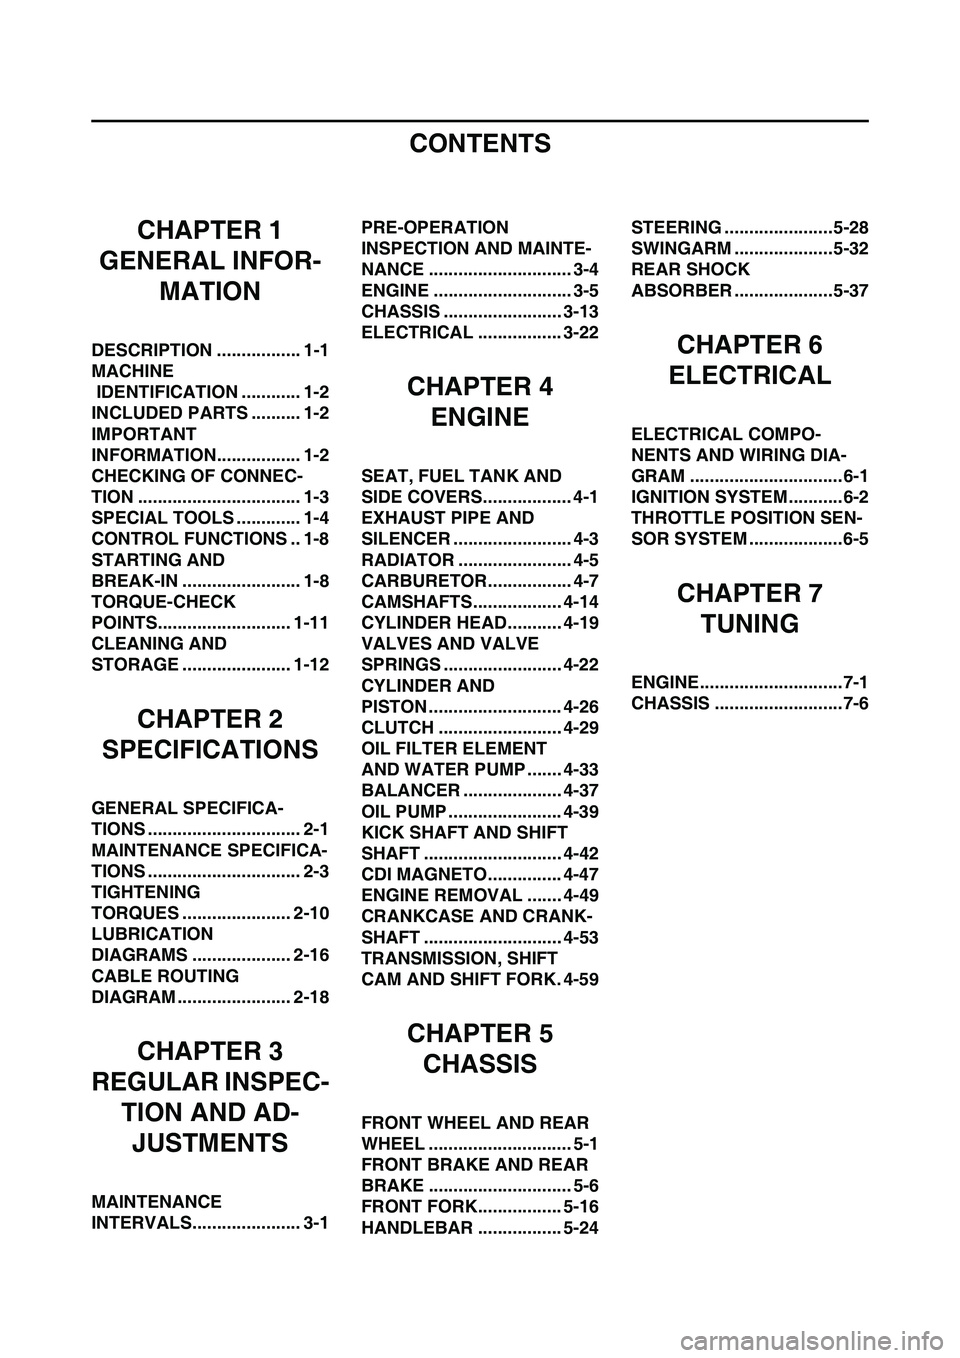
CONTENTS
CHAPTER 1
GENERAL INFOR-
MATION
DESCRIPTION ................. 1-1
MACHINE
IDENTIFICATION ............ 1-2
INCLUDED PARTS .......... 1-2
IMPORTANT
INFORMATION................. 1-2
CHECKING OF CONNEC-
TION ................................. 1-3
SPECIAL TOOLS ............. 1-4
CONTROL FUNCTIONS .. 1-8
STARTING AND
BREAK-IN ........................ 1-8
TORQUE-CHECK
POINTS........................... 1-11
CLEANING AND
STORAGE ...................... 1-12
CHAPTER 2
SPECIFICATIONS
GENERAL SPECIFICA-
TIONS ............................... 2-1
MAINTENANCE SPECIFICA-
TIONS ............................... 2-3
TIGHTENING
TORQUES ...................... 2-10
LUBRICATION
DIAGRAMS .................... 2-16
CABLE ROUTING
DIAGRAM ....................... 2-18
CHAPTER 3
REGULAR INSPEC-
TION AND AD-
JUSTMENTS
MAINTENANCE
INTERVALS...................... 3-1PRE-OPERATION
INSPECTION AND MAINTE-
NANCE ............................. 3-4
ENGINE ............................ 3-5
CHASSIS ........................ 3-13
ELECTRICAL ................. 3-22
CHAPTER 4
ENGINE
SEAT, FUEL TANK AND
SIDE COVERS.................. 4-1
EXHAUST PIPE AND
SILENCER ........................ 4-3
RADIATOR ....................... 4-5
CARBURETOR................. 4-7
CAMSHAFTS.................. 4-14
CYLINDER HEAD........... 4-19
VALVES AND VALVE
SPRINGS ........................ 4-22
CYLINDER AND
PISTON ........................... 4-26
CLUTCH ......................... 4-29
OIL FILTER ELEMENT
AND WATER PUMP ....... 4-33
BALANCER .................... 4-37
OIL PUMP ....................... 4-39
KICK SHAFT AND SHIFT
SHAFT ............................ 4-42
CDI MAGNETO............... 4-47
ENGINE REMOVAL ....... 4-49
CRANKCASE AND CRANK-
SHAFT ............................ 4-53
TRANSMISSION, SHIFT
CAM AND SHIFT FORK. 4-59
CHAPTER 5
CHASSIS
FRONT WHEEL AND REAR
WHEEL ............................. 5-1
FRONT BRAKE AND REAR
BRAKE ............................. 5-6
FRONT FORK................. 5-16
HANDLEBAR ................. 5-24STEERING ......................5-28
SWINGARM ....................5-32
REAR SHOCK
ABSORBER ....................5-37
CHAPTER 6
ELECTRICAL
ELECTRICAL COMPO-
NENTS AND WIRING DIA-
GRAM ...............................6-1
IGNITION SYSTEM...........6-2
THROTTLE POSITION SEN-
SOR SYSTEM ...................6-5
CHAPTER 7
TUNING
ENGINE.............................7-1
CHASSIS ..........................7-6
Page 23 of 188
2-1
GENERAL SPECIFICATIONS
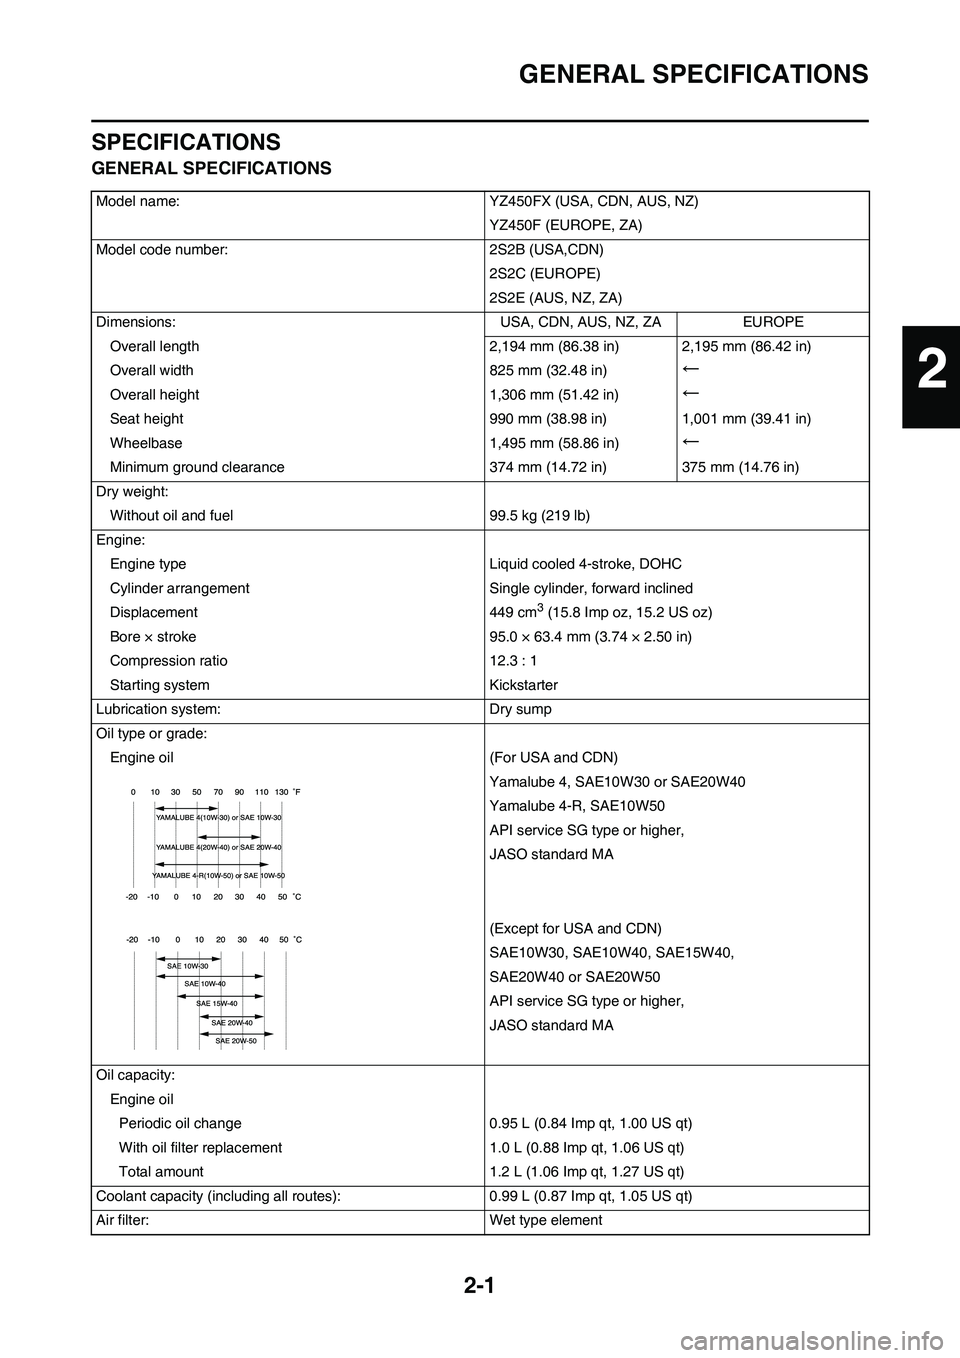
SPECIFICATIONS
GENERAL SPECIFICATIONS
Model name: YZ450FX (USA, CDN, AUS, NZ)
YZ450F (EUROPE, ZA)
Model code number: 2S2B (USA,CDN)
2S2C (EUROPE)
2S2E (AUS, NZ, ZA)
Dimensions: USA, CDN, AUS, NZ, ZA EUROPE
Overall length 2,194 mm (86.38 in) 2,195 mm (86.42 in)
Overall width 825 mm (32.48 in)
←
Overall height 1,306 mm (51.42 in)←
Seat height 990 mm (38.98 in) 1,001 mm (39.41 in)
Wheelbase 1,495 mm (58.86 in)
←
Minimum ground clearance 374 mm (14.72 in) 375 mm (14.76 in)
Dry weight:
Without oil and fuel 99.5 kg (219 lb)
Engine:
Engine type Liquid cooled 4-stroke, DOHC
Cylinder arrangement Single cylinder, forward inclined
Displacement 449 cm
3 (15.8 Imp oz, 15.2 US oz)
Bore × stroke 95.0 × 63.4 mm (3.74 × 2.50 in)
Compression ratio 12.3 : 1
Starting system Kickstarter
Lubrication system: Dry sump
Oil type or grade:
Engine oil (For USA and CDN)
Yamalube 4, SAE10W30 or SAE20W40
Yamalube 4-R, SAE10W50
API service SG type or higher,
JASO standard MA
(Except for USA and CDN)
SAE10W30, SAE10W40, SAE15W40,
SAE20W40 or SAE20W50
API service SG type or higher,
JASO standard MA
Oil capacity:
Engine oil
Periodic oil change 0.95 L (0.84 Imp qt, 1.00 US qt)
With oil filter replacement 1.0 L (0.88 Imp qt, 1.06 US qt)
Total amount 1.2 L (1.06 Imp qt, 1.27 US qt)
Coolant capacity (including all routes): 0.99 L (0.87 Imp qt, 1.05 US qt)
Air filter: Wet type element
2
Page 29 of 188
2-7
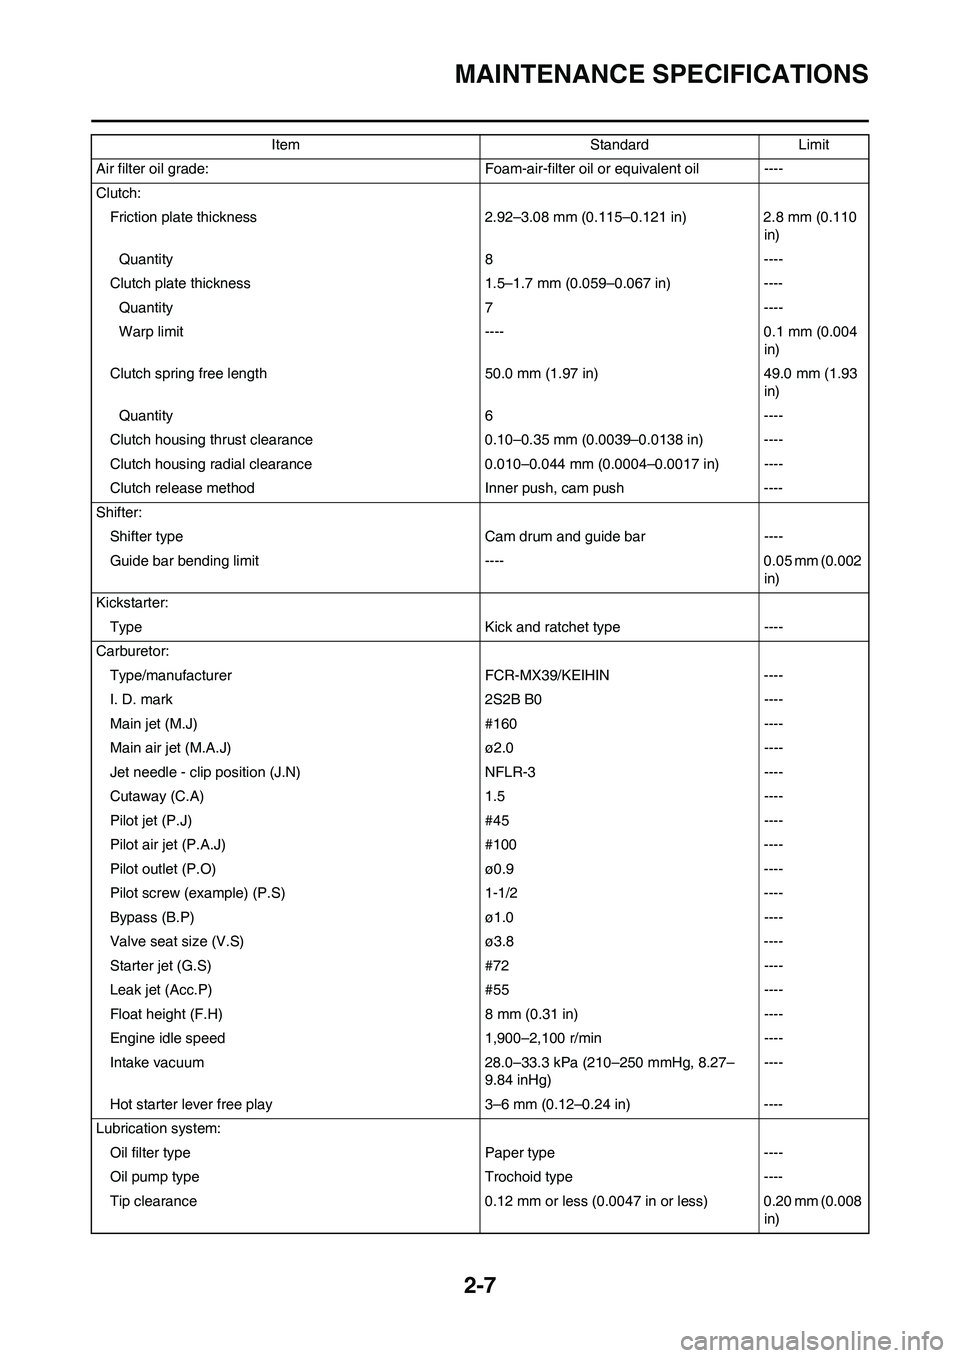
MAINTENANCE SPECIFICATIONS
Air filter oil grade: Foam-air-filter oil or equivalent oil ----
Clutch:
Friction plate thickness 2.92–3.08 mm (0.115–0.121 in) 2.8 mm (0.110
in)
Quantity 8 ----
Clutch plate thickness 1.5–1.7 mm (0.059–0.067 in) ----
Quantity 7 ----
Warp limit ---- 0.1 mm (0.004
in)
Clutch spring free length 50.0 mm (1.97 in) 49.0 mm (1.93
in)
Quantity 6 ----
Clutch housing thrust clearance 0.10–0.35 mm (0.0039–0.0138 in) ----
Clutch housing radial clearance 0.010–0.044 mm (0.0004–0.0017 in) ----
Clutch release method Inner push, cam push ----
Shifter:
Shifter type Cam drum and guide bar ----
Guide bar bending limit ---- 0.05 mm (0.002
in)
Kickstarter:
Type Kick and ratchet type ----
Carburetor:
Type/manufacturer FCR-MX39/KEIHIN ----
I. D. mark 2S2B B0 ----
Main jet (M.J) #160 ----
Main air jet (M.A.J) ø2.0 ----
Jet needle - clip position (J.N) NFLR-3 ----
Cutaway (C.A) 1.5 ----
Pilot jet (P.J) #45 ----
Pilot air jet (P.A.J) #100 ----
Pilot outlet (P.O) ø0.9 ----
Pilot screw (example) (P.S) 1-1/2 ----
Bypass (B.P) ø1.0 ----
Valve seat size (V.S) ø3.8 ----
Starter jet (G.S) #72 ----
Leak jet (Acc.P) #55 ----
Float height (F.H) 8 mm (0.31 in) ----
Engine idle speed 1,900–2,100 r/min ----
Intake vacuum 28.0–33.3 kPa (210–250 mmHg, 8.27–
9.84 inHg)----
Hot starter lever free play 3–6 mm (0.12–0.24 in) ----
Lubrication system:
Oil filter type Paper type ----
Oil pump type Trochoid type ----
Tip clearance 0.12 mm or less (0.0047 in or less) 0.20 mm (0.008
in) Item Standard Limit
Page 32 of 188
2-10
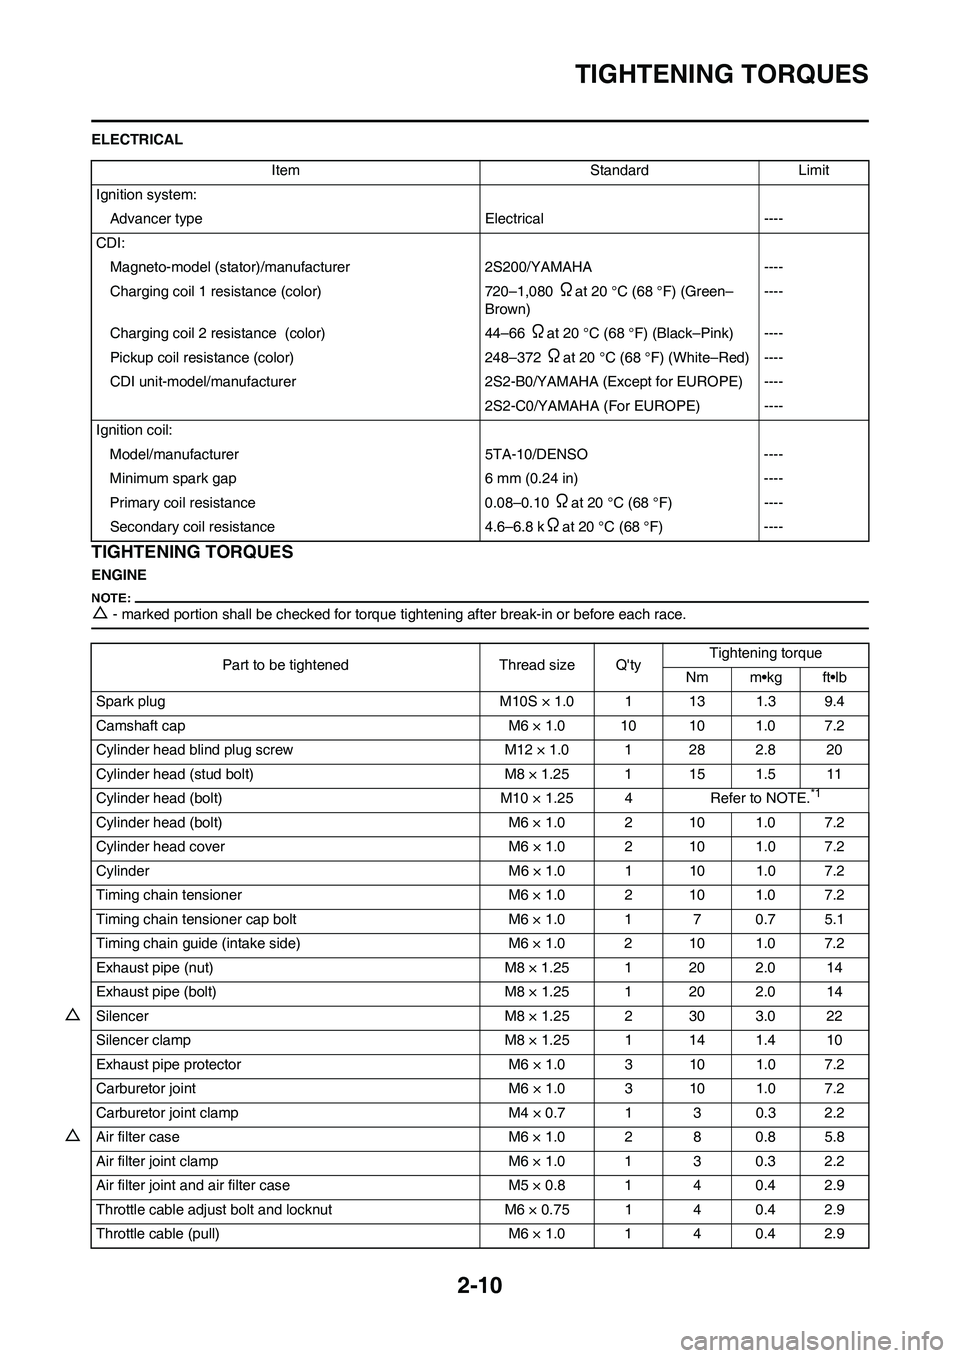
TIGHTENING TORQUES
ELECTRICAL
TIGHTENING TORQUES
ENGINE
△- marked portion shall be checked for torque tightening after break-in or before each race.
Item Standard Limit
Ignition system:
Advancer type Electrical ----
CDI:
Magneto-model (stator)/manufacturer 2S200/YAMAHA ----
Charging coil 1 resistance (color) 720–1,080
Ωat 20 °C (68 °F) (Green–
Brown)----
Charging coil 2 resistance (color) 44–66
Ωat 20 °C (68 °F) (Black–Pink) ----
Pickup coil resistance (color) 248–372
Ωat 20 °C (68 °F) (White–Red) ----
CDI unit-model/manufacturer 2S2-B0/YAMAHA (Except for EUROPE) ----
2S2-C0/YAMAHA (For EUROPE) ----
Ignition coil:
Model/manufacturer 5TA-10/DENSO ----
Minimum spark gap 6 mm (0.24 in) ----
Primary coil resistance 0.08–0.10
Ωat 20 °C (68 °F) ----
Secondary coil resistance 4.6–6.8 k
Ωat 20 °C (68 °F) ----
Part to be tightened Thread size Q'tyTightening torque
Nm m•kg ft•lb
Spark plug M10S × 1.0 1 13 1.3 9.4
Camshaft cap M6 × 1.0 10 10 1.0 7.2
Cylinder head blind plug screw M12 × 1.0 1 28 2.8 20
Cylinder head (stud bolt) M8 × 1.25 1 15 1.5 11
Cylinder head (bolt) M10 × 1.25 4 Refer to NOTE.
*1
Cylinder head (bolt) M6 × 1.0 2 10 1.0 7.2
Cylinder head cover M6 × 1.0 2 10 1.0 7.2
Cylinder M6 × 1.0 1 10 1.0 7.2
Timing chain tensioner M6 × 1.0 2 10 1.0 7.2
Timing chain tensioner cap bolt M6 × 1.0 1 7 0.7 5.1
Timing chain guide (intake side) M6 × 1.0 2 10 1.0 7.2
Exhaust pipe (nut) M8 × 1.25 1 20 2.0 14
Exhaust pipe (bolt) M8 × 1.25 1 20 2.0 14
△Silencer M8 × 1.25 2 30 3.0 22
Silencer clamp M8 × 1.25 1 14 1.4 10
Exhaust pipe protector M6 × 1.0 3 10 1.0 7.2
Carburetor joint M6 × 1.0 3 10 1.0 7.2
Carburetor joint clamp M4 × 0.7 1 3 0.3 2.2
△Air filter case M6 × 1.0 2 8 0.8 5.8
Air filter joint clamp M6 × 1.0 1 3 0.3 2.2
Air filter joint and air filter case M5 × 0.8 1 4 0.4 2.9
Throttle cable adjust bolt and locknut M6 × 0.75 1 4 0.4 2.9
Throttle cable (pull) M6 × 1.0 1 4 0.4 2.9
Page 33 of 188
2-11
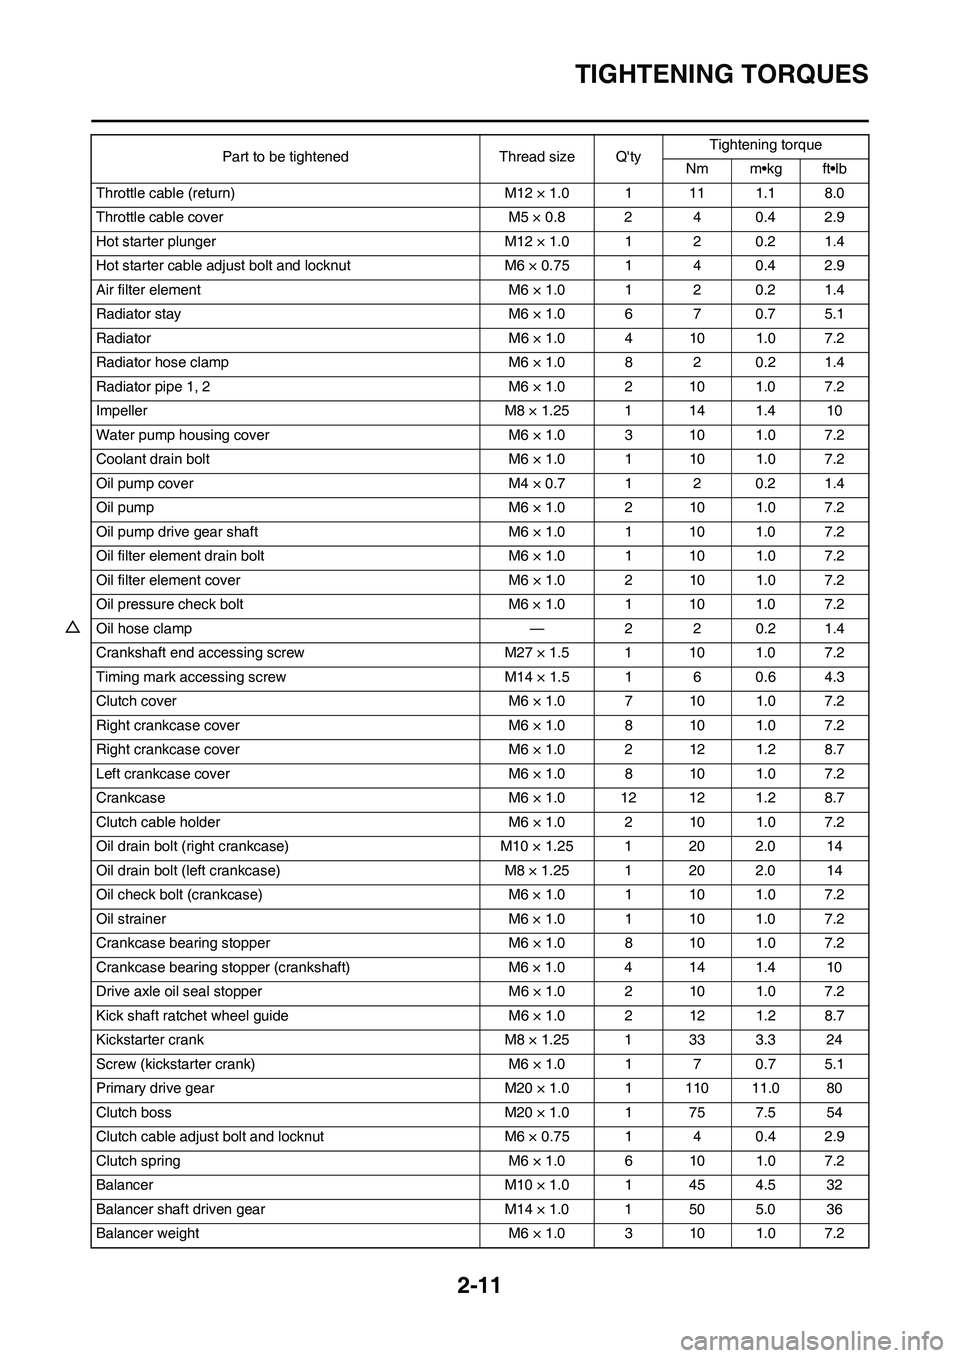
TIGHTENING TORQUES
Throttle cable (return) M12 × 1.0 1 11 1.1 8.0
Throttle cable cover M5 × 0.8 2 4 0.4 2.9
Hot starter plunger M12 × 1.0 1 2 0.2 1.4
Hot starter cable adjust bolt and locknut M6 × 0.75 1 4 0.4 2.9
Air filter element M6 × 1.0 1 2 0.2 1.4
Radiator stay M6 × 1.0 6 7 0.7 5.1
Radiator M6 × 1.0 4 10 1.0 7.2
Radiator hose clamp M6 × 1.0 8 2 0.2 1.4
Radiator pipe 1, 2 M6 × 1.0 2 10 1.0 7.2
Impeller M8 × 1.25 1 14 1.4 10
Water pump housing cover M6 × 1.0 3 10 1.0 7.2
Coolant drain bolt M6 × 1.0 1 10 1.0 7.2
Oil pump cover M4 × 0.7 1 2 0.2 1.4
Oil pump M6 × 1.0 2 10 1.0 7.2
Oil pump drive gear shaft M6 × 1.0 1 10 1.0 7.2
Oil filter element drain bolt M6 × 1.0 1 10 1.0 7.2
Oil filter element cover M6 × 1.0 2 10 1.0 7.2
Oil pressure check bolt M6 × 1.0 1 10 1.0 7.2
△Oil hose clamp — 2 2 0.2 1.4
Crankshaft end accessing screw M27 × 1.5 1 10 1.0 7.2
Timing mark accessing screw M14 × 1.5 1 6 0.6 4.3
Clutch cover M6 × 1.0 7 10 1.0 7.2
Right crankcase cover M6 × 1.0 8 10 1.0 7.2
Right crankcase cover M6 × 1.0 2 12 1.2 8.7
Left crankcase cover M6 × 1.0 8 10 1.0 7.2
Crankcase M6 × 1.0 12 12 1.2 8.7
Clutch cable holder M6 × 1.0 2 10 1.0 7.2
Oil drain bolt (right crankcase) M10 × 1.25 1 20 2.0 14
Oil drain bolt (left crankcase) M8 × 1.25 1 20 2.0 14
Oil check bolt (crankcase) M6 × 1.0 1 10 1.0 7.2
Oil strainer M6 × 1.0 1 10 1.0 7.2
Crankcase bearing stopper M6 × 1.0 8 10 1.0 7.2
Crankcase bearing stopper (crankshaft) M6 × 1.0 4 14 1.4 10
Drive axle oil seal stopper M6 × 1.0 2 10 1.0 7.2
Kick shaft ratchet wheel guide M6 × 1.0 2 12 1.2 8.7
Kickstarter crank M8 × 1.25 1 33 3.3 24
Screw (kickstarter crank) M6 × 1.0 1 7 0.7 5.1
Primary drive gear M20 × 1.0 1 110 11.0 80
Clutch boss M20 × 1.0 1 75 7.5 54
Clutch cable adjust bolt and locknut M6 × 0.75 1 4 0.4 2.9
Clutch spring M6 × 1.0 6 10 1.0 7.2
Balancer M10 × 1.0 1 45 4.5 32
Balancer shaft driven gear M14 × 1.0 1 50 5.0 36
Balancer weight M6 × 1.0 3 10 1.0 7.2Part to be tightened Thread size Q'tyTightening torque
Nm m•kg ft•lb
Page 38 of 188
2-16
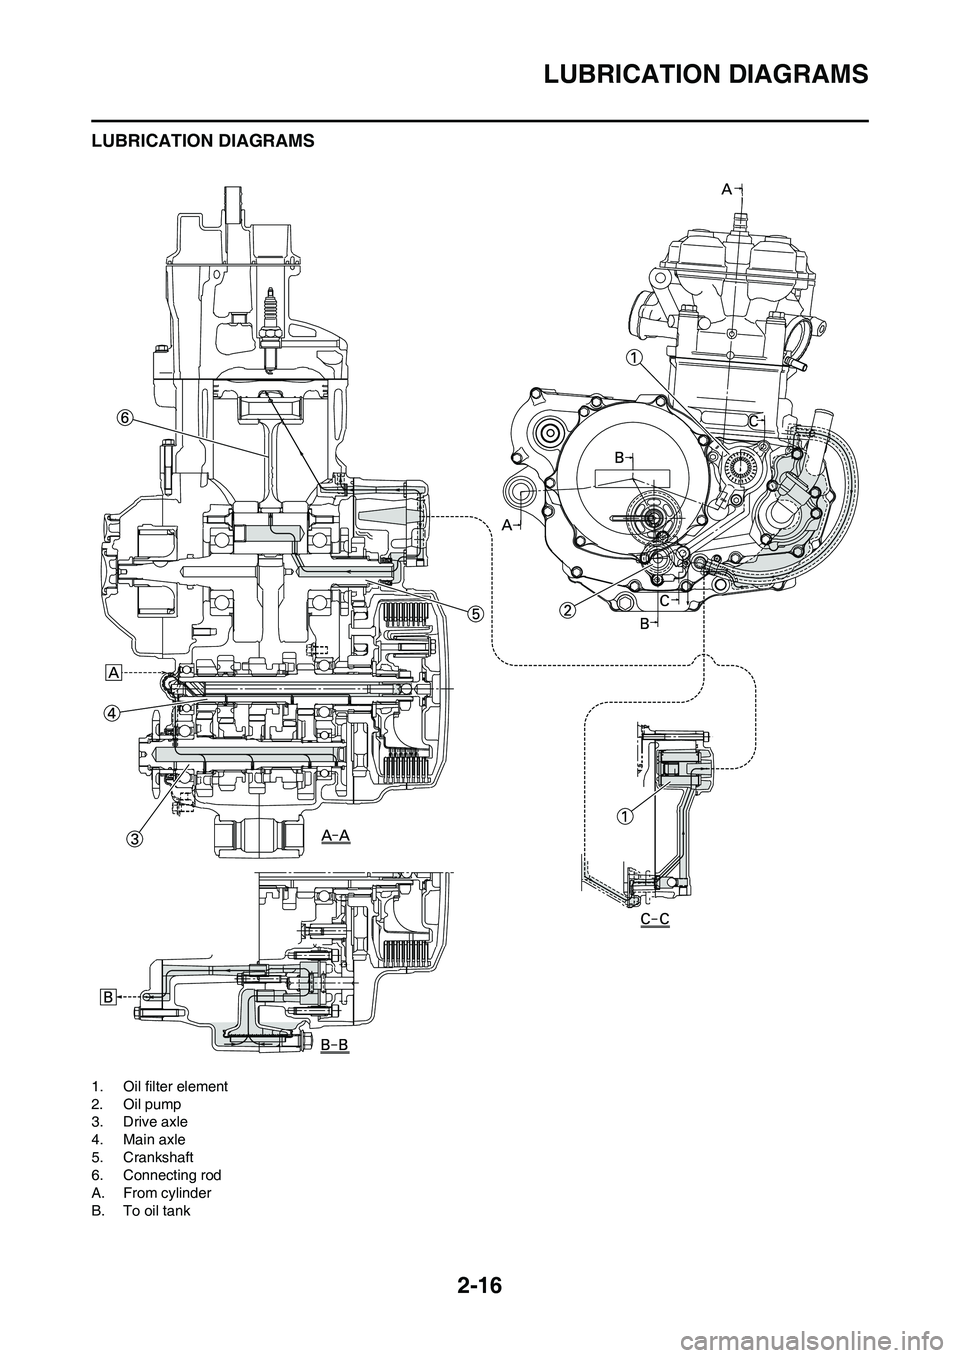
LUBRICATION DIAGRAMS
LUBRICATION DIAGRAMS
1. Oil filter element
2. Oil pump
3. Drive axle
4. Main axle
5. Crankshaft
6. Connecting rod
A. From cylinder
B. To oil tank
Page 48 of 188

3-2
MAINTENANCE INTERVALS
Replace●
TRANSMISSION
Inspect
●
Replace bearing●
SHIFT FORK, SHIFT CAM,
GUIDE BAR
Inspect
●Inspect wear.
ROTOR NUT
Retighten
●●
EXHAUST PIPE, SILENCER,
PROTECTOR
Inspect and retighten
●●
Clean●
Replace●* Whichever comes first
CRANK
Inspect and clean
●●
CARBURETOR
Inspect, adjust and clean
●●
SPARK PLUG
Inspect and clean
●●
Replace●
DRIVE CHAIN Use chain lube.
Lubricate, slack, alignment
●●Chain slack: 48–58 mm (1.9–2.3 in)
Replace
●
COOLING SYSTEM
Check coolant level and leakage
●●
Check radiator cap operation●
Replace coolant●Every two years
Inspect hoses
●
OUTSIDE NUTS AND BOLTS
Retighten
●●Refer to "STARTING AND BREAK-
IN" section in the CHAPTER 1.
AIR FILTER
Clean and lubricate
●●Use foam air-filter oil or equivalent oil.
Replace
●
OIL FILTER
Replace
●●
FRAME
Clean and inspect
●●
FUEL TANK, COCK
Clean and inspect
●●
BRAKES
Adjust lever position and pedal
height
●●
ItemAfter
break-
inEvery
race
Every
third
(or 500
km)Every
fifth (or
1,000
km)
As re-
quiredRemarks
Page 53 of 188
3-7
ENGINE
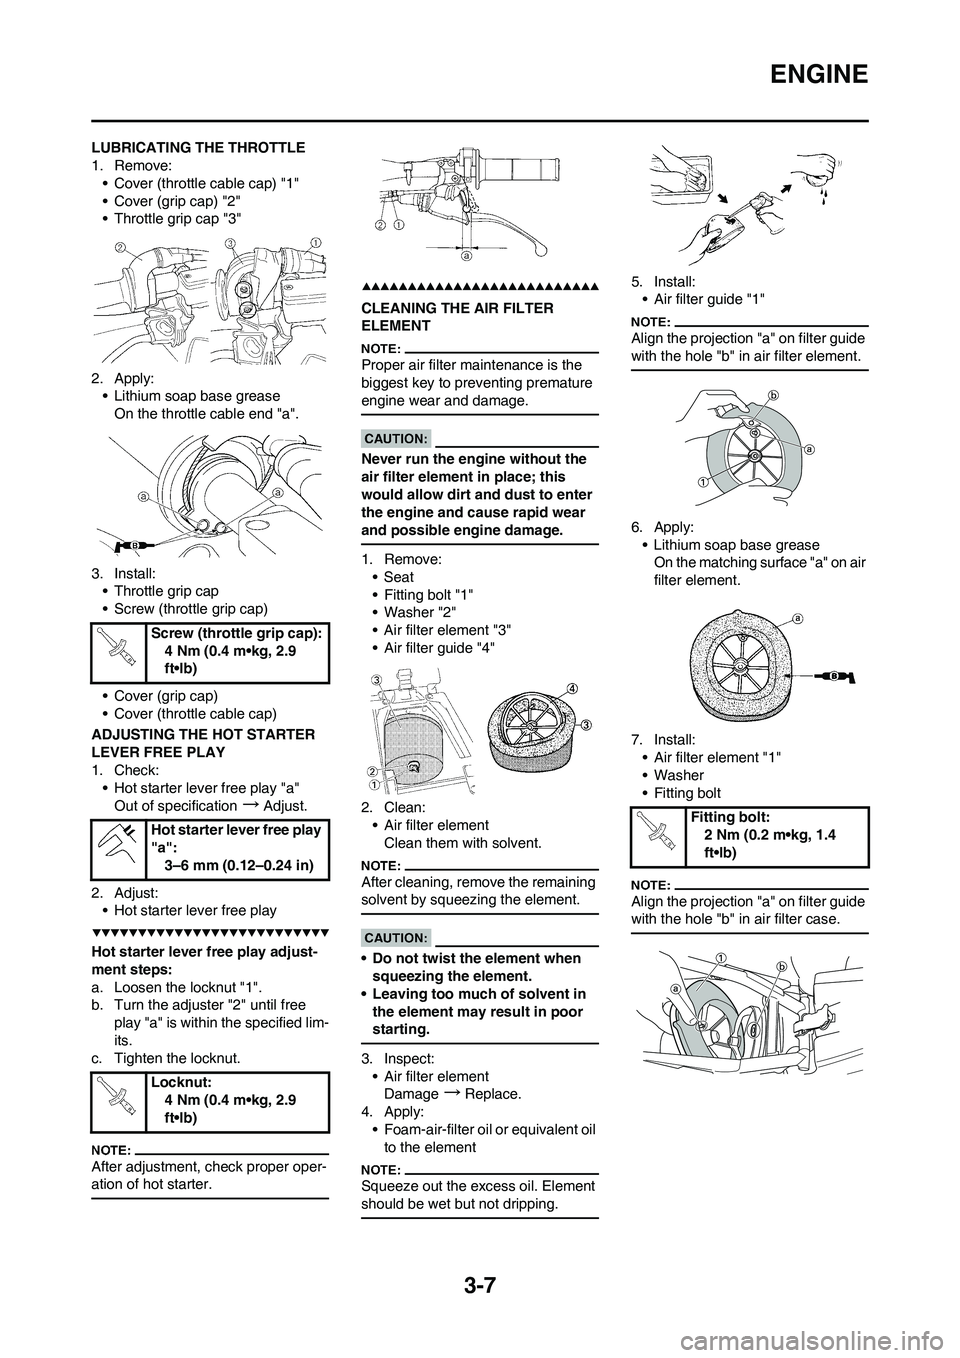
LUBRICATING THE THROTTLE
1. Remove:
• Cover (throttle cable cap) "1"
• Cover (grip cap) "2"
• Throttle grip cap "3"
2. Apply:
• Lithium soap base grease
On the throttle cable end "a".
3. Install:
• Throttle grip cap
• Screw (throttle grip cap)
• Cover (grip cap)
• Cover (throttle cable cap)
ADJUSTING THE HOT STARTER
LEVER FREE PLAY
1. Check:
• Hot starter lever free play "a"
Out of specification
→Adjust.
2. Adjust:
• Hot starter lever free play
Hot starter lever free play adjust-
ment steps:
a. Loosen the locknut "1".
b. Turn the adjuster "2" until free
play "a" is within the specified lim-
its.
c. Tighten the locknut.
After adjustment, check proper oper-
ation of hot starter.
CLEANING THE AIR FILTER
ELEMENT
Proper air filter maintenance is the
biggest key to preventing premature
engine wear and damage.
Never run the engine without the
air filter element in place; this
would allow dirt and dust to enter
the engine and cause rapid wear
and possible engine damage.
1. Remove:
•Seat
• Fitting bolt "1"
• Washer "2"
• Air filter element "3"
• Air filter guide "4"
2. Clean:
• Air filter element
Clean them with solvent.
After cleaning, remove the remaining
solvent by squeezing the element.
• Do not twist the element when
squeezing the element.
• Leaving too much of solvent in
the element may result in poor
starting.
3. Inspect:
• Air filter element
Damage
→Replace.
4. Apply:
• Foam-air-filter oil or equivalent oil
to the element
Squeeze out the excess oil. Element
should be wet but not dripping.
5. Install:
• Air filter guide "1"
Align the projection "a" on filter guide
with the hole "b" in air filter element.
6. Apply:
• Lithium soap base grease
On the matching surface "a" on air
filter element.
7. Install:
• Air filter element "1"
• Washer
• Fitting bolt
Align the projection "a" on filter guide
with the hole "b" in air filter case.
Screw (throttle grip cap):
4 Nm (0.4 m•kg, 2.9
ft•lb)
Hot starter lever free play
"a":
3–6 mm (0.12–0.24 in)
Locknut:
4 Nm (0.4 m•kg, 2.9
ft•lb)
Fitting bolt:
2 Nm (0.2 m•kg, 1.4
ft•lb)
Page 54 of 188

3-8
ENGINE
CHECKING THE ENGINE OIL
LEVEL
1. Stand the machine on a level sur-
face.
• When checking the oil level make
sure that the machine is upright.
• Place the machine on a suitable
stand.
Never remove the oil tank cap just
after high speed operation. The
heated oil could spurt out. causing
danger. Wait until the oil cools
down to approximately 70°C
(158°F).
2. Idle the engine more than 3 min-
utes while keeping the machine
upright. Then stop the engine and
inspect the oil level.
3. Remove:
• Oil tank cap 1
4. Inspect:
• Oil level
Check that the engine oil is above
the level mark "a" and that the oil
does not come out when the
check bolt "1" is removed.
Below the level mark "a"
→Add oil
through the filler cap hole until it is
above the level mark "a".
Oil comes out at the check bolt
→
Drain the oil until it stops coming
out.
When inspecting the oil level, do not
screw the oil level gauge into the oil
tank. Insert the gauge lightly.
(For USA and CDN)
• Do not add any chemical addi-
tives. Engine oil also lubricates
the clutch and additives could
cause clutch slippage.
• Do not allow foreign material to
enter the crankcase.
(Except for USA and CDN)
• Do not add any chemical addi-
tives or use oils with a grade of
CD "a" or higher.
• Do not use oils labeled "ENERGY
CONSERVING II" "b" or higher.
Engine oil also lubricates the
clutch and additives could cause
clutch slippage.• Do not allow foreign material to
enter the crankcase.
5. Start the engine and let it warm up
for several minutes.
When the oil tank is empty, never
start the engine.
6. Idle the engine more than 10 sec-
onds while keeping the machine
upright. Then stop the engine and
add the oil to the maximum level.
7. Install:
• Oil tank cap
CHANGING THE ENGINE OIL
1. Start the engine and let it warm up
for several minutes.
2. Stop the engine and place an oil
pan under the drain bolt.
3. Remove:
• Oil tank plug "1"
• Oil filler cap "2"
• Drain bolt (with gasket) "3"
• Oil filter drain bolt (O-ring) "4"
• Drain bolt (with gasket) "5"
Drain the crankcase and oil tank
of its oil.
4. If the oil filter is to be replaced dur-
ing this oil change, remove the fol-
lowing parts and reinstall them.
Recommended oil:
Yamalube 4,
SAE10W30 or
SAE20W40
Yamalube 4-R,
SAE10W50
API service SG type or
higher, JASO standard
MA
Recommended oil:
SAE10W30,
SAE10W40,
SAE15W40, SAE20W40
or SAE20W50
API service SG type or
higher, JASO standard
MA
Page 55 of 188

3-9
ENGINE
Replacement steps:
a. Remove the oil filter element cov-
er "1" and oil filter element "2".
b. Check the O-rings "3", if cracked
or damaged, replace them with a
new one.
c. Install the oil filter element and oil
filter element cover.
5. Install:
• Gaskets
• Oil filter drain bolt
• Drain bolt (right crankcase)
• Drain bolt (left crankcase)
6. Fill:
• Engine oil7. Install:
• Oil filler cap
8. Inspect:
• Engine (for oil leaks)
• Oil level
Refer to "ENGINE OIL LEVEL IN-
SPECTION".
CHECKING THE OIL PRESSURE
1. Check:
• Oil pressure
Checking steps:
a. Slightly loosen the oil pressure
check bolt "1".
b. Start the engine and keep it idling
until oil starts to seep from the oil
pressure check bolt. If no oil
comes out after one minute, turn
the engine off so it will not seize.
c. Check oil passages and oil pump
for damage or leakage.
d. Start the engine after solving the
problem(s) and recheck the oil
pressure.
e. Tighten the oil pressure check
bolt.
ADJUSTING THE PILOT SCREW
1. Adjust:
• Pilot screw "1"
Adjustment steps:
To optimize the fuel flow at a smaller
throttle opening, each machine's pilot
screw has been individually set at the
factory. Before adjusting the pilot
screw, turn it in fully and count the
number of turns. Record this number
as the factory-set number of turns
out.
a. Turn in the pilot screw until it is
lightly seated.
b. Turn out the pilot screw by the
factory-set number of turns.
ADJUSTING THE ENGINE IDLING
SPEED
1. Start the engine and thoroughly
warm it up.
2. Adjust:
• Engine idling speed
Adjustment steps:
a. Adjust the pilot screw.
Refer to "ADJUSTING THE PI-
LOT SCREW" section.
b. Turn the throttle stop screw "1"
until the specified engine idling
speed.
Using a digital engine tachometer for
idle speed adjustment, detect the en-
gine idling speed by bringing the
sensing element "c" of the engine ta-
chometer close to the ignition coil "2".
Oil filter element cover:
10 Nm (1.0 m•kg, 7.2
ft•lb)
Oil filter drain bolt:
10 Nm (1.0 m•kg, 7.2
ft•lb)
Drain bolt (right crank-
case):
20 Nm (2.0 m•kg, 14
ft•lb)
Drain bolt (left crank-
case):
20 Nm (2.0 m•kg, 14
ft•lb)
Oil quantity:
Periodic oil change:
0.95 L (0.84 Imp qt,
1.00 US qt)
With oil filter replace-
ment:
1.0 L (0.88 Imp qt, 1.06
US qt)
Total amount:
1.2 L (1.06 Imp qt, 1.27
US qt)
Oil pressure check bolt:
10 Nm (1.0 m•kg, 7.2
ft•lb)
Pilot screw (example):
1-1/2 turns out
Digital tachometer:
YU-39951-B/90890-
06760
To increase idle speed
→Turn the
throttle stop screw "1" in "a".
To decrease idle speed
→Turn
the throttle stop screw "1" out
"b".
Engine idling speed:
1,900–2,100 r/min