steering YAMAHA YZ450F 2008 Owners Manual
[x] Cancel search | Manufacturer: YAMAHA, Model Year: 2008, Model line: YZ450F, Model: YAMAHA YZ450F 2008Pages: 188, PDF Size: 11.75 MB
Page 10 of 188
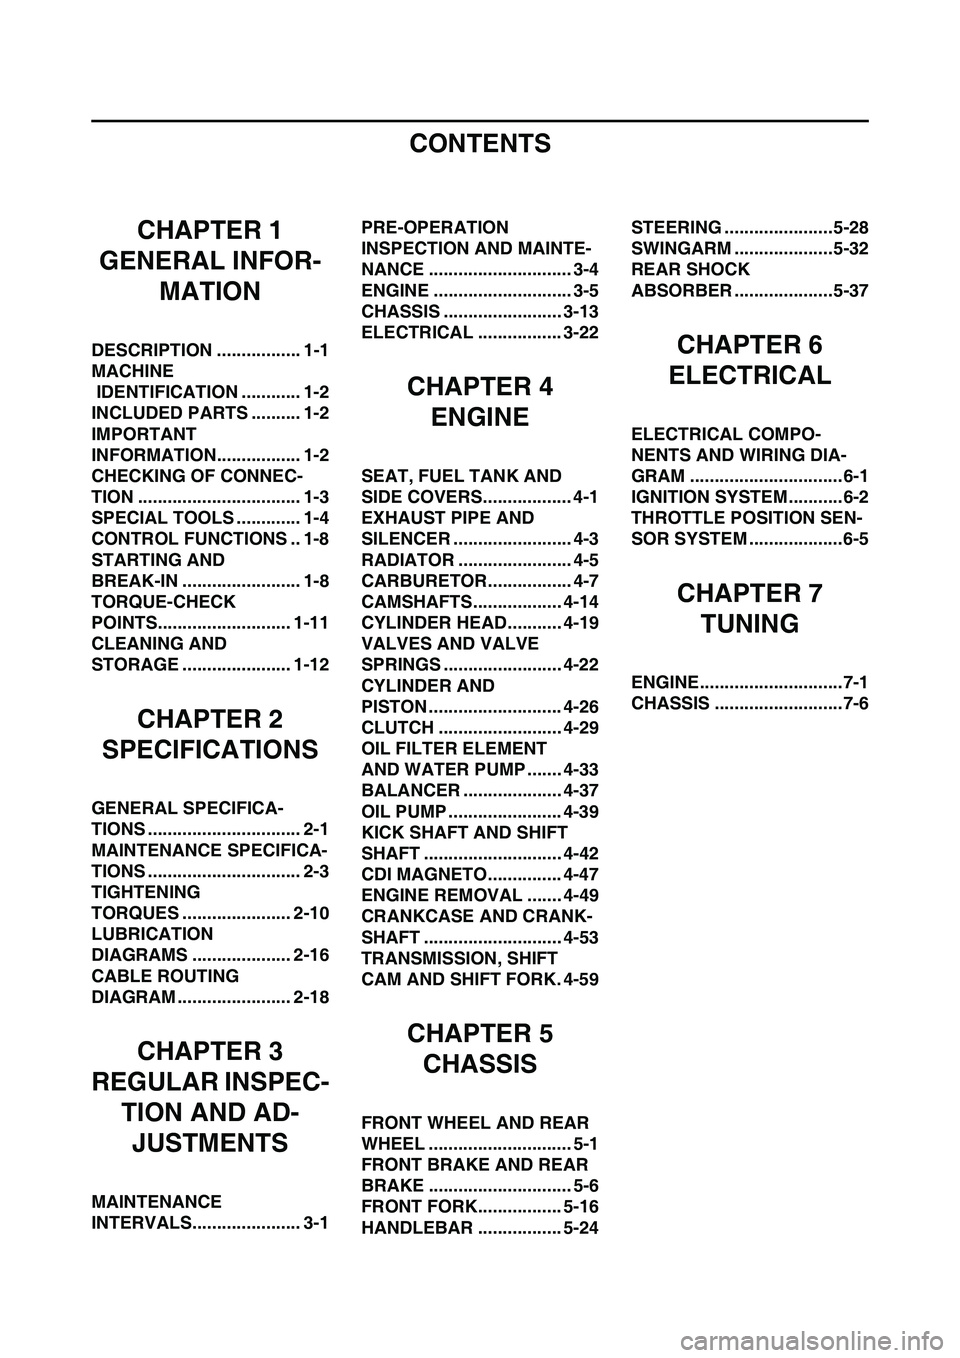
CONTENTS
CHAPTER 1
GENERAL INFOR-
MATION
DESCRIPTION ................. 1-1
MACHINE
IDENTIFICATION ............ 1-2
INCLUDED PARTS .......... 1-2
IMPORTANT
INFORMATION................. 1-2
CHECKING OF CONNEC-
TION ................................. 1-3
SPECIAL TOOLS ............. 1-4
CONTROL FUNCTIONS .. 1-8
STARTING AND
BREAK-IN ........................ 1-8
TORQUE-CHECK
POINTS........................... 1-11
CLEANING AND
STORAGE ...................... 1-12
CHAPTER 2
SPECIFICATIONS
GENERAL SPECIFICA-
TIONS ............................... 2-1
MAINTENANCE SPECIFICA-
TIONS ............................... 2-3
TIGHTENING
TORQUES ...................... 2-10
LUBRICATION
DIAGRAMS .................... 2-16
CABLE ROUTING
DIAGRAM ....................... 2-18
CHAPTER 3
REGULAR INSPEC-
TION AND AD-
JUSTMENTS
MAINTENANCE
INTERVALS...................... 3-1PRE-OPERATION
INSPECTION AND MAINTE-
NANCE ............................. 3-4
ENGINE ............................ 3-5
CHASSIS ........................ 3-13
ELECTRICAL ................. 3-22
CHAPTER 4
ENGINE
SEAT, FUEL TANK AND
SIDE COVERS.................. 4-1
EXHAUST PIPE AND
SILENCER ........................ 4-3
RADIATOR ....................... 4-5
CARBURETOR................. 4-7
CAMSHAFTS.................. 4-14
CYLINDER HEAD........... 4-19
VALVES AND VALVE
SPRINGS ........................ 4-22
CYLINDER AND
PISTON ........................... 4-26
CLUTCH ......................... 4-29
OIL FILTER ELEMENT
AND WATER PUMP ....... 4-33
BALANCER .................... 4-37
OIL PUMP ....................... 4-39
KICK SHAFT AND SHIFT
SHAFT ............................ 4-42
CDI MAGNETO............... 4-47
ENGINE REMOVAL ....... 4-49
CRANKCASE AND CRANK-
SHAFT ............................ 4-53
TRANSMISSION, SHIFT
CAM AND SHIFT FORK. 4-59
CHAPTER 5
CHASSIS
FRONT WHEEL AND REAR
WHEEL ............................. 5-1
FRONT BRAKE AND REAR
BRAKE ............................. 5-6
FRONT FORK................. 5-16
HANDLEBAR ................. 5-24STEERING ......................5-28
SWINGARM ....................5-32
REAR SHOCK
ABSORBER ....................5-37
CHAPTER 6
ELECTRICAL
ELECTRICAL COMPO-
NENTS AND WIRING DIA-
GRAM ...............................6-1
IGNITION SYSTEM...........6-2
THROTTLE POSITION SEN-
SOR SYSTEM ...................6-5
CHAPTER 7
TUNING
ENGINE.............................7-1
CHASSIS ..........................7-6
Page 12 of 188
1-2
MACHINE IDENTIFICATION
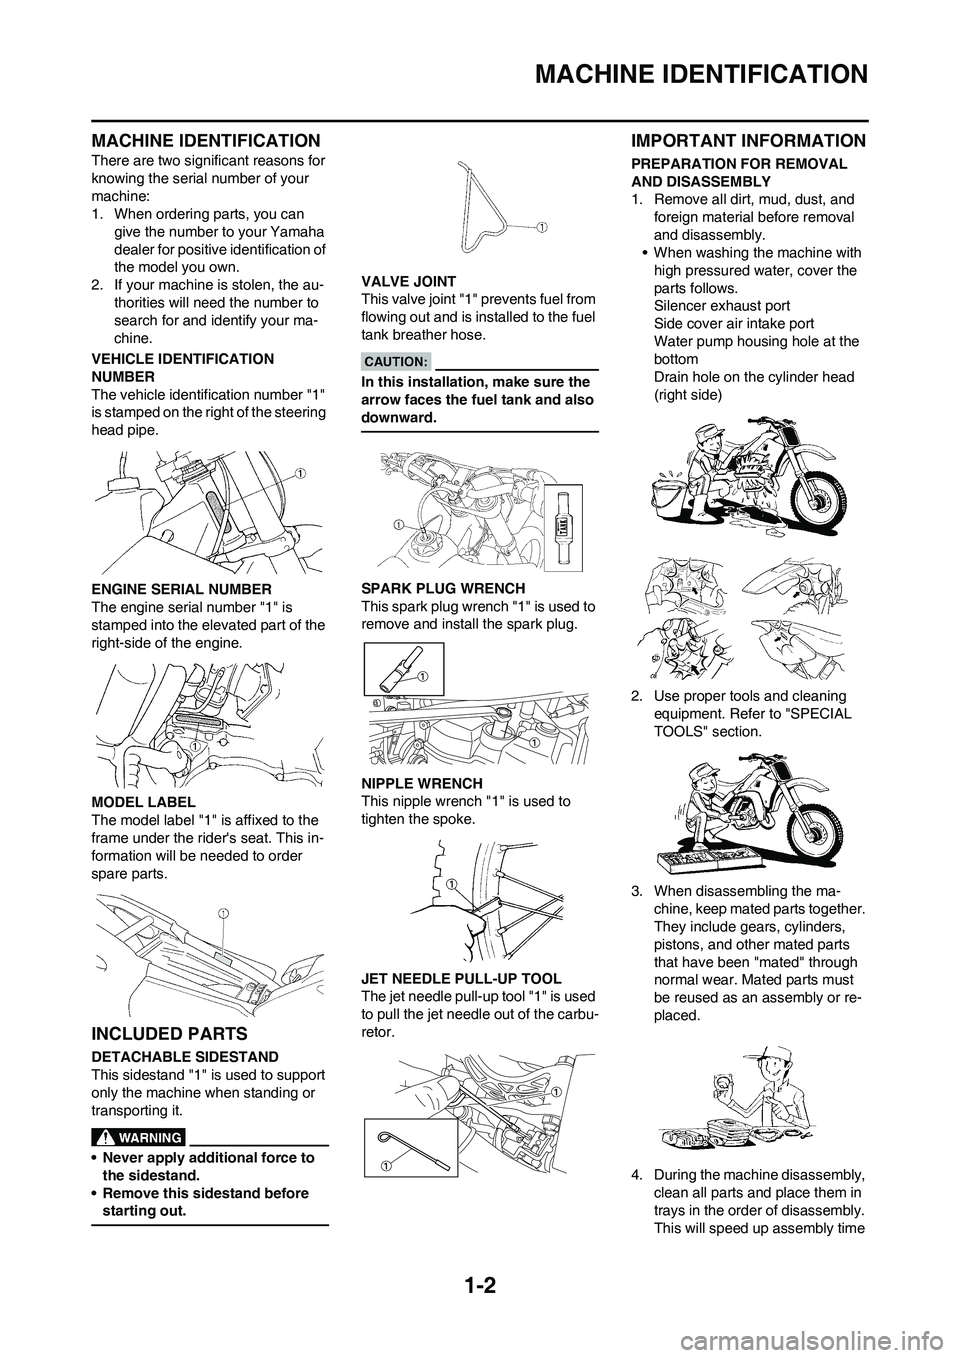
MACHINE IDENTIFICATION
There are two significant reasons for
knowing the serial number of your
machine:
1. When ordering parts, you can
give the number to your Yamaha
dealer for positive identification of
the model you own.
2. If your machine is stolen, the au-
thorities will need the number to
search for and identify your ma-
chine.
VEHICLE IDENTIFICATION
NUMBER
The vehicle identification number "1"
is stamped on the right of the steering
head pipe.
ENGINE SERIAL NUMBER
The engine serial number "1" is
stamped into the elevated part of the
right-side of the engine.
MODEL LABEL
The model label "1" is affixed to the
frame under the rider's seat. This in-
formation will be needed to order
spare parts.
INCLUDED PARTS
DETACHABLE SIDESTAND
This sidestand "1" is used to support
only the machine when standing or
transporting it.
• Never apply additional force to
the sidestand.
• Remove this sidestand before
starting out.
VALVE JOINT
This valve joint "1" prevents fuel from
flowing out and is installed to the fuel
tank breather hose.
In this installation, make sure the
arrow faces the fuel tank and also
downward.
SPARK PLUG WRENCH
This spark plug wrench "1" is used to
remove and install the spark plug.
NIPPLE WRENCH
This nipple wrench "1" is used to
tighten the spoke.
JET NEEDLE PULL-UP TOOL
The jet needle pull-up tool "1" is used
to pull the jet needle out of the carbu-
retor.
IMPORTANT INFORMATION
PREPARATION FOR REMOVAL
AND DISASSEMBLY
1. Remove all dirt, mud, dust, and
foreign material before removal
and disassembly.
• When washing the machine with
high pressured water, cover the
parts follows.
Silencer exhaust port
Side cover air intake port
Water pump housing hole at the
bottom
Drain hole on the cylinder head
(right side)
2. Use proper tools and cleaning
equipment. Refer to "SPECIAL
TOOLS" section.
3. When disassembling the ma-
chine, keep mated parts together.
They include gears, cylinders,
pistons, and other mated parts
that have been "mated" through
normal wear. Mated parts must
be reused as an assembly or re-
placed.
4. During the machine disassembly,
clean all parts and place them in
trays in the order of disassembly.
This will speed up assembly time
Page 15 of 188
1-5
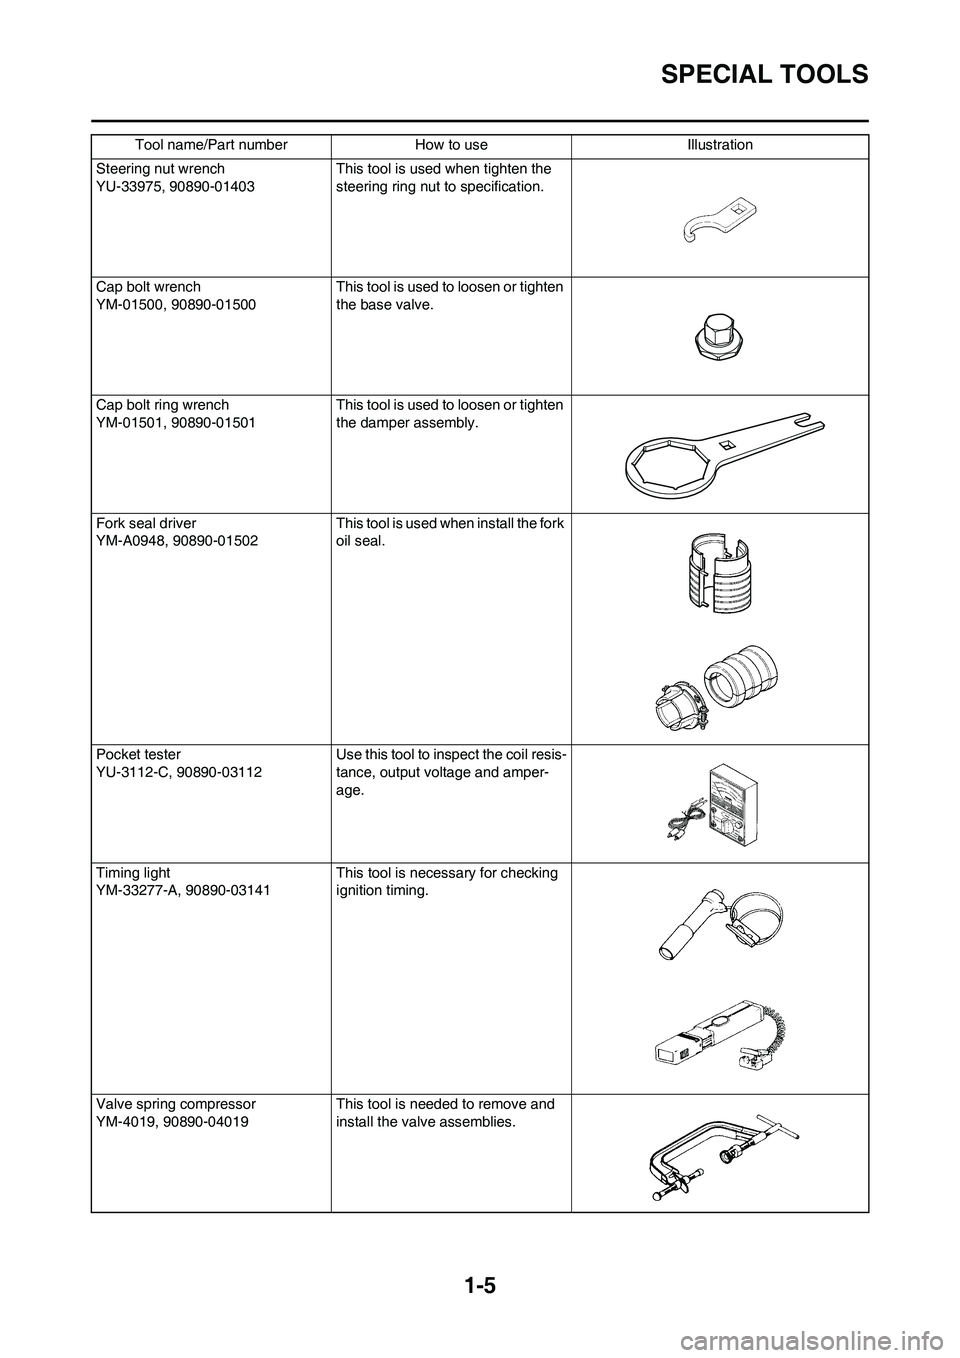
SPECIAL TOOLS
Steering nut wrench
YU-33975, 90890-01403 This tool is used when tighten the
steering ring nut to specification.
Cap bolt wrench
YM-01500, 90890-01500This tool is used to loosen or tighten
the base valve.
Cap bolt ring wrench
YM-01501, 90890-01501This tool is used to loosen or tighten
the damper assembly.
Fork seal driver
YM-A0948, 90890-01502 This tool is used when install the fork
oil seal.
Pocket tester
YU-3112-C, 90890-03112 Use this tool to inspect the coil resis-
tance, output voltage and amper-
age.
Timing light
YM-33277-A, 90890-03141 This tool is necessary for checking
ignition timing.
Valve spring compressor
YM-4019, 90890-04019 This tool is needed to remove and
install the valve assemblies. Tool name/Part number How to use Illustration
Page 21 of 188
1-11
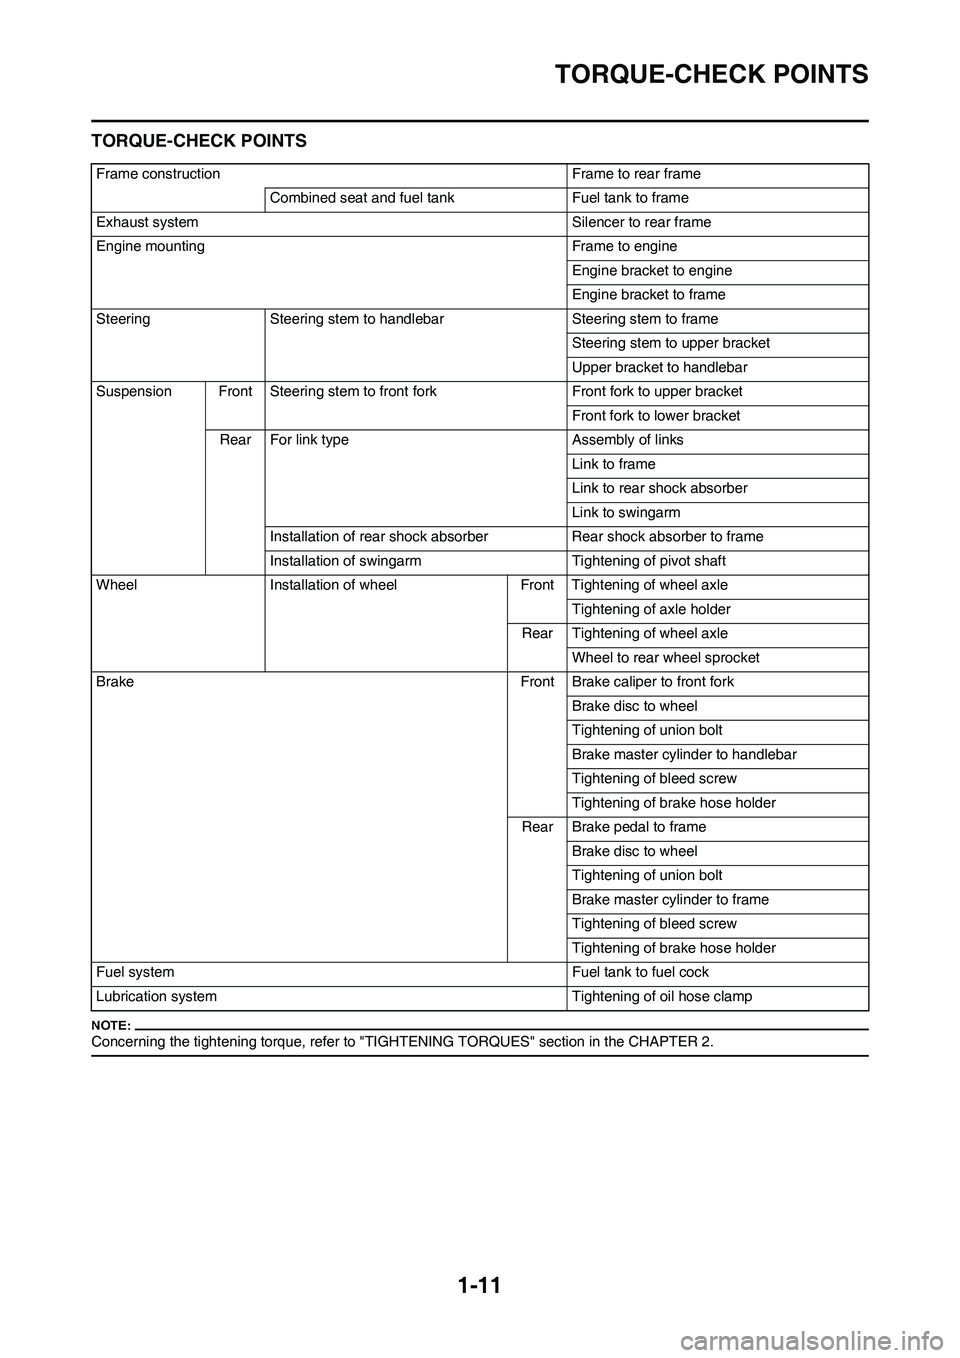
TORQUE-CHECK POINTS
TORQUE-CHECK POINTS
Concerning the tightening torque, refer to "TIGHTENING TORQUES" section in the CHAPTER 2.
Frame construction Frame to rear frame
Combined seat and fuel tank Fuel tank to frame
Exhaust system Silencer to rear frame
Engine mounting Frame to engine
Engine bracket to engine
Engine bracket to frame
Steering Steering stem to handlebar Steering stem to frame
Steering stem to upper bracket
Upper bracket to handlebar
Suspension Front Steering stem to front fork Front fork to upper bracket
Front fork to lower bracket
Rear For link type Assembly of links
Link to frame
Link to rear shock absorber
Link to swingarm
Installation of rear shock absorber Rear shock absorber to frame
Installation of swingarm Tightening of pivot shaft
Wheel Installation of wheel Front Tightening of wheel axle
Tightening of axle holder
Rear Tightening of wheel axle
Wheel to rear wheel sprocket
Brake Front Brake caliper to front fork
Brake disc to wheel
Tightening of union bolt
Brake master cylinder to handlebar
Tightening of bleed screw
Tightening of brake hose holder
Rear Brake pedal to frame
Brake disc to wheel
Tightening of union bolt
Brake master cylinder to frame
Tightening of bleed screw
Tightening of brake hose holder
Fuel system Fuel tank to fuel cock
Lubrication system Tightening of oil hose clamp
Page 30 of 188
2-8
MAINTENANCE SPECIFICATIONS
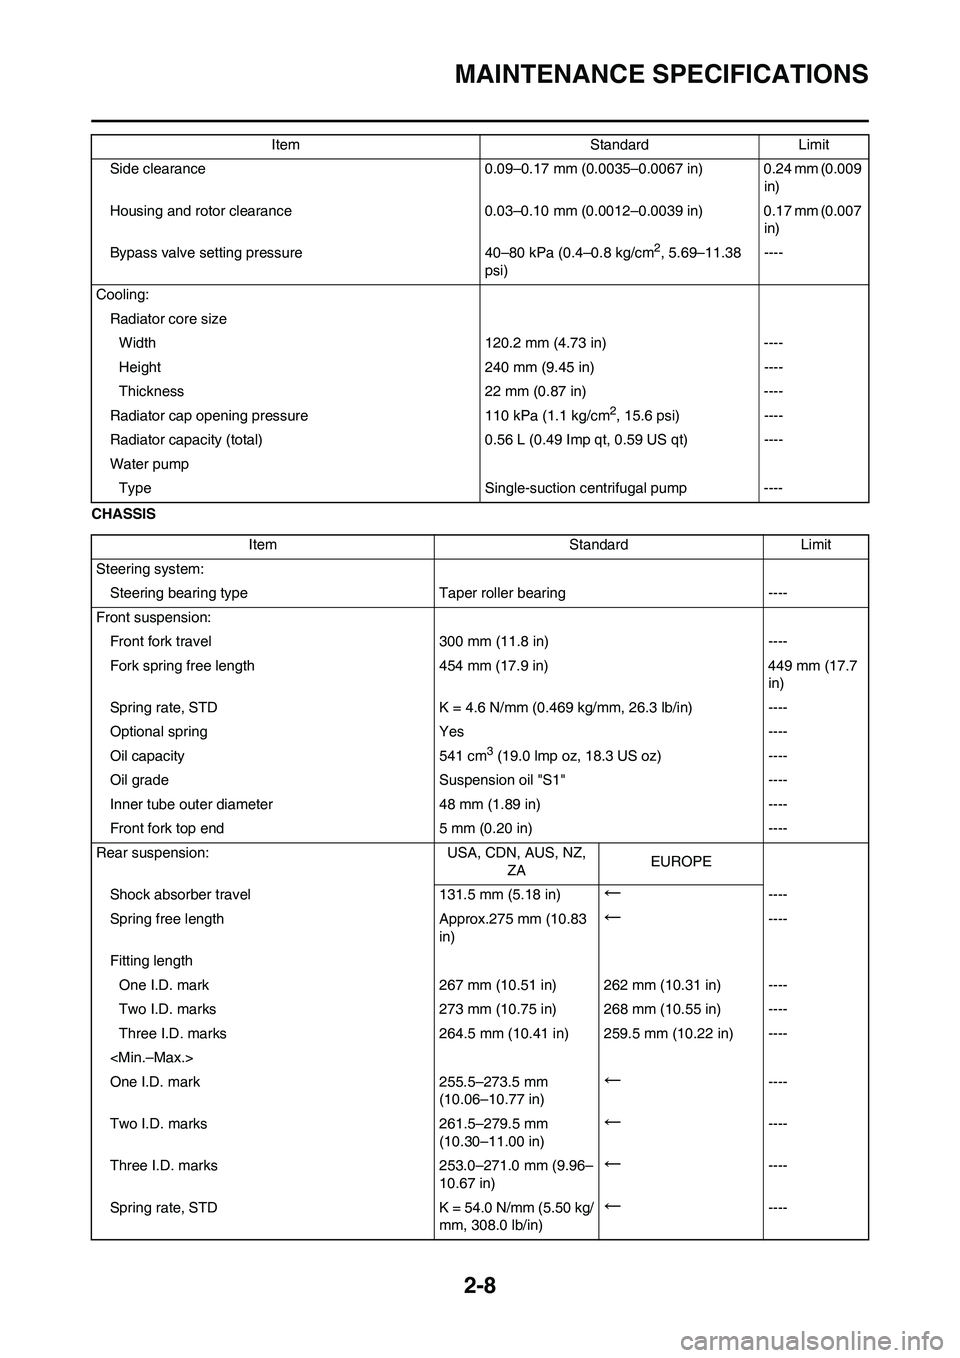
CHASSISSide clearance 0.09–0.17 mm (0.0035–0.0067 in) 0.24 mm (0.009
in)
Housing and rotor clearance 0.03–0.10 mm (0.0012–0.0039 in) 0.17 mm (0.007
in)
Bypass valve setting pressure 40–80 kPa (0.4–0.8 kg/cm
2, 5.69–11.38
psi)----
Cooling:
Radiator core size
Width 120.2 mm (4.73 in) ----
Height 240 mm (9.45 in) ----
Thickness 22 mm (0.87 in) ----
Radiator cap opening pressure 110 kPa (1.1 kg/cm
2, 15.6 psi) ----
Radiator capacity (total) 0.56 L (0.49 Imp qt, 0.59 US qt) ----
Water pump
Type Single-suction centrifugal pump ----Item Standard Limit
Item Standard Limit
Steering system:
Steering bearing typeTaper roller bearing ----
Front suspension:
Front fork travel 300 mm (11.8 in) ----
Fork spring free length 454 mm (17.9 in) 449 mm (17.7
in)
Spring rate, STD K = 4.6 N/mm (0.469 kg/mm, 26.3 lb/in) ----
Optional spring Yes ----
Oil capacity 541 cm
3 (19.0 lmp oz, 18.3 US oz) ----
Oil grade Suspension oil "S1" ----
Inner tube outer diameter 48 mm (1.89 in) ----
Front fork top end 5 mm (0.20 in) ----
Rear suspension: USA, CDN, AUS, NZ,
ZAEUROPE
Shock absorber travel 131.5 mm (5.18 in)
←----
Spring free length Approx.275 mm (10.83
in)
←----
Fitting length
One I.D. mark 267 mm (10.51 in) 262 mm (10.31 in) ----
Two I.D. marks 273 mm (10.75 in) 268 mm (10.55 in) ----
Three I.D. marks 264.5 mm (10.41 in) 259.5 mm (10.22 in) ----
One I.D. mark 255.5–273.5 mm
(10.06–10.77 in)
←----
Two I.D. marks 261.5–279.5 mm
(10.30–11.00 in)
←----
Three I.D. marks 253.0–271.0 mm (9.96–
10.67 in)
←----
Spring rate, STD K = 54.0 N/mm (5.50 kg/
mm, 308.0 lb/in)
←----
Page 34 of 188
2-12
TIGHTENING TORQUES
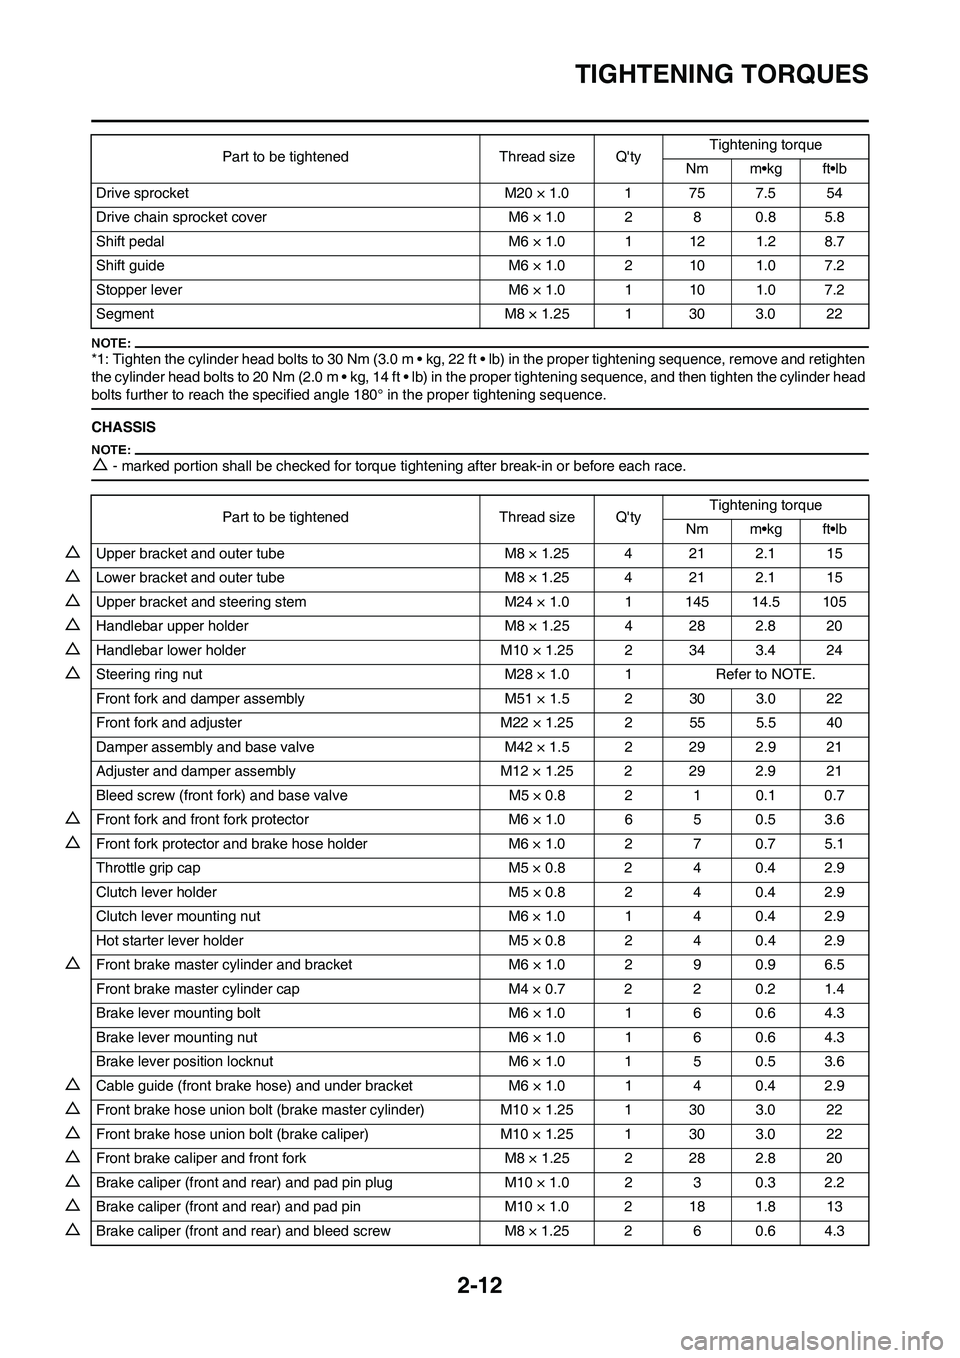
*1: Tighten the cylinder head bolts to 30 Nm (3.0 m • kg, 22 ft • lb) in the proper tightening sequence, remove and retighten
the cylinder head bolts to 20 Nm (2.0 m • kg, 14 ft • lb) in the proper tightening sequence, and then tighten the cylinder head
bolts further to reach the specified angle 180° in the proper tightening sequence.
CHASSIS
△- marked portion shall be checked for torque tightening after break-in or before each race.
Drive sprocket M20 × 1.0 1 75 7.5 54
Drive chain sprocket cover M6 × 1.0 2 8 0.8 5.8
Shift pedal M6 × 1.0 1 12 1.2 8.7
Shift guide M6 × 1.0 2 10 1.0 7.2
Stopper lever M6 × 1.0 1 10 1.0 7.2
Segment M8 × 1.25 1 30 3.0 22Part to be tightened Thread size Q'tyTightening torque
Nm m•kg ft•lb
Part to be tightened Thread size Q'tyTightening torque
Nm m•kg ft•lb
△Upper bracket and outer tube M8 × 1.25 4 21 2.1 15
△Lower bracket and outer tube M8 × 1.25 4 21 2.1 15
△Upper bracket and steering stem M24 × 1.0 1 145 14.5 105
△Handlebar upper holder M8 × 1.25 4 28 2.8 20
△Handlebar lower holder M10 × 1.25 2 34 3.4 24
△Steering ring nut M28 × 1.0 1 Refer to NOTE.
Front fork and damper assembly M51 × 1.5 2 30 3.0 22
Front fork and adjuster M22 × 1.25 2 55 5.5 40
Damper assembly and base valve M42 × 1.5 2 29 2.9 21
Adjuster and damper assembly M12 × 1.25 2 29 2.9 21
Bleed screw (front fork) and base valve M5 × 0.8 2 1 0.1 0.7
△Front fork and front fork protector M6 × 1.0 6 5 0.5 3.6
△Front fork protector and brake hose holder M6 × 1.0 2 7 0.7 5.1
Throttle grip cap M5 × 0.8 2 4 0.4 2.9
Clutch lever holder M5 × 0.8 2 4 0.4 2.9
Clutch lever mounting nut M6 × 1.0 1 4 0.4 2.9
Hot starter lever holder M5 × 0.8 2 4 0.4 2.9
△Front brake master cylinder and bracket M6 × 1.0 2 9 0.9 6.5
Front brake master cylinder cap M4 × 0.7 2 2 0.2 1.4
Brake lever mounting bolt M6 × 1.0 1 6 0.6 4.3
Brake lever mounting nut M6 × 1.0 1 6 0.6 4.3
Brake lever position locknut M6 × 1.0 1 5 0.5 3.6
△Cable guide (front brake hose) and under bracket M6 × 1.0 1 4 0.4 2.9
△Front brake hose union bolt (brake master cylinder) M10 × 1.25 1 30 3.0 22
△Front brake hose union bolt (brake caliper) M10 × 1.25 1 30 3.0 22
△Front brake caliper and front fork M8 × 1.25 2 28 2.8 20
△Brake caliper (front and rear) and pad pin plug M10 × 1.0 2 3 0.3 2.2
△Brake caliper (front and rear) and pad pin M10 × 1.0 2 18 1.8 13
△Brake caliper (front and rear) and bleed screw M8 × 1.25 2 6 0.6 4.3
Page 36 of 188
2-14
TIGHTENING TORQUES
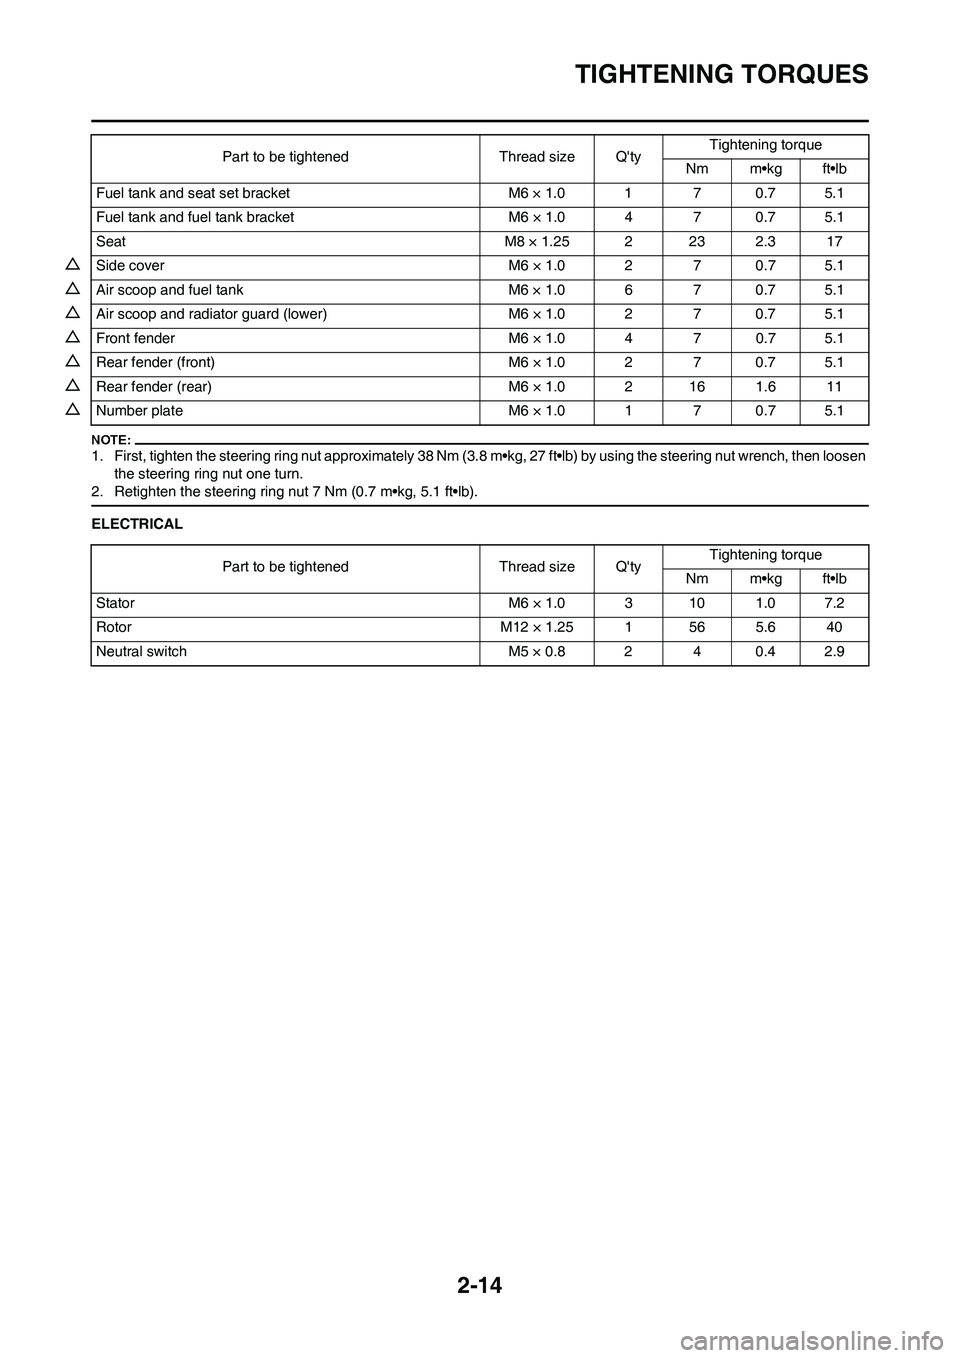
1. First, tighten the steering ring nut approximately 38 Nm (3.8 m•kg, 27 ft•lb) by using the steering nut wrench, then loosen
the steering ring nut one turn.
2. Retighten the steering ring nut 7 Nm (0.7 m•kg, 5.1 ft•lb).
ELECTRICALFuel tank and seat set bracket M6 × 1.0 1 7 0.7 5.1
Fuel tank and fuel tank bracket M6 × 1.0 4 7 0.7 5.1
Seat M8 × 1.25 2 23 2.3 17
△Side cover M6 × 1.0 2 7 0.7 5.1
△Air scoop and fuel tank M6 × 1.0 6 7 0.7 5.1
△Air scoop and radiator guard (lower) M6 × 1.0 2 7 0.7 5.1
△Front fender M6 × 1.0 4 7 0.7 5.1
△Rear fender (front) M6 × 1.0 2 7 0.7 5.1
△Rear fender (rear) M6 × 1.0 2 16 1.6 11
△Number plate M6 × 1.0 1 7 0.7 5.1Part to be tightened Thread size Q'tyTightening torque
Nm m•kg ft•lb
Part to be tightened Thread size Q'tyTightening torque
Nm m•kg ft•lb
Stator M6 × 1.0 3 10 1.0 7.2
Rotor M12 × 1.25 1 56 5.6 40
Neutral switch M5 × 0.8 2 4 0.4 2.9
Page 40 of 188

2-18
CABLE ROUTING DIAGRAM
CABLE ROUTING DIAGRAM
1. Fuel tank breather hose
2. Radiator hose 1
3. Cylinder head breather hose
4. Hose holder
5. Radiator hose 4
6. Clutch cable
7. Connector cover
8. Fuel hose
9. Throttle position sensor lead10. Hot starter cable
11. Carburetor breather hose
12. Carburetor overflow hose
A. Insert the end of the fuel tank
breather hose into the hole in
the steering stem.B. Pass the cylinder head breather
hose on the outside of the radia-
tor hose 1 and between the radi-
ator hose 4 and frame.
C. Align the paint on the cylinder
head breather hose with the
front edge of the hose holder.
D. Pass the clutch cable through
the cable guide.
Page 49 of 188
3-3
MAINTENANCE INTERVALS
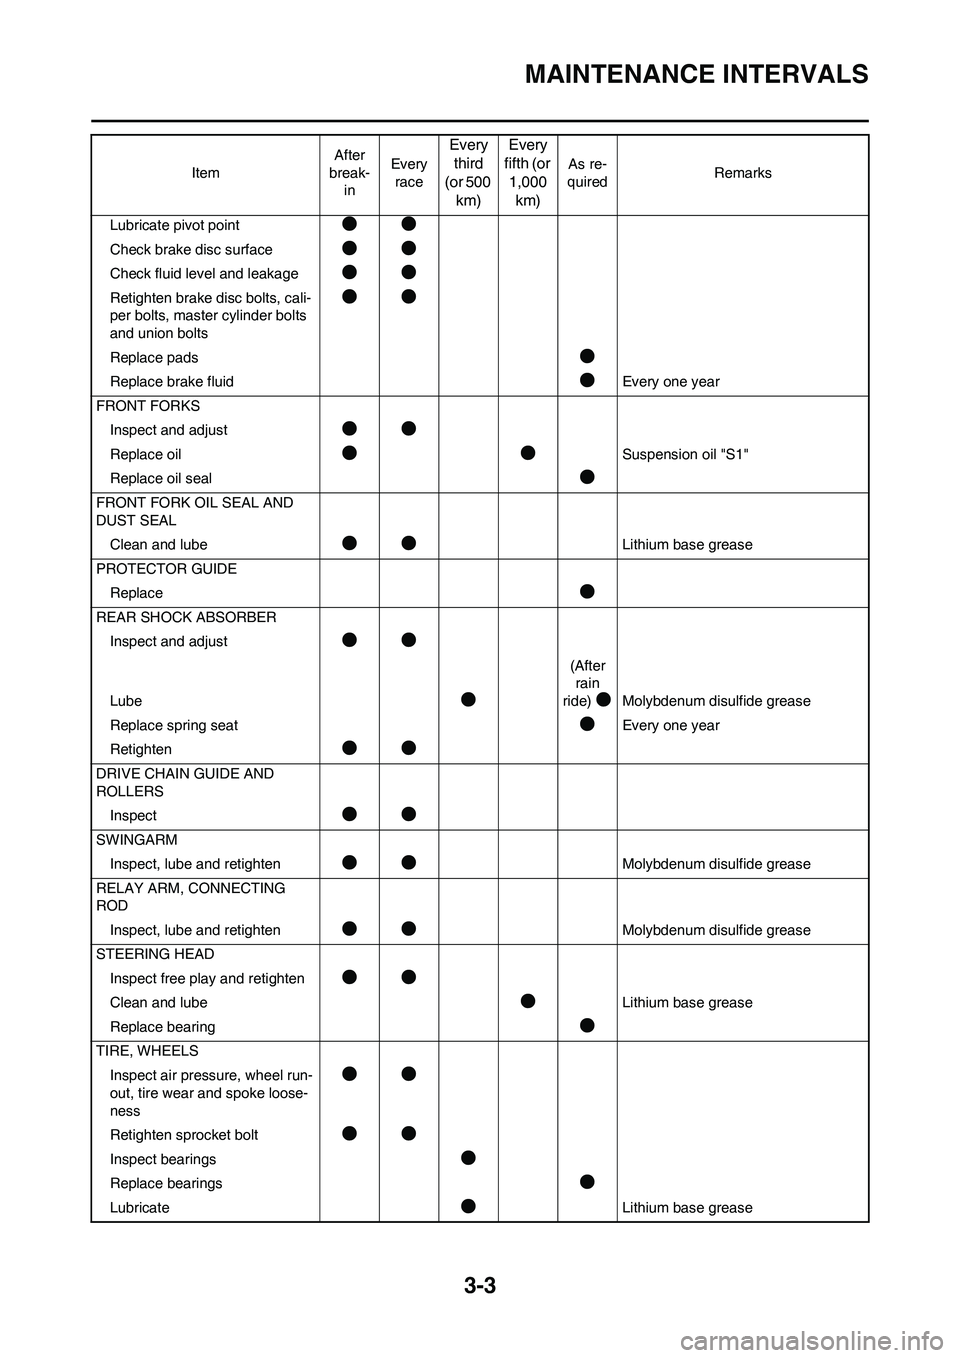
Lubricate pivot point●●
Check brake disc surface●●
Check fluid level and leakage●●
Retighten brake disc bolts, cali-
per bolts, master cylinder bolts
and union bolts●●
Replace pads●
Replace brake fluid●Every one year
FRONT FORKS
Inspect and adjust
●●
Replace oil●●Suspension oil "S1"
Replace oil seal
●
FRONT FORK OIL SEAL AND
DUST SEAL
Clean and lube
●●Lithium base grease
PROTECTOR GUIDE
Replace
●
REAR SHOCK ABSORBER
Inspect and adjust
●●
Lube●
(After
rain
ride)
●Molybdenum disulfide grease
Replace spring seat
●Every one year
Retighten
●●
DRIVE CHAIN GUIDE AND
ROLLERS
Inspect
●●
SWINGARM
Inspect, lube and retighten
●●Molybdenum disulfide grease
RELAY ARM, CONNECTING
ROD
Inspect, lube and retighten
●●Molybdenum disulfide grease
STEERING HEAD
Inspect free play and retighten
●●
Clean and lube●Lithium base grease
Replace bearing
●
TIRE, WHEELS
Inspect air pressure, wheel run-
out, tire wear and spoke loose-
ness
●●
Retighten sprocket bolt●●
Inspect bearings●
Replace bearings●
Lubricate●Lithium base grease ItemAfter
break-
inEvery
race
Every
third
(or 500
km)Every
fifth (or
1,000
km)
As re-
quiredRemarks
Page 50 of 188
3-4
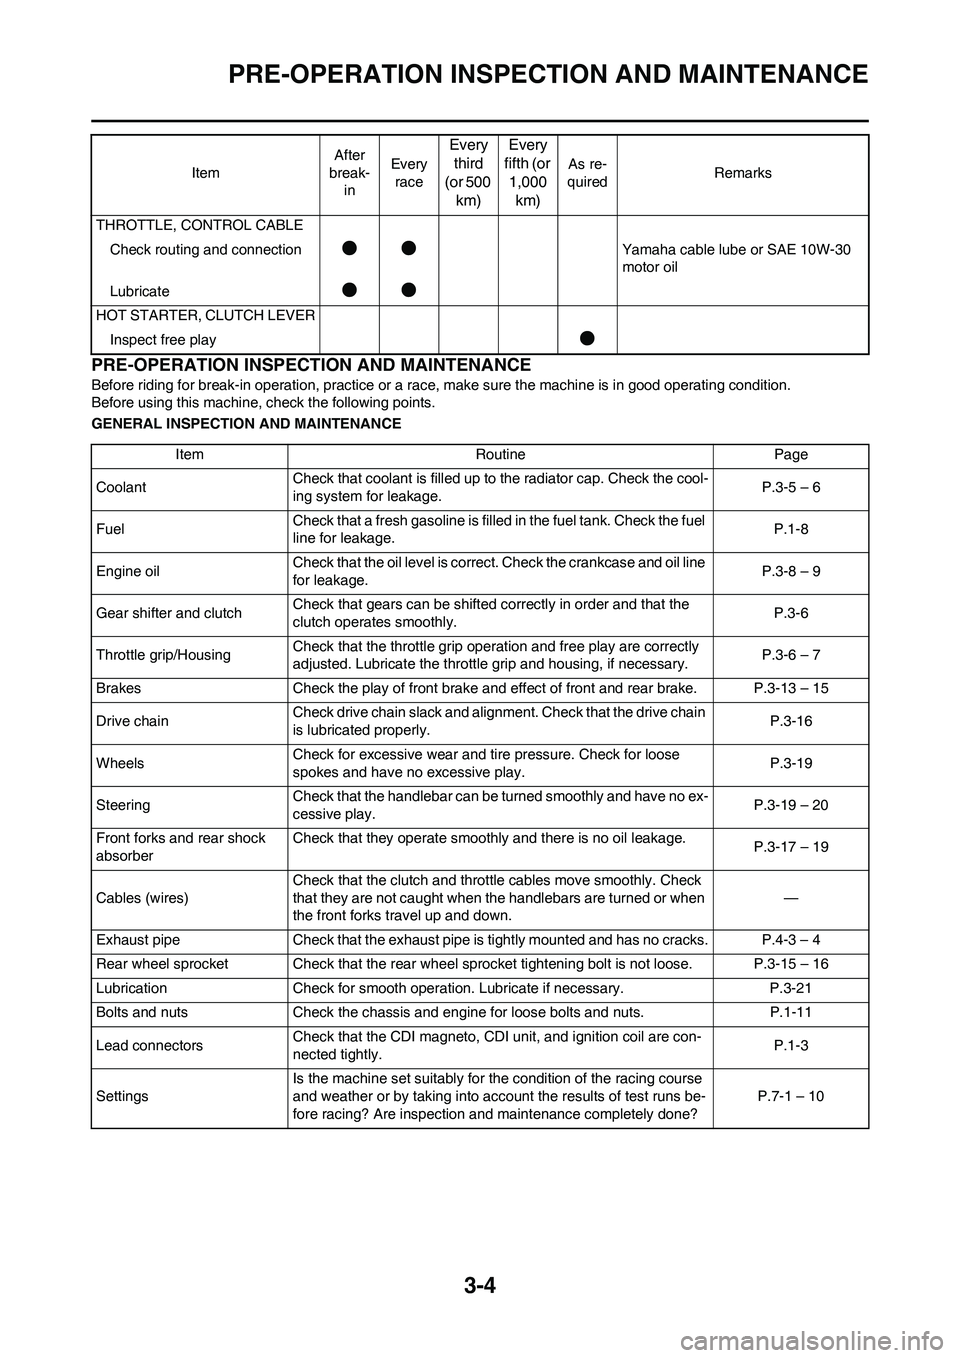
PRE-OPERATION INSPECTION AND MAINTENANCE
PRE-OPERATION INSPECTION AND MAINTENANCE
Before riding for break-in operation, practice or a race, make sure the machine is in good operating condition.
Before using this machine, check the following points.
GENERAL INSPECTION AND MAINTENANCETHROTTLE, CONTROL CABLE
Check routing and connection
●●Yamaha cable lube or SAE 10W-30
motor oil
Lubricate
●●
HOT STARTER, CLUTCH LEVER
Inspect free play
●
ItemAfter
break-
inEvery
race
Every
third
(or 500
km)Every
fifth (or
1,000
km)
As re-
quiredRemarks
Item Routine Page
CoolantCheck that coolant is filled up to the radiator cap. Check the cool-
ing system for leakage.P.3-5 – 6
FuelCheck that a fresh gasoline is filled in the fuel tank. Check the fuel
line for leakage.P.1-8
Engine oilCheck that the oil level is correct. Check the crankcase and oil line
for leakage.P.3-8 – 9
Gear shifter and clutchCheck that gears can be shifted correctly in order and that the
clutch operates smoothly.P.3-6
Throttle grip/HousingCheck that the throttle grip operation and free play are correctly
adjusted. Lubricate the throttle grip and housing, if necessary.P.3-6 – 7
Brakes Check the play of front brake and effect of front and rear brake. P.3-13 – 15
Drive chainCheck drive chain slack and alignment. Check that the drive chain
is lubricated properly.P.3-16
WheelsCheck for excessive wear and tire pressure. Check for loose
spokes and have no excessive play.P.3-19
SteeringCheck that the handlebar can be turned smoothly and have no ex-
cessive play.P.3-19 – 20
Front forks and rear shock
absorberCheck that they operate smoothly and there is no oil leakage.
P.3-17 – 19
Cables (wires)Check that the clutch and throttle cables move smoothly. Check
that they are not caught when the handlebars are turned or when
the front forks travel up and down.—
Exhaust pipe Check that the exhaust pipe is tightly mounted and has no cracks. P.4-3 – 4
Rear wheel sprocket Check that the rear wheel sprocket tightening bolt is not loose. P.3-15 – 16
Lubrication Check for smooth operation. Lubricate if necessary. P.3-21
Bolts and nuts Check the chassis and engine for loose bolts and nuts. P.1-11
Lead connectorsCheck that the CDI magneto, CDI unit, and ignition coil are con-
nected tightly.P.1-3
SettingsIs the machine set suitably for the condition of the racing course
and weather or by taking into account the results of test runs be-
fore racing? Are inspection and maintenance completely done?P.7-1 – 10