width YAMAHA YZ450F 2008 Owners Manual
[x] Cancel search | Manufacturer: YAMAHA, Model Year: 2008, Model line: YZ450F, Model: YAMAHA YZ450F 2008Pages: 188, PDF Size: 11.75 MB
Page 23 of 188
2-1
GENERAL SPECIFICATIONS
SPECIFICATIONS
GENERAL SPECIFICATIONS
Model name: YZ450FX (USA, CDN, AUS, NZ)
YZ450F (EUROPE, ZA)
Model code number: 2S2B (USA,CDN)
2S2C (EUROPE)
2S2E (AUS, NZ, ZA)
Dimensions: USA, CDN, AUS, NZ, ZA EUROPE
Overall length 2,194 mm (86.38 in) 2,195 mm (86.42 in)
Overall width 825 mm (32.48 in)
←
Overall height 1,306 mm (51.42 in)←
Seat height 990 mm (38.98 in) 1,001 mm (39.41 in)
Wheelbase 1,495 mm (58.86 in)
←
Minimum ground clearance 374 mm (14.72 in) 375 mm (14.76 in)
Dry weight:
Without oil and fuel 99.5 kg (219 lb)
Engine:
Engine type Liquid cooled 4-stroke, DOHC
Cylinder arrangement Single cylinder, forward inclined
Displacement 449 cm
3 (15.8 Imp oz, 15.2 US oz)
Bore × stroke 95.0 × 63.4 mm (3.74 × 2.50 in)
Compression ratio 12.3 : 1
Starting system Kickstarter
Lubrication system: Dry sump
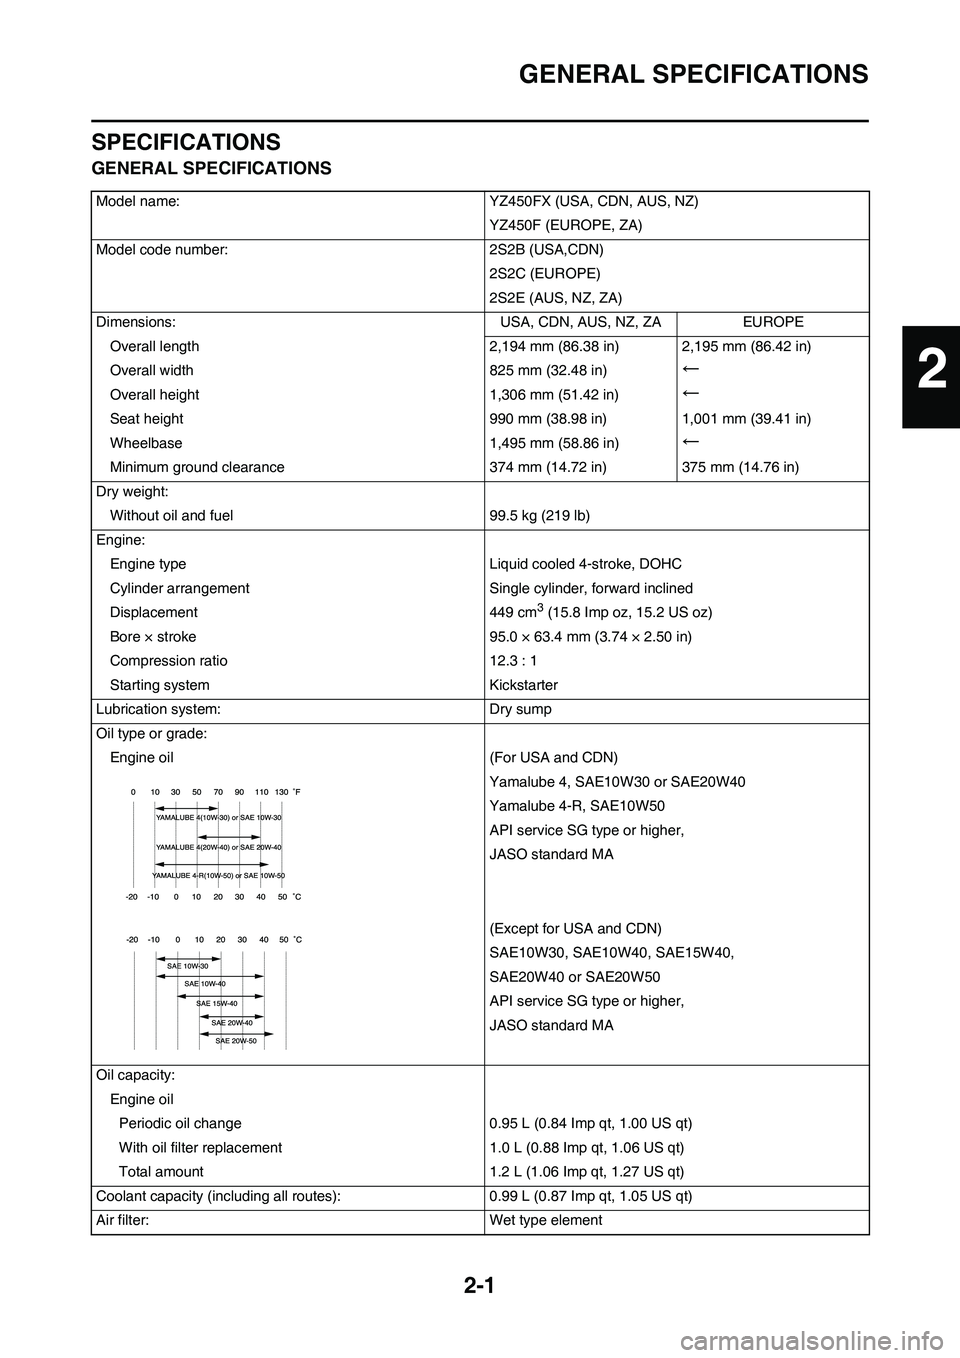
Oil type or grade:
Engine oil (For USA and CDN)
Yamalube 4, SAE10W30 or SAE20W40
Yamalube 4-R, SAE10W50
API service SG type or higher,
JASO standard MA
(Except for USA and CDN)
SAE10W30, SAE10W40, SAE15W40,
SAE20W40 or SAE20W50
API service SG type or higher,
JASO standard MA
Oil capacity:
Engine oil
Periodic oil change 0.95 L (0.84 Imp qt, 1.00 US qt)
With oil filter replacement 1.0 L (0.88 Imp qt, 1.06 US qt)
Total amount 1.2 L (1.06 Imp qt, 1.27 US qt)
Coolant capacity (including all routes): 0.99 L (0.87 Imp qt, 1.05 US qt)
Air filter: Wet type element
2
Page 26 of 188
2-4
MAINTENANCE SPECIFICATIONS
Timing chain:
Timing chain type/No. of links 98XRH2010-118M/118 ----
Timing chain adjustment method Automatic ----
Valve, valve seat, valve guide:
Valve clearance (cold)
IN 0.10–0.15 mm (0.0039–0.0059 in) ----
EX 0.20–0.25 mm (0.0079–0.0098 in) ----
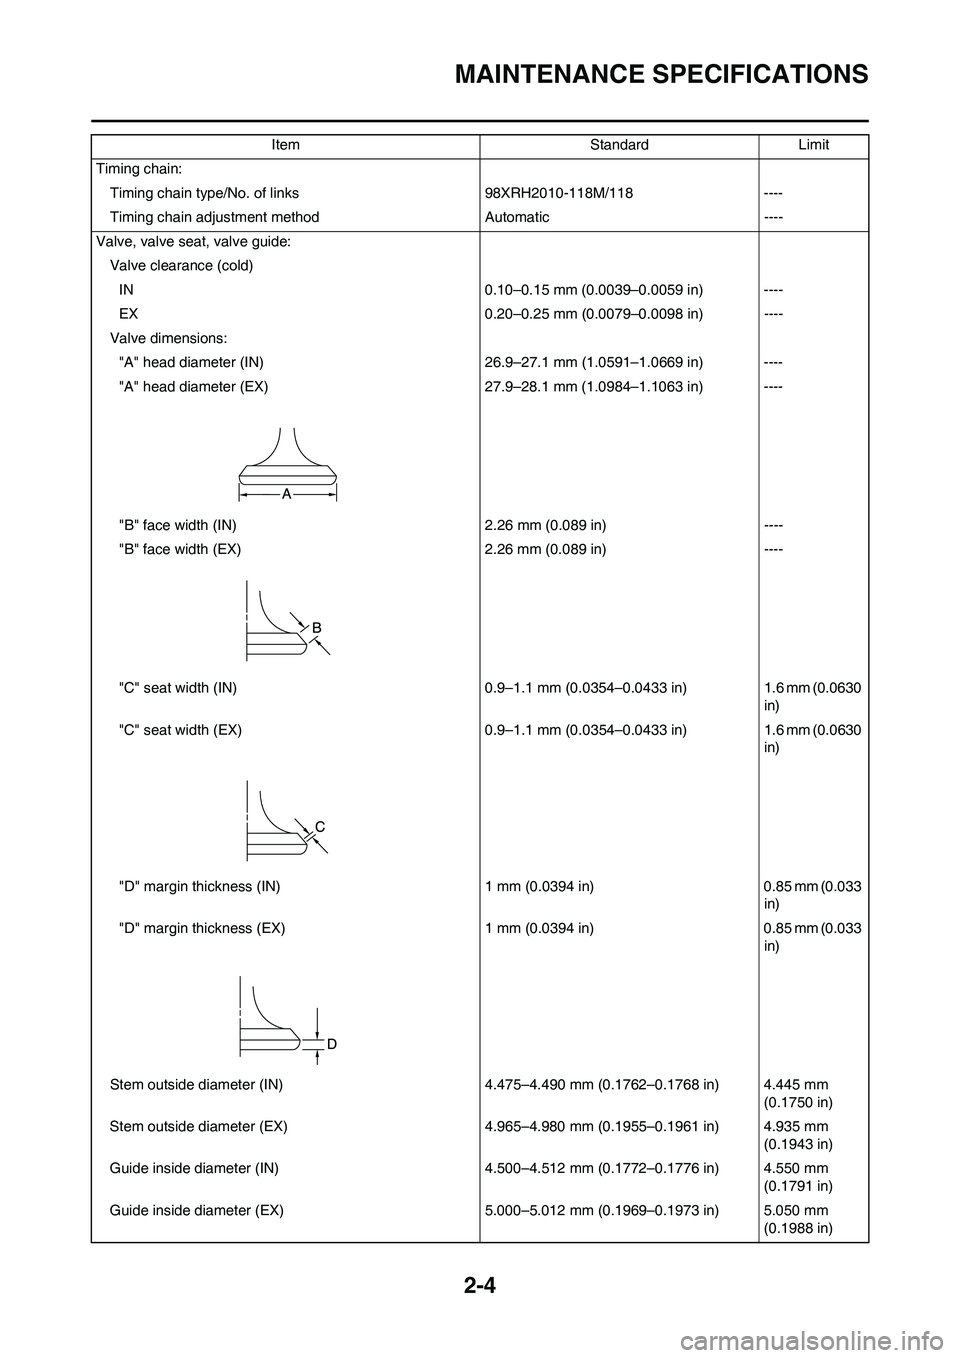
Valve dimensions:
"A" head diameter (IN) 26.9–27.1 mm (1.0591–1.0669 in) ----
"A" head diameter (EX) 27.9–28.1 mm (1.0984–1.1063 in) ----
"B" face width (IN) 2.26 mm (0.089 in) ----
"B" face width (EX) 2.26 mm (0.089 in) ----
"C" seat width (IN) 0.9–1.1 mm (0.0354–0.0433 in) 1.6 mm (0.0630
in)
"C" seat width (EX) 0.9–1.1 mm (0.0354–0.0433 in) 1.6 mm (0.0630
in)
"D" margin thickness (IN) 1 mm (0.0394 in) 0.85 mm (0.033
in)
"D" margin thickness (EX) 1 mm (0.0394 in) 0.85 mm (0.033
in)
Stem outside diameter (IN) 4.475–4.490 mm (0.1762–0.1768 in) 4.445 mm
(0.1750 in)
Stem outside diameter (EX) 4.965–4.980 mm (0.1955–0.1961 in) 4.935 mm
(0.1943 in)
Guide inside diameter (IN) 4.500–4.512 mm (0.1772–0.1776 in) 4.550 mm
(0.1791 in)
Guide inside diameter (EX) 5.000–5.012 mm (0.1969–0.1973 in) 5.050 mm
(0.1988 in) Item Standard Limit
Page 27 of 188
2-5
MAINTENANCE SPECIFICATIONS
Stem-to-guide clearance (IN) 0.010–0.037 mm (0.0004–0.0015 in) 0.08 mm (0.003
in)
Stem-to-guide clearance (EX) 0.020–0.047 mm (0.0008–0.0019 in) 0.10 mm (0.004
in)
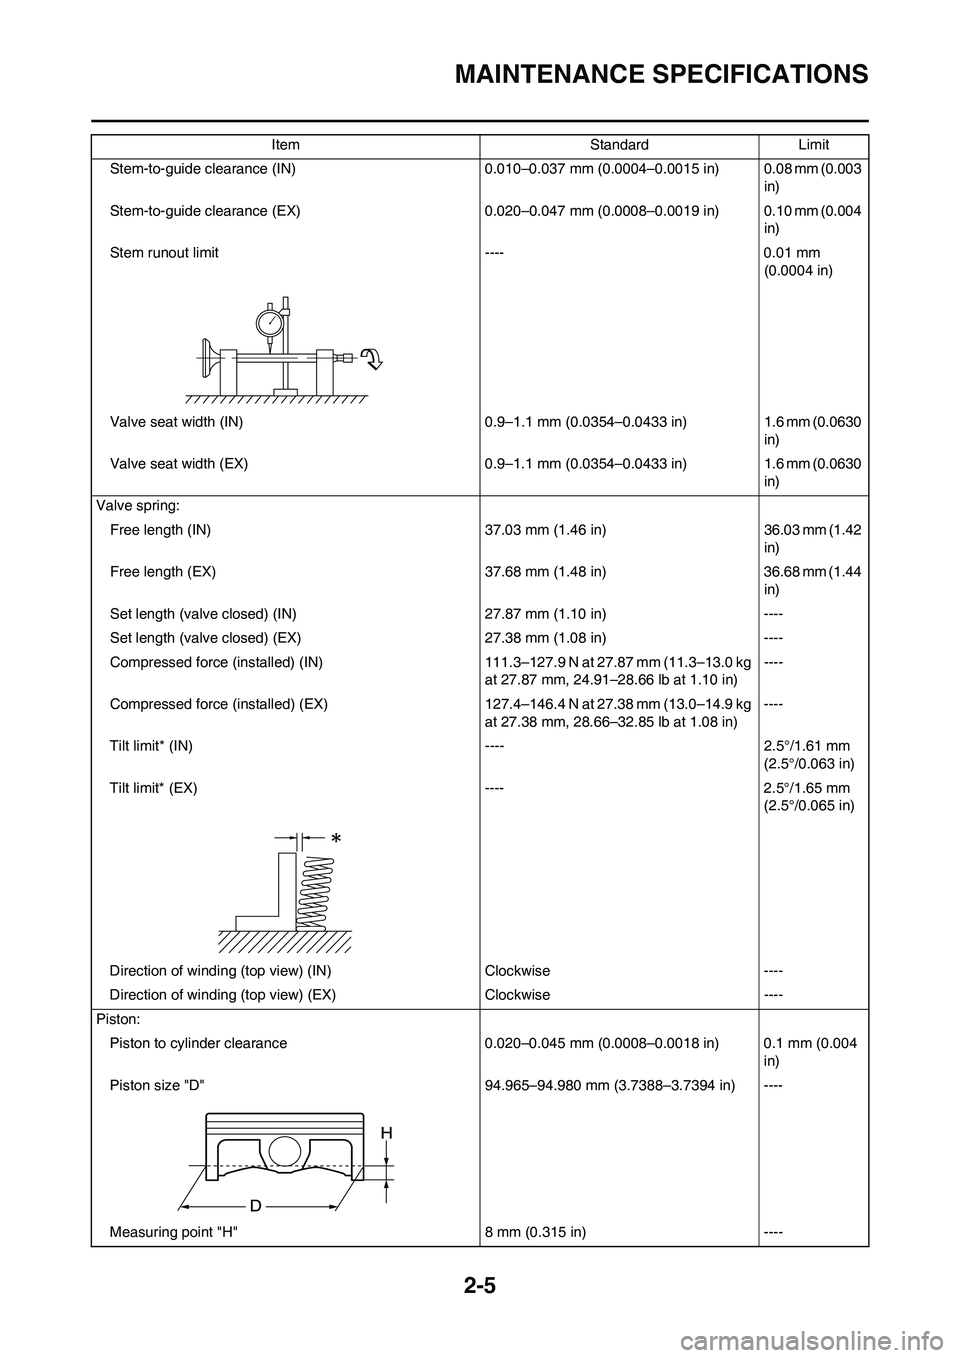
Stem runout limit ---- 0.01 mm
(0.0004 in)
Valve seat width (IN) 0.9–1.1 mm (0.0354–0.0433 in) 1.6 mm (0.0630
in)
Valve seat width (EX) 0.9–1.1 mm (0.0354–0.0433 in) 1.6 mm (0.0630
in)
Valve spring:
Free length (IN) 37.03 mm (1.46 in) 36.03 mm (1.42
in)
Free length (EX) 37.68 mm (1.48 in) 36.68 mm (1.44
in)
Set length (valve closed) (IN) 27.87 mm (1.10 in) ----
Set length (valve closed) (EX) 27.38 mm (1.08 in) ----
Compressed force (installed) (IN) 111.3–127.9 N at 27.87 mm (11.3–13.0 kg
at 27.87 mm, 24.91–28.66 lb at 1.10 in)----
Compressed force (installed) (EX) 127.4–146.4 N at 27.38 mm (13.0–14.9 kg
at 27.38 mm, 28.66–32.85 lb at 1.08 in)----
Tilt limit* (IN) ---- 2.5°/1.61 mm
(2.5°/0.063 in)
Tilt limit* (EX) ---- 2.5°/1.65 mm
(2.5°/0.065 in)
Direction of winding (top view) (IN) Clockwise ----
Direction of winding (top view) (EX) Clockwise ----
Piston:
Piston to cylinder clearance 0.020–0.045 mm (0.0008–0.0018 in) 0.1 mm (0.004
in)
Piston size "D" 94.965–94.980 mm (3.7388–3.7394 in) ----
Measuring point "H" 8 mm (0.315 in) ---- Item Standard Limit
Page 28 of 188

2-6
MAINTENANCE SPECIFICATIONS
Piston off-set 1 mm (0.0394 in) ----
Piston pin bore inside diameter 18.004–18.015 mm (0.7088–0.7093 in) 18.045 mm
(0.7104 in)
Piston pin outside diameter 17.991–18.000 mm (0.7083–0.7087 in) 17.971 mm
(0.7075 in)
Piston rings:
Top ring:
Type Barrel ----
Dimensions (B × T) 1.2 × 3.5 mm (0.05 × 0.14 in) ----
End gap (installed) 0.20–0.30 mm (0.008–0.012 in) 0.55 mm (0.022
in)
Side clearance (installed) 0.030–0.065 mm (0.0012–0.0026 in) 0.12 mm (0.005
in)
2nd ring:
Type Taper ----
Dimensions (B × T) 1.00 × 3.35 mm (0.04 × 0.13 in) ----
End gap (installed) 0.35–0.50 mm (0.014–0.020 in) 0.85 mm (0.033
in)
Side clearance 0.020–0.055 mm (0.0008–0.0022 in) 0.12 mm (0.005
in)
Oil ring:
Dimensions (B × T) 2.0 × 2.9 mm (0.08 × 0.11 in) ----
End gap (installed) 0.2–0.5 mm (0.01–0.02 in) ----
Crankshaft:
Crank width "A" 61.95–62.00 mm (2.439–2.441 in) ----
Runout limit "C" 0.03 mm (0.0012 in) 0.05 mm (0.002
in)
Big end side clearance "D" 0.15–0.45 mm (0.0059–0.0177 in) 0.50 mm (0.02
in)
Small end free play "F" 0.4–1.0 mm (0.02–0.04 in) 2.0 mm (0.08
in)
Balancer:
Balancer drive method Gear ----Item Standard Limit
Page 30 of 188
2-8
MAINTENANCE SPECIFICATIONS
CHASSISSide clearance 0.09–0.17 mm (0.0035–0.0067 in) 0.24 mm (0.009
in)
Housing and rotor clearance 0.03–0.10 mm (0.0012–0.0039 in) 0.17 mm (0.007
in)
Bypass valve setting pressure 40–80 kPa (0.4–0.8 kg/cm
2, 5.69–11.38
psi)----
Cooling:
Radiator core size
Width 120.2 mm (4.73 in) ----
Height 240 mm (9.45 in) ----
Thickness 22 mm (0.87 in) ----
Radiator cap opening pressure 110 kPa (1.1 kg/cm
2, 15.6 psi) ----
Radiator capacity (total) 0.56 L (0.49 Imp qt, 0.59 US qt) ----
Water pump
Type Single-suction centrifugal pump ----Item Standard Limit
Item Standard Limit
Steering system:
Steering bearing typeTaper roller bearing ----
Front suspension:
Front fork travel 300 mm (11.8 in) ----
Fork spring free length 454 mm (17.9 in) 449 mm (17.7
in)
Spring rate, STD K = 4.6 N/mm (0.469 kg/mm, 26.3 lb/in) ----
Optional spring Yes ----
Oil capacity 541 cm
3 (19.0 lmp oz, 18.3 US oz) ----
Oil grade Suspension oil "S1" ----
Inner tube outer diameter 48 mm (1.89 in) ----
Front fork top end 5 mm (0.20 in) ----
Rear suspension: USA, CDN, AUS, NZ,
ZAEUROPE
Shock absorber travel 131.5 mm (5.18 in)
←----
Spring free length Approx.275 mm (10.83
in)
←----
Fitting length
One I.D. mark 267 mm (10.51 in) 262 mm (10.31 in) ----
Two I.D. marks 273 mm (10.75 in) 268 mm (10.55 in) ----
Three I.D. marks 264.5 mm (10.41 in) 259.5 mm (10.22 in) ----
One I.D. mark 255.5–273.5 mm
(10.06–10.77 in)
←----
Two I.D. marks 261.5–279.5 mm
(10.30–11.00 in)
←----
Three I.D. marks 253.0–271.0 mm (9.96–
10.67 in)
←----
Spring rate, STD K = 54.0 N/mm (5.50 kg/
mm, 308.0 lb/in)
←----
Page 85 of 188
4-17
CAMSHAFTS
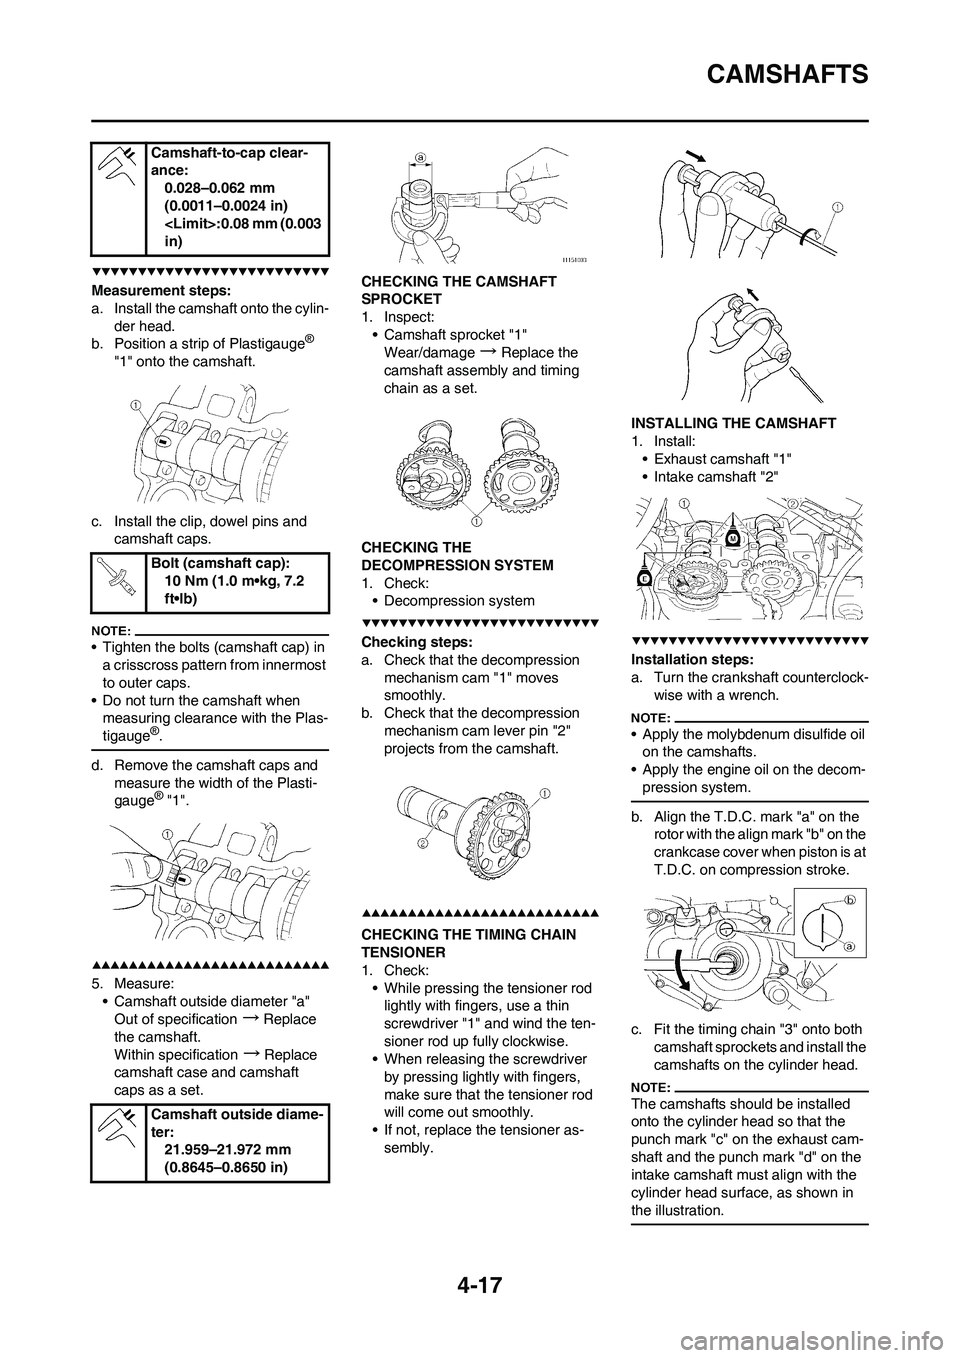
Measurement steps:
a. Install the camshaft onto the cylin-
der head.
b. Position a strip of Plastigauge
®
"1" onto the camshaft.
c. Install the clip, dowel pins and
camshaft caps.
• Tighten the bolts (camshaft cap) in
a crisscross pattern from innermost
to outer caps.
• Do not turn the camshaft when
measuring clearance with the Plas-
tigauge
®.
d. Remove the camshaft caps and
measure the width of the Plasti-
gauge
® "1".
5. Measure:
• Camshaft outside diameter "a"
Out of specification
→Replace
the camshaft.
Within specification
→Replace
camshaft case and camshaft
caps as a set.CHECKING THE CAMSHAFT
SPROCKET
1. Inspect:
• Camshaft sprocket "1"
Wear/damage
→Replace the
camshaft assembly and timing
chain as a set.
CHECKING THE
DECOMPRESSION SYSTEM
1. Check:
• Decompression system
Checking steps:
a. Check that the decompression
mechanism cam "1" moves
smoothly.
b. Check that the decompression
mechanism cam lever pin "2"
projects from the camshaft.
CHECKING THE TIMING CHAIN
TENSIONER
1. Check:
• While pressing the tensioner rod
lightly with fingers, use a thin
screwdriver "1" and wind the ten-
sioner rod up fully clockwise.
• When releasing the screwdriver
by pressing lightly with fingers,
make sure that the tensioner rod
will come out smoothly.
• If not, replace the tensioner as-
sembly.INSTALLING THE CAMSHAFT
1. Install:
• Exhaust camshaft "1"
• Intake camshaft "2"
Installation steps:
a. Turn the crankshaft counterclock-
wise with a wrench.
• Apply the molybdenum disulfide oil
on the camshafts.
• Apply the engine oil on the decom-
pression system.
b. Align the T.D.C. mark "a" on the
rotor with the align mark "b" on the
crankcase cover when piston is at
T.D.C. on compression stroke.
c. Fit the timing chain "3" onto both
camshaft sprockets and install the
camshafts on the cylinder head.
The camshafts should be installed
onto the cylinder head so that the
punch mark "c" on the exhaust cam-
shaft and the punch mark "d" on the
intake camshaft must align with the
cylinder head surface, as shown in
the illustration.
Camshaft-to-cap clear-
ance:
0.028–0.062 mm
(0.0011–0.0024 in)
in)
Bolt (camshaft cap):
10 Nm (1.0 m•kg, 7.2
ft•lb)
Camshaft outside diame-
ter:
21.959–21.972 mm
(0.8645–0.8650 in)
Page 91 of 188
4-23
VALVES AND VALVE SPRINGS
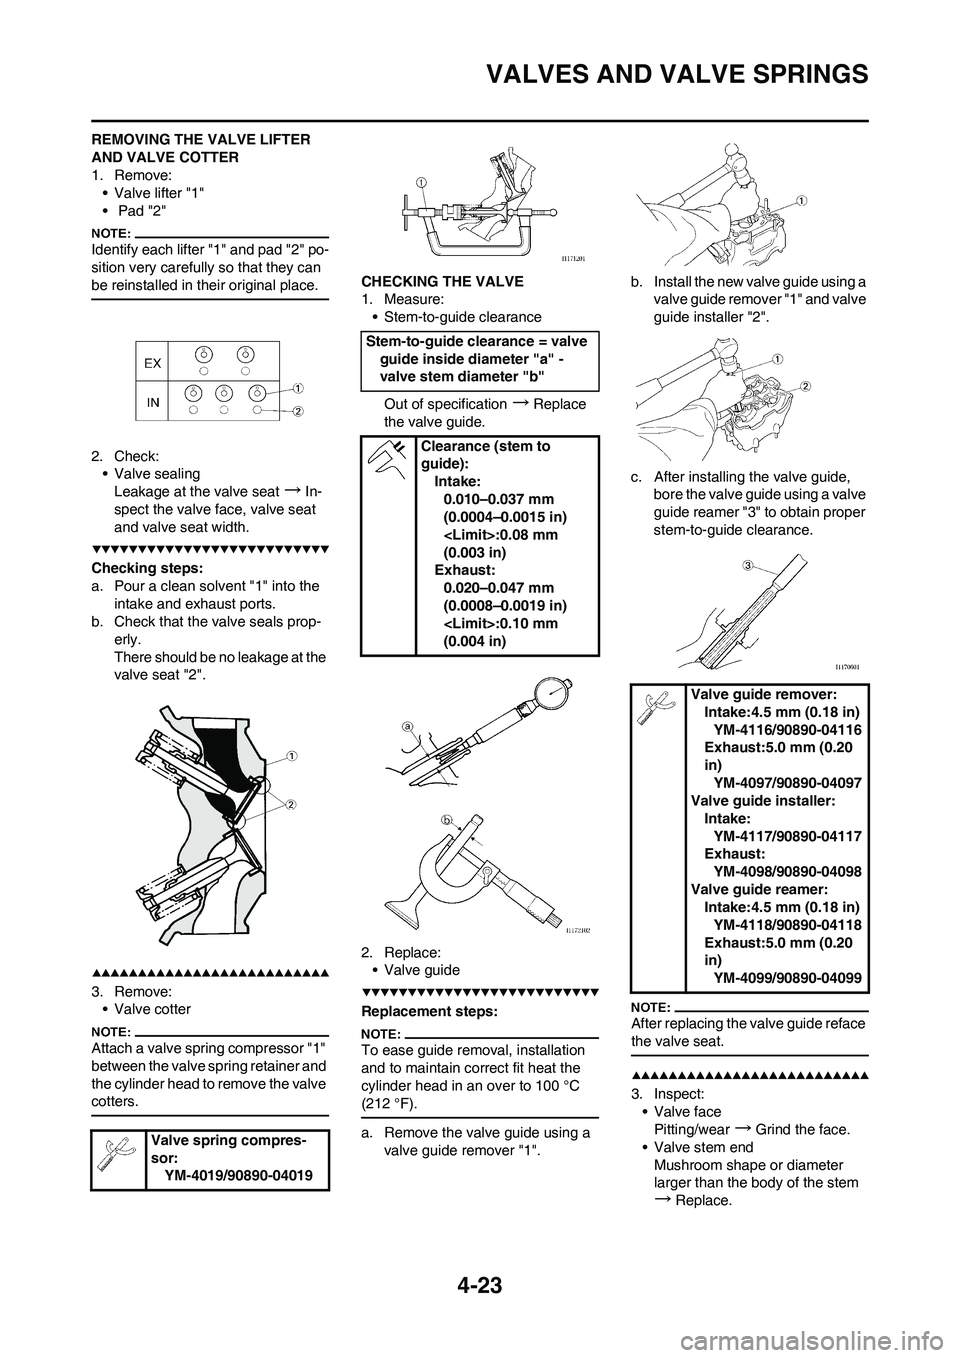
REMOVING THE VALVE LIFTER
AND VALVE COTTER
1. Remove:
• Valve lifter "1"
• Pad "2"
Identify each lifter "1" and pad "2" po-
sition very carefully so that they can
be reinstalled in their original place.
2. Check:
• Valve sealing
Leakage at the valve seat
→In-
spect the valve face, valve seat
and valve seat width.
Checking steps:
a. Pour a clean solvent "1" into the
intake and exhaust ports.
b. Check that the valve seals prop-
erly.
There should be no leakage at the
valve seat "2".
3. Remove:
• Valve cotter
Attach a valve spring compressor "1"
between the valve spring retainer and
the cylinder head to remove the valve
cotters.
CHECKING THE VALVE
1. Measure:
• Stem-to-guide clearance
Out of specification
→Replace
the valve guide.
2. Replace:
• Valve guide
Replacement steps:
To ease guide removal, installation
and to maintain correct fit heat the
cylinder head in an over to 100 °C
(212 °F).
a. Remove the valve guide using a
valve guide remover "1".b. Install the new valve guide using a
valve guide remover "1" and valve
guide installer "2".
c. After installing the valve guide,
bore the valve guide using a valve
guide reamer "3" to obtain proper
stem-to-guide clearance.
After replacing the valve guide reface
the valve seat.
3. Inspect:
• Valve face
Pitting/wear
→Grind the face.
• Valve stem end
Mushroom shape or diameter
larger than the body of the stem
→Replace. Valve spring compres-
sor:
YM-4019/90890-04019
Stem-to-guide clearance = valve
guide inside diameter "a" -
valve stem diameter "b"
Clearance (stem to
guide):
Intake:
0.010–0.037 mm
(0.0004–0.0015 in)
(0.003 in)
Exhaust:
0.020–0.047 mm
(0.0008–0.0019 in)
(0.004 in)
Valve guide remover:
Intake:4.5 mm (0.18 in)
YM-4116/90890-04116
Exhaust:5.0 mm (0.20
in)
YM-4097/90890-04097
Valve guide installer:
Intake:
YM-4117/90890-04117
Exhaust:
YM-4098/90890-04098
Valve guide reamer:
Intake:4.5 mm (0.18 in)
YM-4118/90890-04118
Exhaust:5.0 mm (0.20
in)
YM-4099/90890-04099
Page 92 of 188
4-24
VALVES AND VALVE SPRINGS
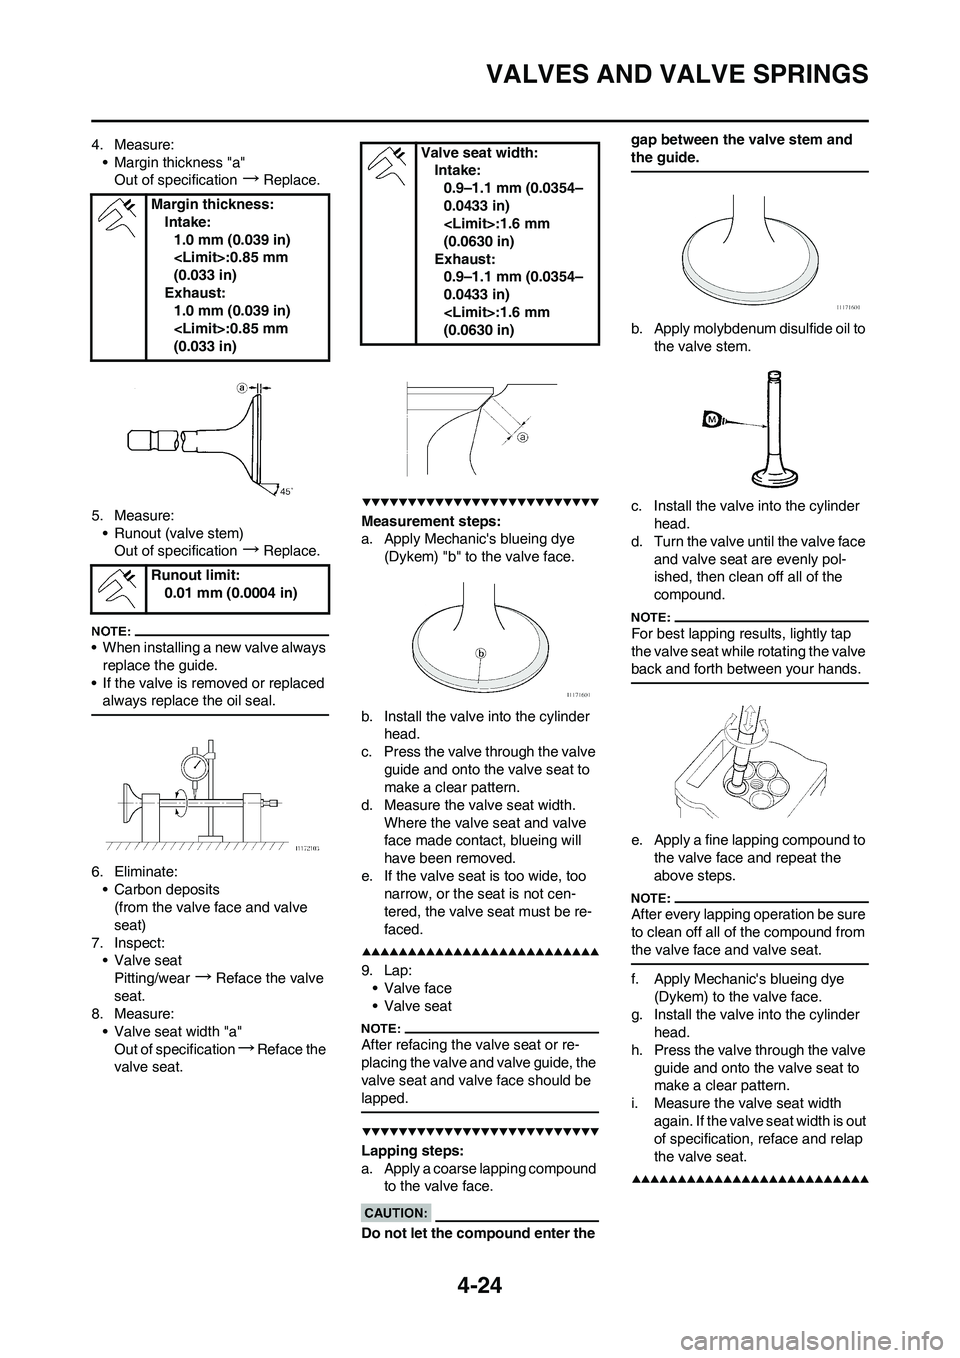
4. Measure:
• Margin thickness "a"
Out of specification
→Replace.
5. Measure:
• Runout (valve stem)
Out of specification
→Replace.
• When installing a new valve always
replace the guide.
• If the valve is removed or replaced
always replace the oil seal.
6. Eliminate:
• Carbon deposits
(from the valve face and valve
seat)
7. Inspect:
• Valve seat
Pitting/wear
→Reface the valve
seat.
8. Measure:
• Valve seat width "a"
Out of specification
→Reface the
valve seat.
Measurement steps:
a. Apply Mechanic's blueing dye
(Dykem) "b" to the valve face.
b. Install the valve into the cylinder
head.
c. Press the valve through the valve
guide and onto the valve seat to
make a clear pattern.
d. Measure the valve seat width.
Where the valve seat and valve
face made contact, blueing will
have been removed.
e. If the valve seat is too wide, too
narrow, or the seat is not cen-
tered, the valve seat must be re-
faced.
9. Lap:
• Valve face
• Valve seat
After refacing the valve seat or re-
placing the valve and valve guide, the
valve seat and valve face should be
lapped.
Lapping steps:
a. Apply a coarse lapping compound
to the valve face.
Do not let the compound enter the gap between the valve stem and
the guide.
b. Apply molybdenum disulfide oil to
the valve stem.
c. Install the valve into the cylinder
head.
d. Turn the valve until the valve face
and valve seat are evenly pol-
ished, then clean off all of the
compound.
For best lapping results, lightly tap
the valve seat while rotating the valve
back and forth between your hands.
e. Apply a fine lapping compound to
the valve face and repeat the
above steps.
After every lapping operation be sure
to clean off all of the compound from
the valve face and valve seat.
f. Apply Mechanic's blueing dye
(Dykem) to the valve face.
g. Install the valve into the cylinder
head.
h. Press the valve through the valve
guide and onto the valve seat to
make a clear pattern.
i. Measure the valve seat width
again. If the valve seat width is out
of specification, reface and relap
the valve seat.
Margin thickness:
Intake:
1.0 mm (0.039 in)
(0.033 in)
Exhaust:
1.0 mm (0.039 in)
(0.033 in)
Runout limit:
0.01 mm (0.0004 in)
Valve seat width:
Intake:
0.9–1.1 mm (0.0354–
0.0433 in)
(0.0630 in)
Exhaust:
0.9–1.1 mm (0.0354–
0.0433 in)
(0.0630 in)
Page 103 of 188
4-35
OIL FILTER ELEMENT AND WATER PUMP
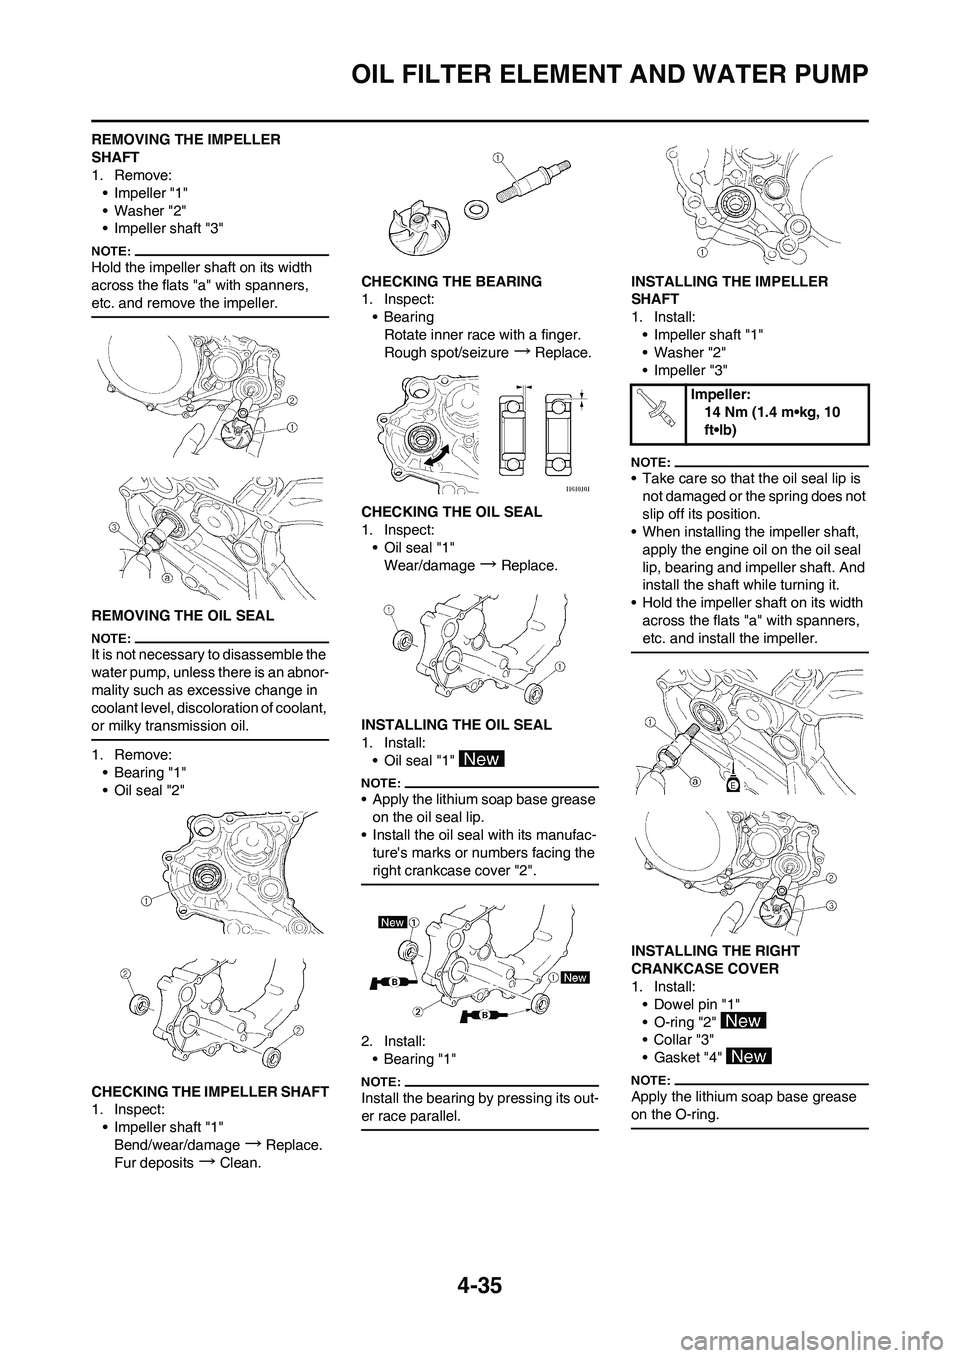
REMOVING THE IMPELLER
SHAFT
1. Remove:
• Impeller "1"
• Washer "2"
• Impeller shaft "3"
Hold the impeller shaft on its width
across the flats "a" with spanners,
etc. and remove the impeller.
REMOVING THE OIL SEAL
It is not necessary to disassemble the
water pump, unless there is an abnor-
mality such as excessive change in
coolant level, discoloration of coolant,
or milky transmission oil.
1. Remove:
• Bearing "1"
• Oil seal "2"
CHECKING THE IMPELLER SHAFT
1. Inspect:
• Impeller shaft "1"
Bend/wear/damage
→Replace.
Fur deposits
→Clean.CHECKING THE BEARING
1. Inspect:
•Bearing
Rotate inner race with a finger.
Rough spot/seizure
→Replace.
CHECKING THE OIL SEAL
1. Inspect:
• Oil seal "1"
Wear/damage
→Replace.
INSTALLING THE OIL SEAL
1. Install:
• Oil seal "1"
• Apply the lithium soap base grease
on the oil seal lip.
• Install the oil seal with its manufac-
ture's marks or numbers facing the
right crankcase cover "2".
2. Install:
•Bearing "1"
Install the bearing by pressing its out-
er race parallel.
INSTALLING THE IMPELLER
SHAFT
1. Install:
• Impeller shaft "1"
• Washer "2"
• Impeller "3"
• Take care so that the oil seal lip is
not damaged or the spring does not
slip off its position.
• When installing the impeller shaft,
apply the engine oil on the oil seal
lip, bearing and impeller shaft. And
install the shaft while turning it.
• Hold the impeller shaft on its width
across the flats "a" with spanners,
etc. and install the impeller.
INSTALLING THE RIGHT
CRANKCASE COVER
1. Install:
• Dowel pin "1"
• O-ring "2"
•Collar "3"
• Gasket "4"
Apply the lithium soap base grease
on the O-ring.
Impeller:
14 Nm (1.4 m•kg, 10
ft•lb)
Page 125 of 188
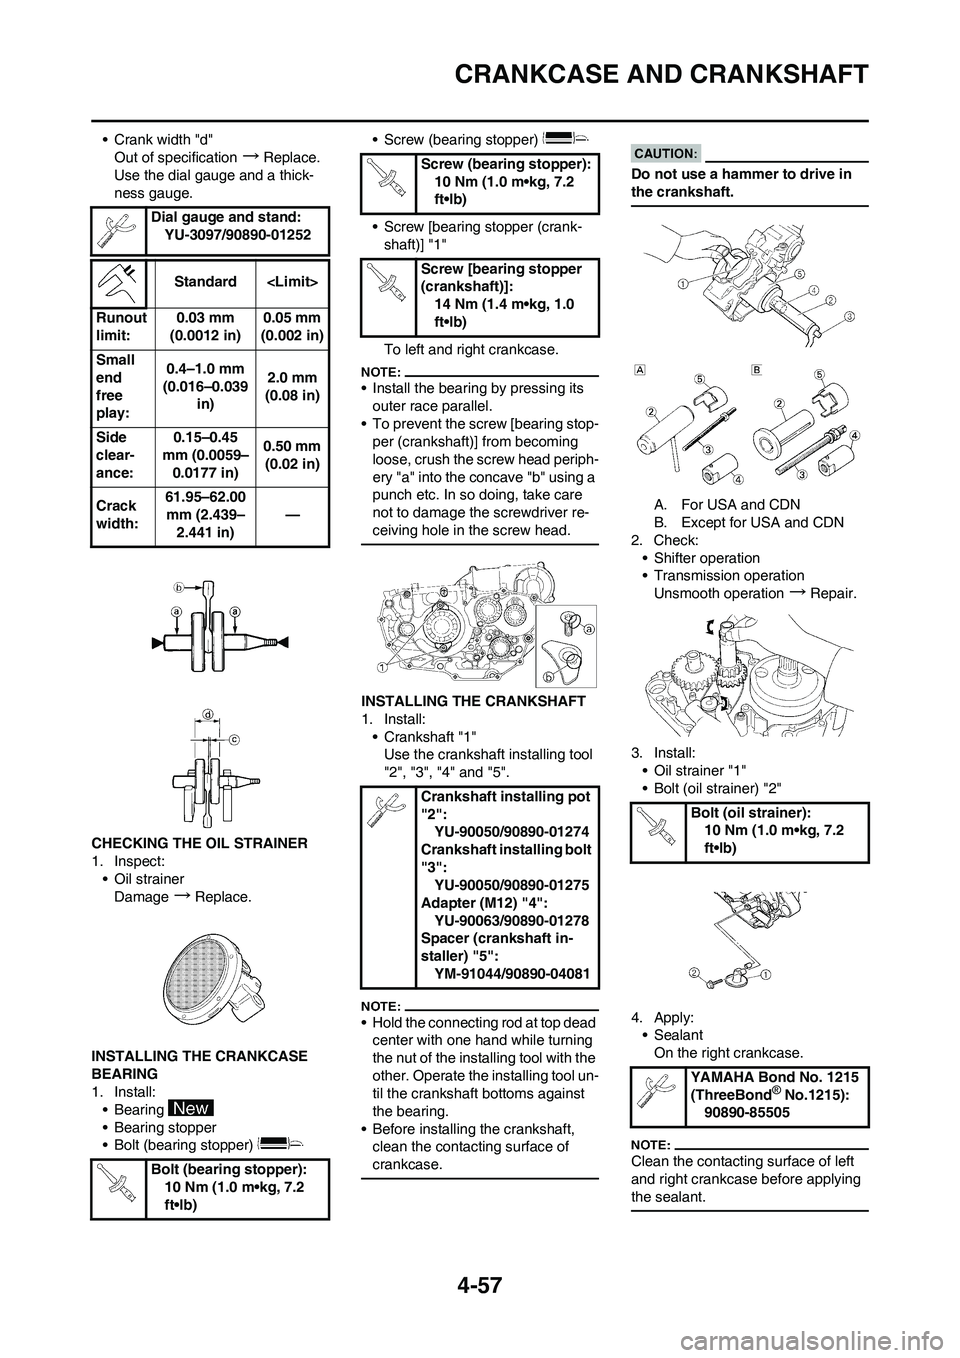
4-57
CRANKCASE AND CRANKSHAFT
• Crank width "d"
Out of specification
→Replace.
Use the dial gauge and a thick-
ness gauge.
CHECKING THE OIL STRAINER
1. Inspect:
• Oil strainer
Damage
→Replace.
INSTALLING THE CRANKCASE
BEARING
1. Install:
• Bearing
• Bearing stopper
• Bolt (bearing stopper) • Screw (bearing stopper)
• Screw [bearing stopper (crank-
shaft)] "1"
To left and right crankcase.
• Install the bearing by pressing its
outer race parallel.
• To prevent the screw [bearing stop-
per (crankshaft)] from becoming
loose, crush the screw head periph-
ery "a" into the concave "b" using a
punch etc. In so doing, take care
not to damage the screwdriver re-
ceiving hole in the screw head.
INSTALLING THE CRANKSHAFT
1. Install:
• Crankshaft "1"
Use the crankshaft installing tool
"2", "3", "4" and "5".
• Hold the connecting rod at top dead
center with one hand while turning
the nut of the installing tool with the
other. Operate the installing tool un-
til the crankshaft bottoms against
the bearing.
• Before installing the crankshaft,
clean the contacting surface of
crankcase.
Do not use a hammer to drive in
the crankshaft.
A. For USA and CDN
B. Except for USA and CDN
2. Check:
• Shifter operation
• Transmission operation
Unsmooth operation
→Repair.
3. Install:
• Oil strainer "1"
• Bolt (oil strainer) "2"
4. Apply:
• Sealant
On the right crankcase.
Clean the contacting surface of left
and right crankcase before applying
the sealant.
Dial gauge and stand:
YU-3097/90890-01252
Standard
Runout
limit:0.03 mm
(0.0012 in)0.05 mm
(0.002 in)
Small
end
free
play:0.4–1.0 mm
(0.016–0.039
in)2.0 mm
(0.08 in)
Side
clear-
ance:0.15–0.45
mm (0.0059–
0.0177 in)0.50 mm
(0.02 in)
Crack
width:61.95–62.00
mm (2.439–
2.441 in)—
Bolt (bearing stopper):
10 Nm (1.0 m•kg, 7.2
ft•lb)
Screw (bearing stopper):
10 Nm (1.0 m•kg, 7.2
ft•lb)
Screw [bearing stopper
(crankshaft)]:
14 Nm (1.4 m•kg, 1.0
ft•lb)
Crankshaft installing pot
"2":
YU-90050/90890-01274
Crankshaft installing bolt
"3":
YU-90050/90890-01275
Adapter (M12) "4":
YU-90063/90890-01278
Spacer (crankshaft in-
staller) "5":
YM-91044/90890-04081
Bolt (oil strainer):
10 Nm (1.0 m•kg, 7.2
ft•lb)
YAMAHA Bond No. 1215
(ThreeBond
® No.1215):
90890-85505