clutch YAMAHA YZ450F 2011 Owners Manual
[x] Cancel search | Manufacturer: YAMAHA, Model Year: 2011, Model line: YZ450F, Model: YAMAHA YZ450F 2011Pages: 230, PDF Size: 14.09 MB
Page 10 of 230
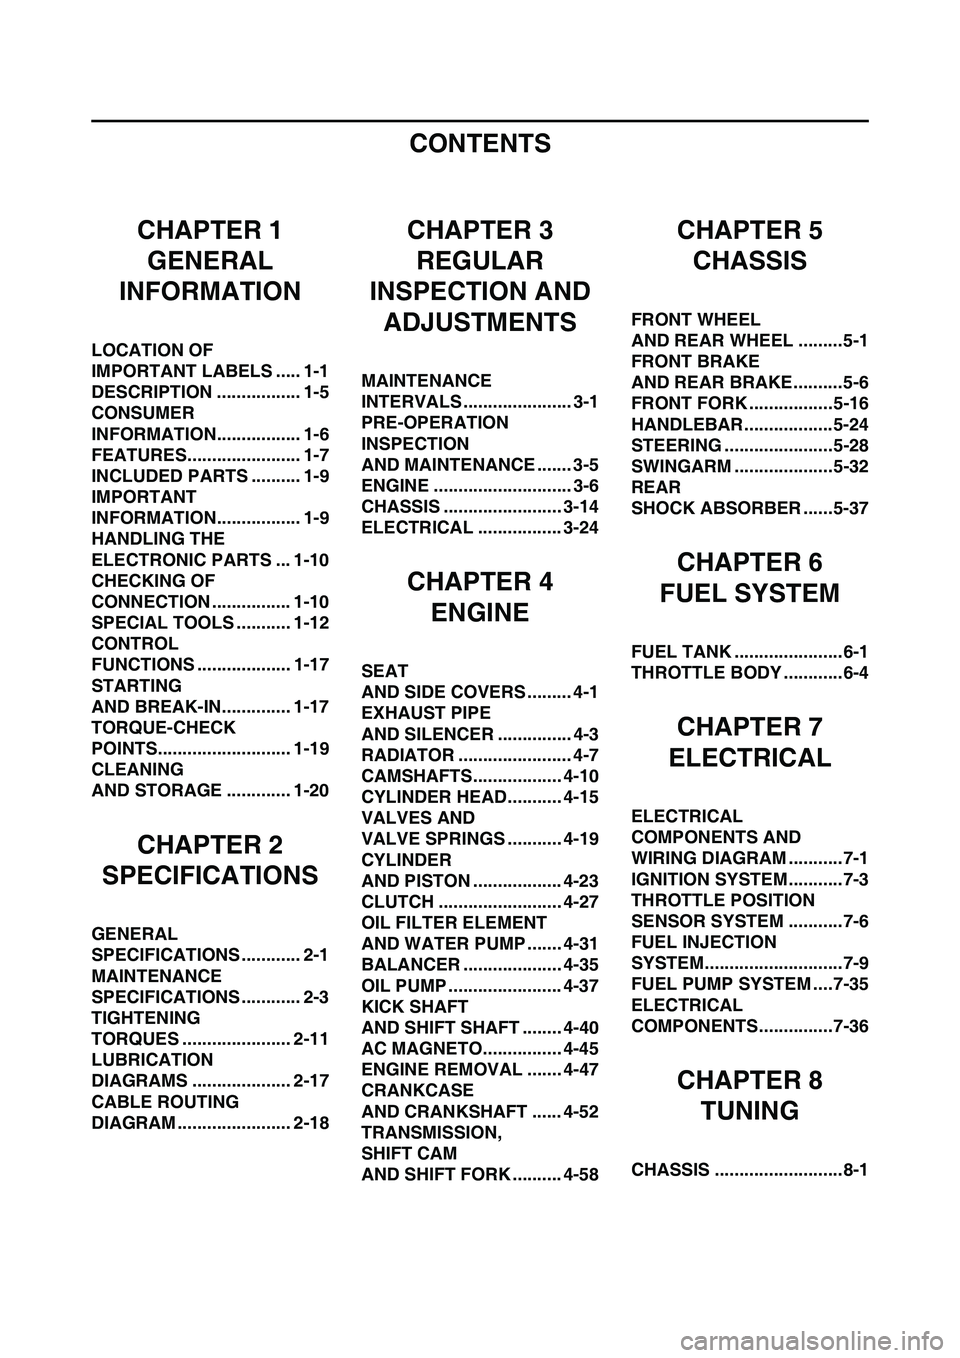
CONTENTS
CHAPTER 1
GENERAL
INFORMATION
LOCATION OF
IMPORTANT LABELS ..... 1-1
DESCRIPTION ................. 1-5
CONSUMER
INFORMATION................. 1-6
FEATURES....................... 1-7
INCLUDED PARTS .......... 1-9
IMPORTANT
INFORMATION................. 1-9
HANDLING THE
ELECTRONIC PARTS ... 1-10
CHECKING OF
CONNECTION ................ 1-10
SPECIAL TOOLS ........... 1-12
CONTROL
FUNCTIONS ................... 1-17
STARTING
AND BREAK-IN.............. 1-17
TORQUE-CHECK
POINTS........................... 1-19
CLEANING
AND STORAGE ............. 1-20
CHAPTER 2
SPECIFICATIONS
GENERAL
SPECIFICATIONS ............ 2-1
MAINTENANCE
SPECIFICATIONS ............ 2-3
TIGHTENING
TORQUES ...................... 2-11
LUBRICATION
DIAGRAMS .................... 2-17
CABLE ROUTING
DIAGRAM ....................... 2-18
CHAPTER 3
REGULAR
INSPECTION AND
ADJUSTMENTS
MAINTENANCE
INTERVALS ...................... 3-1
PRE-OPERATION
INSPECTION
AND MAINTENANCE ....... 3-5
ENGINE ............................ 3-6
CHASSIS ........................ 3-14
ELECTRICAL ................. 3-24
CHAPTER 4
ENGINE
SEAT
AND SIDE COVERS ......... 4-1
EXHAUST PIPE
AND SILENCER ............... 4-3
RADIATOR ....................... 4-7
CAMSHAFTS.................. 4-10
CYLINDER HEAD........... 4-15
VALVES AND
VALVE SPRINGS ........... 4-19
CYLINDER
AND PISTON .................. 4-23
CLUTCH ......................... 4-27
OIL FILTER ELEMENT
AND WATER PUMP ....... 4-31
BALANCER .................... 4-35
OIL PUMP ....................... 4-37
KICK SHAFT
AND SHIFT SHAFT ........ 4-40
AC MAGNETO................ 4-45
ENGINE REMOVAL ....... 4-47
CRANKCASE
AND CRANKSHAFT ...... 4-52
TRANSMISSION,
SHIFT CAM
AND SHIFT FORK .......... 4-58
CHAPTER 5
CHASSIS
FRONT WHEEL
AND REAR WHEEL .........5-1
FRONT BRAKE
AND REAR BRAKE..........5-6
FRONT FORK .................5-16
HANDLEBAR..................5-24
STEERING ......................5-28
SWINGARM ....................5-32
REAR
SHOCK ABSORBER ......5-37
CHAPTER 6
FUEL SYSTEM
FUEL TANK ......................6-1
THROTTLE BODY ............6-4
CHAPTER 7
ELECTRICAL
ELECTRICAL
COMPONENTS AND
WIRING DIAGRAM ...........7-1
IGNITION SYSTEM...........7-3
THROTTLE POSITION
SENSOR SYSTEM ...........7-6
FUEL INJECTION
SYSTEM............................7-9
FUEL PUMP SYSTEM ....7-35
ELECTRICAL
COMPONENTS...............7-36
CHAPTER 8
TUNING
CHASSIS ..........................8-1
Page 15 of 230
1-5
DESCRIPTION
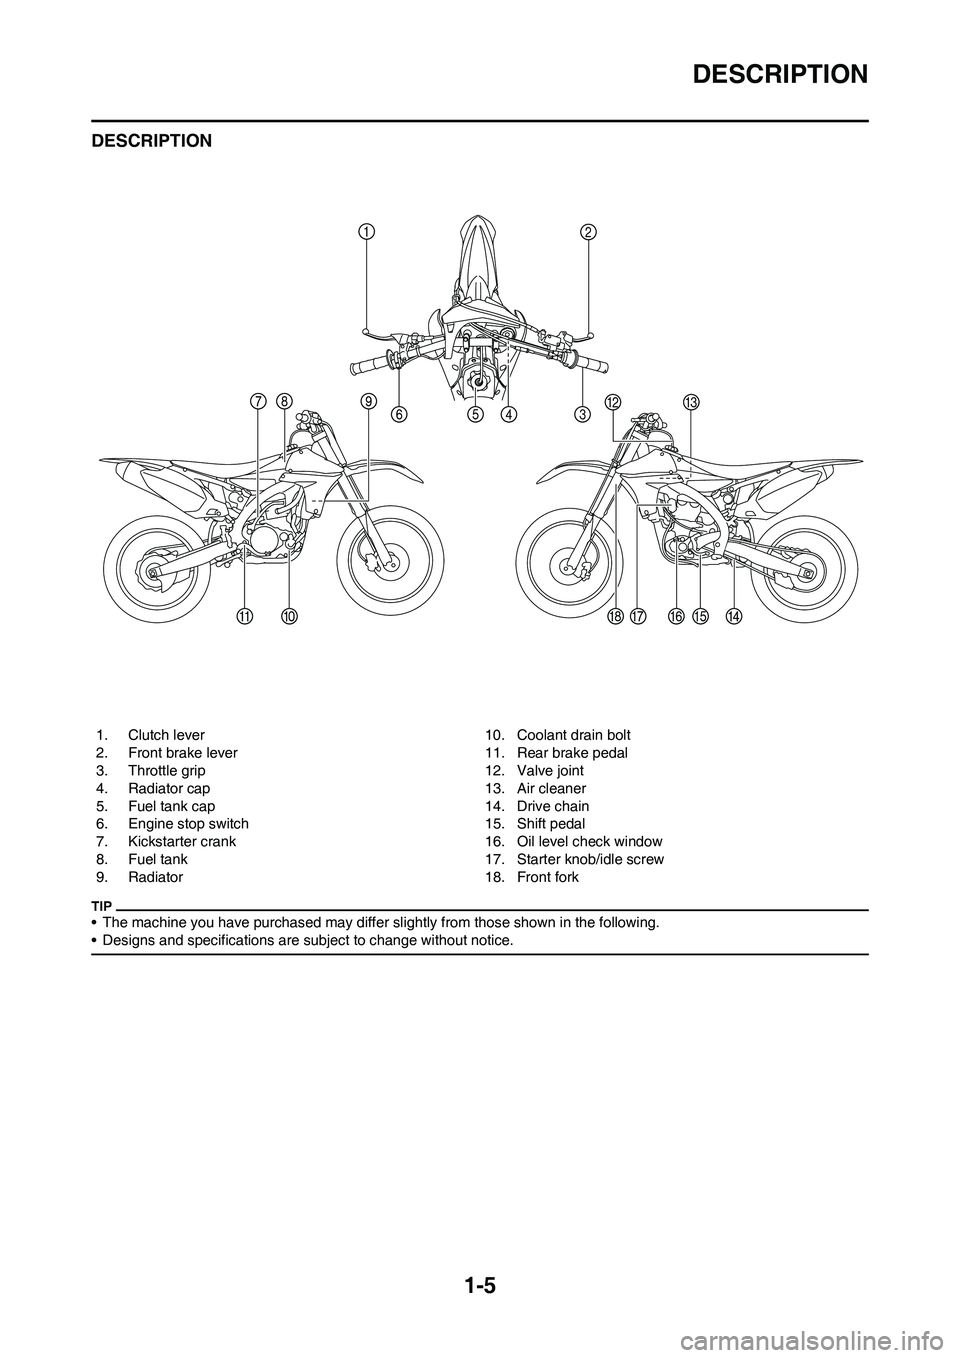
DESCRIPTION
• The machine you have purchased may differ slightly from those shown in the following.
• Designs and specifications are subject to change without notice.
1. Clutch lever
2. Front brake lever
3. Throttle grip
4. Radiator cap
5. Fuel tank cap
6. Engine stop switch
7. Kickstarter crank
8. Fuel tank
9. Radiator10. Coolant drain bolt
11. Rear brake pedal
12. Valve joint
13. Air cleaner
14. Drive chain
15. Shift pedal
16. Oil level check window
17. Starter knob/idle screw
18. Front fork
Page 24 of 230
1-14
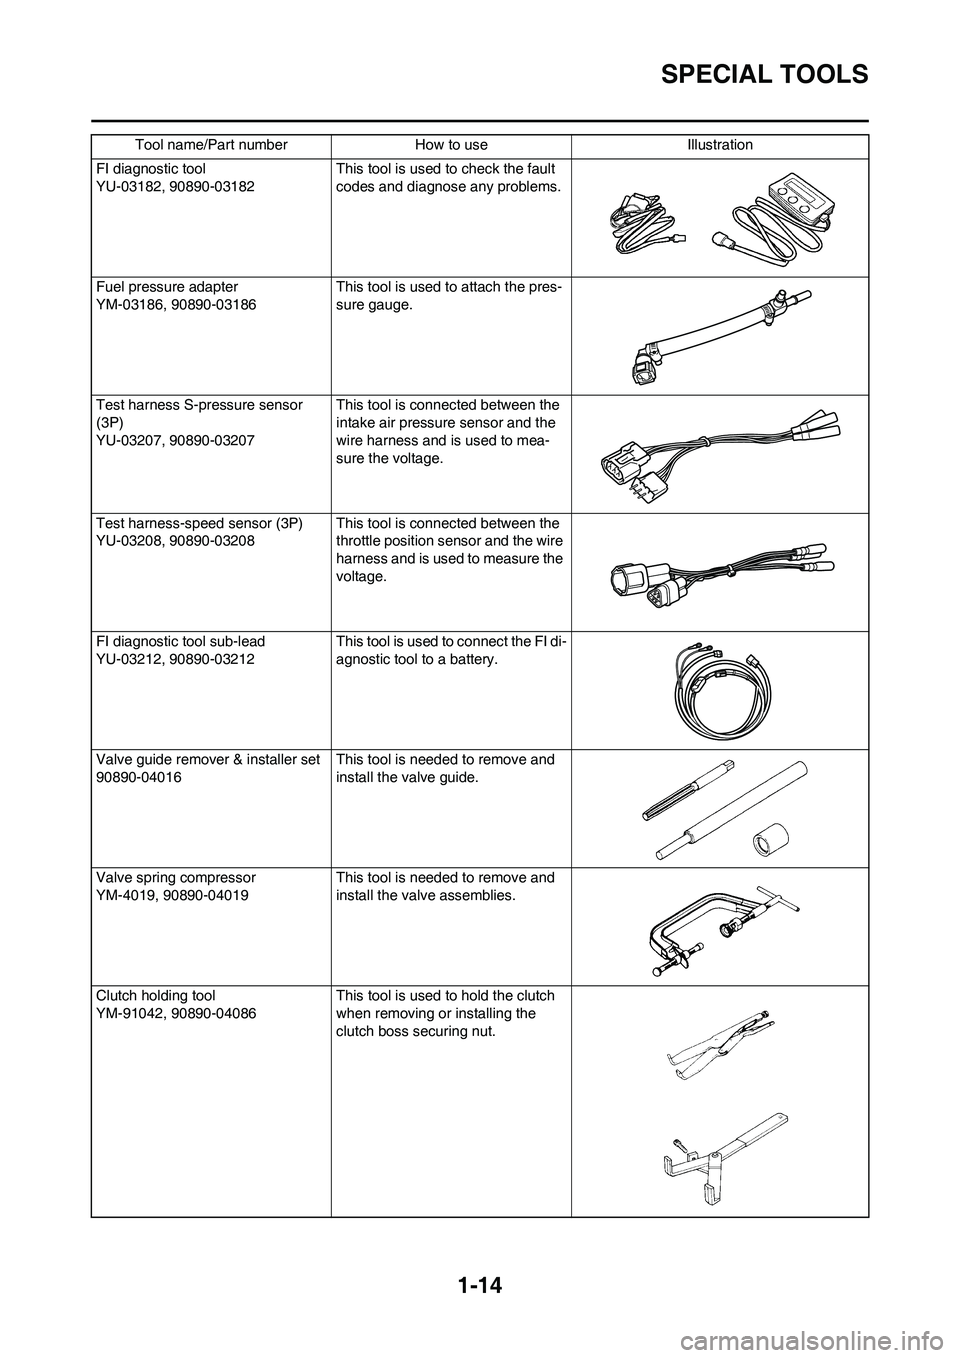
SPECIAL TOOLS
FI diagnostic tool
YU-03182, 90890-03182This tool is used to check the fault
codes and diagnose any problems.
Fuel pressure adapter
YM-03186, 90890-03186This tool is used to attach the pres-
sure gauge.
Test harness S-pressure sensor
(3P)
YU-03207, 90890-03207This tool is connected between the
intake air pressure sensor and the
wire harness and is used to mea-
sure the voltage.
Test harness-speed sensor (3P)
YU-03208, 90890-03208This tool is connected between the
throttle position sensor and the wire
harness and is used to measure the
voltage.
FI diagnostic tool sub-lead
YU-03212, 90890-03212This tool is used to connect the FI di-
agnostic tool to a battery.
Valve guide remover & installer set
90890-04016This tool is needed to remove and
install the valve guide.
Valve spring compressor
YM-4019, 90890-04019This tool is needed to remove and
install the valve assemblies.
Clutch holding tool
YM-91042, 90890-04086This tool is used to hold the clutch
when removing or installing the
clutch boss securing nut. Tool name/Part number How to use Illustration
Page 27 of 230

1-17
CONTROL FUNCTIONS
CONTROL FUNCTIONS
ENGINE STOP SWITCH
The engine stop switch "1" is located
on the left handlebar. Continue push-
ing the engine stop switch till the en-
gine comes to a stop.
CLUTCH LEVER
The clutch lever "1" is located on the
left handlebar; it disengages or en-
gages the clutch. Pull the clutch lever
to the handlebar to disengage the
clutch, and release the lever to en-
gage the clutch. The lever should be
pulled rapidly and released slowly for
smooth starts.
SHIFT PEDAL
The gear ratios of the constant-mesh
5 speed transmission are ideally
spaced. The gears can be shifted by
using the shift pedal "1" on the left
side of the engine.
KICKSTARTER CRANK
Rotate the kickstarter crank "1" away
from the engine. Push the starter
down lightly with your foot until the
gears engage, then kick smoothly
and forcefully to start the engine. This
model has a primary kickstarter crank
so the engine can be started in any
gear if the clutch is disengaged. In
normal practices, however, shift to
neutral before starting.THROTTLE GRIP
The throttle grip "1" is located on the
right handlebar; it accelerates or de-
celerates the engine. For accelera-
tion, turn the grip toward you; for
deceleration, turn it away from you.
FRONT BRAKE LEVER
The front brake lever "1" is located on
the right handlebar. Pull it toward the
handlebar to activate the front brake.
REAR BRAKE PEDAL
The rear brake pedal "1" is located on
the right side of the machine. Press
down on the brake pedal to activate
the rear brake.
STARTER KNOB/IDLE SCREW
The starter knob/idle screw "1" is
used when starting a cold engine.
Pull the starter knob/idle screw out to
open the circuit for starting. When the
engine has warmed up, push it in to
close the circuit.
STARTING AND BREAK-IN
FUEL
Always use the recommended fuel as
stated below. Also, be sure to use
new gasoline the day of a race.
Use only unleaded gasoline. The
use of leaded gasoline will cause
severe damage to the engine inter-
nal parts such as valves, piston
rings, and exhaust system, etc.
Your Yamaha engine has been de-
signed to use premium unleaded gas-
oline with a pump octane number
[(R+M)/2] of 91 or higher, or a re-
search octane number of 95 or high-
er. If knocking (or pinging) occurs,
use a gasoline of a different brand.
• For refueling, be sure to stop the
engine and use enough care not
to spill any fuel. Also be sure to
avoid refueling close to a fire.
• Refuel after the engine, exhaust
pipe, etc. have cooled off.
Gasohol (For USA and Canada)
There are two types of gasohol: gas-
ohol containing ethanol and that con-
taining methanol. Gasohol containing
ethanol can be used if the ethanol
content does not exceed 10%. Gaso-
hol containing methanol is not recom-
mended by Yamaha because it can
cause damage to the fuel system or
vehicle performance problems.
HANDLING NOTE
Never start or run the engine in a
closed area. The exhaust fumes
are poisonous; they can cause
loss of consciousness and death
in a very short time. Always oper-
ate the machine in a well-ventilated
area.
Recommended fuel:
Premium unleaded
gasoline only
Page 32 of 230
2-2
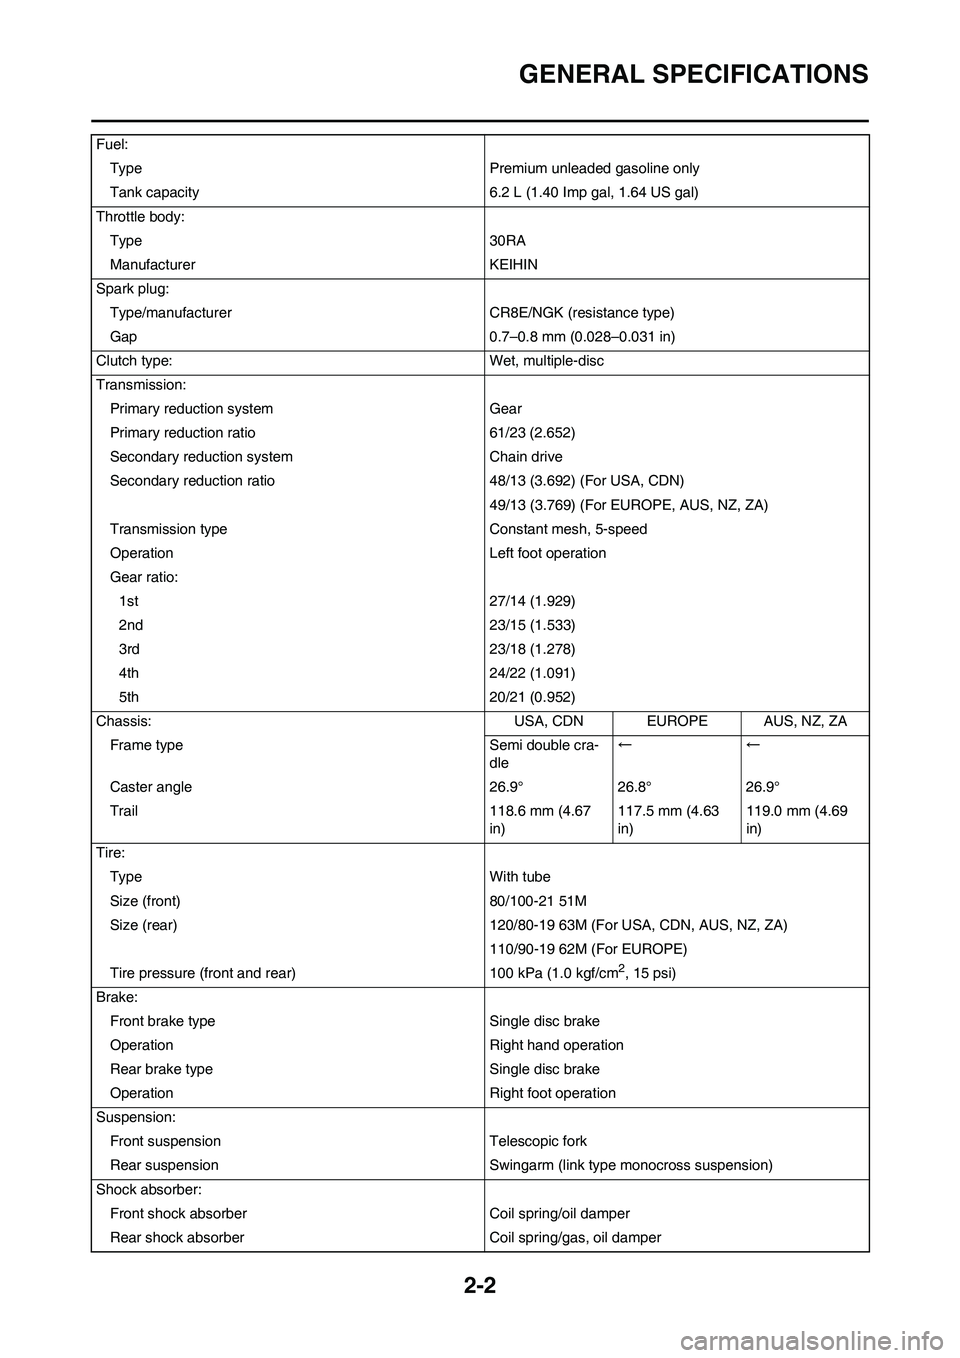
GENERAL SPECIFICATIONS
Fuel:Type Premium unleaded gasoline only
Tank capacity 6.2 L (1.40 Imp gal, 1.64 US gal)
Throttle body: Type 30RA
Manufacturer KEIHIN
Spark plug: Type/manufacturer CR8E/NGK (resistance type)
Gap 0.7–0.8 mm (0.028–0.031 in)
Clutch type: Wet, multiple-disc
Transmission: Primary reduction system Gear
Primary reduction ratio 61/23 (2.652)
Secondary reduction system Chain drive
Secondary reduction ratio 48/13 (3.692) (For USA, CDN)
49/13 (3.769) (For EUROPE, AUS, NZ, ZA)
Transmission type Constant mesh, 5-speed
Operation Left foot operation
Gear ratio: 1st 27/14 (1.929)
2nd 23/15 (1.533)
3rd 23/18 (1.278)
4th 24/22 (1.091)
5th 20/21 (0.952)
Chassis: USA, CDN EUROPE AUS, NZ, ZA Frame type Semi double cra- dle←←
Caster angle 26.9° 26.8° 26.9°
Trail 118.6 mm (4.67 in)117.5 mm (4.63
in)119.0 mm (4.69
in)
Tire: Type With tube
Size (front) 80/100-21 51M
Size (rear) 120/80-19 63M (F or USA, CDN, AUS, NZ, ZA)
110/90-19 62M (For EUROPE)
Tire pressure (front and rear) 100 kPa (1.0 kgf/cm
2, 15 psi)
Brake: Front brake type Single disc brake
Operation Right hand operation
Rear brake type Single disc brake
Operation Right foot operation
Suspension: Front suspension Telescopic fork
Rear suspension Swingarm (link type monocross suspension)
Shock absorber: Front shock absorber Coil spring/oil damper
Rear shock absorber Coil spring/gas, oil damper
Page 37 of 230

2-7
MAINTENANCE SPECIFICATIONS
Crankshaft:
Crank width "A" 61.95–62.00 mm (2.439–2.441 in) ----
Runout limit "C" 0.03 mm (0.0012 in) 0.05 mm (0.002
in)
Big end side clearance "D" 0.15–0.45 mm (0.0059–0.0177 in) 0.50 mm (0.02
in)
Small end free play "F" 0.4–1.0 mm (0.02–0.04 in) 2.0 mm (0.08
in)
Balancer:
Balancer drive method Gear ----
Air filter oil grade: Foam-air-filter oil or equivalent oil ----
Clutch:
Friction plate thickness 2.92–3.08 mm (0.115–0.121 in) 2.8 mm (0.110
in)
Quantity 8 ----
Clutch plate thickness 1.5–1.7 mm (0.059–0.067 in) ----
Quantity 7 ----
Warp limit ---- 0.1 mm (0.004
in)
Clutch spring free length 50.0 mm (1.97 in) 49.0 mm (1.93
in)
Quantity 6 ----
Clutch housing thrust clearance 0.10–0.35 mm (0.0039–0.0138 in) ----
Clutch housing radial clearance 0.010–0.044 mm (0.0004–0.0017 in) ----
Clutch release method Inner push, cam push ----
Shifter:
Shifter type Cam drum and guide bar ----
Guide bar bending limit ---- 0.05 mm (0.002
in)
Kickstarter:
Type Kick and ratchet type ----
Fuel pump:
Fuel pressure 324 kPa (3.24 kg/cm
2, 46.1 psi) ----
Fuel injector:----
Model/manufacturer 1010/DENSO ----
Throttle body:----
I. D. mark 33D1 00 ----
Manufacturer KEIHIN ----Item Standard Limit
Page 40 of 230
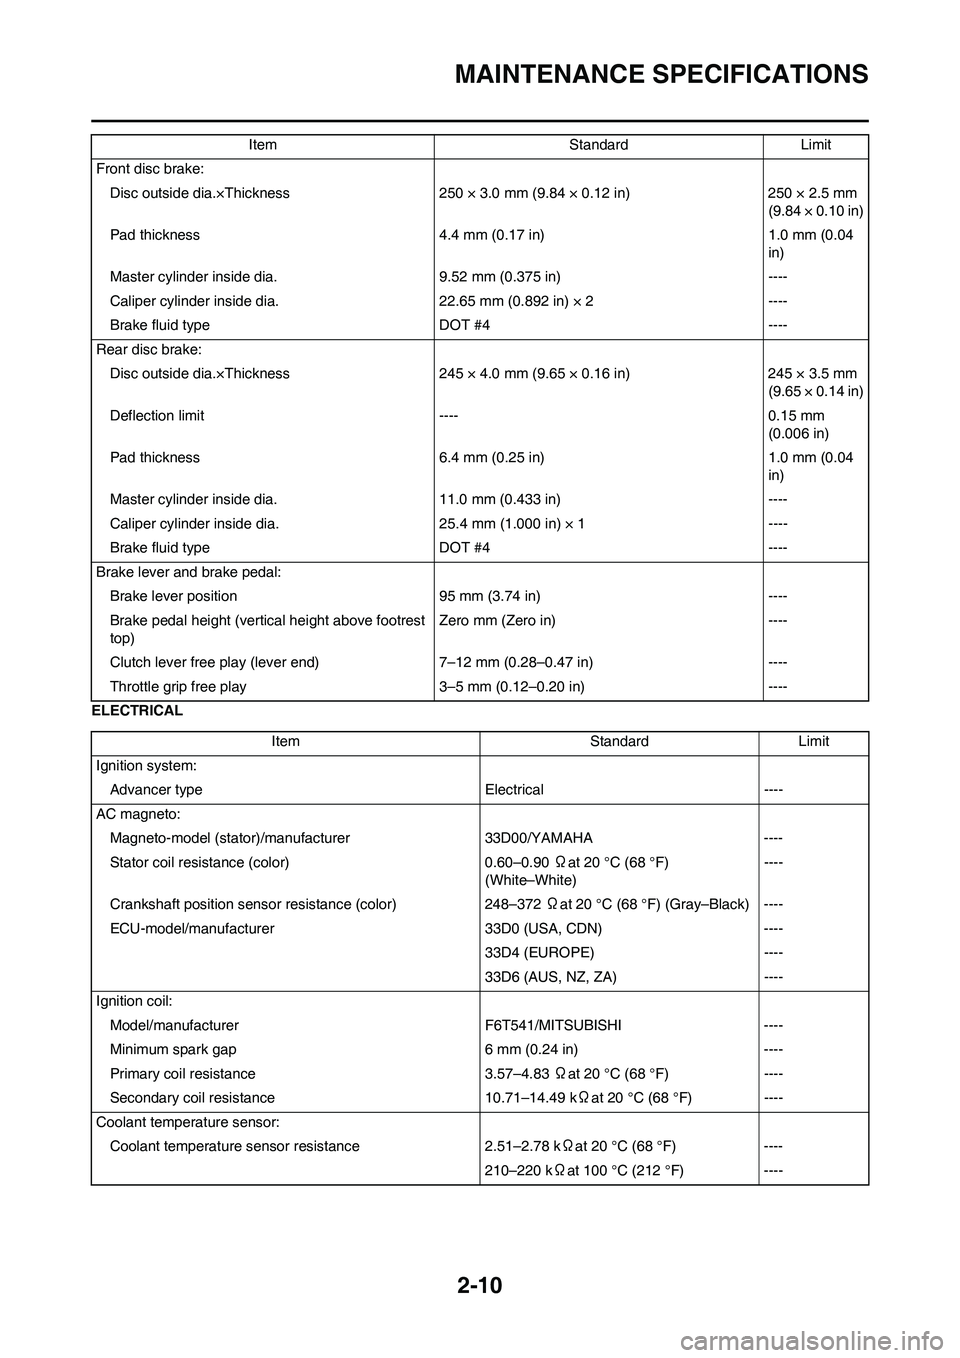
2-10
MAINTENANCE SPECIFICATIONS
ELECTRICALFront disc brake:
Disc outside dia.×Thickness 250 × 3.0 mm (9.84 × 0.12 in) 250 × 2.5 mm
(9.84 × 0.10 in)
Pad thickness 4.4 mm (0.17 in) 1.0 mm (0.04
in)
Master cylinder inside dia. 9.52 mm (0.375 in) ----
Caliper cylinder inside dia. 22.65 mm (0.892 in) × 2 ----
Brake fluid type DOT #4 ----
Rear disc brake:
Disc outside dia.×Thickness 245 × 4.0 mm (9.65 × 0.16 in) 245 × 3.5 mm
(9.65 × 0.14 in)
Deflection limit ---- 0.15 mm
(0.006 in)
Pad thickness 6.4 mm (0.25 in) 1.0 mm (0.04
in)
Master cylinder inside dia. 11.0 mm (0.433 in) ----
Caliper cylinder inside dia. 25.4 mm (1.000 in) × 1 ----
Brake fluid type DOT #4 ----
Brake lever and brake pedal:
Brake lever position 95 mm (3.74 in) ----
Brake pedal height (vertical height above footrest
top)Zero mm (Zero in) ----
Clutch lever free play (lever end) 7–12 mm (0.28–0.47 in) ----
Throttle grip free play3–5 mm (0.12–0.20 in) ---- Item Standard Limit
Item Standard Limit
Ignition system:
Advancer type Electrical ----
AC magneto:
Magneto-model (stator)/manufacturer 33D00/YAMAHA ----
Stator coil resistance (color) 0.60–0.90 Ωat 20 °C (68 °F)
(White–White)----
Crankshaft position sensor resistance (color) 248–372 Ωat 20 °C (68 °F) (Gray–Black) ----
ECU-model/manufacturer 33D0 (USA, CDN) ----
33D4 (EUROPE) ----
33D6 (AUS, NZ, ZA) ----
Ignition coil:
Model/manufacturer F6T541/MITSUBISHI ----
Minimum spark gap 6 mm (0.24 in) ----
Primary coil resistance 3.57–4.83 Ωat 20 °C (68 °F) ----
Secondary coil resistance 10.71–14.49 kΩat 20 °C (68 °F) ----
Coolant temperature sensor:
Coolant temperature sensor resistance 2.51–2.78 kΩat 20 °C (68 °F) ----
210–220 kΩat 100 °C (212 °F) ----
Page 42 of 230

2-12
TIGHTENING TORQUES
*1: Tighten the cylinder head bolts to 30 Nm (3.0 m•kg, 22 ft•lb) in the proper tightening sequence, remove and retighten
the cylinder head bolts to 20 Nm (2.0 m•kg, 14 ft•lb) in the proper tightening sequence, and then tighten the cylinder head
bolts further to reach the specified angle 150° in the proper tightening sequence.
Crankshaft end accessing screw M36 × 1.5 1 10 1.0 7.2
Timing mark accessing screw M14 × 1.5 1 6 0.6 4.3
Clutch cover M6 × 1.0 7 10 1.0 7.2
Right crankcase cover M6 × 1.0 9 10 1.0 7.2
Left crankcase cover M6 × 1.0 8 10 1.0 7.2
Crankcase M6 × 1.0 13 12 1.2 8.7
Clutch cable holder M6 × 1.0 2 10 1.0 7.2
Oil drain bolt M8 × 1.25 1 20 2.0 14
Oil drain bolt M8 × 1.25 1 20 2.0 14
Oil check bolt (crankcase) M6 × 1.0 1 10 1.0 7.2
Oil strainer M6 × 1.0 1 10 1.0 7.2
Oil nozzle M5 × 0.8 1 8 0.8 5.8
Crankcase bearing stopper M6 × 1.0 8 10 1.0 7.2
Crankcase bearing stopper (crankshaft) M8 × 1.25 4 22 2.2 16
Drive axle oil seal stopper M6 × 1.0 2 10 1.0 7.2
Kick shaft ratchet wheel guide M6 × 1.0 2 12 1.2 8.7
Kickstarter crank M8 × 1.25 1 33 3.3 24
Screw (kickstarter crank) M6 × 1.0 1 7 0.7 5.1
Primary drive gear M20 × 1.0 1 100 10.0 72
Clutch boss M20 × 1.0 1 75 7.5 54
Clutch cable locknut M8 × 1.25 1 7 0.7 5.1
Clutch cable adjust bolt and locknut M6 × 0.75 1 4 0.4 2.9
Clutch spring M6 × 1.0 6 10 1.0 7.2
Balancer M10 × 1.0 1 45 4.5 32
Balancer shaft driven gear M14 × 1.0 1 50 5.0 36
Balancer weight M6 × 1.0 3 10 1.0 7.2
Drive sprocket M20 × 1.0 1 75 7.5 54
Drive chain sprocket cover M6 × 1.0 2 7 0.7 5.1
Shift pedal M6 × 1.0 1 12 1.2 8.7
Shift guide M6 × 1.0 2 10 1.0 7.2
Stopper lever M6 × 1.0 1 10 1.0 7.2
Segment M8 × 1.25 1 30 3.0 22Part to be tightened Thread size Q'tyTightening torque
Nm m•kg ft•lb
Page 43 of 230

2-13
TIGHTENING TORQUES
CHASSIS
△- marked portion shall be checked for torque tightening after break-in or before each race.
Part to be tightened Thread size Q'tyTightening torque
Nm m•kg ft•lb
△Upper bracket and outer tube M8 × 1.25 4 21 2.1 15
△Lower bracket and outer tube M8 × 1.25 4 21 2.1 15
△Upper bracket and steering stem M24 × 1.0 1 145 14.5 105
△Handlebar upper holder M8 × 1.25 4 28 2.8 20
△Handlebar lower holder M10 × 1.25 2 34 3.4 24
△Steering ring nut M28 × 1.0 1 Refer to TIP.
Front fork and damper assembly M51 × 1.5 2 30 3.0 22
Front fork and adjuster M22 × 1.25 2 55 5.5 40
Damper assembly and base valve M42 × 1.5 2 29 2.9 21
Adjuster and damper assembly M12 × 1.25 2 29 2.9 21
Bleed screw (front fork) and base valve M5 × 0.8 2 1 0.1 0.7
△Front fork and front fork protector M6 × 1.0 6 5 0.5 3.6
△Front fork protector and brake hose holder M6 × 1.0 2 8 0.8 5.8
Throttle grip cap M5 × 0.8 2 4 0.4 2.9
Clutch lever holder M6 × 1.0 2 5 0.5 3.6
Clutch lever mounting nut M6 × 1.0 1 4 0.4 2.9
Clutch lever position lock nut M5 × 0.8 1 5 0.5 3.6
△Front brake master cylinder and bracket M6 × 1.0 2 9 0.9 6.5
Front brake master cylinder cap M4 × 0.7 2 2 0.2 1.4
Brake lever mounting bolt M6 × 1.0 1 6 0.6 4.3
Brake lever mounting nut M6 × 1.0 1 6 0.6 4.3
Brake lever position locknut M6 × 1.0 1 5 0.5 3.6
△Cable guide (front brake hose) and under bracket M6 × 1.0 1 4 0.4 2.9
△Front brake hose union bolt (brake master cylinder) M10 × 1.25 1 30 3.0 22
△Front brake hose union bolt (brake caliper) M10 × 1.25 1 30 3.0 22
△Front brake caliper and front fork M8 × 1.25 2 28 2.8 20
Brake caliper (front and rear) and pad pin plug M10 × 1.0 2 2 0.2 1.4
△Brake caliper (front and rear) and pad pin M10 × 1.0 2 18 1.8 13
△Brake caliper (front and rear) and bleed screw M8 × 1.25 2 6 0.6 4.3
△Front wheel axle and axle nut M16 × 1.5 1 105 10.5 75
△Front wheel axle holder M8 × 1.25 4 21 2.1 15
△Front brake disc and wheel hub M6 × 1.0 6 12 1.2 8.7
△Rear brake disc and wheel hub M6 × 1.0 6 14 1.4 10
△Footrest bracket and frame M10 × 1.25 4 55 5.5 40
△Brake pedal mounting M8 × 1.25 1 26 2.6 19
Brake pedal position locknut M6 × 1.0 1 6 0.6 4.3
△Rear brake master cylinder and frame M6 × 1.0 2 10 1.0 7.2
Rear brake master cylinder cap M4 × 0.7 2 2 0.2 1.4
△Rear brake hose union bolt (brake caliper) M10 × 1.25 1 30 3.0 22
△Rear brake hose union bolt (brake master cylinder) M10 × 1.25 1 30 3.0 22
△Rear wheel axle and axle nut M22 × 1.5 1 135 13.5 98
Page 51 of 230

2-21
CABLE ROUTING DIAGRAM
1. Clutch cable
2. Throttle cable (return)
3. Throttle cable (pull)
4. Cable holder
5. Clamp
6. Rectifier/regulator
7. Ignition coil
8. Ignition coil coupler
9. AC magneto coupler
10. Radiator hose 2
11. Ground lead terminal
12. Plug cap
13. Ignition coil bracket
14. Clamp (lock)
15. Clamp (clip)
16. AC magneto lead
17. ECU bracketA. Pass the clutch cable, throttle
cables, and engine stop switch
lead through the cable holder.
Pass the clutch cable through
the lower guide only.
B. Route the engine stop switch
lead to the inside of the clip.
C. Fasten the rectifier/regulator
lead and engine stop switch lead
(wire harness end).
D. Insert the projection on the en-
gine stop switch coupler into the
hole in the bracket.
E. Insert the projection on the recti-
fier/regulator coupler into the
hole in the bracket.
F. Position the ignition coil bracket
to the outside of the ignition coil,
and insert the bolts from the igni-
tion coil side.
G. Fasten the AC magneto lead to
the ignition coil bracket with a
plastic locking tie, making sure
to position the tie above the low-
er mounting portion of the brack-
et. Face the buckle of the plastic
locking tie forward, and then cut
off the excess end of the tie.
H. Route the ignition coil lead be-
tween the condenser and the ig-
nition coil.
I. Fit the clip portion of the clamp
into the ignition coil bracket and
fasten the clutch cable with the
locking portion of the clamp.
J. Route the clutch cable to the
outside of the AC magneto lead.
K. Route the throttle cables under
radiator hose 2, making sure not
to twist the cables.
L. Route the AC magneto lead to
the inside of the throttle cables
and clutch cable.
M. Install the ground lead terminal
between the ECU bracket and
the cable holder, making sure to
position the terminal between
the stoppers.
N. Push in the spark plug cap com-
pletely, making sure that there is
no gap between the cylinder
head cover and the cap.
O. Apply sealant to the slit and in-
ner surface of the grommet, and
then install the grommet at the
position shown.