coolant level YAMAHA YZ450F 2011 Owners Manual
[x] Cancel search | Manufacturer: YAMAHA, Model Year: 2011, Model line: YZ450F, Model: YAMAHA YZ450F 2011Pages: 230, PDF Size: 14.09 MB
Page 15 of 230
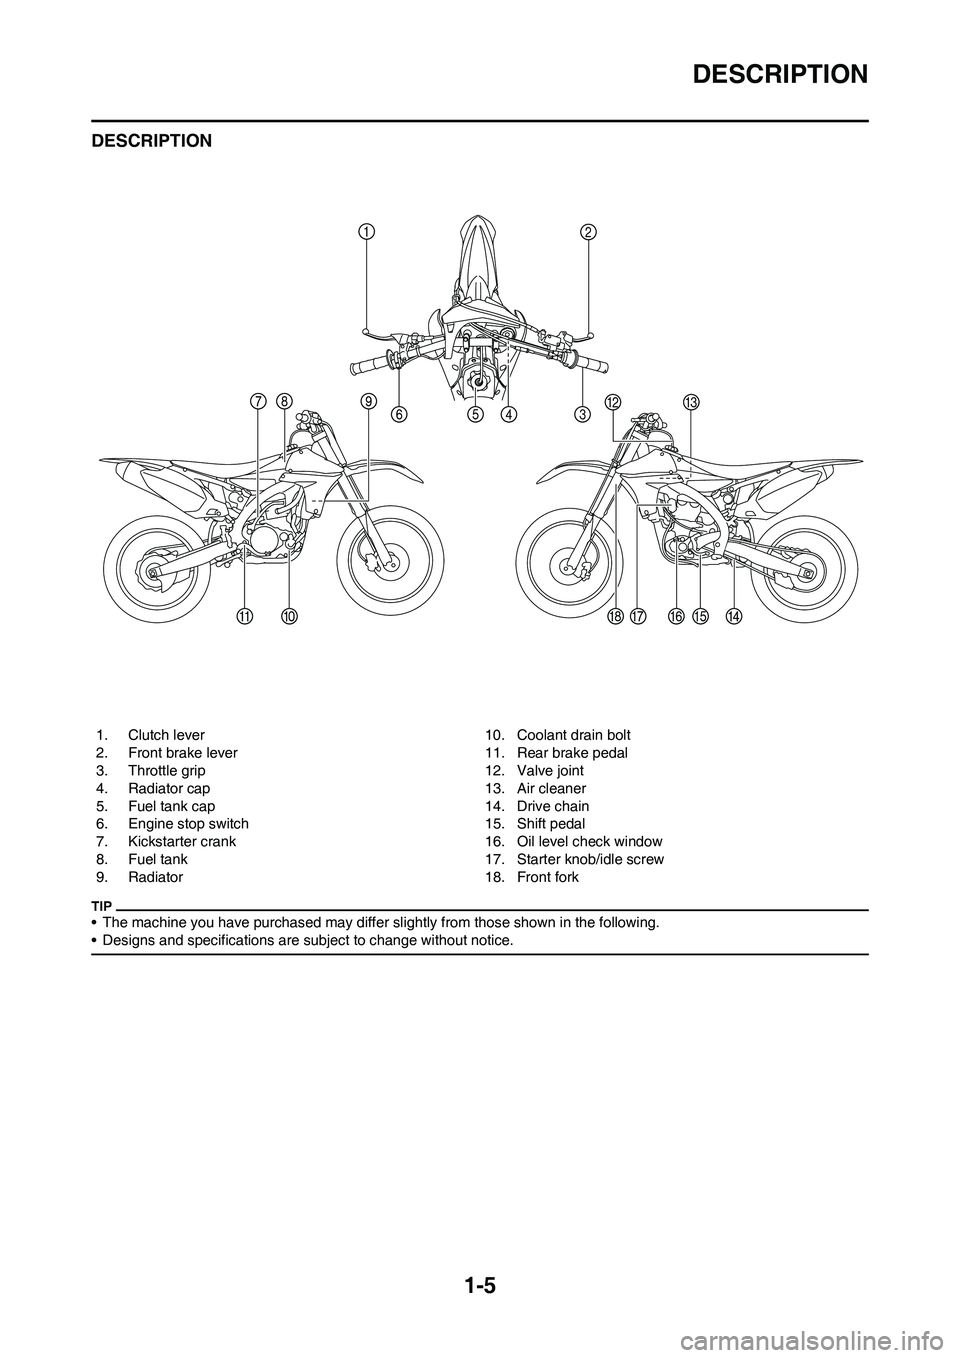
1-5
DESCRIPTION
DESCRIPTION
• The machine you have purchased may differ slightly from those shown in the following.
• Designs and specifications are subject to change without notice.
1. Clutch lever
2. Front brake lever
3. Throttle grip
4. Radiator cap
5. Fuel tank cap
6. Engine stop switch
7. Kickstarter crank
8. Fuel tank
9. Radiator10. Coolant drain bolt
11. Rear brake pedal
12. Valve joint
13. Air cleaner
14. Drive chain
15. Shift pedal
16. Oil level check window
17. Starter knob/idle screw
18. Front fork
Page 28 of 230
1-18
STARTING AND BREAK-IN
• Unlike a two-stroke engine, this
engine cannot be kick started
when the throttle is open be-
cause the kickstarter may kick
back. Also, if the throttle is open
the air/fuel mixture may be too
lean for the engine to start.
• Before starting the machine, per-
form the checks in the pre-opera-
tion check list.
AIR FILTER MAINTENANCE
According to "CLEANING THE AIR
FILTER ELEMENT" section in the
CHAPTER 3, apply the foam-air-filter
oil or its equivalent to the element.
(Excess oil in the element may ad-
versely affect engine starting.)
STARTING A COLD ENGINE
1. Inspect the coolant level.
2. Shift the transmission into neutral.
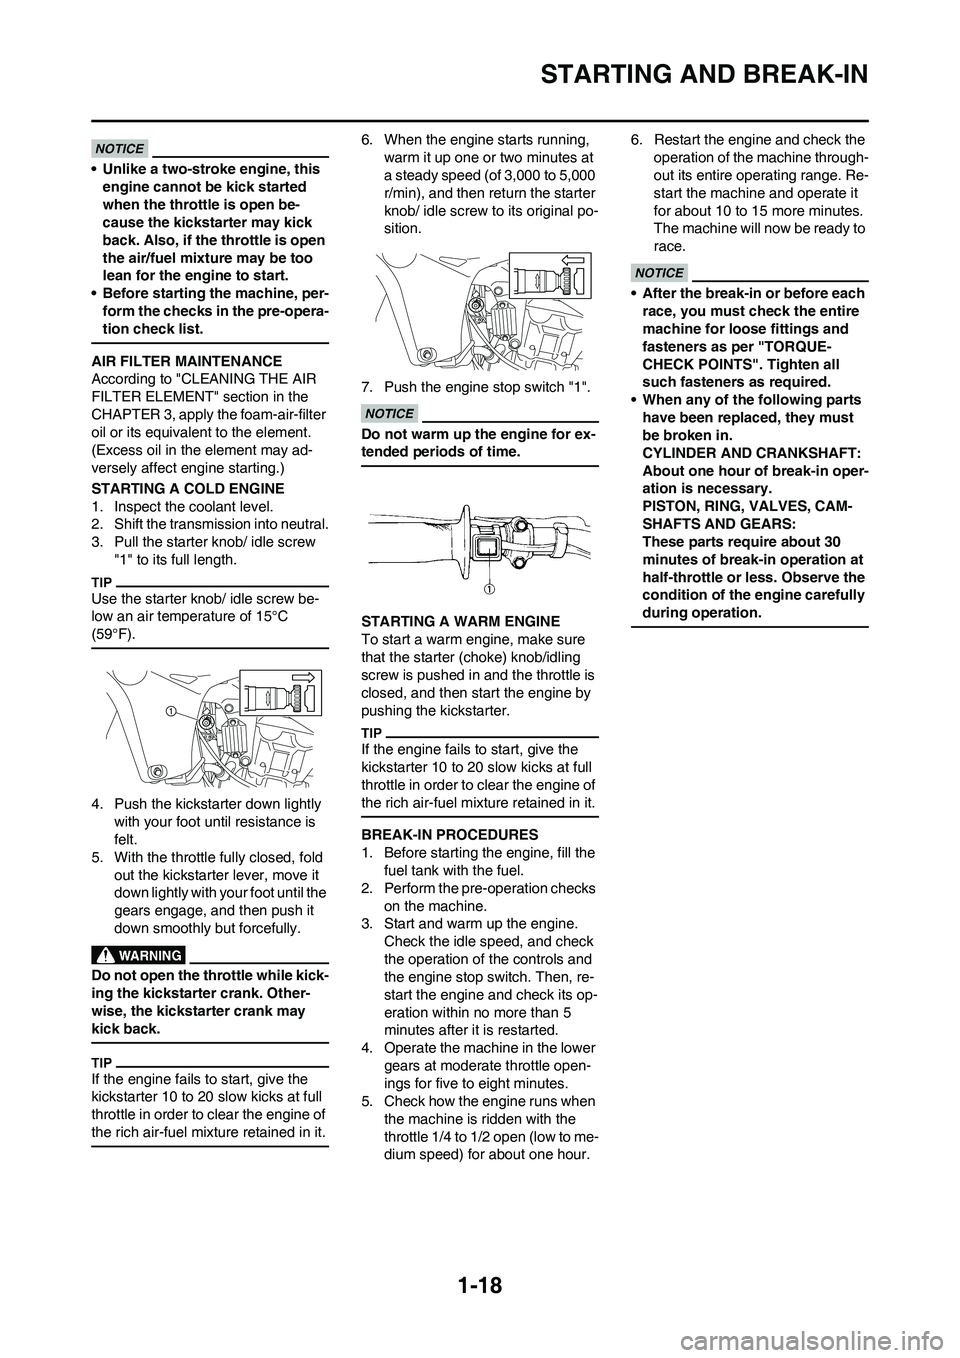
3. Pull the starter knob/ idle screw
"1" to its full length.
Use the starter knob/ idle screw be-
low an air temperature of 15°C
(59°F).
4. Push the kickstarter down lightly
with your foot until resistance is
felt.
5. With the throttle fully closed, fold
out the kickstarter lever, move it
down lightly with your foot until the
gears engage, and then push it
down smoothly but forcefully.
Do not open the throttle while kick-
ing the kickstarter crank. Other-
wise, the kickstarter crank may
kick back.
If the engine fails to start, give the
kickstarter 10 to 20 slow kicks at full
throttle in order to clear the engine of
the rich air-fuel mixture retained in it.
6. When the engine starts running,
warm it up one or two minutes at
a steady speed (of 3,000 to 5,000
r/min), and then return the starter
knob/ idle screw to its original po-
sition.
7. Push the engine stop switch "1".
Do not warm up the engine for ex-
tended periods of time.
STARTING A WARM ENGINE
To start a warm engine, make sure
that the starter (choke) knob/idling
screw is pushed in and the throttle is
closed, and then start the engine by
pushing the kickstarter.
If the engine fails to start, give the
kickstarter 10 to 20 slow kicks at full
throttle in order to clear the engine of
the rich air-fuel mixture retained in it.
BREAK-IN PROCEDURES
1. Before starting the engine, fill the
fuel tank with the fuel.
2. Perform the pre-operation checks
on the machine.
3. Start and warm up the engine.
Check the idle speed, and check
the operation of the controls and
the engine stop switch. Then, re-
start the engine and check its op-
eration within no more than 5
minutes after it is restarted.
4. Operate the machine in the lower
gears at moderate throttle open-
ings for five to eight minutes.
5. Check how the engine runs when
the machine is ridden with the
throttle 1/4 to 1/2 open (low to me-
dium speed) for about one hour.6. Restart the engine and check the
operation of the machine through-
out its entire operating range. Re-
start the machine and operate it
for about 10 to 15 more minutes.
The machine will now be ready to
race.
• After the break-in or before each
race, you must check the entire
machine for loose fittings and
fasteners as per "TORQUE-
CHECK POINTS". Tighten all
such fasteners as required.
• When any of the following parts
have been replaced, they must
be broken in.
CYLINDER AND CRANKSHAFT:
About one hour of break-in oper-
ation is necessary.
PISTON, RING, VALVES, CAM-
SHAFTS AND GEARS:
These parts require about 30
minutes of break-in operation at
half-throttle or less. Observe the
condition of the engine carefully
during operation.
Page 58 of 230
3-2
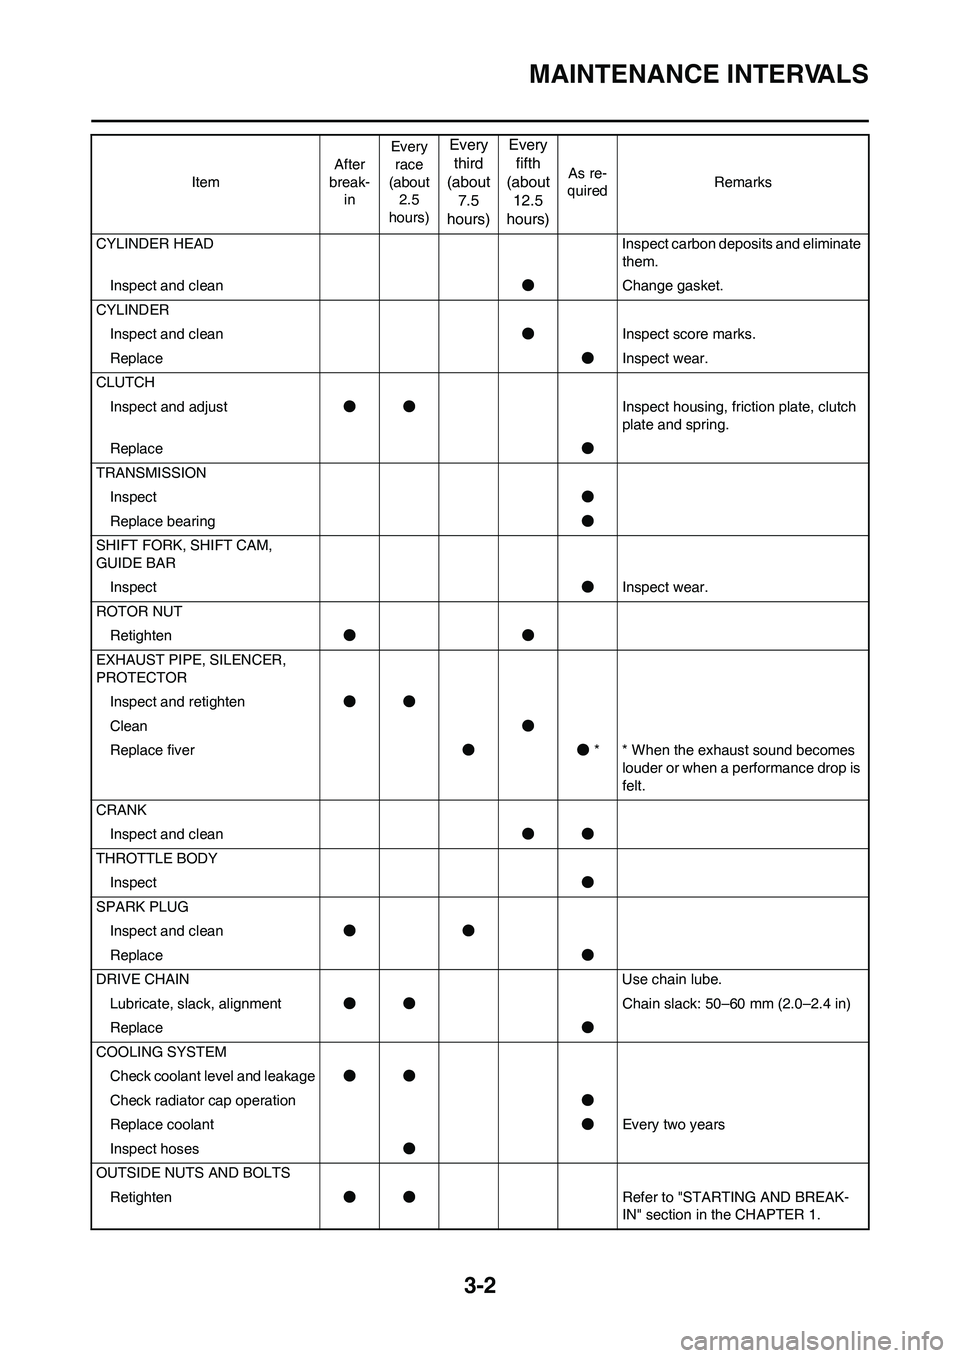
MAINTENANCE INTERVALS
CYLINDER HEAD Inspect carbon deposits and eliminate them.
Inspect and clean ●Change gasket.
CYLINDER Inspect and clean ●Inspect score marks.
Replace ●Inspect wear.
CLUTCH Inspect and adjust ●● Inspect housing, friction plate, clutch
plate and spring.
Replace ●
TRANSMISSION Inspect ●
Replace bearing ●
SHIFT FORK, SHIFT CAM,
GUIDE BAR Inspect ●Inspect wear.
ROTOR NUT Retighten ●●
EXHAUST PIPE, SILENCER,
PROTECTOR Inspect and retighten ●●
Clean ●
Replace fiver ●●* * When the exhaust sound becomes
louder or when a performance drop is
felt.
CRANK Inspect and clean ●●
THROTTLE BODY Inspect ●
SPARK PLUG Inspect and clean ●●
Replace ●
DRIVE CHAIN Use chain lube. Lubricate, slack, alignment ●● Chain slack: 50–60 mm (2.0–2.4 in)
Replace ●
COOLING SYSTEM Check coolant level and leakage ●●
Check radiator cap operation ●
Replace coolant ●Every two years
Inspect hoses ●
OUTSIDE NUTS AND BOLTS Retighten ●● Refer to "STARTING AND BREAK-
IN" section in the CHAPTER 1.
Item
After
break- in Every
race
(about 2.5
hours)
Every third
(about 7.5
hours) Every
fifth
(about 12.5
hours)
As re-
quired Remarks
Page 61 of 230
3-5
PRE-OPERATION INSPECTION AND MAINTENANCE
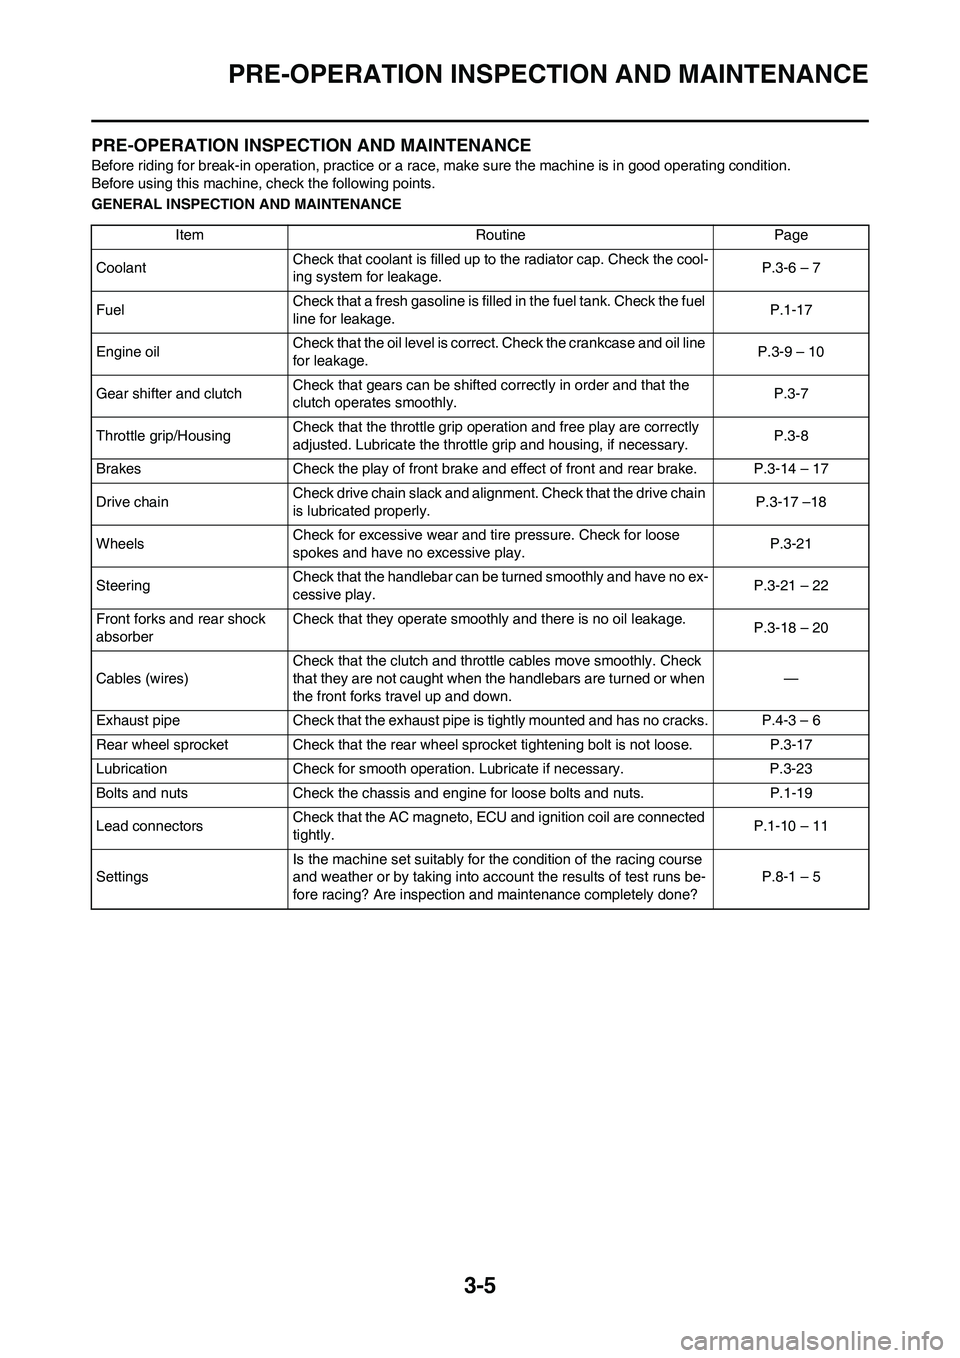
PRE-OPERATION INSPECTION AND MAINTENANCE
Before riding for break-in operation, practice or a race, make sure the machine is in good operating condition.
Before using this machine, check the following points.
GENERAL INSPECTION AND MAINTENANCE
Item Routine Page
CoolantCheck that coolant is filled up to the radiator cap. Check the cool-
ing system for leakage.P.3-6 – 7
FuelCheck that a fresh gasoline is filled in the fuel tank. Check the fuel
line for leakage.P.1-17
Engine oilCheck that the oil level is correct. Check the crankcase and oil line
for leakage.P.3-9 – 10
Gear shifter and clutchCheck that gears can be shifted correctly in order and that the
clutch operates smoothly.P.3-7
Throttle grip/HousingCheck that the throttle grip operation and free play are correctly
adjusted. Lubricate the throttle grip and housing, if necessary.P.3-8
Brakes Check the play of front brake and effect of front and rear brake. P.3-14 – 17
Drive chainCheck drive chain slack and alignment. Check that the drive chain
is lubricated properly.P.3-17 –18
WheelsCheck for excessive wear and tire pressure. Check for loose
spokes and have no excessive play.P.3-21
SteeringCheck that the handlebar can be turned smoothly and have no ex-
cessive play.P.3-21 – 22
Front forks and rear shock
absorberCheck that they operate smoothly and there is no oil leakage.
P.3-18 – 20
Cables (wires)Check that the clutch and throttle cables move smoothly. Check
that they are not caught when the handlebars are turned or when
the front forks travel up and down.—
Exhaust pipe Check that the exhaust pipe is tightly mounted and has no cracks. P.4-3 – 6
Rear wheel sprocket Check that the rear wheel sprocket tightening bolt is not loose. P.3-17
Lubrication Check for smooth operation. Lubricate if necessary. P.3-23
Bolts and nuts Check the chassis and engine for loose bolts and nuts. P.1-19
Lead connectorsCheck that the AC magneto, ECU and ignition coil are connected
tightly.P.1-10 – 11
SettingsIs the machine set suitably for the condition of the racing course
and weather or by taking into account the results of test runs be-
fore racing? Are inspection and maintenance completely done?P.8-1 – 5
Page 62 of 230
3-6
ENGINE
ENGINE
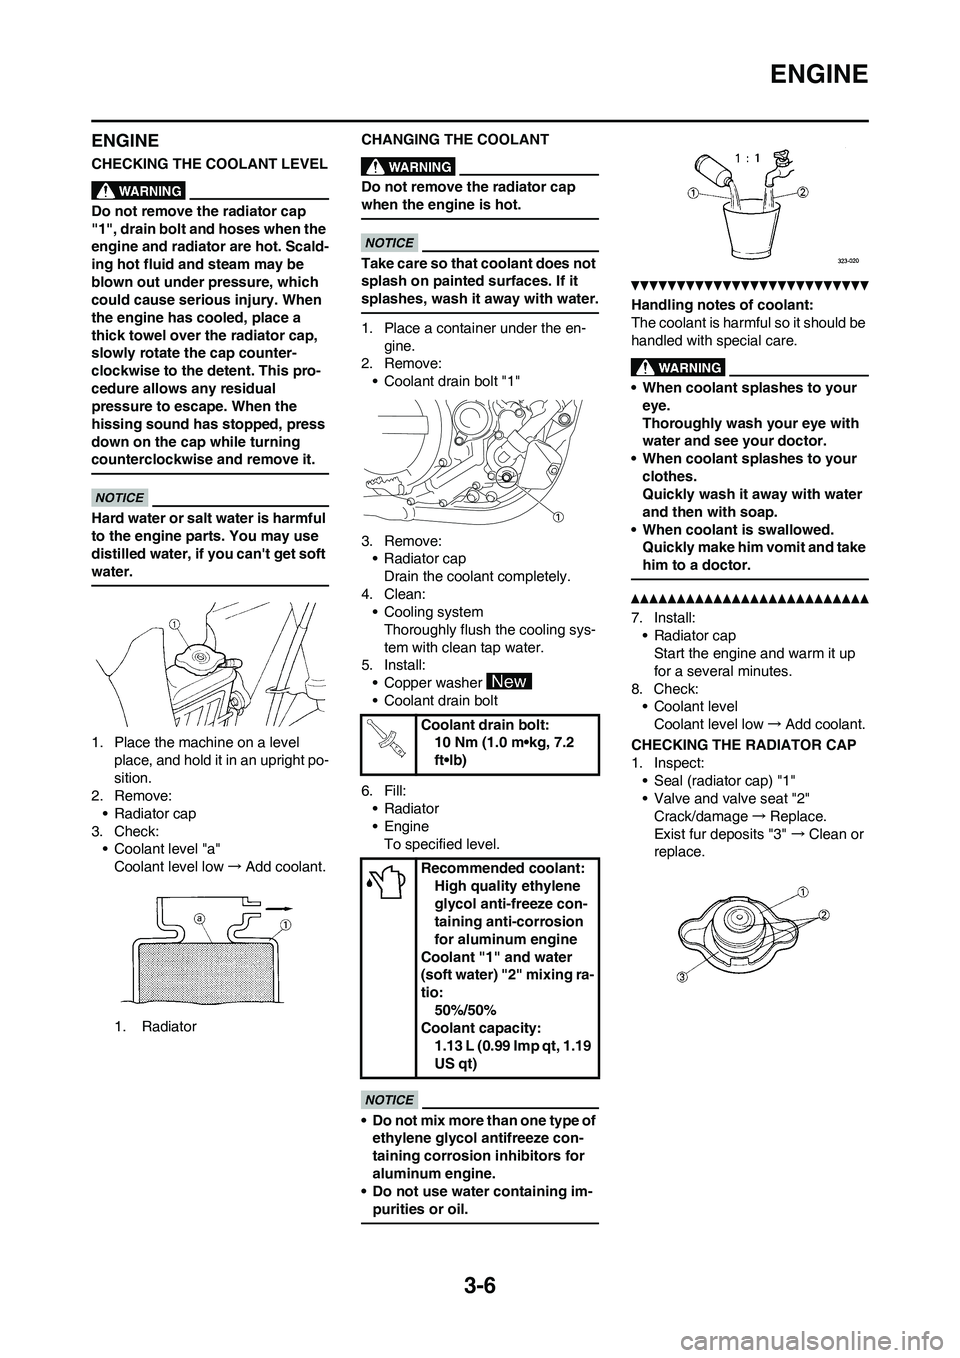
CHECKING THE COOLANT LEVEL
Do not remove the radiator cap
"1", drain bolt and hoses when the
engine and radiator are hot. Scald-
ing hot fluid and steam may be
blown out under pressure, which
could cause serious injury. When
the engine has cooled, place a
thick towel over the radiator cap,
slowly rotate the cap counter-
clockwise to the detent. This pro-
cedure allows any residual
pressure to escape. When the
hissing sound has stopped, press
down on the cap while turning
counterclockwise and remove it.
Hard water or salt water is harmful
to the engine parts. You may use
distilled water, if you can't get soft
water.
1. Place the machine on a level
place, and hold it in an upright po-
sition.
2. Remove:
• Radiator cap
3. Check:
• Coolant level "a"
Coolant level low→Add coolant.
1. RadiatorCHANGING THE COOLANT
Do not remove the radiator cap
when the engine is hot.
Take care so that coolant does not
splash on painted surfaces. If it
splashes, wash it away with water.
1. Place a container under the en-
gine.
2. Remove:
• Coolant drain bolt "1"
3. Remove:
• Radiator cap
Drain the coolant completely.
4. Clean:
• Cooling system
Thoroughly flush the cooling sys-
tem with clean tap water.
5. Install:
• Copper washer
• Coolant drain bolt
6. Fill:
• Radiator
•Engine
To specified level.
• Do not mix more than one type of
ethylene glycol antifreeze con-
taining corrosion inhibitors for
aluminum engine.
• Do not use water containing im-
purities or oil.
Handling notes of coolant:
The coolant is harmful so it should be
handled with special care.
• When coolant splashes to your
eye.
Thoroughly wash your eye with
water and see your doctor.
• When coolant splashes to your
clothes.
Quickly wash it away with water
and then with soap.
• When coolant is swallowed.
Quickly make him vomit and take
him to a doctor.
7. Install:
• Radiator cap
Start the engine and warm it up
for a several minutes.
8. Check:
• Coolant level
Coolant level low→Add coolant.
CHECKING THE RADIATOR CAP
1. Inspect:
• Seal (radiator cap) "1"
• Valve and valve seat "2"
Crack/damage→Replace.
Exist fur deposits "3" →Clean or
replace.
Coolant drain bolt:
10 Nm (1.0 m•kg, 7.2
ft•lb)
Recommended coolant:
High quality ethylene
glycol anti-freeze con-
taining anti-corrosion
for aluminum engine
Coolant "1" and water
(soft water) "2" mixing ra-
tio:
50%/50%
Coolant capacity:
1.13 L (0.99 Imp qt, 1.19
US qt)
Page 63 of 230
3-7
ENGINE
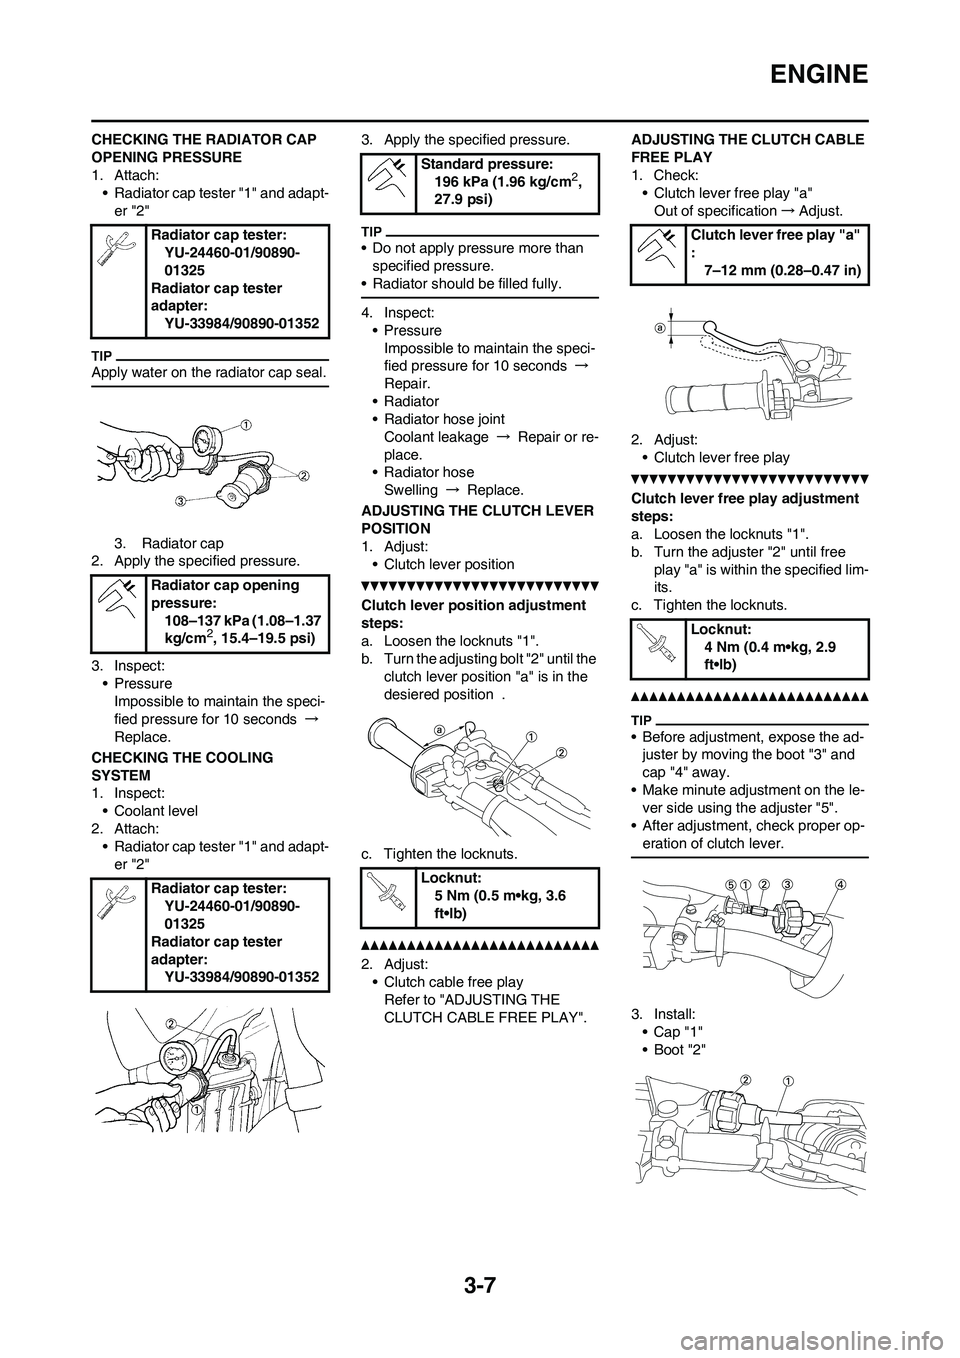
CHECKING THE RADIATOR CAP
OPENING PRESSURE
1. Attach:
• Radiator cap tester "1" and adapt-
er "2"
Apply water on the radiator cap seal.
3. Radiator cap
2. Apply the specified pressure.
3. Inspect:
• Pressure
Impossible to maintain the speci-
fied pressure for 10 seconds →
Replace.
CHECKING THE COOLING
SYSTEM
1. Inspect:
• Coolant level
2. Attach:
• Radiator cap tester "1" and adapt-
er "2"3. Apply the specified pressure.
• Do not apply pressure more than
specified pressure.
• Radiator should be filled fully.
4. Inspect:
•Pressure
Impossible to maintain the speci-
fied pressure for 10 seconds →
Repair.
• Radiator
• Radiator hose joint
Coolant leakage → Repair or re-
place.
• Radiator hose
Swelling → Replace.
ADJUSTING THE CLUTCH LEVER
POSITION
1. Adjust:
• Clutch lever position
Clutch lever position adjustment
steps:
a. Loosen the locknuts "1".
b. Turn the adjusting bolt "2" until the
clutch lever position "a" is in the
desiered position .
c. Tighten the locknuts.
2. Adjust:
• Clutch cable free play
Refer to "ADJUSTING THE
CLUTCH CABLE FREE PLAY".ADJUSTING THE CLUTCH CABLE
FREE PLAY
1. Check:
• Clutch lever free play "a"
Out of specification→Adjust.
2. Adjust:
• Clutch lever free play
Clutch lever free play adjustment
steps:
a. Loosen the locknuts "1".
b. Turn the adjuster "2" until free
play "a" is within the specified lim-
its.
c. Tighten the locknuts.
• Before adjustment, expose the ad-
juster by moving the boot "3" and
cap "4" away.
• Make minute adjustment on the le-
ver side using the adjuster "5".
• After adjustment, check proper op-
eration of clutch lever.
3. Install:
•Cap "1"
• Boot "2" Radiator cap tester:
YU-24460-01/90890-
01325
Radiator cap tester
adapter:
YU-33984/90890-01352
Radiator cap opening
pressure:
108–137 kPa (1.08–1.37
kg/cm
2, 15.4–19.5 psi)
Radiator cap tester:
YU-24460-01/90890-
01325
Radiator cap tester
adapter:
YU-33984/90890-01352
Standard pressure:
196 kPa (1.96 kg/cm2,
27.9 psi)
Locknut:
5 Nm (0.5 m•kg, 3.6
ft•lb)
Clutch lever free play "a"
:
7–12 mm (0.28–0.47 in)
Locknut:
4 Nm (0.4 m•kg, 2.9
ft•lb)
Page 114 of 230
4-33
OIL FILTER ELEMENT AND WATER PUMP
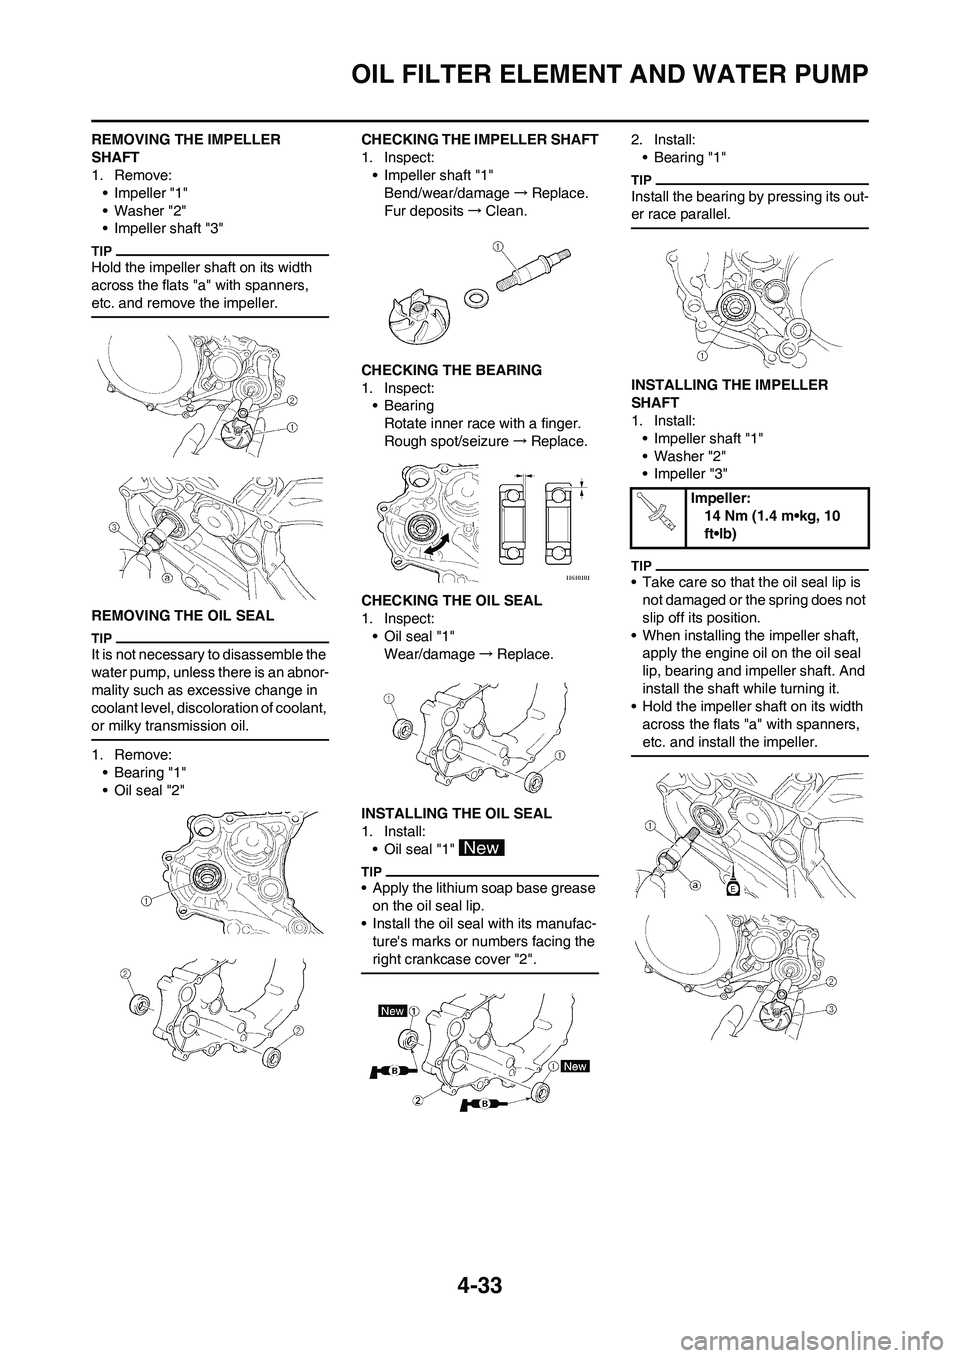
REMOVING THE IMPELLER
SHAFT
1. Remove:
• Impeller "1"
• Washer "2"
• Impeller shaft "3"
Hold the impeller shaft on its width
across the flats "a" with spanners,
etc. and remove the impeller.
REMOVING THE OIL SEAL
It is not necessary to disassemble the
water pump, unless there is an abnor-
mality such as excessive change in
coolant level, discoloration of coolant,
or milky transmission oil.
1. Remove:
• Bearing "1"
• Oil seal "2"CHECKING THE IMPELLER SHAFT
1. Inspect:
• Impeller shaft "1"
Bend/wear/damage→Replace.
Fur deposits→Clean.
CHECKING THE BEARING
1. Inspect:
•Bearing
Rotate inner race with a finger.
Rough spot/seizure→Replace.
CHECKING THE OIL SEAL
1. Inspect:
• Oil seal "1"
Wear/damage→Replace.
INSTALLING THE OIL SEAL
1. Install:
• Oil seal "1"
• Apply the lithium soap base grease
on the oil seal lip.
• Install the oil seal with its manufac-
ture's marks or numbers facing the
right crankcase cover "2".
2. Install:
• Bearing "1"
Install the bearing by pressing its out-
er race parallel.
INSTALLING THE IMPELLER
SHAFT
1. Install:
• Impeller shaft "1"
• Washer "2"
• Impeller "3"
• Take care so that the oil seal lip is
not damaged or the spring does not
slip off its position.
• When installing the impeller shaft,
apply the engine oil on the oil seal
lip, bearing and impeller shaft. And
install the shaft while turning it.
• Hold the impeller shaft on its width
across the flats "a" with spanners,
etc. and install the impeller.
Impeller:
14 Nm (1.4 m•kg, 10
ft•lb)
Page 197 of 230
7-11
FUEL INJECTION SYSTEM
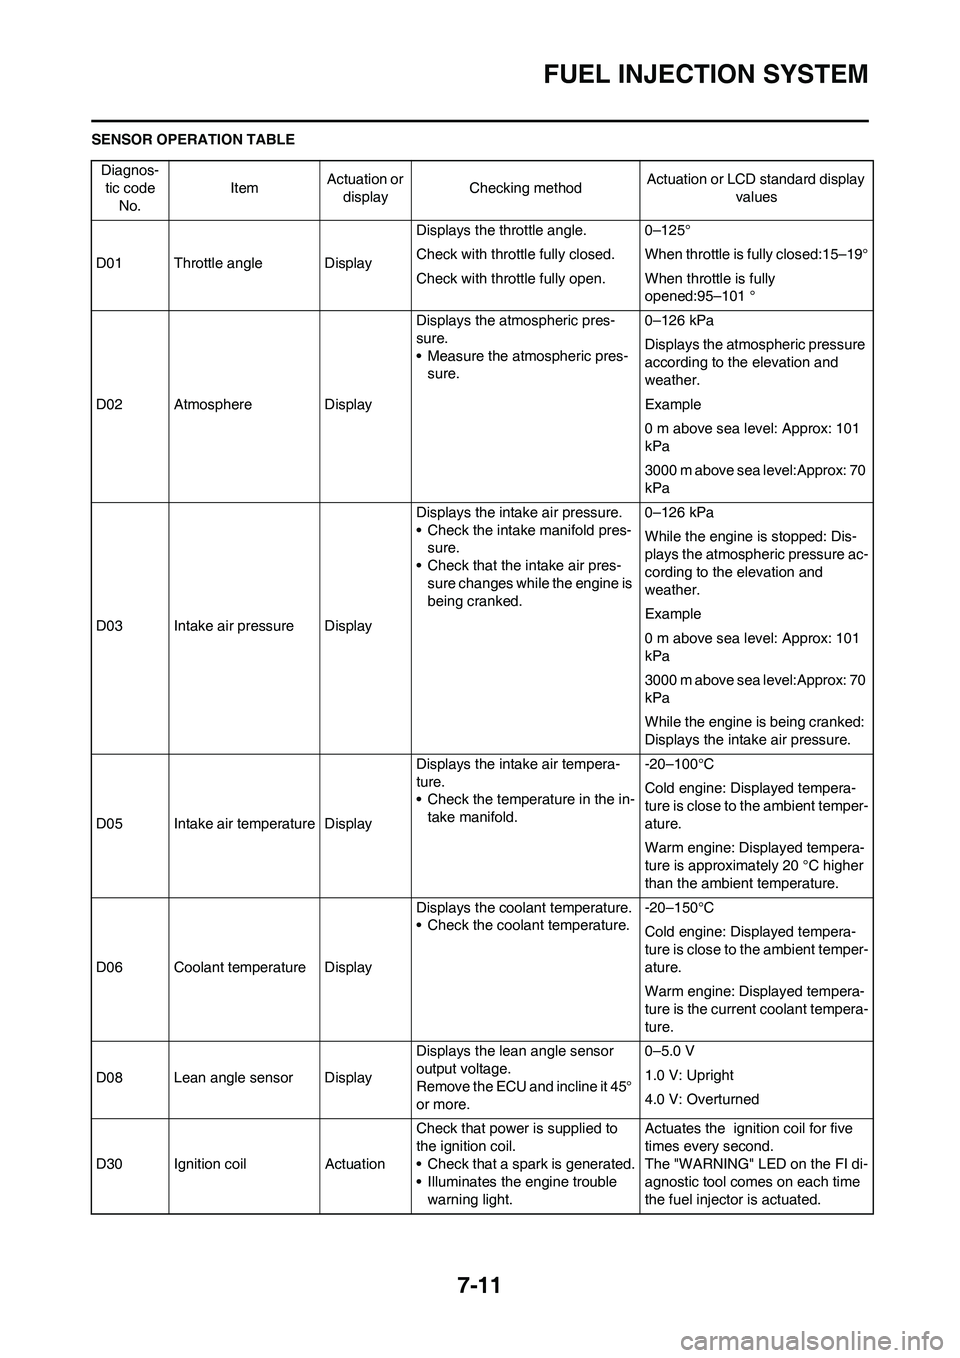
SENSOR OPERATION TABLE
Diagnos-
tic code
No.ItemActuation or
displayChecking methodActuation or LCD standard display
values
D01 Throttle angle DisplayDisplays the throttle angle. 0–125°
Check with throttle fully closed. When throttle is fully closed:15–19°
Check with throttle fully open. When throttle is fully
opened:95–101 °
D02 Atmosphere DisplayDisplays the atmospheric pres-
sure.
• Measure the atmospheric pres-
sure.0–126 kPa
Displays the atmospheric pressure
according to the elevation and
weather.
Example
0 m above sea level: Approx: 101
kPa
3000 m above sea level:Approx: 70
kPa
D03 Intake air pressure DisplayDisplays the intake air pressure.
• Check the intake manifold pres-
sure.
• Check that the intake air pres-
sure changes while the engine is
being cranked.0–126 kPa
While the engine is stopped: Dis-
plays the atmospheric pressure ac-
cording to the elevation and
weather.
Example
0 m above sea level: Approx: 101
kPa
3000 m above sea level:Approx: 70
kPa
While the engine is being cranked:
Displays the intake air pressure.
D05 Intake air temperature DisplayDisplays the intake air tempera-
ture.
• Check the temperature in the in-
take manifold.-20–100°C
Cold engine: Displayed tempera-
ture is close to the ambient temper-
ature.
Warm engine: Displayed tempera-
ture is approximately 20 °C higher
than the ambient temperature.
D06 Coolant temperature DisplayDisplays the coolant temperature.
• Check the coolant temperature.-20–150°C
Cold engine: Displayed tempera-
ture is close to the ambient temper-
ature.
Warm engine: Displayed tempera-
ture is the current coolant tempera-
ture.
D08 Lean angle sensor DisplayDisplays the lean angle sensor
output voltage.
Remove the ECU and incline it 45°
or more.0–5.0 V
1.0 V: Upright
4.0 V: Overturned
D30 Ignition coil ActuationCheck that power is supplied to
the ignition coil.
• Check that a spark is generated.
• Illuminates the engine trouble
warning light.Actuates the ignition coil for five
times every second.
The "WARNING" LED on the FI di-
agnostic tool comes on each time
the fuel injector is actuated.