ignition YAMAHA YZ450F 2014 Owner's Manual
[x] Cancel search | Manufacturer: YAMAHA, Model Year: 2014, Model line: YZ450F, Model: YAMAHA YZ450F 2014Pages: 360, PDF Size: 11.76 MB
Page 316 of 360
FUEL INJECTION SYSTEM
8-26
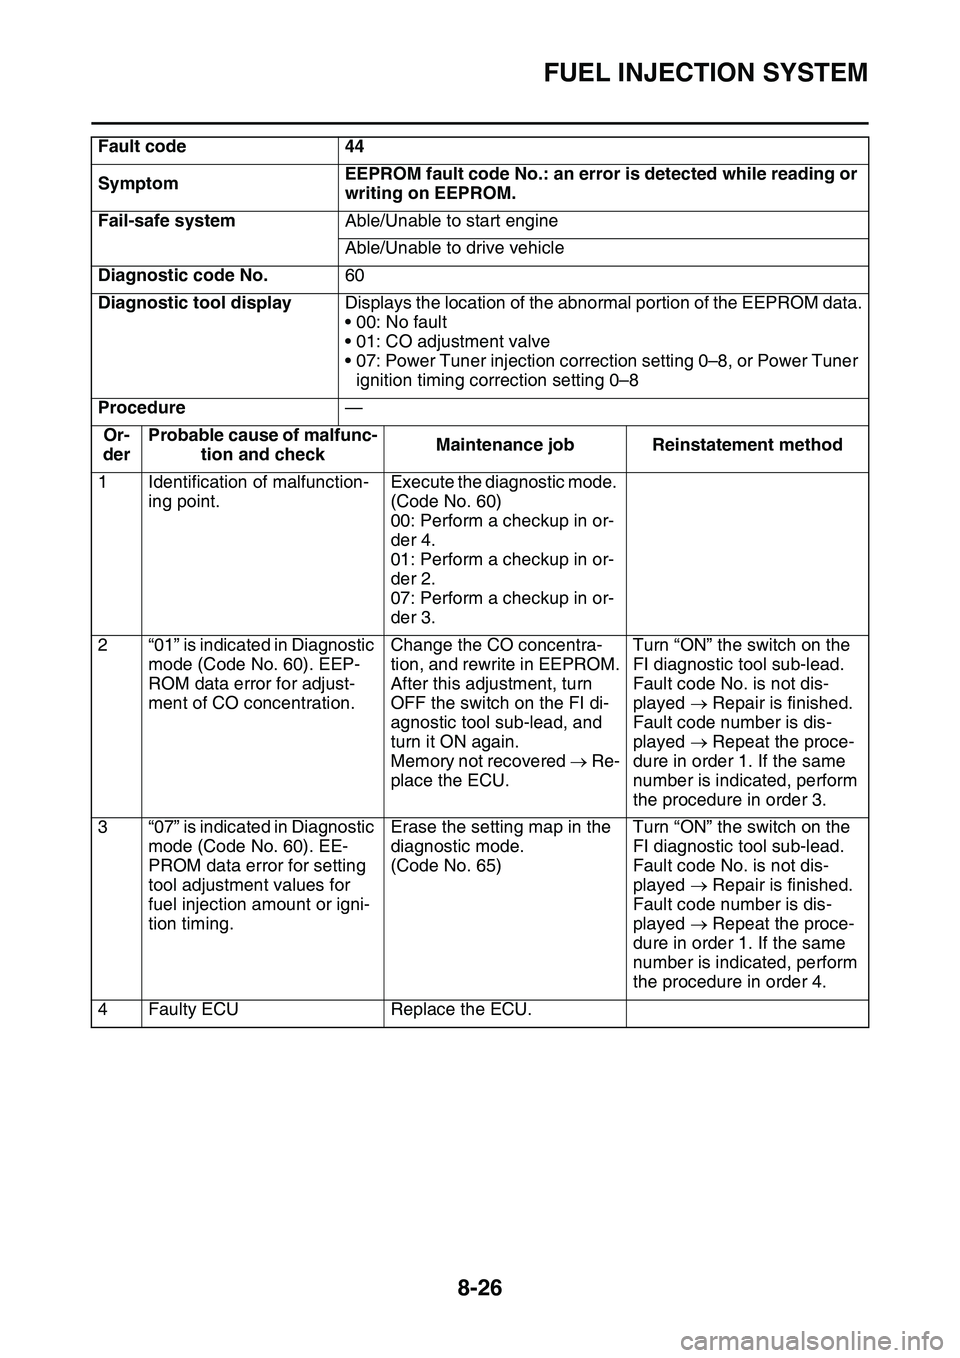
Fault code44
SymptomEEPROM fault code No.: an error is detected while reading or
writing on EEPROM.
Fail-safe systemAble/Unable to start engine
Able/Unable to drive vehicle
Diagnostic code No.60
Diagnostic tool displayDisplays the location of the abnormal portion of the EEPROM data.
• 00: No fault
• 01: CO adjustment valve
• 07: Power Tuner injection correction setting 0–8, or Power Tuner
ignition timing correction setting 0–8
Procedure—
Or-
der
Probable cause of malfunc-
tion and checkMaintenance jobReinstatement method
1Identification of malfunction-
ing point.
Execute the diagnostic mode.
(Code No. 60)
00: Perform a checkup in or-
der 4.
01: Perform a checkup in or-
der 2.
07: Perform a checkup in or-
der 3.
2“01” is indicated in Diagnostic
mode (Code No. 60). EEP-
ROM data error for adjust
-
ment of CO concentration.
Change the CO concentra-
tion, and rewrite in EEPROM.
After this adjustment, turn
OFF the switch on the FI di
-
agnostic tool sub-lead, and
turn it ON again.
Memory not recovered Re-
place the ECU.
Turn “ON” the switch on the
FI diagnostic tool sub-lead.
Fault code No. is not dis-
played Repair is finished.
Fault code number is dis-
played Repeat the proce-
dure in order 1. If the same
number is indicated, perform
the procedure in order 3.
3“07” is indicated in Diagnostic
mode (Code No. 60). EE
-
PROM data error for setting
tool adjustment values for
fuel injection amount or igni
-
tion timing.
Erase the setting map in the
diagnostic mode.
(Code No. 65)
Turn “ON” the switch on the
FI diagnostic tool sub-lead.
Fault code No. is not dis-
played Repair is finished.
Fault code number is dis-
played Repeat the proce-
dure in order 1. If the same
number is indicated, perform
the procedure in order 4.
4Faulty ECUReplace the ECU.
Page 327 of 360
ELECTRICAL COMPONENTS
8-37
EAS1SL1334
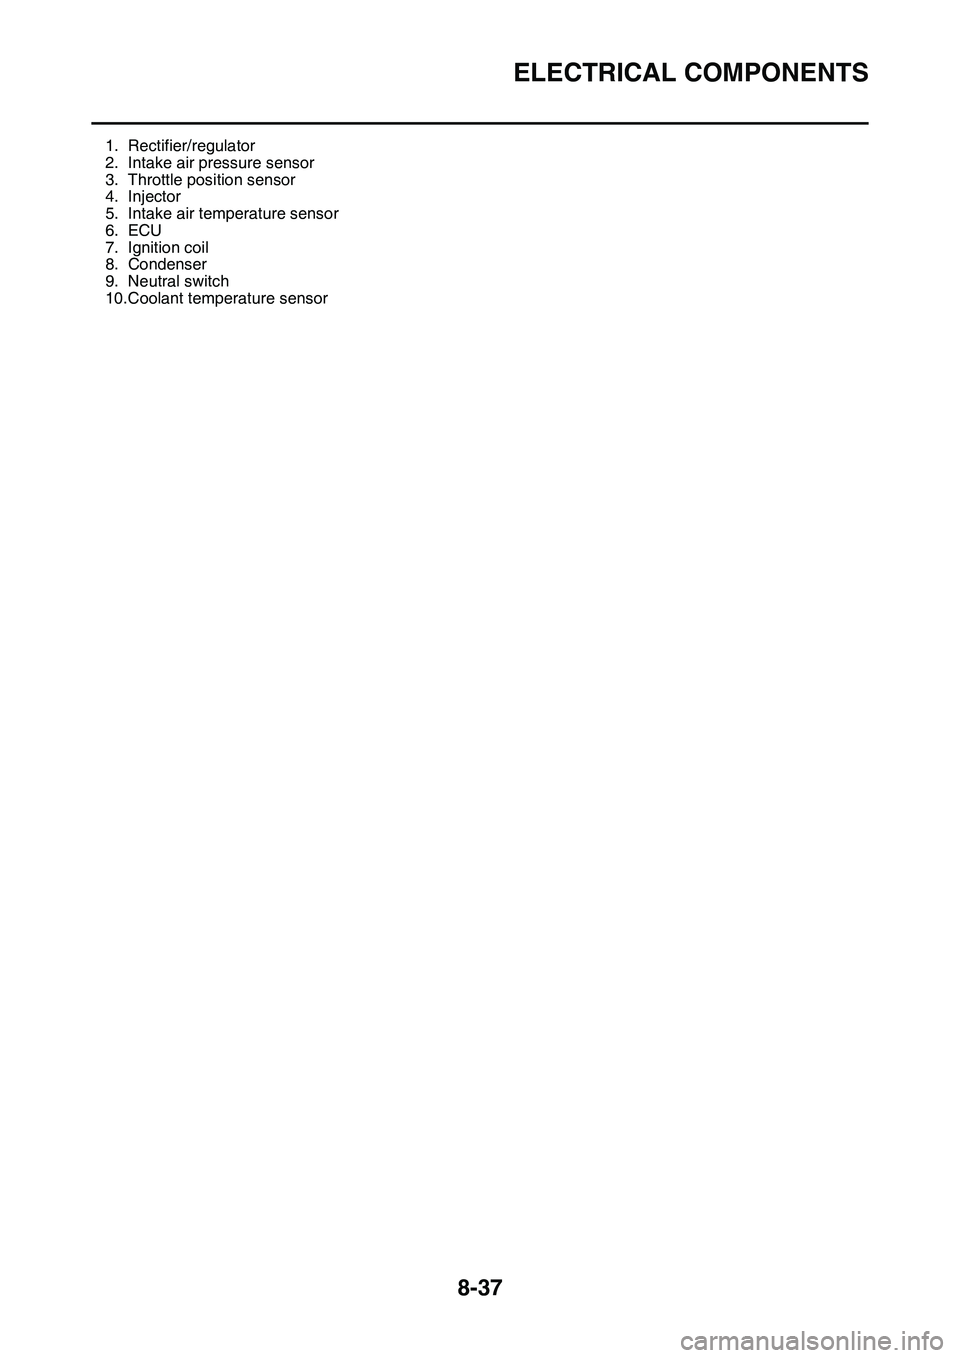
1. Rectifier/regulator
2. Intake air pressure sensor
3. Throttle position sensor
4. Injector
5. Intake air temperature sensor
6. ECU
7. Ignition coil
8. Condenser
9. Neutral switch
10.Coolant temperature sensor
Page 331 of 360
ELECTRICAL COMPONENTS
8-41
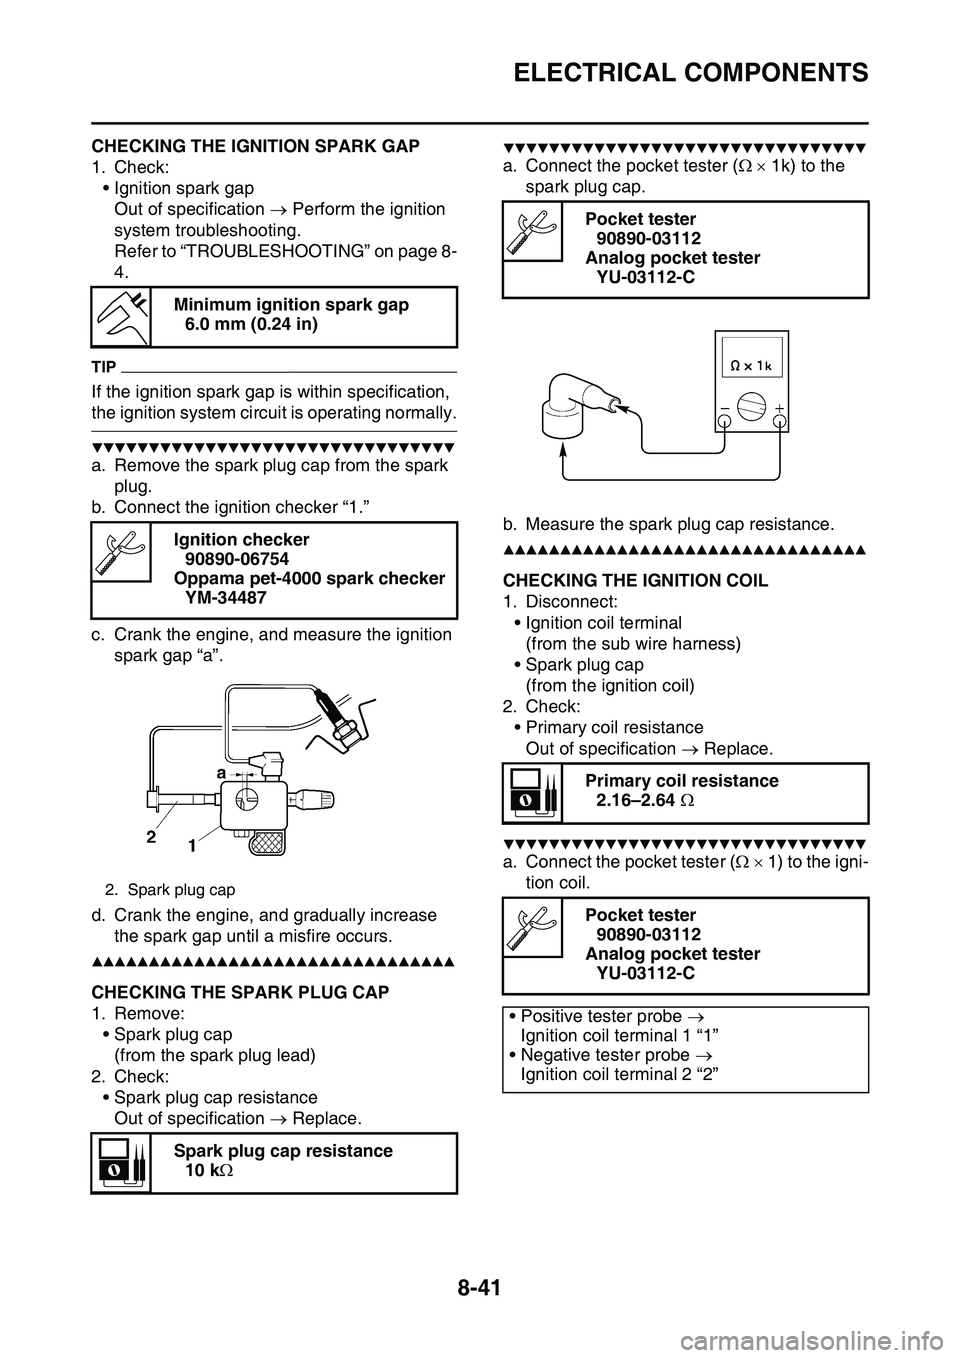
EAS1SL1335CHECKING THE IGNITION SPARK GAP
1. Check:
• Ignition spark gap
Out of specification Perform the ignition
system troubleshooting.
Refer to “TROUBLESHOOTING” on page 8-
4.
TIP
If the ignition spark gap is within specification,
the ignition system circuit is operating normally.
▼▼▼▼▼▼▼▼▼▼▼▼▼▼▼▼▼▼▼▼▼▼▼▼▼▼▼▼▼▼▼▼
a. Remove the spark plug cap from the spark
plug.
b. Connect the ignition checker “1.”
c. Crank the engine, and measure the ignition
spark gap “a”.
d. Crank the engine, and gradually increase
the spark gap until a misfire occurs.
▲▲▲▲▲▲▲▲▲▲▲▲▲▲▲▲▲▲▲▲▲▲▲▲▲▲▲▲▲▲▲▲
EAS1SL1336CHECKING THE SPARK PLUG CAP
1. Remove:
• Spark plug cap
(from the spark plug lead)
2. Check:
• Spark plug cap resistance
Out of specification Replace.
▼▼▼▼▼▼▼▼▼▼▼▼▼▼▼▼▼▼▼▼▼▼▼▼▼▼▼▼▼▼▼▼
a. Connect the pocket tester ( 1k) to the
spark plug cap.
b. Measure the spark plug cap resistance.
▲▲▲▲▲▲▲▲▲▲▲▲▲▲▲▲▲▲▲▲▲▲▲▲▲▲▲▲▲▲▲▲
EAS1SL1337CHECKING THE IGNITION COIL
1. Disconnect:
• Ignition coil terminal
(from the sub wire harness)
• Spark plug cap
(from the ignition coil)
2. Check:
• Primary coil resistance
Out of specification Replace.
▼▼▼▼▼▼▼▼▼▼▼▼▼▼▼▼▼▼▼▼▼▼▼▼▼▼▼▼▼▼▼▼
a. Connect the pocket tester ( 1) to the igni-
tion coil.
Minimum ignition spark gap
6.0 mm (0.24 in)
Ignition checker
90890-06754
Oppama pet-4000 spark checker
YM-34487
2. Spark plug cap
Spark plug cap resistance
10 k
Pocket tester
90890-03112
Analog pocket tester
YU-03112-C
Primary coil resistance
2.16–2.64
Pocket tester
90890-03112
Analog pocket tester
YU-03112-C
• Positive tester probe
Ignition coil terminal 1 “1”
• Negative tester probe
Ignition coil terminal 2 “2”
Page 332 of 360
ELECTRICAL COMPONENTS
8-42
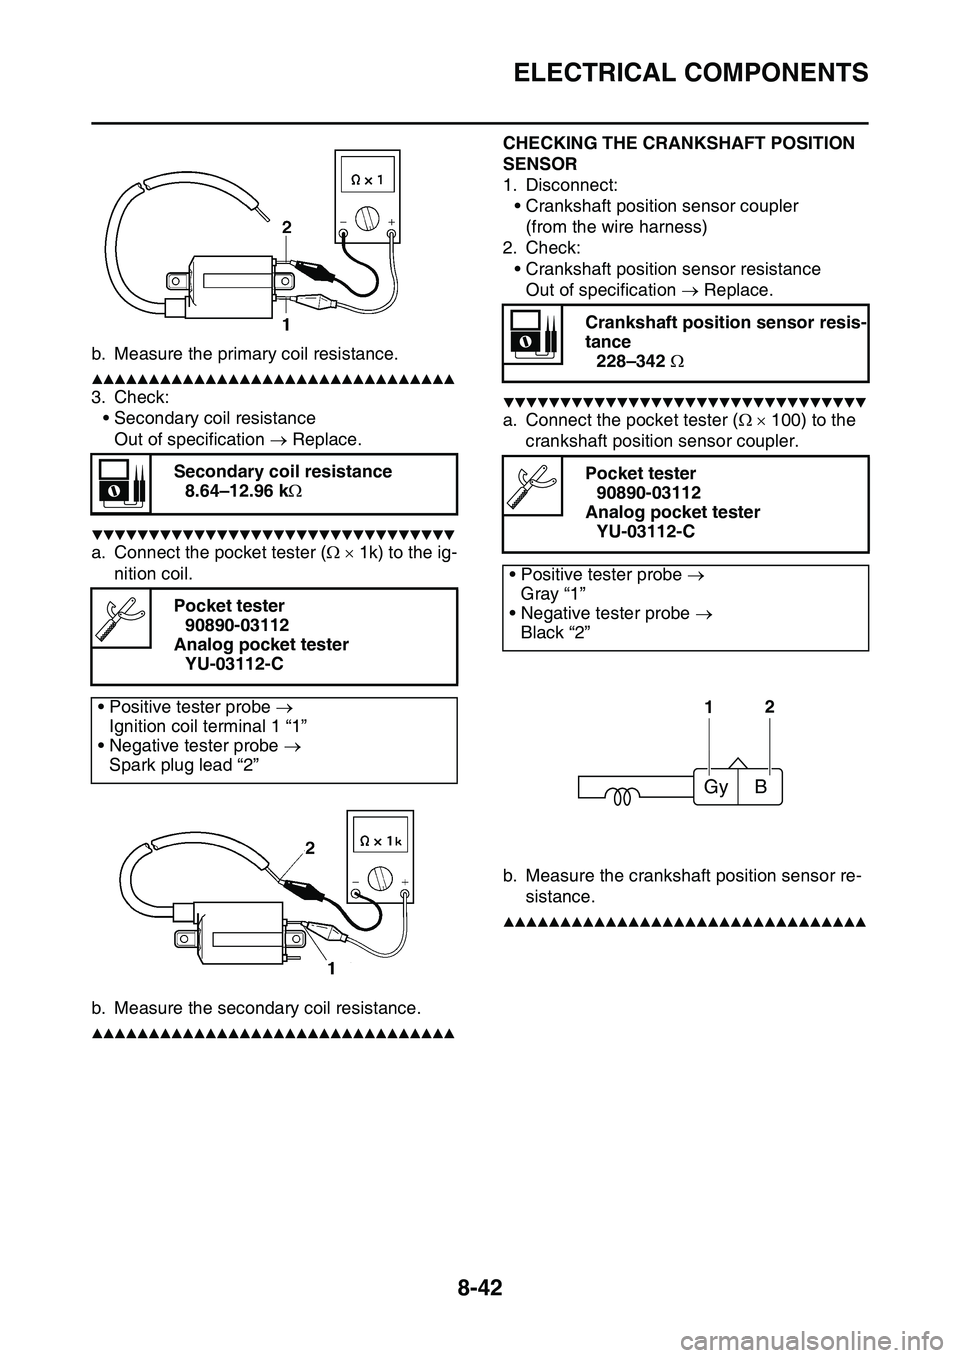
b. Measure the primary coil resistance.
▲▲▲▲▲▲▲▲▲▲▲▲▲▲▲▲▲▲▲▲▲▲▲▲▲▲▲▲▲▲▲▲
3. Check:
• Secondary coil resistance
Out of specification Replace.
▼▼▼▼▼▼▼▼▼▼▼▼▼▼▼▼▼▼▼▼▼▼▼▼▼▼▼▼▼▼▼▼
a. Connect the pocket tester ( 1k) to the ig-
nition coil.
b. Measure the secondary coil resistance.
▲▲▲▲▲▲▲▲▲▲▲▲▲▲▲▲▲▲▲▲▲▲▲▲▲▲▲▲▲▲▲▲
EAS1SL1338
CHECKING THE CRANKSHAFT POSITION
SENSOR
1. Disconnect:
• Crankshaft position sensor coupler
(from the wire harness)
2. Check:
• Crankshaft position sensor resistance
Out of specification Replace.
▼▼▼▼▼▼▼▼▼▼▼▼▼▼▼▼▼▼▼▼▼▼▼▼▼▼▼▼▼▼▼▼
a. Connect the pocket tester ( 100) to the
crankshaft position sensor coupler.
b. Measure the crankshaft position sensor re-
sistance.
▲▲▲▲▲▲▲▲▲▲▲▲▲▲▲▲▲▲▲▲▲▲▲▲▲▲▲▲▲▲▲▲
EAS1SL1339
Secondary coil resistance
8.64–12.96 k
Pocket tester
90890-03112
Analog pocket tester
YU-03112-C
• Positive tester probe
Ignition coil terminal 1 “1”
• Negative tester probe
Spark plug lead “2”
Crankshaft position sensor resis-
tance
228–342
Pocket tester
90890-03112
Analog pocket tester
YU-03112-C
• Positive tester probe
Gray “1”
• Negative tester probe
Black “2”
12
Gy B
Page 333 of 360
ELECTRICAL COMPONENTS
8-43
CHECKING THE ECU
1. Check:
• Mounted condition of ECU.
Improperly mounted Remount.
TIP
• The lean angle sensor is built into the ECU.
• The lean angle sensor stops the engine in
case of a turnover.
• To ensure that the lean angle sensor operates
correctly, do not change the installed condi
-
tion of the ECU.
EAS1SL1340CHECKING THE STATOR COIL
1. Disconnect:
• Stator coil coupler
(from the wire harness)
2. Check:
• Stator coil resistance
Out of specification Replace.
▼▼▼▼▼▼▼▼▼▼▼▼▼▼▼▼▼▼▼▼▼▼▼▼▼▼▼▼▼▼▼▼
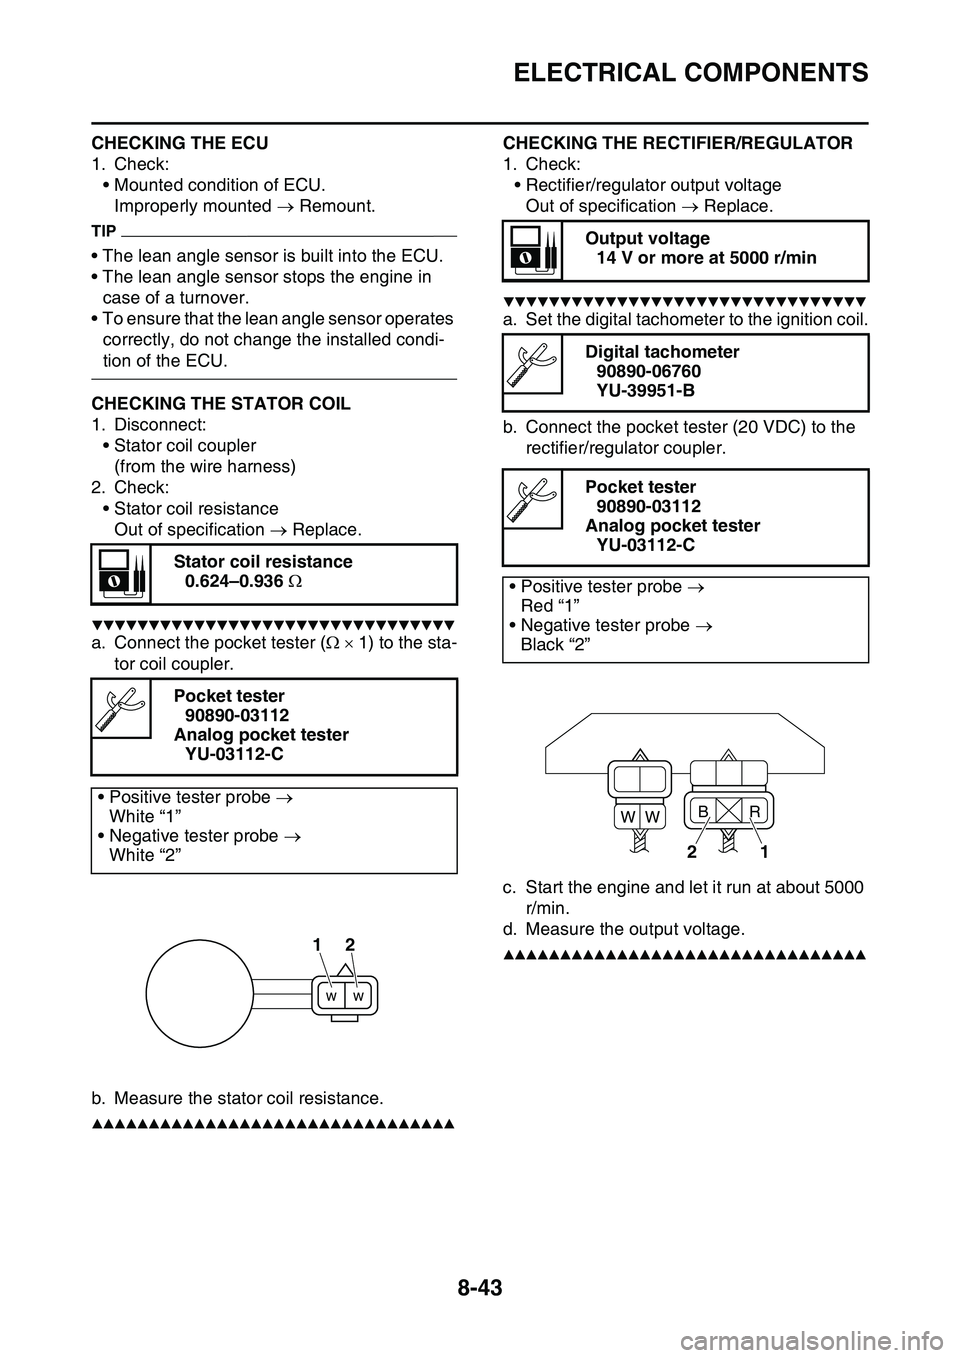
a. Connect the pocket tester ( 1) to the sta-
tor coil coupler.
b. Measure the stator coil resistance.
▲▲▲▲▲▲▲▲▲▲▲▲▲▲▲▲▲▲▲▲▲▲▲▲▲▲▲▲▲▲▲▲
EAS1SL1341
CHECKING THE RECTIFIER/REGULATOR
1. Check:
• Rectifier/regulator output voltage
Out of specification Replace.
▼▼▼▼▼▼▼▼▼▼▼▼▼▼▼▼▼▼▼▼▼▼▼▼▼▼▼▼▼▼▼▼
a. Set the digital tachometer to the ignition coil.
b. Connect the pocket tester (20 VDC) to the
rectifier/regulator coupler.
c. Start the engine and let it run at about 5000
r/min.
d. Measure the output voltage.
▲▲▲▲▲▲▲▲▲▲▲▲▲▲▲▲▲▲▲▲▲▲▲▲▲▲▲▲▲▲▲▲
EAS1SL1342
Stator coil resistance
0.624–0.936
Pocket tester
90890-03112
Analog pocket tester
YU-03112-C
• Positive tester probe
White “1”
• Negative tester probe
White “2”
12
Output voltage
14 V or more at 5000 r/min
Digital tachometer
90890-06760
YU-39951-B
Pocket tester
90890-03112
Analog pocket tester
YU-03112-C
• Positive tester probe
Red “1”
• Negative tester probe
Black “2”
21
B
WWR
Page 340 of 360
TROUBLE SHOOTING
9-1
EAS1SL1349
TROUBLE SHOOTING
EAS1SL1350GENERAL INFORMATION
TIP
The following guide for troubleshooting does
not cover all the possible causes of trouble. It
should be helpful, however, as a guide to basic
troubleshooting. Refer to the relative procedure
in this manual for checks, adjustments, and re
-
placement of parts.
EAS1SL1351STARTING FAILURES
Engine
1. Cylinder and cylinder head
• Loose spark plug
• Loose cylinder head or cylinder
• Damaged cylinder head gasket
• Damaged cylinder gasket
• Worn or damaged cylinder
• Incorrect valve clearance
• Improperly sealed valve
• Incorrect valve-to-valve-seat contact
• Incorrect valve timing
• Faulty valve spring
• Seized valve
2. Piston and piston ring(s)
• Improperly installed piston ring
• Damaged, worn or fatigued piston ring
• Seized piston ring
• Seized or damaged piston
3. Air filter
• Improperly installed air filter
• Clogged air filter element
4. Crankcase and crankshaft
• Improperly assembled crankcase
• Seized crankshaft
Fuel system
1. Fuel tank
• Empty fuel tank
• Clogged fuel tank breather hose
• Deteriorated or contaminated fuel
• Clogged or damaged fuel hose
2. Fuel pump
• Faulty fuel pump
3. Throttle body
• Deteriorated or contaminated fuel
• Sucked-in air
Electrical system
1. Spark plug
• Incorrect spark plug gap
• Incorrect spark plug heat range
• Fouled spark plug
• Worn or damaged electrode
• Worn or damaged insulator
2. Ignition coil
• Cracked or broken ignition coil body
• Broken or shorted primary or secondary
coils
3. Ignition system
• Faulty ECU
• Faulty crankshaft position sensor
• Broken generator rotor woodruff key
4. Switches and wiring
• Faulty ECU
• Faulty engine stop switch
• Broken or shorted wiring
• Faulty neutral switch
• Improperly grounded circuit
• Loose connections
EAS1SL1352INCORRECT ENGINE IDLING SPEED
Engine
1. Cylinder and cylinder head
• Incorrect valve clearance
• Damaged valve train components
2. Air filter
• Clogged air filter element
Fuel system
1. Throttle body
• Damaged or loose throttle body joint
• Improperly synchronized throttle bodies
• Improper throttle cable free play
• Flooded throttle body
Electrical system
1. Spark plug
• Incorrect spark plug gap
• Incorrect spark plug heat range
• Fouled spark plug
• Worn or damaged electrode
• Worn or damaged insulator
• Faulty spark plug cap
2. Ignition coil
• Broken or shorted primary or secondary
coils
• Cracked or broken ignition coil
Page 341 of 360
TROUBLE SHOOTING
9-2
3. Ignition system
• Faulty ECU
• Faulty crankshaft position sensor
• Broken generator rotor woodruff key
EAS1SL1353POOR MEDIUM-AND-HIGH-SPEED PER-
FORMANCE
Refer to “STARTING FAILURES” on page 9-1.
Engine
1. Air filter
• Clogged air filter element
Fuel system
1. Fuel pump
• Faulty fuel pump
2. Throttle body
• Defective throttle body
3. ECU
• Faulty ECU
EAS1SL1354FAULTY GEAR SHIFTING
Shifting is difficult
Refer to “CLUTCH” on page 5-37.
EAS1SL1355SHIFT PEDAL DOES NOT MOVE
Shift shaft
• Bent shift shaft
Shift drum and shift forks
• Foreign object in a shift drum groove
• Seized shift fork
• Bent shift fork guide bar
Transmission
• Seized transmission gear
• Foreign object between transmission gears
• Improperly assembled transmission
EAS1SL1356JUMPS OUT OF GEAR
Shift shaft
• Incorrect shift pedal position
• Improperly returned stopper lever
Shift forks
• Worn shift fork
Shift drum
• Incorrect axial play
• Worn shift drum groove
Transmission
• Worn gear dog
EAS1SL1357FAULTY CLUTCH
Clutch slips
1. Clutch
• Improperly assembled clutch
• Loose or fatigued clutch spring
• Worn friction plate
• Worn clutch plate
2. Engine oil
• Incorrect oil level
• Incorrect oil viscosity (low)
• Deteriorated oil
Clutch drags
1. Clutch
• Unevenly tensioned clutch springs
• Warped pressure plate
• Bent clutch plate
• Swollen friction plate
• Bent clutch push rod
• Damaged clutch boss
• Burnt primary driven gear bushing
2. Engine oil
• Incorrect oil level
• Incorrect oil viscosity (high)
• Deteriorated oil
EAS1SL1358OVERHEATING
Engine
1. Cylinder head and piston
• Heavy carbon buildup
• Clogged coolant passages
2. Engine oil
• Incorrect oil level
• Incorrect oil viscosity
• Inferior oil quality
Cooling system
1. Coolant
• Low coolant level
2. Radiator
• Damaged or leaking radiator
• Faulty radiator cap
• Bent or damaged radiator fin
3. Water pump
• Damaged or faulty water pump
• Damaged hose
• Improperly connected hose
• Damaged pipe
• Improperly connected pipe
Page 342 of 360
TROUBLE SHOOTING
9-3
Fuel system
1. Throttle body
• Damaged or loose throttle body joint
2. Air filter
• Clogged air filter element
Chassis
1. Brake(s)
• Dragging brake
Electrical system
1. Spark plug
• Incorrect spark plug gap
• Incorrect spark plug heat range
2. Ignition system
• Faulty ECU
• Faulty coolant temperature sensor
EAS1SL1359OVERCOOLING
Cooling system
• Faulty coolant temperature sensor
EAS1SL1360POOR BRAKING PERFORMANCE
• Worn brake pad
• Worn brake disc
• Air in hydraulic brake system
• Leaking brake fluid
• Defective master cylinder kit
• Faulty brake caliper kit
• Faulty brake caliper seal
• Loose union bolt
• Damaged brake hose
• Oil or grease on the brake disc
• Oil or grease on the brake pad
• Incorrect brake fluid level
EAS1SL1361FAULTY FRONT FORK LEGS
Leaking oil
• Bent, damaged, or rusty inner tube
• Cracked or damaged outer tube
• Improperly installed oil seal
• Damaged oil seal lip
• Incorrect oil level (high)
• Loose damper rod assembly bolt
• Damaged damper rod assembly bolt copper
washer
• Cracked or damaged cap bolt O-ring
Malfunction
• Bent or damaged inner tube
• Bent or damaged outer tube
• Broken fork spring
• Bent or damaged damper rod
• Incorrect oil viscosity
• Incorrect oil level
EAS1SL1362UNSTABLE HANDLING
1. Handlebar
• Bent or improperly installed handlebar
2. Steering head components
• Improperly installed upper bracket
• Improperly installed lower bracket
(improperly tightened ring nut)
• Bent steering stem
• Damaged ball bearing or bearing race
3. Front fork leg (s)
• Uneven oil levels (both front fork legs)
• Unevenly tensioned fork spring (both front
fork legs)
• Broken fork spring
• Bent or damaged inner tube
• Bent or damaged outer tube
4. Swingarm
• Worn bearing or bushing
• Bent or damaged swingarm
5. Rear shock absorber assembly (-ies)
• Faulty rear shock absorber spring
• Leaking oil or gas
6. Tire (s)
• Uneven tire pressures (front and rear)
• Incorrect tire pressure
• Uneven tire wear
7. Wheel (s)
• Incorrect wheel balance
• Broken or loose spoke
• Damaged wheel bearing
• Bent or loose wheel axle
• Excessive wheel runout
8. Frame
• Bent frame
• Damaged steering head pipe
• Improperly installed bearing race
Page 343 of 360
LIST OF SELF-DIAGNOSTIC AND FAIL-SAFE ACTIONS
9-4
EAS1SL1363
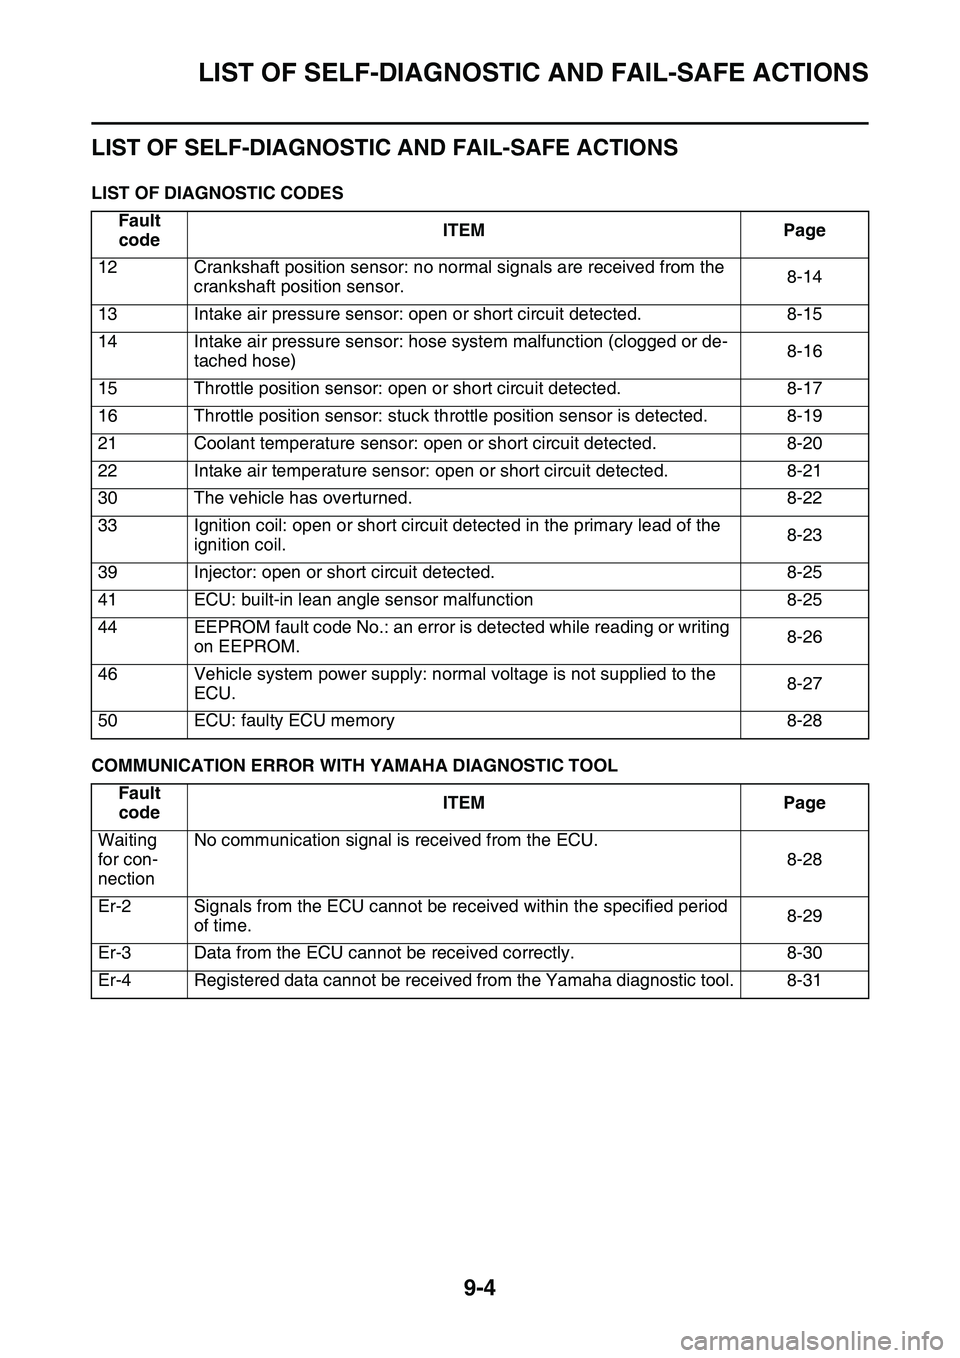
LIST OF SELF-DIAGNOSTIC AND FAIL-SAFE ACTIONS
LIST OF DIAGNOSTIC CODES
COMMUNICATION ERROR WITH YAMAHA DIAGNOSTIC TOOL
Fault
codeITEMPage
12Crankshaft position sensor: no normal signals are received from the
crankshaft position sensor.8-14
13Intake air pressure sensor: open or short circuit detected.8-15
14Intake air pressure sensor: hose system malfunction (clogged or de-
tached hose)8-16
15Throttle position sensor: open or short circuit detected.8-17
16Throttle position sensor: stuck throttle position sensor is detected.8-19
21Coolant temperature sensor: open or short circuit detected.8-20
22Intake air temperature sensor: open or short circuit detected.8-21
30The vehicle has overturned.8-22
33Ignition coil: open or short circuit detected in the primary lead of the
ignition coil.8-23
39Injector: open or short circuit detected.8-25
41ECU: built-in lean angle sensor malfunction8-25
44EEPROM fault code No.: an error is detected while reading or writing
on EEPROM.8-26
46Vehicle system power supply: normal voltage is not supplied to the
ECU.8-27
50ECU: faulty ECU memory8-28
Fault
codeITEMPage
Waiting
for con
-
nection
No communication signal is received from the ECU.
8-28
Er-2Signals from the ECU cannot be received within the specified period
of time.8-29
Er-3Data from the ECU cannot be received correctly.8-30
Er-4Registered data cannot be received from the Yamaha diagnostic tool.8-31
Page 344 of 360
LIST OF SELF-DIAGNOSTIC AND FAIL-SAFE ACTIONS
9-5
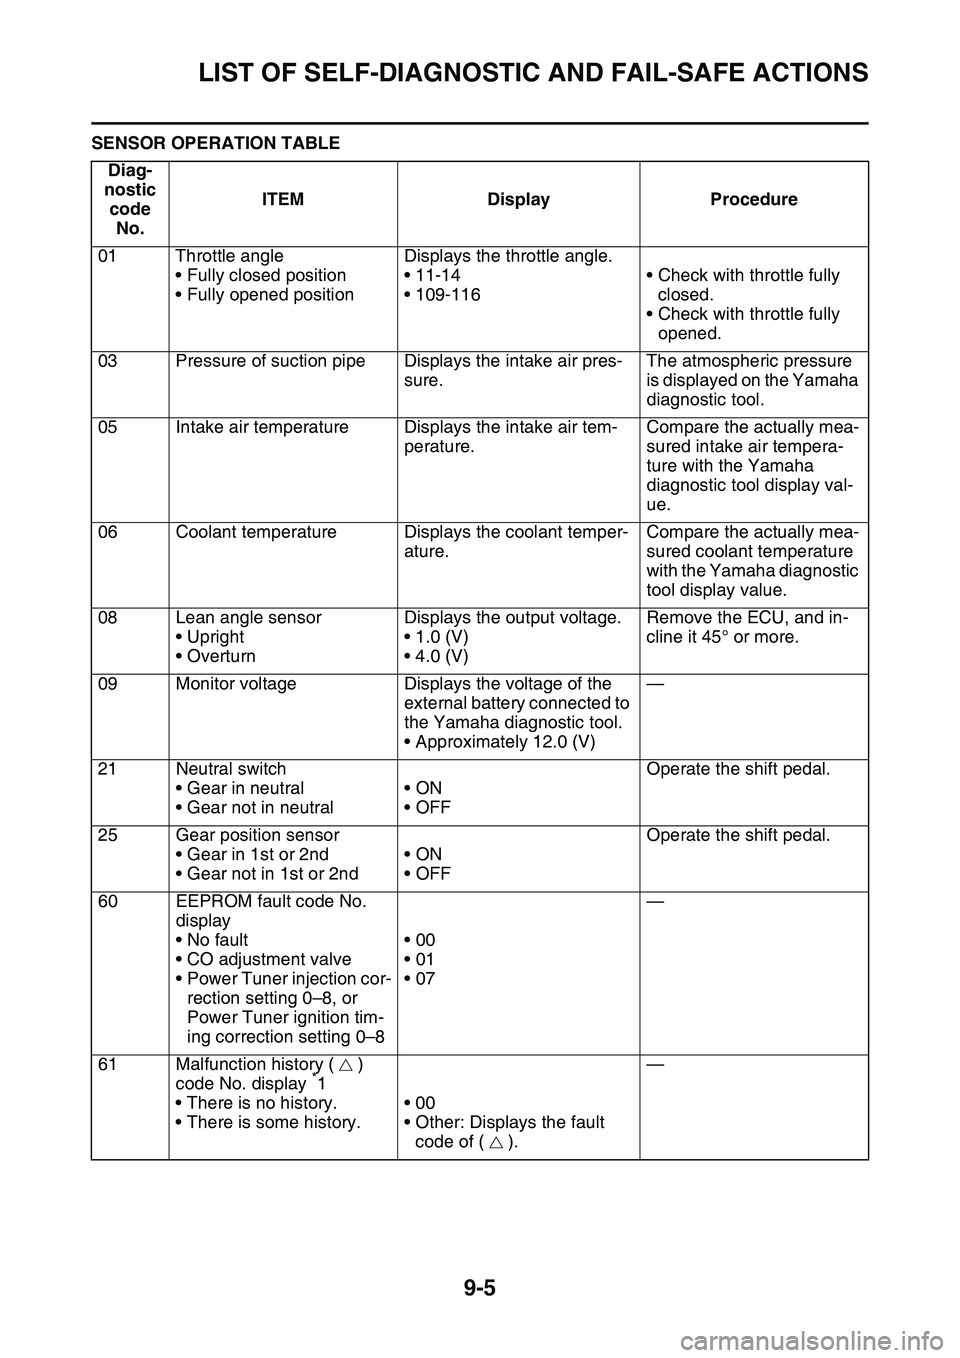
SENSOR OPERATION TABLEDiag-
nostic code No. ITEM Display Procedure
01 Throttle angle • Fully closed position
• Fully opened position Displays the throttle angle.
• 11-14
• 109-116
• Check with throttle fully
closed.
• Check with throttle fully opened.
03 Pressure of suction pipe Displays the intake air pres- sure.The atmospheric pressure
is displayed on the Yamaha
diagnostic tool.
05 Intake air temperature Displays the intake air tem- perature.Compare the actually mea-
sured intake air tempera-
ture with the Yamaha
diagnostic tool display val-
ue.
06 Coolant temperature Displays the coolant temper- ature.Compare the actually mea-
sured coolant temperature
with the Yamaha diagnostic
tool display value.
08 Lean angle sensor • Upright
•Overturn Displays the output voltage.
• 1.0 (V)
• 4.0 (V) Remove the ECU, and in-
cline it 45° or more.
09 Monitor voltage Displays the voltage of the external battery connected to
the Yamaha diagnostic tool.
• Approximately 12.0 (V)—
21 Neutral switch • Gear in neutral
• Gear not in neutral •ON
•OFF Operate the shift pedal.
25 Gear position sensor • Gear in 1st or 2nd
• Gear not in 1st or 2nd •ON
•OFF Operate the shift pedal.
60 EEPROM fault code No. display
• No fault
• CO adjustment valve
• Power Tuner injection cor-rection setting 0–8, or
Power Tuner ignition tim-
ing correction setting 0–8 •00
•01
•07
—
61 Malfunction history ( ) code No. display
*1
• There is no history.
• There is some history. •00
• Other: Displays the fault
code of ( ). —