YAMAHA YZ450F 2014 Owners Manual
Manufacturer: YAMAHA, Model Year: 2014, Model line: YZ450F, Model: YAMAHA YZ450F 2014Pages: 360, PDF Size: 11.76 MB
Page 341 of 360
TROUBLE SHOOTING
9-2
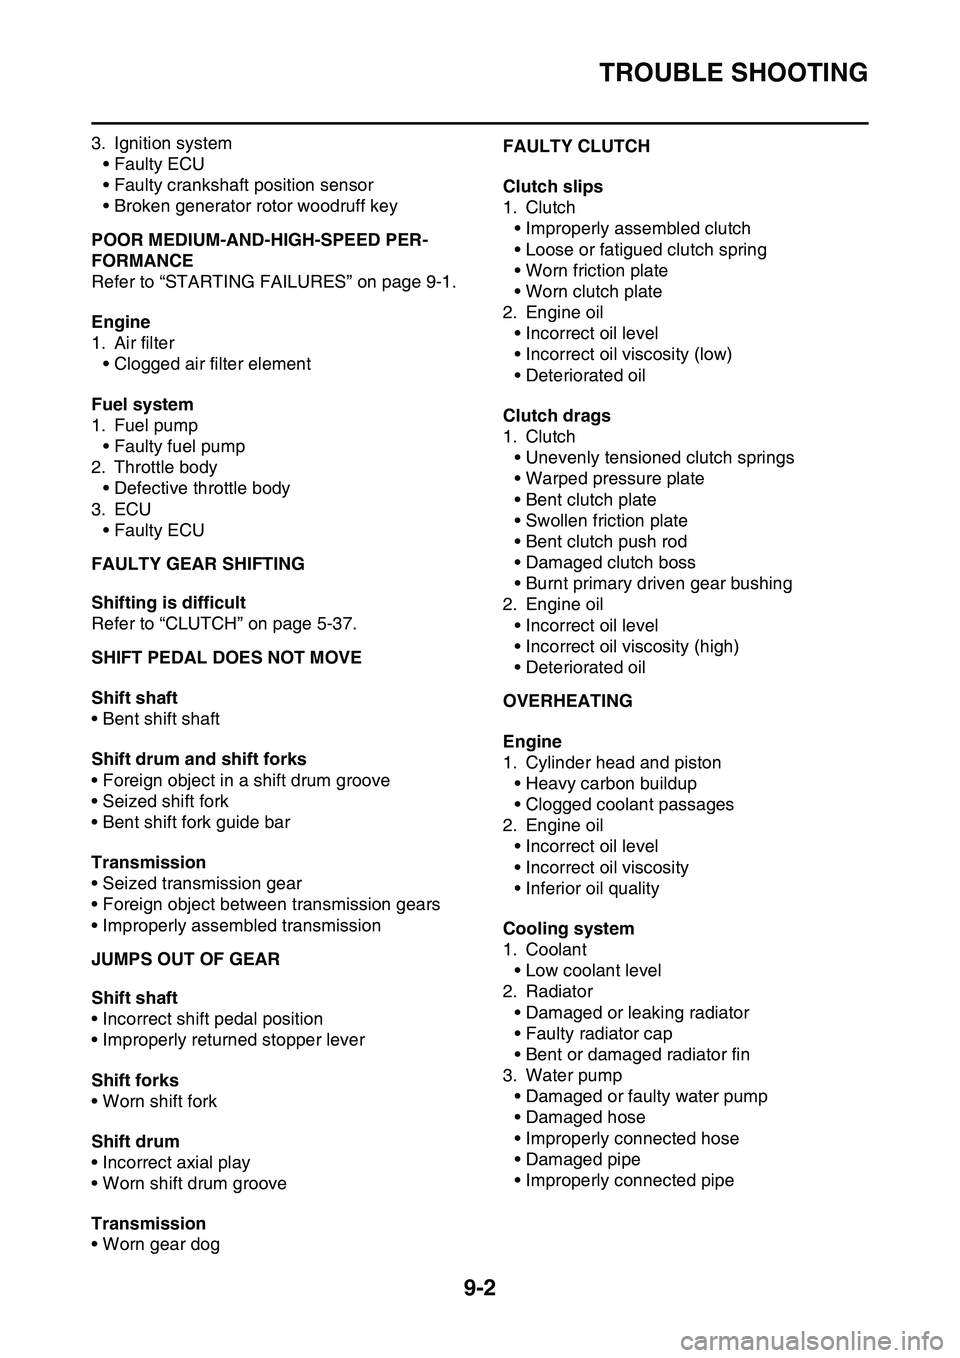
3. Ignition system
• Faulty ECU
• Faulty crankshaft position sensor
• Broken generator rotor woodruff key
EAS1SL1353POOR MEDIUM-AND-HIGH-SPEED PER-
FORMANCE
Refer to “STARTING FAILURES” on page 9-1.
Engine
1. Air filter
• Clogged air filter element
Fuel system
1. Fuel pump
• Faulty fuel pump
2. Throttle body
• Defective throttle body
3. ECU
• Faulty ECU
EAS1SL1354FAULTY GEAR SHIFTING
Shifting is difficult
Refer to “CLUTCH” on page 5-37.
EAS1SL1355SHIFT PEDAL DOES NOT MOVE
Shift shaft
• Bent shift shaft
Shift drum and shift forks
• Foreign object in a shift drum groove
• Seized shift fork
• Bent shift fork guide bar
Transmission
• Seized transmission gear
• Foreign object between transmission gears
• Improperly assembled transmission
EAS1SL1356JUMPS OUT OF GEAR
Shift shaft
• Incorrect shift pedal position
• Improperly returned stopper lever
Shift forks
• Worn shift fork
Shift drum
• Incorrect axial play
• Worn shift drum groove
Transmission
• Worn gear dog
EAS1SL1357FAULTY CLUTCH
Clutch slips
1. Clutch
• Improperly assembled clutch
• Loose or fatigued clutch spring
• Worn friction plate
• Worn clutch plate
2. Engine oil
• Incorrect oil level
• Incorrect oil viscosity (low)
• Deteriorated oil
Clutch drags
1. Clutch
• Unevenly tensioned clutch springs
• Warped pressure plate
• Bent clutch plate
• Swollen friction plate
• Bent clutch push rod
• Damaged clutch boss
• Burnt primary driven gear bushing
2. Engine oil
• Incorrect oil level
• Incorrect oil viscosity (high)
• Deteriorated oil
EAS1SL1358OVERHEATING
Engine
1. Cylinder head and piston
• Heavy carbon buildup
• Clogged coolant passages
2. Engine oil
• Incorrect oil level
• Incorrect oil viscosity
• Inferior oil quality
Cooling system
1. Coolant
• Low coolant level
2. Radiator
• Damaged or leaking radiator
• Faulty radiator cap
• Bent or damaged radiator fin
3. Water pump
• Damaged or faulty water pump
• Damaged hose
• Improperly connected hose
• Damaged pipe
• Improperly connected pipe
Page 342 of 360
TROUBLE SHOOTING
9-3
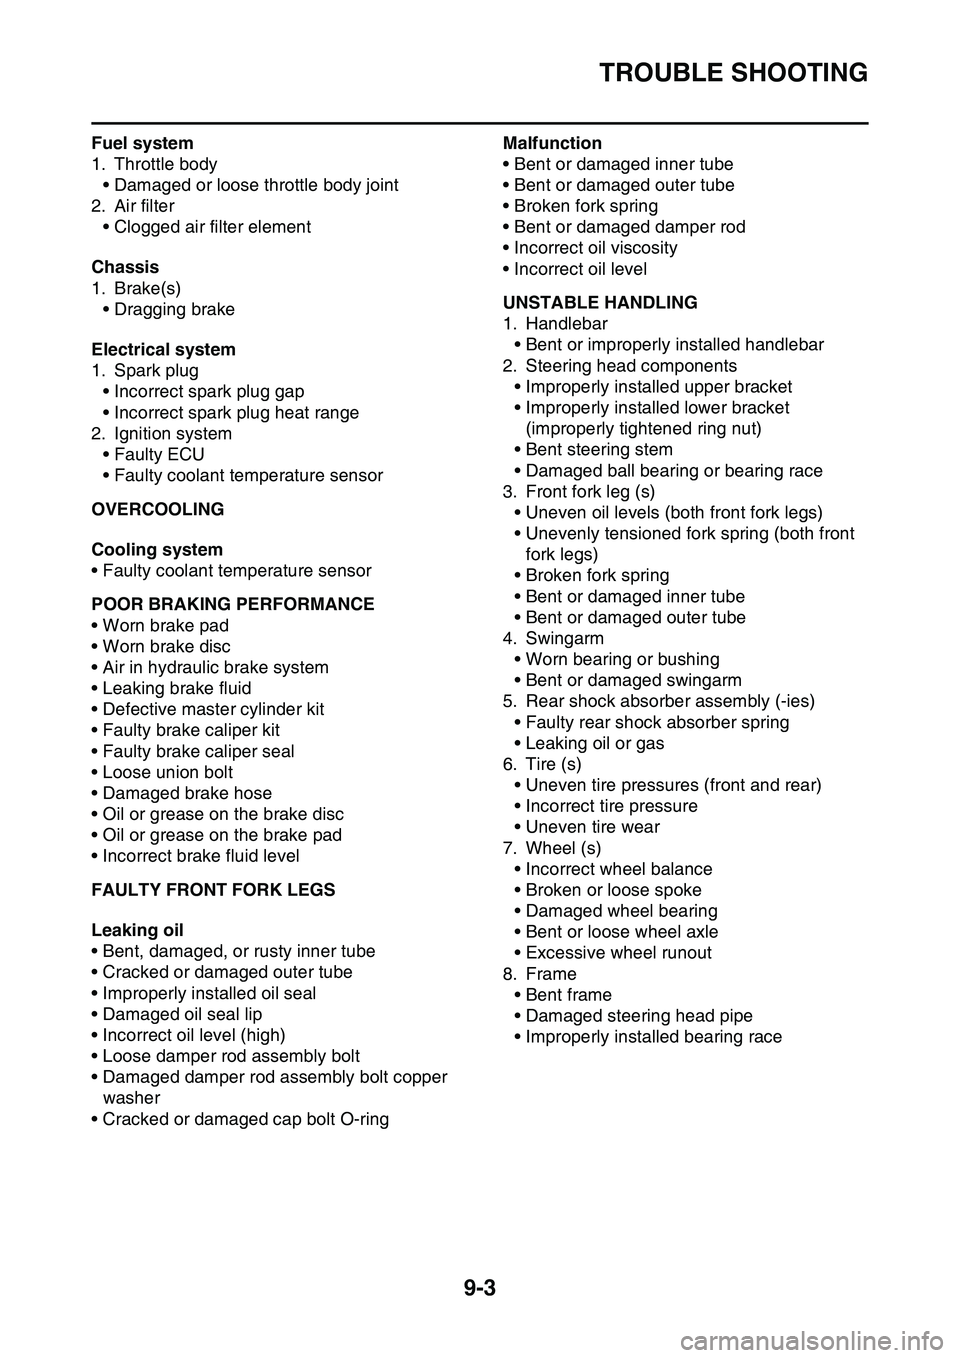
Fuel system
1. Throttle body
• Damaged or loose throttle body joint
2. Air filter
• Clogged air filter element
Chassis
1. Brake(s)
• Dragging brake
Electrical system
1. Spark plug
• Incorrect spark plug gap
• Incorrect spark plug heat range
2. Ignition system
• Faulty ECU
• Faulty coolant temperature sensor
EAS1SL1359OVERCOOLING
Cooling system
• Faulty coolant temperature sensor
EAS1SL1360POOR BRAKING PERFORMANCE
• Worn brake pad
• Worn brake disc
• Air in hydraulic brake system
• Leaking brake fluid
• Defective master cylinder kit
• Faulty brake caliper kit
• Faulty brake caliper seal
• Loose union bolt
• Damaged brake hose
• Oil or grease on the brake disc
• Oil or grease on the brake pad
• Incorrect brake fluid level
EAS1SL1361FAULTY FRONT FORK LEGS
Leaking oil
• Bent, damaged, or rusty inner tube
• Cracked or damaged outer tube
• Improperly installed oil seal
• Damaged oil seal lip
• Incorrect oil level (high)
• Loose damper rod assembly bolt
• Damaged damper rod assembly bolt copper
washer
• Cracked or damaged cap bolt O-ring
Malfunction
• Bent or damaged inner tube
• Bent or damaged outer tube
• Broken fork spring
• Bent or damaged damper rod
• Incorrect oil viscosity
• Incorrect oil level
EAS1SL1362UNSTABLE HANDLING
1. Handlebar
• Bent or improperly installed handlebar
2. Steering head components
• Improperly installed upper bracket
• Improperly installed lower bracket
(improperly tightened ring nut)
• Bent steering stem
• Damaged ball bearing or bearing race
3. Front fork leg (s)
• Uneven oil levels (both front fork legs)
• Unevenly tensioned fork spring (both front
fork legs)
• Broken fork spring
• Bent or damaged inner tube
• Bent or damaged outer tube
4. Swingarm
• Worn bearing or bushing
• Bent or damaged swingarm
5. Rear shock absorber assembly (-ies)
• Faulty rear shock absorber spring
• Leaking oil or gas
6. Tire (s)
• Uneven tire pressures (front and rear)
• Incorrect tire pressure
• Uneven tire wear
7. Wheel (s)
• Incorrect wheel balance
• Broken or loose spoke
• Damaged wheel bearing
• Bent or loose wheel axle
• Excessive wheel runout
8. Frame
• Bent frame
• Damaged steering head pipe
• Improperly installed bearing race
Page 343 of 360
LIST OF SELF-DIAGNOSTIC AND FAIL-SAFE ACTIONS
9-4
EAS1SL1363
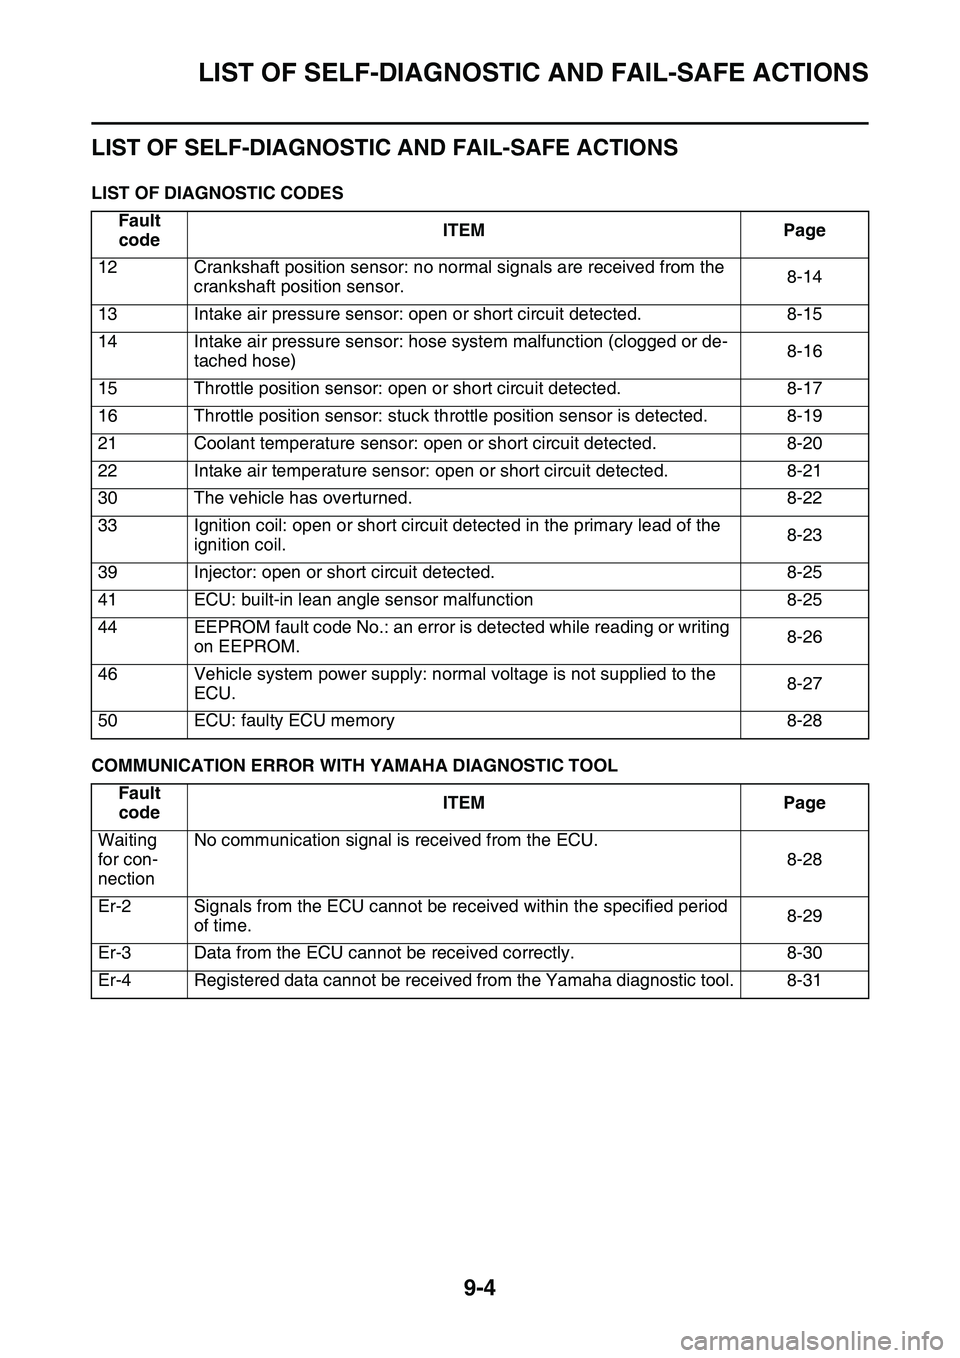
LIST OF SELF-DIAGNOSTIC AND FAIL-SAFE ACTIONS
LIST OF DIAGNOSTIC CODES
COMMUNICATION ERROR WITH YAMAHA DIAGNOSTIC TOOL
Fault
codeITEMPage
12Crankshaft position sensor: no normal signals are received from the
crankshaft position sensor.8-14
13Intake air pressure sensor: open or short circuit detected.8-15
14Intake air pressure sensor: hose system malfunction (clogged or de-
tached hose)8-16
15Throttle position sensor: open or short circuit detected.8-17
16Throttle position sensor: stuck throttle position sensor is detected.8-19
21Coolant temperature sensor: open or short circuit detected.8-20
22Intake air temperature sensor: open or short circuit detected.8-21
30The vehicle has overturned.8-22
33Ignition coil: open or short circuit detected in the primary lead of the
ignition coil.8-23
39Injector: open or short circuit detected.8-25
41ECU: built-in lean angle sensor malfunction8-25
44EEPROM fault code No.: an error is detected while reading or writing
on EEPROM.8-26
46Vehicle system power supply: normal voltage is not supplied to the
ECU.8-27
50ECU: faulty ECU memory8-28
Fault
codeITEMPage
Waiting
for con
-
nection
No communication signal is received from the ECU.
8-28
Er-2Signals from the ECU cannot be received within the specified period
of time.8-29
Er-3Data from the ECU cannot be received correctly.8-30
Er-4Registered data cannot be received from the Yamaha diagnostic tool.8-31
Page 344 of 360
LIST OF SELF-DIAGNOSTIC AND FAIL-SAFE ACTIONS
9-5
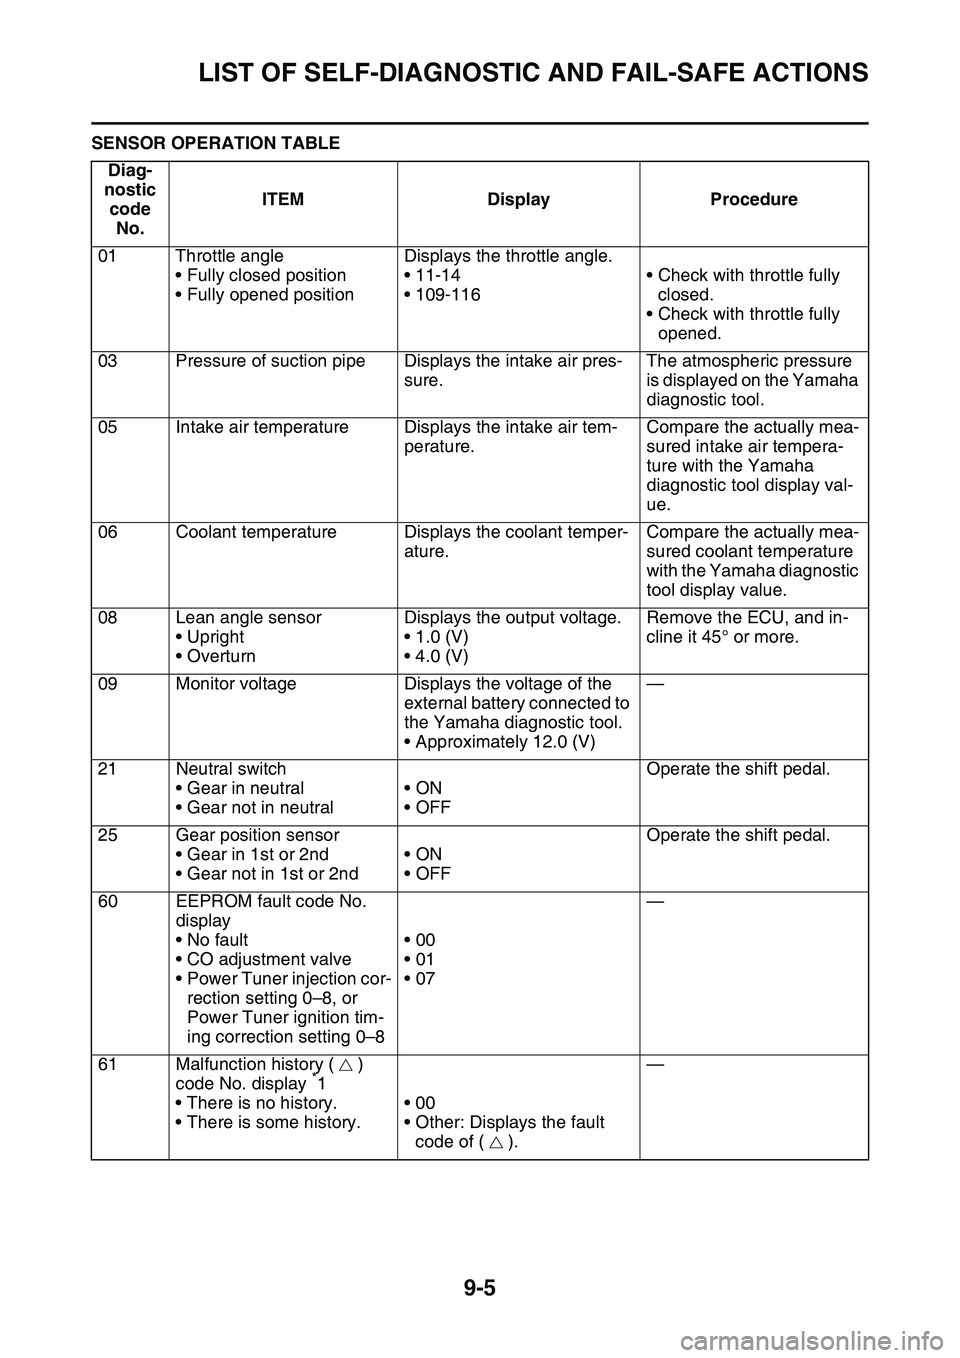
SENSOR OPERATION TABLEDiag-
nostic code No. ITEM Display Procedure
01 Throttle angle • Fully closed position
• Fully opened position Displays the throttle angle.
• 11-14
• 109-116
• Check with throttle fully
closed.
• Check with throttle fully opened.
03 Pressure of suction pipe Displays the intake air pres- sure.The atmospheric pressure
is displayed on the Yamaha
diagnostic tool.
05 Intake air temperature Displays the intake air tem- perature.Compare the actually mea-
sured intake air tempera-
ture with the Yamaha
diagnostic tool display val-
ue.
06 Coolant temperature Displays the coolant temper- ature.Compare the actually mea-
sured coolant temperature
with the Yamaha diagnostic
tool display value.
08 Lean angle sensor • Upright
•Overturn Displays the output voltage.
• 1.0 (V)
• 4.0 (V) Remove the ECU, and in-
cline it 45° or more.
09 Monitor voltage Displays the voltage of the external battery connected to
the Yamaha diagnostic tool.
• Approximately 12.0 (V)—
21 Neutral switch • Gear in neutral
• Gear not in neutral •ON
•OFF Operate the shift pedal.
25 Gear position sensor • Gear in 1st or 2nd
• Gear not in 1st or 2nd •ON
•OFF Operate the shift pedal.
60 EEPROM fault code No. display
• No fault
• CO adjustment valve
• Power Tuner injection cor-rection setting 0–8, or
Power Tuner ignition tim-
ing correction setting 0–8 •00
•01
•07
—
61 Malfunction history ( ) code No. display
*1
• There is no history.
• There is some history. •00
• Other: Displays the fault
code of ( ). —
Page 345 of 360
LIST OF SELF-DIAGNOSTIC AND FAIL-SAFE ACTIONS
9-6
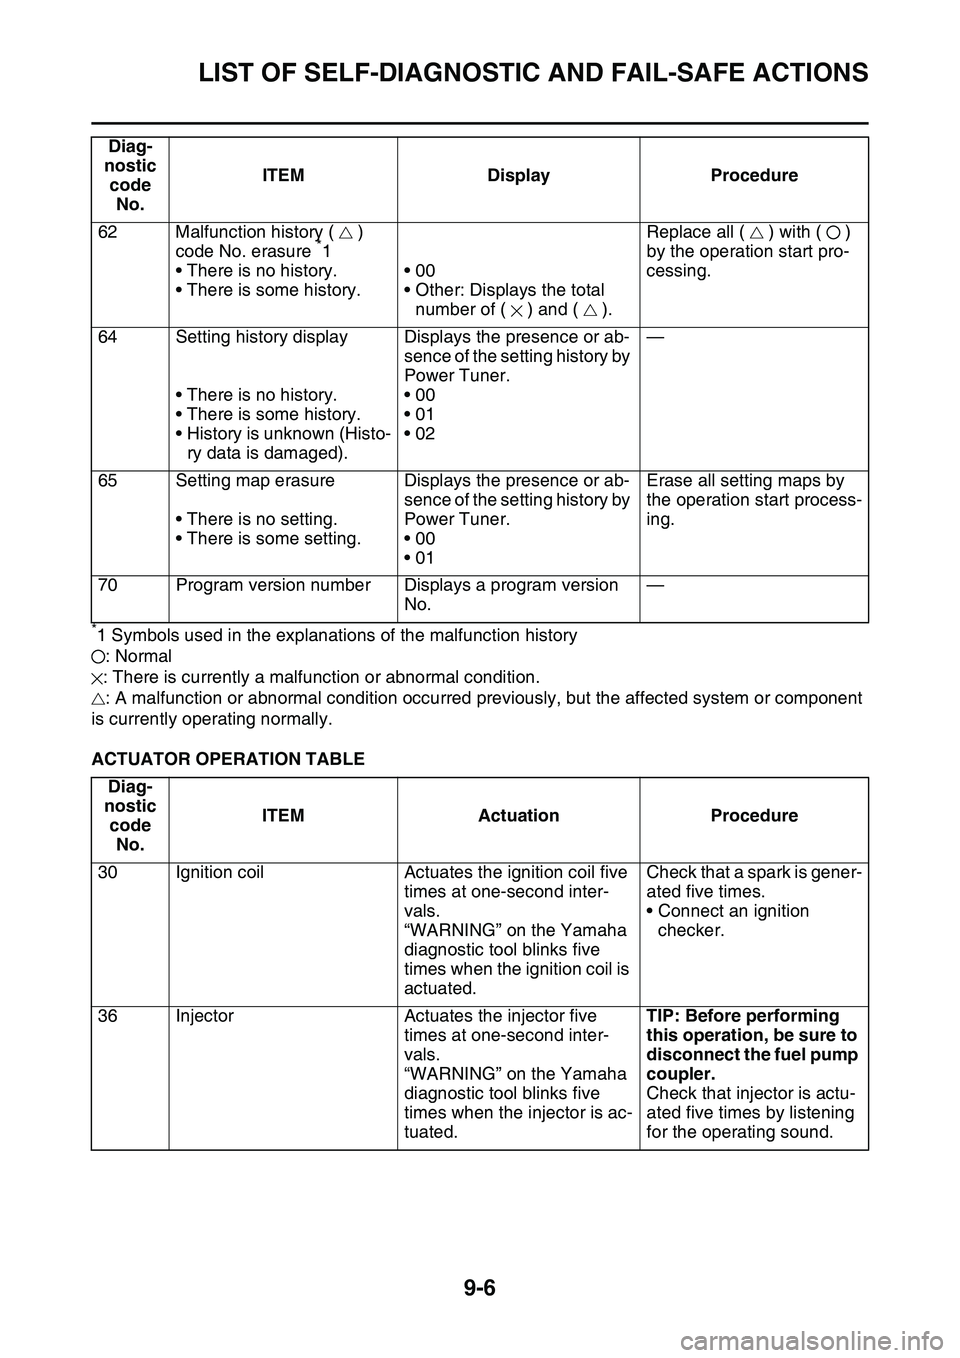
*1 Symbols used in the explanations of the malfunction history: Normal
: There is currently a malfunction or abnormal condition. : A malfunction or abnormal condition occurred prev iously, but the affected system or component
is currently operating normally.
ACTUATOR OPERATION TABLE 62 Malfunction history ( )
code No. erasure
*1
• There is no history.
• There is some history. •00
• Other: Displays the total
number of ( ) and ( ). Replace all ( ) with ( )
by the operation start pro-
cessing.
64 Setting history display • There is no history.
• There is some history.
• History is unknown (Histo-ry data is damaged). Displays the presence or ab-
sence of the setting history by
Power Tuner.
•00
•01
•02
—
65 Setting map erasure • There is no setting.
• There is some setting. Displays the presence or ab-
sence of the setting history by
Power Tuner.
•00
•01 Erase all setting maps by
the operation start process-
ing.
70 Program version number Displays a program version No.—
Diag-
nostic code No. ITEM Actuation Procedure
30 Ignition coil Actuates the ignition coil five times at one-second inter-
vals.
“WARNING” on the Yamaha
diagnostic tool blinks five
times when the ignition coil is
actuated.Check that a spark is gener-
ated five times.
• Connect an ignition
checker.
36 Injector Actuates the injector five times at one-second inter-
vals.
“WARNING” on the Yamaha
diagnostic tool blinks five
times when the injector is ac-
tuated.TIP: Before performing
this operation, be sure to
disconnect the fuel pump
coupler.
Check that injector is actu-
ated five times by listening
for the operating sound.
Diag-
nostic code No. ITEM Display Procedure
Page 346 of 360

LIST OF SELF-DIAGNOSTIC AND FAIL-SAFE ACTIONS
9-7
Page 347 of 360
10
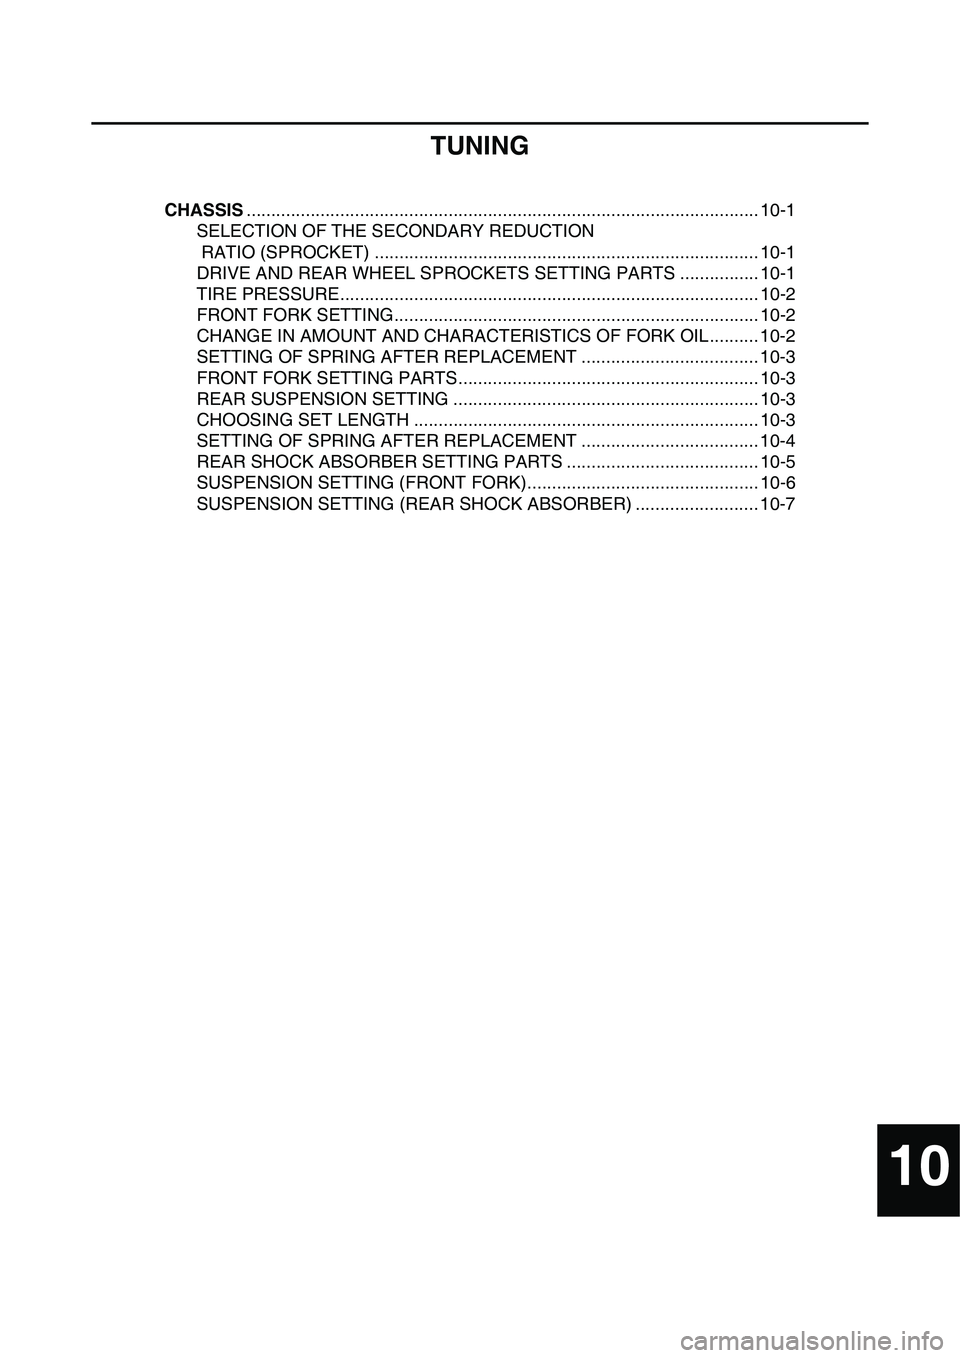
TUNING
CHASSIS........................................................................................................ 10-1
SELECTION OF THE SECONDARY REDUCTION
RATIO (SPROCKET) .............................................................................. 10-1
DRIVE AND REAR WHEEL SPROCKETS SETTING PARTS ................ 10-1
TIRE PRESSURE..................................................................................... 10-2
FRONT FORK SETTING.......................................................................... 10-2
CHANGE IN AMOUNT AND CHARACTERISTICS OF FORK OIL.......... 10-2
SETTING OF SPRING AFTER REPLACEMENT .................................... 10-3
FRONT FORK SETTING PARTS............................................................. 10-3
REAR SUSPENSION SETTING .............................................................. 10-3
CHOOSING SET LENGTH ...................................................................... 10-3
SETTING OF SPRING AFTER REPLACEMENT .................................... 10-4
REAR SHOCK ABSORBER SETTING PARTS ....................................... 10-5
SUSPENSION SETTING (FRONT FORK)............................................... 10-6
SUSPENSION SETTING (REAR SHOCK ABSORBER) ......................... 10-7
Page 348 of 360
CHASSIS
10-1
EAS1SL1365
CHASSIS
EAS1SL1366SELECTION OF THE SECONDARY REDUC-
TION RATIO (SPROCKET)
• It is generally said that the secondary gear ra-
tio should be reduced for a longer straight por-
tion of a speed course and should be
increased for a course with many corners. Ac
-
tually, however, as the speed depends on the
ground condition of the day of the race, be
sure to run through the circuit to set the ma
-
chine suitable for the entire course.
• In actuality, it is very difficult to achieve set-
tings suitable for the entire course and some
settings may be sacrificed. Thus, the settings
should be matched to the portion of the
course that has the greatest effect on the race
result. In such a case, run through the entire
course while making notes of lap times to find
the best balance; then, determine the second
-
ary reduction ratio.
• If a course has a long straight portion where a
machine can run at maximum speed, the ma
-
chine is generally set such that it can develop
its maximum revolutions toward the end of the
straight line, with care taken to avoid the en
-
gine over-revving.
TIP
Riding technique varies from rider to rider and
the performance of a machine also vary from
machine to machine. Therefore, do not imitate
other rider's settings from the beginning but
choose your own setting according to the level
of your riding technique.
EAS1SL1367
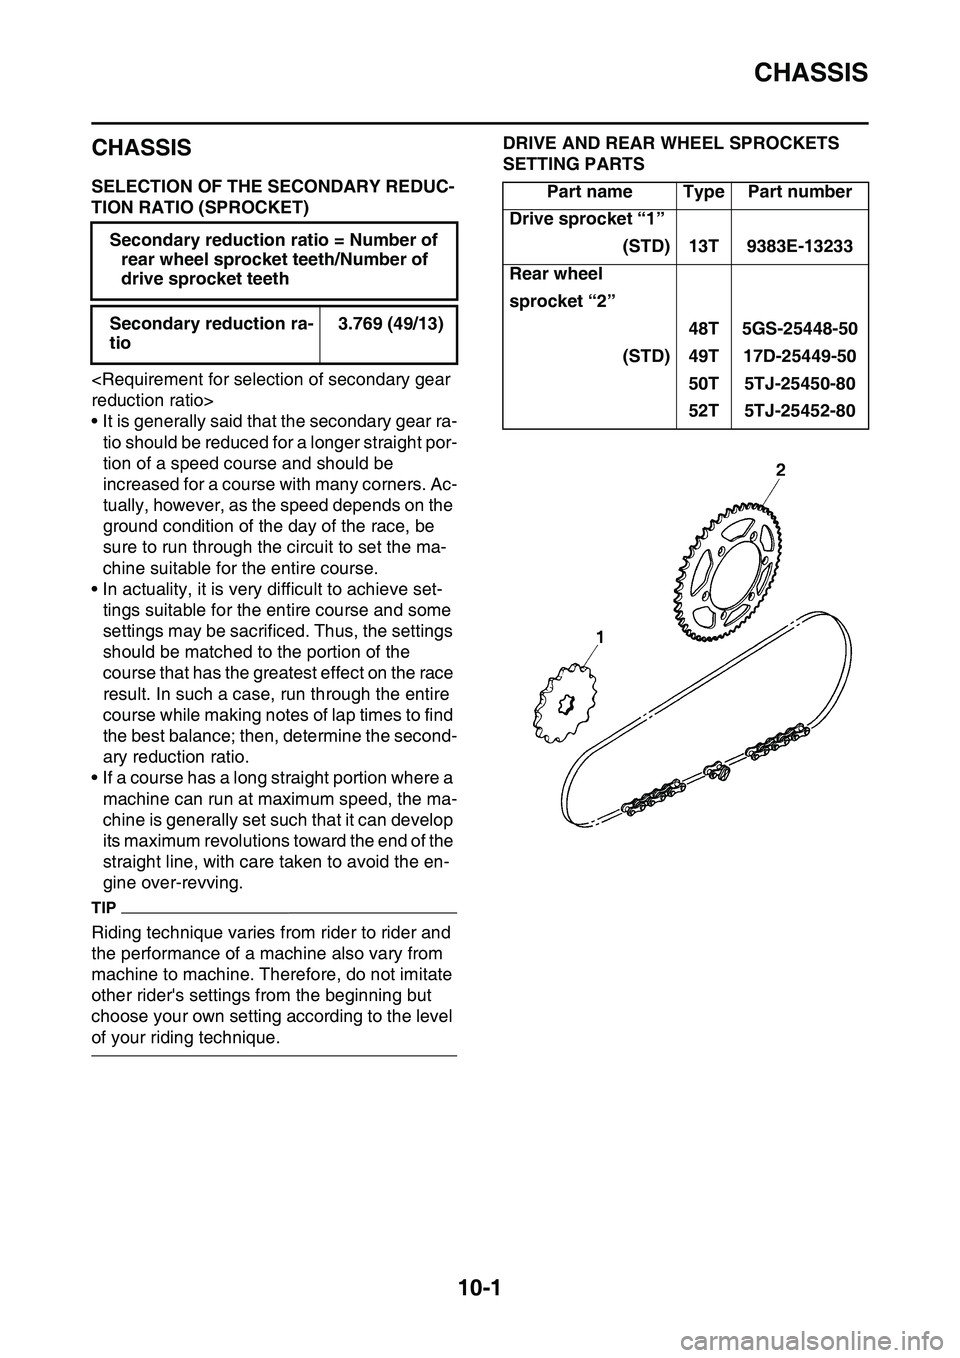
DRIVE AND REAR WHEEL SPROCKETS
SETTING PARTS
EAS1SL1368
Secondary reduction ratio = Number of
rear wheel sprocket teeth/Number of
drive sprocket teeth
Secondary reduction ra-
tio
3.769 (49/13)
Part nameTypePart number
Drive sprocket “1”
(STD)13T9383E-13233
Rear wheel
sprocket “2”
48T5GS-25448-50
(STD)49T17D-25449-50
50T5TJ-25450-80
52T5TJ-25452-80
Page 349 of 360
CHASSIS
10-2
TIRE PRESSURE
Tire pressure should be adjusted to suit the
road surface condition of the circuit.
• Under a rainy, a muddy, a sandy, or a slippery
condition, the tire pressure should be lower
for a larger area of contact with the road sur
-
face.
• Under a stony or a hard road condition, the
tire pressure should be higher to prevent a flat
tire.
EAS1SL1369FRONT FORK SETTING
The front fork setting should be made depend-
ing on the rider's feeling of an actual run and
the circuit conditions.
The front fork setting includes the following
three factors:
1. Setting of air spring characteristics
• Change the fork oil amount.
2. Setting of spring preload
• Change the spring.
3. Setting of damping force
• Change the compression damping force.
• Change the rebound damping force.
The spring acts on the load and the damping
force acts on the cushion travel speed.
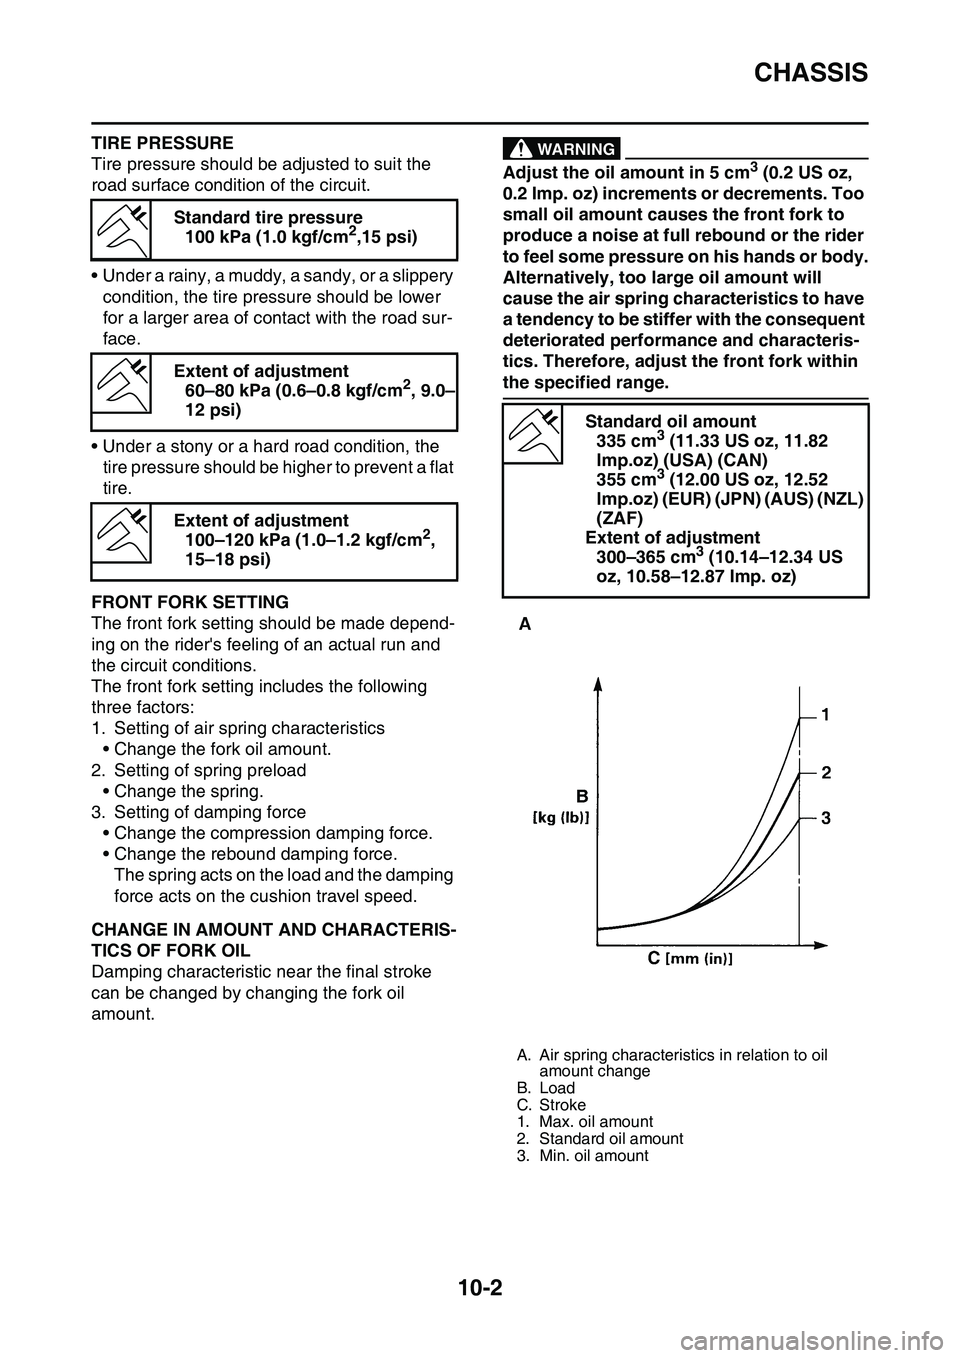
EAS1SL1370CHANGE IN AMOUNT AND CHARACTERIS-
TICS OF FORK OIL
Damping characteristic near the final stroke
can be changed by changing the fork oil
amount.
EWA1DX4001
WARNING
Adjust the oil amount in 5 cm3 (0.2 US oz,
0.2 Imp. oz) increments or decrements. Too
small oil amount causes the front fork to
produce a noise at full rebound or the rider
to feel some pressure on his hands or body.
Alternatively, too large oil amount will
cause the air spring characteristics to have
a tendency to be stiffer with the consequent
deteriorated performance and characteris
-
tics. Therefore, adjust the front fork within
the specified range.
EAS1SL1371
Standard tire pressure
100 kPa (1.0 kgf/cm2,15 psi)
Extent of adjustment
60–80 kPa (0.6–0.8 kgf/cm2, 9.0–
12 psi)
Extent of adjustment
100–120 kPa (1.0–1.2 kgf/cm2,
15–18 psi)
Standard oil amount
335 cm3 (11.33 US oz, 11.82
lmp.oz) (USA) (CAN)
355 cm3 (12.00 US oz, 12.52
lmp.oz) (EUR) (JPN) (AUS) (NZL)
(ZAF)
Extent of adjustment
300–365 cm3 (10.14–12.34 US
oz, 10.58–12.87 Imp. oz)
A. Air spring characteristics in relation to oil
amount change
B. Load
C. Stroke
1. Max. oil amount
2. Standard oil amount
3. Min. oil amount
Page 350 of 360
CHASSIS
10-3
SETTING OF SPRING AFTER REPLACE-
MENT
As the front fork setting can be easily affected
by the rear suspension, take care so that the
front and the rear are balanced (in position etc.)
when setting the front fork.
1. Use of soft spring
• Change the rebound damping force.
Turn out one or two clicks.
• Change the compression damping force.
Turn in one or two clicks.
TIP
Generally a soft spring gives a soft riding feel-
ing. Rebound damping tends to become stron-
ger and the front fork may sink deeply over a
series of gaps.
2. Use of stiff spring
• Change the rebound damping force.
Turn in one or two clicks.
• Change the compression damping force.
Turn out one or two clicks.
TIP
Generally a stiff spring gives a stiff riding feel-
ing. Rebound damping tends to become weak-
er, resulting in lack of a sense of contact with
the road surface or in a vibrating handlebar.
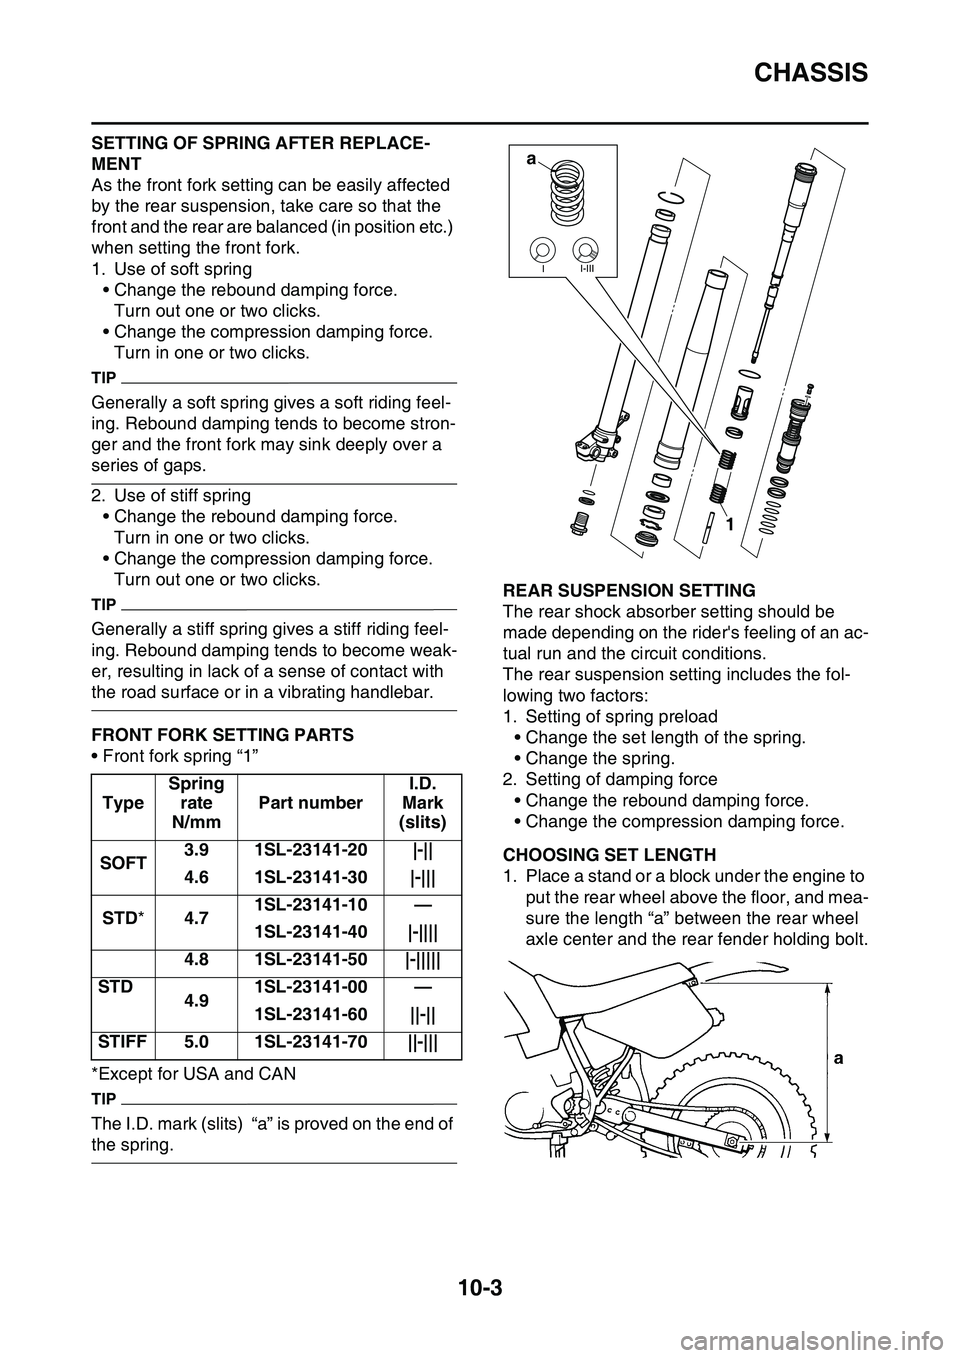
EAS1SL1372FRONT FORK SETTING PARTS
• Front fork spring “1”
*Except for USA and CAN
TIP
The I.D. mark (slits) “a” is proved on the end of
the spring.
EAS1SL1373REAR SUSPENSION SETTING
The rear shock absorber setting should be
made depending on the rider's feeling of an ac
-
tual run and the circuit conditions.
The rear suspension setting includes the fol-
lowing two factors:
1. Setting of spring preload
• Change the set length of the spring.
• Change the spring.
2. Setting of damping force
• Change the rebound damping force.
• Change the compression damping force.
EAS1SL1374CHOOSING SET LENGTH
1. Place a stand or a block under the engine to
put the rear wheel above the floor, and mea
-
sure the length “a” between the rear wheel
axle center and the rear fender holding bolt.
Type
Spring
rate
N/mm
Part number
I.D.
Mark
(slits)
SOFT3.91SL-23141-20|-||
4.61SL-23141-30|-|||
STD*4.71SL-23141-10—
1SL-23141-40|-||||
4.81SL-23141-50|-|||||
STD4.91SL-23141-00—
1SL-23141-60||-||
STIFF5.01SL-23141-70||-|||
a
1