engine oil YAMAHA YZ65 2018 Owners Manual
[x] Cancel search | Manufacturer: YAMAHA, Model Year: 2018, Model line: YZ65, Model: YAMAHA YZ65 2018Pages: 90, PDF Size: 9.58 MB
Page 8 of 90

Table of contents
Location of important la bels ........... 1-1
Safety information ............................ 2-1
Description ....................................... 3-1
Left view ......................................... 3-1
Right view ....................................... 3-2
Controls and instruments ............... 3-3
Instrument an d control functions ... 4-1
Handlebar switch............................ 4-1
Clutch lever .................................... 4-1
Shift pedal ...................................... 4-2
Brake lever...................................... 4-2
Brake pedal .................................... 4-3
Fuel tank cap .................................. 4-3
Fuel ................................................. 4-4
Fuel tank breather hose.................. 4-6
Fuel cock ........................................ 4-6
Starter (choke) knob ....................... 4-7
Kickstarter ...................................... 4-7
Seat ................................................ 4-8
Adjusting the front fork ................... 4-9
Front fork bleeding ....................... 4-10
Adjusting the shock absorber assembly ................................... 4-11
Removable sidestand ................... 4-15
YPVS system ................................ 4-16
For your safety – pre-operation
checks ............................................... 5-1
Operation an d important ri din g
points ................................................ 6-1
Starting and warming up a cold
engine ......................................... 6-1
Starting a warm engine .................. 6-2
Shifting ........................................... 6-2
Engine break-in .............................. 6-3
Parking ........................................... 6-5
Perio dic maintenance an d
a d justment ........................................ 7-1
Periodic maintenance and lubrication chart .......................... 7-2
Checking the spark plug ................ 7-6 Transmission oil .............................. 7-7
Coolant ............................................ 7-8
Cleaning the air filter element ....... 7-10
Adjusting the carburetor ............... 7-12
Adjusting the engine idling
speed ......................................... 7-12
Adjusting the throttle grip free play ............................................ 7-13
Tires .............................................. 7-14
Spoke wheels ................................ 7-16
Adjusting the clutch lever free play ............................................ 7-16
Checking the brake lever free play ............................................ 7-17
Checking the shift pedal ............... 7-18
Checking the front and rear brake pads ........................................... 7-18
Checking the brake fluid level ....... 7-19
Changing the brake fluid ............... 7-20
Drive chain slack ........................... 7-21
Cleaning and lubricating the drive chain ................................. 7-22
Checking and lubricating the
cables ........................................ 7-23
Checking and lubricating the throttle grip and cable ............... 7-23
Checking and lubricating the brake and clutch levers ............. 7-24
Checking and lubricating the
brake pedal ................................ 7-24
Lubricating the rear suspension.... 7-25
Lubricating the swingarm pivots ... 7-25
Checking the front fork ................. 7-26
Checking the steering ................... 7-26
Checking the wheel bearings ........ 7-27
Supporting the motorcycle ........... 7-27
Front wheel ................................... 7-28
Rear wheel .................................... 7-29
Troubleshooting ............................ 7-30
Troubleshooting charts ................. 7-31
Motorcycle care an d stora ge .......... 8-1
Matte color caution ......................... 8-1
Care................................................. 8-1
Storage............................................ 8-3
UBR880E0.book Page 1 Friday, February 16, 2018 8:32 AM
Page 30 of 90
Instrument and control functions
4-4
4
EAU41837
Fuel
This motorcycle has been designed to
use a premixed fuel of gasoline and 2-
stroke engine oil. Always mix the gaso-
line and oil in a clean container before
filling the fuel tank.
NOTICE
ECA15602
Always use fresh gasoline, an d fill
the fuel tank with a fresh mix just be-
fore ri din g. Do not use premixe d fuel
that is more than a few hours ol d.
Mixin g g asoline an d 2-stroke en gine
oil
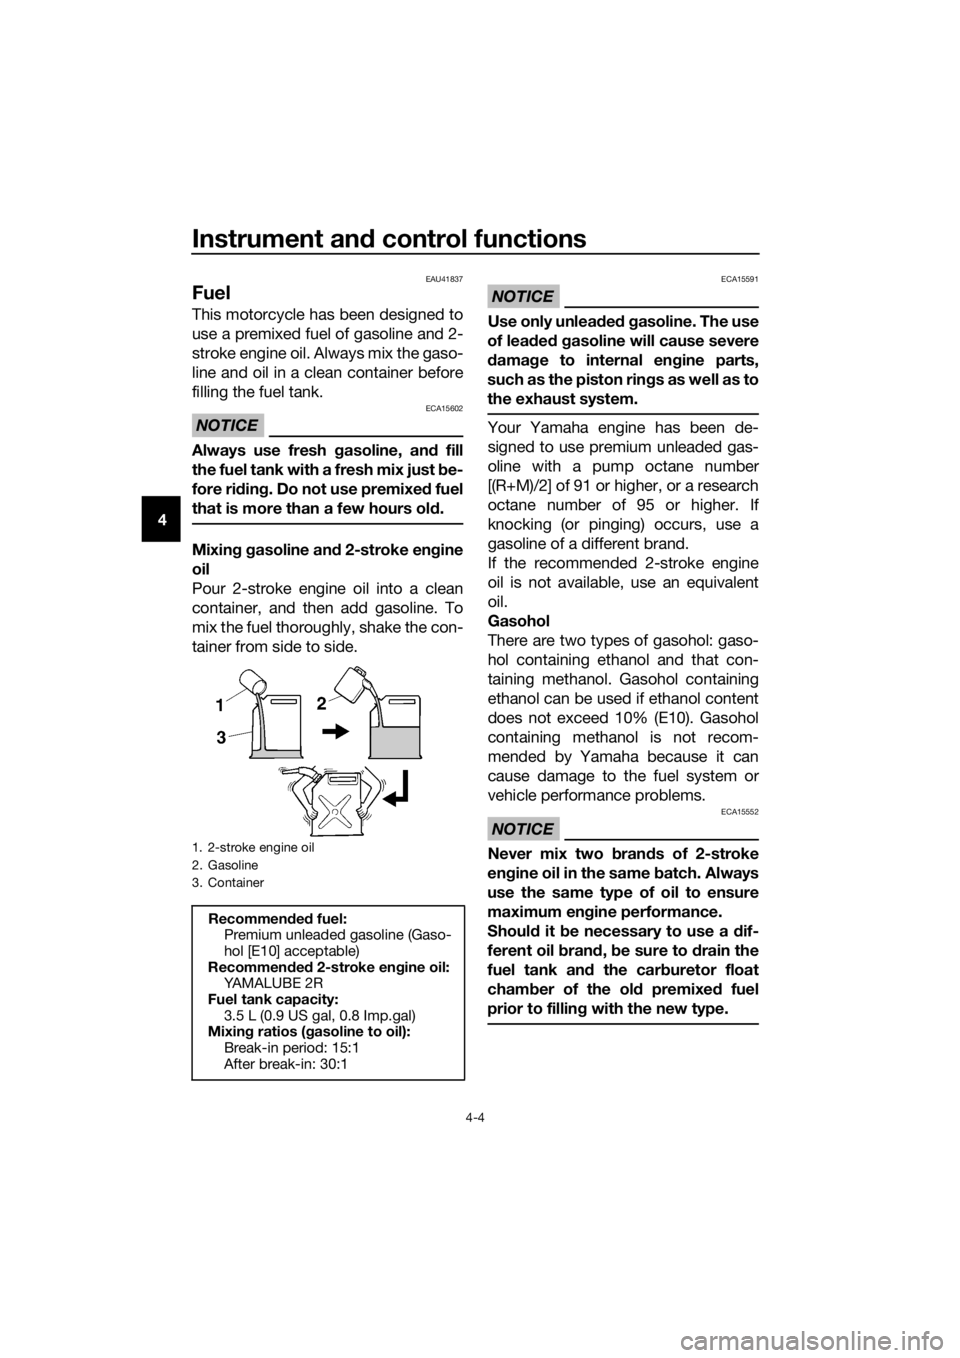
Pour 2-stroke engine oil into a clean
container, and then add gasoline. To
mix the fuel thoroughly, shake the con-
tainer from side to side.
NOTICE
ECA15591
Use only unlea ded g asoline. The use
of lead ed g asoline will cause severe
d amag e to internal en gine parts,
such as the piston rin gs as well as to
the exhaust system.
Your Yamaha engine has been de-
signed to use premium unleaded gas-
oline with a pump octane number
[(R+M)/2] of 91 or higher, or a research
octane number of 95 or higher. If
knocking (or pinging) occurs, use a
gasoline of a different brand.
If the recommended 2-stroke engine
oil is not available, use an equivalent
oil.
Gasohol
There are two types of gasohol: gaso-
hol containing ethanol and that con-
taining methanol. Gasohol containing
ethanol can be used if ethanol content
does not exceed 10% (E10). Gasohol
containing methanol is not recom-
mended by Yamaha because it can
cause damage to the fuel system or
vehicle performance problems.
NOTICE
ECA15552
Never mix two bran ds of 2-stroke
en gine oil in the same batch. Always
use the same type of oil to ensure
maximum en gine performance.
Shoul d it be necessary to use a dif-
ferent oil bran d, b e sure to drain the
fuel tank an d the car buretor float
cham ber of the ol d premixe d fuel
prior to fillin g with the new type.1. 2-stroke engine oil
2. Gasoline
3. Container
Recommen ded fuel:
Premium unleaded gasoline (Gaso-
hol [E10] acceptable)
Recommen ded 2-stroke en gine oil:
YA M A L U B E 2 R
Fuel tank capacity: 3.5 L (0.9 US gal, 0.8 Imp.gal)
Mixin g ratios ( gasoline to oil):
Break-in period: 15:1
After break-in: 30:1
UBR880E0.book Page 4 Friday, February 16, 2018 8:32 AM
Page 44 of 90

For your safety – pre-operation checks
5-2
5
Drive chain• Check chain slack.
• Adjust if necessary.
• Check chain condition.
• Lubricate if necessary. 7-21,
7-22
Drive sprocket • Check the drive sprocket nut torque.
• Tighten if necessary.
—
Wheels and tires •Check for damage.
• Check tire condition and tread depth.
• Check air pressure.
• Correct if necessary.
• Check for loose spokes and tighten if necessary. 7-14,
7-16
Shift pedal • Make sure that operation is smooth.
• Check the shift pedal bolt torque.
• Correct if necessary. 7-18
Brake pedal • Make sure that operation is smooth.
• Lubricate pedal pivoting point if necessary. 7-24
Brake and clutch le-
vers • Make sure that operation is smooth.
• Lubricate lever pivoting points if necessary.
7-24
Steering • Check that the handlebar can be turned smoothly and
has no excessive play. 7-26
Front fork and rear
shock absorber as-
sembly • Check that they operate smoothly and there is no oil
leakage. 4-9,
4-10,
4-11, 7-26
Chassis fasteners • Make sure that all nuts, bolts and screws are properly
tightened.
• Check all cotter pins for damage and correct install- ment.
• Tighten or replace if necessary. —
Moving parts and ca-
bles • Check the control cables for damage.
• Check that the control cables move smoothly.
• Check that the control cables are not caught when the
handlebars are turned or when the front forks travel up
and down.
• Lubricate moving parts and cables if necessary. 7-23,
7-24,
7-25, 7-25
Exhaust system • Check that the exhaust pipe and muffler are tightly
mounted and have no cracks.
• Check for leakage. —
Engine stop switch • Check operation. 4-1
Ignition system • Check that all leads and cables are properly connected. 7-6
ITEM
CHECKSPAGE
UBR880E0.book Page 2 Friday, April 6, 2018 11:11 AM
Page 47 of 90
Operation and important ri din g points
6-3
6
an
d d rive train, which are not
d esi gne d to withstan d the
shock of force d shifting .
EAU16691To start out an d accelerate
1. Pull the clutch lever to disengage the clutch.
2. Shift the transmission into first gear.
3. Open the throttle gradually and si- multaneously release the clutch
lever slowly.
4. Once the motorcycle has reached a speed high enough to change
gears, close the throttle, and at the
same time, quickly pull the clutch
lever in.
5. Shift the transmission into second gear. (Make sure not to shift the
transmission into the neutral posi-
tion.)
6. Open the throttle halfway and gradually release the clutch lever.
7. Follow the same procedure when
shifting to the next gear.
EAU16711To decelerate
1. Close the throttle and apply both the front and the rear brakes to
slow the motorcycle.
2. Downshift through the gears and shift the transmission into the neu-
tral position when the motorcycle
is almost completely stopped.
EAU41506
Engine break-in
WARNING
EWA10322
Failure to properly maintain the vehi-
cle or performin g maintenance ac-
tivities incorrectly may increase
your risk of injury or death durin g
service or while usin g the vehicle. If
you are not familiar with vehicle ser-
vice, have a Yamaha d ealer perform
service.
TIP
Before starting the engine for the first
time, the air filter must be lubricated.
(See page 7-10.)
En gine break-in proce dure
1. Fill the fuel tank with a break-in oil- fuel mixture as follows.
2. Start and warm up the engine. Check the operation of the con-
trols and the engine stop switch.
(See page 4-1.)
3. Operate the motorcycle in the low- er gears at moderate throttle
openings for 5 to 8 minutes. Stop
the engine and check the spark
plug condition (see page 7-6); it
will show a rich condition during
break-in.
4. Allow the engine to cool. Restart the engine and operate the motor-
cycle as in the step above for 5
minutes. Then, very briefly shift to
Recommen ded 2-stroke en gine oil:
YAMALUBE 2R
Mixin g ratio ( gasoline to oil):
15:1
UBR880E0.book Page 3 Friday, February 16, 2018 8:32 AM
Page 48 of 90
Operation and important rid ing points
6-4
6 the higher gears and check the
full-throttle response. Stop the en-
gine and check the spark plug.
5. After again allowing the engine to cool, restart and run the motorcy-
cle for 5 more minutes. Full throttle
and the higher gears may be used,
but sustained full-throttle opera-
tion should be avoided. Stop the
engine and check the spark plug
again.
6. Allow the engine to cool, remove the cylinder head and cylinder,
and inspect the piston and cylin-
der. Remove any high spots on
the piston with #600-grit wet
sandpaper. Clean all components
and carefully reassemble the cyl-
inder head and cylinder.
7. Drain the break-in oil-fuel mixture from the fuel tank and refill with
the normal oil-fuel mixture. (See
page 4-4.)
8. Start the engine and check its power delivery and throttle re-
sponse throughout all gear rang-
es. Stop the engine and check the
spark plug condition. It should be-
gin to lighten in color.
9. Restart the motorcycle and ride it for about 10 to 15 more minutes.
Stop the engine and check the
spark plug condition. (See page
7-6.)
10. Lastly, thoroughly check the mo- torcycle for loose parts, oil leak-
age and any other problems.
Check all fittings and fasteners
and tighten as necessary.
TIP
Be sure to inspect and make adjust-
ments thoroughly. In particular, check
control cable slack, drive chain slack
and for loose spokes.
Notes on en gine overhauls
If the following parts have been re-
placed, they must be broken in as fol-
lows. Piston, rings or transmission
gears: 30 minutes of break-in op-
eration at half-throttle or less.
Cylinder or crankshaft: 60 minutes
of break-in operation is necessary.
TIP
Observe the condition of the engine
carefully during break-in operation.
NOTICE
ECA10271
If any en gine trou ble shoul d occur
d uring the en gine break-in perio d,
imme diately have a Yamaha d ealer
check the vehicle.
UBR880E0.book Page 4 Friday, February 16, 2018 8:32 AM
Page 56 of 90
Periodic maintenance an d a djustment
7-7
7 To install the spark plu
g
1. Clean the surface of the spark plug gasket and its mating sur-
face, and then wipe off any grime
from the spark plug threads.
2. Install the spark plug with the spark plug wrench, and then tight-
en it to the specified torque.
TIP
If a torque wrench is not available
when installing a spark plug, a good
estimate of the correct torque is 1/4–
1/2 turn past finger tight. However, the
spark plug should be tightened to the
specified torque as soon as possible.
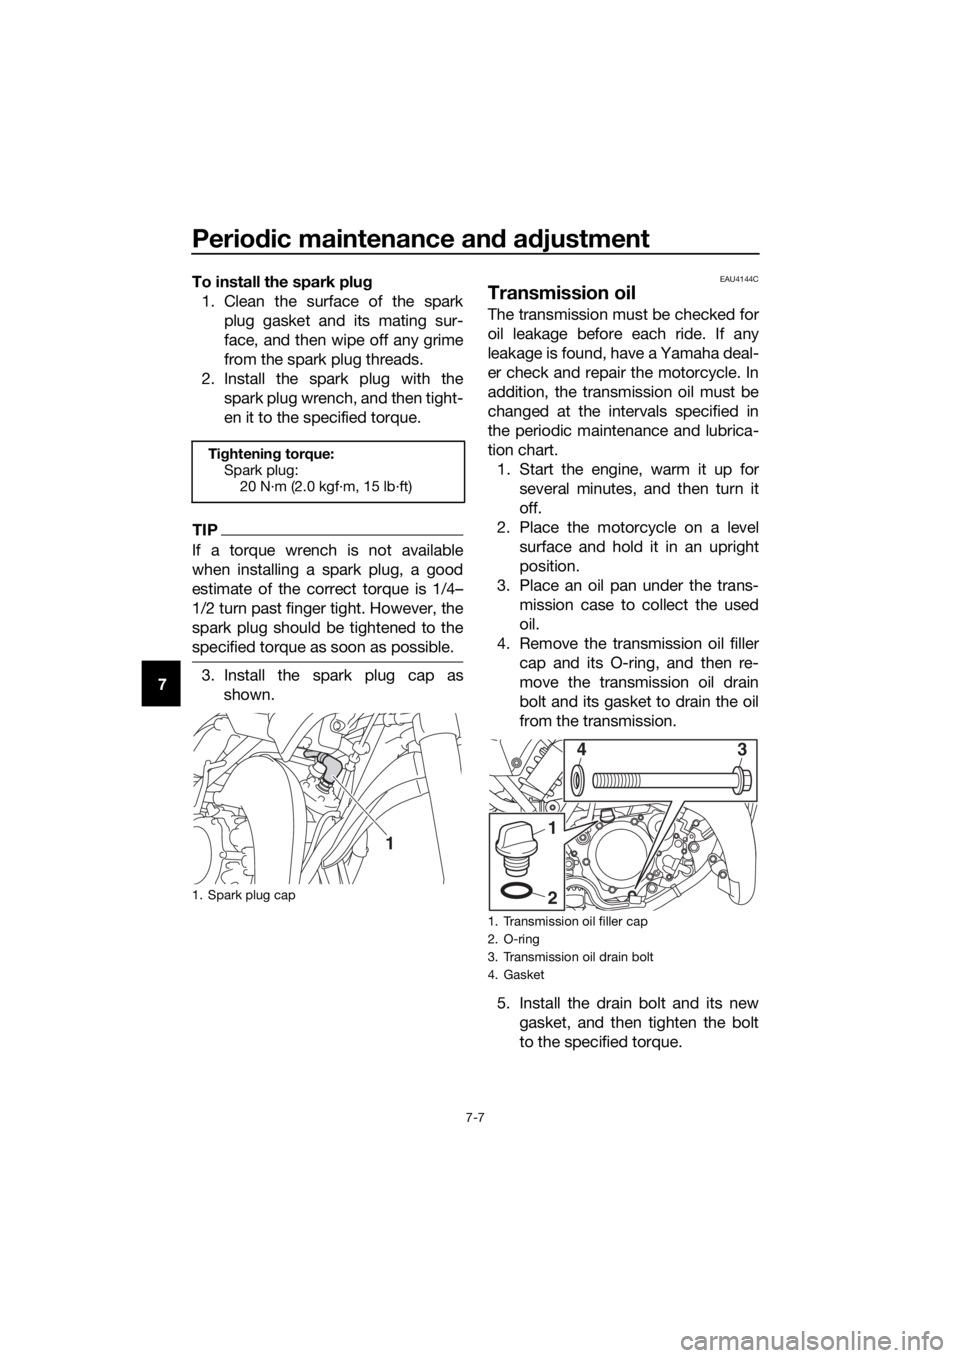
3. Install the spark plug cap asshown.
EAU4144C
Transmission oil
The transmission must be checked for
oil leakage before each ride. If any
leakage is found, have a Yamaha deal-
er check and repair the motorcycle. In
addition, the transmission oil must be
changed at the intervals specified in
the periodic maintenance and lubrica-
tion chart.1. Start the engine, warm it up for several minutes, and then turn it
off.
2. Place the motorcycle on a level surface and hold it in an upright
position.
3. Place an oil pan under the trans- mission case to collect the used
oil.
4. Remove the transmission oil filler cap and its O-ring, and then re-
move the transmission oil drain
bolt and its gasket to drain the oil
from the transmission.
5. Install the drain bolt and its new gasket, and then tighten the bolt
to the specified torque.
Tightenin g torque:
Spark plug: 20 N·m (2.0 kgf·m, 15 lb·ft)
1. Spark plug cap
1
1. Transmission oil filler cap
2. O-ring
3. Transmission oil drain bolt
4. Gasket
1
2
43
UBR880E0.book Page 7 Friday, February 16, 2018 8:32 AM
Page 57 of 90
Periodic maintenance an d a djustment
7-8
7
6. Refill with the specified amount of
the recommended transmission
oil.
NOTICE
ECA10453
In or der to prevent clutch slip-
pa ge (since the transmission oil
also lu bricates the clutch), do
not mix any chemical additives.
Do not use oils with a diesel
specification of “CD” or oils of a
hi gher quality than specifie d. In
a ddition, do not use oils la bele d
“ENERGY CONSERVING II” or
hi gher.
Make sure that no forei gn mate-
rial enters the transmission.
7. Check the O-ring for damage, and replace it if necessary.
8. Install and tighten the transmis- sion oil filler cap and its O-ring.
9. Start the engine, and then let it idle for several minutes while checking
it for oil leakage. If oil is leaking,
immediately turn the engine off
and check for the cause.
EAU20071
Coolant
The coolant level should be checked
before each ride. In addition, the cool-
ant must be changed at the intervals
specified in the periodic maintenance
and lubrication chart.
EAUM1296To check the coolant level1. Place the vehicle on a level sur- face and hold it in an upright posi-
tion.
TIP
The coolant level must be
checked on a cold engine since
the level varies with engine tem-
perature.
Make sure that the vehicle is posi-
tioned straight up when checking
the coolant level. A slight tilt to the
side can result in a false reading.
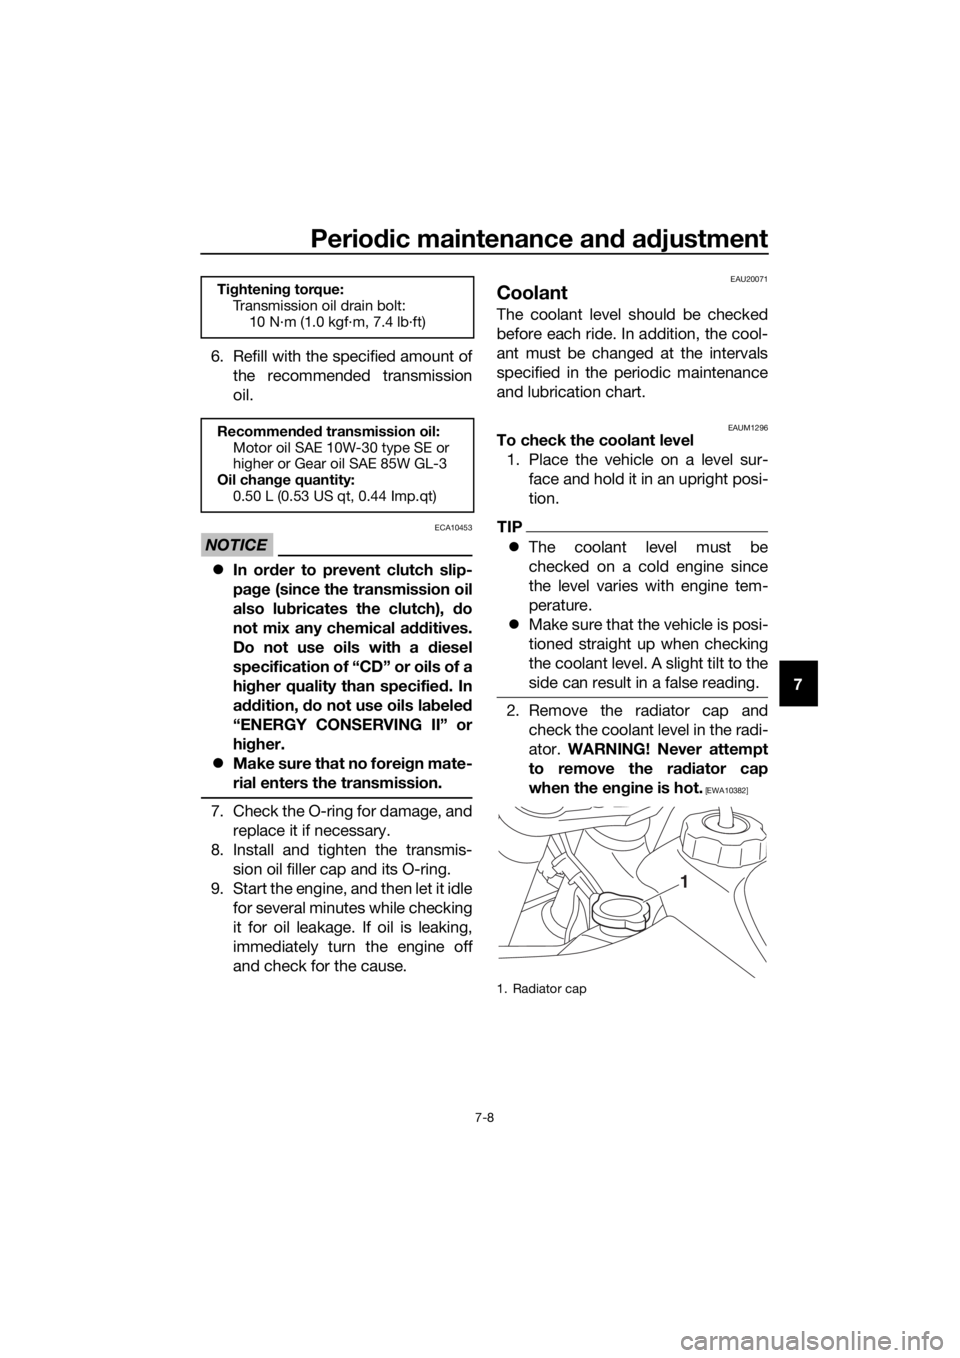
2. Remove the radiator cap and
check the coolant level in the radi-
ator. WARNING! Never attempt
to remove the ra diator cap
when the en gine is hot.
[EWA10382]
Ti ghtening torque:
Transmission oil drain bolt: 10 N·m (1.0 kgf·m, 7.4 lb·ft)
Recommen ded transmission oil:
Motor oil SAE 10W-30 type SE or
higher or Gear oil SAE 85W GL-3
Oil chan ge quantity:
0.50 L (0.53 US qt, 0.44 Imp.qt)
1. Radiator cap
1
UBR880E0.book Page 8 Friday, February 16, 2018 8:32 AM
Page 82 of 90
Motorcycle care and stora ge
8-1
8
EAU37834
Matte color caution
NOTICE
ECA15193
Some mo dels are equipped with
matte colore d finishe d parts. Be
sure to consult a Yamaha dealer for
a d vice on what pro ducts to use be-
fore cleanin g the vehicle. Usin g a
b rush, harsh chemical prod ucts or
cleanin g compoun ds when cleanin g
these parts will scratch or damag e
their surface. Wax also shoul d not
b e applied to any matte colored fin-
ishe d parts.
EAU41359
Care
While the open design of a motorcycle
reveals the attractiveness of the tech-
nology, it also makes it more vulnera-
ble. Rust and corrosion can develop
even if high-quality components are
used. A rusty exhaust pipe may go un-
noticed on a car, however, it detracts
from the overall appearance of a mo-
torcycle. Frequent and proper care
does not only comply with the terms of
the warranty, but it will also keep your
motorcycle looking good, extend its
life and optimize its performance.
Before cleanin g
1. Cover the muffler outlet with a plastic bag after the engine has
cooled down.
2. Make sure that all caps and cov- ers as well as all electrical cou-
plers and connectors, including
the spark plug cap, are tightly in-
stalled.
3. Remove extremely stubborn dirt, like oil burnt onto the crankcase,
with a degreasing agent and a
brush, but never apply such prod-
ucts onto seals, gaskets, sprock-
ets, the drive chain and wheel
axles. Always rinse the dirt and
degreaser off with water.
Cleanin g
NOTICE
ECA17692
Avoi d usin g stron g aci dic wheel
cleaners, especially on spoke d
wheels. If such pro ducts are
use d on har d-to-remove dirt, do
not leave the cleaner on the af-
UBR880E0.book Page 1 Friday, February 16, 2018 8:32 AM
Page 83 of 90

Motorcycle care and stora ge
8-2
8
fected
area any lon ger than in-
structed . Also, thorou ghly rinse
the area off with water, immed i-
ately dry it, an d then apply a cor-
rosion protection spray.
Improper cleanin g can damag e
plastic parts (such as cowlin gs,
panels, etc.) an d the mufflers.
Use only a soft, clean cloth or
spon ge with water to clean
plastic. However, if the plastic
parts cannot be thorou ghly
cleaned with water, dilute d mil d
d eter gent with water may b e
use d. Be sure to rinse off any
d eter gent resi due using plenty
of water, as it is harmful to plas-
tic parts.
Do not use any harsh chemical
prod ucts on plastic parts. Be
sure to avoi d usin g cloths or
spon ges which have b een in
contact with stron g or a brasive
cleanin g prod ucts, solvent or
thinner, fuel ( gasoline), rust re-
movers or inhi bitors, brake flui
d,
an
tifreeze or electrolyte.
Do not use hi gh-pressure wash-
ers or steam-jet cleaners since
they cause water seepag e and
d eterioration in the followin g ar-
eas: seals (of wheel an d swin g-
arm bearin gs, fork an d b rakes),
electric components (couplers,
connectors, an d switches),
b reather hoses an d vents.
After normal use
Remove dirt with warm water, a mild
detergent, and a soft, clean sponge,
and then rinse thoroughly with clean
water. Use a toothbrush or bottlebrush
for hard-to-reach areas. Stubborn dirt and insects will come off more easily if
the area is covered with a wet cloth for
a few minutes before cleaning.
After riding in the rain or near the sea
Since sea salt is extremely corrosive,
carry out the following steps after each
ride in the rain or near the sea.
1. Clean the motorcycle with cold water and a mild detergent, after
the engine has cooled down.
NOTICE: Do not use warm wa-
ter since it increases the corro-
sive action of the salt.
[ECA10792]
2. Apply a corrosion protection spray on all metal, including chrome-
and nickel-plated, surfaces to pre-
vent corrosion.
After cleanin g
1. Dry the motorcycle with a chamois or an absorbing cloth.
2. Immediately dry the drive chain and lubricate it to prevent it from
rusting.
3. Use a chrome polish to shine chrome, aluminum and stainless-
steel parts, including the exhaust
system.
4. To prevent corrosion, it is recom- mended to apply a corrosion pro-
tection spray on all metal,
including chrome- and nickel-plat-
ed, surfaces.
5. Use spray oil as a universal clean- er to remove any remaining dirt.
6. Touch up minor paint damage caused by stones, etc.
7. Wax all painted surfaces.
8. Let the motorcycle dry completely before storing or covering it.
UBR880E0.book Page 2 Friday, February 16, 2018 8:32 AM
Page 84 of 90
Motorcycle care and stora ge
8-3
8
WARNING
EWA11132
Contaminants on the brakes or tires
can cause loss of control. Make sure that there is no oil or
wax on the brakes or tires.
If necessary, clean the brake
d iscs an d b rake linin gs with a
re gular brake disc cleaner or
acetone, an d wash the tires with
warm water and a mild d eter-
g ent. Before ri din g at hi gher
speed s, test the motorcycle’s
b rakin g performance an d cor-
nerin g b ehavior.
NOTICE
ECA10801
Apply spray oil an d wax spar-
in gly an d make sure to wipe off
any excess.
Never apply oil or wax to any
rubber an d plastic parts, but
treat them with a suita ble care
prod uct.
Avoi d usin g a brasive polishin g
compoun ds as they will wear
away the paint.
TIP
Consult a Yamaha dealer for advice on
what products to use.
EAU41515
Stora ge
Short-term
Always store your motorcycle in a cool,
dry place and, if necessary, protect it
against dust with a porous cover. Be
sure the engine and the exhaust sys-
tem are cool before covering the mo-
torcycle.
NOTICE
ECA10811
Storin g the motorcycle in a
poorly ventilated room or cover-
in g it with a tarp, while it is still
wet, will allow water an d humi d-
ity to seep in an d cause rust.
To prevent corrosion, avoi d
d amp cellars, sta bles ( because
of the presence of ammonia)
an d areas where stron g chemi-
cals are store d.
Lon g-term
Before storing your motorcycle for sev-
eral months: 1. Follow all the instructions in the “Care” section of this chapter.
2. For motorcycles equipped with a fuel cock that has an “OFF” posi-
tion: Turn the fuel cock lever to
“OFF”.
3. Drain the fuel tank and fuel lines, and the carburetor float chamber
by loosening the drain bolt; this
will prevent fuel deposits from
building up.
4. Perform the following steps to protect the cylinder, piston rings,
etc. from corrosion.a. Remove the spark plug cap and spark plug.
UBR880E0.book Page 3 Friday, February 16, 2018 8:32 AM