oil YAMAHA YZ85 2002 Manual PDF
[x] Cancel search | Manufacturer: YAMAHA, Model Year: 2002, Model line: YZ85, Model: YAMAHA YZ85 2002Pages: 504, PDF Size: 40.45 MB
Page 388 of 504

5 - 33
CHAS
5. Install:
lSpring guide 1
lLocknut 2
To damper rod 3.
NOTE:
Install the spring guide with its cut a facing
downward.
5PA50980
6. Install:
lDust seal 1
lStopper ring 2
lOil seal 3
lOil seal washer 4
lSlide metal 5
To inner tube 6.
NOTE:
lApply the fork oil on the inner tube.
lWhen installing the oil seal, use vinyl seat a
with fork oil applied to protect the oil seal lip.
lInstall the oil seal with its manufacture’s
marks or number facing the axle holder side.
5PA50990
5PA51000
7. Install:
lPiston metal 1
NOTE:
Install the piston metal onto the slot on inner
tube.
5PA51010
8. Install:
lOuter tube 1
To inner tube 2.
5PA51020
FRONT FORK
Page 390 of 504

5 - 34
CHAS
9. Install:
lSlide metal 1
lOil seal washer 2
To outer tube slot.
NOTE:
Press the slide metal into the outer tube with
fork seal driver 3.
Fork seal driver:
YM-01442/90890-014425PA51030
5PA51040
10. Install:
lOil seal 1
NOTE:
Press the oil seal into the outer tube with fork
seal driver 2.
Fork seal driver:
YM-01442/90890-01442
5PA51050
11. Install:
lStopper ring 1
NOTE:
Fit the stopper ring correctly in the groove in
the outer tube.
5PA51060
12. Install:
lDust seal 1
NOTE:
Apply the lithium soap base grease on the
inner tube.
5PA51070
FRONT FORK
Page 392 of 504
5 - 35
CHAS
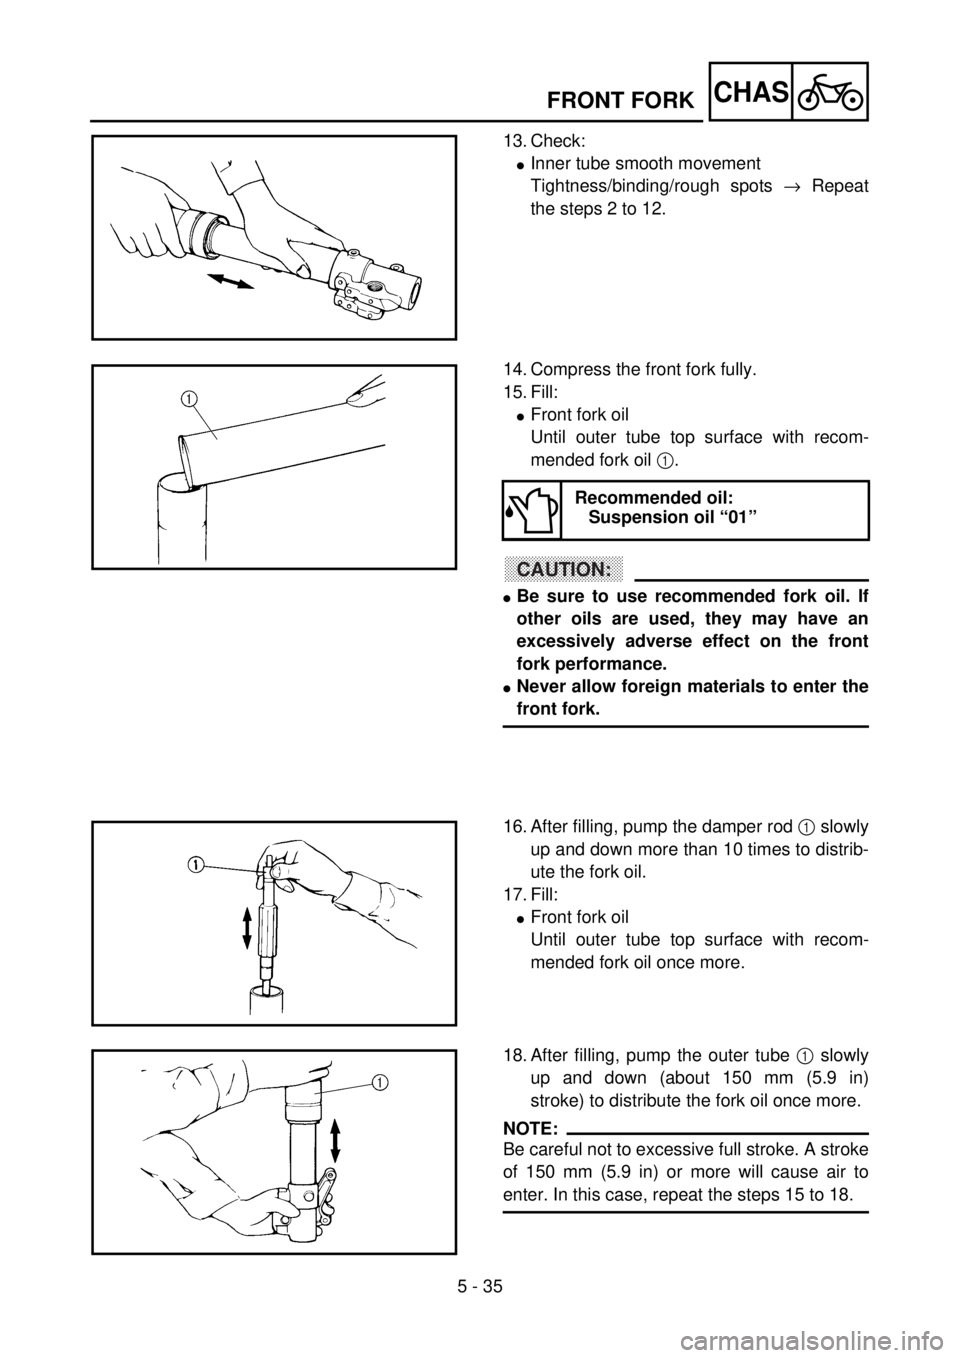
13. Check:
lInner tube smooth movement
Tightness/binding/rough spots ® Repeat
the steps 2 to 12.
5PA51080
14. Compress the front fork fully.
15. Fill:
lFront fork oil
Until outer tube top surface with recom-
mended fork oil 1.
CAUTION:
lBe sure to use recommended fork oil. If
other oils are used, they may have an
excessively adverse effect on the front
fork performance.
lNever allow foreign materials to enter the
front fork.
Recommended oil:
Suspension oil “01”
5PA51090
16. After filling, pump the damper rod 1 slowly
up and down more than 10 times to distrib-
ute the fork oil.
17. Fill:
lFront fork oil
Until outer tube top surface with recom-
mended fork oil once more.
5PA51100
18. After filling, pump the outer tube 1 slowly
up and down (about 150 mm (5.9 in)
stroke) to distribute the fork oil once more.
NOTE:
Be careful not to excessive full stroke. A stroke
of 150 mm (5.9 in) or more will cause air to
enter. In this case, repeat the steps 15 to 18.
5PA51110
FRONT FORK
Page 394 of 504
5 - 36
CHAS
19. Wait ten minutes until the air bubbles have
been removed from the front fork, and the
oil has dispense evenly in system before
setting recommended oil level.
NOTE:
Fill with the fork oil up to the top end of the
outer tube, or the fork oil will not spread over to
every part of the front forks, thus making it
impossible to obtain the correct level.
Be sure to fill with the fork oil up to the top of
the outer tube and bleed the front forks.
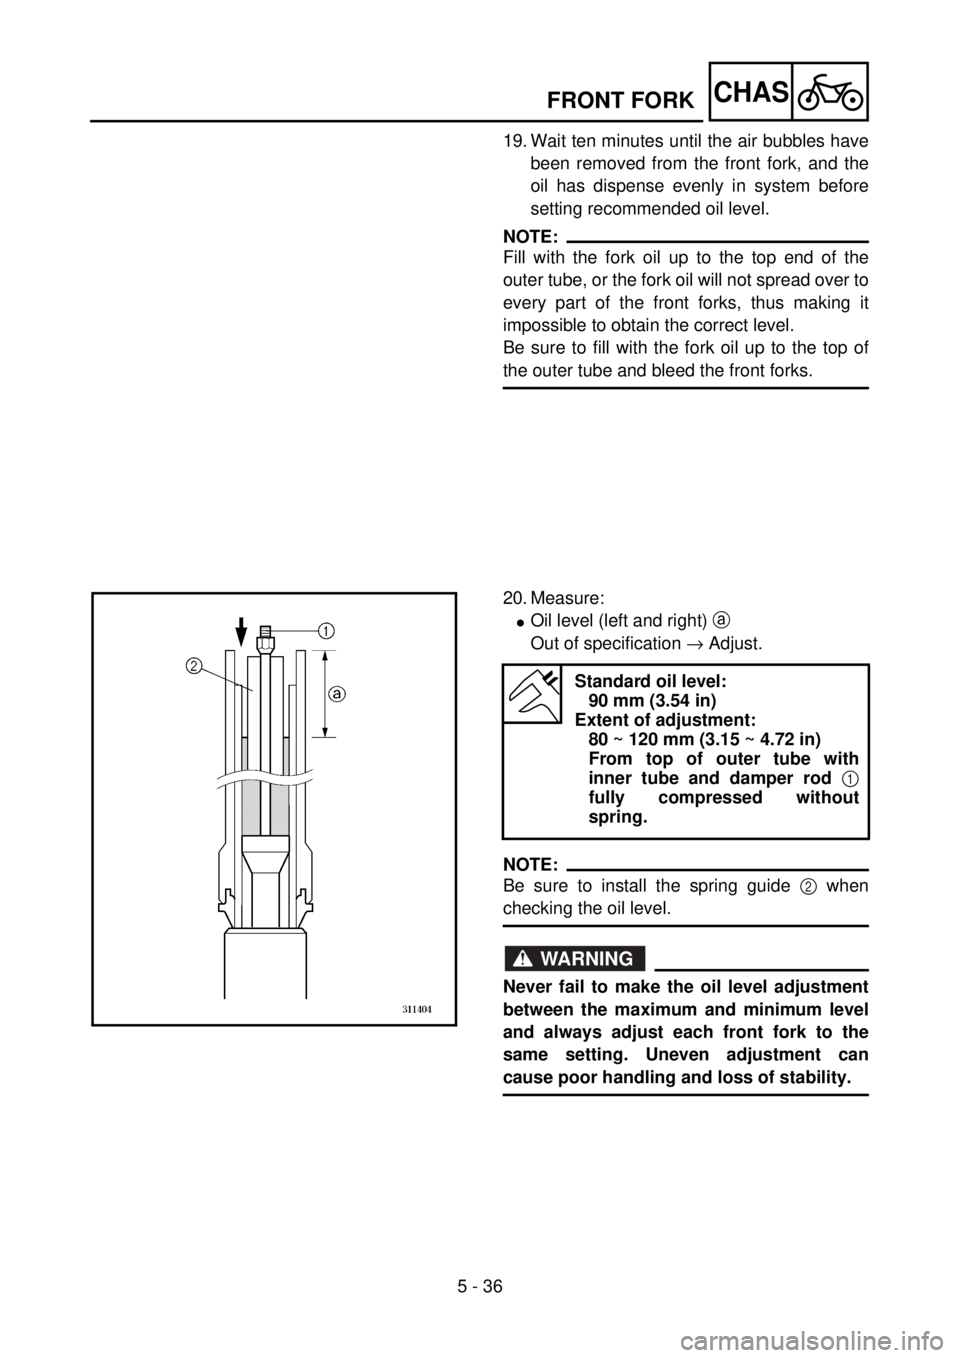
20. Measure:
lOil level (left and right) a
Out of specification ® Adjust.
NOTE:
Be sure to install the spring guide 2 when
checking the oil level.
WARNING
Never fail to make the oil level adjustment
between the maximum and minimum level
and always adjust each front fork to the
same setting. Uneven adjustment can
cause poor handling and loss of stability.
Standard oil level:
90 mm (3.54 in)
Extent of adjustment:
80 ~ 120 mm (3.15 ~ 4.72 in)
From top of outer tube with
inner tube and damper rod 1
fully compressed without
spring.
5PA51120
FRONT FORK
Page 408 of 504

5 - 43
CHAS
EC5B5000
ASSEMBLY AND INSTALLATION
Handlebar
1. Install:
lHandlebar 1
lHandlebar upper holder 2
lBolt (handlebar upper holder) 3
NOTE:
lThe handlebar upper holder should be
installed with the punched mark a forward.
lFirst tighten the bolts on the front side of the
handlebar upper holder, and then tighten the
bolts on the rear side.
5PA51330
T R..27 Nm (2.7 m · kg, 19 ft · lb)
5PA51340
2. Install:
lLeft grip 1
Apply the adhesive to the handlebar 2.
NOTE:
lBefore applying the adhesive, wipe off
grease or oil on the handlebar surface a
with a lacquer thinner.
lInstall the left grip to the handlebar so that
the arrow mark (L) faces straight upward.5PA51350
3. Install:
lRight grip 1
Apply the adhesive on the tube guide 2.
NOTE:
lBefore applying the adhesive, wipe off
grease or oil on the tube guide surface a
with a lacquer thinner.
lLocate the mating mark b on the grip as
shown.5PA51360
5PA51370
HANDLEBAR
Page 426 of 504

5 - 52
CHAS
EC578000
SWINGARM DISASSEMBLY
5PA51630
Extent of removal:
1 Swingarm disassembly
2 Connecting rod removal and disassembly
3 Relay arm removal and disassembly
Extent of removal Order Part name Q’ty Remarks
SWINGARM DISASSEMBLY
1 Relay arm 1
2 Connecting rod 1
3 Cover 2
4 Collar 5
5 Dust seal 2
6 Bushing 4
7 Oil seal 8
8 Bearing 8
Refer to “REMOVAL POINTS”.
9 Bushing (swingarm) 2
0 Bearing (relay arm-rear shock
absorber)1 Refer to “REMOVAL POINTS”.
1
2
3
2
3
3
SWINGARM
Page 430 of 504

5 - 54
CHAS
INSPECTION
Wash the bearings, bushings, collars, and cov-
ers in a solvent.
Swingarm
1. Inspect:
lBearing 1
lBushing 2
lCollar 3
Free play exists/unsmooth revolution/rust
® Replace bearing, bushing and collar as
a set.
2. Inspect:
lOil seal 4
Damage ® Replace.
5PA51680
Relay arm
1. Inspect:
lBearing 1
lBushing 2
Free play exists/unsmooth revolution/rust
® Replace bearing and bushing as a set.
2. Inspect:
lOil seal 3
Damage ® Replace.
5PA51690
Connecting rod
1. Inspect:
lBearing 1
lBushing 2
Free play exists/unsmooth revolution/rust
® Replace bearing and bushing as a set.
2. Inspect:
lOil seal 3
Damage ® Replace.
5PA51700
SWINGARM
Page 432 of 504

5 - 55
CHAS
EC575000
ASSEMBLY AND INSTALLATION
Bearing (relay arm-rear shock absorber)
1. Install:
lBearing 1
NOTE:
lApply the lithium soap base grease on the
bearing when installing.
lInstall the bearing parallel until the stopper
ring groove appears by pressing its outer
race.
5PA51710
2. Install:
lStopper ring 1
NOTE:
After installing the stopper ring, push back the
bearing until it contacts the stopper ring.
5PA51720
Bearing, bushing and oil seal
1. Install:
lBearing 1
lBushing (swingarm) 2
lOil seal 3
To swingarm.
NOTE:
lApply the molybdenum disulfide grease on
the bearing and bushing when installing.
lInstall the bearing by pressing it on the side
having the manufacture’s marks or numbers.
lFirst install the bushing and then the bearing
to a specified depth from inside.
Installed depth of bearings and
bushings:
Bearing a: 4.5 mm (0.18 in)
Bushing b: 4.5 mm (0.18 in)
5PA51730
5PA51740
SWINGARM
Page 434 of 504

5 - 56
CHAS
2. Install:
lBearing 1
lOil seal 2
To relay arm.
NOTE:
lApply the molybdenum disulfide grease on
the bearing when installing.
lInstall the bearing by pressing it on the side
having the manufacture’s marks or numbers.
3. Install:
lBearing 1
lOil seal 2
To connecting rod.
NOTE:
lApply the molybdenum disulfide grease on
the bearing when installing.
lInstall the bearing by pressing it on the side
having the manufacture’s marks or numbers.
Installed depth of bearings:
Depth a: 4.5 mm (0.18 in)
Depth b: 0.5 mm (0.02 in)
Installed depth of bearings a:
6.5 mm (0.26 in)
5PA51750
5PA51760
Swingarm
1. Install:
lCollar 1
To swingarm 2.
NOTE:
Apply the molybdenum disulfide grease on the
collars, bearings, bushings and oil seal lips.
2. Install:
lBushing 1
lDust seal 2
lCollar 3
lCover 4
To relay arm 5.
NOTE:
Apply the molybdenum disulfide grease on the
bushings, dust seals, collars, cover lips, bear-
ings and oil seal lips.
5PA51770
5PA51780
SWINGARM
Page 436 of 504

5 - 57
CHAS
3. Install:
lBushing 1
To connecting rod 2.
NOTE:
Apply the molybdenum disulfide grease on the
bushings, bearings and oil seal lips.
5PA51790
4. Install:
lConnecting rod 1
lWasher 2
lBolt (connecting rod) 3
lNut (connecting rod) 4
To swingarm 5.
NOTE:
Apply the molybdenum disulfide grease on the
bolt.
5PA51800
T R..53 Nm (5.3 m · kg, 38 ft · lb)
5. Install:
lRelay arm 1
lBolt (relay arm) 2
lNut (relay arm) 3
NOTE:
Apply the molybdenum disulfide grease on the
bolt.
6. Install:
lSwingarm 1
lPivot shaft 2
lWasher 3
lNut (pivot shaft) 4
NOTE:
lApply the molybdenum disulfide grease on
the pivot shaft.
lInsert the pivot shaft from right side.
5PA51810
T R..54 Nm (5.4 m · kg, 39 ft · lb)
5PA51820
T R..63 Nm (6.3 m · kg, 45 ft · lb)
SWINGARM